
鸿蒙多功能工具箱开发实战(三)-分类页面与工具卡片组件
·
鸿蒙多功能工具箱开发实战(三)-分类页面与工具卡片组件
前言
工具卡片是应用的核心UI组件,承载着工具的展示和入口功能。本文将详细讲解如何设计一个美观、交互友好的工具卡片组件,以及如何使用Grid网格布局实现分类页面的展示。
一、工具卡片设计分析
1.1 功能需求
- 展示工具图标、名称、描述
- 支持自定义主题色
- 点击跳转到对应工具页面
- 视觉效果:圆角、阴影、点击态
1.2 UI设计
图 1 亲戚称呼计算器
┌─────────────────────────────┐
│ │
│ 👨👩👧👦 │
│ │
│ 亲戚称呼计算器 │
│ │
│ 计算亲戚关系的称呼 │
│ │
└─────────────────────────────┘
二、工具卡片组件实现
2.1 组件定义
创建 components/ToolCard.ets:
/**
 * 工具卡片组件
 */
@Component
export struct ToolCard {
  @Prop name: string = ''
  @Prop icon: string = '🔧'
  @Prop description: string = ''
  @Prop color: string = '#4A90E2'
  onCardClick: () => void = () => {}

  build() {
    Column() {
      // 图标区域
      Column() {
        Text(this.icon)
          .fontSize(40)
      }
      .width(60)
      .height(60)
      .borderRadius(30)
      .backgroundColor(this.color + '20')
      .justifyContent(FlexAlign.Center)
      .margin({ top: 16 })

      // 名称
      Text(this.name)
        .fontSize(16)
        .fontWeight(FontWeight.Medium)
        .fontColor('#333333')
        .margin({ top: 12 })

      // 描述
      Text(this.description)
        .fontSize(12)
        .fontColor('#999999')
        .margin({ top: 4, bottom: 16 })
        .maxLines(2)
        .textOverflow({ overflow: TextOverflow.Ellipsis })
    }
    .width('100%')
    .backgroundColor('#FFFFFF')
    .borderRadius(12)
    .shadow({ radius: 8, color: '#1A000000', offsetY: 2 })
    .onClick(() => { this.onCardClick() })
  }
}
图 2 亲戚计算页面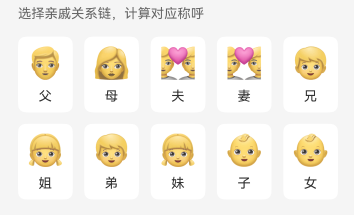
2.2 关键技术点解析
@Prop 装饰器
@Prop 用于父组件向子组件单向传递数据:
// 子组件定义
@Component
export struct ToolCard {
@Prop name: string = ''
@Prop icon: string = '🔧'
}
// 父组件使用
ToolCard({
name: '亲戚称呼计算器',
icon: '👨👩👧👦'
})
@Prop vs @Link 区别:
| 装饰器 | 数据流向 | 使用场景 |
|---|---|---|
| @Prop | 父 → 子(单向) | 展示数据 |
| @Link | 父 ↔ 子(双向) | 需要修改父组件数据 |
颜色透明度处理
// 字符串拼接(16进制透明度)
.backgroundColor(this.color + '20')  // #4A90E2 → #4A90E220
16进制透明度参考:
100%: FF  90%: E6  80%: CC  70%: B2
60%: 99   50%: 80   40%: 66   30%: 4D
20%: 33   10%: 1A
三、Grid网格布局
3.1 Grid基本用法
Grid() {
  GridItem() { Text('Item 1') }
  GridItem() { Text('Item 2') }
  GridItem() { Text('Item 3') }
}
.columnsTemplate('1fr 1fr')    // 两列等宽
.rowsGap(16)                   // 行间距
.columnsGap(16)                // 列间距
.width('100%')
.height(300)
3.2 列模板详解
// 两列等宽
.columnsTemplate('1fr 1fr')

// 三列等宽
.columnsTemplate('1fr 1fr 1fr')

// 固定宽度 + 自适应
.columnsTemplate('100px 1fr')
3.3 使用ForEach渲染
Grid() {
  ForEach(this.toolList, (tool: ToolItem) => {
    GridItem() {
      ToolCard({
        name: tool.name,
        icon: tool.icon,
        description: tool.description,
        color: tool.color,
        onCardClick: () => {
          router.pushUrl({ url: tool.route })
        }
      })
    }
  })
}
.columnsTemplate('1fr 1fr')
.rowsGap(16)
.columnsGap(16)
四、分类页面实现
4.1 计算工具页面
import { ToolCard } from '../components/ToolCard'
import router from '@ohos.router'
@Component
export struct CalculatorPage {
build() {
Column() {
Text('计算工具')
.fontSize(24)
.fontWeight(FontWeight.Bold)
.margin({ top: 20, bottom: 20 })
.width('100%')
.padding({ left: 20 })
Grid() {
GridItem() {
ToolCard({
name: '亲戚称呼计算器',
icon: '👨👩👧👦',
description: '计算亲戚关系的称呼',
color: '#4A90E2',
onCardClick: () => {
router.pushUrl({ url: 'pages/calculator/RelativeCalculator' })
}
})
}
GridItem() {
ToolCard({
name: '日期计算器',
icon: '📅',
description: '计算日期间隔',
color: '#50C878',
onCardClick: () => {
router.pushUrl({ url: 'pages/calculator/DateCalculator' })
}
})
}
GridItem() {
ToolCard({
name: '开发进行中',
icon: '🚧',
description: '更多工具开发中...',
color: '#B8B8B8',
onCardClick: () => {}
})
}
}
.columnsTemplate('1fr 1fr')
.rowsGap(16)
.columnsGap(16)
.width('100%')
.padding({ left: 16, right: 16, bottom: 20 })
.layoutWeight(1)
}
.width('100%')
.height('100%')
}
}
4.2 使用ForEach简化代码
@Component
export struct ConvertPage {
  private convertTools = [
    { name: '长度换算', icon: '📏', description: '米、英尺等', color: '#3498DB', route: 'pages/convert/LengthConvert' },
    { name: '重量换算', icon: '⚖️', description: '千克、磅等', color: '#E67E22', route: 'pages/convert/WeightConvert' },
    { name: '面积换算', icon: '📐', description: '平方米、亩等', color: '#1ABC9C', route: 'pages/convert/AreaConvert' }
  ]

  build() {
    Column() {
      Text('换算工具')
        .fontSize(24)
        .fontWeight(FontWeight.Bold)
        .margin({ top: 20, bottom: 20 })
        .width('100%')
        .padding({ left: 20 })

      Grid() {
        ForEach(this.convertTools, (tool) => {
          GridItem() {
            ToolCard({
              name: tool.name,
              icon: tool.icon,
              description: tool.description,
              color: tool.color,
              onCardClick: () => {
                router.pushUrl({ url: tool.route })
              }
            })
          }
        })

        GridItem() {
          ToolCard({
            name: '开发进行中',
            icon: '🚧',
            description: '更多工具开发中...',
            color: '#B8B8B8',
            onCardClick: () => {}
          })
        }
      }
      .columnsTemplate('1fr 1fr')
      .rowsGap(16)
      .columnsGap(16)
      .width('100%')
      .padding({ left: 16, right: 16, bottom: 20 })
      .layoutWeight(1)
    }
    .width('100%')
    .height('100%')
  }
}
五、"开发进行中"占位卡片
5.1 设计目的
- 给用户持续更新的期待感
- 填充网格空白,保持视觉平衡
- 可添加点击提示功能
5.2 带提示弹窗版本
GridItem() {
  ToolCard({
    name: '开发进行中',
    icon: '🚧',
    description: '更多工具开发中...',
    color: '#B8B8B8',
    onCardClick: () => {
      AlertDialog.show({
        title: '敬请期待',
        message: '新功能正在紧张开发中,敬请期待!',
        autoCancel: true,
        alignment: DialogAlignment.Center
      })
    }
  })
}
六、小结
本文详细讲解了工具卡片组件和分类页面的实现,核心要点:
- ✅ @Prop 实现父子组件单向数据传递
- ✅ Grid + GridItem 实现网格布局
- ✅ ForEach 循环渲染工具列表
- ✅ 颜色透明度处理技巧
- ✅ 文本溢出处理
- ✅ "开发进行中"占位卡片设计
下一篇文章将讲解路由导航与页面跳转的实现。
系列文章导航:
下期预告:鸿蒙多功能工具箱开发实战(四)-路由导航与页面跳转

作为“人工智能6S店”的官方数字引擎,为AI开发者与企业提供一个覆盖软硬件全栈、一站式门户。
更多推荐
 8
8 0
0- 0


 已为社区贡献7条内容

所有评论(0)