
鸿蒙PC用Electron框架——Canvas蜡笔抖动效果实现技术深度解析
文章摘要 开源鸿蒙PC社区推出蜡笔效果模拟技术,通过三层叠加策略实现逼真的数字绘画质感。核心实现包括:基础绘制框架搭建、颜色调整算法(亮度±15-20)及多层线条随机偏移(±1-1.5像素)。主线条保持原色,亮色层(80%粗细)和暗色层(60%粗细)分别叠加,辅以边缘纹理随机点增强颗粒感。代码提供完整Canvas事件绑定及RGB分量动态调整,最终呈现宽度变化、边缘柔和的∿∿∿∿蜡笔笔触效果。项目开
·
欢迎加入开源鸿蒙PC社区:
https://harmonypc.csdn.net/
atomgit仓库地址: https://atomgit.com/m0_66062719/ertongxuehualabihua
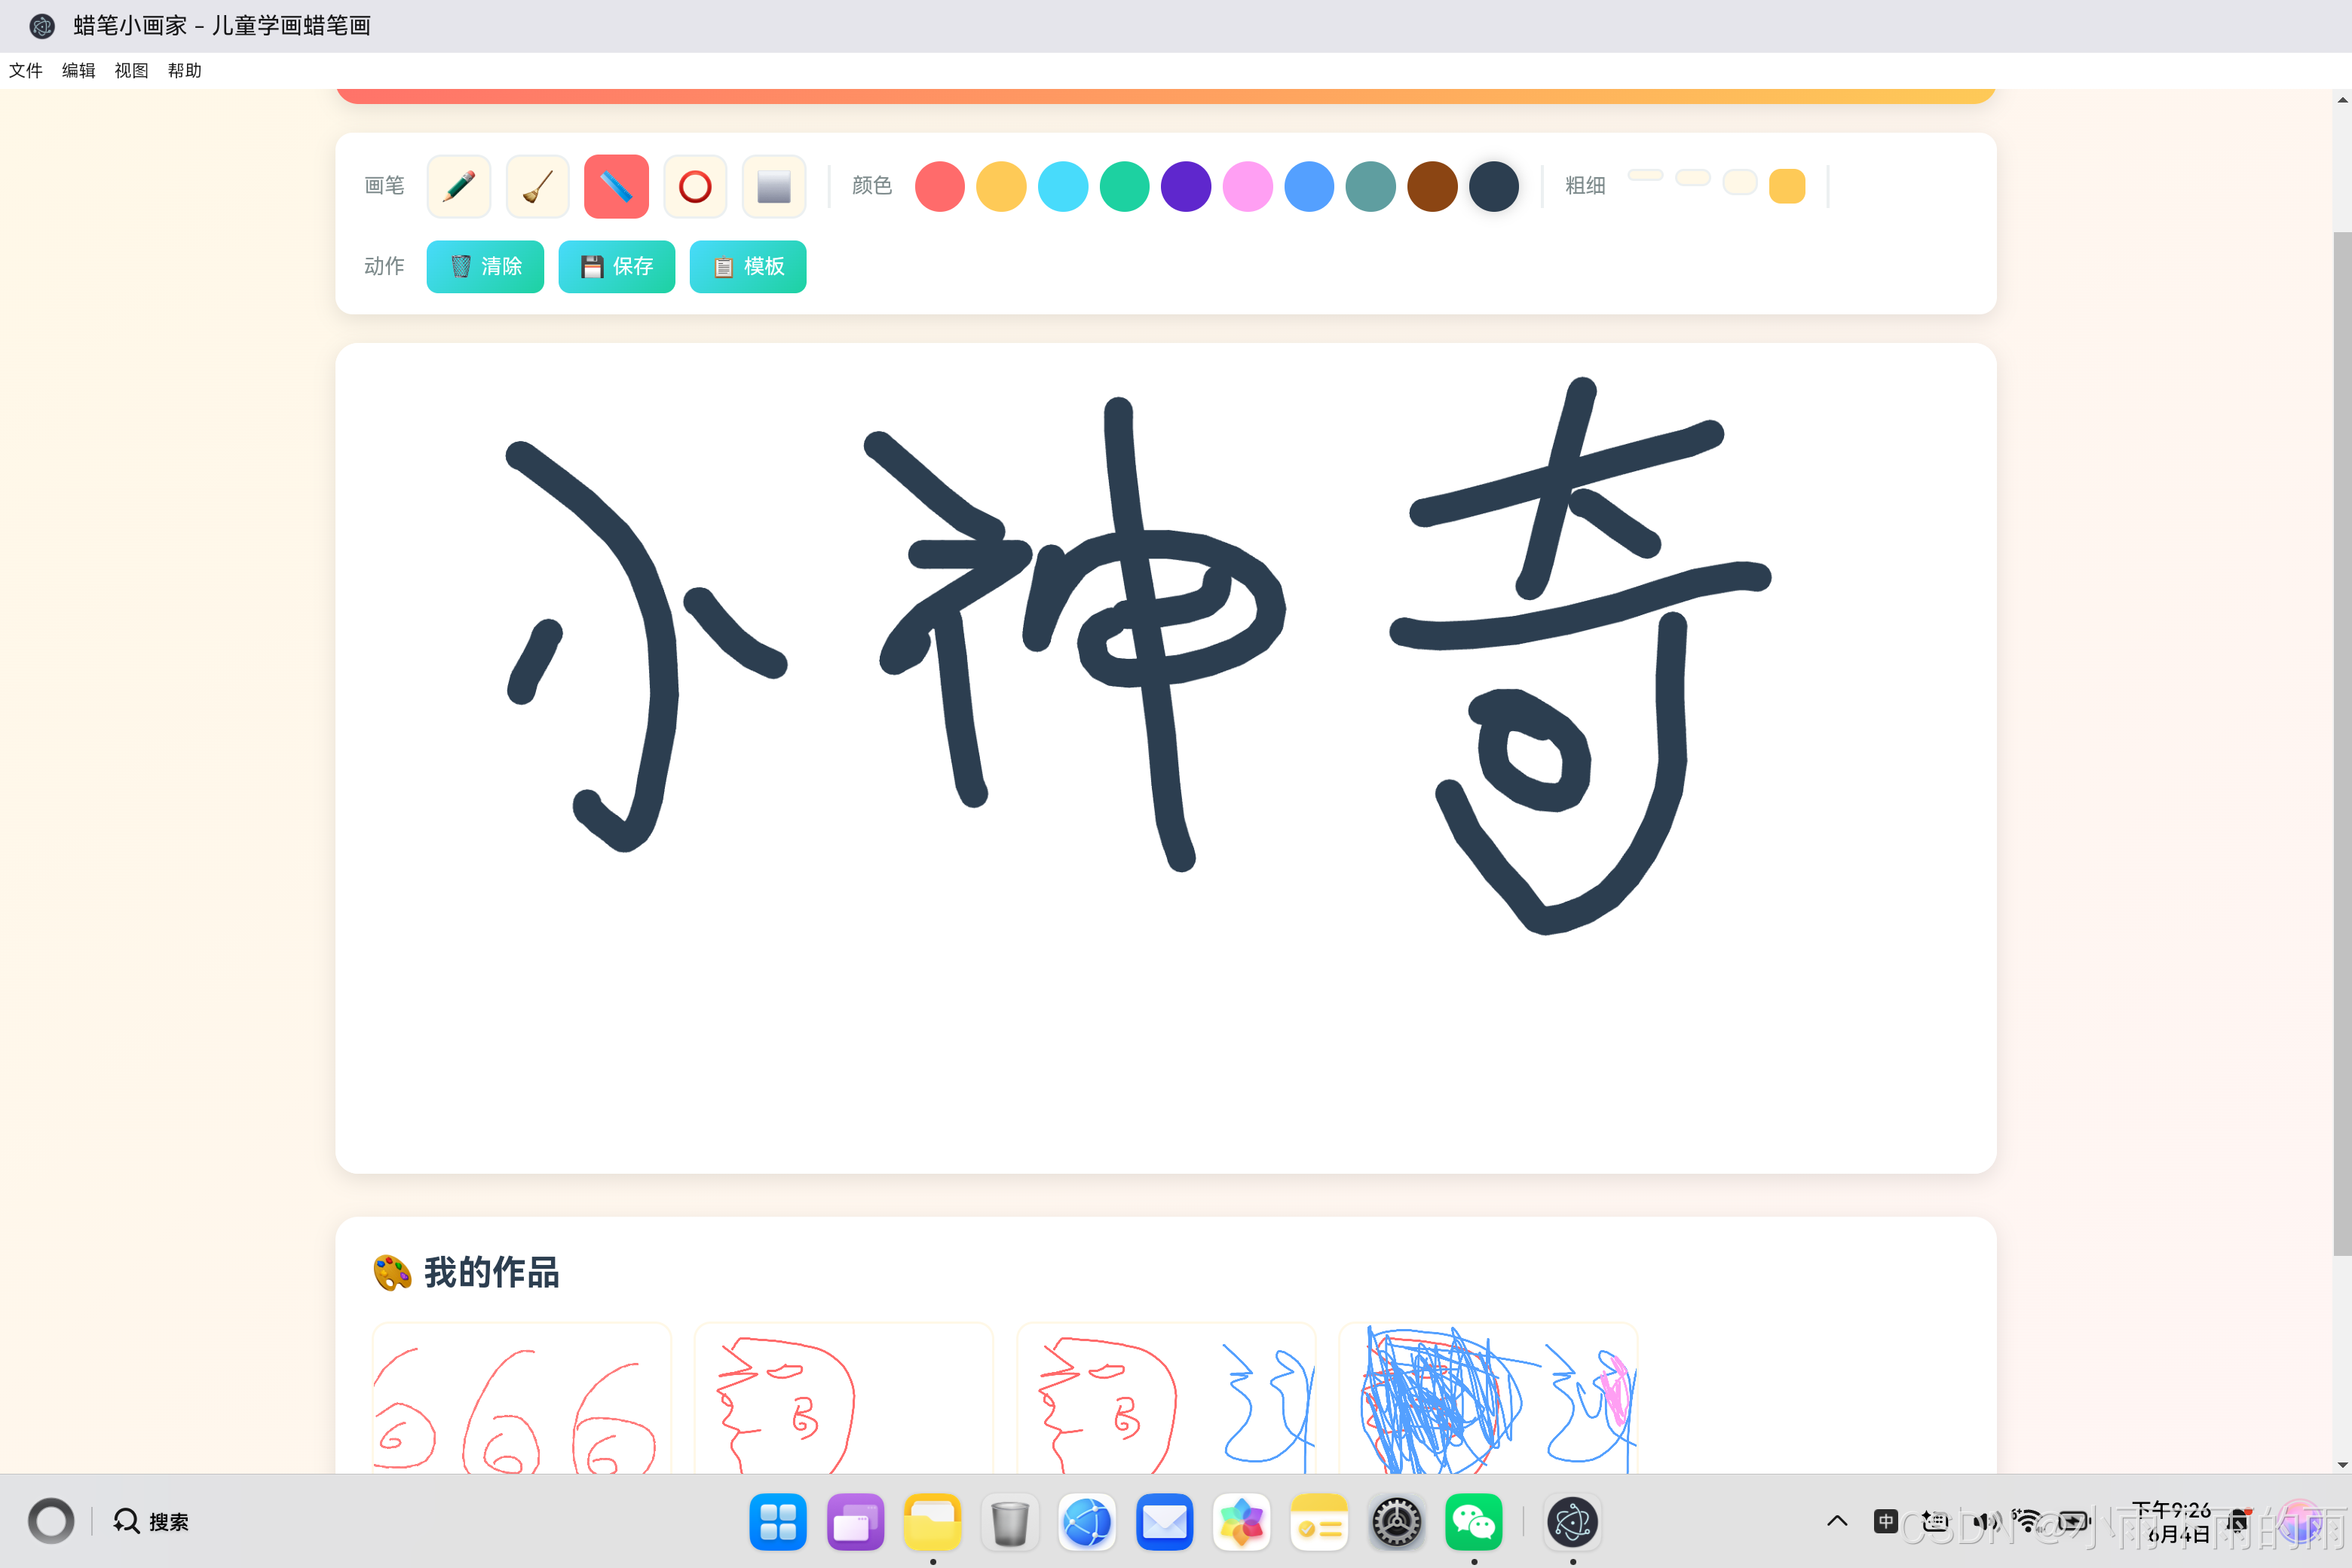
一、蜡笔效果概述
1.1 为什么需要蜡笔效果
在数字绘画中,模拟真实绘画工具的质感是一项重要的技术挑战。相比矢量线条的平滑和机械,蜡笔效果需要呈现:
┌─────────────────────────────────────────────────────┐
│                                                     │
│  真实蜡笔的特点                                      │
│  ├─ 边缘不规则 - 有颗粒感和毛边                     │
│  ├─ 颜色叠加 - 多层涂抹产生混合色                  │
│  ├─ 压力变化 - 边缘较淡、中间较深                  │
│  ├─ 纸张纹理 - 蜡笔在纸上留下细微的纹理            │
│  └─ 随机性 - 每一次涂抹都有微妙的不同              │
│                                                     │
└─────────────────────────────────────────────────────┘
1.2 实现思路分析
我们采用三层叠加的策略来模拟蜡笔质感:
第一层:主线条
├─ 正常颜色
├─ 完整粗细
└─ 基准位置

第二层:偏移线条
├─ 稍亮颜色(+20亮度)
├─ 80%粗细
└─ ±1.5像素随机偏移

第三层:暗色线条
├─ 稍暗颜色(-15亮度)
├─ 60%粗细
└─ ±1像素随机偏移
1.3 效果对比
平滑线条(普通画笔):
━━━━━━━━━━━━━━━━━━━━━━━━
宽度一致、边缘清晰、无纹理

蜡笔线条(抖动效果):
∿∿∿∿∿∿∿∿∿∿∿∿∿∿∿∿∿∿
宽度变化、边缘柔和、有纹理
二、核心技术实现
2.1 基础绘制框架
首先建立完整的Canvas绑定和事件处理框架:
// 全局变量
let canvas, ctx;
let isDrawing = false;
let lastX = 0, lastY = 0;
let currentColor = '#ff6b6b';
let currentSize = 6;

// 初始化Canvas
function initCanvas() {
    canvas = document.getElementById('drawingCanvas');
    ctx = canvas.getContext('2d');

    // 高清适配
    resizeCanvas();
    window.addEventListener('resize', resizeCanvas);

    // 绑定事件
    canvas.addEventListener('mousedown', startDrawing);
    canvas.addEventListener('mousemove', draw);
    canvas.addEventListener('mouseup', stopDrawing);
    canvas.addEventListener('mouseout', stopDrawing);

    // 触摸支持
    canvas.addEventListener('touchstart', handleTouchStart, { passive: false });
    canvas.addEventListener('touchmove', handleTouchMove, { passive: false });
}

// 开始绘制
function startDrawing(e) {
    isDrawing = true;
    const rect = canvas.getBoundingClientRect();
    lastX = e.clientX - rect.left;
    lastY = e.clientY - rect.top;

    // 画一个起始点(防止断线)
    ctx.beginPath();
    ctx.arc(lastX, lastY, currentSize / 2, 0, Math.PI * 2);
    ctx.fillStyle = currentColor;
    ctx.fill();
}
2.2 颜色调整算法
蜡笔效果需要多层颜色,需要一个颜色调整函数:
/**
 * 调整颜色亮度
 * @param {string} color - 十六进制颜色值 '#ff6b6b'
 * @param {number} amount - 调整量,正数变亮,负数变暗
 * @returns {string} 调整后的颜色值
 */
function adjustColor(color, amount) {
    // 去除#号
    const hex = color.replace('#', '');

    // 解析RGB分量
    const r = parseInt(hex.substring(0, 2), 16);
    const g = parseInt(hex.substring(2, 4), 16);
    const b = parseInt(hex.substring(4, 6), 16);

    // 调整亮度(限制在0-255范围内)
    const newR = Math.min(255, Math.max(0, r + amount));
    const newG = Math.min(255, Math.max(0, g + amount));
    const newB = Math.min(255, Math.max(0, b + amount));

    // 转回十六进制
    const toHex = (n) => n.toString(16).padStart(2, '0');

    return `#${toHex(newR)}${toHex(newG)}${toHex(newB)}`;
}

// 使用示例
console.log(adjustColor('#ff6b6b', 20));  // '#ff7b7b' (更亮)
console.log(adjustColor('#ff6b6b', -20)); // '#ff5b5b' (更暗)
算法详解:
输入:'#ff6b6b' (红色)
     R = ff(255), G = 6b(107), B = 6b(107)

调整 +20:
     R = 255, G = 127, B = 127
     结果:'#ff7f7f' (偏亮的红色)

调整 -15:
     R = 240, G = 92, B = 92
     结果:'#f05c5c' (偏暗的红色)
2.3 核心绘制函数
蜡笔效果的核心实现:
/**
 * 绘制带蜡笔效果的线条
 * @param {number} fromX - 起点X
 * @param {number} fromY - 起点Y
 * @param {number} toX - 终点X
 * @param {number} toY - 终点Y
 */
function drawCrayonLine(fromX, fromY, toX, toY) {
    // ============ 第一层:主线条 ============
    ctx.strokeStyle = currentColor;
    ctx.lineWidth = currentSize;
    ctx.lineCap = 'round';
    ctx.lineJoin = 'round';

    ctx.beginPath();
    ctx.moveTo(fromX, fromY);
    ctx.lineTo(toX, toY);
    ctx.stroke();

    // ============ 第二层:亮色偏移线条 ============
    // 颜色变亮20
    ctx.strokeStyle = adjustColor(currentColor, 20);
    // 粗细变为80%
    ctx.lineWidth = currentSize * 0.8;

    ctx.beginPath();
    // 随机偏移 ±1.5 像素
    const offsetX1 = (Math.random() - 0.5) * 3;
    const offsetY1 = (Math.random() - 0.5) * 3;
    ctx.moveTo(fromX + offsetX1, fromY + offsetY1);
    ctx.lineTo(toX + offsetX1, toY + offsetY1);
    ctx.stroke();

    // ============ 第三层:暗色偏移线条 ============
    // 颜色变暗15
    ctx.strokeStyle = adjustColor(currentColor, -15);
    // 粗细变为60%
    ctx.lineWidth = currentSize * 0.6;

    ctx.beginPath();
    // 随机偏移 ±1 像素
    const offsetX2 = (Math.random() - 0.5) * 2;
    const offsetY2 = (Math.random() - 0.5) * 2;
    ctx.moveTo(fromX + offsetX2, fromY + offsetY2);
    ctx.lineTo(toX + offsetX2, toY + offsetY2);
    ctx.stroke();

    // ============ 可选:第四层:边缘纹理 ============
    // 添加一些随机点模拟蜡笔颗粒
    addCrayonTexture(fromX, fromY, toX, toY);
}

/**
 * 添加蜡笔纹理效果
 */
function addCrayonTexture(fromX, fromY, toX, toY) {
    // 计算线条长度
    const length = Math.sqrt(Math.pow(toX - fromX, 2) + Math.pow(toY - fromY, 2));
    // 根据长度决定添加多少个点
    const pointCount = Math.floor(length / 5);

    ctx.fillStyle = adjustColor(currentColor, 30);

    for (let i = 0; i < pointCount; i++) {
        // 在线条上随机位置
        const t = Math.random();
        const x = fromX + (toX - fromX) * t;
        const y = fromY + (toY - fromY) * t;

        // 随机偏移
        const offsetX = (Math.random() - 0.5) * currentSize * 0.8;
        const offsetY = (Math.random() - 0.5) * currentSize * 0.8;

        // 画一个小圆点
        ctx.beginPath();
        ctx.arc(x + offsetX, y + offsetY, currentSize * 0.15, 0, Math.PI * 2);
        ctx.fill();
    }
}
2.4 绘制流程整合
将蜡笔效果整合到主绘制流程:
// 绘制中
function draw(e) {
    if (!isDrawing) return;

    const rect = canvas.getBoundingClientRect();
    const currentX = e.clientX - rect.left;
    const currentY = e.clientY - rect.top;

    // 使用蜡笔效果绘制
    drawCrayonLine(lastX, lastY, currentX, currentY);

    // 更新起点
    lastX = currentX;
    lastY = currentY;
}
三、高级效果优化
3.1 曲线优化 - 减少折线感
对于快速移动的笔画,使用贝塞尔曲线替代直线:
/**
 * 带曲线优化的蜡笔绘制
 */
function drawCrayonCurve(fromX, fromY, toX, toY) {
    // 计算中点(控制点)
    const midX = (fromX + toX) / 2;
    const midY = (fromY + toY) / 2;

    // ============ 第一层:主曲线 ============
    ctx.strokeStyle = currentColor;
    ctx.lineWidth = currentSize;
    ctx.lineCap = 'round';
    ctx.lineJoin = 'round';

    ctx.beginPath();
    ctx.moveTo(fromX, fromY);
    ctx.quadraticCurveTo(fromX, fromY, midX, midY);
    ctx.stroke();

    // ============ 第二层:偏移曲线(亮) ============
    ctx.strokeStyle = adjustColor(currentColor, 25);
    ctx.lineWidth = currentSize * 0.75;

    const offsetX1 = (Math.random() - 0.5) * 2;
    const offsetY1 = (Math.random() - 0.5) * 2;

    ctx.beginPath();
    ctx.moveTo(fromX + offsetX1, fromY + offsetY1);
    ctx.quadraticCurveTo(fromX + offsetX1, fromY + offsetY1, midX + offsetX1, midY + offsetY1);
    ctx.stroke();

    // ============ 第三层:偏移曲线(暗) ============
    ctx.strokeStyle = adjustColor(currentColor, -20);
    ctx.lineWidth = currentSize * 0.5;

    const offsetX2 = (Math.random() - 0.5) * 2;
    const offsetY2 = (Math.random() - 0.5) * 2;

    ctx.beginPath();
    ctx.moveTo(fromX + offsetX2, fromY + offsetY2);
    ctx.quadraticCurveTo(fromX + offsetX2, fromY + offsetY2, midX + offsetX2, midY + offsetY2);
    ctx.stroke();
}
3.2 压力模拟 - 边缘淡化
模拟真实蜡笔的边缘淡化效果:
/**
 * 带压力模拟的蜡笔绘制
 * @param {number} width - 画笔宽度
 */
function drawWithPressure(fromX, fromY, toX, toY, width) {
    // 边缘淡化系数
    const fadeCoeff = 0.3;

    // 计算线条角度
    const angle = Math.atan2(toY - fromY, toX - fromX);
    const perpX = Math.cos(angle + Math.PI / 2);
    const perpY = Math.sin(angle + Math.PI / 2);

    // 绘制三层,每层偏移量递增
    const layers = [
        { offset: 0, alpha: 1.0, widthMult: 1.0 },
        { offset: 0.6, alpha: 0.7, widthMult: 0.8 },
        { offset: 1.2, alpha: 0.4, widthMult: 0.5 }
    ];

    layers.forEach((layer, index) => {
        // 颜色随层数变亮
        const brightness = index * 15;
        ctx.strokeStyle = adjustColor(currentColor, brightness);

        // 透明度随层数降低
        ctx.globalAlpha = layer.alpha;

        // 宽度随层数减小
        ctx.lineWidth = width * layer.widthMult;

        // 垂直于线条方向的偏移
        const offset = layer.offset * (Math.random() > 0.5 ? 1 : -1);
        const offsetX = perpX * offset;
        const offsetY = perpY * offset;

        ctx.beginPath();
        ctx.moveTo(fromX + offsetX, fromY + offsetY);
        ctx.lineTo(toX + offsetX, toY + offsetY);
        ctx.stroke();
    });

    // 恢复透明度
    ctx.globalAlpha = 1.0;
}
3.3 纸张纹理叠加
添加纸张纹理背景,增强真实感:
/**
 * 在Canvas上添加纸张纹理
 */
function addPaperTexture() {
    // 获取画布元素
    const container = canvas.parentElement;

    // 创建纹理Canvas
    const textureCanvas = document.createElement('canvas');
    textureCanvas.width = canvas.width;
    textureCanvas.height = canvas.height;
    const textureCtx = textureCanvas.getContext('2d');

    // 生成随机噪点
    const imageData = textureCtx.createImageData(textureCanvas.width, textureCanvas.height);
    const data = imageData.data;

    for (let i = 0; i < data.length; i += 4) {
        const noise = Math.random() * 15 - 7.5; // -7.5 到 7.5
        data[i] = 128 + noise;     // R
        data[i + 1] = 128 + noise; // G
        data[i + 2] = 128 + noise; // B
        data[i + 3] = 10;           // A (很低的不透明度)
    }

    textureCtx.putImageData(imageData, 0, 0);

    // 绘制到主画布
    ctx.drawImage(textureCanvas, 0, 0, container.clientWidth, container.clientHeight);
}

// 应用纸张纹理
setTimeout(addPaperTexture, 100);
3.4 动态颗粒密度
根据画笔大小动态调整颗粒密度:
/**
 * 动态颗粒密度
 */
function drawCrayonWithDynamicTexture(fromX, fromY, toX, toY) {
    // 基础绘制
    drawCrayonLine(fromX, fromY, toX, toY);

    // 根据画笔大小计算颗粒数量
    // 画笔越大,颗粒越多、越大
    const baseDensity = 0.3; // 基础密度
    const densityMultiplier = currentSize / 6; // 根据画笔大小调整
    const density = baseDensity * densityMultiplier;

    const length = Math.sqrt(Math.pow(toX - fromX, 2) + Math.pow(toY - fromY, 2));
    const pointCount = Math.floor(length * density);

    for (let i = 0; i < pointCount; i++) {
        const t = i / pointCount;
        const x = fromX + (toX - fromX) * t;
        const y = fromY + (toY - fromY) * t;

        // 颗粒大小与画笔成正比
        const dotSize = currentSize * 0.1 * (0.5 + Math.random());

        // 随机位置偏移
        const offsetX = (Math.random() - 0.5) * currentSize * 1.5;
        const offsetY = (Math.random() - 0.5) * currentSize * 1.5;

        // 随机亮度变化
        const brightness = (Math.random() - 0.5) * 40;

        ctx.fillStyle = adjustColor(currentColor, brightness);
        ctx.globalAlpha = 0.3 + Math.random() * 0.4;

        ctx.beginPath();
        ctx.arc(x + offsetX, y + offsetY, dotSize, 0, Math.PI * 2);
        ctx.fill();
    }

    ctx.globalAlpha = 1.0;
}
四、性能优化策略
4.1 批量绘制优化
减少Canvas状态切换的开销:
// 优化前:每层都设置状态
function drawInefficient(fromX, fromY, toX, toY) {
    // 第一层
    ctx.strokeStyle = currentColor;
    ctx.lineWidth = currentSize;
    ctx.beginPath();
    ctx.moveTo(fromX, fromY);
    ctx.lineTo(toX, toY);
    ctx.stroke();

    // 第二层
    ctx.strokeStyle = adjustColor(currentColor, 20);
    ctx.lineWidth = currentSize * 0.8;
    ctx.beginPath();
    ctx.moveTo(fromX, fromY);
    ctx.lineTo(toX, toY);
    ctx.stroke();

    // 第三层
    ctx.strokeStyle = adjustColor(currentColor, -15);
    ctx.lineWidth = currentSize * 0.6;
    ctx.beginPath();
    ctx.moveTo(fromX, fromY);
    ctx.lineTo(toX, toY);
    ctx.stroke();
}

// 优化后:使用路径批次
function drawOptimized(fromX, fromY, toX, toY) {
    // 收集三条线的偏移
    const offsets = [
        { dx: 0, dy: 0, color: currentColor, width: currentSize },
        { dx: (Math.random() - 0.5) * 3, dy: (Math.random() - 0.5) * 3,
          color: adjustColor(currentColor, 20), width: currentSize * 0.8 },
        { dx: (Math.random() - 0.5) * 2, dy: (Math.random() - 0.5) * 2,
          color: adjustColor(currentColor, -15), width: currentSize * 0.6 }
    ];

    // 批量绘制
    offsets.forEach(layer => {
        ctx.strokeStyle = layer.color;
        ctx.lineWidth = layer.width;
        ctx.beginPath();
        ctx.moveTo(fromX + layer.dx, fromY + layer.dy);
        ctx.lineTo(toX + layer.dx, toY + layer.dy);
        ctx.stroke();
    });
}
4.2 离屏Canvas预渲染
将常用效果预渲染到离屏Canvas:
// 创建离屏Canvas用于缓存效果
const offscreenCanvas = document.createElement('canvas');
const offscreenCtx = offscreenCanvas.getContext('2d');

// 预渲染颗粒纹理
function prerenderTexturePattern() {
    offscreenCanvas.width = 100;
    offscreenCanvas.height = 100;

    offscreenCtx.clearRect(0, 0, 100, 100);

    // 绘制多个颗粒点
    for (let i = 0; i < 20; i++) {
        const x = Math.random() * 100;
        const y = Math.random() * 100;
        const size = Math.random() * 3 + 1;

        offscreenCtx.fillStyle = `rgba(0, 0, 0, ${Math.random() * 0.1})`;
        offscreenCtx.beginPath();
        offscreenCtx.arc(x, y, size, 0, Math.PI * 2);
        offscreenCtx.fill();
    }
}

// 使用预渲染纹理
function usePrerenderedTexture(fromX, fromY, toX, toY) {
    // 创建图案
    const pattern = ctx.createPattern(offscreenCanvas, 'repeat');

    // 绘制基础线条
    ctx.strokeStyle = currentColor;
    ctx.lineWidth = currentSize;
    ctx.lineCap = 'round';
    ctx.beginPath();
    ctx.moveTo(fromX, fromY);
    ctx.lineTo(toX, toY);
    ctx.stroke();

    // 使用纹理作为混合
    ctx.strokeStyle = pattern;
    ctx.globalCompositeOperation = 'overlay';
    ctx.lineWidth = currentSize;
    ctx.beginPath();
    ctx.moveTo(fromX, fromY);
    ctx.lineTo(toX, toY);
    ctx.stroke();
    ctx.globalCompositeOperation = 'source-over';
}
4.3 帧率控制
使用requestAnimationFrame优化绘制:
// 批量绘制队列
let drawQueue = [];
let isProcessing = false;

function queueDraw(fromX, fromY, toX, toY) {
    drawQueue.push({ fromX, fromY, toX, toY });
    processQueue();
}

function processQueue() {
    if (isProcessing || drawQueue.length === 0) return;

    isProcessing = true;

    requestAnimationFrame(() => {
        // 批量处理队列中的绘制
        const batchSize = 5; // 每帧最多处理5条
        const batch = drawQueue.splice(0, batchSize);

        batch.forEach(draw => {
            drawCrayonLine(draw.fromX, draw.fromY, draw.toX, draw.toY);
        });

        isProcessing = false;

        // 继续处理剩余的
        if (drawQueue.length > 0) {
            processQueue();
        }
    });
}
五、完整可运行示例
以下是一个完整的蜡笔效果实现示例:
<!DOCTYPE html>
<html lang="zh-CN">
<head>
    <meta charset="UTF-8">
    <meta name="viewport" content="width=device-width, initial-scale=1.0">
    <title>Canvas蜡笔效果演示</title>
    <style>
        * { margin: 0; padding: 0; box-sizing: border-box; }

        .container {
            max-width: 900px;
            margin: 20px auto;
            padding: 20px;
        }

        .toolbar {
            display: flex;
            gap: 15px;
            margin-bottom: 20px;
            padding: 15px;
            background: #f5f5f5;
            border-radius: 10px;
        }

        .tool-group {
            display: flex;
            align-items: center;
            gap: 10px;
        }

        label { font-weight: bold; }

        .color-btn {
            width: 30px;
            height: 30px;
            border: 3px solid transparent;
            border-radius: 50%;
            cursor: pointer;
        }

        .color-btn.active {
            border-color: #333;
        }

        input[type="range"] {
            width: 100px;
        }

        canvas {
            border: 2px solid #ddd;
            border-radius: 10px;
            cursor: crosshair;
            background: white;
        }

        button {
            padding: 8px 16px;
            border: none;
            background: #ff6b6b;
            color: white;
            border-radius: 5px;
            cursor: pointer;
        }

        button:hover { background: #ff5252; }
    </style>
</head>
<body>
    <div class="container">
        <div class="toolbar">
            <div class="tool-group">
                <label>颜色:</label>
                <button class="color-btn active" style="background: #ff6b6b" data-color="#ff6b6b"></button>
                <button class="color-btn" style="background: #feca57" data-color="#feca57"></button>
                <button class="color-btn" style="background: #48dbfb" data-color="#48dbfb"></button>
                <button class="color-btn" style="background: #1dd1a1" data-color="#1dd1a1"></button>
                <button class="color-btn" style="background: #5f27cd" data-color="#5f27cd"></button>
            </div>

            <div class="tool-group">
                <label>粗细:</label>
                <input type="range" id="sizeSlider" min="2" max="30" value="8">
                <span id="sizeValue">8px</span>
            </div>

            <div class="tool-group">
                <button onclick="clearCanvas()">清除画布</button>
            </div>
        </div>

        <canvas id="canvas" width="860" height="500"></canvas>
    </div>

    <script>
        // ============ 核心代码 ============
        let canvas, ctx;
        let isDrawing = false;
        let lastX = 0, lastY = 0;
        let currentColor = '#ff6b6b';
        let currentSize = 8;

        // 颜色调整函数
        function adjustColor(color, amount) {
            const hex = color.replace('#', '');
            const r = parseInt(hex.substring(0, 2), 16);
            const g = parseInt(hex.substring(2, 4), 16);
            const b = parseInt(hex.substring(4, 6), 16);

            const clamp = (v) => Math.min(255, Math.max(0, v));

            const toHex = (n) => clamp(n).toString(16).padStart(2, '0');

            return `#${toHex(r + amount)}${toHex(g + amount)}${toHex(b + amount)}`;
        }

        // 蜡笔绘制核心函数
        function drawCrayonLine(fromX, fromY, toX, toY) {
            // 第一层:主线条
            ctx.strokeStyle = currentColor;
            ctx.lineWidth = currentSize;
            ctx.lineCap = 'round';
            ctx.lineJoin = 'round';
            ctx.beginPath();
            ctx.moveTo(fromX, fromY);
            ctx.lineTo(toX, toY);
            ctx.stroke();

            // 第二层:亮色偏移
            ctx.strokeStyle = adjustColor(currentColor, 20);
            ctx.lineWidth = currentSize * 0.8;
            ctx.beginPath();
            const o1x = (Math.random() - 0.5) * 3;
            const o1y = (Math.random() - 0.5) * 3;
            ctx.moveTo(fromX + o1x, fromY + o1y);
            ctx.lineTo(toX + o1x, toY + o1y);
            ctx.stroke();

            // 第三层:暗色偏移
            ctx.strokeStyle = adjustColor(currentColor, -15);
            ctx.lineWidth = currentSize * 0.6;
            ctx.beginPath();
            const o2x = (Math.random() - 0.5) * 2;
            const o2y = (Math.random() - 0.5) * 2;
            ctx.moveTo(fromX + o2x, fromY + o2y);
            ctx.lineTo(toX + o2x, toY + o2y);
            ctx.stroke();

            // 第四层:纹理颗粒
            const length = Math.sqrt(Math.pow(toX - fromX, 2) + Math.pow(toY - fromY, 2));
            const points = Math.floor(length / 6);

            ctx.fillStyle = adjustColor(currentColor, 30);
            for (let i = 0; i < points; i++) {
                const t = i / points;
                const x = fromX + (toX - fromX) * t;
                const y = fromY + (toY - fromY) * t;

                ctx.beginPath();
                ctx.arc(
                    x + (Math.random() - 0.5) * currentSize * 0.8,
                    y + (Math.random() - 0.5) * currentSize * 0.8,
                    currentSize * 0.15,
                    0, Math.PI * 2
                );
                ctx.fill();
            }
        }

        // 事件处理
        function init() {
            canvas = document.getElementById('canvas');
            ctx = canvas.getContext('2d');

            canvas.addEventListener('mousedown', (e) => {
                isDrawing = true;
                const rect = canvas.getBoundingClientRect();
                lastX = e.clientX - rect.left;
                lastY = e.clientY - rect.top;
            });

            canvas.addEventListener('mousemove', (e) => {
                if (!isDrawing) return;
                const rect = canvas.getBoundingClientRect();
                const x = e.clientX - rect.left;
                const y = e.clientY - rect.top;

                drawCrayonLine(lastX, lastY, x, y);

                lastX = x;
                lastY = y;
            });

            canvas.addEventListener('mouseup', () => isDrawing = false);
            canvas.addEventListener('mouseout', () => isDrawing = false);

            // 颜色选择
            document.querySelectorAll('.color-btn').forEach(btn => {
                btn.addEventListener('click', () => {
                    document.querySelectorAll('.color-btn').forEach(b => b.classList.remove('active'));
                    btn.classList.add('active');
                    currentColor = btn.dataset.color;
                });
            });

            // 粗细调节
            const slider = document.getElementById('sizeSlider');
            const sizeValue = document.getElementById('sizeValue');
            slider.addEventListener('input', () => {
                currentSize = parseInt(slider.value);
                sizeValue.textContent = slider.value + 'px';
            });
        }

        function clearCanvas() {
            ctx.fillStyle = 'white';
            ctx.fillRect(0, 0, canvas.width, canvas.height);
        }

        init();
    </script>
</body>
</html>
六、技术总结
6.1 核心要点回顾
┌─────────────────────────────────────────────────────┐
│                                                     │
│  蜡笔效果实现要点                                    │
│                                                     │
│  1. 三层叠加                                        │
│     ├─ 主线条:基准颜色和粗细                       │
│     ├─ 亮层:+20亮度,80%粗细,±1.5px偏移           │
│     └─ 暗层:-15亮度,60%粗细,±1px偏移             │
│                                                     │
│  2. 随机性                                          │
│     ├─ 位置偏移随机化                               │
│     ├─ 颗粒分布随机化                               │
│     └─ 亮度变化随机化                               │
│                                                     │
│  3. 颜色调整                                        │
│     └─ RGB分量独立调整                              │
│                                                     │
│  4. 性能优化                                        │
│     ├─ 批量状态设置                                 │
│     ├─ requestAnimationFrame                       │
│     └─ 离屏Canvas预渲染                             │
│                                                     │
└─────────────────────────────────────────────────────┘
6.2 效果调优参数表
| 参数 | 推荐值 | 说明 |
|---|---|---|
| 亮度调整量(亮) | +15 ~ +30 | 第二层颜色变亮程度 |
| 亮度调整量(暗) | -10 ~ -25 | 第三层颜色变暗程度 |
| 粗细比例(亮) | 0.7 ~ 0.85 | 第二层占主线条的比例 |
| 粗细比例(暗) | 0.5 ~ 0.7 | 第三层占主线条的比例 |
| 位置偏移量 | 1 ~ 2px | 随机偏移的范围 |
| 颗粒密度 | 长度/5 ~ 长度/8 | 每单位长度的颗粒数 |
| 颗粒大小 | 粗细×0.1 ~ 0.2 | 颗粒点的大小 |
6.3 应用场景
蜡笔效果技术可应用于:
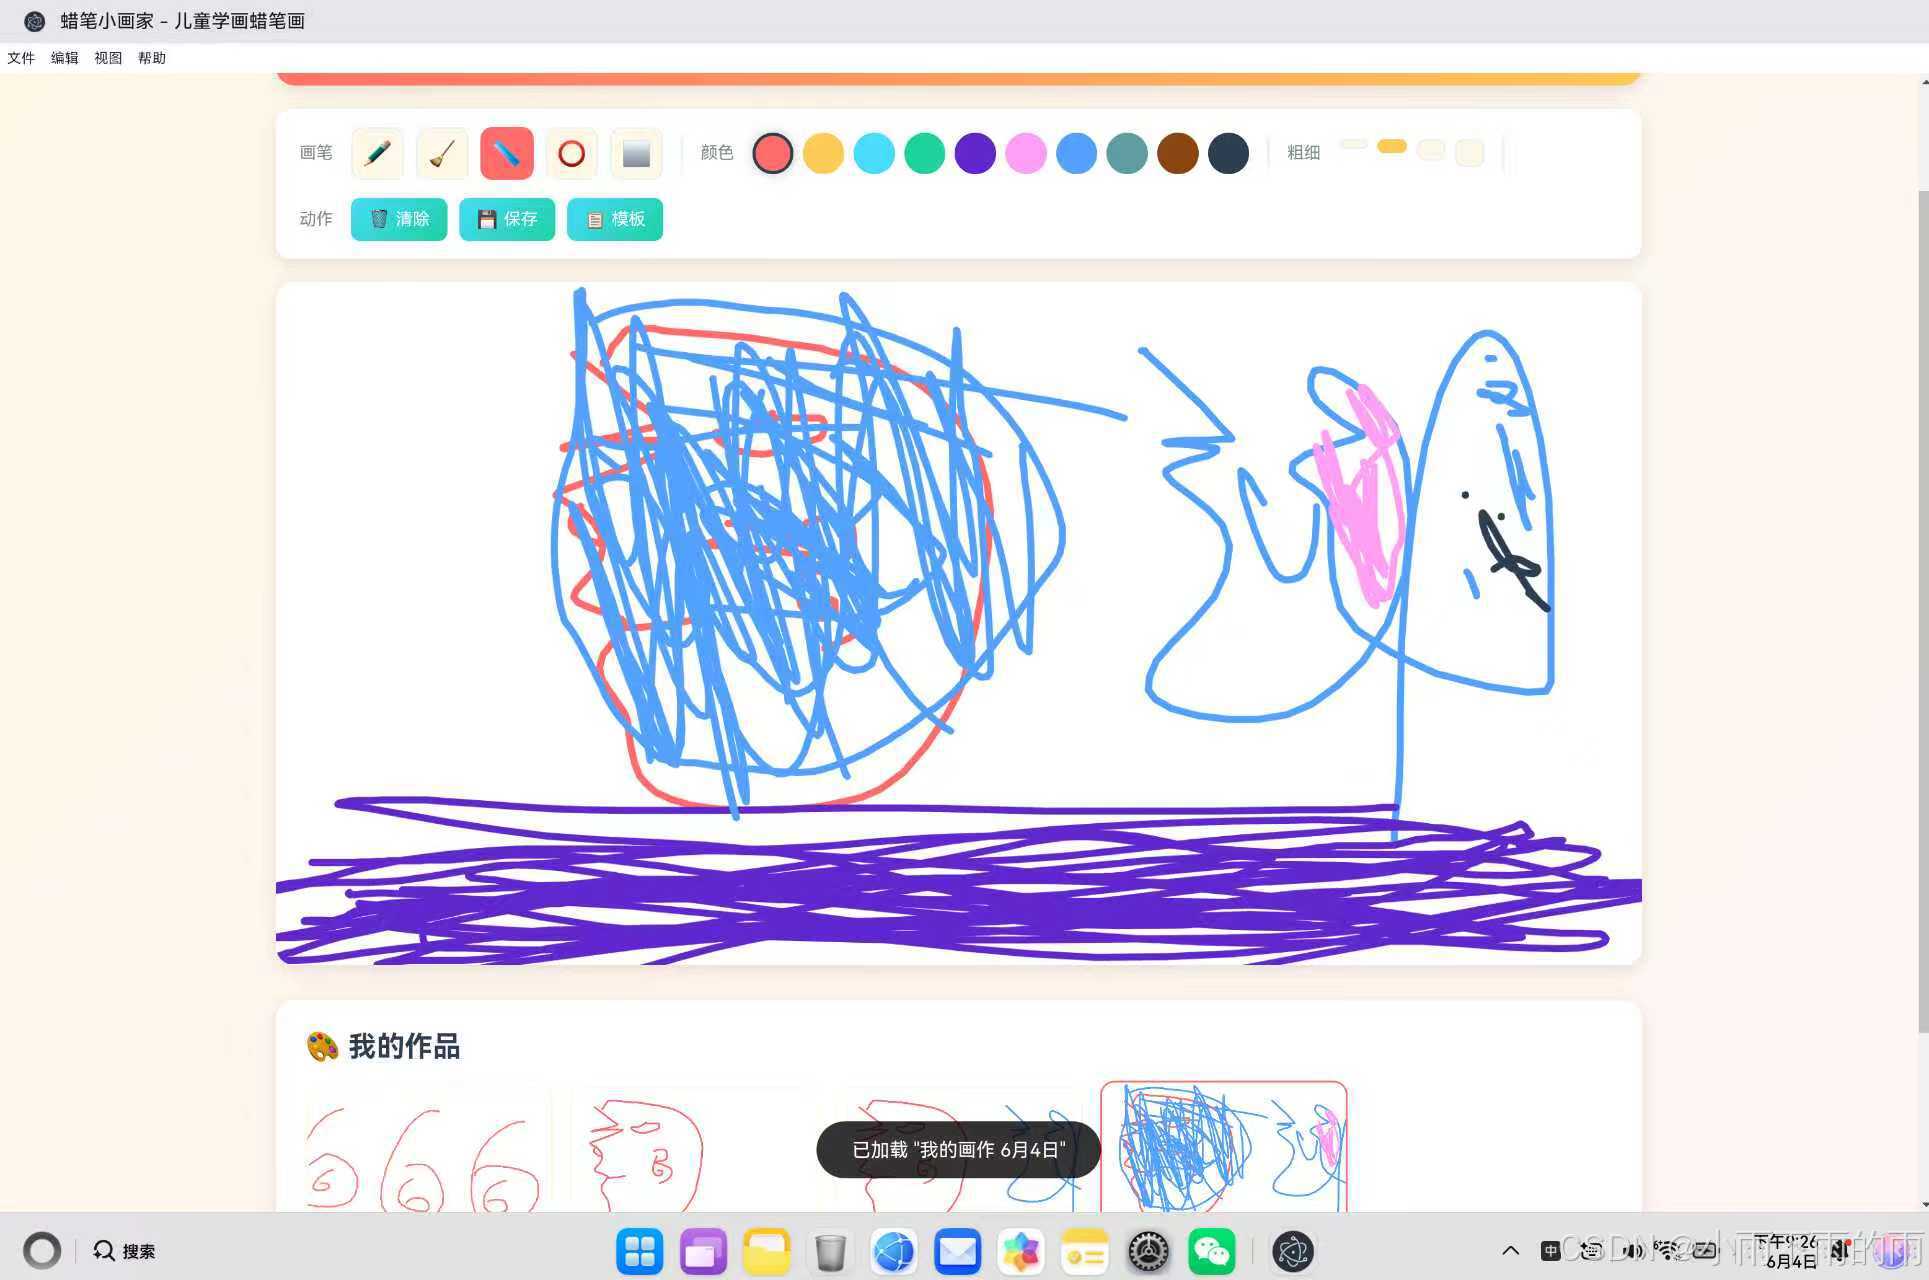
- 儿童绘画应用 - 如蜡笔小画家
- 艺术类应用 - 模拟各种绘画工具
- 手写笔记 - 增加手写真实感
- 涂鸦应用 - 趣味性涂鸦功能
- 签名验证 - 模拟真实签名效果
通过调整参数和算法,可以实现水彩、铅笔、粉笔等多种绘画效果,为用户提供更丰富的创作体验。

作为“人工智能6S店”的官方数字引擎,为AI开发者与企业提供一个覆盖软硬件全栈、一站式门户。
更多推荐
 0
0 0
0- 0


 已为社区贡献10条内容

所有评论(0)