
YOLOv26 模型转换到 Ascend 310B4 NPU 部署全流程指南
·
YOLOv26 模型转换到 Ascend 310B4 NPU 部署全流程指南
写在前面
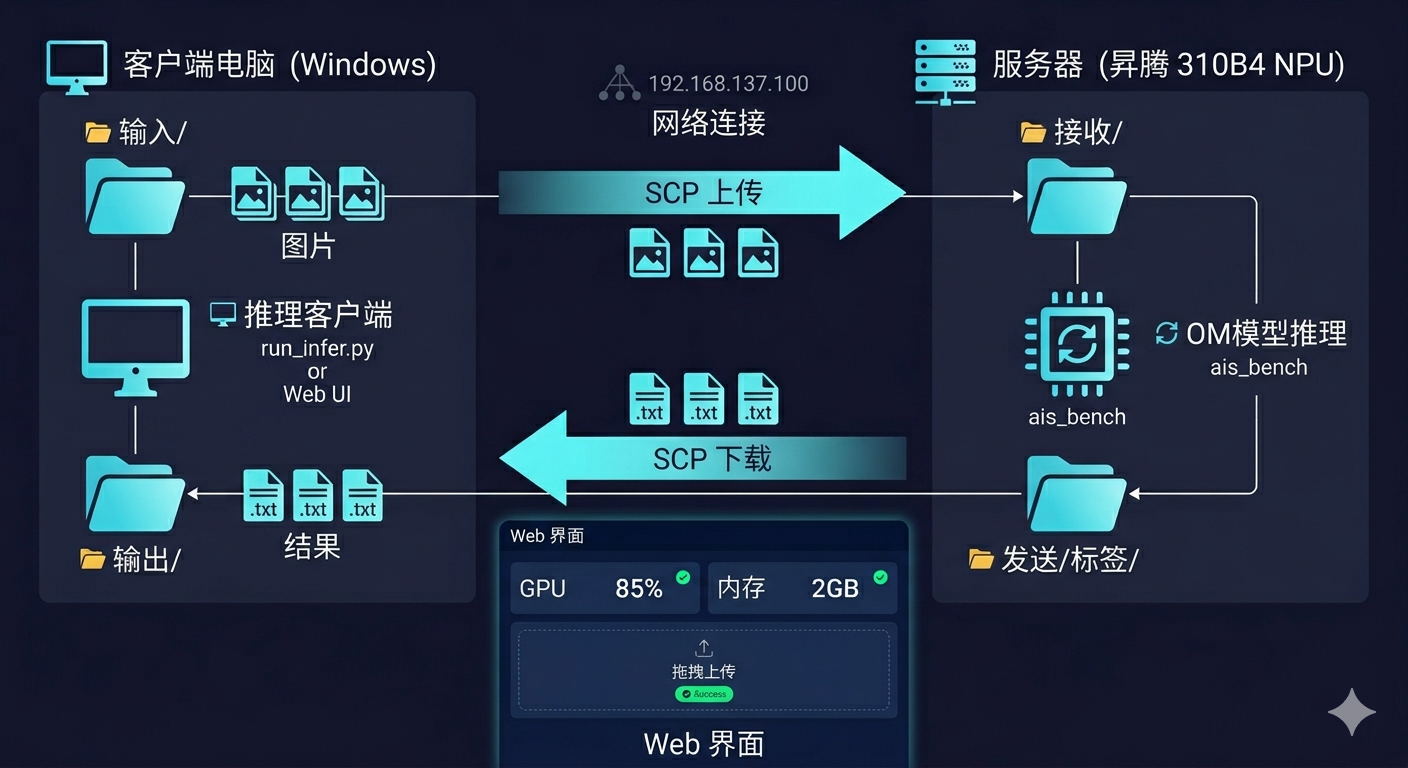
本文详细介绍如何将 YOLOv26 模型转换为华为昇腾 310B4 NPU 可运行的 OM 模型,并实现分布式推理部署。系统采用上位机(Windows) + 下位机(Ascend 310B4)的架构,上位机通过 SCP 传输图片,下位机完成推理后返回结果。
一、环境准备
1.1 硬件要求
| 角色 | 配置 |
|---|---|
| 上位机 | Windows 10/11,可通过网线直连下位机 |
| 下位机 | 华为 Ascend 310B4,atlas 200 dk A2 开发板 已安装 CANN 驱动 |
1.2 下位机环境
# 确认 CANN 已安装
source /usr/local/Ascend/ascend-toolkit/set_env.sh

# 确认 Python 环境
/usr/local/miniconda3/bin/python --version

# 确认 ais_bench 可用
/usr/local/miniconda3/bin/python -c "from ais_bench.infer.interface import InferSession; print('OK')"
1.3 上位机环境
# 安装 Python 依赖
pip install opencv-python flask
二、模型转换 (PT → OM)
2.1 导出 ONNX
# export_onnx.py
import torch
from ultralytics import YOLO

# 加载训练好的模型
model = YOLO('best.pt')

# 导出为 ONNX (动态输入尺寸)
model.export(format='onnx', dynamic=False, simplify=True)
在服务器上运行:
python export_onnx.py
2.2 转换为 OM 模型
使用 ATC 工具将 ONNX 转换为 OM 模型:
# 进入 CANN 环境
source /usr/local/Ascend/ascend-toolkit/set_env.sh

# ATC 转换命令
atc --model=best.onnx \
    --output=best \
    --input_format=NCHW \
    --input_shape="images:1,3,640,640" \
    --log=error \
    --soc_version=Ascend310B4
转换成功后会生成 best.om 文件。
三、下位机推理脚本
3.1 完整推理代码
新建文件 inference_yolov26_full.py:
"""
YOLOv26 OM 模型推理 - 功能完整版
支持:OM模型推理、分块推理(大图)、评估、可视化、结果保存
"""

from __future__ import annotations
import argparse
import os
import time
from pathlib import Path
import cv2
import numpy as np
import torch
from torchvision.ops import batched_nms

from ais_bench.infer.interface import InferSession

# 配置
IMG_EXTS = {".jpg", ".jpeg", ".png", ".bmp", ".tif", ".tiff", ".webp"}

def letterbox(img, new_shape=640, color=(114, 114, 114)):
    """平滑缩放并填充,保持长宽比"""
    shape = img.shape[:2]
    r = min(new_shape / shape[0], new_shape / shape[1])
    new_unpad = int(round(shape[1] * r)), int(round(shape[0] * r))
    dw, dh = (new_shape - new_unpad[0]) / 2, (new_shape - new_unpad[1]) / 2

    if shape[::-1] != new_unpad:
        img = cv2.resize(img, new_unpad, interpolation=cv2.INTER_LINEAR)

    top, bottom = int(round(dh - 0.1)), int(round(dh + 0.1))
    left, right = int(round(dw - 0.1)), int(round(dw + 0.1))
    img = cv2.copyMakeBorder(img, top, bottom, left, right, cv2.BORDER_CONSTANT, value=color)
    return img, r, (dw, dh)

def postprocess_yolov26_to_orig(pred, orig_shape, ratio, pad, conf_threshold=0.25, iou_threshold=0.45):
    """YOLOv26 后处理 - 转换到原图坐标"""
    orig_h, orig_w = orig_shape
    dw, dh = pad
    pred = np.squeeze(pred)

    boxes = pred[:, :4]
    conf_scores = pred[:, 4]
    class_ids = pred[:, 5]

    # 置信度过滤
    mask = conf_scores > conf_threshold
    boxes, conf_scores, class_ids = boxes[mask], conf_scores[mask], class_ids[mask]

    if len(boxes) == 0:
        return np.array([]), np.array([]), np.array([])

    # NMS
    nms_boxes = np.zeros_like(boxes)
    nms_boxes[:, 2] = boxes[:, 2] - boxes[:, 0]
    nms_boxes[:, 3] = boxes[:, 3] - boxes[:, 1]
    nms_boxes[:, 0], nms_boxes[:, 1] = boxes[:, 0], boxes[:, 1]

    indices = cv2.dnn.NMSBoxes(
        nms_boxes.tolist(), conf_scores.tolist(), conf_threshold, iou_threshold
    )

    if len(indices) == 0:
        return np.array([]), np.array([]), np.array([])

    indices = indices.flatten()
    boxes = boxes[indices]
    conf_scores = conf_scores[indices]
    class_ids = class_ids[indices]

    # 还原到原图坐标
    boxes[:, [0, 2]] = (boxes[:, [0, 2]] - dw) / ratio
    boxes[:, [1, 3]] = (boxes[:, [1, 3]] - dh) / ratio

    # 边界裁剪
    boxes[:, [0, 2]] = boxes[:, [0, 2]].clip(0, orig_w)
    boxes[:, [1, 3]] = boxes[:, [1, 3]].clip(0, orig_h)

    return boxes, conf_scores, class_ids

def yolo_lines_from_predictions(boxes, conf, cls, shape, save_conf=False):
    """转换为YOLO格式"""
    h, w = shape
    lines = []
    for box, score, class_id in zip(boxes.tolist(), conf.tolist(), cls.tolist()):
        x1, y1, x2, y2 = box
        cx = ((x1 + x2) * 0.5) / w
        cy = ((y1 + y2) * 0.5) / h
        bw = (x2 - x1) / w
        bh = (y2 - y1) / h
        parts = [f"{int(class_id)}", f"{cx:.6f}", f"{cy:.6f}", f"{bw:.6f}", f"{bh:.6f}"]
        if save_conf:
            parts.append(f"{score:.6f}")
        lines.append(" ".join(parts))
    return lines

def get_image_paths(source: Path):
    """获取图片路径列表"""
    if source.is_file():
        return [source]

    paths = []
    for p in sorted(source.iterdir()):
        if p.is_file() and p.suffix.lower() in IMG_EXTS:
            paths.append(p)
    if paths:
        return paths

    img_dir = source / "images"
    if img_dir.exists():
        for p in sorted(img_dir.iterdir()):
            if p.is_file() and p.suffix.lower() in IMG_EXTS:
                paths.append(p)
    return paths

def main():
    import argparse
    parser = argparse.ArgumentParser()
    parser.add_argument("--model", type=str, default="/shijiazhuang/best.om")
    parser.add_argument("--source", type=str, default="/shijiazhuang/incoming")
    parser.add_argument("--save-dir", type=str, default="/shijiazhuang/outgoing")
    parser.add_argument("--device", type=int, default=0)
    parser.add_argument("--conf", type=float, default=0.25)
    parser.add_argument("--iou", type=float, default=0.45)
    args = parser.parse_args()

    model_path = Path(args.model)
    source = Path(args.source)
    save_dir = Path(args.save_dir)
    save_dir.mkdir(parents=True, exist_ok=True)

    # 加载模型
    session = InferSession(args.device, str(model_path))
    print(f"Loaded: {model_path}")

    # 获取图片
    image_paths = get_image_paths(source)
    print(f"Found {len(image_paths)} images")

    for image_path in image_paths:
        img = cv2.imread(str(image_path)
        if img is None:
            continue

        h, w = img.shape[:2]

        # 预处理
        img_letterbox, ratio, (dw, dh) = letterbox(img, 640)
        img_rgb = cv2.cvtColor(img_letterbox, cv2.COLOR_BGR2RGB)
        img_input = img_rgb.astype(np.float32) / 255.0
        img_input = np.transpose(img_input, (2, 0, 1))
        img_input = np.expand_dims(img_input, axis=0)
        img_input = np.ascontiguousarray(img_input)

        # 推理
        preds = session.infer([img_input])
        pred = preds[0][0]

        # 后处理
        boxes, conf, cls = postprocess_yolov26_to_orig(
            pred, (h, w), ratio, (dw, dh), args.conf, args.iou
        )

        # 保存结果
        lines = yolo_lines_from_predictions(boxes, conf, cls, (h, w))
        save_path = save_dir / "labels" / f"{image_path.stem}.txt"
        save_path.parent.mkdir(parents=True, exist_ok=True)
        save_path.write_text("\n".join(lines))

        print(f"{image_path.name}: {len(boxes)} detections")

if __name__ == "__main__":
    main()
3.2 创建必要目录
ssh root@192.168.137.100
mkdir -p /shijiazhuang/incoming /shijiazhuang/outgoing
四、上位机批量推理客户端
4.1 代码实现
新建文件 run_infer.py:
"""
YOLO 分布式推理 - 批量版
把图片复制到 input 文件夹,自动批量推理
"""

import os
import subprocess
import time
from pathlib import Path

# 配置
HOST = "192.168.137.100"
USER = "root"
INPUT_DIR = "input"
OUTPUT_DIR = "output"
REMOTE_IN = "/shijiazhuang/incoming"
REMOTE_OUT = "/shijiazhuang/outgoing"

def ssh(cmd):
    result = subprocess.run(
        f'ssh -o StrictHostKeyChecking=no {USER}@{HOST} "{cmd}"',
        shell=True, capture_output=True, text=True, timeout=120
    )
    return result.returncode == 0

def scp_send(local, remote):
    result = subprocess.run(
        f'scp -o StrictHostKeyChecking=no "{local}" {USER}@{HOST}:{remote}',
        shell=True, capture_output=True
    )
    return result.returncode == 0

def scp_recv(remote, local):
    result = subprocess.run(
        f'scp -o StrictHostKeyChecking=no {USER}@{HOST}:{remote} "{local}"',
        shell=True, capture_output=True
    )
    return result.returncode == 0

def process_batch():
    print(f"扫描 {INPUT_DIR}/")

    img_files = []
    for ext in ['.jpg', '.jpeg', '.png', '.bmp']:
        img_files.extend(Path(INPUT_DIR).glob(f"*{ext}"))
        img_files.extend(Path(INPUT_DIR).glob(f"*{ext.upper()}"))

    pending = [f for f in img_files if not (Path(OUTPUT_DIR) / f"{f.stem}.txt").exists()]

    if not pending:
        print("没有新图片")
        return

    print(f"找到 {len(pending)} 张新图片")

    # 上传
    print("上传中...")
    for f in pending:
        if scp_send(str(f), f"{REMOTE_IN}/{f.name}"):
            print(f"  上传成功: {f.name}")

    # 推理
    print("推理中...")
    ssh(f"source /usr/local/Ascend/ascend-toolkit/set_env.sh && "
        f"/usr/local/miniconda3/bin/python /shijiazhuang/inference_yolov26_full.py "
        f"--source {REMOTE_IN} --save-dir {REMOTE_OUT} --model /shijiazhuang/best.om --device 0")

    # 下载结果
    print("下载结果...")
    for f in pending:
        result_txt = f"{REMOTE_OUT}/labels/{f.stem}.txt"
        local_txt = Path(OUTPUT_DIR) / f"{f.stem}.txt"
        if scp_recv(result_txt, str(local_txt)):
            print(f"  {f.name}: OK")

    # 清理远程图片
    ssh(f"rm -f {REMOTE_IN}/*.jpg {REMOTE_IN}/*.jpeg {REMOTE_IN}/*.png {REMOTE_IN}/*.bmp")

def main():
    os.makedirs(INPUT_DIR, exist_ok=True)
    os.makedirs(OUTPUT_DIR, exist_ok=True)

    print("=" * 50)
    print("YOLO 分布式推理系统")
    print(f"目标: {USER}@{HOST}")
    print("=" * 50)

    if not ssh("echo connected"):
        print("无法连接服务器!")
        return

    print("使用方法:")
    print(f"1. 把图片复制到 {INPUT_DIR}/")
    print(f"2. 运行程序")
    print(f"3. 结果保存在 {OUTPUT_DIR}/")

    input("按回车开始...")

    while True:
        process_batch()
        input("按回车继续...")

if __name__ == "__main__":
    main()
五、Web 可视化界面 (可选)
5.1 Flask Web 界面
新建 web_ui.py:
"""
YOLO 分布式推理 - Web 可视化界面
带拖拽上传、结果展示、性能监控
"""

from flask import Flask, render_template_string, request, redirect, url_for
import os
import subprocess
import time
import json
from pathlib import Path

app = Flask(__name__)
app.config['UPLOAD_FOLDER'] = 'input'
app.config['RESULT_FOLDER'] = 'output'
app.config['HOST'] = '192.168.137.100'
app.config['USER'] = 'root'

os.makedirs(app.config['UPLOAD_FOLDER'], exist_ok=True)
os.makedirs(app.config['RESULT_FOLDER'], exist_ok=True)

def ssh(cmd):
    result = subprocess.run(
        f'ssh -o StrictHostKeyChecking=no {app.config["USER"]}@{app.config["HOST"]} "{cmd}"',
        shell=True, capture_output=True, text=True, timeout=120
    )
    return result.returncode == 0, result.stdout, result.stderr

def scp_send(local, remote):
    result = subprocess.run(
        f'scp -o StrictHostKeyChecking=no "{local}" {app.config["USER"]}@{app.config["HOST"]}:{remote}',
        shell=True, capture_output=True
    )
    return result.returncode == 0

def scp_recv(remote, local):
    result = subprocess.run(
        f'scp -o StrictHostKeyChecking=no {app.config["USER"]}@{app.config["HOST"]}:{remote} "{local}"',
        shell=True, capture_output=True
    )
    return result.returncode == 0

def get_remote_stats():
    """获取下位机性能统计"""
    ok, stdout, _ = ssh("source /usr/local/Ascend/ascend-toolkit/set_env.sh && "
                        "nvidia-smi --query-gpu=utilization.gpu,memory.used,memory.total "
                        "--format=csv,noheader,nounits")
    if ok:
        try:
            util, mem_used, mem_total = stdout.strip().split(',')
            return {
                'gpu_util': float(util.strip()),
                'mem_used': int(mem_used.strip()),
                'mem_total': int(mem_total.strip()),
                'mem_percent': int(mem_used.strip()) * 100 / int(mem_total.strip())
            }
        except:
            pass
    return {'gpu_util': 0, 'mem_used': 0, 'mem_total': 0, 'mem_percent': 0}

@app.route('/')
def index():
    return render_template_string(HTML)

@app.route('/upload', methods=['POST'])
def upload_file():
    if 'file' not in request.files:
        return "No file", 400

    files = request.files.getlist('file')
    uploaded = []

    for file in files:
        if file.filename:
            filepath = os.path.join(app.config['UPLOAD_FOLDER'], file.filename)
            file.save(filepath)
            uploaded.append(file.filename)
            remote_path = f"/shijiazhuang/incoming/{file.filename}"
            scp_send(filepath, remote_path)

    # 触发推理
    ssh(f"source /usr/local/Ascend/ascend-toolkit/set_env.sh && "
        f"/usr/local/miniconda3/bin/python /shijiazhuang/inference_yolov26_full.py "
        f"--source /shijiazhuang/incoming --save-dir /shijiazhuang/outgoing "
        f"--model /shijiazhuang/best.om --device 0")

    # 等待并下载结果
    time.sleep(3)
    for filename in uploaded:
        stem = Path(filename).stem
        result_path = f"/shijiazhuang/outgoing/labels/{stem}.txt"
        local_path = os.path.join(app.config['RESULT_FOLDER'], f"{stem}.txt")
        scp_recv(result_path, local_path)

    return redirect(url_for('results'))

@app.route('/results')
def results():
    result_files = list(Path(app.config['RESULT_FOLDER']).glob("*.txt"))
    results = []
    for f in result_files:
        content = f.read_text().strip()
        if content:
            lines = content.split('\n')
            results.append({'name': f.stem, 'count': len(lines), 'lines': lines[:5]})
        else:
            results.append({'name': f.stem, 'count': 0, 'lines': []})
    return render_template_string(RESULTS_HTML, results=results, server=app.config['HOST'])

@app.route('/stats')
def stats():
    stats = get_remote_stats()
    return json.dumps(stats)

HTML = '''
<!DOCTYPE html>
<html>
<head>
    <meta charset="UTF-8">
    <title>YOLO 分布式推理系统</title>
    <style>
        * { box-sizing: border-box; margin: 0; padding: 0; }
        body { font-family: 'Segoe UI', Arial; background: #1a1a2e; color: #fff; min-height: 100vh; }
        .container { max-width: 1000px; margin: 0 auto; padding: 20px; }
        h1 { text-align: center; color: #00d4ff; margin-bottom: 30px; }
        .stats-bar { display: flex; gap: 20px; margin-bottom: 30px; }
        .stat-card { flex: 1; background: linear-gradient(135deg, #16213e, #0f3460); padding: 20px; border-radius: 10px; text-align: center; }
        .stat-value { font-size: 32px; font-weight: bold; color: #00d4ff; }
        .stat-label { color: #888; margin-top: 5px; }
        .upload-area { background: linear-gradient(135deg, #16213e, #0f3460); border: 3px dashed #00d4ff; padding: 60px; text-align: center; border-radius: 15px; cursor: pointer; transition: all 0.3s; }
        .upload-area:hover { border-color: #00ff88; }
        .btn { display: inline-block; background: linear-gradient(135deg, #00d4ff, #0099ff); color: #000; padding: 15px 40px; border: none; border-radius: 8px; font-size: 16px; cursor: pointer; margin-top: 30px; text-decoration: none; }
        #fileInput { display: none; }
    </style>
</head>
<body>
    <div class="container">
        <h1>YOLO 分布式推理系统</h1>
        <div class="stats-bar">
            <div class="stat-card">
                <div class="stat-value" id="gpuUtil">--</div>
                <div class="stat-label">GPU 利用率 %</div>
            </div>
            <div class="stat-card">
                <div class="stat-value" id="memUsed">--</div>
                <div class="stat-label">内存使用 MB</div>
            </div>
            <div class="stat-card">
                <div class="stat-value" id="memPercent">--</div>
                <div class="stat-label">内存占用 %</div>
            </div>
        </div>
        <form action="/upload" method="post" enctype="multipart/form-data" id="uploadForm">
            <div class="upload-area" onclick="document.getElementById('fileInput').click()">
                <div>点击或拖拽图片到此处上传</div>
            </div>
            <input type="file" id="fileInput" name="file" accept="image/*" multiple onchange="submitForm()">
        </form>
        <div style="text-align: center;">
            <a href="/results" class="btn">查看结果</a>
        </div>
    </div>
    <script>
        function submitForm() { document.getElementById('uploadForm').submit(); }
        const uploadArea = document.querySelector('.upload-area');
        uploadArea.addEventListener('dragover', e => { e.preventDefault(); uploadArea.style.borderColor = '#00ff88'; });
        uploadArea.addEventListener('dragleave', e => { e.preventDefault(); uploadArea.style.borderColor = '#00d4ff'; });
        uploadArea.addEventListener('drop', e => { e.preventDefault(); document.getElementById('fileInput').files = e.dataTransfer.files; submitForm(); });
        function updateStats() {
            fetch('/stats').then(r => r.json()).then(data => {
                document.getElementById('gpuUtil').textContent = data.gpu_util.toFixed(1);
                document.getElementById('memUsed').textContent = data.mem_used;
                document.getElementById('memPercent').textContent = data.mem_percent.toFixed(1);
            });
        }
        updateStats();
        setInterval(updateStats, 2000);
    </script>
</body>
</html>
'''

RESULTS_HTML = '''
<!DOCTYPE html>
<html>
<head>
    <meta charset="UTF-8">
    <title>推理结果</title>
    <style>
        body { font-family: 'Segoe UI', Arial; background: #1a1a2e; color: #fff; }
        .container { max-width: 1000px; margin: 0 auto; padding: 20px; }
        .result-card { background: linear-gradient(135deg, #16213e, #0f3460); padding: 20px; border-radius: 10px; margin-bottom: 15px; }
        .result-lines { background: #0a0a1a; padding: 15px; border-radius: 5px; font-family: monospace; color: #0f0; }
    </style>
</head>
<body>
    <div class="container">
        <a href="/" style="color:#00d4ff;">返回</a>
        <h1>推理结果</h1>
        {% for r in results %}
        <div class="result-card">
            <div>{{ r.name }}.jpg - {{ r.count }} 个目标</div>
            {% if r.lines %}
            <div class="result-lines">{% for line in r.lines %}{{ line }}<br>{% endfor %}</div>
            {% endif %}
        </div>
        {% endfor %}
    </div>
</body>
</html>
'''

if __name__ == '__main__':
    app.run(host='0.0.0.0', port=5000, debug=True)
5.2 启动 Web 服务
cd e:\project\shijiazhuang\distributed
python web_ui.py
访问 http://localhost:5000 即可使用拖拽上传和性能监控功能。
六、使用方法
6.1 批量推理模式
# 1. 复制图片到 input 文件夹
copy test\images\*.jpg input\

# 2. 运行程序
python run_infer.py

# 3. 按回车开始推理
# 结果保存在 output/ 文件夹
6.2 Web 界面模式
# 启动服务
python web_ui.py

# 浏览器访问 http://localhost:5000
# 拖拽上传图片 → 自动推理 → 查看结果
七、常见问题
Q1: SSH 连接失败
# 测试连接
ssh -v root@192.168.137.100

# 配置 SSH 密钥避免每次输入密码
ssh-keygen -t rsa
# 将公钥添加到下位机 /root/.ssh/authorized_keys
Q2: 推理无结果
# 检查下位机 incoming 目录
ssh root@192.168.137.100 "ls /shijiazhuang/incoming/"
Q3: 推理失败
# 手动运行看错误
ssh root@192.168.137.100 "source /usr/local/Ascend/ascend-toolkit/set_env.sh && /usr/local/miniconda3/bin/python /shijiazhuang/inference_yolov26_full.py --source /shijiazhuang/incoming --save-dir /shijiazhuang/outgoing --model /shijiazhuang/best.om --device 0"
八、系统架构图
九、总结
本文详细介绍了 YOLOv26 模型在昇腾 310B4 NPU 上的完整部署流程:
- 模型转换: PT → ONNX → OM
- 推理脚本: 基于 ais_bench 的 OM 推理实现
- 分布式部署: 上位机(Windows)通过SCP传输图片,下位机完成推理
- 可视化界面: Flask Web 界面支持拖拽上传和性能监控
整个系统采用网线直连,延迟低、传输稳定,适合实际项目部署使用。
本文档基于实际项目测试编写,测试环境:Ascend 310B4 + CANN 7.0 + Python 3.9

作为“人工智能6S店”的官方数字引擎,为AI开发者与企业提供一个覆盖软硬件全栈、一站式门户。
更多推荐
 8
8 0
0- 0


 已为社区贡献2条内容

所有评论(0)