
HarmonyOS 6.1 实战:Row 垂直居中对齐 VerticalAlign.Center,多行文本图标垂直居中技巧
引言:鸿蒙开发背景与ArkTS语言生态
鸿蒙操作系统(HarmonyOS)作为华为面向万物互联时代打造的分布式操作系统,自诞生以来便以"一次开发,多端部署"的核心理念深刻改变了移动应用的开发范式。在鸿蒙的应用开发体系中,ArkTS语言是最为关键的一环。ArkTS是在TypeScript基础上扩展而来的编程语言,它保留了TypeScript的静态类型检查能力,同时针对鸿蒙的声明式UI框架ArkUI进行了深度定制与语法增强。与传统的命令式UI开发不同,ArkTS鼓励开发者以声明式的方式描述界面结构,即"告诉系统我想要什么样的界面",而非"一步步指导系统如何绘制界面"。这种范式转变不仅大幅减少了样板代码的编写量,更使得界面的状态驱动机制变得清晰而可预测。在ArkTS中,开发者通过链式调用方式配置组件属性,每一个点号调用都是对组件样式的精确刻画,这种设计让UI代码具备了极高的可读性与可维护性。
ArkUI作为鸿蒙的官方声明式UI框架,提供了一套完整的组件体系,涵盖了容器组件、基础组件、画布组件、媒体组件等多种类型。容器组件如Column(纵向线性布局)、Row(横向线性布局)、Stack(层叠布局)、Flex(弹性布局)等构成了界面的骨架结构;基础组件如Text(文本)、Image(图片)、Button(按钮)、Progress(进度条)、TextInput(输入框)、Toggle(开关)等则填充了界面的内容血肉。这些组件通过统一的属性方法链式调用进行配置,配合状态管理装饰器实现数据驱动的自动刷新机制。在ArkUI中,开发者无需手动调用"刷新界面"的方法,只要被装饰器标记的状态变量发生变更,框架会自动追踪其依赖关系并触发对应组件的重新渲染,这一机制被称为"状态驱动UI刷新"。
声明式UI范式的核心优势在于其将"状态"与"视图"之间的关系显式化、声明化。在传统的命令式开发模式中,开发者需要手动获取UI控件的引用,在数据变化时逐个更新控件的属性值,这不仅容易遗漏更新点导致界面与数据不同步,也使得代码逻辑变得分散而难以维护。而ArkTS的声明式范式通过@State、@Prop、@Link、@Builder、@Entry、@Component等装饰器,将状态的管理与UI的描述紧密结合在一起。@Component装饰器标记一个自定义组件,@Entry装饰器标记该组件为页面的入口组件,@State装饰器声明组件内部的可变状态变量,@Builder装饰器则用于定义可复用的UI构建函数。这套装饰器体系使得开发者能够以最少的代码量实现最复杂的界面逻辑,同时保持代码的清晰结构与高度可读性。
在鸿蒙ArkUI的组件体系中,还有一个极为重要的概念是"布局权重"(layoutWeight)。当多个子组件在同一个线性容器(Row或Column)中排列时,layoutWeight属性用于分配剩余空间的占比权重。这一机制与CSS Flexbox中的flex-grow属性有异曲同工之妙,使得自适应布局在不同屏幕尺寸下能够优雅地缩放。此外,ArkUI还提供了zIndex层级控制、position绝对定位、translate位移变换、scale缩放变换、opacity透明度控制等高级布局与动画能力,让开发者能够在声明式框架内实现复杂的交互动画效果。配合animateTo动画API,开发者可以轻松实现属性变化时的过渡动画,包括持续时间、缓动曲线、播放模式等参数的精细控制。这些能力共同构成了鸿蒙ArkTS开发的强大工具箱,使得复杂业务场景下的高质量应用开发成为可能。
一、数据模型层:接口定义与类型安全
在ArkTS中,interface用于定义对象的结构类型,这是TypeScript类型系统的核心特性之一。通过interface,开发者可以为复杂的数据对象定义明确的类型约束,确保在编译阶段就能捕获类型不匹配的错误。本项目定义了五个核心接口,分别对应牙齿、复诊记录、对比照片、护理商品和订单这五个业务实体。
1.1 牙齿数据接口
interface ToothT13 {
  id: number
  name: string
  stage: number // 0未动 1移动中 2到位 3保持
  move: number
}
在这里插入图片描述
ToothT13接口定义了单颗牙齿的数据结构。其中id为唯一标识符,name存储牙齿名称(如"右上1"),stage字段使用数字编码表示牙齿的矫正阶段(0代表未启动、1代表移动中、2代表到位、3代表保持期),move字段则记录该牙齿的移动进度百分比。这种用数字编码表示状态的设计在数据存储与条件渲染中非常高效,因为数字的比较运算比字符串匹配更快,且占用内存更少。
技术概念强调: ArkTS的interface定义的是纯类型声明,编译后会被完全擦除,不会产生任何运行时开销。这意味着使用interface既能获得开发阶段的类型安全保护,又不会影响应用的运行性能。这是TypeScript类型擦除机制在ArkTS中的体现,是一种零成本的抽象。
1.2 复诊记录接口
interface VisitT13 {
  id: number
  date: string
  act: string
  doctor: string
  pain: number
  next: string
}
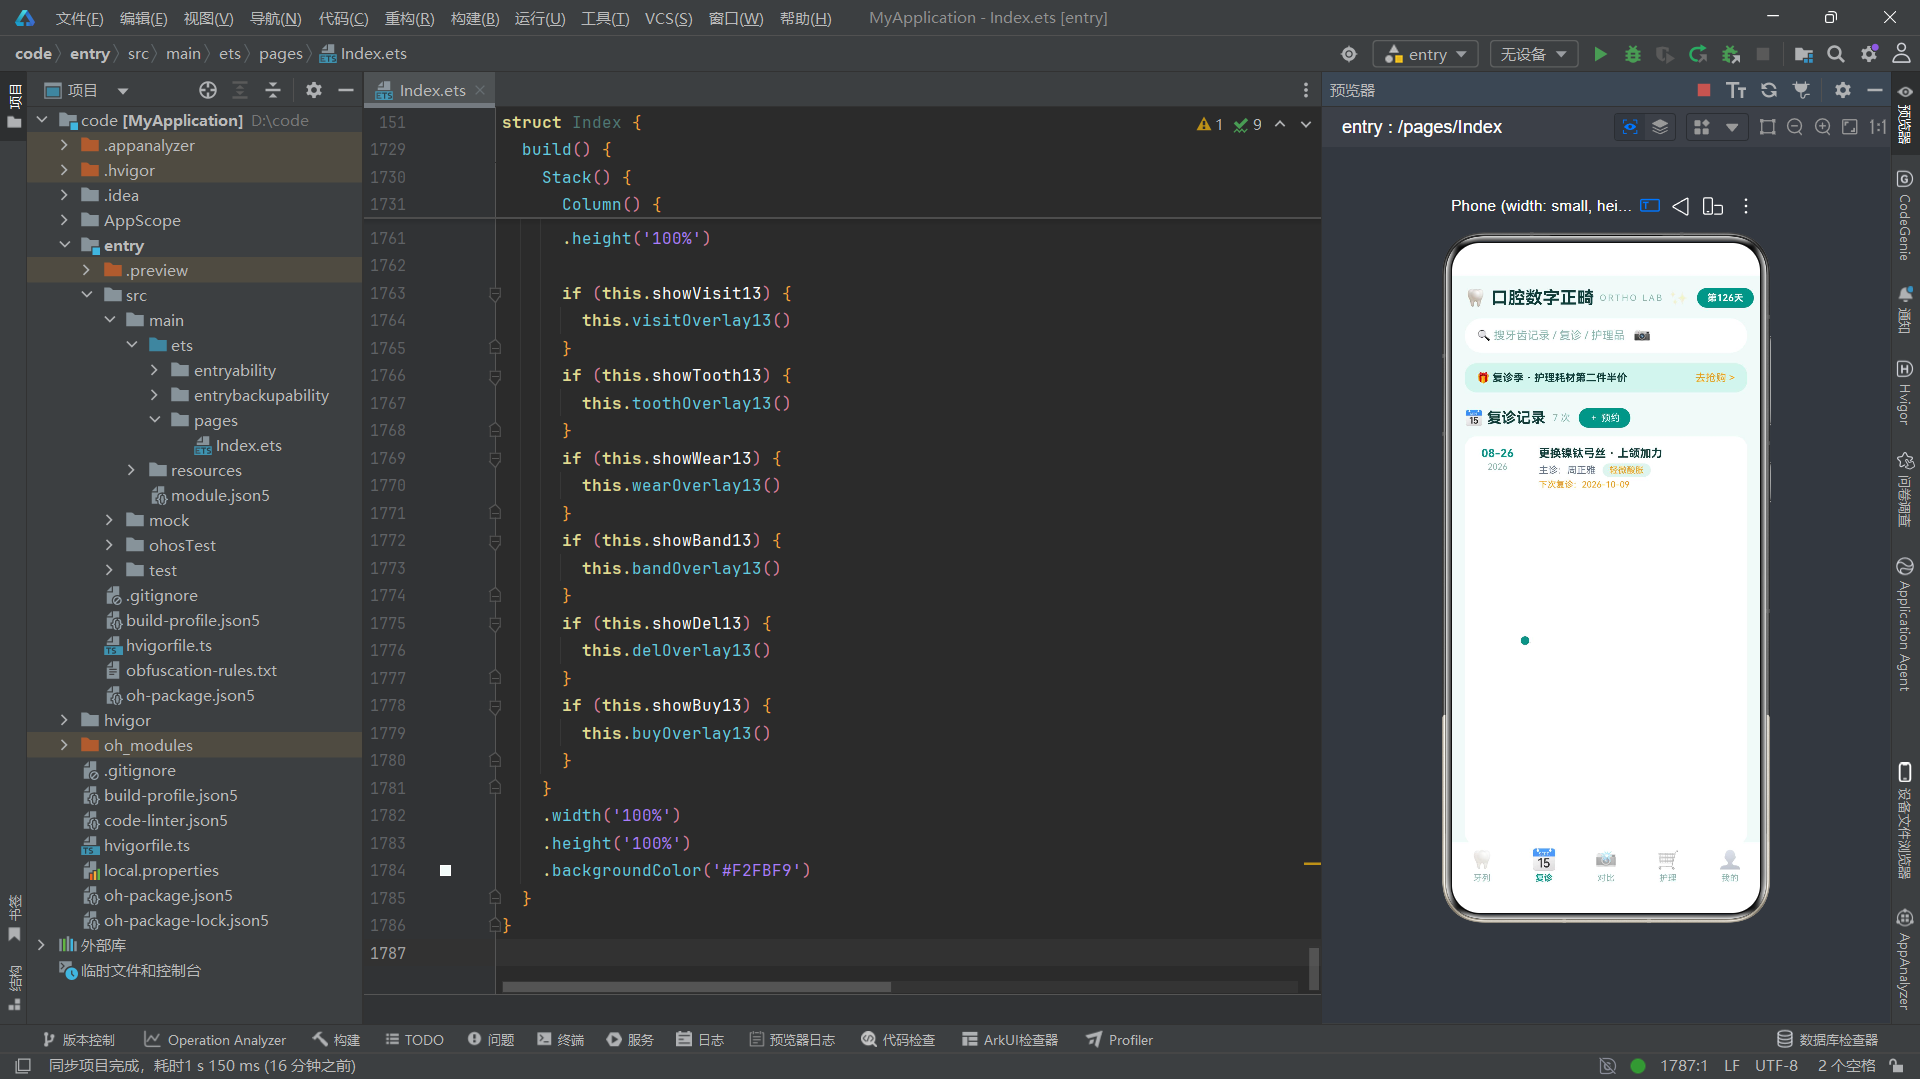
VisitT13接口封装了一次复诊记录的完整信息。date和next分别记录当前复诊日期与下次复诊日期,act描述复诊的具体操作内容(如"更换镍钛弓丝"),doctor记录主诊医生姓名,pain字段用数字量化疼痛感受。这里特别值得注意的是疼痛度采用数字而非文字描述,这与ToothT13中的stage设计理念一致——通过数字编码便于条件判断与颜色映射,后续的painWord13函数会将数字转化为人类可读的文字描述。
技术概念强调: 在ArkTS中,数字编码与字符串描述的分离是一种经典的"数据-表现"分层策略。数据层保持简洁的数字表示以利于比较、排序和存储,表现层通过函数将数字映射为描述性文字和视觉颜色。这种分层使得数据与视觉解耦,后续修改展示逻辑时无需触碰数据结构。
1.3 对比照片、商品与订单接口
interface SnapT13 {
  id: number
  date: string
  days: number
  score: number
  gap: number
  note: string
}

interface GoodT13 {
  id: number
  name: string
  cat: string
  price: number
  stock: number
}

interface OrdT13 {
  id: string
  good: string
  status: string
  amount: number
  date: string
}
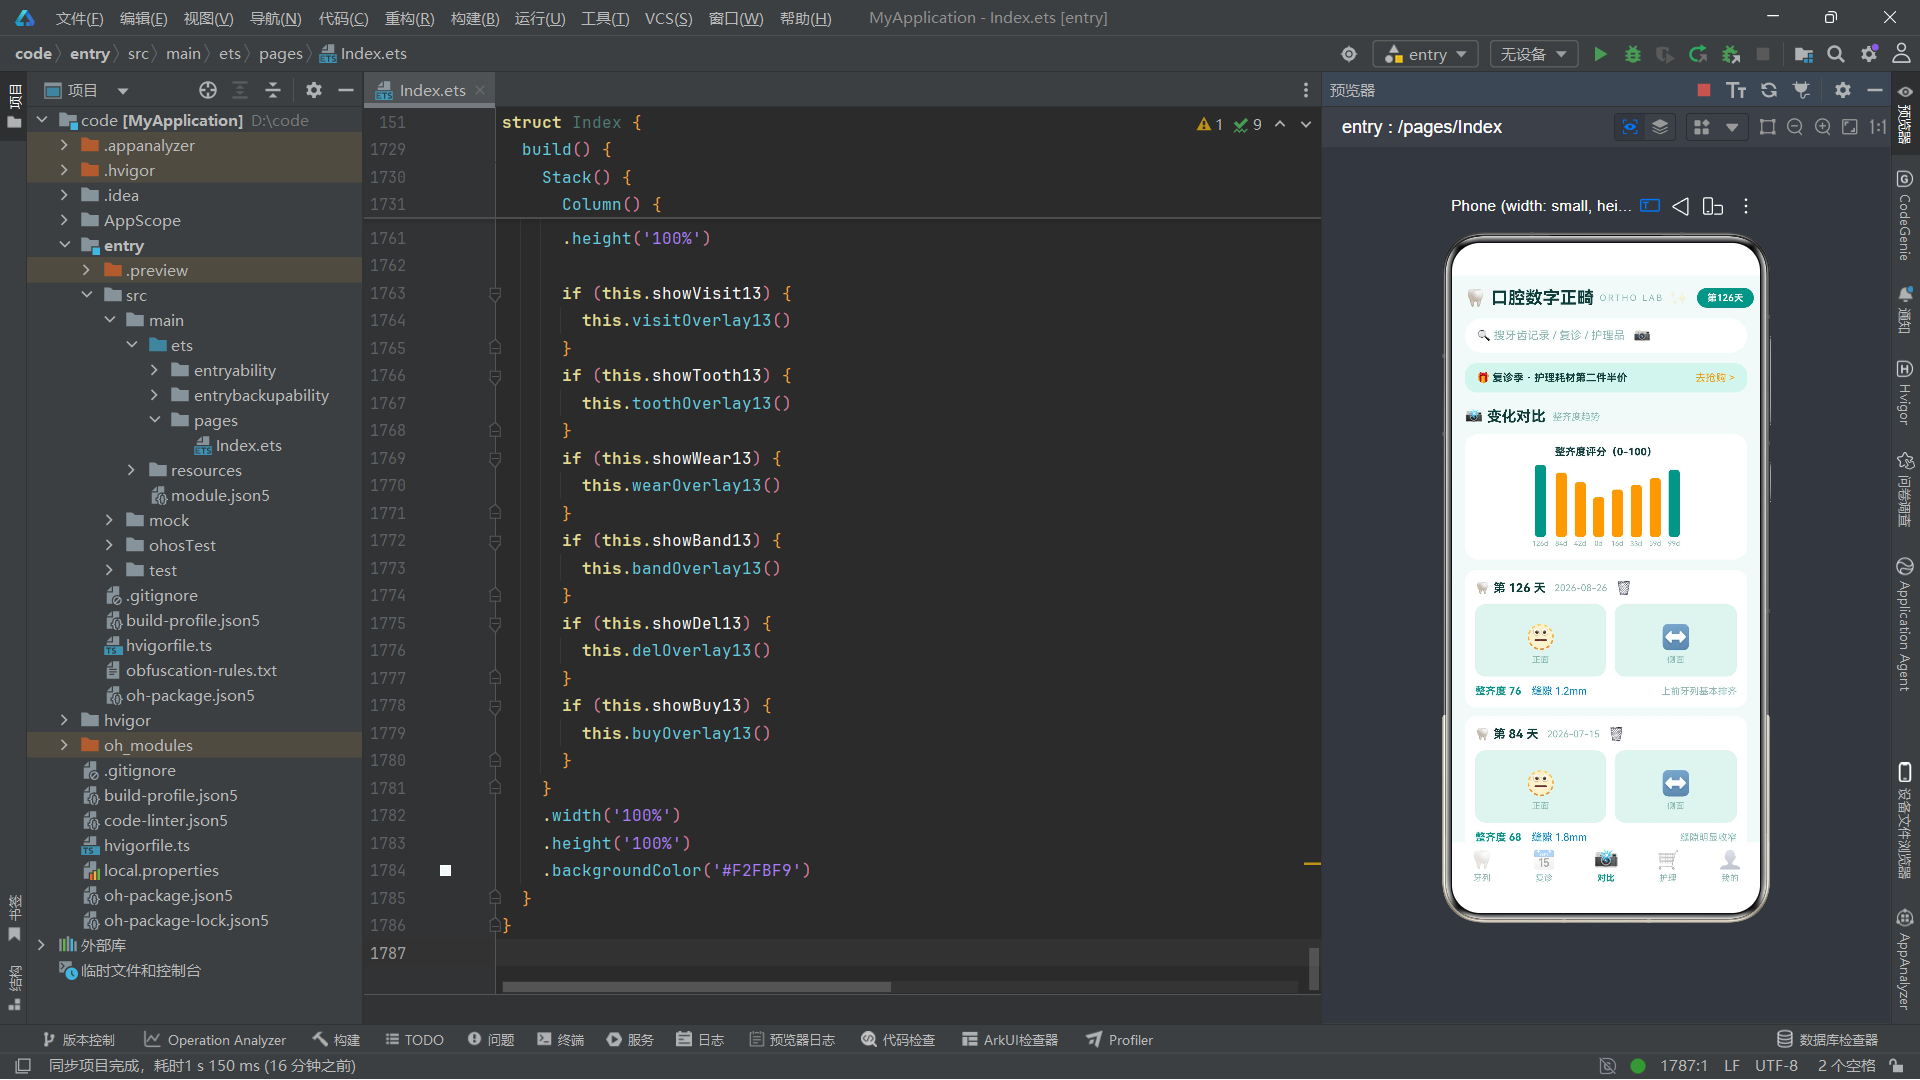
这三个接口分别定义了正畸进度对比照片、护理商品和诊疗订单的数据结构。SnapT13中的score记录整齐度评分(0-100),gap记录牙缝间隙宽度(毫米),这两个量化指标是评估正畸进展的核心数据。GoodT13中的cat字段将商品分为"耗材"“清洁”“电器"三个分类,用于后续的商品分类图标渲染。OrdT13的id采用字符串类型而非数字,因为订单号包含字母前缀(如"D20260826001”),这是实际业务中常见的混合编码方案。
技术概念强调: ArkTS的interface支持可选属性(通过
?标记)和只读属性(通过readonly标记),但在本项目中所有属性都是必填且可变的。这是因为这些接口主要用于描述可交互的动态数据,而非不可变的配置常量。在需要不可变保证的场景中,应使用readonly修饰符来防止意外修改。
二、静态数据层:常量数组的初始化策略
在定义完接口之后,项目使用const关键字声明了一系列常量数组作为初始数据源。这些数组使用了接口作为类型参数,确保每条数据的结构严格符合类型约束。
2.1 牙齿数据初始化
const TEETH13: Array<ToothT13> = [
  { id: 1, name: '右上1', stage: 2, move: 100 },
  { id: 2, name: '右上2', stage: 2, move: 100 },
  { id: 3, name: '右上3', stage: 1, move: 62 },
  { id: 4, name: '右上4', stage: 1, move: 48 },
  { id: 5, name: '右上5', stage: 0, move: 12 },
  { id: 6, name: '右上6', stage: 0, move: 8 },
  { id: 7, name: '右上7', stage: 0, move: 5 },
  { id: 8, name: '右上8', stage: 0, move: 0 },
  { id: 9, name: '左上1', stage: 3, move: 100 },
  { id: 10, name: '左上2', stage: 2, move: 100 },
  { id: 11, name: '左上3', stage: 1, move: 71 },
  { id: 12, name: '左上4', stage: 1, move: 55 },
  { id: 13, name: '左上5', stage: 0, move: 15 },
  { id: 14, name: '左上6', stage: 0, move: 10 },
  { id: 15, name: '左上7', stage: 0, move: 4 },
  { id: 16, name: '左上8', stage: 0, move: 0 }
]
TEETH13数组定义了上颌全部16颗牙齿的初始状态数据。数组采用Array<ToothT13>泛型语法声明类型,确保每个元素都符合ToothT13接口结构。从数据中可以读出正畸治疗的进展规律:前牙(编号1-2、9-10)通常最先完成移动(stage为2或3),因为前牙根短且受力面积小,移动效率高;而磨牙(编号7-8、15-16)几乎未动(move为0或极低值),因为磨牙根多且粗壮,需要更大的持续力才能移动。这组数据真实反映了正畸治疗中"前牙先行、后牙跟进"的医学规律。
技术概念强调:
const关键字在ArkTS中保证的是"绑定的不可变性"而非"值的不可变性"。对于const声明的数组,不能重新赋值为另一个数组,但数组内部的元素仍然可以被修改。如果需要完全不可变的数组,应使用Object.freeze()或采用只读类型readonly ToothT13[]。在本项目中,组件内部通过.slice()创建副本后再赋值给@State变量,实现了数据隔离。
2.2 复诊记录与对比照片数据
const VISITS13: Array<VisitT13> = [
  { id: 1, date: '2026-08-26', act: '更换镍钛弓丝 · 上颌加力', doctor: '周正雅', pain: 3, next: '2026-10-09' },
  { id: 2, date: '2026-07-15', act: '下颌皮筋更换 II 类牵引', doctor: '周正雅', pain: 2, next: '2026-08-26' },
  { id: 3, date: '2026-06-03', act: '尖牙远中移动评估', doctor: '周正雅', pain: 4, next: '2026-07-15' },
  { id: 4, date: '2026-04-22', act: '安装自锁托槽 · 全口', doctor: '周正雅', pain: 5, next: '2026-06-03' },
  { id: 5, date: '2026-04-20', act: '拍摄全景片 + 侧位片', doctor: '放射科', pain: 1, next: '2026-04-22' },
  { id: 6, date: '2026-04-05', act: '口扫取模 · 制定方案', doctor: '周正雅', pain: 0, next: '2026-04-20' },
  { id: 7, date: '2026-03-28', act: '初诊面型分析', doctor: '周正雅', pain: 0, next: '2026-04-05' }
]
VISITS13数组按时间倒序排列了7次复诊记录,从初诊面型分析到最新的弓丝更换,完整勾勒了正畸治疗的时间线。每条记录中的next字段指向下一次复诊日期,形成了一条逻辑上的"时间链"。pain字段的数值变化也很有规律——安装托槽当天疼痛度最高(5),随后的复诊逐步降低,这符合正畸治疗中"初期适应、后期维持"的疼痛演变规律。
const SNAPS13: Array<SnapT13> = [
  { id: 1, date: '2026-08-26', days: 126, score: 76, gap: 1.2, note: '上前牙列基本排齐' },
  { id: 2, date: '2026-07-15', days: 84, score: 68, gap: 1.8, note: '缝隙明显收窄' },
  { id: 3, date: '2026-06-03', days: 42, score: 58, gap: 2.4, note: '尖牙开始远移' },
  { id: 4, date: '2026-04-22', days: 0, score: 42, gap: 3.5, note: '戴牙套第一天' },
  { id: 5, date: '2026-05-08', days: 16, score: 50, gap: 3.0, note: '适应期结束' },
  { id: 6, date: '2026-05-25', days: 33, score: 55, gap: 2.7, note: '下牙列变化明显' },
  { id: 7, date: '2026-06-20', days: 59, score: 62, gap: 2.1, note: '覆颌改善' },
  { id: 8, date: '2026-07-30', days: 99, score: 71, gap: 1.5, note: '中线对齐过半' }
]
SNAPS13数组记录了8个时间点的对比快照,score字段呈现从42到76的稳步上升趋势,gap字段则从3.5mm逐渐收窄至1.2mm,这两个指标的变化趋势直观地证明了正畸治疗的有效性。值得注意的是这些快照并非严格按days升序排列,而是按id顺序排列,这在后续的柱状图渲染时需要特别关注数据顺序的处理。
2.3 商品、订单与佩戴时长数据
const GOODS13: Array<GoodT13> = [
  { id: 1, name: '正畸保护蜡 · 薄荷味', cat: '耗材', price: 29, stock: 4 },
  { id: 2, name: '托槽专用间隙刷', cat: '清洁', price: 39, stock: 6 },
  { id: 3, name: '冲牙器 便携款', cat: '电器', price: 259, stock: 2 },
  { id: 4, name: '含氟正畸牙膏', cat: '清洁', price: 45, stock: 8 },
  { id: 5, name: '皮筋套装 · 混色', cat: '耗材', price: 19, stock: 10 },
  { id: 6, name: '牙套清洁泡腾片×30', cat: '清洁', price: 59, stock: 5 },
  { id: 7, name: '正畸专用咬胶', cat: '耗材', price: 25, stock: 9 },
  { id: 8, name: '菌斑显示剂×20', cat: '耗材', price: 22, stock: 7 },
  { id: 9, name: '舌苔清洁器', cat: '清洁', price: 18, stock: 12 },
  { id: 10, name: '正畸阴影刷(超细软毛)', cat: '清洁', price: 36, stock: 6 }
]

const ORDS13: Array<OrdT13> = [
  { id: 'D20260826001', good: '更换镍钛弓丝(含复诊)', status: '已完成', amount: 380, date: '2026-08-26' },
  { id: 'D20260801002', good: '冲牙器 便携款', status: '已完成', amount: 259, date: '2026-08-01' },
  { id: 'D20260715003', good: '皮筋套装 · 混色 ×3', status: '已完成', amount: 57, date: '2026-07-15' },
  { id: 'D20260901004', good: '保持器(摘牙套后备用)', status: '待制作', amount: 880, date: '2026-09-01' },
  { id: 'D20260620005', good: '含氟正畸牙膏 ×2', status: '已完成', amount: 90, date: '2026-06-20' },
  { id: 'D20260910006', good: '下次复诊 · 下颌加力', status: '待就诊', amount: 380, date: '2026-10-09' }
]

const WEAR13: Array<string> = ['14h', '19h', '21h', '20h', '22h', '21h', '18h']
const WEARV13: Array<number> = [14, 19, 21, 20, 22, 21, 18]
const WK13: Array<string> = ['周一', '周二', '周三', '周四', '周五', '周六', '周日']
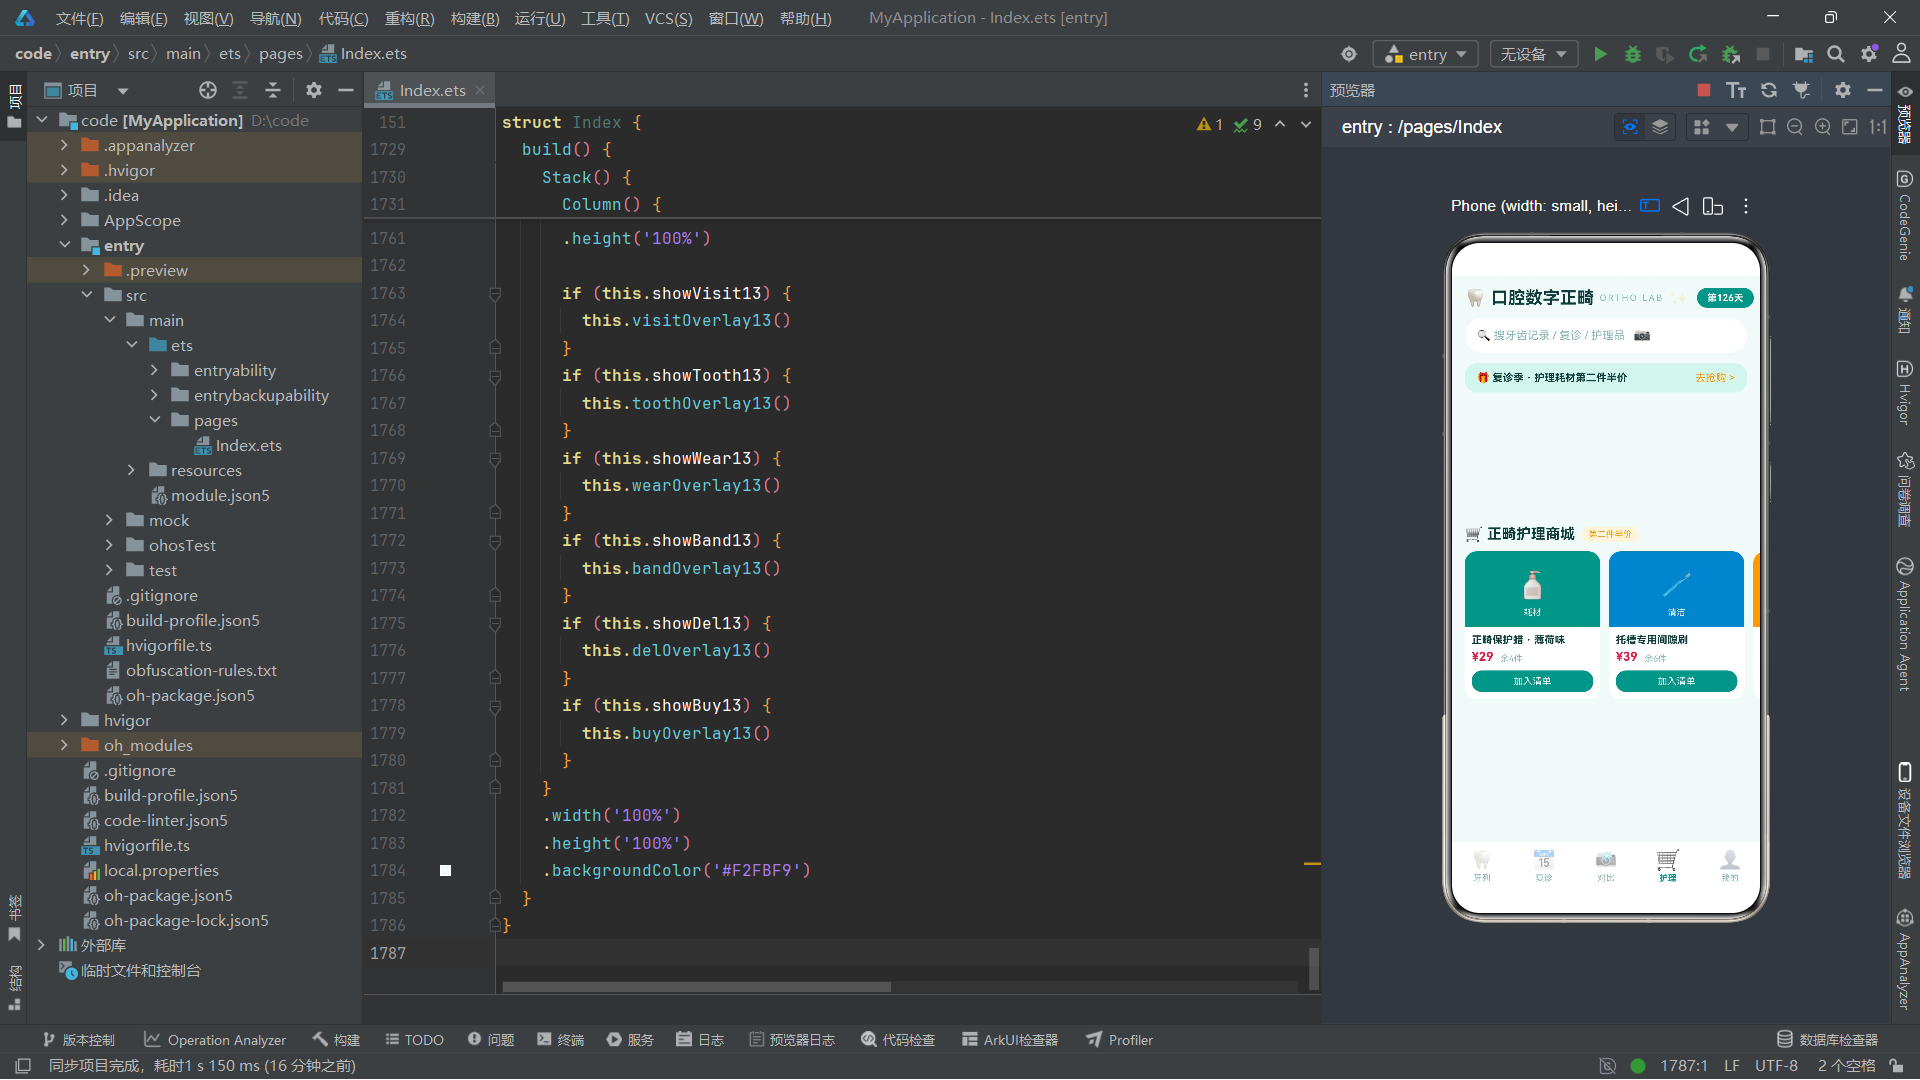
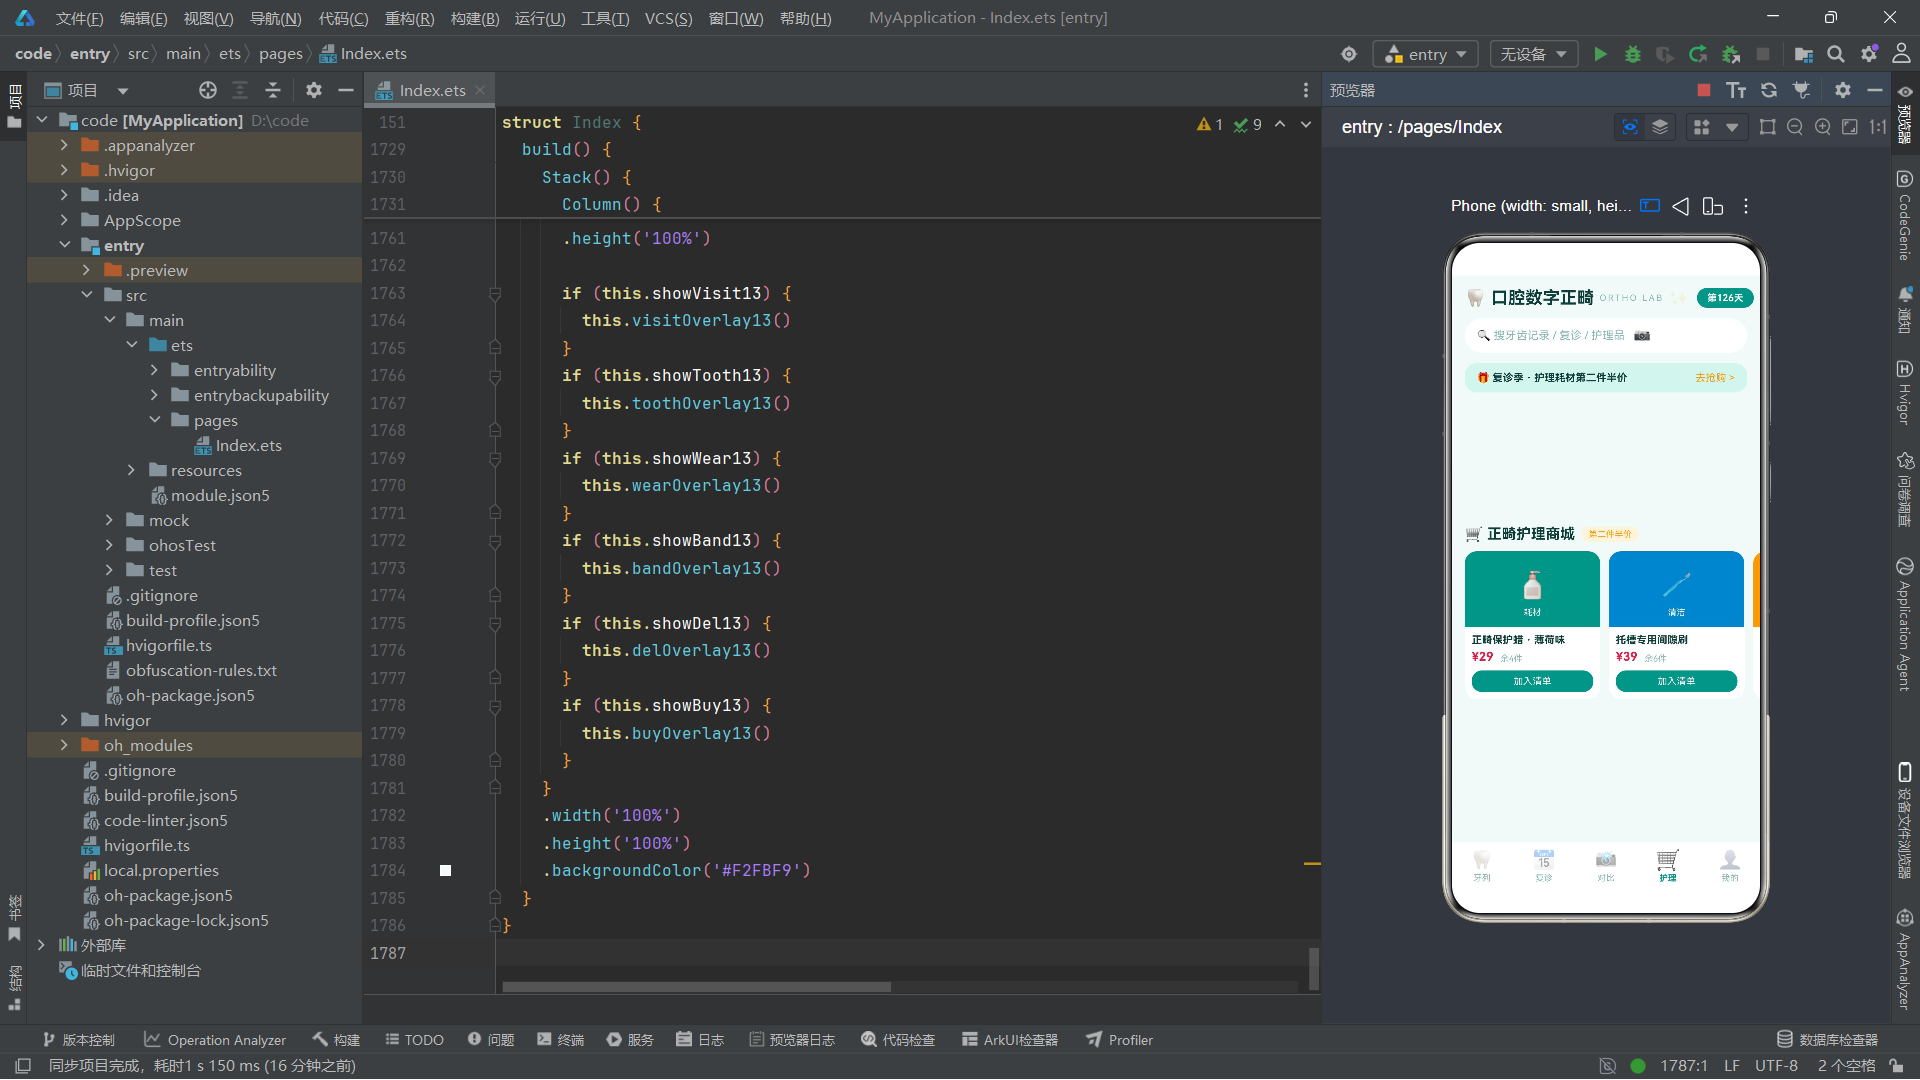
商品数据GOODS13定义了10种正畸护理商品,涵盖耗材、清洁、电器三个品类。订单数据ORDS13记录了6笔诊疗与购买订单,其中status字段有"已完成"“待制作”"待就诊"三种状态。WEAR13和WEARV13两个数组分别以字符串和数字形式记录了一周7天的皮筋佩戴时长,前者用于展示(带"h"后缀),后者用于数值计算(如柱状图宽度比例)。WK13则存储了中文星期标签。这种"展示数据"与"计算数据"的分离设计,避免了频繁的字符串解析操作,是一种以空间换时间的优化策略。
技术概念强调: 在ArkTS中,
Array<T>是泛型数组的推荐写法,等价于T[]。两者在编译后的JavaScript中完全相同,但Array<T>在泛型上下文中更具可读性,尤其在类型参数较多时(如Array<Array<ToothT13>>比ToothT13[][]更易理解)。
三、工具函数层:状态映射与条件渲染辅助
项目定义了三个工具函数,用于将数字编码映射为人类可读的文字和颜色值。这些函数是"数据-表现"分层策略中表现层的核心组件。
3.1 阶段名称与阶段颜色映射函数
function stageName13(s: number): string {
  if (s === 3) {
    return '保持'
  }
  if (s === 2) {
    return '到位'
  }
  if (s === 1) {
    return '移动中'
  }
  return '未启动'
}

function stageColor13(s: number): string {
  if (s === 3) {
    return '#0284C7'
  }
  if (s === 2) {
    return '#0D9488'
  }
  if (s === 1) {
    return '#F59E0B'
  }
  return '#CBD5E1'
}
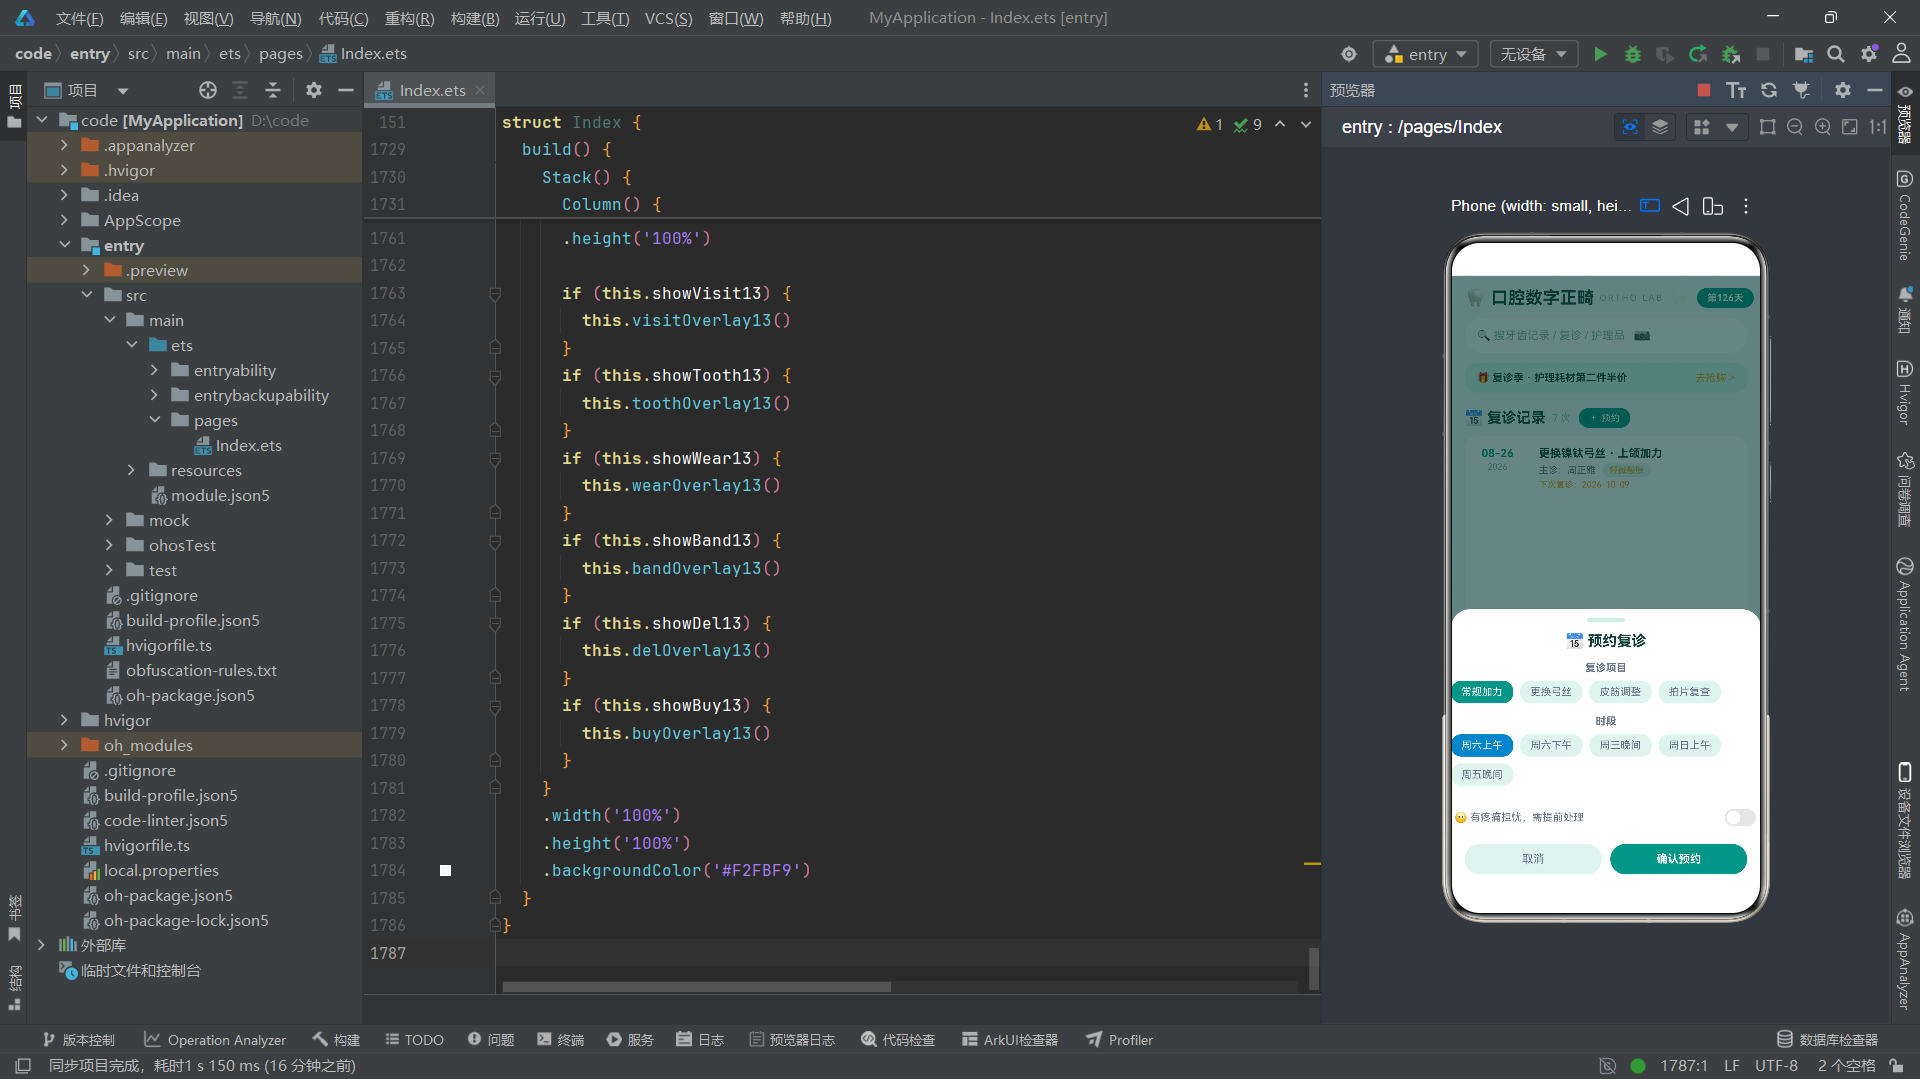
stageName13函数接收阶段数字(0-3),返回对应的中文描述字符串。stageColor13函数则返回与阶段对应的十六进制颜色值:保持阶段使用天蓝色(#0284C7),到位阶段使用青绿色(#0D9488),移动中使用琥珀色(#F59E0B),未启动使用浅灰色(#CBD5E1)。这两个函数在多处被调用——牙齿网格的颜色填充、图例展示、牙齿详情弹框中的进度条颜色等,充分体现了函数复用的设计优势。
技术概念强调: 将颜色定义为函数返回值而非常量对象,是一种灵活的设计选择。函数可以根据输入参数动态决定返回值,未来如果需要根据主题模式(深色/浅色)返回不同颜色,只需修改函数逻辑即可,所有调用点自动适配。这种"行为即配置"的思想在声明式UI框架中尤为重要。
3.2 疼痛描述映射函数
function painWord13(p: number): string {
  if (p >= 4) {
    return '明显酸痛'
  }
  if (p >= 2) {
    return '轻微酸胀'
  }
  return '无不适'
}
painWord13函数将疼痛度数字映射为描述性文字。与stageName13使用严格相等(===)不同,painWord13使用大于等于(>=)比较,这是因为疼痛度是一个连续的量化指标,而阶段是一个离散的分类编码。函数将疼痛度0-1映射为"无不适",2-3映射为"轻微酸胀",4及以上映射为"明显酸痛",这种分级映射策略使得同一数值在不同上下文中能够产生不同的语义解读。
技术概念强调: ArkTS中的函数声明使用
function关键字,与TypeScript语法完全一致。函数的参数和返回值都可以标注类型,这是ArkTS作为静态类型语言的核心优势。类型标注不仅是文档,更在编译阶段提供静态检查,防止传入错误类型的参数。在开发模式下,IDE能够基于类型标注提供精准的代码补全和错误提示,大幅提升开发效率。
四、组件入口与状态管理:@Entry、@Component与@State
4.1 组件声明与入口标记
@Entry
@Component
struct Index {
@Entry装饰器标记Index结构体为页面的入口组件。在鸿蒙ArkUI中,一个页面有且仅有一个@Entry组件,它是整个页面的渲染根节点。@Component装饰器则声明Index为一个自定义组件,使其可以被其他组件引用和复用。struct关键字是ArkTS特有的结构体声明语法,与TypeScript的class不同,struct在编译后会被优化为更高效的值类型或轻量对象,减少了面向对象封装的性能开销。
技术概念强调:
@Entry和@Component是ArkTS装饰器体系的基石。@Entry使组件获得页面级别的生命周期管理能力(如aboutToAppear、aboutToDisappear),而@Component则为结构体内的@State、@Builder等装饰器提供作用域上下文。一个没有@Component标记的struct无法使用状态管理装饰器,这是ArkTS编译器层面的强制约束。
4.2 状态变量声明
  @State tab13: number = 0
  @State teeth13: Array<ToothT13> = TEETH13.slice()
  @State visits13: Array<VisitT13> = VISITS13.slice()
  @State snaps13: Array<SnapT13> = SNAPS13.slice()
  @State goods13: Array<GoodT13> = GOODS13.slice()
  @State ords13: Array<OrdT13> = ORDS13.slice()
  @State showVisit13: boolean = false
  @State showTooth13: boolean = false
  @State showWear13: boolean = false
  @State showBand13: boolean = false
  @State showDel13: boolean = false
  @State showBuy13: boolean = false
  @State selTooth13: number = 0
  @State selSnap13: number = 0
  @State selGood13: number = 0
  @State vItem13: number = 0
  @State vSlot13: number = 0
  @State vWorry13: boolean = false
  @State wearH13: number = 20
  @State wearNote13: string = ''
  @State bandColor13: number = 0
  @State bandHour13: number = 20
  @State buyNum13: number = 1
  @State armed13: boolean = false
  @State toothY13: number = 0
  @State bracOp13: number = 1
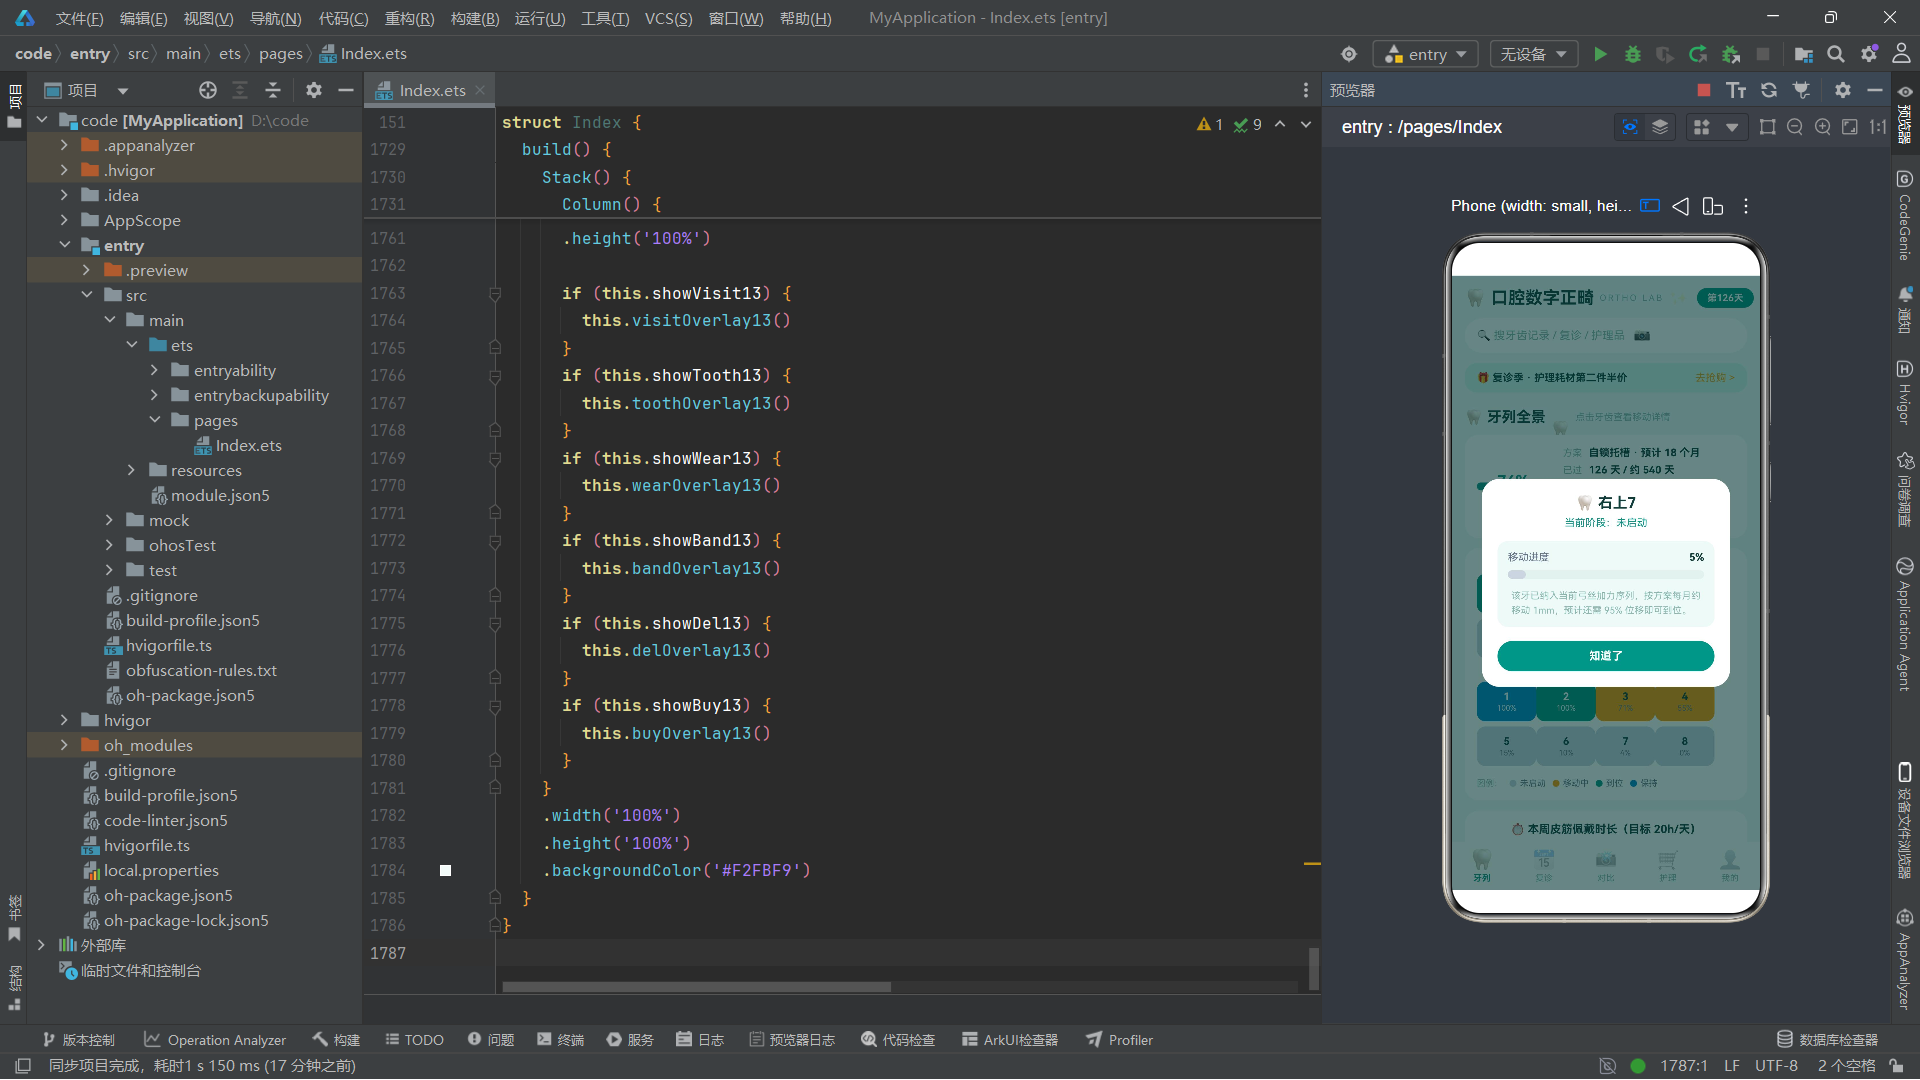
这是组件状态变量的集中声明区。@State装饰器是ArkUI状态管理体系中最基础也最重要的装饰器,它标记的变量在值发生变化时会自动触发依赖该变量的UI组件重新渲染。可以看到这里声明了大量状态变量,可以分为以下几类:
数据类状态: teeth13、visits13、snaps13、goods13、ords13,这些变量分别引用对应的数据数组。注意它们都通过.slice()方法创建了原数组的浅拷贝,这样做是为了将组件内部状态与外部常量解耦——组件对数组的修改(如删除对比照片时使用filter重建数组)不会影响原始常量数据。
弹框显隐状态: showVisit13、showTooth13、showWear13、showBand13、showDel13、showBuy13,六个布尔值分别控制六个弹框的显示与隐藏。这种"每个弹框一个布尔状态"的设计简单直观,适合弹框数量可控的场景。
选中索引状态: selTooth13、selSnap13、selGood13,分别记录当前选中的牙齿、对比照片和商品在数组中的索引位置,用于弹框中展示对应项的详细信息。
表单交互状态: vItem13、vSlot13、vWorry13用于预约复诊弹框中的项目选择、时段选择和疼痛担忧开关;wearH13、wearNote13用于记录佩戴时长的数值输入和备注文本;bandColor13、bandHour13用于皮筋计划编辑弹框中的规格选择和目标时长;buyNum13用于购买弹框中的数量选择;armed13用于删除确认弹框中的安全开关。
动画状态: toothY13和bracOp13是两个特殊的动画驱动变量,分别控制牙齿图标的垂直浮动位移和闪烁图标的不透明度。这两个变量在aboutToAppear生命周期中被设置为无限动画的目标值。
技术概念强调:
@State装饰器的工作原理是"可观察性追踪"(Observability Tracking)。当@State变量被赋新值时,ArkUI框架会比较新旧值,如果发现变化,则标记所有依赖该变量的UI组件为"脏"(dirty),在下一次渲染帧时统一重新渲染这些脏组件。这种"批量延迟更新"策略避免了频繁的逐次渲染,保证了UI更新的性能。需要注意的是,@State对数组和对象的观察是"浅层引用观察"——直接替换整个数组会触发刷新,但修改数组内部元素(如arr[0].name = 'new')需要通过整体替换方式才能确保触发。
技术概念强调:
.slice()方法创建的是"浅拷贝"。对于包含基本类型字段的对象数组,浅拷贝足够安全,因为对象内部的原始值字段不会被共享引用。但如果对象内部还包含引用类型字段(如嵌套数组或对象),则需要深拷贝才能完全隔离。在本项目中,所有接口的字段都是number和string等原始类型,因此.slice()提供的浅拷贝已经足够。
五、生命周期与动画初始化:aboutToAppear与animateTo
  aboutToAppear() {
    this.getUIContext().animateTo({ duration: 2200, iterations: -1, playMode: PlayMode.Alternate, curve: Curve.EaseInOut }, () => {
      this.toothY13 = 14
    })
    this.getUIContext().animateTo({ duration: 1200, iterations: -1, playMode: PlayMode.Alternate, curve: Curve.EaseInOut }, () => {
      this.bracOp13 = 0.25
    })
  }
aboutToAppear是ArkUI组件的生命周期回调函数,在组件实例创建后、UI渲染前被调用。这是进行初始化逻辑的理想位置——此时状态变量已经完成初始赋值,但界面尚未渲染,在此处启动动画不会产生可见的"跳变"效果。
这里通过this.getUIContext().animateTo()启动了两个无限循环动画。第一个动画将toothY13从初始值0平滑过渡到14,持续2200毫秒,iterations: -1表示无限循环,PlayMode.Alternate表示交替播放模式(正向播放完毕后反向播放,形成来回往复的效果),Curve.EaseInOut表示缓入缓出曲线(动画开始和结束时速度较慢,中间速度较快,模拟自然运动)。由于toothY13被绑定了牙齿图标的translate位移属性,这个动画实现了牙齿图标上下浮动的效果。
第二个动画将bracOp13从初始值1(完全不透明)过渡到0.25(部分透明),持续1200毫秒,同样使用无限循环和交替播放模式。由于bracOp13被绑定了闪烁图标的opacity属性,这个动画实现了图标闪烁的效果——从完全可见到半透明再回到完全可见,循环往复。
技术概念强调:
animateTo是ArkUI提供的命令式动画API,它接受一个动画配置对象和一个闭包函数。闭包中通过修改@State变量的值来定义动画的"目标状态",框架会自动在当前值与目标值之间进行插值过渡。iterations: -1表示无限循环,PlayMode.Alternate配合无限循环可以实现"来回往复"的动画效果(如浮动、闪烁、呼吸灯等),而PlayMode.Normal则会每次循环后"跳回"起始值。
技术概念强调:
aboutToAppear生命周期函数在整个组件存活期间只被调用一次,适合做一次性初始化操作。与之对应的aboutToDisappear在组件销毁前调用,适合做资源释放操作。此外还有onPageShow、onPageHide、onPageBackPress等页面级别的生命周期回调,它们在@Entry组件中可用,用于处理页面级的事件响应。
六、头部栏构建:@Builder与容器组件
  @Builder
  headerBar13() {
    Column() {
      Row() {
        Text('🦷 口腔数字正畸')
          .fontSize(20)
          .fontWeight(FontWeight.Bold)
          .fontColor('#0F3D3A')
        Text('ORTHO LAB')
          .fontSize(10)
          .fontColor('#8AB8B2')
          .letterSpacing(2)
          .margin({ left: 6 })
        Text('✨')
          .fontSize(18)
          .opacity(this.bracOp13)
          .margin({ left: 6 })
        Column() {
          Text('第126天')
            .fontSize(11)
            .fontWeight(FontWeight.Bold)
            .fontColor('#FFFFFF')
        }
        .padding({ left: 12, right: 12, top: 5, bottom: 5 })
        .borderRadius(13)
        .backgroundColor('#0D9488')
        .margin({ left: 10 })
        Text('🔔')
          .fontSize(19)
          .margin({ left: 8 })
      }
      .width('100%')
      .alignItems(VerticalAlign.Center)
@Builder装饰器声明了一个UI构建函数headerBar13,该函数封装了页面顶部头部栏的完整布局。@Builder的核心价值在于将可复用的UI片段抽取为独立函数,减少build()方法的复杂度,同时保持代码的清晰结构。
头部栏的最外层是一个Column容器组件。Column是ArkUI中的纵向线性布局容器,其子组件沿垂直方向从上到下依次排列。Column内部嵌套的第一个子组件是一个Row容器——Row是横向线性布局容器,子组件沿水平方向从左到右排列。这个Row包含了应用标题、副标题、闪烁动画图标、天数标签和通知铃铛图标。
其中闪烁图标Text('✨')的opacity属性绑定了this.bracOp13状态变量,这是前面aboutToAppear中启动的动画的直接消费点。当bracOp13在1和0.25之间往复变化时,这个图标的透明度也随之变化,形成闪烁效果。
天数标签使用了Column包裹Text的方式实现,而不是直接给Text设置背景色和内边距。这是因为ArkUI中Text组件虽然可以直接设置样式,但使用Column包裹可以实现更精确的圆角裁剪控制——Column的borderRadius属性会裁剪其内部所有内容,而直接给Text设置borderRadius在某些渲染路径下可能无法完美裁剪背景。
技术概念强调:
@Builder装饰的函数与普通函数有本质区别。@Builder函数的内容会在编译时被展开为内联的UI声明,因此它没有运行时函数调用的开销。同时,@Builder函数内部可以通过this访问组件的状态变量,享有完整的上下文绑定能力。这使得@Builder成为ArkTS中实现UI复用的首选方案,既避免了重复代码,又不牺牲运行时性能。
继续看头部栏的下半部分:
      Row() {
        Text('🔍 搜牙齿记录 / 复诊 / 护理品')
          .fontSize(13)
          .fontColor('#8AB8B2')
        Text('📷')
          .fontSize(16)
          .margin({ left: 10 })
      }
      .width('100%')
      .height(40)
      .borderRadius(20)
      .backgroundColor('#FFFFFF')
      .padding({ left: 14, right: 12 })
      .alignItems(VerticalAlign.Center)
      .margin({ top: 12 })

      Row() {
        Text('🎁 复诊季 · 护理耗材第二件半价')
          .fontSize(12)
          .fontWeight(FontWeight.Bold)
          .fontColor('#0F3D3A')
          .layoutWeight(1)
        Text('去抢购 >')
          .fontSize(12)
          .fontColor('#F59E0B')
          .onClick(() => {
            this.tab13 = 3
          })
      }
      .width('100%')
      .padding({ left: 14, right: 14, top: 10, bottom: 10 })
      .borderRadius(14)
      .backgroundColor('#D9F5EE')
      .alignItems(VerticalAlign.Center)
      .margin({ top: 12 })
    }
    .width('100%')
    .padding({ left: 16, right: 16, top: 14, bottom: 8 })
    .backgroundColor('#F2FBF9')
  }
头部栏的第二个Row实现了一个搜索栏样式的区域,设置了40的高度和20的圆角半径(高度的一半,形成完整的圆角胶囊形状)。这个搜索栏目前只是一个视觉占位,没有实际的搜索功能实现。
第三个Row是促销信息条,使用薄荷绿色背景(#D9F5EE)。其中"去抢购"文本的onClick回调将this.tab13设置为3,即切换到护理商品Tab页。这是Tab切换的一种实现方式——通过修改@State变量tab13的值,触发build()方法中的条件渲染逻辑重新执行,从而展示对应Tab的内容。
技术概念强调:
layoutWeight属性是ArkUI线性布局中的权重分配机制。在这个促销条中,促销文案设置了layoutWeight(1),而"去抢购"按钮没有设置layoutWeight(默认为0)。这意味着促销文案会占据Row中除"去抢购"按钮宽度之外的所有剩余空间,实现"文案弹性填充、按钮固定宽度"的布局效果。layoutWeight的值表示权重比例而非绝对像素值,多个子组件可以设置不同的权重值来按比例分配剩余空间。
七、牙列网格构建:可复用Builder与ForEach列表渲染
7.1 单颗牙齿网格构建器
  @Builder
  toothGrid13(t: ToothT13) {
    Column() {
      Text(t.name.slice(2))
        .fontSize(12)
        .fontWeight(FontWeight.Bold)
        .fontColor(t.stage >= 2 ? '#FFFFFF' : '#0F3D3A')
      Text(t.move.toString() + '%')
        .fontSize(9)
        .fontColor(t.stage >= 2 ? '#E6FBF6' : '#64748B')
        .margin({ top: 1 })
    }
    .width('23%')
    .height(46)
    .borderRadius(10)
    .justifyContent(FlexAlign.Center)
    .backgroundColor(stageColor13(t.stage))
    .margin({ bottom: 6 })
    .onClick(() => {
      this.selTooth13 = t.id - 1
      this.showTooth13 = true
    })
  }
toothGrid13是一个接收ToothT13参数的@Builder函数,用于渲染单颗牙齿的网格单元。这种"参数化Builder"设计使得同一套渲染逻辑可以被多个位置复用,无需重复编写。
函数内部使用Column容器,包含两行文本:牙齿编号(通过t.name.slice(2)截取名称的后半部分,如"右上1"截取为"1")和移动进度百分比。文本颜色根据阶段动态选择——当stage >= 2(到位或保持)时使用白色系文字(搭配深色背景),否则使用深色系文字(搭配浅色背景)。
背景色通过调用stageColor13(t.stage)动态获取,实现了四阶段四色编码的视觉区分。onClick回调将选中索引设置为t.id - 1(数组索引从0开始,而id从1开始),并打开牙齿详情弹框。
技术概念强调:
@Builder函数支持参数传递是ArkTS相较于普通声明式框架的一项重要扩展。通过参数化Builder,开发者可以实现类似于"组件工厂"的模式——同一段UI构建逻辑可以根据不同的数据参数生成不同的视觉表现。这在列表项渲染、卡片复用等场景中极为实用,避免了为每种数据类型都编写独立的Builder函数。
7.2 牙列Tab页:进度环、方案信息与牙列网格
  @Builder
  tabTeeth13() {
    Column() {
      Row() {
        Text('🦷 牙列全景')
          .fontSize(17)
          .fontWeight(FontWeight.Bold)
          .fontColor('#0F3D3A')
        Text('🦷')
          .fontSize(18)
          .translate({ y: this.toothY13 })
          .margin({ left: 6 })
        Text('点击牙齿查看移动详情')
          .fontSize(11)
          .fontColor('#8AB8B2')
          .margin({ left: 6 })
      }
      .width('100%')
      .alignItems(VerticalAlign.Center)
      .margin({ bottom: 10 })
牙列Tab页的标题区域中,第二个Text('🦷')设置了translate({ y: this.toothY13 })位移变换,绑定了前面动画驱动的toothY13状态变量。当toothY13在0和14之间往复变化时,这个牙齿图标会产生上下浮动的动画效果。translate变换不会影响布局空间(与margin不同,它是在布局完成后进行的视觉变换),因此不会导致周围组件位置抖动。
技术概念强调:
translate是ArkUI的仿射变换(Affine Transform)属性之一,用于在不改变元素布局位置的前提下进行视觉位移。与position(绝对定位)不同,translate不影响文档流中其他元素的位置,是一种纯粹的视觉渲染变换。这使得它特别适合用于动画场景——通过animateTo驱动translate值的变化,可以在不影响布局的前提下实现流畅的位移动画效果。
接下来是进度卡片区域,使用了Stack层叠布局来实现环形进度指示器:
      Row() {
        Column() {
          Stack() {
            Progress({ value: 76, total: 100 })
              .style({ strokeWidth: 9 })
              .color('#0D9488')
              .backgroundColor('#E2F3EF')
              .width(84)
              .height(84)
            Column() {
              Text('76%')
                .fontSize(18)
                .fontWeight(FontWeight.Bold)
                .fontColor('#0D9488')
              Text('总进度')
                .fontSize(9)
                .fontColor('#8AB8B2')
                .margin({ top: 2 })
            }
            .justifyContent(FlexAlign.Center)
          }
          .width(84)
          .height(84)
        }
        .justifyContent(FlexAlign.Center)
Stack是ArkUI的层叠布局容器,其子组件沿Z轴方向层叠排列(后声明的子组件在上层)。这里使用Stack将Progress环形进度条和一个Column(包含百分比文字和"总进度"标签)层叠在一起,形成"圆环外框 + 中心文字"的经典环形进度组件。
Progress组件是ArkUI内置的进度指示器组件,通过value和total属性配置当前值和总量。当type未指定时,默认使用环形样式(ProgressType.Ring)。style({ strokeWidth: 9 })设置环形线条的宽度为9像素,color设置进度填充色,backgroundColor设置轨道底色。
技术概念强调:
Stack层叠布局是ArkUI中实现"叠加"效果的核心容器。常见的使用场景包括:图标叠加角标、图片叠加渐变蒙版、进度环叠加中心文字等。Stack的子组件默认居中对齐,但可以通过alignContent属性修改对齐方式。子组件的层叠顺序遵循"后声明在上"的规则,这一点在实现多层叠加时需要特别注意。
继续看进度卡片的右侧信息区和牙列网格:
        Column() {
          Row() {
            Text('方案')
              .fontSize(11)
              .fontColor('#8AB8B2')
            Text('自锁托槽 · 预计 18 个月')
              .fontSize(12)
              .fontWeight(FontWeight.Bold)
              .fontColor('#0F3D3A')
              .margin({ left: 8 })
          }
          .width('100%')
          Row() {
            Text('已过')
              .fontSize(11)
              .fontColor('#8AB8B2')
            Text('126 天 / 约 540 天')
              .fontSize(12)
              .fontWeight(FontWeight.Bold)
              .fontColor('#0F3D3A')
              .margin({ left: 8 })
          }
          .width('100%')
          .margin({ top: 6 })
          Row() {
            Text('下次复诊')
              .fontSize(11)
              .fontColor('#8AB8B2')
            Text('10-09 · 下颌加力')
              .fontSize(12)
              .fontWeight(FontWeight.Bold)
              .fontColor('#F59E0B')
              .margin({ left: 8 })
          }
          .width('100%')
          .margin({ top: 6 })
          Text('预约复诊')
            .fontSize(12)
            .fontColor('#FFFFFF')
            .padding({ left: 18, right: 18, top: 7, bottom: 7 })
            .borderRadius(15)
            .backgroundColor('#0D9488')
            .margin({ top: 10 })
            .onClick(() => {
              this.vItem13 = 0
              this.vSlot13 = 0
              this.vWorry13 = false
              this.showVisit13 = true
            })
        }
        .layoutWeight(1)
        .alignItems(HorizontalAlign.Start)
        .padding({ left: 16 })
      }
      .width('100%')
      .padding(14)
      .borderRadius(16)
      .backgroundColor('#FFFFFF')
      .alignItems(VerticalAlign.Center)
      .margin({ bottom: 12 })
右侧信息区使用Column容器,设置了layoutWeight(1)来占据左侧进度环之外的所有水平空间。这个信息区包含三行"标签-值"对和底部的"预约复诊"按钮。每行的Row中,标签使用浅色小字,值使用深色粗体字,形成清晰的层次对比。"预约复诊"按钮的onClick回调在打开弹框前先重置了表单状态(vItem13、vSlot13、vWorry13),确保每次打开弹框时表单都是初始状态。
技术概念强调:
layoutWeight(1)配合alignItems(HorizontalAlign.Start)是一个经典的组合模式。layoutWeight(1)让Column占据剩余空间使其内容有足够宽度展示,而alignItems(HorizontalAlign.Start)让内部子组件左对齐,符合信息阅读从左到右的习惯。如果不设置layoutWeight,Column宽度会根据内容自适应,可能导致长文本被截断或布局错位。
接下来是上下颌牙列网格的渲染:
      Column() {
        Text('上颌牙列 · 右侧')
          .fontSize(13)
          .fontWeight(FontWeight.Bold)
          .fontColor('#0F3D3A')
        Flex({ wrap: FlexWrap.Wrap }) {
          ForEach(this.teeth13.slice(0, 8), (t: ToothT13) => {
            this.toothGrid13(t)
          }, (t: ToothT13) => t.id.toString() + t.stage.toString())
        }
        .width('100%')

        Text('上颌牙列 · 左侧')
          .fontSize(13)
          .fontWeight(FontWeight.Bold)
          .fontColor('#0F3D3A')
          .margin({ top: 6 })
        Flex({ wrap: FlexWrap.Wrap }) {
          ForEach(this.teeth13.slice(8), (t: ToothT13) => {
            this.toothGrid13(t)
          }, (t: ToothT13) => t.id.toString() + t.stage.toString())
        }
        .width('100%')

        Row() {
          Text('图例:')
            .fontSize(10)
            .fontColor('#8AB8B2')
          ForEach(['未启动', '移动中', '到位', '保持'], (s: string, i: number) => {
            Row() {
              Row()
                .width(8)
                .height(8)
                .borderRadius(4)
                .backgroundColor(stageColor13(i))
              Text(s)
                .fontSize(10)
                .fontColor('#64748B')
                .margin({ left: 4 })
            }
            .margin({ left: 8 })
          }, (s: string) => s)
        }
        .width('100%')
        .margin({ top: 8 })
      }
      .width('100%')
      .padding(14)
      .borderRadius(16)
      .backgroundColor('#FFFFFF')
      .margin({ bottom: 12 })
牙列网格使用Flex({ wrap: FlexWrap.Wrap })弹性布局容器,设置wrap: FlexWrap.Wrap表示子组件在主轴方向排满后自动换行。16颗上颌牙齿分为右侧8颗(slice(0, 8))和左侧8颗(slice(8))两组,分别用两个Flex容器渲染。
ForEach是ArkUI的列表渲染组件,接受三个参数:数据源数组、子组件生成函数和键值生成函数。子组件生成函数(t: ToothT13) => { this.toothGrid13(t) }为每个数据项调用toothGrid13 Builder来渲染UI。键值生成函数(t: ToothT13) => t.id.toString() + t.stage.toString()为每个项生成唯一标识符,框架据此进行Diff算法——当数据变化时,只有键值发生变化的项才会被重新渲染,未变化的项保持不动,这大幅提升了列表更新性能。
图例区域使用ForEach遍历字符串数组['未启动', '移动中', '到位', '保持'],配合索引i调用stageColor13(i)生成对应颜色的小圆点。
技术概念强调:
ForEach是ArkUI实现动态列表渲染的核心组件,类似于前端框架中的map或v-for。它的三个参数中,键值生成函数(第三个参数)尤为重要——它决定了Diff算法如何识别列表项的唯一性。如果键值生成不当(如使用索引作为键值),在列表项增删时可能导致状态错乱或性能下降。最佳实践是使用数据项中具有业务语义的唯一字段组合作为键值。
技术概念强调:
Flex组件是ArkUI对CSS Flexbox模型的实现。FlexWrap.Wrap表示允许换行,FlexWrap.NoWrap表示不换行。与Row和Column相比,Flex提供了更灵活的布局控制能力,包括direction(主轴方向)、justifyContent(主轴对齐)、alignItems(交叉轴对齐)和wrap(换行策略)。在需要自动换行的场景中,Flex比Row更合适,因为Row不支持自动换行。
7.3 佩戴时长横条图
      Column() {
        Text('⏱️ 本周皮筋佩戴时长(目标 20h/天)')
          .fontSize(13)
          .fontWeight(FontWeight.Bold)
          .fontColor('#0F3D3A')
        ForEach(WEAR13, (w: string, i: number) => {
          Row() {
            Text(WK13[i])
              .fontSize(11)
              .fontColor('#64748B')
              .width(38)
            Row() {
              Row()
                .width((WEARV13[i] * 100 / 24).toString() + '%')
                .height(12)
                .borderRadius(6)
                .backgroundColor(WEARV13[i] >= 20 ? '#0D9488' : '#F59E0B')
            }
            .layoutWeight(1)
            .height(12)
            .borderRadius(6)
            .backgroundColor('#E2F3EF')
            Text(w)
              .fontSize(11)
              .fontColor(WEARV13[i] >= 20 ? '#0D9488' : '#F59E0B')
              .fontWeight(FontWeight.Bold)
              .width(36)
              .textAlign(TextAlign.End)
          }
          .width('100%')
          .alignItems(VerticalAlign.Center)
          .margin({ top: 8 })
        }, (w: string, i: number) => w + i.toString())
        Row() {
          Text('今日佩戴')
            .fontSize(11)
            .fontColor('#8AB8B2')
            .layoutWeight(1)
          Text('记一笔')
            .fontSize(11)
            .fontColor('#FFFFFF')
            .padding({ left: 14, right: 14, top: 5, bottom: 5 })
            .borderRadius(12)
            .backgroundColor('#0284C7')
            .onClick(() => {
              this.wearH13 = 20
              this.wearNote13 = ''
              this.showWear13 = true
            })
        }
        .width('100%')
        .alignItems(VerticalAlign.Center)
        .margin({ top: 12 })
      }
      .width('100%')
      .padding(14)
      .borderRadius(16)
      .backgroundColor('#FFFFFF')
      .margin({ bottom: 12 })
    }
    .width('100%')
  }
佩戴时长横条图是一个自定义的柱状图实现。每一行包含星期标签、进度条和时长数值。进度条使用嵌套Row实现——外层Row设置了浅色背景(#E2F3EF)和layoutWeight(1)占据中间空间,内层Row通过宽度百分比(WEARV13[i] * 100 / 24).toString() + '%'来表示数据值的比例,使用深色背景(达标用青绿色,未达标用琥珀色)。这种"外层轨道+内层填充"的双层结构正是传统进度条组件的经典实现原理。
技术概念强调: 这段代码展示了一种无需图表库即可实现简单柱状图的方法。通过将数值映射为百分比宽度,配合容器背景色和填充色,就能实现直观的数据可视化。这种方法的优点是轻量、灵活、完全可控;缺点是无法实现复杂图表(如折线图、饼图)需要时还需借助专门的图表组件或Canvas绘制。在数据量不大的场景中,这种"CSS式图表"是非常实用的选择。
八、复诊记录Tab页:时间轴布局与条件样式
  @Builder
  tabVisits13() {
    Column() {
      Row() {
        Text('📅 复诊记录')
          .fontSize(17)
          .fontWeight(FontWeight.Bold)
          .fontColor('#0F3D3A')
        Text(this.visits13.length.toString() + ' 次')
          .fontSize(11)
          .fontColor('#8AB8B2')
          .margin({ left: 8 })
        Text('+ 预约')
          .fontSize(11)
          .fontColor('#FFFFFF')
          .padding({ left: 12, right: 12, top: 5, bottom: 5 })
          .borderRadius(12)
          .backgroundColor('#0D9488')
          .margin({ left: 10 })
          .onClick(() => {
            this.vItem13 = 0
            this.vSlot13 = 0
            this.vWorry13 = false
            this.showVisit13 = true
          })
      }
      .width('100%')
      .alignItems(VerticalAlign.Center)
      .margin({ bottom: 10 })
复诊记录Tab页的标题区域使用Row横向排列标题、次数标签和"预约"按钮。次数标签Text(this.visits13.length.toString() + ' 次')动态读取visits13数组的长度,当复诊记录增删时此数字会自动更新——这是@State状态驱动UI刷新的直接体现。
接下来是复诊记录列表的时间轴布局:
      ForEach(this.visits13, (v: VisitT13) => {
        Row() {
          Column() {
            Text(v.date.slice(5))
              .fontSize(13)
              .fontWeight(FontWeight.Bold)
              .fontColor('#0D9488')
            Text(v.date.slice(0, 4))
              .fontSize(10)
              .fontColor('#8AB8B2')
              .margin({ top: 2 })
          }
          .width(52)
          .alignItems(HorizontalAlign.Center)

          Column() {
            Row() {
              Circle({ width: 10, height: 10 })
                .fill('#0D9488')
              Column()
                .width(2)
                .layoutWeight(1)
                .backgroundColor('#D5EDE8')
                .margin({ top: 4 })
            }
            .width(12)
            .height('100%')
          }
          .width(14)
          .height('100%')

          Column() {
            Text(v.act)
              .fontSize(13)
              .fontWeight(FontWeight.Bold)
              .fontColor('#0F3D3A')
            Row() {
              Text('主诊:' + v.doctor)
                .fontSize(11)
                .fontColor('#64748B')
              Text(painWord13(v.pain))
                .fontSize(10)
                .fontColor(v.pain >= 4 ? '#E11D48' : (v.pain >= 2 ? '#F59E0B' : '#0D9488'))
                .padding({ left: 8, right: 8, top: 2, bottom: 2 })
                .borderRadius(8)
                .backgroundColor('#E2F3EF')
                .margin({ left: 8 })
            }
            .width('100%')
            .alignItems(VerticalAlign.Center)
            .margin({ top: 4 })
            Text('下次复诊:' + v.next)
              .fontSize(10)
              .fontColor('#F59E0B')
              .margin({ top: 3 })
          }
          .layoutWeight(1)
          .alignItems(HorizontalAlign.Start)
          .padding({ left: 8 })
        }
        .width('100%')
        .alignItems(VerticalAlign.Top)
        .padding(12)
        .borderRadius(14)
        .backgroundColor('#FFFFFF')
        .margin({ bottom: 10 })
      }, (v: VisitT13) => v.id.toString())
    }
    .width('100%')
  }
每条复诊记录使用三列布局:左侧日期列(固定52像素宽度,使用slice方法截取日期的月日部分和年份分别显示)、中间时间轴线列(使用Circle组件绘制圆点和Column绘制竖线,形成时间轴的视觉效果)、右侧内容列(使用layoutWeight(1)占据剩余空间,显示操作内容、医生信息和疼痛标签)。
时间轴的竖线使用了一个Column组件,设置width(2)和layoutWeight(1),layoutWeight(1)让它占据Column容器中圆点以下的所有垂直空间,形成从圆点延伸到底部的竖线效果。这种"圆点+竖线"的视觉模式是时间轴设计的经典手法。
疼痛标签的颜色使用嵌套三元表达式动态选择:疼痛度大于等于4时使用红色(#E11D48),大于等于2时使用琥珀色(#F59E0B),否则使用青绿色(#0D9488)。这种多级条件样式使得不同严重程度的疼痛一眼可辨。
技术概念强调:
Circle是ArkUI的绘制组件之一,用于绘制圆形。它接受width和height参数定义尺寸,通过fill方法设置填充色。除了Circle,ArkUI还提供了Ellipse(椭圆)、Line(直线)、Polyline(折线)、Polygon(多边形)、Path(自定义路径)等绘制组件,它们基于Canvas绘制能力,可以在无需图片资源的情况下实现各种几何图形。
技术概念强调: 在ArkTS中,字符串的
slice方法与JavaScript完全一致——slice(5)表示从索引5开始截取到末尾,slice(0, 4)表示截取索引0到4(不含4)的子串。这在日期格式化中非常实用,例如将"2026-08-26"截取为"08-26"(月日)和"2026"(年份)两部分分别渲染。
九、对比照片Tab页:柱状图与卡片列表
9.1 整齐度趋势柱状图
  @Builder
  tabSnaps13() {
    Column() {
      Row() {
        Text('📸 变化对比')
          .fontSize(17)
          .fontWeight(FontWeight.Bold)
          .fontColor('#0F3D3A')
        Text('整齐度趋势')
          .fontSize(11)
          .fontColor('#8AB8B2')
          .margin({ left: 8 })
      }
      .width('100%')
      .margin({ bottom: 10 })

      Column() {
        Text('整齐度评分(0-100)')
          .fontSize(12)
          .fontWeight(FontWeight.Bold)
          .fontColor('#0F3D3A')
        Row({ space: 8 }) {
          ForEach(this.snaps13, (s: SnapT13) => {
            Column() {
              Row()
                .width(13)
                .height(s.score * 1.1)
                .borderRadius(4)
                .backgroundColor(s.score >= 70 ? '#0D9488' : '#F59E0B')
              Text(s.days.toString() + 'd')
                .fontSize(8)
                .fontColor('#8AB8B2')
                .margin({ top: 3 })
            }
            .alignItems(HorizontalAlign.Center)
          }, (s: SnapT13) => s.id.toString() + s.score.toString())
        }
        .alignItems(VerticalAlign.Bottom)
        .height(96)
        .width('100%')
        .justifyContent(FlexAlign.Center)
        .margin({ top: 8 })
      }
      .width('100%')
      .padding(14)
      .borderRadius(16)
      .backgroundColor('#FFFFFF')
      .margin({ bottom: 12 })
整齐度趋势柱状图使用Row({ space: 8 })容器实现水平排列的柱子,space: 8设置子组件之间的间距为8像素。每根柱子是一个Column容器,内含一个Row矩形(宽度13像素,高度为s.score * 1.1像素)和底部的天数标签。柱子颜色根据评分是否达到70分阈值选择青绿色或琥珀色。Row容器设置了alignItems(VerticalAlign.Bottom),使所有柱子底部对齐,形成标准的柱状图视觉效果。
技术概念强调:
Row({ space: 8 })构造函数中的space参数设置子组件的主轴间距,等价于在每个子组件之间插入8像素的间隙。这比为每个子组件单独设置margin更简洁高效。Column组件也支持space参数,用于设置垂直方向的子组件间距。
9.2 对比照片卡片列表
      ForEach(this.snaps13, (s: SnapT13) => {
        Column() {
          Row() {
            Text('🦷 第 ' + s.days.toString() + ' 天')
              .fontSize(14)
              .fontWeight(FontWeight.Bold)
              .fontColor('#0F3D3A')
            Text(s.date)
              .fontSize(11)
              .fontColor('#8AB8B2')
              .margin({ left: 10 })
            Text('🗑️')
              .fontSize(15)
              .margin({ left: 10 })
              .onClick(() => {
                this.selSnap13 = s.id - 1
                this.armed13 = false
                this.showDel13 = true
              })
          }
          .width('100%')
          .alignItems(VerticalAlign.Center)

          Row() {
            Column() {
              Text('🫥')
                .fontSize(28)
                .margin({ top: 8 })
              Text('正面')
                .fontSize(10)
                .fontColor('#8AB8B2')
                .margin({ top: 4 })
            }
            .layoutWeight(1)
            .height(84)
            .borderRadius(12)
            .backgroundColor('#E2F3EF')
            .justifyContent(FlexAlign.Center)
            .alignItems(HorizontalAlign.Center)

            Column() {
              Text('↔️')
                .fontSize(28)
                .margin({ top: 8 })
              Text('侧面')
                .fontSize(10)
                .fontColor('#8AB8B2')
                .margin({ top: 4 })
            }
            .layoutWeight(1)
            .height(84)
            .borderRadius(12)
            .backgroundColor('#E2F3EF')
            .justifyContent(FlexAlign.Center)
            .alignItems(HorizontalAlign.Center)
            .margin({ left: 10 })
          }
          .width('100%')
          .margin({ top: 10 })

          Row() {
            Text('整齐度 ' + s.score.toString())
              .fontSize(12)
              .fontWeight(FontWeight.Bold)
              .fontColor('#0D9488')
            Text('缝隙 ' + s.gap.toString() + 'mm')
              .fontSize(12)
              .fontColor('#0284C7')
              .margin({ left: 12 })
            Text(s.note)
              .fontSize(11)
              .fontColor('#8AB8B2')
              .layoutWeight(1)
              .textAlign(TextAlign.End)
              .maxLines(1)
              .textOverflow({ overflow: TextOverflow.Ellipsis })
          }
          .width('100%')
          .alignItems(VerticalAlign.Center)
          .margin({ top: 10 })
        }
        .width('100%')
        .padding(12)
        .borderRadius(14)
        .backgroundColor('#FFFFFF')
        .margin({ bottom: 10 })
      }, (s: SnapT13) => s.id.toString())
    }
    .width('100%')
  }
每张对比照片卡片包含三个部分:标题行(天数、日期、删除按钮)、照片预览区(正面和侧面两个占位区域,使用layoutWeight(1)平分空间)和数据行(整齐度、缝隙宽度和备注文字)。
照片预览区使用两个Column容器分别占位,每个设置layoutWeight(1)实现等宽分布。这里用Emoji代替实际照片,配合"正面""侧面"标签形成照片占位符的视觉效果。
数据行中的备注文字设置了maxLines(1)和textOverflow({ overflow: TextOverflow.Ellipsis }),表示最多显示一行,超出部分以省略号截断。这保证了长备注不会破坏卡片布局的整齐性。
删除按钮的onClick回调先记录选中索引、重置安全开关状态,然后打开删除确认弹框——这种"先选后删"的设计模式确保用户不会误删照片。
技术概念强调:
maxLines和textOverflow是ArkUI文本组件的两个重要属性。maxLines限制文本显示的最大行数,textOverflow设置溢出时的处理方式(TextOverflow.Ellipsis为省略号截断,TextOverflow.Clip为直接裁剪)。这两个属性配合使用,可以在固定高度的容器中优雅地处理变长文本,避免布局溢出问题。
十、护理商品Tab页:商品卡片网格与分类图标
  @Builder
  tabGoods13() {
    Column() {
      Row() {
        Text('🛒 正畸护理商城')
          .fontSize(17)
          .fontWeight(FontWeight.Bold)
          .fontColor('#0F3D3A')
        Text('第二件半价')
          .fontSize(10)
          .fontColor('#F59E0B')
          .padding({ left: 8, right: 8, top: 3, bottom: 3 })
          .borderRadius(9)
          .backgroundColor('#FDF3DC')
          .margin({ left: 8 })
      }
      .width('100%')
      .margin({ bottom: 10 })

      Row({ space: 10 }) {
        ForEach(this.goods13, (g: GoodT13) => {
          Column() {
            Column() {
              Text(g.cat === '电器' ? '💧' : (g.cat === '清洁' ? '🪥' : '🧴'))
                .fontSize(30)
                .margin({ top: 12 })
              Text(g.cat)
                .fontSize(10)
                .fontColor('#FFFFFF')
                .padding({ left: 8, right: 8, top: 2, bottom: 2 })
                .borderRadius(8)
                .backgroundColor('#0000001A')
                .margin({ top: 6 })
            }
            .width('100%')
            .height(88)
            .borderRadius({ topLeft: 14, topRight: 14 })
            .justifyContent(FlexAlign.Center)
            .alignItems(HorizontalAlign.Center)
            .backgroundColor(g.id % 3 === 1 ? '#0D9488' : (g.id % 3 === 2 ? '#0284C7' : '#F59E0B'))

            Column() {
              Text(g.name)
                .fontSize(12)
                .fontWeight(FontWeight.Bold)
                .fontColor('#0F3D3A')
                .maxLines(1)
                .textOverflow({ overflow: TextOverflow.Ellipsis })
              Row() {
                Text('¥' + g.price.toString())
                  .fontSize(14)
                  .fontWeight(FontWeight.Bold)
                  .fontColor('#E11D48')
                Text('余' + g.stock.toString() + '件')
                  .fontSize(10)
                  .fontColor('#8AB8B2')
                  .margin({ left: 8 })
              }
              .width('100%')
              .alignItems(VerticalAlign.Bottom)
              .margin({ top: 4 })
              Text('加入清单')
                .fontSize(11)
                .fontColor('#FFFFFF')
                .width('100%')
                .textAlign(TextAlign.Center)
                .padding({ top: 6, bottom: 6 })
                .borderRadius(12)
                .backgroundColor('#0D9488')
                .margin({ top: 8 })
                .onClick(() => {
                  this.selGood13 = g.id - 1
                  this.buyNum13 = 1
                  this.showBuy13 = true
                })
            }
            .width('100%')
            .alignItems(HorizontalAlign.Start)
            .padding(8)
          }
          .width('48%')
          .borderRadius(14)
          .backgroundColor('#FFFFFF')
          .margin({ bottom: 10 })
        }, (g: GoodT13) => g.id.toString() + g.stock.toString())
      }
      .width('100%')
    }
    .width('100%')
  }
商品Tab页使用Row({ space: 10 })容器实现两列商品卡片布局。每个卡片宽度设置为'48%',配合10像素间距,刚好实现两列排列(48% + 48% + 间距 ≈ 100%)。
商品卡片分为两部分:顶部图标区(高度88像素,使用分类Emoji和分类标签,背景色通过g.id % 3取模运算在三种颜色间循环)和底部信息区(商品名称、价格、库存和"加入清单"按钮)。
分类Emoji使用嵌套三元表达式根据g.cat字段动态选择:电器类用水滴(💧),清洁类用牙刷(🪥),耗材类用瓶子(🧴)。这种用Emoji代替真实图片的方式适合快速原型开发,减少了图片资源的管理成本。
技术概念强调:
borderRadius({ topLeft: 14, topRight: 14 })是ArkUI圆角设置的一种精细控制方式。通过对象参数可以分别设置四个角的圆角半径,实现如"上方圆角、下方直角"或"上方直角、下方圆角"等非对称圆角效果。这在卡片设计中非常常用——卡片顶部跟随图片区域圆角,底部跟随信息区域保持直角,形成视觉层次感。
技术概念强调:
g.id % 3取模运算是实现"循环颜色分配"的经典技巧。当列表项需要按固定模式循环使用几种颜色时,取模运算可以高效地实现这一需求。id % 3 === 1匹配第一色,id % 3 === 2匹配第二色,id % 3 === 0匹配第三色,循环往复。
十一、我的Tab页:用户信息、统计数据与订单列表
  @Builder
  tabMine13() {
    Column() {
      Row() {
        Column() {
          Text('😀')
            .fontSize(30)
        }
        .width(58)
        .height(58)
        .borderRadius(29)
        .backgroundColor('#D9F5EE')
        .justifyContent(FlexAlign.Center)

        Column() {
          Text('沈皓')
            .fontSize(17)
            .fontWeight(FontWeight.Bold)
            .fontColor('#0F3D3A')
          Text('正畸阶段:排齐收缝期 · 剩余约 414 天')
            .fontSize(11)
            .fontColor('#8AB8B2')
            .margin({ top: 4 })
        }
        .layoutWeight(1)
        .alignItems(HorizontalAlign.Start)
        .padding({ left: 12 })

        Text('档案 >')
          .fontSize(12)
          .fontColor('#0D9488')
      }
      .width('100%')
      .padding(14)
      .borderRadius(16)
      .backgroundColor('#FFFFFF')
      .alignItems(VerticalAlign.Center)
      .margin({ bottom: 12 })
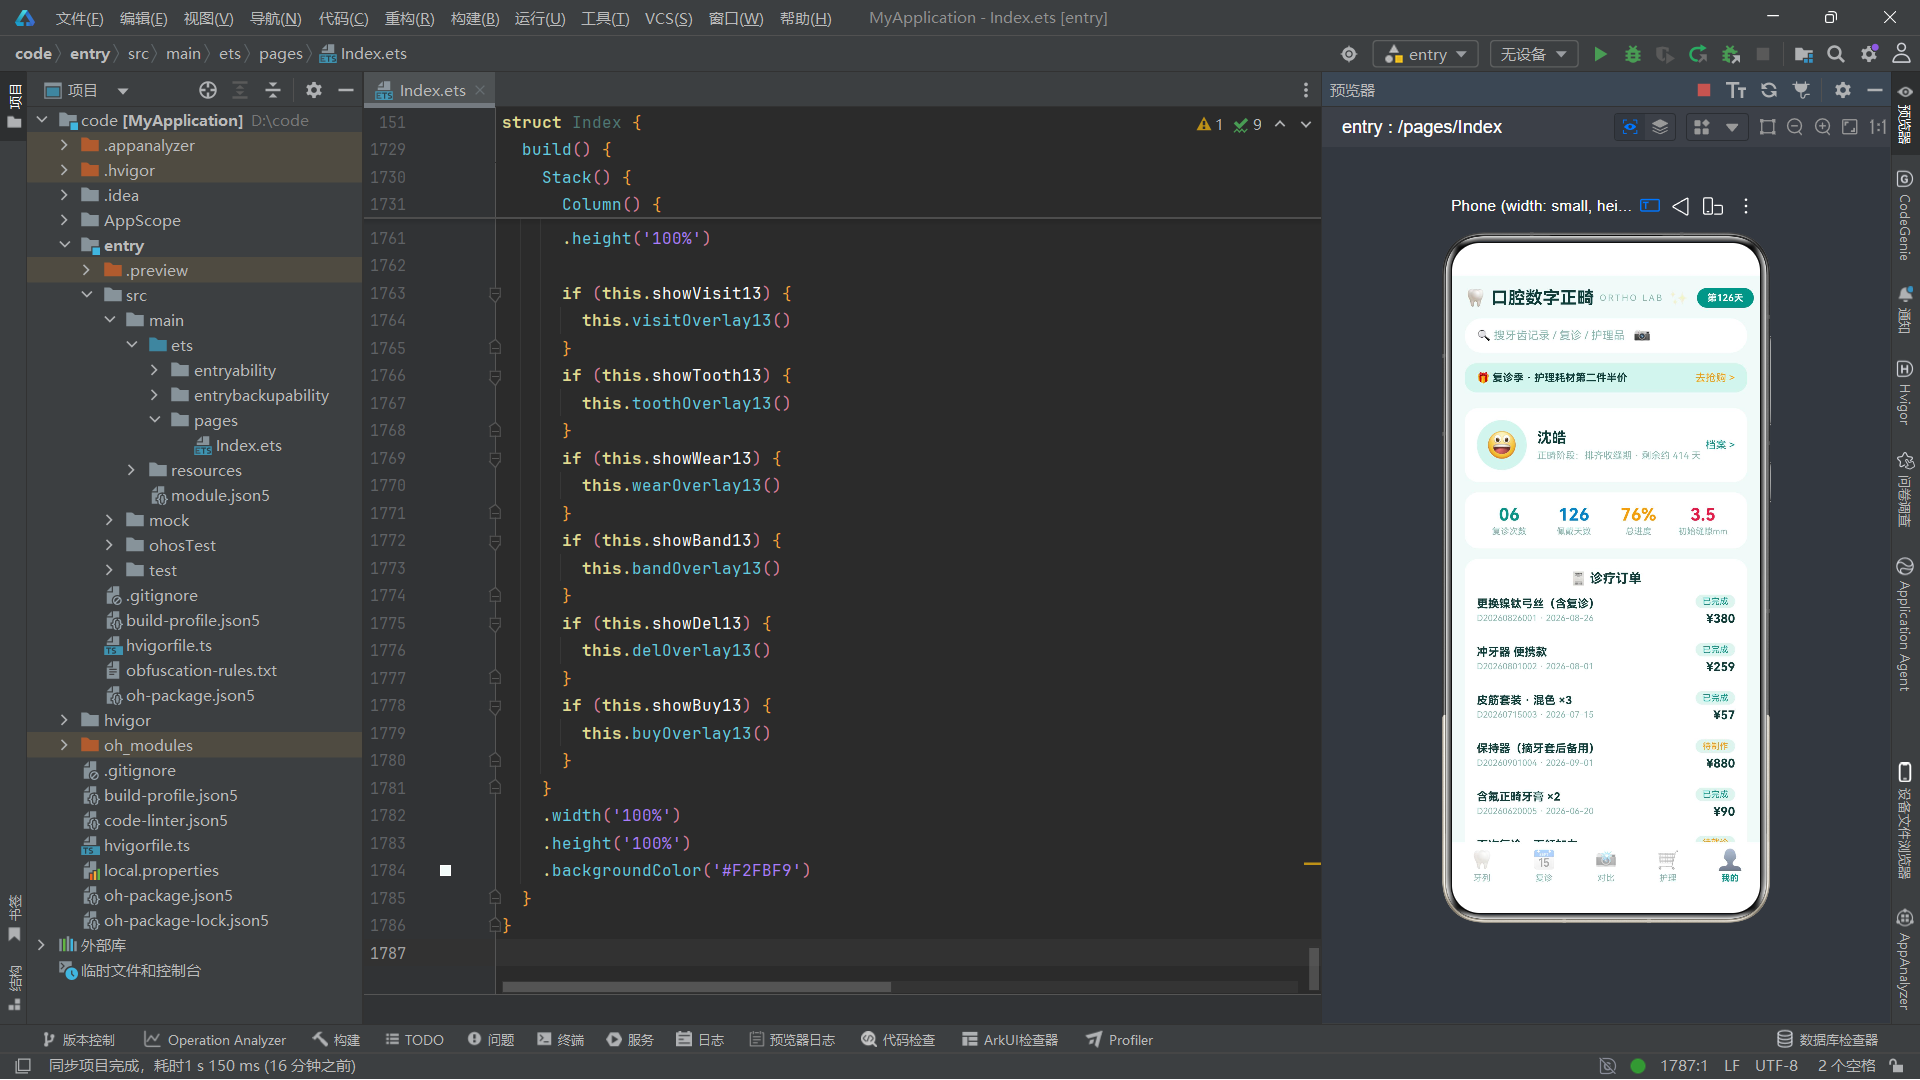
"我的"页面顶部是用户信息卡片,使用三列布局:头像(圆形背景,通过width=58, height=58, borderRadius=29形成正圆)、用户名和阶段信息(layoutWeight(1)占据中间空间)、档案入口。
技术概念强调: 正圆的实现技巧是将
width、height设为相同值,borderRadius设为该值的一半。例如58像素宽高的元素,borderRadius设为29即可形成完美的圆形。这是因为borderRadius以像素为单位(而非百分比),当它等于元素尺寸的一半时,四个角的圆弧恰好拼接成完整的圆形。
统计卡片使用四个等宽Column配合layoutWeight(1)实现等分布局:
      Row() {
        Column() {
          Text('06')
            .fontSize(20)
            .fontWeight(FontWeight.Bold)
            .fontColor('#0D9488')
          Text('复诊次数')
            .fontSize(10)
            .fontColor('#8AB8B2')
            .margin({ top: 2 })
        }
        .layoutWeight(1)
        Column() {
          Text('126')
            .fontSize(20)
            .fontWeight(FontWeight.Bold)
            .fontColor('#0284C7')
          Text('佩戴天数')
            .fontSize(10)
            .fontColor('#8AB8B2')
            .margin({ top: 2 })
        }
        .layoutWeight(1)
        Column() {
          Text('76%')
            .fontSize(20)
            .fontWeight(FontWeight.Bold)
            .fontColor('#F59E0B')
          Text('总进度')
            .fontSize(10)
            .fontColor('#8AB8B2')
            .margin({ top: 2 })
        }
        .layoutWeight(1)
        Column() {
          Text('3.5')
            .fontSize(20)
            .fontWeight(FontWeight.Bold)
            .fontColor('#E11D48')
          Text('初始缝隙mm')
            .fontSize(10)
            .fontColor('#8AB8B2')
            .margin({ top: 2 })
        }
        .layoutWeight(1)
      }
      .width('100%')
      .padding(14)
      .borderRadius(16)
      .backgroundColor('#FFFFFF')
      .margin({ bottom: 12 })
四个统计项使用不同的强调色(青绿、天蓝、琥珀、玫红),形成色彩编码的视觉区分。每个统计项都是"大数字+小标签"的上下结构,数字使用20号字粗体,标签使用10号字浅色。
技术概念强调: 当多个子组件都设置
layoutWeight(1)时,它们会等分父容器中除子组件固有尺寸之外的剩余空间。如果有N个子组件都设置layoutWeight(1),则每个子组件获得剩余空间的1/N。这是一种简洁高效的自适应等分布局方法,无需计算具体的像素宽度。
订单列表和皮筋计划区域:
      Column() {
        Text('🧾 诊疗订单')
          .fontSize(15)
          .fontWeight(FontWeight.Bold)
          .fontColor('#0F3D3A')
        ForEach(this.ords13, (o: OrdT13) => {
          Row() {
            Column() {
              Text(o.good)
                .fontSize(13)
                .fontWeight(FontWeight.Bold)
                .fontColor('#0F3D3A')
                .maxLines(1)
                .textOverflow({ overflow: TextOverflow.Ellipsis })
              Text(o.id + ' · ' + o.date)
                .fontSize(10)
                .fontColor('#8AB8B2')
                .margin({ top: 3 })
            }
            .layoutWeight(1)
            .alignItems(HorizontalAlign.Start)

            Column() {
              Text(o.status)
                .fontSize(10)
                .fontColor(o.status === '已完成' ? '#0D9488' : '#F59E0B')
                .padding({ left: 8, right: 8, top: 2, bottom: 2 })
                .borderRadius(8)
                .backgroundColor('#E2F3EF')
              Text('¥' + o.amount.toString())
                .fontSize(14)
                .fontWeight(FontWeight.Bold)
                .fontColor('#0F3D3A')
                .margin({ top: 4 })
            }
            .alignItems(HorizontalAlign.End)
          }
          .width('100%')
          .alignItems(VerticalAlign.Center)
          .padding({ top: 10, bottom: 10 })
        }, (o: OrdT13) => o.id + o.status)
      }
      .width('100%')
      .padding(14)
      .borderRadius(16)
      .backgroundColor('#FFFFFF')
      .margin({ bottom: 12 })

      Column() {
        Row() {
          Text('🧷 皮筋佩戴计划')
            .fontSize(14)
            .fontWeight(FontWeight.Bold)
            .fontColor('#0F3D3A')
          Text('编辑')
            .fontSize(11)
            .fontColor('#FFFFFF')
            .padding({ left: 12, right: 12, top: 4, bottom: 4 })
            .borderRadius(11)
            .backgroundColor('#0284C7')
            .margin({ left: 10 })
            .onClick(() => {
              this.bandColor13 = 0
              this.bandHour13 = 20
              this.showBand13 = true
            })
        }
        .width('100%')
        Text('当前:兔牌 3/16 · 中力 · 每日 20 小时 · 每餐后更换')
          .fontSize(12)
          .fontColor('#64748B')
          .margin({ top: 8 })
      }
      .width('100%')
      .padding(14)
      .borderRadius(16)
      .backgroundColor('#FFFFFF')
      .alignItems(HorizontalAlign.Start)
      .margin({ bottom: 12 })
    }
    .width('100%')
  }
订单列表中每行使用两列布局:左侧订单信息(layoutWeight(1)占据主要空间)和右侧状态与金额(右对齐)。订单状态标签的颜色根据o.status === '已完成'条件选择青绿色或琥珀色,使得已完成和待处理订单一眼可辨。
技术概念强调:
alignItems(HorizontalAlign.End)在Column容器中的作用是让子组件在水平方向上右对齐。这与Column默认的HorizontalAlign.Center(水平居中)不同。在需要右侧对齐信息的场景中(如金额、状态标签),这个属性非常有用。
十二、弹框系统:六种交互浮层的实现策略
12.1 预约复诊弹框——底部抽屉模式
  @Builder
  visitOverlay13() {
    Column() {
      Column() {
        Row()
          .width(44)
          .height(5)
          .borderRadius(3)
          .backgroundColor('#D5EDE8')
          .margin({ top: 10 })

        Text('📅 预约复诊')
          .fontSize(17)
          .fontWeight(FontWeight.Bold)
          .fontColor('#0F3D3A')
          .margin({ top: 12 })

        Text('复诊项目')
          .fontSize(12)
          .fontWeight(FontWeight.Bold)
          .fontColor('#64748B')
          .margin({ top: 14 })
        Row({ space: 8 }) {
          ForEach(['常规加力', '更换弓丝', '皮筋调整', '拍片复查'], (a: string, i: number) => {
            Text(a)
              .fontSize(12)
              .fontColor(this.vItem13 === i ? '#FFFFFF' : '#64748B')
              .padding({ left: 12, right: 12, top: 6, bottom: 6 })
              .borderRadius(12)
              .backgroundColor(this.vItem13 === i ? '#0D9488' : '#E2F3EF')
              .onClick(() => {
                this.vItem13 = i
              })
          }, (a: string, i: number) => a + i.toString())
        }
        .width('100%')
        .margin({ top: 8 })

        Text('时段')
          .fontSize(12)
          .fontWeight(FontWeight.Bold)
          .fontColor('#64748B')
          .margin({ top: 14 })
        Flex({ wrap: FlexWrap.Wrap }) {
          ForEach(['周六上午', '周六下午', '周三晚间', '周日上午', '周五晚间'], (s: string, i: number) => {
            Text(s)
              .fontSize(12)
              .fontColor(this.vSlot13 === i ? '#FFFFFF' : '#64748B')
              .padding({ left: 12, right: 12, top: 6, bottom: 6 })
              .borderRadius(12)
              .backgroundColor(this.vSlot13 === i ? '#0284C7' : '#E2F3EF')
              .margin({ right: 8, bottom: 8 })
              .onClick(() => {
                this.vSlot13 = i
              })
          }, (s: string, i: number) => s + i.toString())
        }
        .width('100%')
        .margin({ top: 8 })

        Row() {
          Text('😶 有疼痛担忧,需提前处理')
            .fontSize(12)
            .fontColor('#64748B')
            .layoutWeight(1)
          Toggle({ type: ToggleType.Switch, isOn: this.vWorry13 })
            .selectedColor('#0D9488')
            .onChange((on: boolean) => {
              this.vWorry13 = on
            })
        }
        .width('100%')
        .alignItems(VerticalAlign.Center)
        .padding({ left: 4, right: 4 })
        .margin({ top: 14 })

        Row({ space: 10 }) {
          Text('取消')
            .fontSize(13)
            .fontColor('#64748B')
            .layoutWeight(1)
            .textAlign(TextAlign.Center)
            .padding({ top: 10, bottom: 10 })
            .borderRadius(19)
            .backgroundColor('#E2F3EF')
            .onClick(() => {
              this.showVisit13 = false
            })
          Text('确认预约')
            .fontSize(13)
            .fontWeight(FontWeight.Bold)
            .fontColor('#FFFFFF')
            .layoutWeight(1)
            .textAlign(TextAlign.Center)
            .padding({ top: 10, bottom: 10 })
            .borderRadius(19)
            .backgroundColor('#0D9488')
        }
        .width('100%')
        .padding({ left: 16, right: 16, top: 16, bottom: 18 })
      }
      .width('100%')
      .borderRadius({ topLeft: 22, topRight: 22 })
      .backgroundColor('#FFFFFF')
      .onClick(() => {
      })
    }
    .width('100%')
    .height('100%')
    .backgroundColor('#99053230')
    .justifyContent(FlexAlign.End)
    .zIndex(999)
    .onClick(() => {
      this.showVisit13 = false
    })
  }
预约复诊弹框采用"底部抽屉"模式。最外层Column设置了height('100%')占满全屏、backgroundColor('#99053230')半透明遮罩、justifyContent(FlexAlign.End)将内容推到底部、zIndex(999)确保浮在所有内容之上。内层Column是抽屉主体,仅设置顶部圆角(borderRadius({ topLeft: 22, topRight: 22 })),形成从底部滑入的视觉效果。
抽屉顶部有一个"拖拽指示条"——一个44x5的圆角矩形,这是移动端底部抽屉的标准设计语言,提示用户可以下拉关闭。抽屉内容包含四个部分:复诊项目选择(4个标签按钮,通过vItem13记录选中状态)、时段选择(5个标签按钮,使用Flex换行布局,通过vSlot13记录选中状态)、疼痛担忧开关(Toggle组件)和底部按钮组(取消和确认)。
技术概念强调:
Toggle是ArkUI的开关组件,支持Switch(滑动开关)和Checkbox(复选框)两种类型。通过isOn属性绑定状态,selectedColor设置开启状态的强调色,onChange回调监听开关状态变化。在本项目中,Toggle用于疼痛担忧标记和删除确认安全开关两个场景。
技术概念强调:
zIndex属性控制组件在Stack层叠布局中的渲染层级。zIndex值越大,组件越在上层。在本项目中,所有弹框都设置zIndex(999)确保它们浮在Tab内容之上。需要注意的是,zIndex只在同一Stack容器内生效,不同Stack容器之间的层级无法通过zIndex跨容器比较。
技术概念强调: 弹框的"点击外部关闭"机制通过最外层
Column的onClick回调实现this.showVisit13 = false,而内层抽屉主体也设置了空的onClick(() => {})回调。这是因为ArkUI的事件传播机制——点击内层抽屉时事件被空回调"消费"而不继续传播到外层,从而阻止了"点击抽屉内容也关闭弹框"的问题。这是一种经典的事件冒泡阻断技巧。
12.2 牙齿详情弹框——居中卡片模式
  @Builder
  toothOverlay13() {
    Column() {
      Column() {
        Text('🦷 ' + TEETH13[this.selTooth13].name)
          .fontSize(17)
          .fontWeight(FontWeight.Bold)
          .fontColor('#0F3D3A')
        Text('当前阶段:' + stageName13(TEETH13[this.selTooth13].stage))
          .fontSize(12)
          .fontColor('#0D9488')
          .margin({ top: 6 })

        Column() {
          Row() {
            Text('移动进度')
              .fontSize(12)
              .fontColor('#64748B')
            Text(TEETH13[this.selTooth13].move.toString() + '%')
              .fontSize(12)
              .fontWeight(FontWeight.Bold)
              .fontColor('#0F3D3A')
              .layoutWeight(1)
              .textAlign(TextAlign.End)
          }
          .width('100%')
          Row() {
            Progress({ value: TEETH13[this.selTooth13].move, total: 100, type: ProgressType.Linear })
              .style({ strokeWidth: 10 })
              .color(stageColor13(TEETH13[this.selTooth13].stage))
              .backgroundColor('#E2F3EF')
              .layoutWeight(1)
          }
          .width('100%')
          .margin({ top: 8 })
          Text('该牙已纳入当前弓丝加力序列,按方案每月约移动 1mm,预计还需 ' + (100 - TEETH13[this.selTooth13].move).toString() + '% 位移即可到位。')
            .fontSize(11)
            .fontColor('#8AB8B2')
            .lineHeight(17)
            .margin({ top: 10 })
        }
        .width('100%')
        .padding(12)
        .borderRadius(12)
        .backgroundColor('#F0FAF7')
        .margin({ top: 14 })

        Text('知道了')
          .fontSize(13)
          .fontWeight(FontWeight.Bold)
          .fontColor('#FFFFFF')
          .width('100%')
          .textAlign(TextAlign.Center)
          .padding({ top: 10, bottom: 10 })
          .borderRadius(19)
          .backgroundColor('#0D9488')
          .margin({ top: 16 })
          .onClick(() => {
            this.showTooth13 = false
          })
      }
      .width('80%')
      .padding(18)
      .borderRadius(20)
      .backgroundColor('#FFFFFF')
      .onClick(() => {
      })
    }
    .width('100%')
    .height('100%')
    .backgroundColor('#99053230')
    .justifyContent(FlexAlign.Center)
    .zIndex(999)
    .onClick(() => {
      this.showTooth13 = false
    })
  }
牙齿详情弹框采用"居中卡片"模式。与底部抽屉不同,这里使用justifyContent(FlexAlign.Center)将内容卡片垂直居中,卡片宽度设为'80%'(而非100%),形成居中悬浮卡片的视觉效果。
弹框内容通过TEETH13[this.selTooth13]读取常量数组中对应索引的牙齿数据。这里直接引用常量TEETH13而非组件状态变量teeth13,因为牙齿数据在应用运行期间不会修改(没有编辑牙齿的功能),引用常量更加直接。弹框内部使用了Progress组件的ProgressType.Linear线性进度条类型,与之前环形进度(默认ProgressType.Ring)形成对比。
技术概念强调:
Progress组件支持三种类型:ProgressType.Linear(线性进度条)、ProgressType.Ring(环形进度,默认)、ProgressType.ScaleRing(刻度环形进度)。通过type参数指定类型,style方法配置样式参数(如strokeWidth线条宽度),color和backgroundColor分别设置进度填充色和轨道底色。
12.3 记录佩戴时长弹框——数值步进器与文本输入
  @Builder
  wearOverlay13() {
    Column() {
      Column() {
        Text('⏱️ 记录今日佩戴')
          .fontSize(17)
          .fontWeight(FontWeight.Bold)
          .fontColor('#0F3D3A')
          .margin({ top: 14 })

        Row() {
          Text('佩戴时长')
            .fontSize(12)
            .fontWeight(FontWeight.Bold)
            .fontColor('#64748B')
          Row() {
            Text('-')
              .fontSize(15)
              .fontColor('#64748B')
              .padding(6)
              .onClick(() => {
                if (this.wearH13 > 0) {
                  this.wearH13 = this.wearH13 - 1
                }
              })
            Text(this.wearH13.toString() + 'h')
              .fontSize(14)
              .fontWeight(FontWeight.Bold)
              .fontColor('#0D9488')
              .padding({ left: 10, right: 10 })
            Text('+')
              .fontSize(15)
              .fontColor('#F59E0B')
              .padding(6)
              .onClick(() => {
                if (this.wearH13 < 24) {
                  this.wearH13 = this.wearH13 + 1
                }
              })
          }
          .borderRadius(10)
          .backgroundColor('#E2F3EF')
          .margin({ left: 12 })
          Text(this.wearH13 >= 20 ? '✓ 达标' : '差 ' + (20 - this.wearH13).toString() + 'h')
            .fontSize(11)
            .fontColor(this.wearH13 >= 20 ? '#0D9488' : '#F59E0B')
            .margin({ left: 10 })
        }
        .width('100%')
        .alignItems(VerticalAlign.Center)
        .margin({ top: 16 })

        Text('备注')
          .fontSize(12)
          .fontWeight(FontWeight.Bold)
          .fontColor('#64748B')
          .margin({ top: 14 })
        TextInput({ placeholder: '如:晚饭忘戴一小时…', text: this.wearNote13 })
          .fontSize(13)
          .fontColor('#0F3D3A')
          .placeholderColor('#9CC3BD')
          .backgroundColor('#E2F3EF')
          .borderRadius(12)
          .padding({ left: 12, right: 12 })
          .margin({ top: 8 })
          .onChange((v: string) => {
            this.wearNote13 = v
          })

        Row({ space: 10 }) {
          Text('取消')
            .fontSize(13)
            .fontColor('#64748B')
            .layoutWeight(1)
            .textAlign(TextAlign.Center)
            .padding({ top: 10, bottom: 10 })
            .borderRadius(19)
            .backgroundColor('#E2F3EF')
            .onClick(() => {
              this.showWear13 = false
            })
          Text('保存记录')
            .fontSize(13)
            .fontWeight(FontWeight.Bold)
            .fontColor('#FFFFFF')
            .layoutWeight(1)
            .textAlign(TextAlign.Center)
            .padding({ top: 10, bottom: 10 })
            .borderRadius(19)
            .backgroundColor('#0284C7')
            .onClick(() => {
              this.showWear13 = false
            })
        }
        .width('100%')
        .margin({ top: 18, bottom: 18 })
      }
      .width('84%')
      .padding(18)
      .borderRadius(20)
      .backgroundColor('#FFFFFF')
      .onClick(() => {
      })
    }
    .width('100%')
    .height('100%')
    .backgroundColor('#99053230')
    .justifyContent(FlexAlign.Center)
    .zIndex(999)
    .onClick(() => {
      this.showWear13 = false
    })
  }
这个弹框实现了自定义的"数值步进器"——通过"-“和"+"两个按钮来增减wearH13的值,并设置边界检查(不低于0、不高于24)。步进器旁边动态显示达标状态:当wearH13 >= 20时显示"✓ 达标”,否则显示还差多少小时达标。
TextInput组件是ArkUI的文本输入框,通过placeholder设置占位提示文字,text绑定状态变量实现受控输入,onChange回调在输入内容变化时同步更新状态变量。placeholderColor设置占位文字颜色,backgroundColor和borderRadius设置输入框的视觉样式。
技术概念强调:
TextInput是ArkUI的基础输入组件,支持placeholder(占位符)、text(当前文本值)、type(输入类型,如普通文本、密码、数字、邮箱)、maxLength(最大长度)等属性。onChange回调在文本变化时触发,参数为当前输入的字符串。在声明式框架中,TextInput通常配合@State变量实现"受控输入"模式——输入框的值由状态变量驱动,用户输入又反向更新状态变量,形成双向绑定。
12.4 编辑皮筋计划弹框——规格选择与目标设置
  @Builder
  bandOverlay13() {
    Column() {
      Column() {
        Row()
          .width(44)
          .height(5)
          .borderRadius(3)
          .backgroundColor('#D5EDE8')
          .margin({ top: 10 })

        Text('🧷 编辑皮筋佩戴计划')
          .fontSize(17)
          .fontWeight(FontWeight.Bold)
          .fontColor('#0F3D3A')
          .margin({ top: 12 })

        Text('皮筋规格')
          .fontSize(12)
          .fontWeight(FontWeight.Bold)
          .fontColor('#64748B')
          .margin({ top: 14 })
        Row({ space: 8 }) {
          ForEach(['兔 3/16 中力', '松鼠 1/4 轻', '狐狸 3/16 重'], (b: string, i: number) => {
            Column() {
              Text(b.split(' ')[0])
                .fontSize(13)
                .fontWeight(FontWeight.Bold)
                .fontColor(this.bandColor13 === i ? '#0D9488' : '#64748B')
              Text(b.split(' ')[1])
                .fontSize(10)
                .fontColor('#8AB8B2')
                .margin({ top: 2 })
            }
            .padding({ left: 14, right: 14, top: 8, bottom: 8 })
            .borderRadius(12)
            .backgroundColor(this.bandColor13 === i ? '#D9F5EE' : '#E2F3EF')
            .onClick(() => {
              this.bandColor13 = i
            })
          }, (b: string, i: number) => b + i.toString())
        }
        .width('100%')
        .margin({ top: 8 })

        Row() {
          Text('每日佩戴目标')
            .fontSize(12)
            .fontWeight(FontWeight.Bold)
            .fontColor('#64748B')
          Row() {
            Text('-')
              .fontSize(15)
              .fontColor('#64748B')
              .padding(6)
              .onClick(() => {
                if (this.bandHour13 > 8) {
                  this.bandHour13 = this.bandHour13 - 2
                }
              })
            Text(this.bandHour13.toString() + 'h')
              .fontSize(14)
              .fontWeight(FontWeight.Bold)
              .fontColor('#0D9488')
              .padding({ left: 10, right: 10 })
            Text('+')
              .fontSize(15)
              .fontColor('#F59E0B')
              .padding(6)
              .onClick(() => {
                if (this.bandHour13 < 24) {
                  this.bandHour13 = this.bandHour13 + 2
                }
              })
          }
          .borderRadius(10)
          .backgroundColor('#E2F3EF')
          .margin({ left: 12 })
        }
        .width('100%')
        .alignItems(VerticalAlign.Center)
        .margin({ top: 18 })

        Text('提示:每餐后与刷牙后需更换新皮筋,皮筋拉伸超过 12 小时弹性下降。')
          .fontSize(10)
          .fontColor('#F59E0B')
          .lineHeight(15)
          .margin({ top: 14 })
          .padding({ left: 4, right: 4 })

        Row({ space: 10 }) {
          Text('取消')
            .fontSize(13)
            .fontColor('#64748B')
            .layoutWeight(1)
            .textAlign(TextAlign.Center)
            .padding({ top: 10, bottom: 10 })
            .borderRadius(19)
            .backgroundColor('#E2F3EF')
            .onClick(() => {
              this.showBand13 = false
            })
          Text('保存计划')
            .fontSize(13)
            .fontWeight(FontWeight.Bold)
            .fontColor('#FFFFFF')
            .layoutWeight(1)
            .textAlign(TextAlign.Center)
            .padding({ top: 10, bottom: 10 })
            .borderRadius(19)
            .backgroundColor('#0D9488')
            .onClick(() => {
              this.showBand13 = false
            })
        }
        .width('100%')
        .padding({ left: 16, right: 16, top: 16, bottom: 18 })
      }
      .width('100%')
      .borderRadius({ topLeft: 22, topRight: 22 })
      .backgroundColor('#FFFFFF')
      .onClick(() => {
      })
    }
    .width('100%')
    .height('100%')
    .backgroundColor('#99053230')
    .justifyContent(FlexAlign.End)
    .zIndex(999)
    .onClick(() => {
      this.showBand13 = false
    })
  }
皮筋计划编辑弹框采用底部抽屉模式。皮筋规格选择使用ForEach遍历三种规格字符串,通过b.split(' ')将规格名称拆分为动物名和力度等级两部分分别展示。选中状态通过bandColor13索引记录,选中项使用薄荷绿背景,未选中使用浅灰背景。
每日佩戴目标使用步进器,但步进值设为2小时(而非1小时),下限设为8小时(而非0),上限为24小时,符合皮筋佩戴的实际医学要求。
技术概念强调: 字符串的
split方法在ArkTS中与JavaScript完全一致——通过分隔符将字符串拆分为数组。b.split(' ')将"兔 3/16 中力"拆分为[“兔”, “3/16”, “中力”],取[0]得到动物名,取[1]得到规格尺寸。这种将复合信息打包在字符串中、使用时再拆分的方式,在数据量小的场景中比定义更细粒度的接口字段更加灵活简洁。
12.5 删除确认弹框——安全开关与窄危险卡
  @Builder
  delOverlay13() {
    Column() {
      Column() {
        Text('⚠️')
          .fontSize(30)
          .margin({ top: 16 })
        Text('删除这张对比照?')
          .fontSize(16)
          .fontWeight(FontWeight.Bold)
          .fontColor('#0F3D3A')
          .margin({ top: 10 })
        Text(this.snaps13.length > this.selSnap13 ? '第 ' + this.snaps13[this.selSnap13].days.toString() + ' 天 · ' + this.snaps13[this.selSnap13].date : '')
          .fontSize(12)
          .fontColor('#8AB8B2')
          .margin({ top: 6 })
        Text('删除后该时间点的正畸进度影像将无法找回,医生评估排齐趋势时缺少参考。')
          .fontSize(11)
          .fontColor('#E11D48')
          .lineHeight(17)
          .margin({ top: 8 })
          .padding({ left: 14, right: 14 })

        Row() {
          Text('我确认删除')
            .fontSize(11)
            .fontColor('#64748B')
            .layoutWeight(1)
          Toggle({ type: ToggleType.Switch, isOn: this.armed13 })
            .selectedColor('#E11D48')
            .onChange((on: boolean) => {
              this.armed13 = on
            })
        }
        .width('100%')
        .alignItems(VerticalAlign.Center)
        .padding({ left: 16, right: 16, top: 12 })

        Row({ space: 10 }) {
          Text('再想想')
            .fontSize(13)
            .fontColor('#64748B')
            .layoutWeight(1)
            .textAlign(TextAlign.Center)
            .padding({ top: 10, bottom: 10 })
            .borderRadius(18)
            .backgroundColor('#E2F3EF')
            .onClick(() => {
              this.showDel13 = false
            })
          Text(this.armed13 ? '删除' : '请先打开开关')
            .fontSize(13)
            .fontColor('#FFFFFF')
            .layoutWeight(1)
            .textAlign(TextAlign.Center)
            .padding({ top: 10, bottom: 10 })
            .borderRadius(18)
            .backgroundColor(this.armed13 ? '#E11D48' : '#9CC3BD')
            .onClick(() => {
              if (this.armed13 && this.selSnap13 < this.snaps13.length) {
                this.snaps13 = this.snaps13.filter((x: SnapT13, i: number) => i !== this.selSnap13)
                this.showDel13 = false
              }
            })
        }
        .width('100%')
        .padding({ left: 16, right: 16, top: 14, bottom: 16 })
      }
      .width('74%')
      .borderRadius(18)
      .backgroundColor('#FFFFFF')
      .border({ width: 1.5, color: '#F5C6CE' })
      .onClick(() => {
      })
    }
    .width('100%')
    .height('100%')
    .backgroundColor('#99401018')
    .justifyContent(FlexAlign.Center)
    .zIndex(999)
    .onClick(() => {
      this.showDel13 = false
    })
  }
删除确认弹框采用居中窄卡片模式,宽度仅'74%',配合玫红色边框(#F5C6CE)和深红色半透明遮罩(#99401018),营造危险操作的警示氛围。
这个弹框的安全设计核心是"双重确认"机制:用户需要先打开Toggle开关(armed13设为true),删除按钮才会从禁用状态(灰色背景、文字"请先打开开关")变为激活状态(红色背景、文字"删除")。删除按钮的onClick回调中检查this.armed13为true才执行实际的filter操作删除数组项。
删除操作使用this.snaps13.filter((x, i) => i !== this.selSnap13)创建新数组并赋值给@State变量snaps13,这是ArkUI中修改数组状态变量的标准方式——通过生成新数组替换旧数组来触发UI刷新。
技术概念强调: 在ArkUI中,直接修改
@State数组的元素(如this.snaps13[index] = newValue)不会可靠地触发UI刷新,因为ArkUI的状态观察机制对数组采用的是"引用比较"而非"深度比较"。正确做法是通过slice、filter、map等不可变操作生成新数组后整体赋值,使引用发生变化从而触发刷新。这是ArkUI状态管理中一个常见的陷阱,开发者需要特别注意。
技术概念强调:
border({ width: 1.5, color: '#F5C6CE' })用于设置组件的边框样式。与CSS不同的是,ArkUI的border方法接受一个对象参数,可以统一设置四个边的样式,也可以通过{ top: {...}, bottom: {...} }的形式分别设置每条边的样式。width为边框粗细(像素),color为边框颜色。
12.6 购买护理品弹框——数量选择与价格计算
  @Builder
  buyOverlay13() {
    Column() {
      Column() {
        Row()
          .width(44)
          .height(5)
          .borderRadius(3)
          .backgroundColor('#D5EDE8')
          .margin({ top: 10 })

        Row() {
          Text('🛒 购买护理品')
            .fontSize(17)
            .fontWeight(FontWeight.Bold)
            .fontColor('#0F3D3A')
          Text(GOODS13[this.selGood13].name)
            .fontSize(11)
            .fontColor('#0D9488')
            .maxLines(1)
            .textOverflow({ overflow: TextOverflow.Ellipsis })
            .layoutWeight(1)
            .textAlign(TextAlign.End)
        }
        .width('100%')
        .alignItems(VerticalAlign.Center)
        .padding({ left: 16, right: 16, top: 12 })

        Row() {
          Text('数量')
            .fontSize(13)
            .fontWeight(FontWeight.Bold)
            .fontColor('#64748B')
          Row() {
            Text('-')
              .fontSize(16)
              .fontColor('#64748B')
              .padding(8)
              .onClick(() => {
                if (this.buyNum13 > 1) {
                  this.buyNum13 = this.buyNum13 - 1
                }
              })
            Text(this.buyNum13.toString())
              .fontSize(15)
              .fontWeight(FontWeight.Bold)
              .fontColor('#0F3D3A')
              .padding({ left: 12, right: 12 })
            Text('+')
              .fontSize(16)
              .fontColor('#F59E0B')
              .padding(8)
              .onClick(() => {
                if (this.buyNum13 < GOODS13[this.selGood13].stock) {
                  this.buyNum13 = this.buyNum13 + 1
                }
              })
          }
          .borderRadius(12)
          .backgroundColor('#E2F3EF')
          .margin({ left: 12 })
          Text('库存 ' + GOODS13[this.selGood13].stock.toString() + ' 件')
            .fontSize(10)
            .fontColor('#8AB8B2')
            .margin({ left: 10 })
        }
        .width('100%')
        .alignItems(VerticalAlign.Center)
        .padding({ left: 16, right: 16 })
        .margin({ top: 18 })

        Column() {
          Row() {
            Text('单价')
              .fontSize(12)
              .fontColor('#8AB8B2')
            Text('¥' + GOODS13[this.selGood13].price.toString())
              .fontSize(12)
              .fontColor('#0F3D3A')
              .layoutWeight(1)
              .textAlign(TextAlign.End)
          }
          .width('100%')
          Row() {
            Text('第二件半价')
              .fontSize(12)
              .fontColor('#8AB8B2')
            Text('-¥' + (Math.floor(this.buyNum13 / 2) * Math.round(GOODS13[this.selGood13].price / 2)).toString())
              .fontSize(12)
              .fontColor('#0D9488')
              .layoutWeight(1)
              .textAlign(TextAlign.End)
          }
          .width('100%')
          .margin({ top: 6 })
          Row() {
            Text('合计')
              .fontSize(14)
              .fontWeight(FontWeight.Bold)
              .fontColor('#0F3D3A')
            Text('¥' + (GOODS13[this.selGood13].price * this.buyNum13 - Math.floor(this.buyNum13 / 2) * Math.round(GOODS13[this.selGood13].price / 2)).toString())
              .fontSize(18)
              .fontWeight(FontWeight.Bold)
              .fontColor('#E11D48')
              .layoutWeight(1)
              .textAlign(TextAlign.End)
          }
          .width('100%')
          .margin({ top: 10 })
        }
        .width('100%')
        .padding(14)
        .borderRadius(14)
        .backgroundColor('#F0FAF7')
        .margin({ top: 18, left: 16, right: 16 })

        Row({ space: 10 }) {
          Text('再看看')
            .fontSize(13)
            .fontColor('#64748B')
            .layoutWeight(1)
            .textAlign(TextAlign.Center)
            .padding({ top: 10, bottom: 10 })
            .borderRadius(19)
            .backgroundColor('#E2F3EF')
            .onClick(() => {
              this.showBuy13 = false
            })
          Text('下单')
            .fontSize(13)
            .fontWeight(FontWeight.Bold)
            .fontColor('#FFFFFF')
            .layoutWeight(1)
            .textAlign(TextAlign.Center)
            .padding({ top: 10, bottom: 10 })
            .borderRadius(19)
            .backgroundColor('#E11D48')
        }
        .width('100%')
        .padding({ left: 16, right: 16, top: 18, bottom: 18 })
      }
      .width('100%')
      .borderRadius({ topLeft: 22, topRight: 22 })
      .backgroundColor('#FFFFFF')
      .onClick(() => {
      })
    }
    .width('100%')
    .height('100%')
    .backgroundColor('#99053230')
    .justifyContent(FlexAlign.End)
    .zIndex(999)
    .onClick(() => {
      this.showBuy13 = false
    })
  }
购买弹框采用底部抽屉模式,包含数量选择器、价格计算区和操作按钮。数量选择器的上限设为商品库存量(GOODS13[this.selGood13].stock),防止超量购买。
价格计算区实现了"第二件半价"的促销逻辑——优惠金额为Math.floor(this.buyNum13 / 2) * Math.round(GOODS13[this.selGood13].price / 2),即每两件中第二件半价。Math.floor(buyNum13 / 2)计算可以享受半价的件数,Math.round(price / 2)计算半价金额(取整避免小数)。合计金额为单价 × 数量 - 优惠金额,所有计算在UI渲染时实时进行,随数量变化自动更新。
技术概念强调:
Math.floor和Math.round是ArkTS可用的标准数学函数。Math.floor向下取整(如2.9→2),Math.round四舍五入取整(如2.5→3, 2.4→2)。在价格计算中使用取整函数可以避免浮点数精度问题导致的价格异常(如29/2=14.5,Math.round将其取整为15或14取决于四舍五入规则)。
十三、底部Tab栏:导航切换与状态高亮
  @Builder
  tabBar13() {
    Row() {
      ForEach([['🦷', '牙列'], ['📅', '复诊'], ['📸', '对比'], ['🛒', '护理'], ['👤', '我的']], (t: string[], i: number) => {
        Column() {
          Text(t[0])
            .fontSize(21)
            .opacity(this.tab13 === i ? 1 : 0.45)
            .scale(this.tab13 === i ? { x: 1.12, y: 1.12 } : { x: 1, y: 1 })
          Text(t[1])
            .fontSize(10)
            .fontColor(this.tab13 === i ? '#0D9488' : '#8AB8B2')
            .fontWeight(this.tab13 === i ? FontWeight.Bold : FontWeight.Normal)
            .margin({ top: 3 })
        }
        .layoutWeight(1)
        .justifyContent(FlexAlign.Center)
        .alignItems(HorizontalAlign.Center)
        .padding({ top: 8, bottom: 8 })
        .onClick(() => {
          this.tab13 = i
        })
      }, (t: string[], i: number) => t[1] + i.toString())
    }
    .width('100%')
    .backgroundColor('#FFFFFF')
  }
底部Tab栏使用ForEach遍历二维数组渲染5个Tab项,每个Tab项使用layoutWeight(1)等分宽度。当前选中的Tab(this.tab13 === i)通过三个维度进行视觉高亮:图标不透明度从0.45提升到1(opacity)、图标放大1.12倍(scale)、标签文字颜色从浅灰变为青绿并加粗(fontColor和fontWeight)。这三个视觉变化的叠加使得选中态与未选中态区分明显。
scale变换通过{ x: 1.12, y: 1.12 }参数在水平和垂直方向同时放大1.12倍,产生选中项"放大突出"的效果。与translate类似,scale也是一种不影响布局的视觉变换。
技术概念强调:
scale是ArkUI的缩放变换属性,接受{ x, y }对象参数分别设置X轴和Y轴的缩放比例。1为原始大小,1.12为放大12%,0.8为缩小20%。scale变换常用于按钮点击反馈(按下时缩小)和Tab选中高亮(选中时放大)等交互场景,配合animateTo可以实现平滑的缩放过渡动画。
十四、build方法:Stack层叠架构与条件渲染
  build() {
    Stack() {
      Column() {
        this.headerBar13()

        Scroll() {
          Column() {
            if (this.tab13 === 0) {
              this.tabTeeth13()
            } else if (this.tab13 === 1) {
              this.tabVisits13()
            } else if (this.tab13 === 2) {
              this.tabSnaps13()
            } else if (this.tab13 === 3) {
              this.tabGoods13()
            } else {
              this.tabMine13()
            }
          }
          .width('100%')
          .padding({ left: 16, right: 16, top: 10, bottom: 20 })
        }
        .scrollable(ScrollDirection.Vertical)
        .scrollBar(BarState.Off)
        .layoutWeight(1)
        .width('100%')
        .backgroundColor('#F2FBF9')
        .edgeEffect(EdgeEffect.Spring)

        this.tabBar13()
      }
      .width('100%')
      .height('100%')

      if (this.showVisit13) {
        this.visitOverlay13()
      }
      if (this.showTooth13) {
        this.toothOverlay13()
      }
      if (this.showWear13) {
        this.wearOverlay13()
      }
      if (this.showBand13) {
        this.bandOverlay13()
      }
      if (this.showDel13) {
        this.delOverlay13()
      }
      if (this.showBuy13) {
        this.buyOverlay13()
      }
    }
    .width('100%')
    .height('100%')
    .backgroundColor('#F2FBF9')
  }
build()方法是每个@Component组件必须实现的核心方法,它返回组件的UI结构描述。这是声明式UI的入口点——框架通过调用build()方法获取组件的渲染树。
本项目的build()方法使用Stack作为根容器,内部包含两大层:第一层是主界面(Column包含头部栏、Scroll内容区和Tab栏),第二层是六个条件渲染的弹框。由于Stack的层叠特性,后声明的弹框组件会浮在主界面之上,配合弹框自身的zIndex(999)和半透明遮罩,实现了弹框覆盖主界面的视觉效果。
内容区使用Scroll滚动容器包裹,scrollable(ScrollDirection.Vertical)设置垂直方向可滚动,scrollBar(BarState.Off)隐藏滚动条(保持视觉简洁),edgeEffect(EdgeEffect.Spring)设置边缘回弹效果为弹簧模式(滚动到边缘时有弹性回弹动画),layoutWeight(1)让内容区占据头部栏和Tab栏之间的所有空间。
条件渲染通过if-else if-else语句根据this.tab13的值选择渲染对应的Tab内容Builder。当tab13变化时,ArkUI会自动销毁旧Tab的组件树并构建新Tab的组件树,实现页面切换效果。
技术概念强调:
Scroll是ArkUI的滚动容器组件,当内容超出可视区域时提供滚动能力。ScrollDirection.Vertical表示垂直滚动,ScrollDirection.Horizontal表示水平滚动,ScrollDirection.Free表示自由方向(配合ScrollDirection使用)。BarState.Off隐藏滚动条,BarState.On始终显示,BarState.Auto滚动时显示。EdgeEffect.Spring设置弹簧回弹效果,EdgeEffect.None无回弹,EdgeEffect.Fade渐隐效果。
技术概念强调: ArkUI中的
if-else条件渲染不仅控制组件的显示与隐藏,还会影响组件的生命周期。当条件从true变为false时,对应的组件会被完全销毁(触发aboutToDisappear);当条件从false变为true时,组件会被重新创建(触发aboutToAppear)。这与CSS的display: none有本质区别——后者只是视觉隐藏,组件仍存在于DOM中。因此,在Tab切换场景中,使用if-else意味着每次切换Tab都会重建组件树,对于重型组件可能影响性能。
技术概念强调: 弹框的"条件渲染"模式(
if (this.showXxx13) { this.xxxOverlay13() })是一种轻量级的弹框管理方案。当状态变量为true时弹框渲染到Stack上层,为false时从组件树中移除。这种模式的优点是简单直接、无需额外的弹框管理框架;缺点是一次只方便管理少量弹框,且弹框的显隐没有内置过渡动画(需要开发者自行通过animateTo添加)。
十五、架构流程图
整体页面架构流程
数据状态驱动流程
十六、核心概念对比表
以下表格对本项目中涉及的数据结构、组件、状态变量、装饰器、工具函数等核心概念进行系统对比:
| 类别 | 名称 | 类型/签名 | 用途 | 使用位置 | 关键特性 |
|---|---|---|---|---|---|
| 接口 | ToothT13 | interface | 牙齿数据结构定义 | TEETH13常量、teeth13状态 | 含id/name/stage/move四字段 |
| 接口 | VisitT13 | interface | 复诊记录结构定义 | VISITS13常量、visits13状态 | 含id/date/act/doctor/pain/next |
| 接口 | SnapT13 | interface | 对比照片结构定义 | SNAPS13常量、snaps13状态 | 含id/date/days/score/gap/note |
| 接口 | GoodT13 | interface | 商品数据结构定义 | GOODS13常量、goods13状态 | 含id/name/cat/price/stock |
| 接口 | OrdT13 | interface | 订单数据结构定义 | ORDS13常量、ords13状态 | id为字符串类型(含字母前缀) |
| 装饰器 | @Entry | struct decorator | 标记页面入口组件 | struct Index声明 | 每个页面仅一个@Entry组件 |
| 装饰器 | @Component | struct decorator | 声明自定义组件 | struct Index声明 | 提供状态管理作用域 |
| 装饰器 | @State | property decorator | 声明可观察状态变量 | 组件内27个状态变量 | 值变化时触发UI刷新 |
| 装饰器 | @Builder | method decorator | 声明UI构建函数 | 14个Builder方法 | 编译时内联展开,无运行时开销 |
| 容器组件 | Column | layout container | 纵向线性布局 | 几乎所有布局结构 | 子组件从上到下排列 |
| 容器组件 | Row | layout container | 横向线性布局 | 头部栏、列表行、按钮组 | 子组件从左到右排列 |
| 容器组件 | Stack | layout container | 层叠布局 | build根容器、进度环 | 子组件沿Z轴层叠 |
| 容器组件 | Flex | layout container | 弹性布局 | 牙列网格、时段选择 | 支持FlexWrap.Wrap自动换行 |
| 容器组件 | Scroll | scroll container | 滚动容器 | build方法内容区 | 垂直滚动+弹簧回弹 |
| 基础组件 | Text | basic component | 文本显示 | 全局通用 | 支持fontSize/fontColor/fontWeight等 |
| 基础组件 | Progress | basic component | 进度指示器 | 总进度环、牙齿进度条 | 支持Ring/Linear两种类型 |
| 基础组件 | TextInput | basic component | 文本输入框 | 佩戴记录弹框备注 | 受控输入模式,onChange同步状态 |
| 基础组件 | Toggle | basic component | 开关/复选框 | 疼痛担忧、删除确认 | 支持Switch/Checkbox两种类型 |
| 绘制组件 | Circle | drawing component | 绘制圆形 | 复诊时间轴节点 | 通过fill设置填充色 |
| 列表渲染 | ForEach | rendering component | 列表循环渲染 | 牙齿网格、复诊列表等 | 三参数:数据源/生成函数/键值函数 |
十七、总结
本文通过对一个完整的口腔数字正畸应用源码的逐段解析,深入剖析了鸿蒙ArkTS声明式UI开发的核心理念与实践方法。从数据模型层的接口定义到静态数据层的常量数组初始化,从工具函数层的状态映射到组件入口的状态管理,从生命周期动画到各Tab页面的布局构建,从弹框系统的交互设计到底层build方法的架构组织,这个项目涵盖了ArkTS应用开发中几乎所有常见的技术要点和设计模式。
在数据架构层面,项目采用了"接口-常量-状态"三层分离的设计策略。接口定义数据的类型契约,确保编译期类型安全;常量数组提供初始数据源,与运行时状态解耦;@State变量通过.slice()拷贝常量数据,实现组件内部的可变状态管理。这种分层设计使得数据来源清晰、修改路径明确、类型安全保障到位。五个接口分别对应五个业务实体(牙齿、复诊、对比照片、商品、订单),每个接口的字段设计都体现了"数据-表现"分离的思想——用数字编码表示状态(如stage、pain),用字符串存储显示文本,通过工具函数在渲染时进行映射转换。
在状态管理层面,项目声明了27个@State状态变量,覆盖了数据状态、弹框显隐、选中索引、表单输入和动画驱动五大类。@State装饰器的工作原理是可观察性追踪——当被装饰的变量值发生变化时,框架自动追踪所有依赖该变量的UI组件并进行批量延迟重新渲染。项目特别展示了ArkUI数组状态修改的正确方式:通过filter等不可变操作生成新数组后整体赋值,而非直接修改数组元素,这是ArkUI状态管理中一个关键且容易出错的要点。
在UI构建层面,项目大量使用@Builder装饰器将复杂的UI拆分为14个可复用的构建函数。@Builder函数在编译时被内联展开,无运行时调用开销,同时享有完整的组件上下文绑定能力。容器组件的嵌套使用构建了清晰的布局层次——Stack作为根容器实现层叠架构,Column和Row作为线性布局骨架,Flex提供弹性换行能力,Scroll封装可滚动内容区。这种"容器嵌套+Builder拆分"的组织方式使得近1800行代码的项目依然保持着良好的可读性和可维护性。
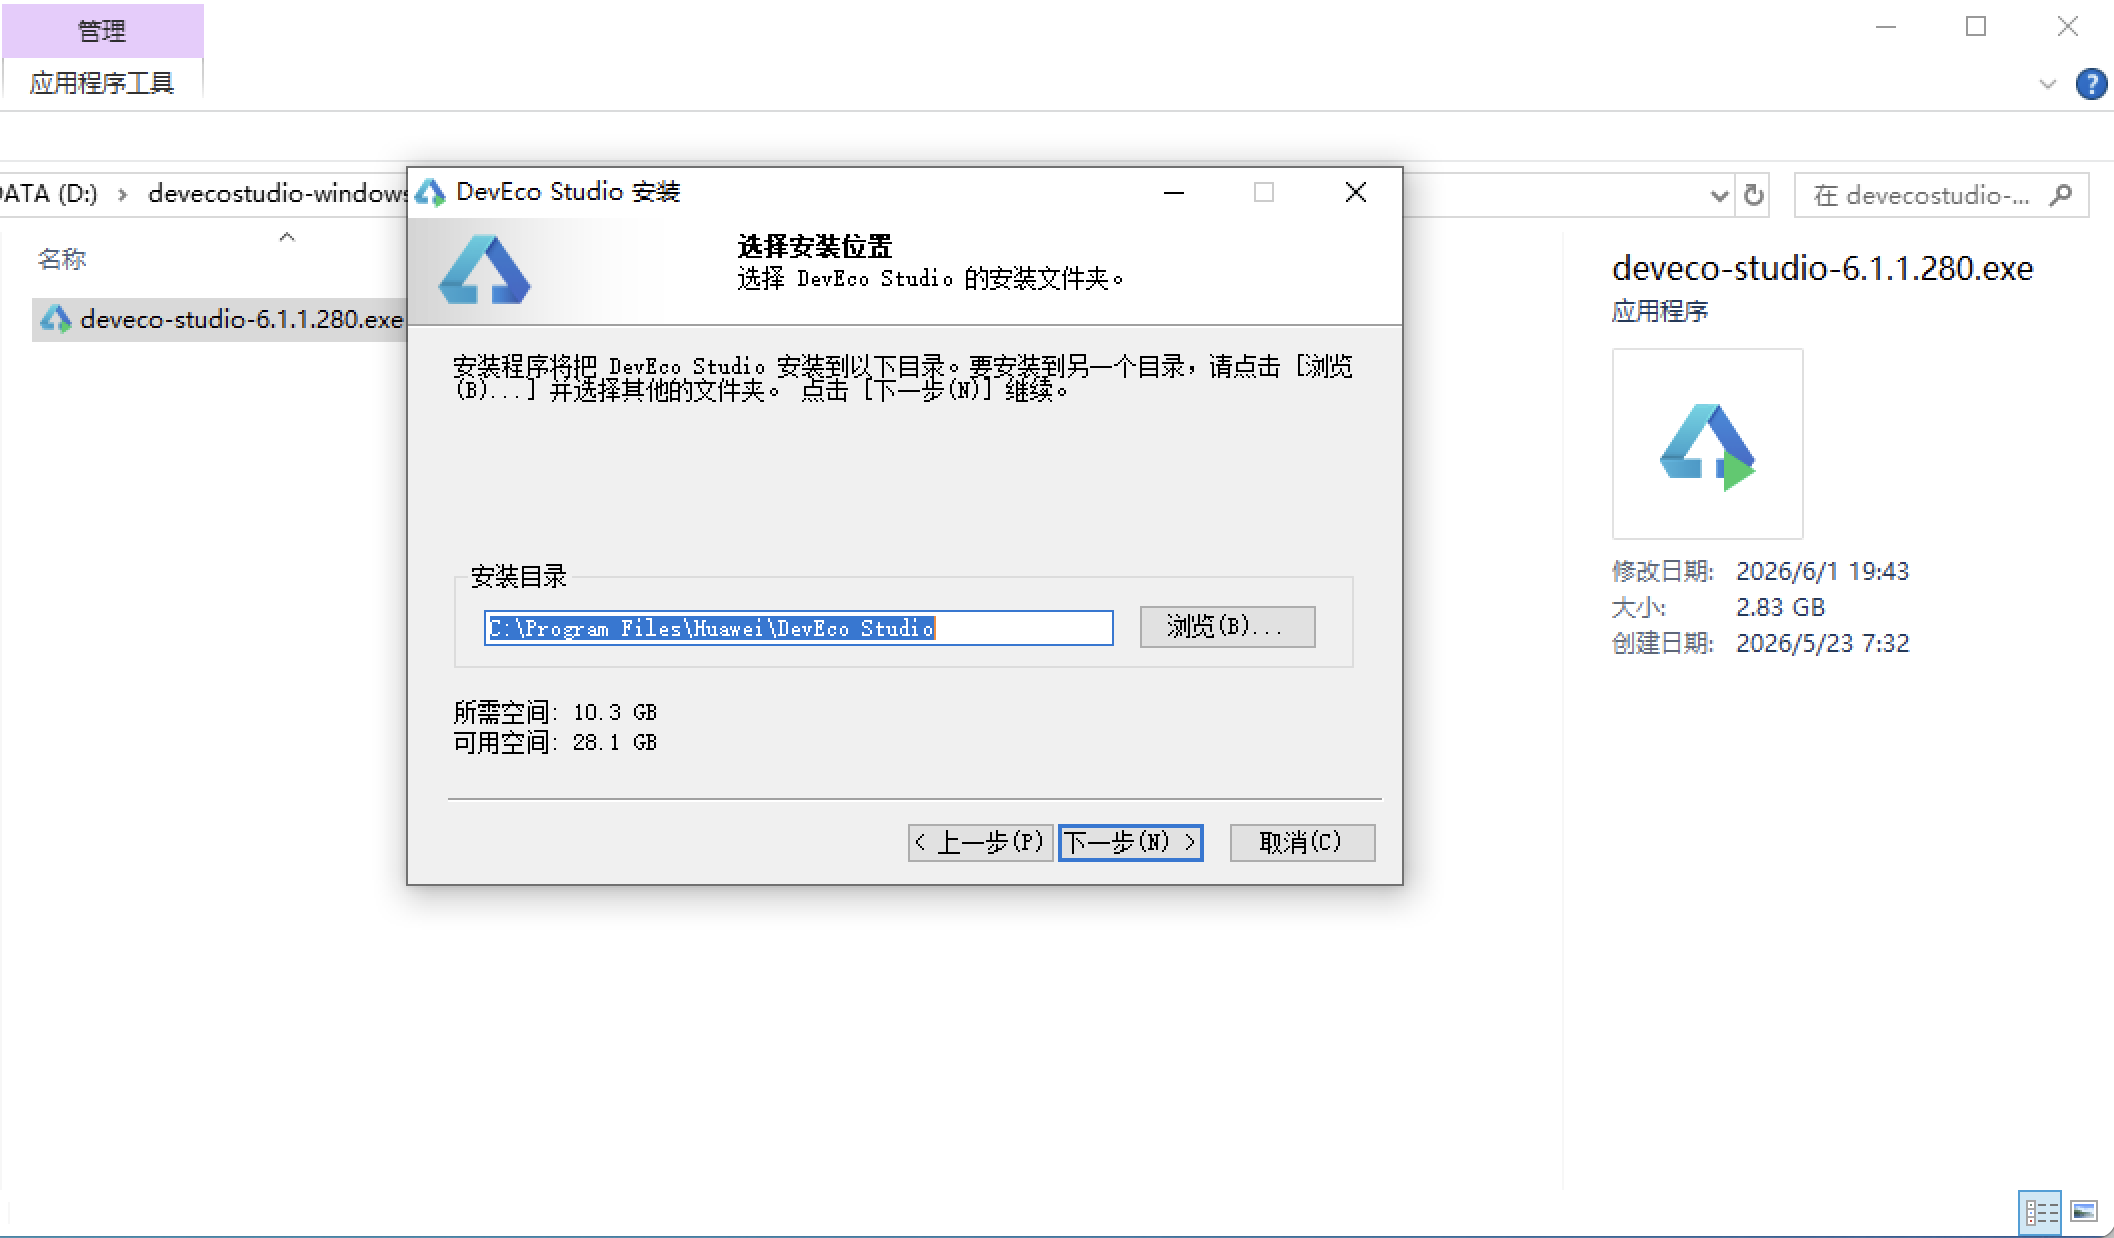
安装DevEco Studio程序
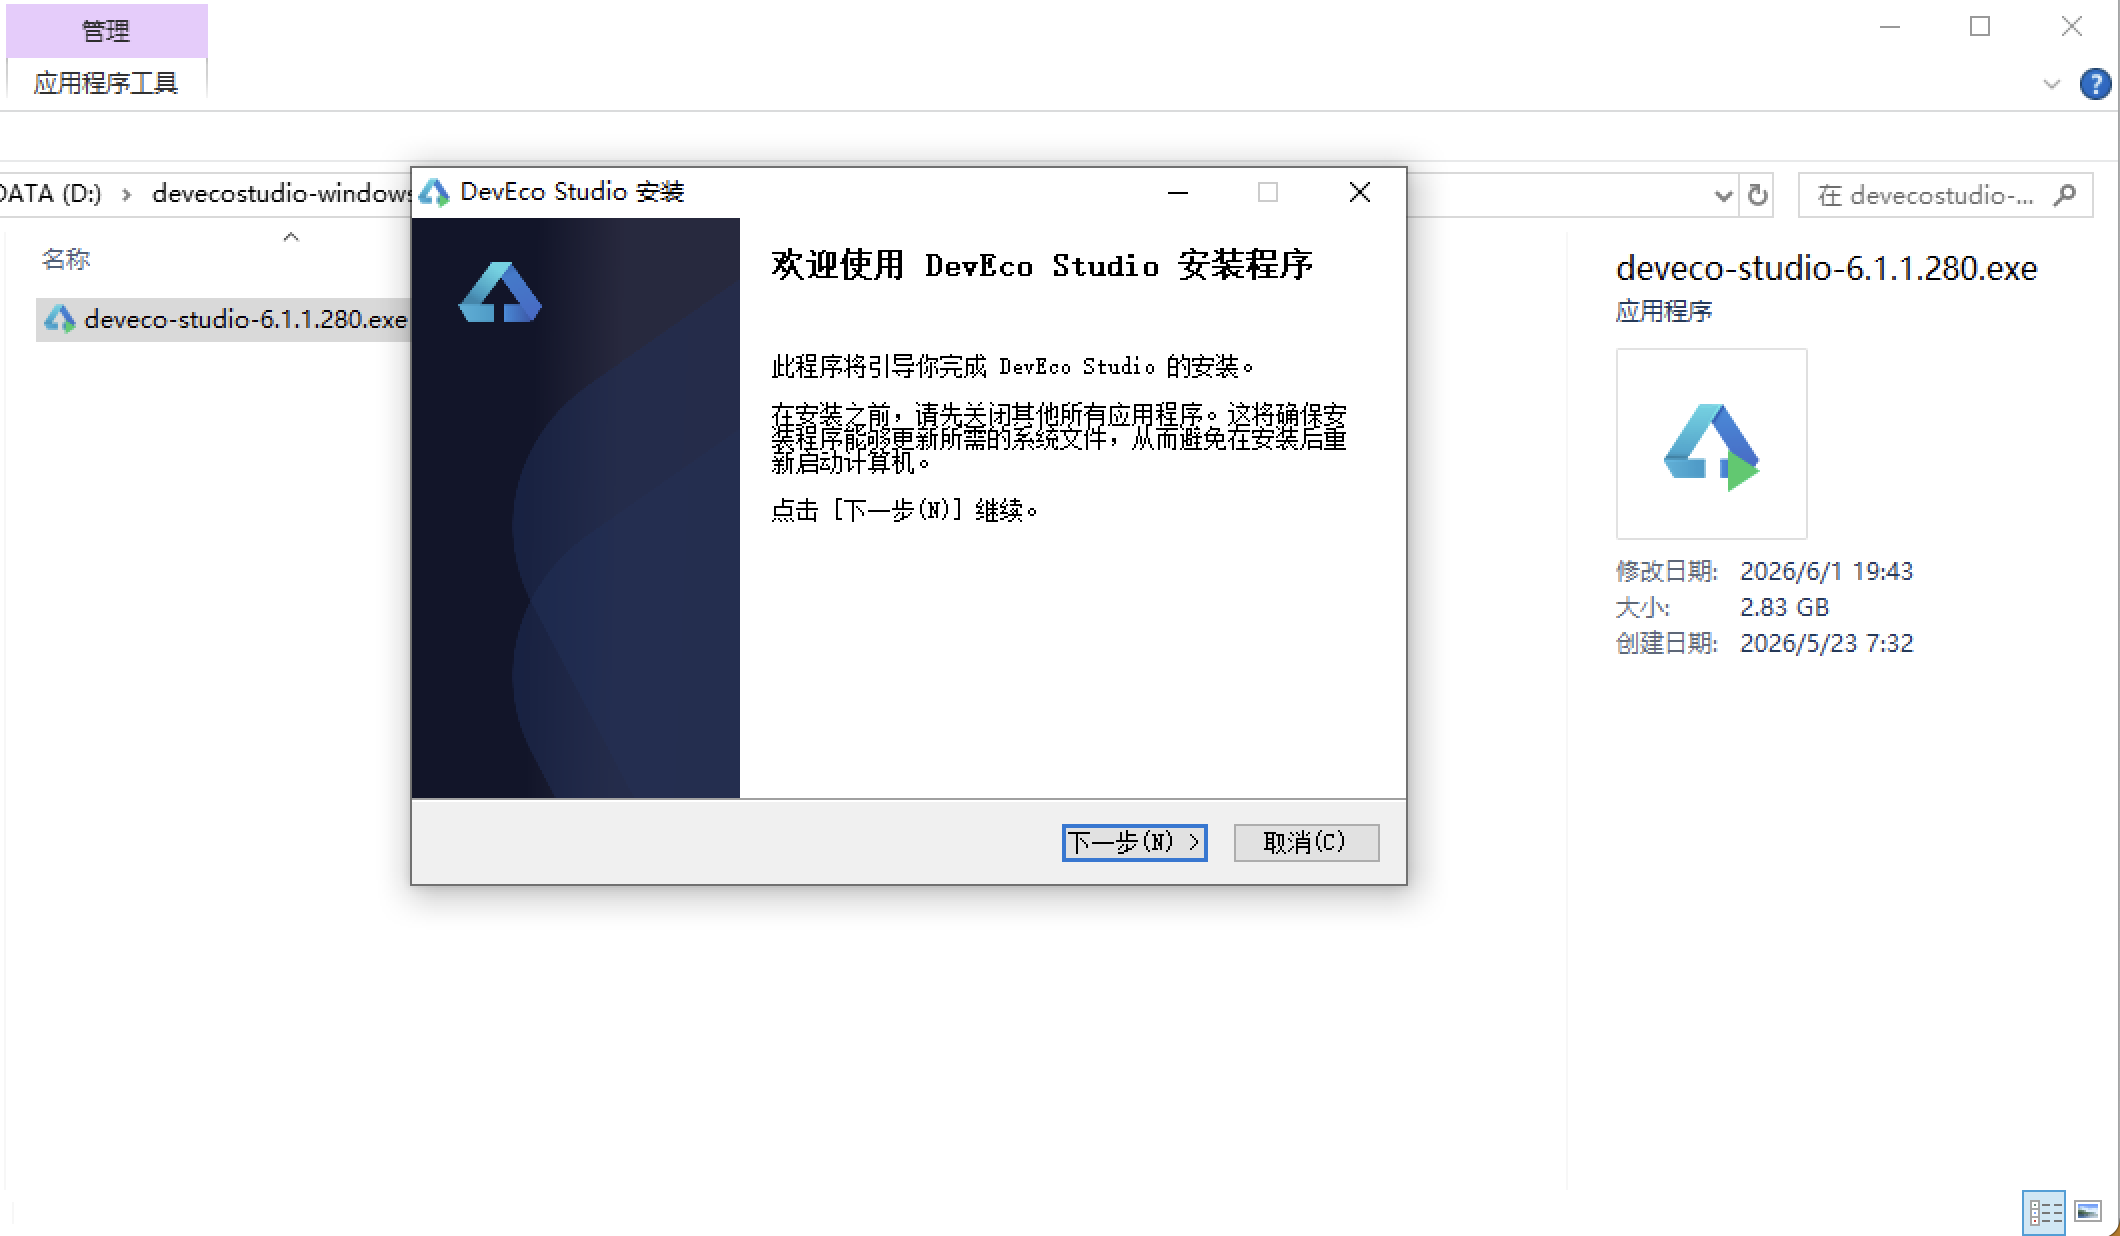
选择目标安装目录:
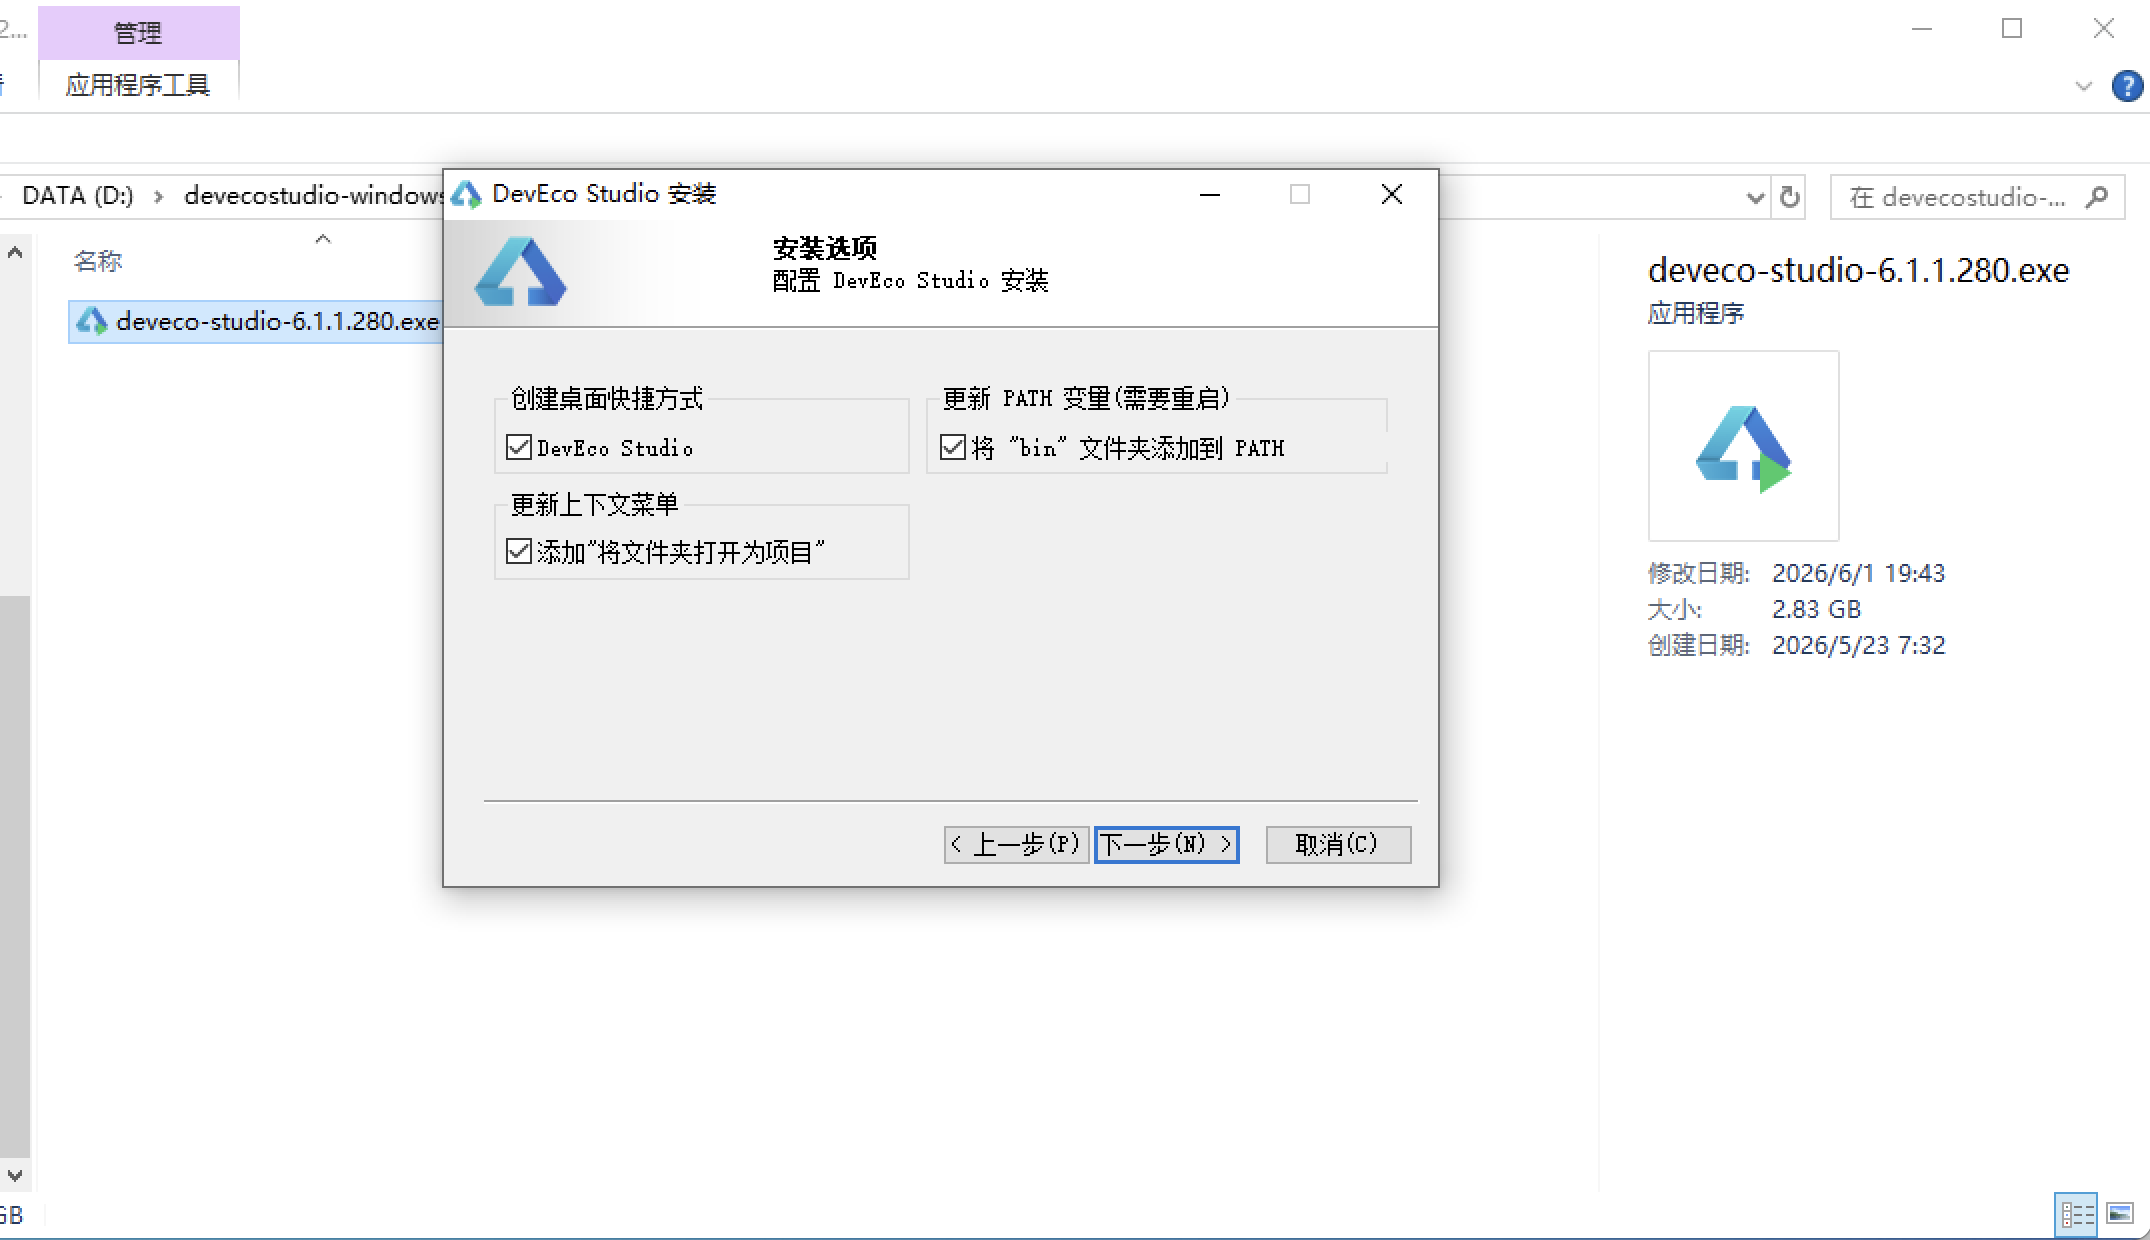
设置环境变量,但是需要重启一下:
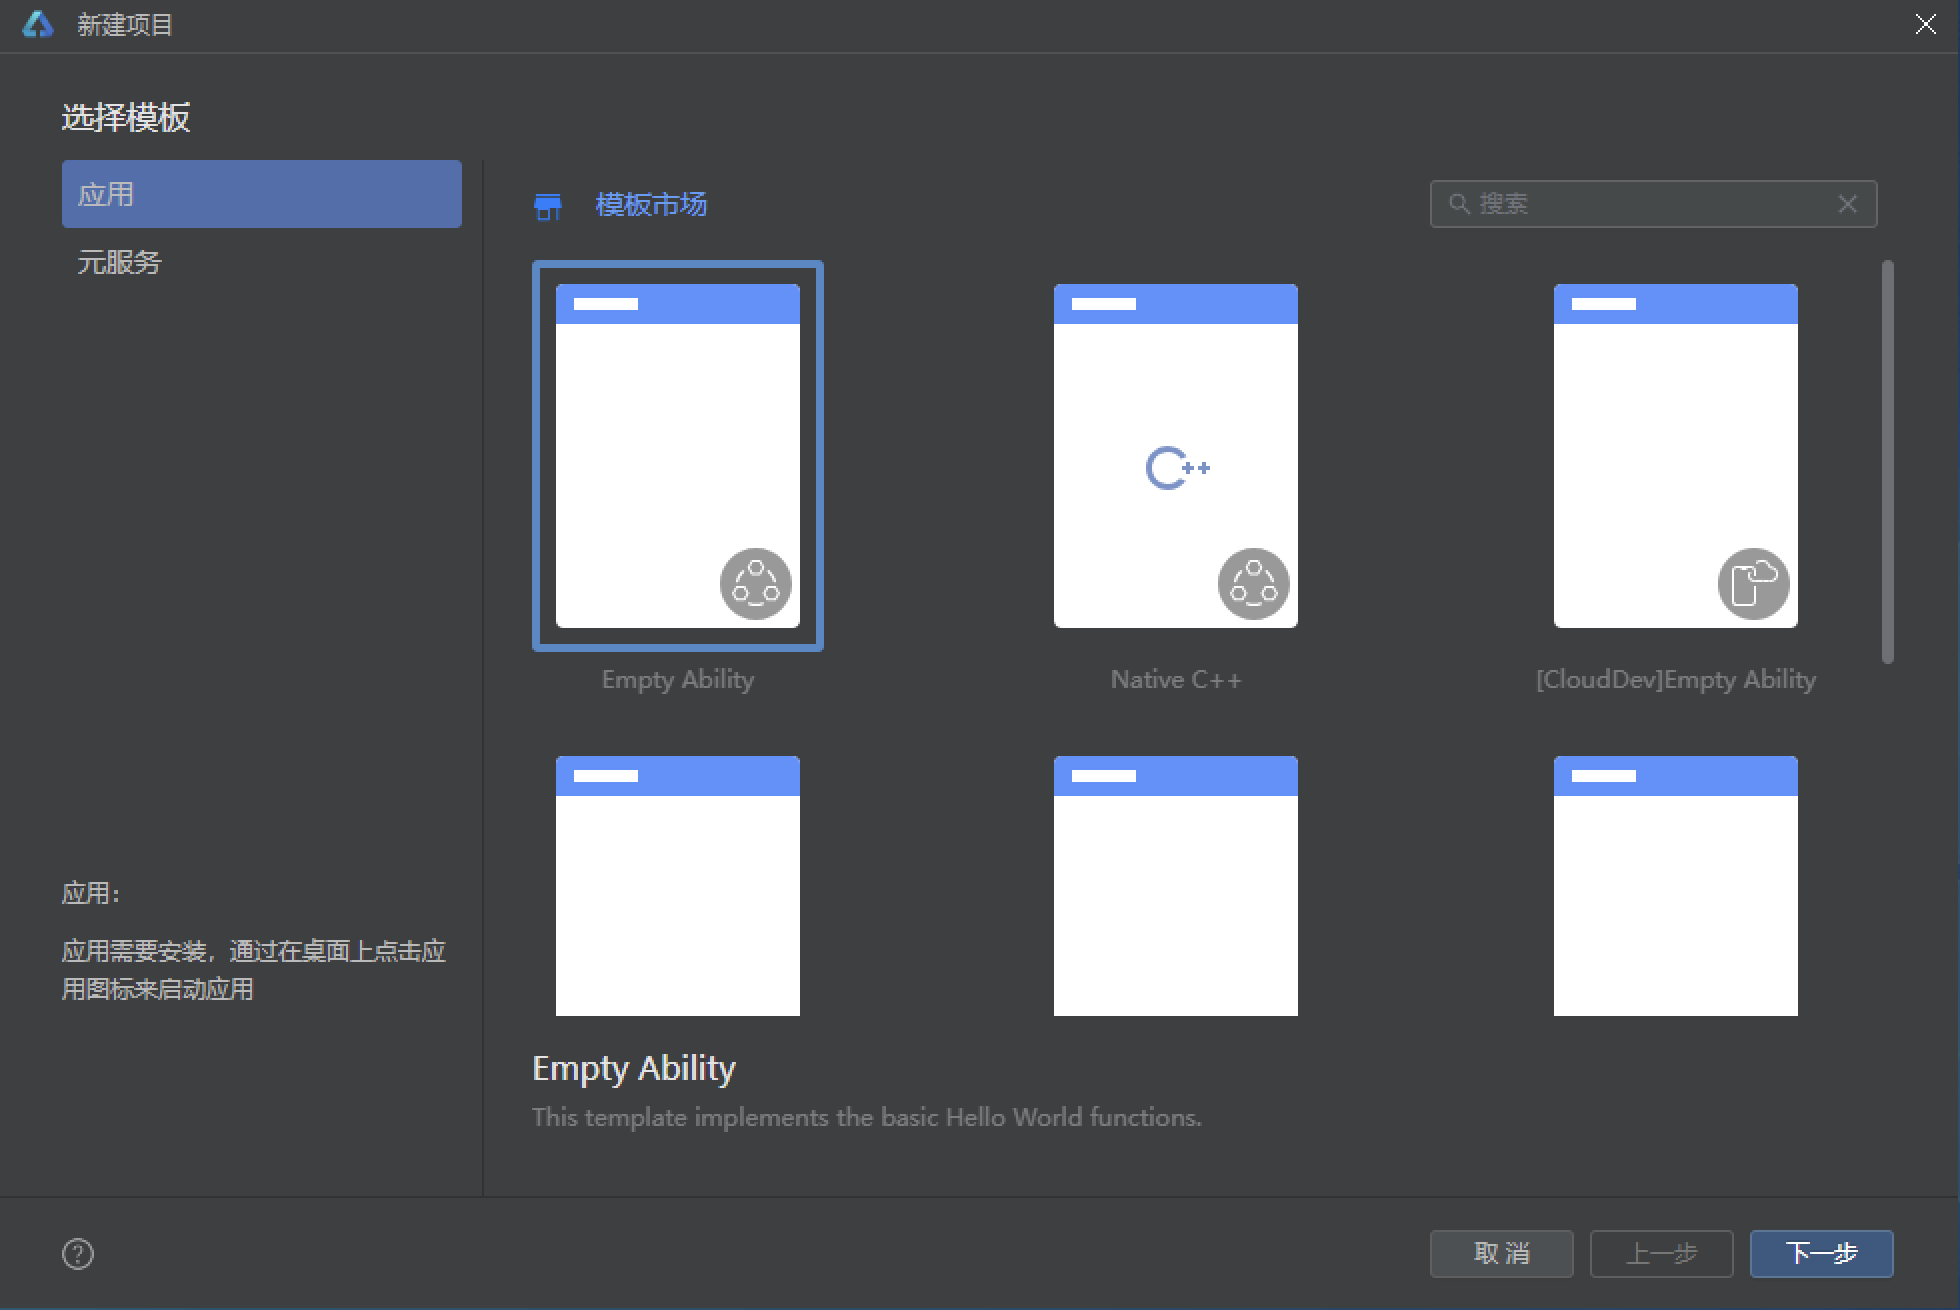
新建一个空白模板:
设置API为24的模板项目: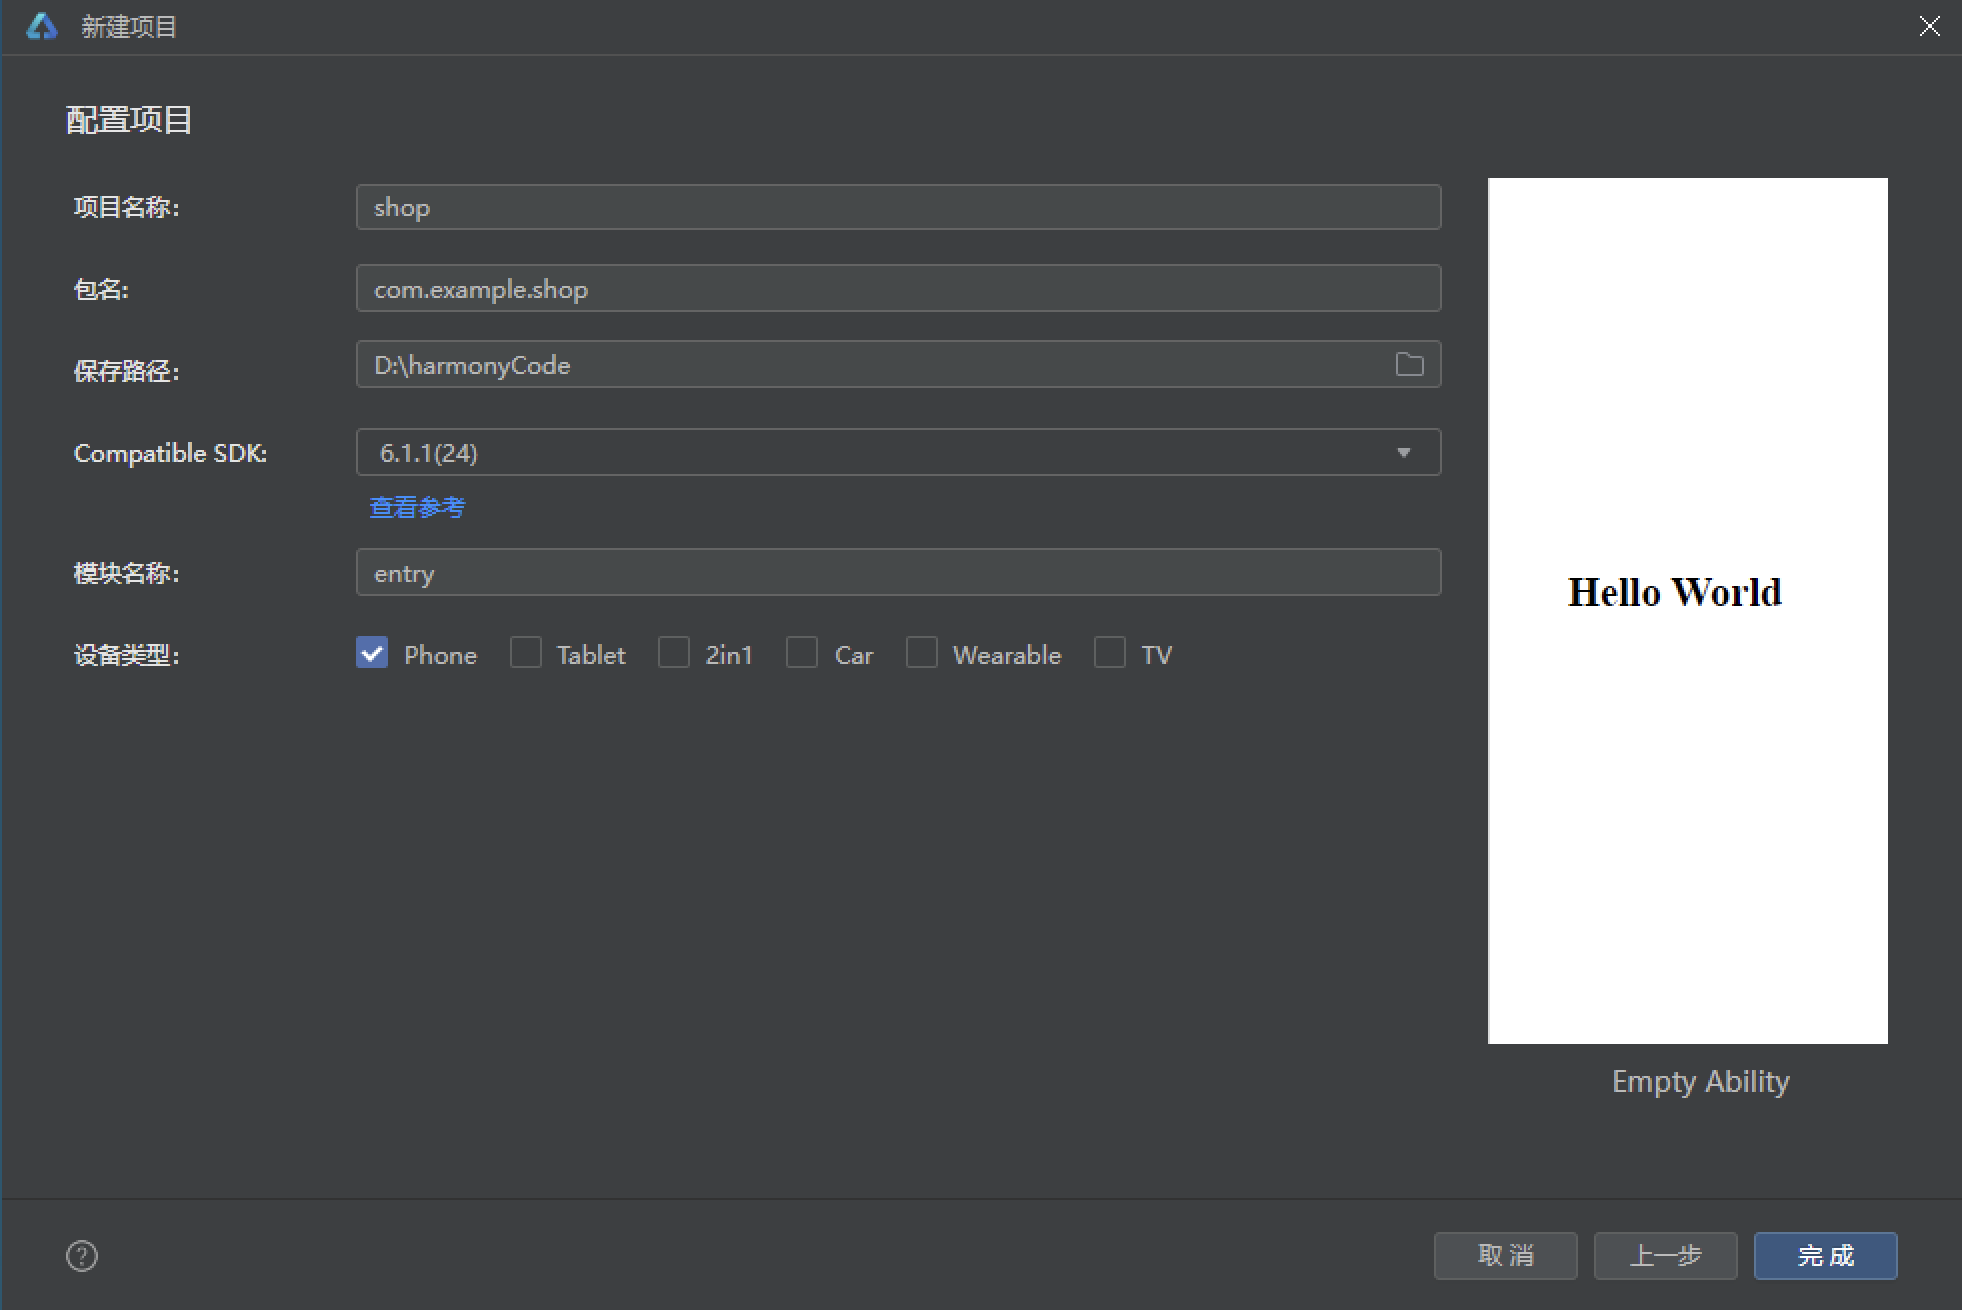
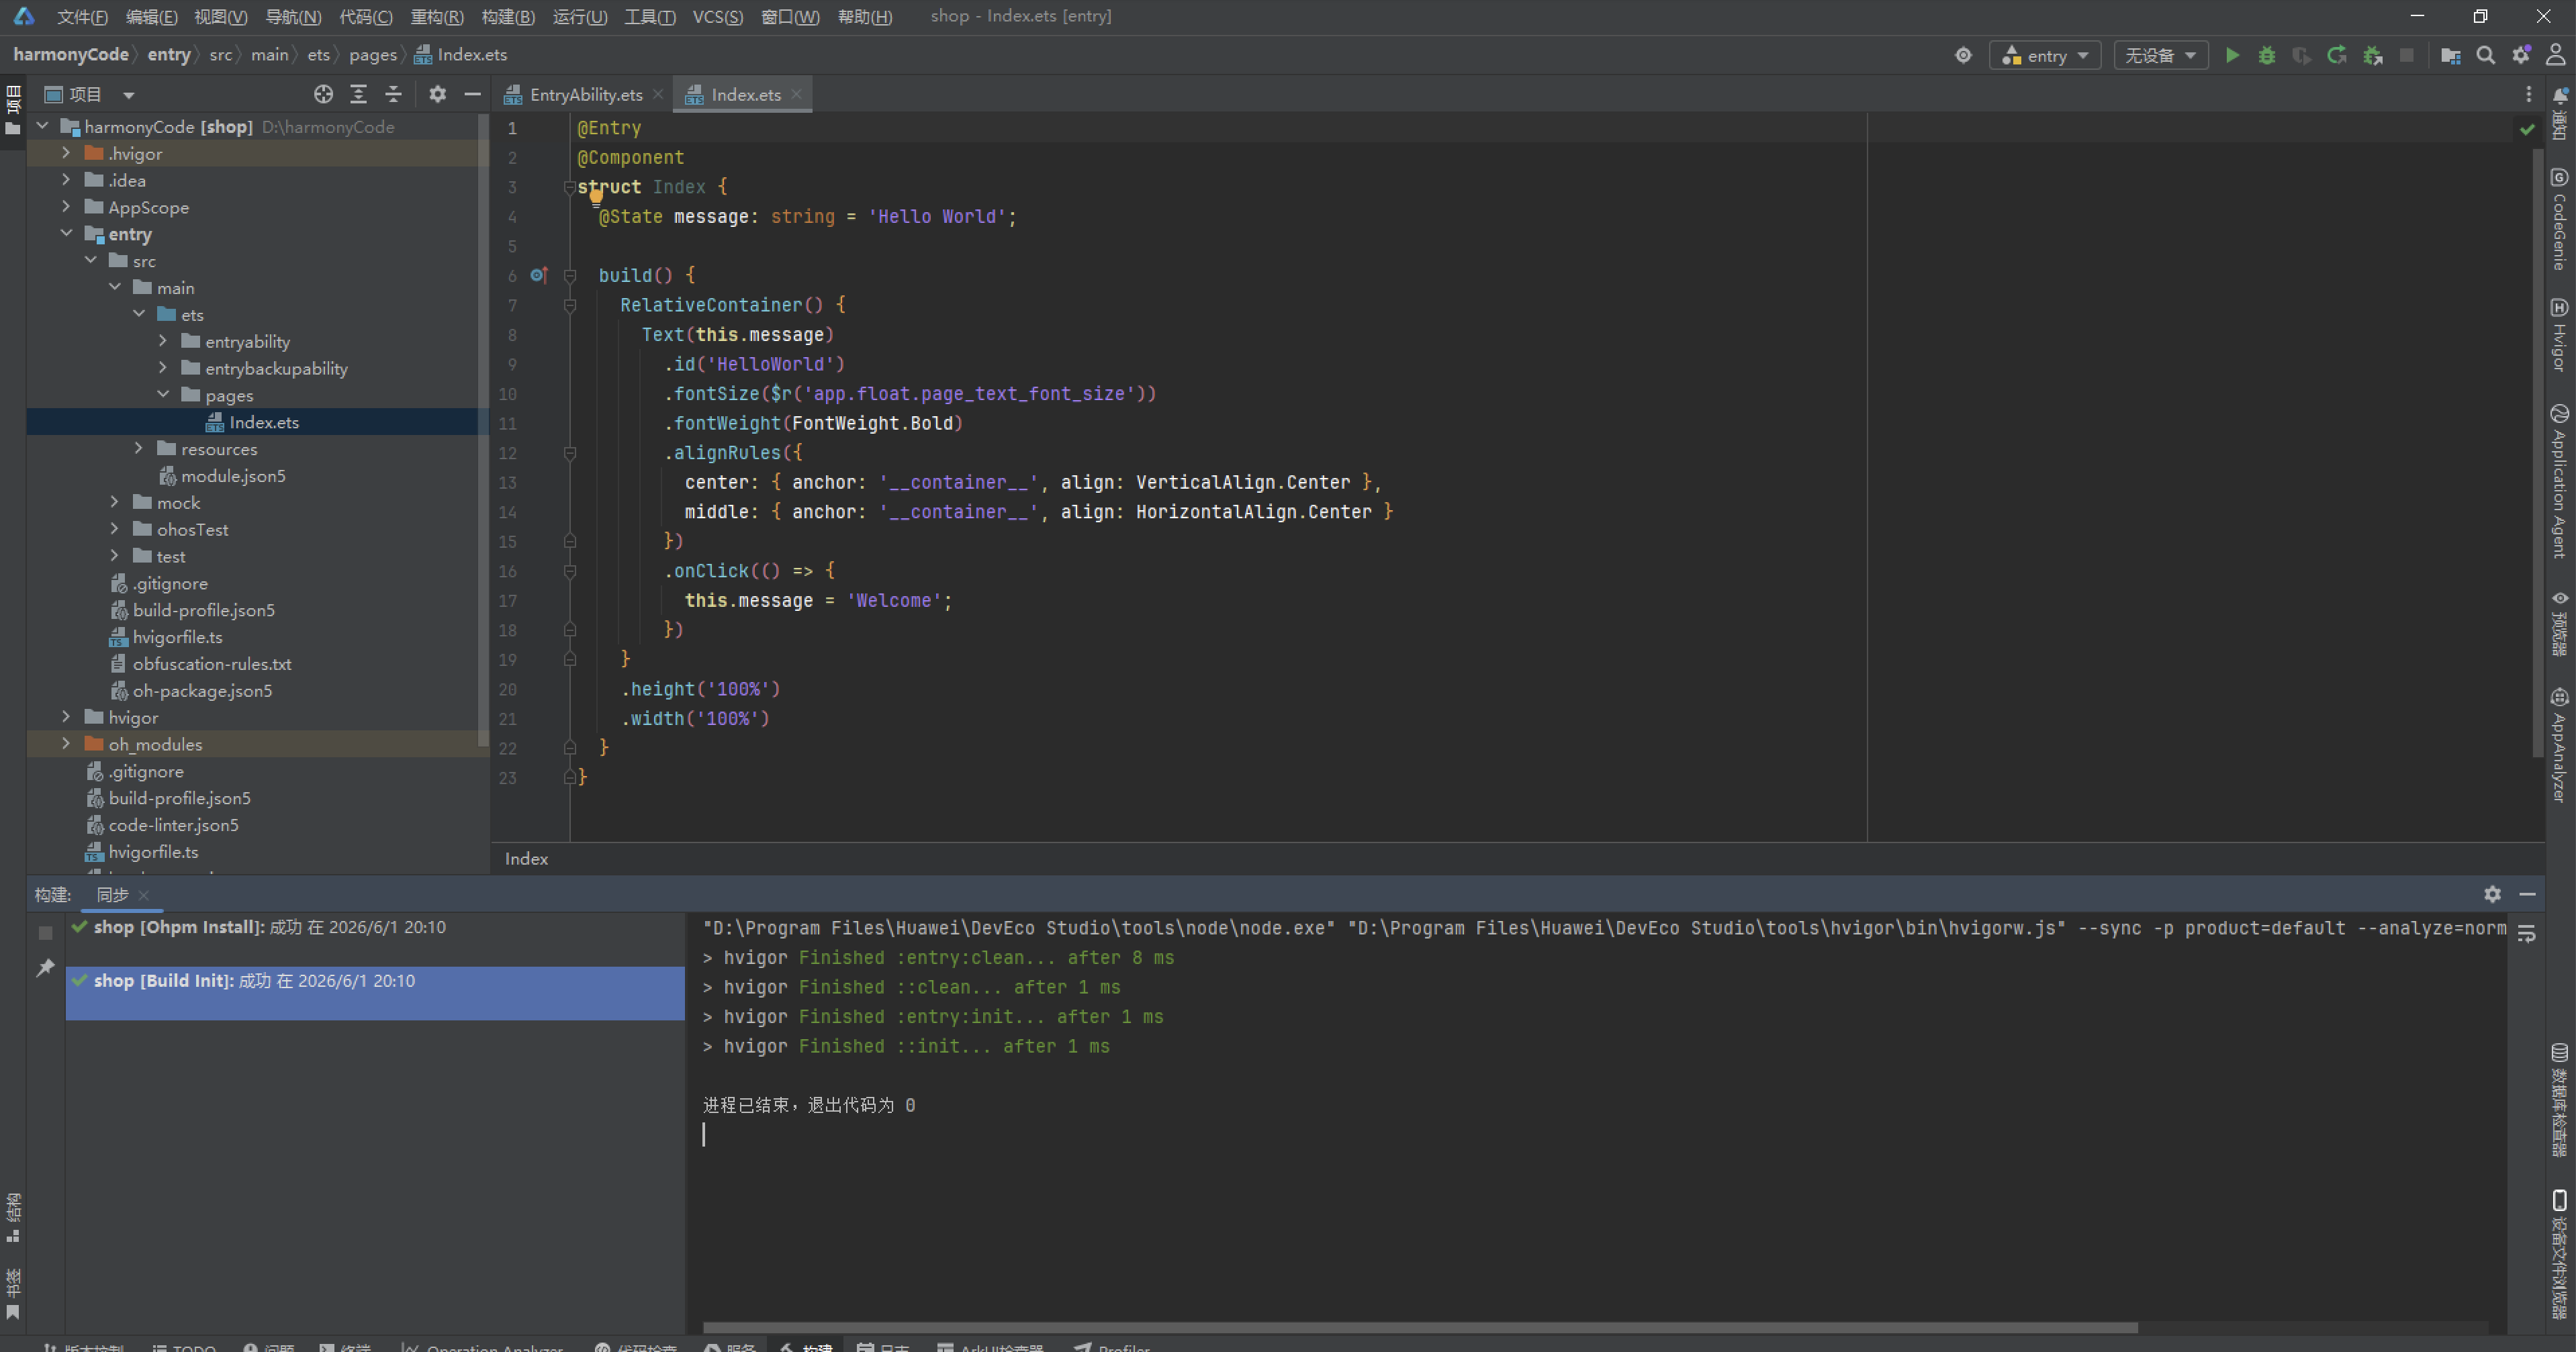
初始化项目,自动下载相关依赖:
完整代码:
// 清爽薄荷浅色:薄荷白底 + 青绿主色 + 天蓝 + 琥珀;5 tab(牙列/复诊/对比/护理/我的)
// 6 个弹框:预约复诊抽屉 / 牙齿详情居中卡 / 记录佩戴时长居中卡 / 编辑皮筋计划抽屉 / 删除对比照窄危险卡 / 购买护理品抽屉
// 特效:🦷 toothY13 浮动 + ✨ bracOp13 闪烁(aboutToAppear 无限动画)
// 图表:矫正总进度环形 / 上下牙列 16 格可点 / 复诊时间轴 / 整齐度趋势柱状 / 佩戴时长横条

interface ToothT13 {
  id: number
  name: string
  stage: number // 0未动 1移动中 2到位 3保持
  move: number
}

interface VisitT13 {
  id: number
  date: string
  act: string
  doctor: string
  pain: number
  next: string
}

interface SnapT13 {
  id: number
  date: string
  days: number
  score: number
  gap: number
  note: string
}

interface GoodT13 {
  id: number
  name: string
  cat: string
  price: number
  stock: number
}

interface OrdT13 {
  id: string
  good: string
  status: string
  amount: number
  date: string
}

const TEETH13: Array<ToothT13> = [
  { id: 1, name: '右上1', stage: 2, move: 100 },
  { id: 2, name: '右上2', stage: 2, move: 100 },
  { id: 3, name: '右上3', stage: 1, move: 62 },
  { id: 4, name: '右上4', stage: 1, move: 48 },
  { id: 5, name: '右上5', stage: 0, move: 12 },
  { id: 6, name: '右上6', stage: 0, move: 8 },
  { id: 7, name: '右上7', stage: 0, move: 5 },
  { id: 8, name: '右上8', stage: 0, move: 0 },
  { id: 9, name: '左上1', stage: 3, move: 100 },
  { id: 10, name: '左上2', stage: 2, move: 100 },
  { id: 11, name: '左上3', stage: 1, move: 71 },
  { id: 12, name: '左上4', stage: 1, move: 55 },
  { id: 13, name: '左上5', stage: 0, move: 15 },
  { id: 14, name: '左上6', stage: 0, move: 10 },
  { id: 15, name: '左上7', stage: 0, move: 4 },
  { id: 16, name: '左上8', stage: 0, move: 0 }
]

const VISITS13: Array<VisitT13> = [
  { id: 1, date: '2026-08-26', act: '更换镍钛弓丝 · 上颌加力', doctor: '周正雅', pain: 3, next: '2026-10-09' },
  { id: 2, date: '2026-07-15', act: '下颌皮筋更换 II 类牵引', doctor: '周正雅', pain: 2, next: '2026-08-26' },
  { id: 3, date: '2026-06-03', act: '尖牙远中移动评估', doctor: '周正雅', pain: 4, next: '2026-07-15' },
  { id: 4, date: '2026-04-22', act: '安装自锁托槽 · 全口', doctor: '周正雅', pain: 5, next: '2026-06-03' },
  { id: 5, date: '2026-04-20', act: '拍摄全景片 + 侧位片', doctor: '放射科', pain: 1, next: '2026-04-22' },
  { id: 6, date: '2026-04-05', act: '口扫取模 · 制定方案', doctor: '周正雅', pain: 0, next: '2026-04-20' },
  { id: 7, date: '2026-03-28', act: '初诊面型分析', doctor: '周正雅', pain: 0, next: '2026-04-05' }
]

const SNAPS13: Array<SnapT13> = [
  { id: 1, date: '2026-08-26', days: 126, score: 76, gap: 1.2, note: '上前牙列基本排齐' },
  { id: 2, date: '2026-07-15', days: 84, score: 68, gap: 1.8, note: '缝隙明显收窄' },
  { id: 3, date: '2026-06-03', days: 42, score: 58, gap: 2.4, note: '尖牙开始远移' },
  { id: 4, date: '2026-04-22', days: 0, score: 42, gap: 3.5, note: '戴牙套第一天' },
  { id: 5, date: '2026-05-08', days: 16, score: 50, gap: 3.0, note: '适应期结束' },
  { id: 6, date: '2026-05-25', days: 33, score: 55, gap: 2.7, note: '下牙列变化明显' },
  { id: 7, date: '2026-06-20', days: 59, score: 62, gap: 2.1, note: '覆颌改善' },
  { id: 8, date: '2026-07-30', days: 99, score: 71, gap: 1.5, note: '中线对齐过半' }
]

const GOODS13: Array<GoodT13> = [
  { id: 1, name: '正畸保护蜡 · 薄荷味', cat: '耗材', price: 29, stock: 4 },
  { id: 2, name: '托槽专用间隙刷', cat: '清洁', price: 39, stock: 6 },
  { id: 3, name: '冲牙器 便携款', cat: '电器', price: 259, stock: 2 },
  { id: 4, name: '含氟正畸牙膏', cat: '清洁', price: 45, stock: 8 },
  { id: 5, name: '皮筋套装 · 混色', cat: '耗材', price: 19, stock: 10 },
  { id: 6, name: '牙套清洁泡腾片×30', cat: '清洁', price: 59, stock: 5 },
  { id: 7, name: '正畸专用咬胶', cat: '耗材', price: 25, stock: 9 },
  { id: 8, name: '菌斑显示剂×20', cat: '耗材', price: 22, stock: 7 },
  { id: 9, name: '舌苔清洁器', cat: '清洁', price: 18, stock: 12 },
  { id: 10, name: '正畸阴影刷(超细软毛)', cat: '清洁', price: 36, stock: 6 }
]

const ORDS13: Array<OrdT13> = [
  { id: 'D20260826001', good: '更换镍钛弓丝(含复诊)', status: '已完成', amount: 380, date: '2026-08-26' },
  { id: 'D20260801002', good: '冲牙器 便携款', status: '已完成', amount: 259, date: '2026-08-01' },
  { id: 'D20260715003', good: '皮筋套装 · 混色 ×3', status: '已完成', amount: 57, date: '2026-07-15' },
  { id: 'D20260901004', good: '保持器(摘牙套后备用)', status: '待制作', amount: 880, date: '2026-09-01' },
  { id: 'D20260620005', good: '含氟正畸牙膏 ×2', status: '已完成', amount: 90, date: '2026-06-20' },
  { id: 'D20260910006', good: '下次复诊 · 下颌加力', status: '待就诊', amount: 380, date: '2026-10-09' }
]

const WEAR13: Array<string> = ['14h', '19h', '21h', '20h', '22h', '21h', '18h']
const WEARV13: Array<number> = [14, 19, 21, 20, 22, 21, 18]
const WK13: Array<string> = ['周一', '周二', '周三', '周四', '周五', '周六', '周日']

function stageName13(s: number): string {
  if (s === 3) {
    return '保持'
  }
  if (s === 2) {
    return '到位'
  }
  if (s === 1) {
    return '移动中'
  }
  return '未启动'
}

function stageColor13(s: number): string {
  if (s === 3) {
    return '#0284C7'
  }
  if (s === 2) {
    return '#0D9488'
  }
  if (s === 1) {
    return '#F59E0B'
  }
  return '#CBD5E1'
}

function painWord13(p: number): string {
  if (p >= 4) {
    return '明显酸痛'
  }
  if (p >= 2) {
    return '轻微酸胀'
  }
  return '无不适'
}

@Entry
@Component
struct Index {
  @State tab13: number = 0
  @State teeth13: Array<ToothT13> = TEETH13.slice()
  @State visits13: Array<VisitT13> = VISITS13.slice()
  @State snaps13: Array<SnapT13> = SNAPS13.slice()
  @State goods13: Array<GoodT13> = GOODS13.slice()
  @State ords13: Array<OrdT13> = ORDS13.slice()
  @State showVisit13: boolean = false
  @State showTooth13: boolean = false
  @State showWear13: boolean = false
  @State showBand13: boolean = false
  @State showDel13: boolean = false
  @State showBuy13: boolean = false
  @State selTooth13: number = 0
  @State selSnap13: number = 0
  @State selGood13: number = 0
  @State vItem13: number = 0
  @State vSlot13: number = 0
  @State vWorry13: boolean = false
  @State wearH13: number = 20
  @State wearNote13: string = ''
  @State bandColor13: number = 0
  @State bandHour13: number = 20
  @State buyNum13: number = 1
  @State armed13: boolean = false
  @State toothY13: number = 0
  @State bracOp13: number = 1

  aboutToAppear() {
    this.getUIContext().animateTo({ duration: 2200, iterations: -1, playMode: PlayMode.Alternate, curve: Curve.EaseInOut }, () => {
      this.toothY13 = 14
    })
    this.getUIContext().animateTo({ duration: 1200, iterations: -1, playMode: PlayMode.Alternate, curve: Curve.EaseInOut }, () => {
      this.bracOp13 = 0.25
    })
  }

  @Builder
  headerBar13() {
    Column() {
      Row() {
        Text('🦷 口腔数字正畸')
          .fontSize(20)
          .fontWeight(FontWeight.Bold)
          .fontColor('#0F3D3A')
        Text('ORTHO LAB')
          .fontSize(10)
          .fontColor('#8AB8B2')
          .letterSpacing(2)
          .margin({ left: 6 })
        Text('✨')
          .fontSize(18)
          .opacity(this.bracOp13)
          .margin({ left: 6 })
        Column() {
          Text('第126天')
            .fontSize(11)
            .fontWeight(FontWeight.Bold)
            .fontColor('#FFFFFF')
        }
        .padding({ left: 12, right: 12, top: 5, bottom: 5 })
        .borderRadius(13)
        .backgroundColor('#0D9488')
        .margin({ left: 10 })
        Text('🔔')
          .fontSize(19)
          .margin({ left: 8 })
      }
      if (this.showDel13) {
        this.delOverlay13()
      }
      if (this.showBuy13) {
        this.buyOverlay13()
      }
    }
    .width('100%')
    .height('100%')
    .backgroundColor('#F2FBF9')
  }
}
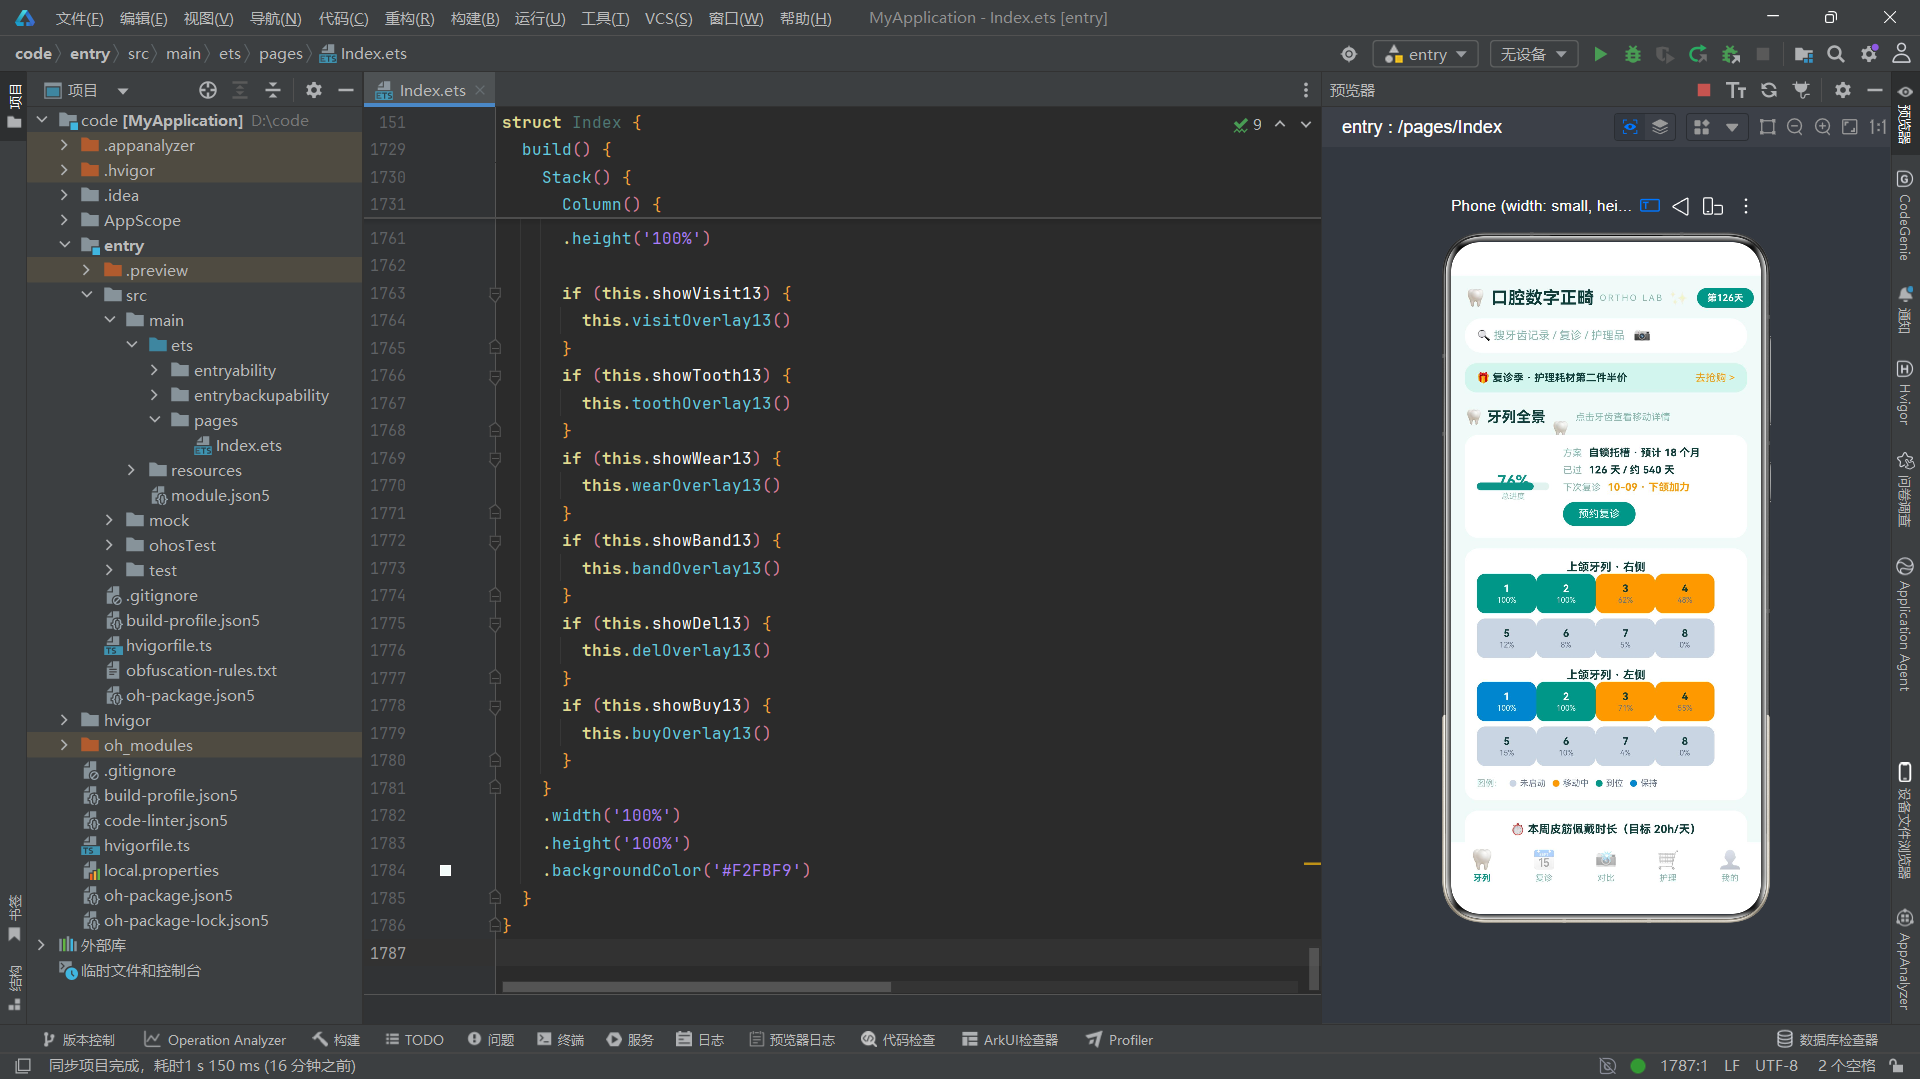
在交互设计层面,项目实现了六种弹框模式,展示了底部抽屉、居中卡片、窄危险卡三种弹框布局策略。每种弹框都采用了"半透明遮罩+zIndex层级控制+点击外部关闭+事件冒泡阻断"的标准实现方案。特别是删除确认弹框的"安全开关"设计(通过Toggle的armed13状态控制删除按钮的激活),体现了对危险操作的防护意识。步进器、标签选择器、TextInput受控输入等表单交互模式也都有完整的实现示例。
在动画与视觉效果层面,项目通过aboutToAppear生命周期中启动的animateTo无限循环动画实现了牙齿浮动和图标闪烁两种装饰效果。translate位移变换和opacity透明度变化配合PlayMode.Alternate交替播放模式,形成了自然流畅的往复动画。此外,scale缩放变换用于Tab选中高亮,borderRadius非对称圆角用于卡片视觉层次,条件样式(三元表达式选择颜色)用于数据可视化编码,这些视觉技巧共同打造了精致的界面表现力。
在渲染性能层面,ForEach的键值生成函数是列表渲染性能优化的关键。项目为每个ForEach都提供了基于业务字段组合的键值生成函数(如t.id.toString() + t.stage.toString()),确保Diff算法能够精确识别列表项的变化,只重新渲染真正变化的项而非整个列表。if-else条件渲染用于Tab切换和弹框显隐,虽然每次切换会重建组件树,但在本项目的数据规模下性能影响可以忽略。layoutWeight权重分配避免了固定像素布局的适配问题,使界面在不同屏幕尺寸下都能正确缩放。

作为“人工智能6S店”的官方数字引擎,为AI开发者与企业提供一个覆盖软硬件全栈、一站式门户。
更多推荐



 0
0 0
0- 0


 已为社区贡献110条内容

所有评论(0)