
色块课表网格:ArkUI 让鸿蒙课程表像教室黑板
实例:课程表管理(Course)|风格:课表网格
一、设计理念:课表要「一格一课的格子里」
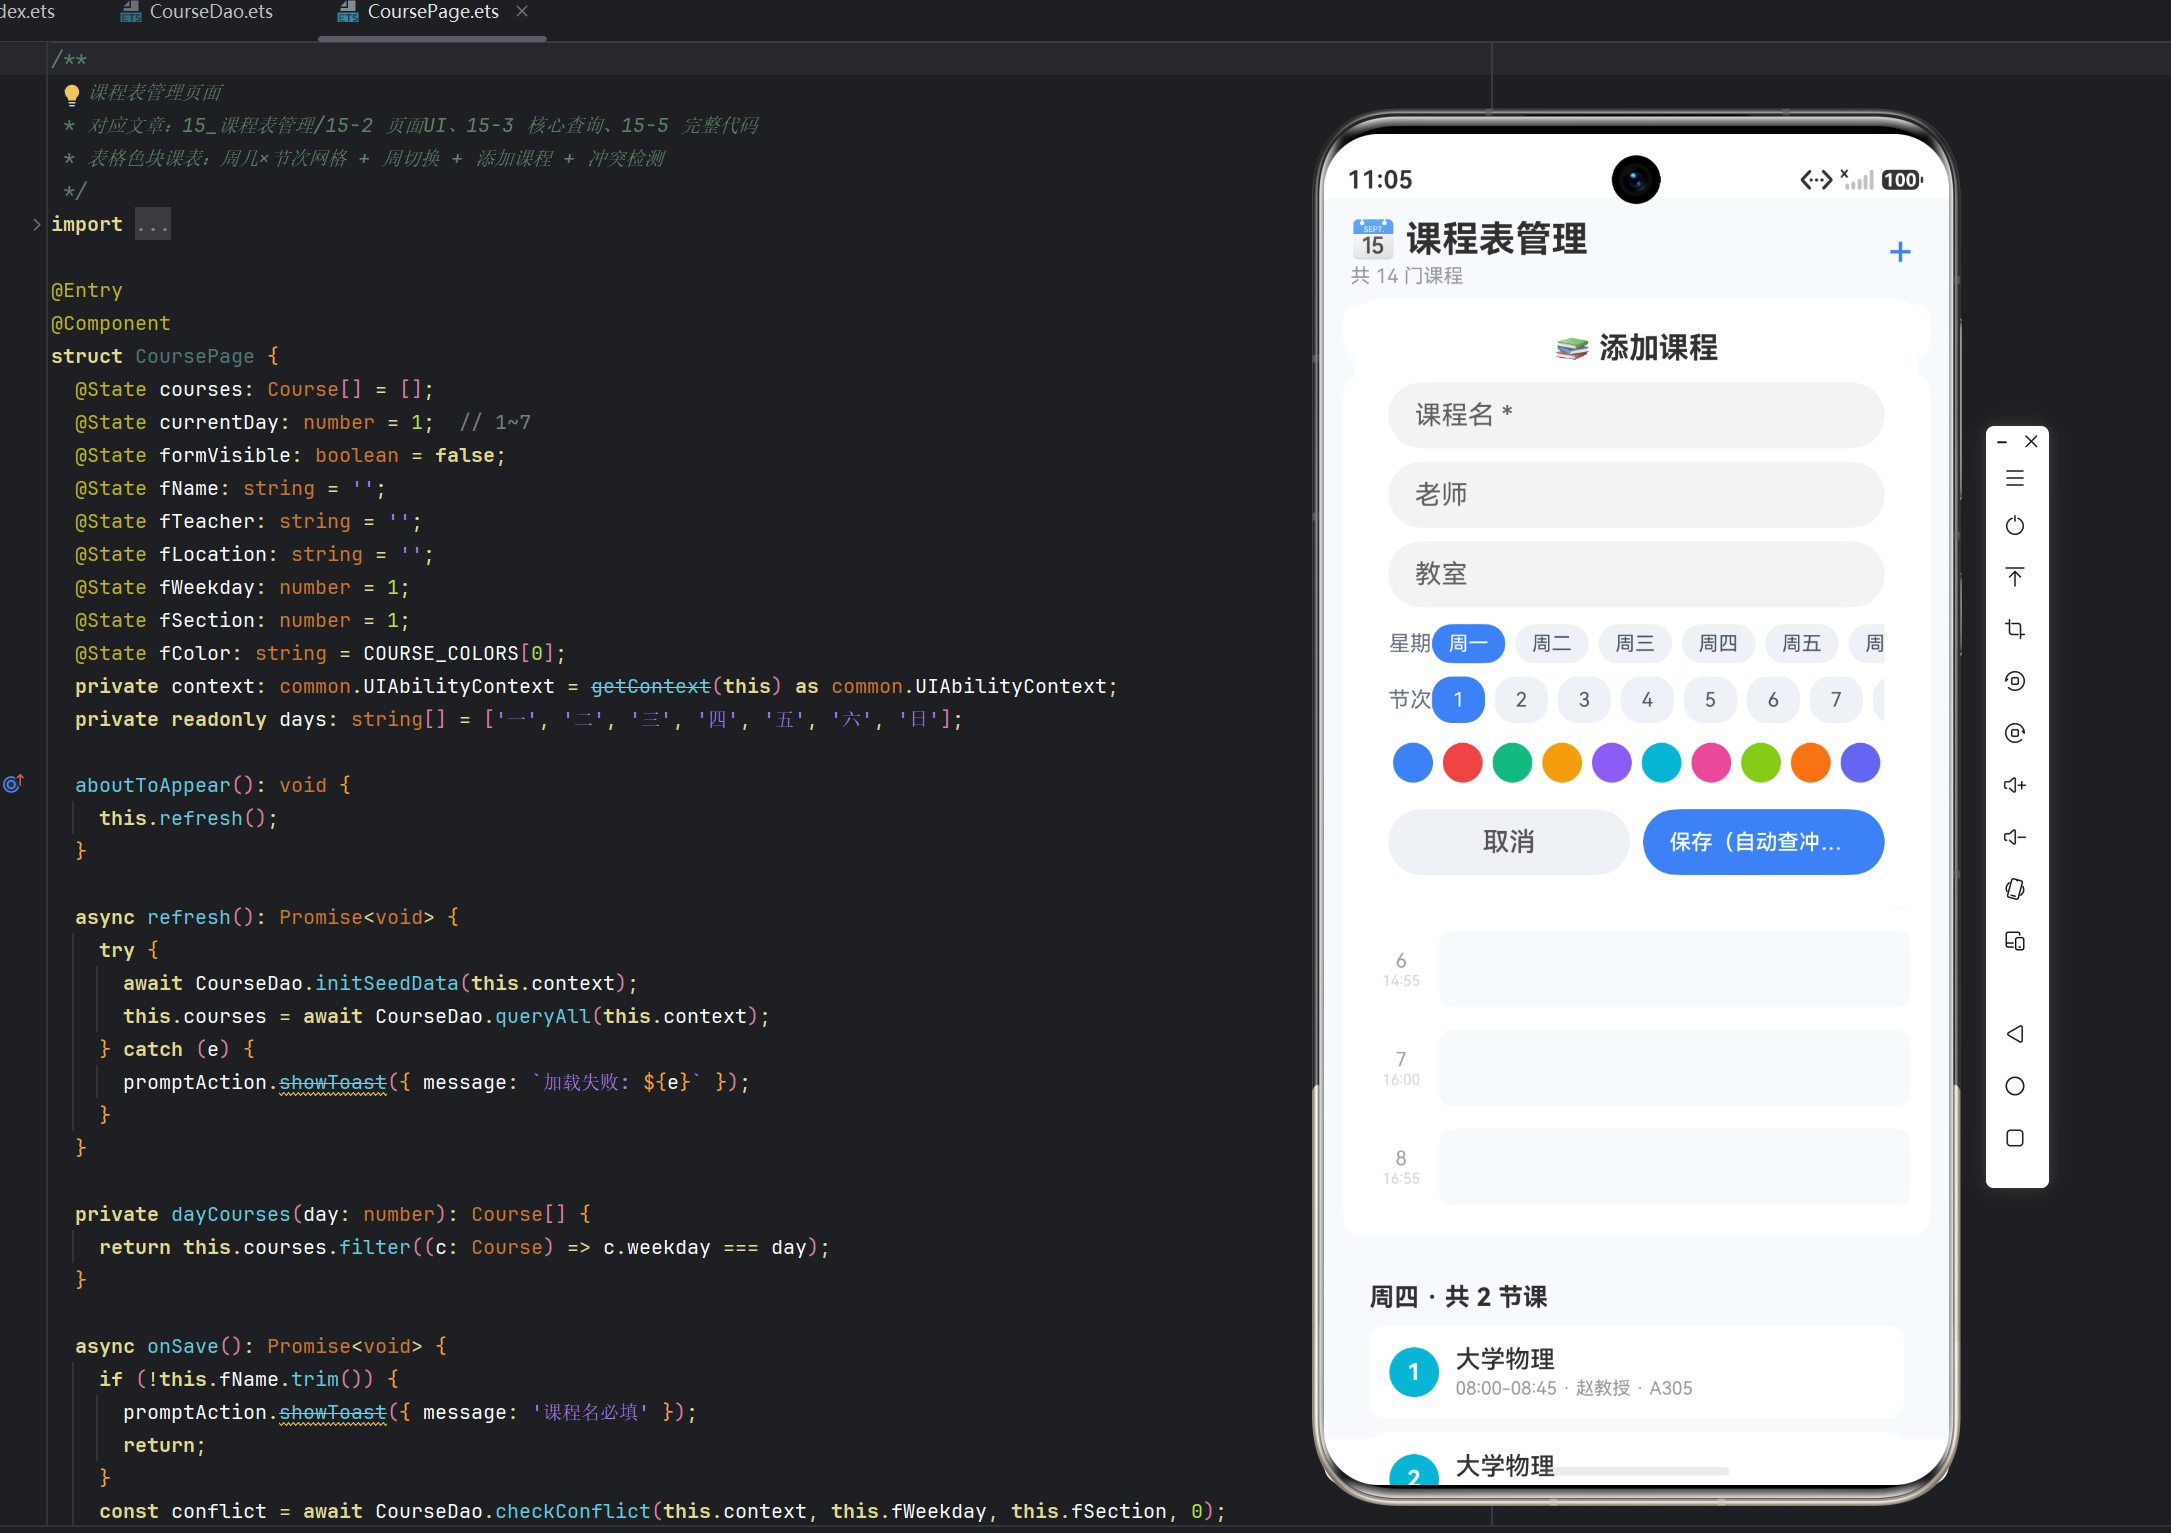
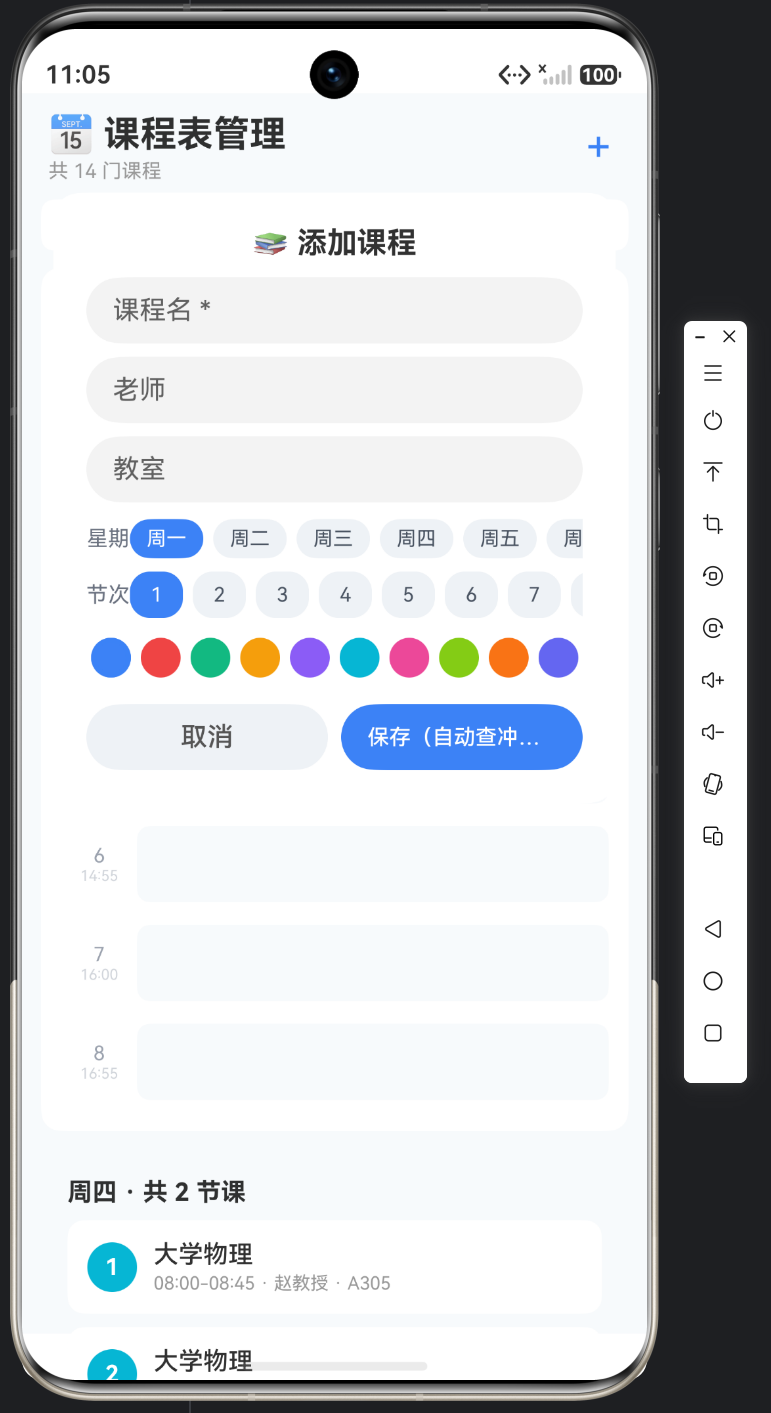
课程表的 UI 目标是真实课程表——不是列表,是网格:横向星期、纵向节次、格子里是色块课程。实例 15 的风格「课表网格」:周切换条(7 天横向)+ 节次时间轴(8 节纵向)+ 色块课表(当天格子)+ 当天课程列表。
页面信息架构:
- 标题栏:课程表管理 + 课程总数 + 添加按钮;
- 周切换条:周一~周日 7 个 tab(选中蓝色高亮);
- 课表格子:节次时间轴(第 1~8 节 + 时间)+ 当天 8 行格子(色块课程);
- 当天课程列表:选中天的课程明细(节次圆标 + 课程名 + 时间老师教室);
- 添加课程弹窗:课程名/老师/教室 + 星期/节次选择 + 色板 + 冲突检测保存。
二、页面骨架与核心状态
@State courses: Course[] = [];
@State currentDay: number = 1;  // 1~7
@State formVisible: boolean = false;
@State fName: string = '';
@State fTeacher: string = '';
@State fLocation: string = '';
@State fWeekday: number = 1;
@State fSection: number = 1;
@State fColor: string = COURSE_COLORS[0];
private readonly days: string[] = ['一', '二', '三', '四', '五', '六', '日'];
核心状态:courses(全部课程)、currentDay(当前选中周几)、表单七态(弹窗输入)。days 数组:数字 weekday → 「周一~周日」的展示映射。
build 骨架(无 Stack——添加按钮在标题栏,弹窗在 Column 内):
Column() {
  // 标题栏(含 +)
  // 周切换条
  // 课表格子(时间轴 + 当天格子)
  // 当天课程列表
  // 添加课程弹窗
}
三、周切换条:7 天横向 tab
Row({ space: 4 }) {
  ForEach(this.days, (d: string, idx: number) => {
    Text(`周${d}`)
      .fontSize(13).layoutWeight(1).textAlign(TextAlign.Center)
      .padding({ top: 8, bottom: 8 })
      .borderRadius(8)
      .backgroundColor(this.currentDay === idx + 1 ? '#3B82F6' : '#FFFFFF')
      .fontColor(this.currentDay === idx + 1 ? Color.White : '#4B5563')
      .onClick(() => this.currentDay = idx + 1)
  }, (d: string, idx: number) => `${idx}-${d}`)
}.width('94%').margin({ top: 10 })
7 等分 tab:layoutWeight(1) 均分宽度——周一~周日一排。选中态:蓝色底白字 vs 白底灰字。idx + 1:数组下标 0~6 映射 weekday 1~7(currentDay = idx + 1)。
四、课表格子:节次时间轴 + 当天格子
课表网格是**「每节次一行」的纵向结构**:
Column() {
  Row() {   // 表头
    Text('节次').fontSize(12).fontColor('#9CA3AF').width(46).textAlign(TextAlign.Center)
    Text(`周${this.days[this.currentDay - 1]}`).fontSize(12).fontColor('#9CA3AF').layoutWeight(1).textAlign(TextAlign.Center)
  }.width('100%').padding({ bottom: 6 })
  ForEach([1, 2, 3, 4, 5, 6, 7, 8], (section: number) => {
    Row() {
      Column() {   // 节次时间轴
        Text(`${section}`).fontSize(12).fontColor('#9CA3AF')
        Text(SECTION_TIMES[section - 1].substring(0, 5)).fontSize(9).fontColor('#D1D5DB')
      }.width(46)
      Row({ space: 4 }) {   // 该节次的课程格子
        ForEach(this.courses.filter((c: Course) => c.weekday === this.currentDay && c.section === section), (c: Course) => {
          Column() {
            Text(c.name).fontSize(13).fontWeight(FontWeight.Bold).fontColor(Color.White).maxLines(1)
            Text(`${c.teacher} · ${c.location}`).fontSize(10).fontColor('rgba(255,255,255,0.85)').maxLines(1)
          }
          .layoutWeight(1).padding(6).borderRadius(8).backgroundColor(c.color)
          .alignItems(HorizontalAlign.Start)
          .onClick(() => this.showCourseMenu(c))
        }, (c: Course) => `${c.id}-${c.section}`)
        if (this.courses.filter((c: Course) => c.weekday === this.currentDay && c.section === section).length === 0) {
          Text('').layoutWeight(1).height(46).borderRadius(8).backgroundColor('#F8FAFC')
        }
      }
      .layoutWeight(1).height(54)
    }
    .width('100%').padding({ top: 3, bottom: 3 })
  }, (section: number) => `sec-${section}`)
}
.width('94%').padding(12).backgroundColor(Color.White).borderRadius(12).margin({ top: 10 })
网格的逐行渲染:8 节循环(ForEach [1…8]),每节一行 = 「节次号 + 时间」左侧 46 宽 + 「该节次的课程」右侧。
格子内容:courses.filter(weekday === currentDay && section === section)——过滤出该格子的课程(连堂课同节次多门时并排显示,Row({ space: 4 }) 内多块)。空节次显示浅灰占位格(height(46) 的 #F8FAFC 空块)——空位有视觉反馈,网格完整。
色块课卡:课程名白字粗体 + 「老师 · 教室」半透明白字,背景课程色——色块即课程,扫一眼认课。点课卡 → showCourseMenu(详情/删除菜单)。
filter 的重复调用:每节次两次 filter(渲染 + 判空)——Demo 数据量小无所谓;真实大量课程可先按天分组缓存。数据量小时 filter 直接写是务实选择。
五、当天课程列表:节次圆标 + 明细
课表格子下方的「当天课程列表」——选中天的课程按节次排列:
Column() {
  Text(`周${this.days[this.currentDay - 1]} · 共 ${this.dayCourses(this.currentDay).length} 节课`)
    .fontSize(15).fontWeight(FontWeight.Bold)
  ForEach(this.dayCourses(this.currentDay), (c: Course) => {
    Row({ space: 10 }) {
      Text(`${c.section}`).fontSize(14).fontWeight(FontWeight.Bold)
        .width(30).height(30).borderRadius(15).backgroundColor(c.color)
        .fontColor(Color.White).textAlign(TextAlign.Center)
      Column({ space: 2 }) {
        Text(c.name).fontSize(15).fontWeight(FontWeight.Medium)
        Text(`${SECTION_TIMES[c.section - 1]} · ${c.teacher} · ${c.location}`).fontSize(11).fontColor('#999999')
      }.alignItems(HorizontalAlign.Start).layoutWeight(1)
    }
    .width('100%').padding(12).backgroundColor(Color.White).borderRadius(10).margin({ top: 8 })
  }, (c: Course) => `d-${c.id}`)
}
.width('94%').padding(16).margin({ top: 12, bottom: 24 })
.alignItems(HorizontalAlign.Start)
dayCourses 辅助方法:
private dayCourses(day: number): Course[] {
  return this.courses.filter((c: Course) => c.weekday === day);
}
节次圆标:节次号放课程色圆形里(30×30 圆)——延续色块视觉。明细行:课程名 + 「08:00-08:45 · 王教授 · A101」。网格 + 列表双视图:网格看布局、列表看细节——同一天的数据两种呈现。
六、添加课程弹窗:星期/节次/色板选择
添加课程弹窗(多行选择器):
if (this.formVisible) {
  Column() {
    Text('📚 添加课程').fontSize(18).fontWeight(FontWeight.Bold)
    TextInput({ placeholder: '课程名 *', text: this.fName }).margin({ top: 10 }).onChange((v: string) => this.fName = v)
    TextInput({ placeholder: '老师', text: this.fTeacher }).margin({ top: 8 }).onChange((v: string) => this.fTeacher = v)
    TextInput({ placeholder: '教室', text: this.fLocation }).margin({ top: 8 }).onChange((v: string) => this.fLocation = v)
    // 星期选择(横向滚动 chips)
    // 节次选择(1~8 横向滚动)
    // 色板选择(10 色圆点)
    Row({ space: 8 }) {
      Button('取消')...
      Button('保存(自动查冲突)')...
    }
  }
  .padding(20).borderRadius(16).backgroundColor(Color.White).width('90%')
  .position({ x: '5%', y: '8%' })
}
星期 chips(横向 Scroll):
Row() {
  Text('星期').fontSize(13).fontColor('#6B7280')
  Scroll() {
    Row({ space: 6 }) {
      ForEach(this.days, (d: string, idx: number) => {
        Text(`周${d}`)
          .fontSize(12).padding({ left: 10, right: 10, top: 5, bottom: 5 })
          .borderRadius(12)
          .backgroundColor(this.fWeekday === idx + 1 ? '#3B82F6' : '#EEF2F7')
          .fontColor(this.fWeekday === idx + 1 ? Color.White : '#4B5563')
          .onClick(() => this.fWeekday = idx + 1)
      }, (d: string, idx: number) => `w-${idx}`)
    }
  }.scrollable(ScrollDirection.Horizontal).scrollBar(BarState.Off).layoutWeight(1)
}.width('100%').margin({ top: 10 })
色板选择(10 色圆点):
Row({ space: 6 }) {
  ForEach(COURSE_COLORS, (c: string) => {
    Row().width(24).height(24).borderRadius(12).backgroundColor(c)
      .border({ width: this.fColor === c ? 3 : 0, color: '#3B82F6' })
      .onClick(() => this.fColor = c)
  }, (c: string) => c)
}.margin({ top: 12 })
选中色加蓝描边(border 3 宽)——颜色选择器的选中态。**保存按钮文案「保存(自动查冲突)」**提前告知用户有冲突检测——onSave 里 checkConflict 拦截(15-3 详解)。
七、课卡菜单:showActionMenu
点课表色块 → 操作菜单:
showCourseMenu(c: Course): void {
  promptAction.showActionMenu({
    title: c.name,
    buttons: [
      { text: '查看详情', color: '#3B82F6' },
      { text: '删除', color: '#EF4444' },
    ],
  }).then((res: promptAction.ActionMenuSuccessResponse) => {
    if (res.index === 0) {
      promptAction.showDialog({
        title: c.name,
        message: `${c.teacher} · ${c.location}\n周${this.days[c.weekday - 1]} 第${c.section}节\n${SECTION_TIMES[c.section - 1]}\n教学周:${c.weeks}`,
        buttons: [{ text: '知道了', color: '#3B82F6' }],
      });
    }
    if (res.index === 1) {
      this.deleteCourse(c);
    }
  });
}
showActionMenu 首次登场:动作菜单(底部弹出多个操作项)——比 showDialog 更适合「多个动作」场景。详情用 showDialog 拼多行信息(\n 换行)。删除走确认框(deleteCourse 内 showDialog 二次确认)。
八、UI 风格要素一览
| 风格项 | 取值 | 说明 |
|---|---|---|
| 页面背景 | #F8FAFC 极浅灰蓝 |
课表清爽 |
| 主色 | #3B82F6 蓝 |
选中/添加 |
| 周切换 | 7 等分 tab | 蓝色选中态 |
| 课表网格 | 节次时间轴 + 色块格子 | 黑板感 |
| 课程色板 | 10 色 HEX | 色块区分 |
| 空节次 | 浅灰占位格 | 网格完整 |
九、文章小结
本篇文章完成了实例 15 的 UI 层:周切换条(7 等分 tab)+ 课表格子(节次时间轴 + 当天色块课程 + 空位占位)+ 当天课程列表(节次圆标 + 明细)+ 添加弹窗(星期/节次 chips + 色板)+ 课卡菜单(showActionMenu)。设计核心是「课表网格感」——逐节次行渲染 + 色块课程 + 空节次占位让网格完整真实。交互亮点是 showActionMenu 动作菜单(首次登场)与色板描边选中态。

作为“人工智能6S店”的官方数字引擎,为AI开发者与企业提供一个覆盖软硬件全栈、一站式门户。
更多推荐
 1
1 0
0- 0


 已为社区贡献50条内容

所有评论(0)