
在鸿蒙平台学习Flutter:Dart语言概述与特性,编写个人信息数据模型类
作者:付文龙(红目香薰)
仓库地址:https://gitcode.com/feng8403000/FlutterfromBeginnertoAdvancedForHarmonyOS.git
联系邮箱:372699828@qq.com

一、引言
欢迎来到《Flutter从入门到进阶-HarmonyOS版本》系列文章的第一篇。在这篇文章中,我们将从零开始,学习Flutter开发的基石——Dart语言。作为一门现代化的编程语言,Dart为Flutter框架提供了强大的支持,无论是在Android、iOS还是鸿蒙(HarmonyOS)平台上,都能发挥出色的性能。
1.1 为什么选择Flutter和Dart?
在移动应用开发领域,跨平台框架层出不穷,React Native、Xamarin、Flutter等各有特色。那么,为什么我们要选择Flutter呢?
| 特性 | Flutter | React Native | Xamarin |
|---|---|---|---|
| 渲染方式 | 自绘引擎(Skia) | 原生组件桥接 | 原生组件桥接 |
| 性能 | 接近原生 | JavaScript桥接开销 | .NET运行时 |
| 开发体验 | Hot Reload | Hot Reload | Hot Reload |
| UI一致性 | 跨平台一致 | 平台差异较大 | 平台差异较大 |
| 生态系统 | 快速增长 | 成熟但碎片化 | 微软支持 |
Flutter的最大优势在于其自绘引擎,这意味着UI在不同平台上具有高度一致性,开发者可以专注于业务逻辑而无需处理平台差异。而Dart语言作为Flutter的官方语言,为这种高性能渲染提供了坚实的基础。
1.2 鸿蒙平台的机遇与挑战
随着鸿蒙OS的快速发展,越来越多的开发者开始关注鸿蒙平台的应用开发。Flutter作为跨平台框架,天然支持鸿蒙平台,这为开发者提供了一次开发、多端运行的机会。
然而,鸿蒙平台也带来了一些挑战:
- 平台特性差异:鸿蒙有其独特的能力和API
- 权限管理:鸿蒙的权限系统与Android有所不同
- 性能优化:需要针对鸿蒙设备进行特定优化
在后续的文章中,我们将逐一解决这些问题。现在,让我们从Dart语言开始,打好坚实的基础。
二、Dart语言概述
2.1 Dart的发展历程
Dart是由Google开发的一门开源编程语言,首次发布于2011年。起初,Google希望用Dart替代JavaScript,成为Web开发的新标准。虽然这个目标未能实现,但Dart在其他领域找到了自己的位置。
2017年,Google发布了Flutter框架,选择Dart作为其唯一的开发语言。这一决策让Dart重新获得了关注,并迅速成为移动开发领域的热门语言。
2.2 Dart的核心特性
Dart语言融合了多种编程范式的优点,具有以下核心特性:
2.2.1 强类型与类型推断
Dart是一门强类型语言,但同时支持类型推断。这意味着你可以选择显式声明类型,也可以让编译器自动推断。
// 显式类型声明
String name = '付文龙';
int age = 30;
double height = 1.75;

// 类型推断
var occupation = '高级软件工程师'; // 推断为String
final location = '北京市朝阳区'; // 推断为String,不可重新赋值
const PI = 3.14159; // 编译时常量
这种灵活性让开发者可以在开发效率和类型安全之间找到平衡。
2.2.2 面向对象编程
Dart是一门纯粹的面向对象语言,所有东西都是对象,包括数字、函数等。
class Person {
  String name;
  int age;

  Person(this.name, this.age);

  void introduce() {
    print('你好,我是$name,今年$age岁');
  }
}

void main() {
  var person = Person('付文龙', 30);
  person.introduce(); // 输出:你好,我是付文龙,今年30岁
}
2.2.3 异步编程支持
Dart内置了强大的异步编程支持,通过Future和Stream来处理异步操作。
// Future用于单个异步操作
Future<String> fetchUserData() async {
  await Future.delayed(const Duration(seconds: 1));
  return '用户数据';
}

// Stream用于多个异步事件
Stream<int> countStream(int to) async* {
  for (int i = 1; i <= to; i++) {
    await Future.delayed(const Duration(seconds: 1));
    yield i;
  }
}
2.2.4 JIT与AOT编译
Dart支持两种编译模式:
- JIT(Just-In-Time): 即时编译,支持Hot Reload,开发效率高
- AOT(Ahead-Of-Time): 提前编译,生成原生代码,运行效率高
Flutter开发时使用JIT模式,发布时使用AOT模式,兼顾了开发效率和运行性能。
2.2.5 空安全
从Dart 2.12开始,空安全(Null Safety)成为默认特性。这意味着变量默认不为空,需要明确声明可空类型。
// 非空变量,必须初始化
String name = '付文龙';

// 可空变量,可以为null
String? middleName; // 默认为null

// 空检查
if (middleName != null) {
  print(middleName.length); // 安全访问
}

// 空断言
print(middleName!.length); // 如果为null,会抛出异常

// 空合并运算符
String displayName = middleName ?? '未知';
空安全显著减少了空指针异常,提高了代码的健壮性。
三、Dart语言基础语法
3.1 变量与常量
在Dart中,变量声明有几种方式:
// 使用var声明,类型由初始值推断
var name = '付文龙';

// 使用final声明,只能赋值一次
final age = 30;

// 使用const声明编译时常量
const maxAge = 120;

// 使用具体类型声明
String occupation = '高级软件工程师';
bool isOnline = true;
区别与适用场景:
| 声明方式 | 特点 | 适用场景 |
|---|---|---|
var |
类型推断,可重新赋值 | 局部变量,需要修改的值 |
final |
类型推断,不可重新赋值 | 配置值,初始化后不变的值 |
const |
编译时常量 | 常量值,如数学常数、固定配置 |
| 具体类型 | 显式类型,可重新赋值 | 需要明确类型的场景 |
3.2 数据类型
Dart提供了丰富的数据类型:
3.2.1 基本类型
// 数值类型
int age = 30;
double height = 1.75;
num weight = 65.5; // 可以是int或double

// 字符串
String name = '付文龙';
String bio = '''
这是一段多行字符串
可以包含换行
''';

// 布尔值
bool isOnline = true;
bool hasEmail = false;
3.2.2 集合类型
// List - 有序列表
List<String> socialAccounts = ['GitHub', 'CSDN', '掘金', '知乎'];
List<int> numbers = [1, 2, 3, 4, 5];

// Map - 键值对
Map<String, String> contact = {
  'email': '372699828@qq.com',
  'phone': '13800138000',
};

// Set - 无序不重复集合
Set<String> tags = {'Flutter', 'Dart', 'HarmonyOS', 'Flutter'}; // 自动去重
3.2.3 类型转换
// 字符串转数字
String ageStr = '30';
int age = int.parse(ageStr);
double height = double.parse('1.75');

// 数字转字符串
int count = 10;
String countStr = count.toString();
String piStr = 3.14.toStringAsFixed(2); // '3.14'

// 布尔值转字符串
bool isOnline = true;
String status = isOnline ? '在线' : '离线';
3.3 函数定义
// 基本函数
String formatName(String firstName, String lastName) {
  return '$firstName $lastName';
}

// 可选参数
String buildGreeting(String name, {String? title, int? age}) {
  String result = '你好';
  if (title != null) {
    result += ',$title';
  }
  result += ' $name';
  if (age != null) {
    result += ',今年$age岁';
  }
  return result;
}

// 默认参数
void printUserInfo(String name, {int age = 18, String gender = '未知'}) {
  print('姓名:$name,年龄:$age,性别:$gender');
}

// 箭头函数
int square(int x) => x * x;
bool isAdult(int age) => age >= 18;
3.4 控制流语句
3.4.1 条件语句
// if-else
if (age >= 18) {
  print('成年人');
} else if (age >= 12) {
  print('青少年');
} else {
  print('儿童');
}

// switch
switch (gender) {
  case '男':
    print('男性');
    break;
  case '女':
    print('女性');
    break;
  default:
    print('未知性别');
}
3.4.2 循环语句
// for循环
for (int i = 0; i < 5; i++) {
  print(i);
}

// for-in循环
List<String> fruits = ['苹果', '香蕉', '橙子'];
for (var fruit in fruits) {
  print(fruit);
}

// while循环
int count = 0;
while (count < 5) {
  print(count);
  count++;
}

// do-while循环
do {
  print(count);
  count++;
} while (count < 10);
3.4.3 集合操作
List<int> numbers = [1, 2, 3, 4, 5];

// 遍历
numbers.forEach((num) => print(num));

// 映射
List<int> squares = numbers.map((num) => num * num).toList();

// 过滤
List<int> evenNumbers = numbers.where((num) => num % 2 == 0).toList();

// 折叠
int sum = numbers.reduce((a, b) => a + b);

// 排序
numbers.sort((a, b) => b - a); // 降序排列
四、面向对象编程
4.1 类的定义
在Dart中,类是组织代码的基本单元。让我们创建一个Person类来表示个人信息:
class Person {
  // 类成员变量
  String name;
  int age;
  String occupation;
  String gender;

  // 构造函数
  Person(this.name, this.age, this.occupation, this.gender);

  // 方法
  String getDescription() {
    return '$name,$age岁,$gender,职业:$occupation';
  }
}
4.2 构造函数
Dart提供了多种构造函数形式:
class Person {
  String name;
  int age;
  String occupation;

  // 默认构造函数
  Person(this.name, this.age, this.occupation);

  // 命名构造函数
  Person.fromJson(Map<String, dynamic> json) {
    name = json['name'];
    age = json['age'];
    occupation = json['occupation'];
  }

  // 重定向构造函数
  Person.unknown() : this('未知', 0, '未知');
}
4.3 访问修饰符
Dart没有显式的访问修饰符,但约定使用下划线开头表示私有成员:
class Person {
  // 私有成员,只能在当前库中访问
  String _password;

  // 公共成员
  String name;
  int age;

  Person(this.name, this.age, this._password);

  // 提供访问私有成员的方法
  bool validatePassword(String input) {
    return _password == input;
  }
}
4.4 继承
class Employee extends Person {
String department;
Employee(String name, int age, this.department) : super(name, age, '职员');
String getDescription() {
return '${super.getDescription()},部门:$department';
}
}
4.5 Mixin
Mixin是Dart中一种代码复用机制:
mixin OnlineStatus {
  bool isOnline = false;

  void goOnline() {
    isOnline = true;
  }

  void goOffline() {
    isOnline = false;
  }
}

class Person with OnlineStatus {
  String name;

  Person(this.name);
}

void main() {
  var person = Person('付文龙');
  person.goOnline();
  print(person.isOnline); // true
}
五、异步编程
5.1 Future
Future表示一个异步操作的结果:
// 创建Future
Future<String> fetchUserInfo() {
  return Future.delayed(const Duration(seconds: 2), () {
    return '用户信息:付文龙,30岁';
  });
}

// 使用then处理结果
fetchUserInfo().then((info) {
  print(info);
}).catchError((error) {
  print('出错了:$error');
});

// 使用async/await
void main() async {
  try {
    String info = await fetchUserInfo();
    print(info);
  } catch (error) {
    print('出错了:$error');
  }
}
5.2 Stream
Stream表示一系列异步事件:
// 创建Stream
Stream<int> countDown(int from) async* {
  for (int i = from; i >= 0; i--) {
    await Future.delayed(const Duration(seconds: 1));
    yield i;
  }
}

// 监听Stream
countDown(5).listen(
  (count) => print('倒计时:$count'),
  onDone: () => print('倒计时结束'),
  onError: (error) => print('出错了:$error'),
);

// 使用await for
void main() async {
  await for (int count in countDown(3)) {
    print('倒计时:$count');
  }
  print('倒计时结束');
}
5.3 并发处理
Future<String> fetchUserData() async {
  await Future.delayed(const Duration(seconds: 2));
  return '用户数据';
}

Future<String> fetchOrderData() async {
  await Future.delayed(const Duration(seconds: 3));
  return '订单数据';
}

// 并发执行多个Future
void main() async {
  var futures = [fetchUserData(), fetchOrderData()];
  var results = await Future.wait(futures);

  print(results[0]); // 用户数据
  print(results[1]); // 订单数据
}
六、编写个人信息数据模型类
现在,让我们将所学的Dart知识应用到实际项目中,编写一个完整的个人信息数据模型类。
6.1 需求分析
我们需要创建一个Person类来表示个人信息,包含以下字段:
| 字段名 | 类型 | 说明 | 是否必填 |
|---|---|---|---|
| name | String | 姓名 | 是 |
| age | int | 年龄 | 是 |
| occupation | String | 职业 | 是 |
| gender | String | 性别 | 是 |
| String | 邮箱 | 是 | |
| phone | String | 电话 | 是 |
| avatarUrl | String | 头像URL | 是 |
| socialAccounts | List<String> | 社交账号列表 | 是 |
| isOnline | bool | 是否在线 | 是 |
| location | String | 位置 | 是 |
| bio | String | 个人简介 | 是 |
6.2 实现Person类
class Person {
  final String name;
  final int age;
  final String occupation;
  final String gender;
  final String email;
  final String phone;
  final String avatarUrl;
  final List<String> socialAccounts;
  final bool isOnline;
  final String location;
  final String bio;

  const Person({
    required this.name,
    required this.age,
    required this.occupation,
    required this.gender,
    required this.email,
    required this.phone,
    required this.avatarUrl,
    required this.socialAccounts,
    required this.isOnline,
    required this.location,
    required this.bio,
  });
}
代码解析:
-
final关键字:所有字段都使用final修饰,表示它们在初始化后不可修改,确保对象的不可变性。 -
required关键字:标记所有参数为必填项,确保创建对象时不会遗漏必要信息。 -
const构造函数:构造函数使用const修饰,允许创建编译时常量对象,提高性能。
6.3 添加JSON序列化支持
在实际应用中,我们经常需要将对象转换为JSON格式进行网络传输或本地存储:
factory Person.fromJson(Map<String, dynamic> json) {
  final socialList = json['socialAccounts'] as List<dynamic>;
  return Person(
    name: json['name'] as String,
    age: json['age'] as int,
    occupation: json['occupation'] as String,
    gender: json['gender'] as String,
    email: json['email'] as String,
    phone: json['phone'] as String,
    avatarUrl: json['avatarUrl'] as String,
    socialAccounts: socialList.map((e) => e as String).toList(),
    isOnline: json['isOnline'] as bool,
    location: json['location'] as String,
    bio: json['bio'] as String,
  );
}

Map<String, dynamic> toJson() {
  return {
    'name': name,
    'age': age,
    'occupation': occupation,
    'gender': gender,
    'email': email,
    'phone': phone,
    'avatarUrl': avatarUrl,
    'socialAccounts': socialAccounts,
    'isOnline': isOnline,
    'location': location,
    'bio': bio,
  };
}
代码解析:
-
factory构造函数:fromJson是一个工厂构造函数,用于从JSON数据创建Person对象。 -
类型转换:由于JSON数据是
Map<String, dynamic>类型,我们需要显式转换每个字段的类型。 -
列表处理:
socialAccounts是一个列表,需要先转换为List<dynamic>,然后通过map方法转换为List<String>。
6.4 添加copyWith方法
在Flutter中,不可变对象是常见的模式。当我们需要修改对象的某个字段时,通常会创建一个新对象。copyWith方法可以方便地实现这一点:
Person copyWith({
  String? name,
  int? age,
  String? occupation,
  String? gender,
  String? email,
  String? phone,
  String? avatarUrl,
  List<String>? socialAccounts,
  bool? isOnline,
  String? location,
  String? bio,
}) {
  return Person(
    name: name ?? this.name,
    age: age ?? this.age,
    occupation: occupation ?? this.occupation,
    gender: gender ?? this.gender,
    email: email ?? this.email,
    phone: phone ?? this.phone,
    avatarUrl: avatarUrl ?? this.avatarUrl,
    socialAccounts: socialAccounts ?? this.socialAccounts,
    isOnline: isOnline ?? this.isOnline,
    location: location ?? this.location,
    bio: bio ?? this.bio,
  );
}
代码解析:
-
可选命名参数:所有参数都是可选的,使用
?标记为可空类型。 -
空合并运算符:使用
??运算符,如果参数为null,则使用原对象的值。 -
创建新对象:返回一个新的
Person对象,而不是修改原对象。
6.5 添加相等性判断和哈希码
为了能够正确比较两个Person对象是否相等,我们需要重写==运算符和hashCode方法:
bool operator ==(Object other) =>
identical(this, other) ||
other is Person &&
runtimeType == other.runtimeType &&
name == other.name &&
age == other.age &&
occupation == other.occupation &&
gender == other.gender &&
email == other.email &&
phone == other.phone &&
avatarUrl == other.avatarUrl &&
_listsEqual(socialAccounts, other.socialAccounts) &&
isOnline == other.isOnline &&
location == other.location &&
bio == other.bio;
int get hashCode =>
name.hashCode ^
age.hashCode ^
occupation.hashCode ^
gender.hashCode ^
email.hashCode ^
phone.hashCode ^
avatarUrl.hashCode ^
socialAccounts.hashCode ^
isOnline.hashCode ^
location.hashCode ^
bio.hashCode;
bool _listsEqual(List<String> a, List<String> b) {
if (a.length != b.length) return false;
for (int i = 0; i < a.length; i++) {
if (a[i] != b[i]) return false;
}
return true;
}
代码解析:
-
==运算符:首先检查是否是同一个对象(identical),然后检查类型是否相同,最后逐一比较每个字段。 -
列表比较:由于
List的==运算符比较的是引用而不是内容,我们需要自定义_listsEqual方法来比较列表内容。 -
hashCode方法:使用异或运算(^)组合所有字段的哈希码,确保相等的对象有相同的哈希码。
6.6 添加toString方法
为了方便调试,我们可以添加toString方法:
String toString() {
return 'Person{name: $name, age: $age, occupation: $occupation, gender: $gender, '
'email: $email, phone: $phone, avatarUrl: $avatarUrl, socialAccounts: $socialAccounts, '
'isOnline: $isOnline, location: $location, bio: $bio}';
}
七、在Flutter应用中使用Person类
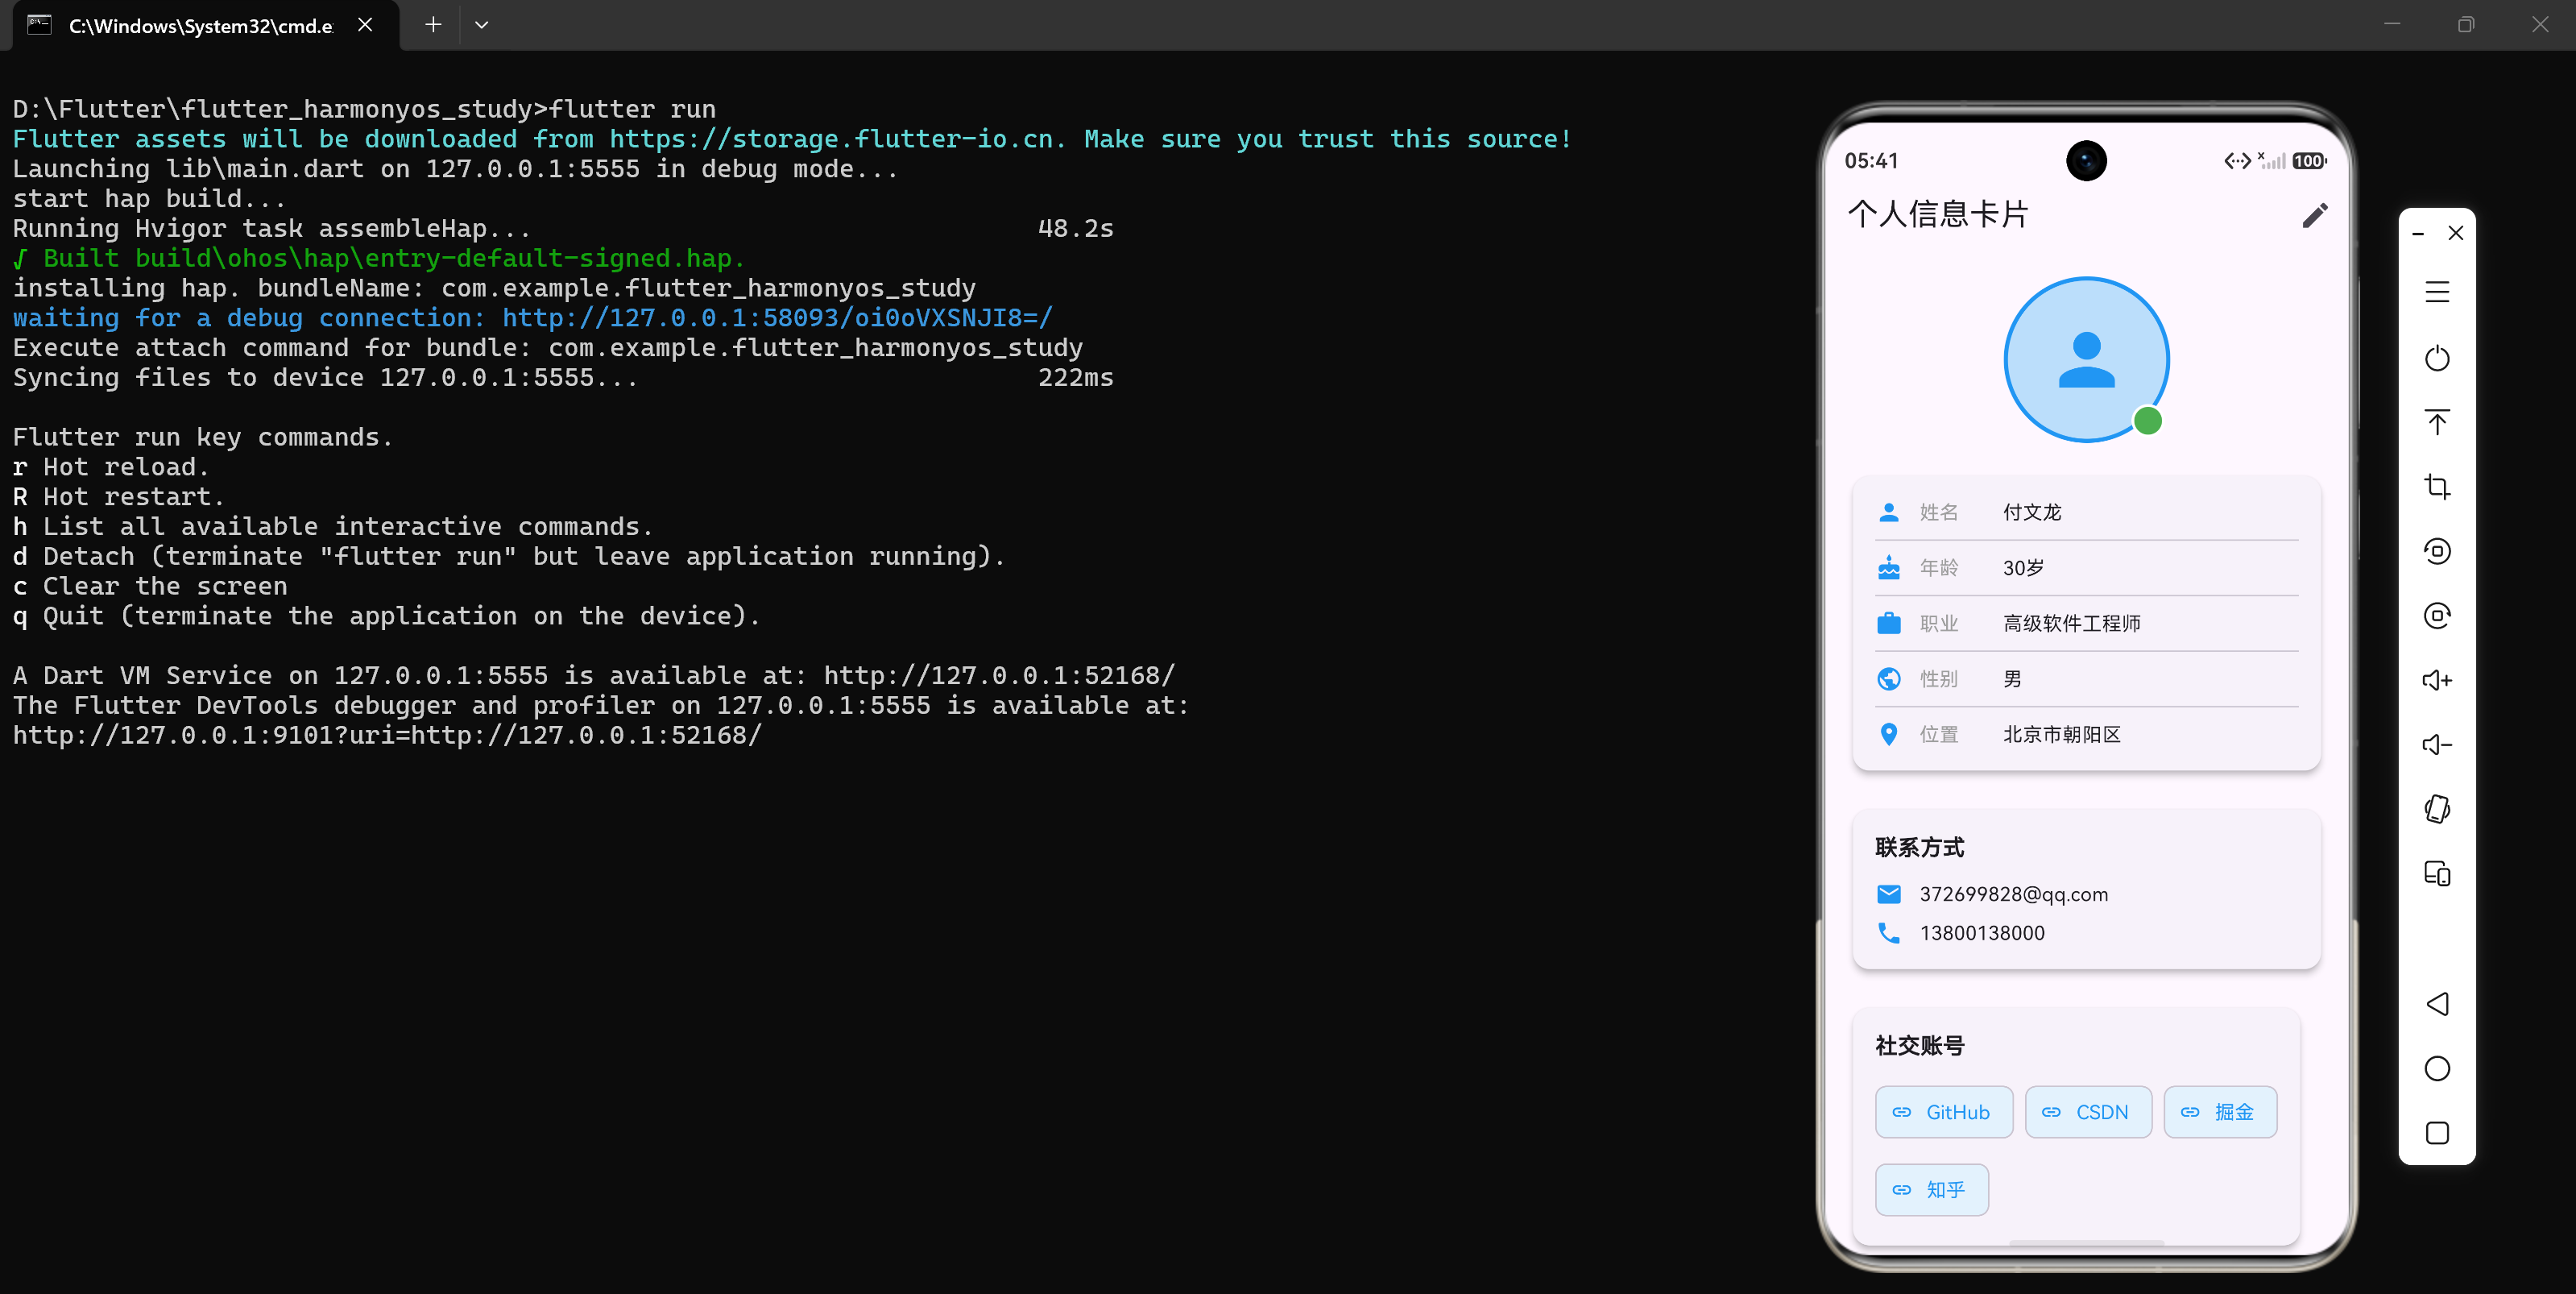
现在,让我们创建一个完整的个人信息卡片展示应用,将Person类应用到实际场景中。
7.1 创建应用入口
import 'package:flutter/material.dart';
import 'package:harmonyos_study/models/person.dart';
void main() {
runApp(const PersonalInfoApp());
}
class PersonalInfoApp extends StatelessWidget {
const PersonalInfoApp({super.key});
Widget build(BuildContext context) {
return MaterialApp(
title: '个人信息卡片',
debugShowCheckedModeBanner: false,
theme: ThemeData(
primarySwatch: Colors.blue,
visualDensity: VisualDensity.adaptivePlatformDensity,
),
home: const PersonalInfoPage(),
);
}
}
7.2 创建主页面
class PersonalInfoPage extends StatefulWidget {
const PersonalInfoPage({super.key});
State<PersonalInfoPage> createState() => _PersonalInfoPageState();
}
class _PersonalInfoPageState extends State<PersonalInfoPage> {
late Person _currentPerson;
bool _isEditing = false;
final TextEditingController _nameController = TextEditingController();
final TextEditingController _ageController = TextEditingController();
final TextEditingController _occupationController = TextEditingController();
final TextEditingController _bioController = TextEditingController();
void initState() {
super.initState();
_currentPerson = Person(
name: '付文龙',
age: 30,
occupation: '高级软件工程师',
gender: '男',
email: '372699828@qq.com',
phone: '13800138000',
avatarUrl: '',
socialAccounts: ['GitHub', 'CSDN', '掘金', '知乎'],
isOnline: true,
location: '北京市朝阳区',
bio: '热爱技术,专注于Flutter跨平台开发,致力于打造高质量的移动应用。拥有丰富的鸿蒙平台适配经验,追求极致的用户体验。',
);
_nameController.text = _currentPerson.name;
_ageController.text = _currentPerson.age.toString();
_occupationController.text = _currentPerson.occupation;
_bioController.text = _currentPerson.bio;
}
void _toggleEdit() {
setState(() {
_isEditing = !_isEditing;
});
}
void _saveChanges() {
setState(() {
_currentPerson = _currentPerson.copyWith(
name: _nameController.text,
age: int.tryParse(_ageController.text) ?? _currentPerson.age,
occupation: _occupationController.text,
bio: _bioController.text,
);
_isEditing = false;
});
}
void _cancelEdit() {
setState(() {
_nameController.text = _currentPerson.name;
_ageController.text = _currentPerson.age.toString();
_occupationController.text = _currentPerson.occupation;
_bioController.text = _currentPerson.bio;
_isEditing = false;
});
}
}
7.3 构建UI界面
Widget build(BuildContext context) {
return Scaffold(
appBar: AppBar(
title: const Text('个人信息卡片'),
actions: [
IconButton(
icon: Icon(_isEditing ? Icons.save : Icons.edit),
onPressed: _isEditing ? _saveChanges : _toggleEdit,
),
if (_isEditing)
IconButton(
icon: const Icon(Icons.cancel),
onPressed: _cancelEdit,
),
],
),
body: SingleChildScrollView(
padding: const EdgeInsets.all(16),
child: Column(
crossAxisAlignment: CrossAxisAlignment.start,
children: [
_buildAvatarSection(),
const SizedBox(height: 20),
_buildBasicInfoSection(),
const SizedBox(height: 20),
_buildContactSection(),
const SizedBox(height: 20),
_buildSocialAccountsSection(),
const SizedBox(height: 20),
_buildBioSection(),
],
),
),
);
}
7.4 实现各个组件
Widget _buildAvatarSection() {
  return Center(
    child: Stack(
      children: [
        Container(
          width: 120,
          height: 120,
          decoration: BoxDecoration(
            color: Colors.blue[100],
            borderRadius: BorderRadius.circular(60),
            border: Border.all(
              color: Colors.blue,
              width: 3,
            ),
          ),
          child: const Icon(
            Icons.person,
            size: 60,
            color: Colors.blue,
          ),
        ),
        Positioned(
          bottom: 4,
          right: 4,
          child: Container(
            width: 24,
            height: 24,
            decoration: BoxDecoration(
              color: _currentPerson.isOnline ? Colors.green : Colors.grey,
              borderRadius: BorderRadius.circular(12),
              border: Border.all(
                color: Colors.white,
                width: 2,
              ),
            ),
          ),
        ),
      ],
    ),
  );
}
八、代码优化与最佳实践
8.1 使用json_serializable自动生成代码
手动编写JSON序列化代码容易出错,我们可以使用json_serializable包来自动生成:
步骤1:添加依赖
dependencies:
  json_annotation: ^4.8.1

dev_dependencies:
  build_runner: ^2.4.7
  json_serializable: ^6.7.1
步骤2:修改Person类
import 'package:json_annotation/json_annotation.dart';
part 'person.g.dart';
()
class Person {
final String name;
final int age;
// ...其他字段
const Person({
required this.name,
required this.age,
// ...其他参数
});
factory Person.fromJson(Map<String, dynamic> json) => _$PersonFromJson(json);
Map<String, dynamic> toJson() => _$PersonToJson(this);
}
步骤3:生成代码
flutter pub run build_runner build
8.2 使用freezed实现不可变对象
freezed是一个强大的代码生成库,可以自动生成copyWith、==、hashCode、toString等方法:
步骤1:添加依赖
dependencies:
  freezed_annotation: ^2.4.1
  json_annotation: ^4.8.1

dev_dependencies:
  build_runner: ^2.4.7
  freezed: ^2.4.6
  json_serializable: ^6.7.1
步骤2:修改Person类
import 'package:freezed_annotation/freezed_annotation.dart';
part 'person.freezed.dart';
part 'person.g.dart';
class Person with _$Person {
const factory Person({
required String name,
required int age,
required String occupation,
required String gender,
required String email,
required String phone,
required String avatarUrl,
required List<String> socialAccounts,
required bool isOnline,
required String location,
required String bio,
}) = _Person;
factory Person.fromJson(Map<String, dynamic> json) => _$PersonFromJson(json);
}
步骤3:生成代码
flutter pub run build_runner build
使用freezed后,我们不再需要手动编写copyWith、==、hashCode、toString等方法,大大减少了样板代码。
九、总结与展望
9.1 本章回顾
在本章中,我们学习了以下内容:
- Dart语言概述:了解了Dart的发展历程和核心特性
- Dart基础语法:掌握了变量、数据类型、函数、控制流等基本语法
- 面向对象编程:学习了类、构造函数、继承、Mixin等概念
- 异步编程:掌握了Future、Stream等异步编程模式
- 数据模型设计:实现了一个完整的Person数据模型类
- 实际应用:创建了个人信息卡片展示应用
9.2 核心代码总结
本章的核心代码包括:
- Person数据模型类:位于[models/person.dart](file:///d:/Flutter/flutter_harmonyos_study/lib/models/person.dart)
- 主应用入口:位于[main.dart](file:///d:/Flutter/flutter_harmonyos_study/lib/main.dart)
- 测试文件:位于[test/widget_test.dart](file:///d:/Flutter/flutter_harmonyos_study/test/widget_test.dart)
9.3 下一章预告
在下一章中,我们将继续学习Dart语言的更多高级特性,包括:
- 变量声明与类型系统
- 常量与不可变性
- 函数定义与参数
- 控制流语句
- 集合类型
同时,我们将继续完善个人信息卡片应用,添加更多功能和交互。
附录
A. 常用Dart资源
- Dart官方文档:https://dart.dev/docs
- Flutter官方文档:https://flutter.dev/docs
- Dart语言规范:https://dart.dev/guides/language/spec
B. 代码仓库
本系列文章的所有代码都托管在GitCode上:
https://gitcode.com/feng8403000/FlutterfromBeginnertoAdvancedForHarmonyOS.git
C. 联系作者
如果您有任何问题或建议,欢迎通过以下方式联系我:
- 邮箱:372699828@qq.com
- GitHub:https://github.com/feng8403000
- CSDN:https://blog.csdn.net/feng8403000
文档版本:v1.0
创建日期:2026年7月18日

作为“人工智能6S店”的官方数字引擎,为AI开发者与企业提供一个覆盖软硬件全栈、一站式门户。
更多推荐

 0
0 0
0- 0


 已为社区贡献81条内容

所有评论(0)