
Flutter 鸿蒙特性展示台_SingleChildScrollView滚动视图与内容适配
一、项目概述
1.1 应用背景
在移动应用开发中,内容溢出是常见的问题。当页面内容超过屏幕高度时,需要提供滚动功能让用户查看完整内容。Flutter 提供了 SingleChildScrollView 组件,可以方便地实现滚动视图功能。
本文以「鸿蒙特性展示台」应用为例,详细讲解如何使用 Flutter 的 SingleChildScrollView 组件实现滚动视图,包括内容适配、滚动控制、性能优化等技巧。
1.2 技术栈
| 技术点 | 说明 |
|---|---|
| SingleChildScrollView | 单子滚动视图组件 |
| ScrollController | 滚动控制器,用于控制滚动位置 |
| ScrollNotification | 滚动通知,用于监听滚动事件 |
| MediaQuery | 媒体查询,用于获取屏幕尺寸 |
| LayoutBuilder | 布局构建器,用于响应式布局 |
| Expanded | 弹性布局组件,用于自适应空间分配 |
1.3 界面效果
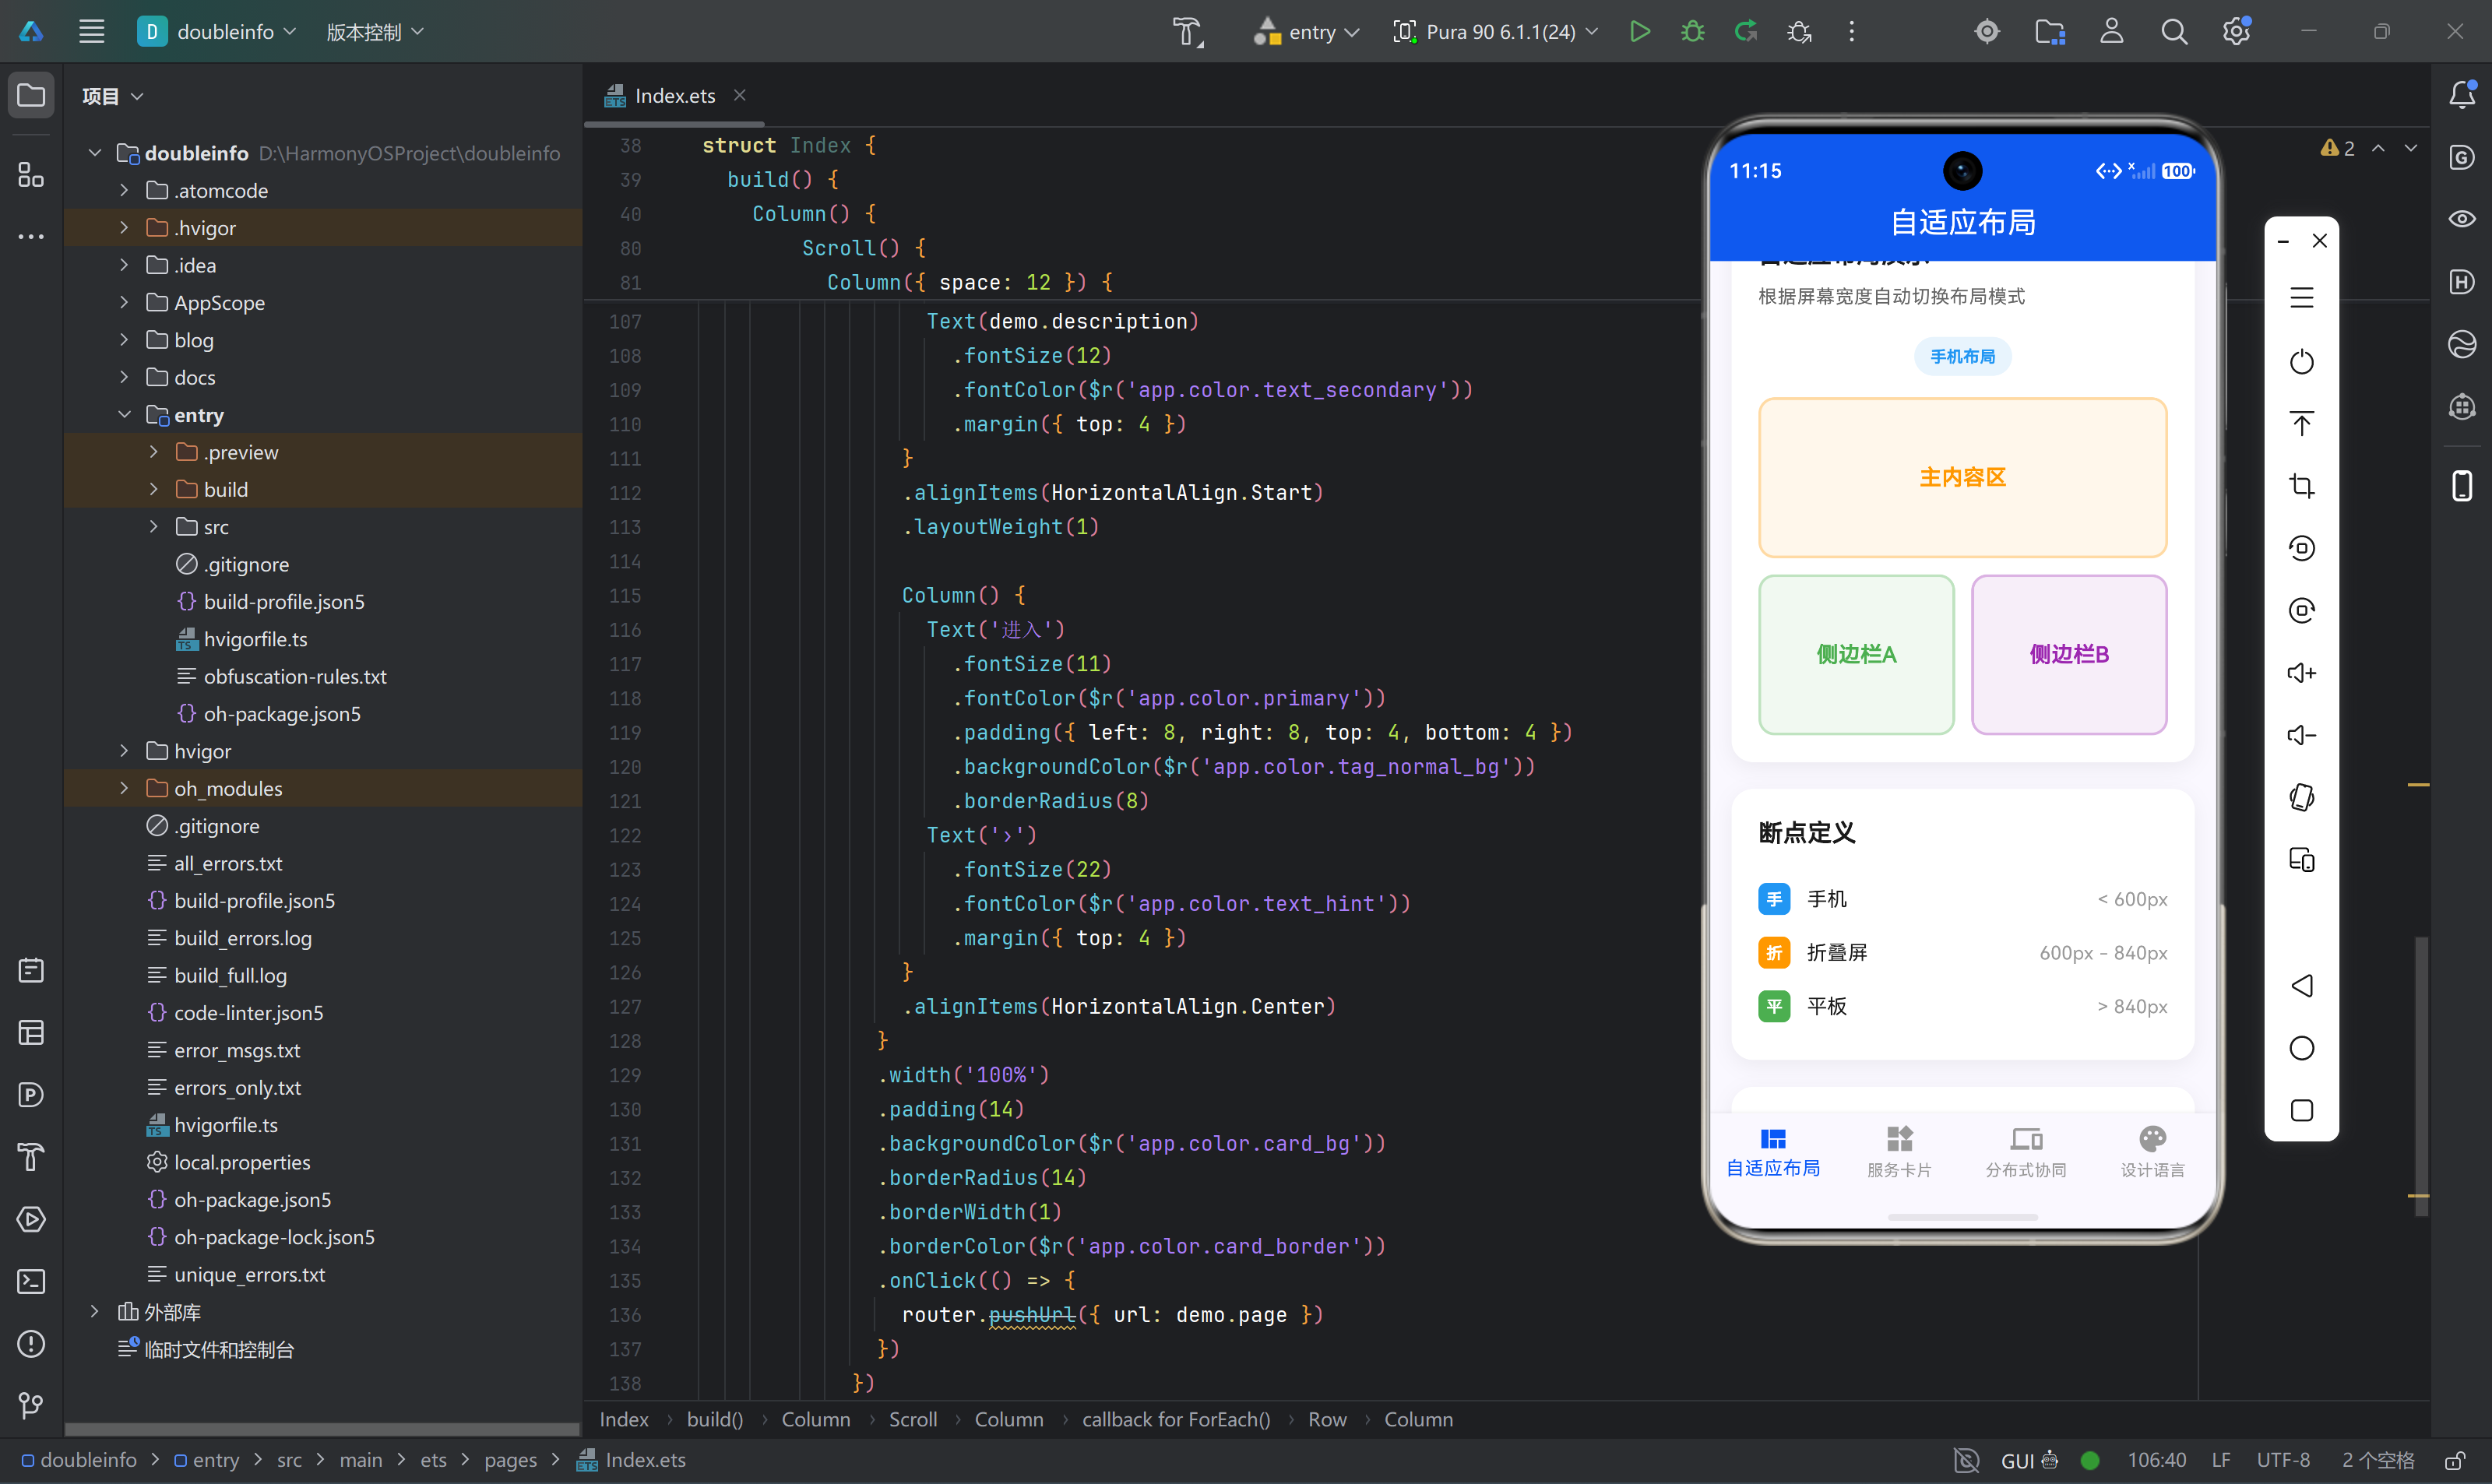
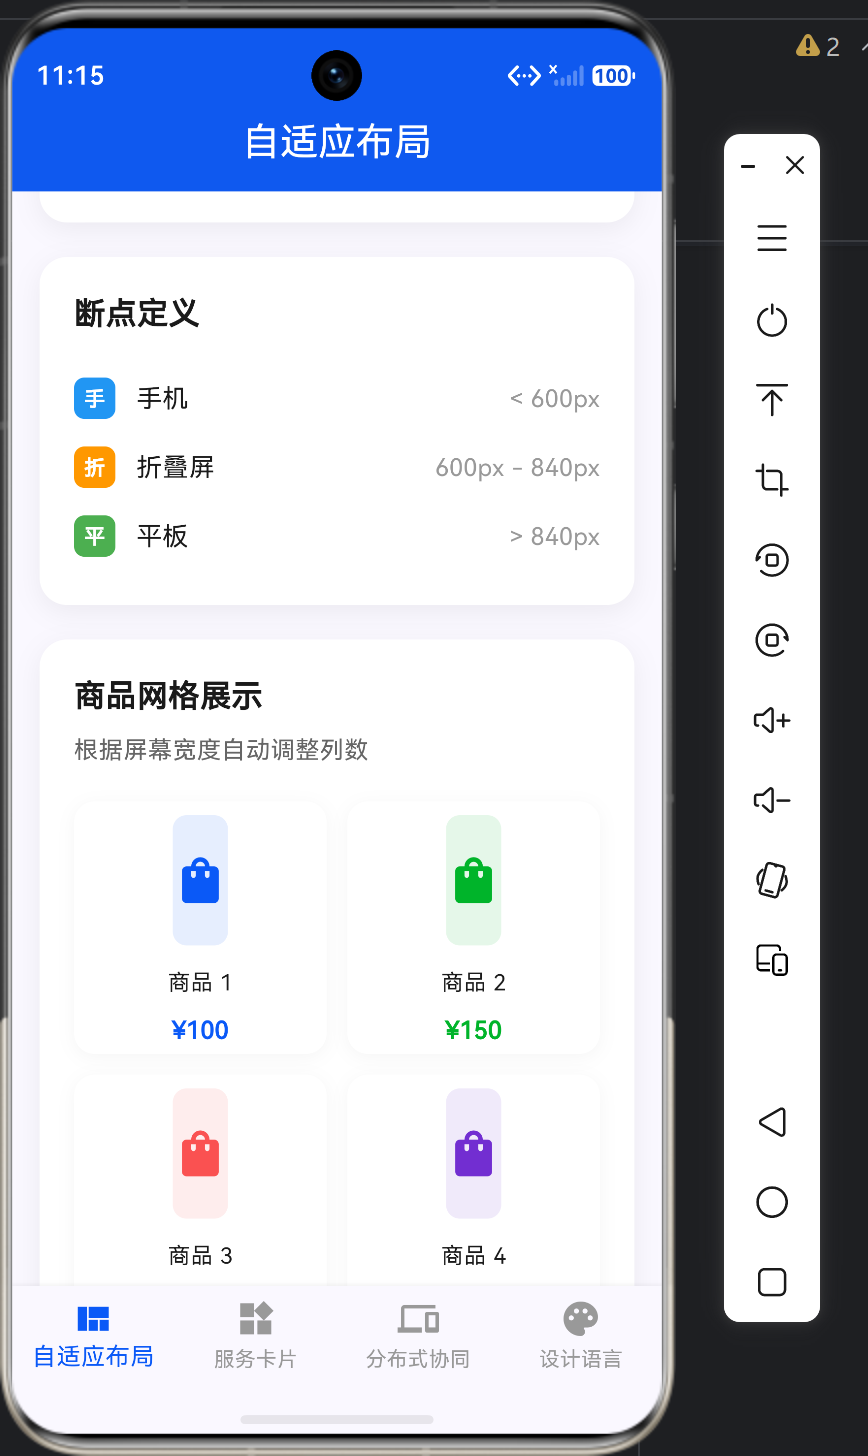
应用的各个页面都使用了 SingleChildScrollView 实现内容滚动:
┌─────────────────────────────────────────────────────────────────┐
│                      滚动视图演示                                │
│                                                                 │
│  ┌───────────────────────────────────────────────────────────┐  │
│  │  设备信息卡片                                             │  │
│  │  ┌───────────────────────────────────────────────────┐   │  │
│  │  │  📱 设备信息                                      │   │  │
│  │  │  手机模式                                         │   │  │
│  │  │  屏幕宽度: 360.0px                                │   │  │
│  │  │  屏幕高度: 640.0px                                │   │  │
│  │  │  像素密度: 2.00                                   │   │  │
│  │  │  屏幕方向: 竖屏                                   │   │  │
│  │  └───────────────────────────────────────────────────┘   │  │
│  └───────────────────────────────────────────────────────────┘  │
│                                 ↓ 可滚动 ↓                        │
│  ┌───────────────────────────────────────────────────────────┐  │
│  │  自适应布局演示                                       │  │
│  │  ┌───────────────────────────────────────────────────┐   │  │
│  │  │  📱 手机布局                                      │   │  │
│  │  │  ┌─────────────────────────────────────────────┐   │   │  │
│  │  │  │  主内容区                                    │   │   │  │
│  │  │  ├─────────────────────────────────────────────┤   │   │  │
│  │  │  │  侧边栏A  │  侧边栏B                        │   │   │  │
│  │  │  └─────────────────────────────────────────────┘   │   │  │
│  │  └───────────────────────────────────────────────────┘   │  │
│  └───────────────────────────────────────────────────────────┘  │
│                                 ↓ 可滚动 ↓                        │
│  ┌───────────────────────────────────────────────────────────┐  │
│  │  断点定义                                           │  │
│  │  ┌───────────────────────────────────────────────────┐   │  │
│  │  │  📱 手机  < 600px                                │   │  │
│  │  │  📱 折叠屏  600px - 840px                        │   │  │
│  │  │  📱 平板  > 840px                                │   │  │
│  │  └───────────────────────────────────────────────────┘   │  │
│  └───────────────────────────────────────────────────────────┘  │
│                                 ↓ 可滚动 ↓                        │
│  ┌───────────────────────────────────────────────────────────┐  │
│  │  商品网格展示                                       │  │
│  │  ┌──────────┐ ┌──────────┐                             │  │
│  │  │  商品1   │ │  商品2   │                             │  │
│  │  │  ¥100   │ │  ¥150   │                             │  │
│  │  └──────────┘ └──────────┘                             │  │
│  │  ┌──────────┐ ┌──────────┐                             │  │
│  │  │  商品3   │ │  商品4   │                             │  │
│  │  │  ¥200   │ │  ¥250   │                             │  │
│  │  └──────────┘ └──────────┘                             │  │
│  └───────────────────────────────────────────────────────────┘  │
└─────────────────────────────────────────────────────────────────┘
二、核心代码解析
2.1 SingleChildScrollView 基础用法
应用的各个页面都使用了 SingleChildScrollView 实现内容滚动:
class AdaptiveLayoutPage extends StatelessWidget {
const AdaptiveLayoutPage({super.key});
Widget build(BuildContext context) {
return SingleChildScrollView(
padding: const EdgeInsets.all(16),
child: Column(
crossAxisAlignment: CrossAxisAlignment.start,
children: [
_buildDeviceInfoCard(context),
const SizedBox(height: 20),
_buildLayoutDemo(context),
const SizedBox(height: 20),
_buildBreakpointInfo(),
const SizedBox(height: 20),
_buildMultiColumnDemo(context),
],
),
);
}
}
代码要点:
- SingleChildScrollView:最外层使用
SingleChildScrollView包裹,确保内容可以滚动 - padding:设置统一的
padding: EdgeInsets.all(16),符合鸿蒙设计规范 - Column:使用
Column作为主布局容器,按垂直方向排列各个组件 - 子组件:包含设备信息卡片、布局演示、断点定义和商品网格展示等组件
2.2 滚动方向配置
SingleChildScrollView 支持水平和垂直滚动:
SingleChildScrollView(
  scrollDirection: Axis.vertical, // 垂直滚动(默认)
  padding: const EdgeInsets.all(16),
  child: Column(
    // 子组件
  ),
)

SingleChildScrollView(
  scrollDirection: Axis.horizontal, // 水平滚动
  padding: const EdgeInsets.all(16),
  child: Row(
    // 子组件
  ),
)
三、滚动控制
3.1 ScrollController 使用
使用 ScrollController 控制滚动位置:
class _AdaptiveLayoutPageState extends State<AdaptiveLayoutPage> {
final ScrollController _scrollController = ScrollController();
void initState() {
super.initState();
// 监听滚动事件
_scrollController.addListener(() {
print('滚动位置: ${_scrollController.offset}');
});
}
void _scrollToTop() {
_scrollController.animateTo(
0,
duration: const Duration(milliseconds: 300),
curve: Curves.easeInOut,
);
}
void _scrollToBottom() {
_scrollController.animateTo(
_scrollController.position.maxScrollExtent,
duration: const Duration(milliseconds: 300),
curve: Curves.easeInOut,
);
}
Widget build(BuildContext context) {
return SingleChildScrollView(
controller: _scrollController,
padding: const EdgeInsets.all(16),
child: Column(
children: [
// 页面内容
ElevatedButton(
onPressed: _scrollToTop,
child: const Text('回到顶部'),
),
ElevatedButton(
onPressed: _scrollToBottom,
child: const Text('滚动到底部'),
),
],
),
);
}
void dispose() {
_scrollController.dispose();
super.dispose();
}
}
代码要点:
- ScrollController:创建滚动控制器
- addListener:监听滚动事件
- animateTo:动画滚动到指定位置
- maxScrollExtent:获取最大滚动范围
- dispose:释放滚动控制器资源
3.2 滚动通知监听
使用 NotificationListener 监听滚动通知:
NotificationListener<ScrollNotification>(
  onNotification: (notification) {
    if (notification is ScrollStartNotification) {
      print('滚动开始');
    } else if (notification is ScrollUpdateNotification) {
      print('滚动更新: ${notification.scrollDelta}');
    } else if (notification is ScrollEndNotification) {
      print('滚动结束');
    }
    return false;
  },
  child: SingleChildScrollView(
    padding: const EdgeInsets.all(16),
    child: Column(
      // 子组件
    ),
  ),
)
四、内容适配技巧
4.1 高度自适应
使用 LayoutBuilder 实现高度自适应:
LayoutBuilder(
  builder: (context, constraints) {
    final maxHeight = constraints.maxHeight;
    return SingleChildScrollView(
      padding: const EdgeInsets.all(16),
      child: ConstrainedBox(
        constraints: BoxConstraints(
          minHeight: maxHeight,
        ),
        child: Column(
          children: [
            // 子组件
          ],
        ),
      ),
    );
  },
)
4.2 内容溢出处理
使用 Expanded 和 Flexible 处理内容溢出:
SingleChildScrollView(
  padding: const EdgeInsets.all(16),
  child: Column(
    children: [
      Row(
        children: [
          Expanded(
            child: Text(
              '这是一段很长的文本,需要自动换行显示',
              style: const TextStyle(fontSize: 16),
            ),
          ),
        ],
      ),
      Row(
        children: [
          Flexible(
            flex: 1,
            child: Text(
              '这是一段很长的文本,需要自动换行显示',
              style: const TextStyle(fontSize: 16),
            ),
          ),
          const SizedBox(width: 16),
          Flexible(
            flex: 1,
            child: Text(
              '这是另一段很长的文本',
              style: const TextStyle(fontSize: 16),
            ),
          ),
        ],
      ),
    ],
  ),
)
4.3 文本溢出处理
使用 TextOverflow 处理文本溢出:
SingleChildScrollView(
  padding: const EdgeInsets.all(16),
  child: Column(
    children: [
      Text(
        '这是一段非常长的文本,当文本内容超过容器宽度时,需要进行溢出处理',
        style: const TextStyle(fontSize: 16),
        maxLines: 1,
        overflow: TextOverflow.ellipsis, // 省略号处理
      ),
      const SizedBox(height: 16),
      Text(
        '这是一段非常长的文本,当文本内容超过容器宽度时,需要进行溢出处理',
        style: const TextStyle(fontSize: 16),
        maxLines: 2,
        overflow: TextOverflow.fade, // 渐隐处理
      ),
      const SizedBox(height: 16),
      Text(
        '这是一段非常长的文本,当文本内容超过容器宽度时,需要进行溢出处理',
        style: const TextStyle(fontSize: 16),
        overflow: TextOverflow.clip, // 裁剪处理
      ),
    ],
  ),
)
五、性能优化技巧
5.1 避免过度滚动
使用 physics 属性控制滚动行为:
SingleChildScrollView(
  padding: const EdgeInsets.all(16),
  physics: const ClampingScrollPhysics(), // 禁止回弹效果
  child: Column(
    // 子组件
  ),
)

SingleChildScrollView(
  padding: const EdgeInsets.all(16),
  physics: const BouncingScrollPhysics(), // 启用回弹效果
  child: Column(
    // 子组件
  ),
)

SingleChildScrollView(
  padding: const EdgeInsets.all(16),
  physics: const NeverScrollableScrollPhysics(), // 禁止滚动
  child: Column(
    // 子组件
  ),
)
5.2 延迟加载内容
使用 FutureBuilder 延迟加载内容:
SingleChildScrollView(
  padding: const EdgeInsets.all(16),
  child: FutureBuilder(
    future: _loadContent(),
    builder: (context, snapshot) {
      if (snapshot.connectionState == ConnectionState.done) {
        return Column(
          children: snapshot.data as List<Widget>,
        );
      }
      return const Center(child: CircularProgressIndicator());
    },
  ),
)

Future<List<Widget>> _loadContent() async {
  await Future.delayed(const Duration(milliseconds: 500));
  return [
    _buildDeviceInfoCard(context),
    const SizedBox(height: 20),
    _buildLayoutDemo(context),
  ];
}
5.3 使用 RepaintBoundary
使用 RepaintBoundary 隔离绘制区域:
SingleChildScrollView(
  padding: const EdgeInsets.all(16),
  child: Column(
    children: [
      RepaintBoundary(
        child: _buildDeviceInfoCard(context),
      ),
      const SizedBox(height: 20),
      RepaintBoundary(
        child: _buildLayoutDemo(context),
      ),
    ],
  ),
)
六、鸿蒙设计规范适配
6.1 滚动条样式
鸿蒙设计语言定义了标准的滚动条样式:
Scrollbar(
  thumbVisibility: true, // 始终显示滚动条
  thickness: 4, // 滚动条厚度
  radius: const Radius.circular(2), // 滚动条圆角
  child: SingleChildScrollView(
    padding: const EdgeInsets.all(16),
    child: Column(
      // 子组件
    ),
  ),
)
6.2 内容间距规范
鸿蒙设计语言定义了标准的内容间距:
| 间距值 | 用途 |
|---|---|
| 8px | 小间距,用于组件内部元素 |
| 12px | 中间距,用于卡片内部元素 |
| 16px | 标准间距,用于卡片之间 |
| 20px | 大间距,用于区块之间 |
6.3 内容宽度规范
鸿蒙设计语言定义了标准的内容宽度:
| 设备类型 | 内容宽度 |
|---|---|
| 手机 | 全屏宽度 |
| 折叠屏 | 全屏宽度 |
| 平板 | 最大宽度 840px,居中显示 |
七、常见问题与解决方案
7.1 内容不滚动
问题描述: 设置了 SingleChildScrollView 但内容不滚动。
解决方案:
- 确保子组件的高度超过
SingleChildScrollView的高度 - 确保没有设置
physics: NeverScrollableScrollPhysics() - 确保父容器没有限制
SingleChildScrollView的高度
7.2 滚动性能差
问题描述: 滚动时页面卡顿。
解决方案:
- 减少子组件的数量和复杂度
- 使用
RepaintBoundary隔离绘制区域 - 使用
const构造函数避免不必要的重建 - 考虑使用
ListView.builder替代SingleChildScrollView+Column
7.3 键盘遮挡输入框
问题描述: 弹出键盘时输入框被遮挡。
解决方案:
使用 Scaffold 的 resizeToAvoidBottomInset 属性:
Scaffold(
  resizeToAvoidBottomInset: true, // 自动调整布局避免键盘遮挡
  body: SingleChildScrollView(
    padding: const EdgeInsets.all(16),
    child: Column(
      children: [
        TextField(
          decoration: const InputDecoration(
            hintText: '请输入内容',
          ),
        ),
      ],
    ),
  ),
)
八、高级功能实现
8.1 下拉刷新
使用 RefreshIndicator 实现下拉刷新:
RefreshIndicator(
  onRefresh: () async {
    // 模拟刷新数据
    await Future.delayed(const Duration(seconds: 1));
    setState(() {
      // 更新数据
    });
  },
  child: SingleChildScrollView(
    padding: const EdgeInsets.all(16),
    child: Column(
      // 子组件
    ),
  ),
)
8.2 无限滚动
使用 ScrollController 实现无限滚动:
class _AdaptiveLayoutPageState extends State<AdaptiveLayoutPage> {
final ScrollController _scrollController = ScrollController();
List<Widget> _items = [];
bool _isLoading = false;
void initState() {
super.initState();
_loadMoreItems();
_scrollController.addListener(_onScroll);
}
void _onScroll() {
if (_scrollController.position.pixels == _scrollController.position.maxScrollExtent && !_isLoading) {
_loadMoreItems();
}
}
void _loadMoreItems() {
setState(() {
_isLoading = true;
});
Future.delayed(const Duration(seconds: 1), () {
setState(() {
_items.addAll([
// 添加更多项目
]);
_isLoading = false;
});
});
}
Widget build(BuildContext context) {
return SingleChildScrollView(
controller: _scrollController,
padding: const EdgeInsets.all(16),
child: Column(
children: [
..._items,
if (_isLoading) const CircularProgressIndicator(),
],
),
);
}
void dispose() {
_scrollController.dispose();
super.dispose();
}
}
九、总结
本文详细讲解了「鸿蒙特性展示台」应用中 SingleChildScrollView 滚动视图与内容适配的实现方法,包括:
- SingleChildScrollView 基础用法:实现垂直和水平滚动
- 滚动控制:使用 ScrollController 控制滚动位置和监听滚动事件
- 内容适配技巧:高度自适应、内容溢出处理和文本溢出处理
- 性能优化技巧:避免过度滚动、延迟加载内容和使用 RepaintBoundary
- 鸿蒙设计规范适配:滚动条样式、内容间距规范和内容宽度规范
- 常见问题与解决方案:内容不滚动、滚动性能差和键盘遮挡输入框
- 高级功能实现:下拉刷新和无限滚动
通过学习本文,开发者可以掌握如何使用 Flutter 实现符合鸿蒙设计规范的滚动视图,提升应用的用户体验和视觉质量。
参考资料:

作为“人工智能6S店”的官方数字引擎,为AI开发者与企业提供一个覆盖软硬件全栈、一站式门户。
更多推荐



 6
6 0
0- 0


 已为社区贡献96条内容

所有评论(0)