
HarmonyOS7 网络层怎么封才不烂尾?HttpService、拦截器、重试、缓存一套讲清
文章目录
前言
写过几个鸿蒙项目之后,你会发现一个很痛的问题:网络请求代码散落在各个页面和 ViewModel 里,到处是重复的 Token 拼接、错误处理、loading 状态管理。改一个接口地址要全局搜索替换,加一个签名逻辑要改十几个文件。
这篇文章我把网络层彻底收拢到一个 HttpService 里,拦截器、重试、缓存一把搞定,后面所有业务都只跟这一个入口打交道。
为什么要统一网络层
分散的网络请求有这些坑:
- Token 过期了,每个请求各自处理刷新逻辑,容易出现并发刷新
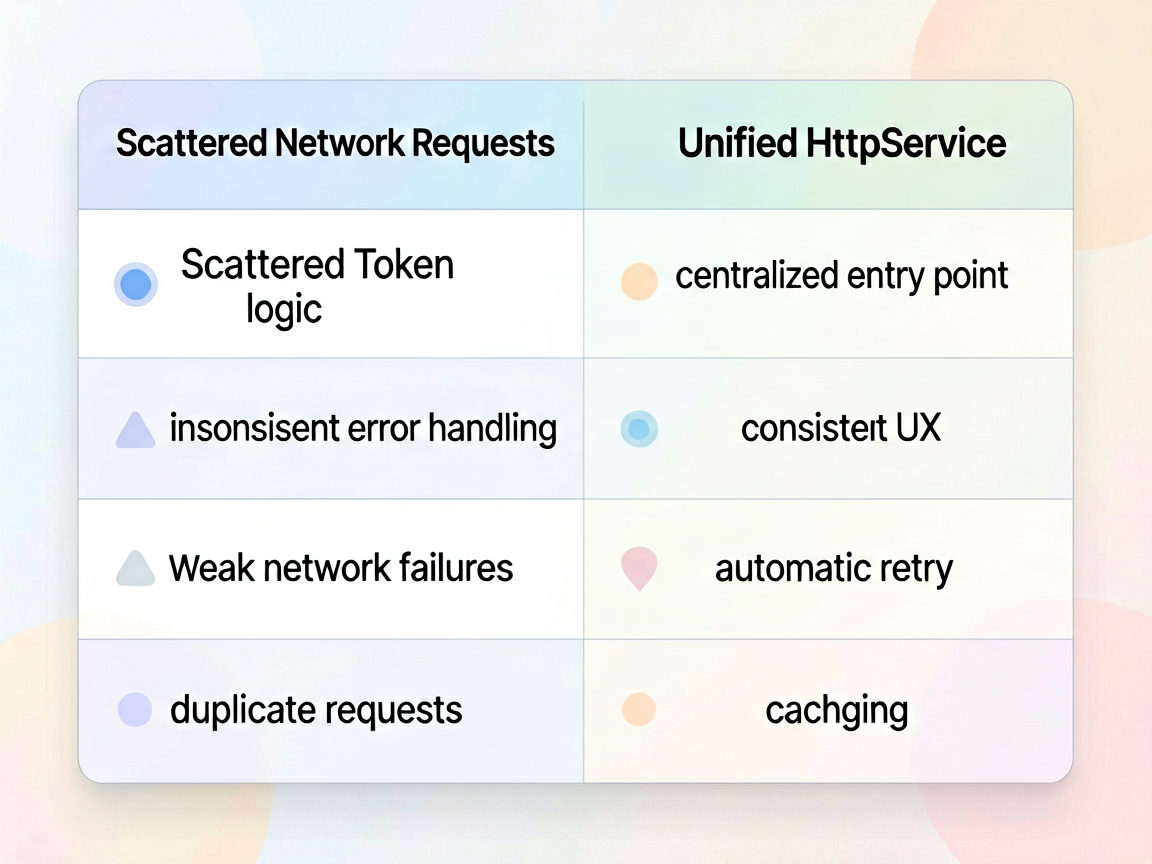
- 接口报错,有的页面弹 Toast,有的静默失败,体验不一致
- 弱网环境下没有重试,用户只能手动下拉刷新
- 同一个 GET 接口短时间内重复请求,浪费流量和服务器资源
统一网络层的核心目标就一个:让业务代码只关心"请求什么数据",不关心"怎么请求"。
拦截器链设计
拦截器思路来自 OkHttp,鸿蒙虽然没有这个库,但模式可以自己实现。核心就是一个数组,请求前走一遍请求拦截器,响应后走一遍响应拦截器。
先定义拦截器接口:
// 拦截器接口定义
export interface HttpInterceptor {
  onRequest?(config: RequestConfig): Promise<RequestConfig>;
  onResponse?(response: HttpResponse): Promise<HttpResponse>;
  onError?(error: HttpError): Promise<HttpError>;
}

export interface RequestConfig {
  url: string;
  method: string;
  headers: Record<string, string>;
  params?: Record<string, Object>;
  body?: Object;
  timeout?: number;
  retryCount?: number;
  cache?: boolean;
  cacheTTL?: number;
}

export interface HttpResponse {
  code: number;
  data: Object;
  message: string;
  rawResponse: http.HttpResponse;
}

export interface HttpError {
  code: number;
  message: string;
  config: RequestConfig;
  rawError?: Error;
}
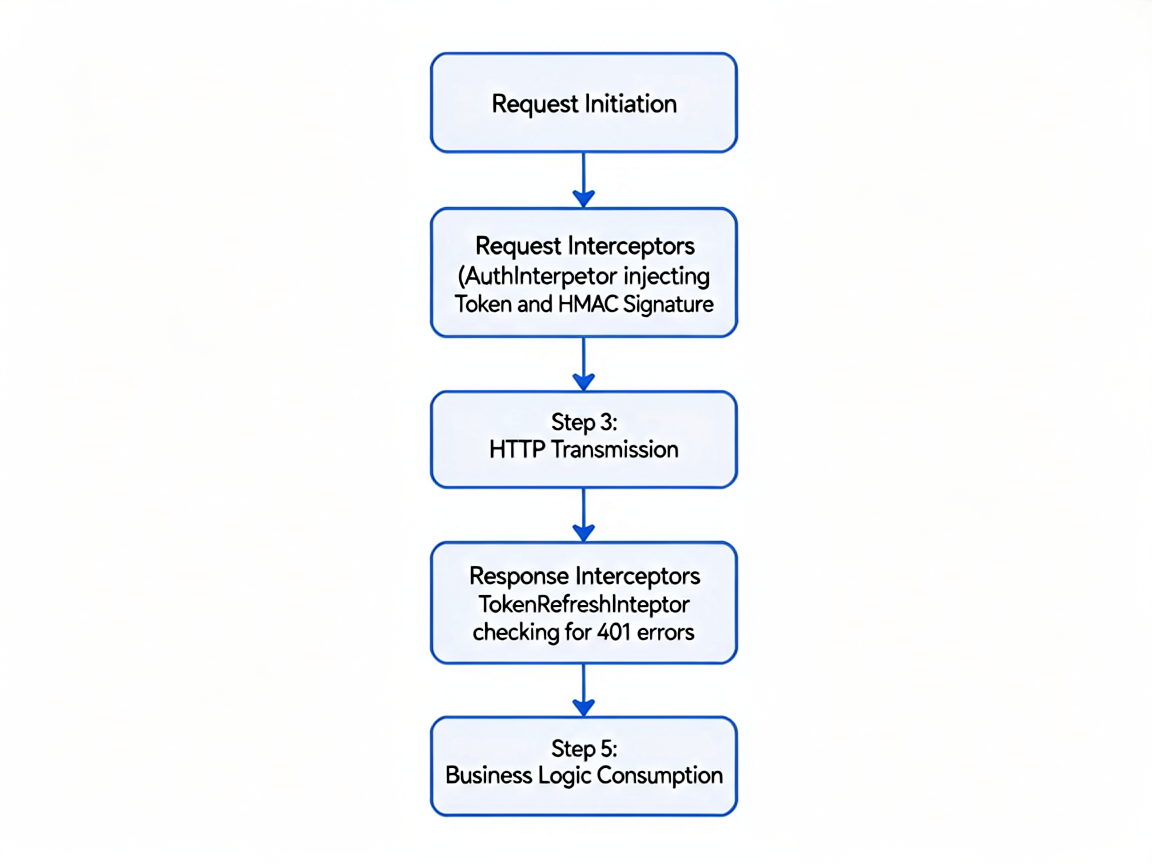
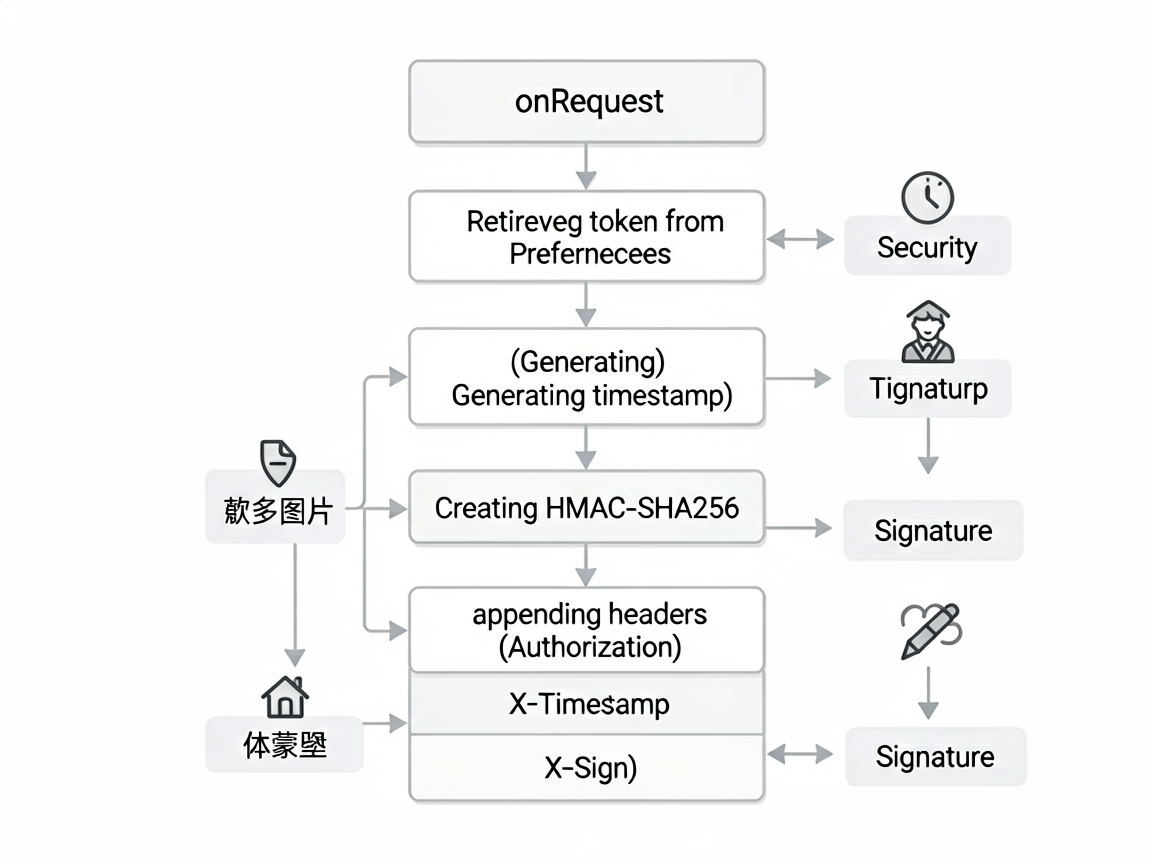
请求拦截器:Token 注入 + 签名
请求拦截器最常用的场景就是往 header 里塞 Token 和签名。Token 从 Preferences 里读,签名用时间戳 + AppSecret 做 HMAC。
export class AuthInterceptor implements HttpInterceptor {
  private appSecret: string = 'your_app_secret';

  async onRequest(config: RequestConfig): Promise<RequestConfig> {
    // 注入 Token
    const token = await this.getToken();
    if (token) {
      config.headers['Authorization'] = `Bearer ${token}`;
    }

    // 生成签名
    const timestamp = Date.now().toString();
    const signStr = `${timestamp}${this.appSecret}`;
    const sign = await this.hmacSha256(signStr);
    config.headers['X-Timestamp'] = timestamp;
    config.headers['X-Sign'] = sign;

    return config;
  }

  private async getToken(): Promise<string | null> {
    const context = getContext(this) as common.UIAbilityContext;
    const prefs = await preferences.getPreferences(context, 'auth_store');
    return prefs.getSync('access_token', '') as string;
  }

  private async hmacSha256(data: string): Promise<string> {
    const hmacAlg = cryptoFramework.createHmac({ algName: 'sha256' });
    // 简化示例,实际需要用密钥初始化
    const result = await hmacAlg.update(data);
    return result.toString();
  }
}
响应拦截器:错误码处理 + Token 自动刷新
响应拦截器的重头戏是 Token 刷新。这里有个坑必须处理:多个请求同时收到 401,不能同时发多个刷新请求。用一个 Promise 锁来搞定。
export class TokenRefreshInterceptor implements HttpInterceptor {
  private isRefreshing: boolean = false;
  private refreshPromise: Promise<string> | null = null;

  async onResponse(response: HttpResponse): Promise<HttpResponse> {
    // Token 过期,自动刷新
    if (response.code === 401) {
      const newToken = await this.refreshToken();
      // 刷新成功后抛出特殊标记,让 HttpService 重试原始请求
      throw { code: -1, message: 'token_refreshed', retry: true } as HttpError;
    }

    // 业务错误码统一处理
    if (response.code !== 200 && response.code !== 0) {
      throw {
        code: response.code,
        message: response.message || '未知错误',
        config: {} as RequestConfig
      } as HttpError;
    }

    return response;
  }

  private async refreshToken(): Promise<string> {
    // 防止并发刷新
    if (this.isRefreshing) {
      return this.refreshPromise!;
    }
    this.isRefreshing = true;

    this.refreshPromise = new Promise<string>(async (resolve, reject) => {
      try {
        const context = getContext() as common.UIAbilityContext;
        const prefs = await preferences.getPreferences(context, 'auth_store');
        const refreshToken = prefs.getSync('refresh_token', '') as string;

        const result = await http.createHttp().request(
          'https://api.example.com/auth/refresh',
          { method: http.RequestMethod.POST, extraData: { refresh_token: refreshToken } }
        );

        const data = JSON.parse(result.result as string) as Record<string, string>;
        await prefs.put('access_token', data['access_token']);
        await prefs.flush();
        resolve(data['access_token']);
      } catch (e) {
        // 刷新失败,踢用户到登录页
        reject(e);
      } finally {
        this.isRefreshing = false;
        this.refreshPromise = null;
      }
    });

    return this.refreshPromise;
  }
}
请求重试策略
弱网环境太常见了,地铁里、电梯里都可能断网。自动重试能显著提升用户体验。我用指数退避策略,第一次等 1 秒,第二次等 2 秒,第三次等 4 秒,最多重试 3 次。
private async requestWithRetry(config: RequestConfig): Promise<HttpResponse> {
  const maxRetries = config.retryCount ?? 3;
  let lastError: HttpError | null = null;

  for (let attempt = 0; attempt <= maxRetries; attempt++) {
    try {
      return await this.doRequest(config);
    } catch (error) {
      lastError = error as HttpError;

      // 只对网络错误重试,业务错误不重试
      if (!this.isRetryable(error as HttpError)) {
        throw error;
      }

      if (attempt < maxRetries) {
        const delay = Math.pow(2, attempt) * 1000; // 指数退避
        await this.sleep(delay);
        console.info(`[HttpService] 重试第 ${attempt + 1} 次,等待 ${delay}ms`);
      }
    }
  }

  throw lastError!;
}

private isRetryable(error: HttpError): boolean {
  // 网络超时、连接失败、5xx 服务端错误可以重试
  return error.code === -1 || error.code === -2 ||
         (error.code >= 500 && error.code < 600);
}

private sleep(ms: number): Promise<void> {
  return new Promise(resolve => setTimeout(resolve, ms));
}
GET 请求缓存 + 过期策略
对于不经常变化的数据(比如配置信息、分类列表),缓存一下能省不少请求。用一个简单的 Map + 过期时间来实现。
interface CacheEntry {
  data: HttpResponse;
  expireAt: number;
}

export class HttpCacheManager {
  private cache: Map<string, CacheEntry> = new Map();
  private defaultTTL: number = 5 * 60 * 1000; // 默认 5 分钟

  get(key: string): HttpResponse | null {
    const entry = this.cache.get(key);
    if (!entry) return null;

    if (Date.now() > entry.expireAt) {
      this.cache.delete(key);
      return null;
    }
    return entry.data;
  }

  set(key: string, data: HttpResponse, ttl?: number): void {
    this.cache.set(key, {
      data,
      expireAt: Date.now() + (ttl ?? this.defaultTTL)
    });
  }

  // 清除指定前缀的缓存
  invalidate(prefix: string): void {
    for (const key of this.cache.keys()) {
      if (key.startsWith(prefix)) {
        this.cache.delete(key);
      }
    }
  }

  clear(): void {
    this.cache.clear();
  }
}
HttpService 主类:把所有东西串起来
最后把拦截器、重试、缓存组装到一起:
export class HttpService {
  private interceptors: HttpInterceptor[] = [];
  private cacheManager: HttpCacheManager = new HttpCacheManager();
  private baseUrl: string;

  constructor(baseUrl: string) {
    this.baseUrl = baseUrl;
  }

  addInterceptor(interceptor: HttpInterceptor): HttpService {
    this.interceptors.push(interceptor);
    return this;
  }

  async get<T>(url: string, params?: Record<string, Object>, options?: Partial<RequestConfig>): Promise<T> {
    const config: RequestConfig = {
      url: this.baseUrl + url,
      method: 'GET',
      headers: {},
      params,
      ...options
    };

    // 检查缓存
    if (config.cache !== false) {
      const cached = this.cacheManager.get(config.url + JSON.stringify(params ?? {}));
      if (cached) return cached.data as T;
    }

    const response = await this.requestWithRetry(config);

    // 缓存 GET 响应
    if (config.cache !== false) {
      this.cacheManager.set(
        config.url + JSON.stringify(params ?? {}),
        response,
        config.cacheTTL
      );
    }

    return response.data as T;
  }

  async post<T>(url: string, body?: Object, options?: Partial<RequestConfig>): Promise<T> {
    const config: RequestConfig = {
      url: this.baseUrl + url,
      method: 'POST',
      headers: { 'Content-Type': 'application/json' },
      body,
      ...options
    };
    const response = await this.requestWithRetry(config);
    return response.data as T;
  }

  private async doRequest(config: RequestConfig): Promise<HttpResponse> {
    // 执行请求拦截器链
    let processedConfig = config;
    for (const interceptor of this.interceptors) {
      if (interceptor.onRequest) {
        processedConfig = await interceptor.onRequest(processedConfig);
      }
    }

    // 发起实际请求
    const httpRequest = http.createHttp();
    const result = await httpRequest.request(processedConfig.url, {
      method: processedConfig.method as http.RequestMethod,
      header: processedConfig.headers,
      extraData: processedConfig.body ?? processedConfig.params,
      connectTimeout: processedConfig.timeout ?? 15000,
      readTimeout: processedConfig.timeout ?? 15000,
    });

    let response: HttpResponse = {
      code: result.responseCode,
      data: JSON.parse(result.result as string),
      message: '',
      rawResponse: result
    };

    // 执行响应拦截器链
    for (const interceptor of this.interceptors) {
      if (interceptor.onResponse) {
        response = await interceptor.onResponse(response);
      }
    }

    return response;
  }
}

// 全局单例 + 初始化
export const httpService = new HttpService('https://api.example.com')
  .addInterceptor(new AuthInterceptor())
  .addInterceptor(new TokenRefreshInterceptor());
业务层用起来
封装完之后,业务代码变得特别干净:
// 在 ViewModel 或 Page 中使用
interface UserInfo {
  name: string;
  avatar: string;
  level: number;
}

async function loadUserInfo() {
  try {
    const data = await httpService.get<UserInfo>('/user/profile', undefined, {
      cache: true,
      cacheTTL: 10 * 60 * 1000  // 缓存 10 分钟
    });
    this.userName = data.name;
    this.userAvatar = data.avatar;
  } catch (error) {
    // 错误已经被拦截器处理过,这里只需要关心 UI 降级
    this.showErrorState = true;
  }
}
一些实用建议
用了这套封装之后,我有几点感受比较深:
拦截器顺序很重要。 Token 注入要在签名之前,Token 刷新要在业务错误码处理之前。顺序搞反了会出奇怪的 bug。
重试别太激进。 最多 3 次,一定要用指数退避。我见过有人写死循环重试,直接把服务端打爆了。
缓存的 key 要精心设计。 简单的 URL + 参数拼接对于大多数场景够用了,但如果参数里有时间戳之类的动态值,要做特殊处理,否则缓存永远命中不了。
Token 刷新的并发控制是关键。 不用 Promise 锁的话,一个页面 5 个请求同时 401,就会发 5 个刷新请求,后面的刷新请求用的是已经失效的 refresh_token,全部失败,用户直接被踢到登录页。这个问题我调了一下午才发现。

作为“人工智能6S店”的官方数字引擎,为AI开发者与企业提供一个覆盖软硬件全栈、一站式门户。
更多推荐


 0
0 0
0- 0


 已为社区贡献47条内容

所有评论(0)