
鸿蒙NEXT新手实战|从零手写精美渐变天气卡片(API23 规范开发完整版) ✅ 适配版本:HarmonyOS NEXT 6.1.0(API23) ✅ 开发工具:DevEco Studio 最新版 ✅
✅ 适配版本:HarmonyOS NEXT 6.1.0(API23)
✅ 开发工具:DevEco Studio 最新版
✅ 项目模型:Stage模型
✅ 适合人群:鸿蒙零基础入门、只会写基础布局、想提升UI审美与编码规范的开发者
🌤️ 前言:为什么新手必学天气卡片项目?
很多初学鸿蒙的小伙伴都会遇到一个问题:基础组件看得懂,单独写页面就无从下手,写出来的界面粗糙、代码混乱、全是硬编码。
这是因为缺少标准化开发思维和UI落地实战经验。
相比于计算器、记事本这类基础项目,天气卡片优势非常明显:
•难度适中:无复杂算法、无网络请求、无权限适配,专注UI与基础逻辑
•知识点密集:覆盖资源解耦、响应式状态、弹性布局、渐变阴影、生命周期等高频考点
•视觉效果优秀:成品精致美观,可直接作为个人实战作品集
•工程规范标准:完全贴合企业级鸿蒙开发规范
今天这篇文章,我将带大家从零搭建、逐行拆解、规范落地,手把手完成一款高颜值渐变天气卡片,帮大家彻底摆脱“原生简陋页面”,入门商用级鸿蒙UI开发。
🏗️ 项目整体架构与工程规范
- 整体设计思路
本次项目采用纯原生ArkUI组件化开发,全程遵循鸿蒙官方开发准则:
•样式与代码分离:颜色、尺寸、文本全部抽离资源文件
•布局层级清晰:外层适配居中、内层分层展示数据
•状态驱动UI:使用@State实现数据动态响应
•视觉层次分明:主次文本、卡片阴影、渐变过渡层层递进 - 精简工程目录解析
摒弃冗余文件,保留核心可运行结构,新手一目了然:
plain text
muban23/
├── AppScope/ # 应用全局配置
│ └── app.json5 # 包名、版本、图标全局配置
├── entry/
│ ├── module.json5 # 模块能力、路由、启动配置
│ └── src/main/
│ ├── ets/
│ │ ├── entryability/EntryAbility.ets # 应用生命周期
│ │ └── pages/Index.ets # 核心天气卡片页面
│ └── resources/ # 颜色/尺寸/文本/路由资源
└── 构建配置文件
⚙️ 核心配置文件标准化配置
很多新手容易忽略配置文件,导致项目运行报错、页面无法加载。这里统一规范配置,直接复制可用。
- 全局应用配置 app.json5
定义应用唯一标识与基础信息,是应用打包安装的核心依据:
json
{
  "app": {
    "bundleName": "com.example.muban23",
    "vendor": "example",
    "versionCode": 1000000,
    "versionName": "1.0.0",
    "buildVersion": "1",
    "icon": "$media:layered_image",
    "label": "$string:app_name"
  }
}
- 页面路由配置 main_pages.json
指定应用默认首页,框架自动识别页面路径:
json
{
  "src": [
    "pages/Index"
  ]
}
- 模块核心配置 module.json5
配置应用启动入口、设备适配、桌面图标启动能力,保留默认规范配置即可,新手无需随意改动:
json
{
  "module": {
    "name": "entry",
    "type": "entry",
    "description": "$string:module_desc",
    "mainElement": "EntryAbility",
    "deviceTypes": ["phone"],
    "deliveryWithInstall": true,
    "installationFree": false,
    "pages": "$profile:main_pages",
    "abilities": [
      {
        "name": "EntryAbility",
        "srcEntry": "./ets/entryability/EntryAbility.ets",
        "description": "$string:EntryAbility_desc",
        "icon": "$media:layered_image",
        "label": "$string:EntryAbility_label",
        "startWindowIcon": "$media:startIcon",
        "startWindowBackground": "$color:start_window_background",
        "exported": true,
        "skills": [
          {
            "entities": ["entity.system.home"],
            "actions": ["ohos.want.action.home"]
          }
        ]
      }
    ]
  }
}
🎨 资源文件统一规范化管理
优质鸿蒙项目的核心:零硬编码。所有颜色、字号、间距、文字内容全部抽离资源文件,方便后期迭代、主题修改、国际化适配。
- 颜色资源 color.json
定制清新蓝天渐变配色,适配天气场景,主次颜色对比舒适:
json
{
  "color": [
    { "name": "start_window_background", "value": "#FFFFFF" },
    { "name": "weather_card_bg_start", "value": "#4A90D9" },
    { "name": "weather_card_bg_end", "value": "#7EC8E3" },
    { "name": "weather_text_primary", "value": "#FFFFFF" },
    { "name": "weather_text_secondary", "value": "#E0F0FF" },
    { "name": "weather_detail_bg", "value": "#33FFFFFF" }
  ]
}
- 尺寸资源 float.json
严格区分 fp字体单位、vp布局单位,全设备自适应适配:
json
{
  "float": [
    { "name": "weather_temp_font", "value": "64fp" },
    { "name": "weather_city_font", "value": "24fp" },
    { "name": "weather_desc_font", "value": "18fp" },
    { "name": "weather_detail_font", "value": "16fp" },
    { "name": "weather_icon_font", "value": "48fp" },
    { "name": "weather_card_radius", "value": "32vp" },
    { "name": "weather_card_padding", "value": "24vp" }
  ]
}
- 文本资源 string.json
{
  "string": [
    { "name": "module_desc", "value": "module description" },
    { "name": "EntryAbility_desc", "value": "description" },
    { "name": "EntryAbility_label", "value": "label" },
    { "name": "weather_city", "value": "Beijing" },
    { "name": "weather_temp", "value": "28°C" },
    { "name": "weather_desc", "value": "Sunny" },
    { "name": "weather_humidity", "value": "Humidity" },
    { "name": "weather_wind", "value": "Wind" },
    { "name": "weather_humidity_val", "value": "60%" },
    { "name": "weather_wind_val", "value": "12 km/h" }
  ]
}
🧩 核心页面开发:高颜值天气卡片实现
页面采用外层垂直居中+内层分层布局,结合渐变背景、悬浮阴影、弹性权重布局,实现媲美原生应用的视觉效果。
完整 Index.ets 源码
typescript
@Entry
@Component
struct WeatherCard {
  // 响应式状态数据,数据变更自动刷新UI
  @State city: string = 'Beijing';
  @State temperature: string = '28°C';
  @State description: string = 'Sunny';
  @State humidity: string = '60%';
  @State windSpeed: string = '12 km/h';

  // 天气图标Emoji
  private weatherIcon: string = '\u2600\uFE0F';

  build() {
    // 根容器:整页居中展示
    Column() {
      // 核心天气卡片
      Column() {
        // 天气图标
        Text(this.weatherIcon)
          .fontSize($r('app.float.weather_icon_font'))
          .textAlign(TextAlign.Center)

        // 核心温度
        Text(this.temperature)
          .fontSize($r('app.float.weather_temp_font'))
          .fontColor($r('app.color.weather_text_primary'))
          .fontWeight(FontWeight.Bold)
          .margin({ top: 4 })

        // 天气状态描述
        Text(this.description)
          .fontSize($r('app.float.weather_desc_font'))
          .fontColor($r('app.color.weather_text_secondary'))
          .margin({ top: 8 })

        // 城市名称
        Text(this.city)
          .fontSize($r('app.float.weather_city_font'))
          .fontColor($r('app.color.weather_text_primary'))
          .fontWeight(FontWeight.Medium)
          .margin({ top: 16 })

        // 装饰分割线
        Divider()
          .width('60%')
          .color($r('app.color.weather_detail_bg'))
          .height(1)
          .margin({ top: 20, bottom: 20 })

        // 湿度、风速详情横向布局
        Row() {
          // 湿度模块
          Column() {
            Text('\uD83D\uDCA7').fontSize(20)
            Text($r('app.string.weather_humidity'))
              .fontSize($r('app.float.weather_detail_font'))
              .fontColor($r('app.color.weather_text_secondary'))
              .margin({ top: 4 })
            Text(this.humidity)
              .fontSize($r('app.float.weather_detail_font'))
              .fontColor($r('app.color.weather_text_primary'))
              .fontWeight(FontWeight.Medium)
          }
          .layoutWeight(1)
          .alignItems(HorizontalAlign.Center)

          // 垂直分割线
          Divider()
            .height('80%')
            .width(1)
            .color($r('app.color.weather_detail_bg'))
            .margin({ left: 12, right: 12 })

          // 风速模块
          Column() {
            Text('\uD83C\uDF2C\uFE0F').fontSize(20)
            Text($r('app.string.weather_wind'))
              .fontSize($r('app.float.weather_detail_font'))
              .fontColor($r('app.color.weather_text_secondary'))
              .margin({ top: 4 })
            Text(this.windSpeed)
              .fontSize($r('app.float.weather_detail_font'))
              .fontColor($r('app.color.weather_text_primary'))
              .fontWeight(FontWeight.Medium)
          }
          .layoutWeight(1)
          .alignItems(HorizontalAlign.Center)
        }
        .width('100%')
        .padding({ top: 12, bottom: 8 })
      }
      .width('85%')
      .padding($r('app.float.weather_card_padding'))
      // 蓝系渐变背景
      .linearGradient({
        direction: GradientDirection.RightBottom,
        colors: [
          [$r('app.color.weather_card_bg_start'), 0.0],
          [$r('app.color.weather_card_bg_end'), 1.0]
        ]
      })
      // 悬浮阴影效果
      .shadow({
        radius: 24,
        color: 0x334A90D9,
        offsetX: 0,
        offsetY: 8
      })
      .borderRadius($r('app.float.weather_card_radius'))
      .alignItems(HorizontalAlign.Center)
    }
    .width('100%')
    .height('100%')
    .justifyContent(FlexAlign.Center)
    .backgroundColor('#F0F4F8')
  }
}
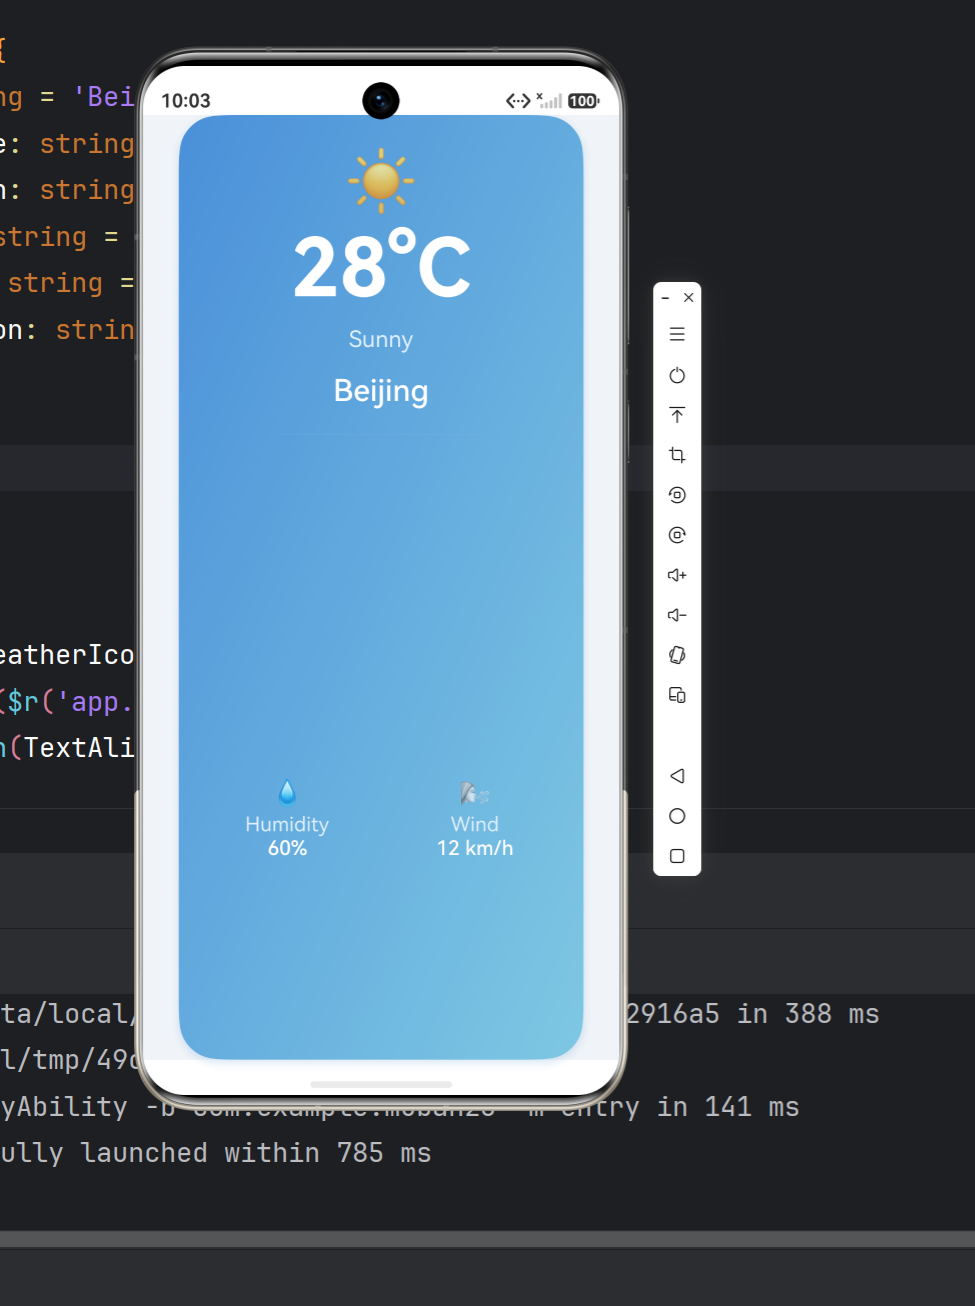
核心UI技巧拆解
•渐变背景:采用从深天蓝到浅天蓝的对角渐变,视觉通透高级,摆脱纯白单调背景
•悬浮阴影:使用卡片主色调透明阴影,柔和不突兀,模拟原生卡片悬浮质感
•权重均分布局:layoutWeight 实现湿度、风速模块自动平分宽度,全屏幕适配无错乱
•视觉层级:超大温度字体为主视觉,城市、描述、详情依次弱化,主次分明
🔍 应用生命周期原理(新手必懂)
很多新手只会写UI,不懂应用运行逻辑。UIAbility 生命周期是鸿蒙应用运行的核心,掌控应用启动、前台、后台、销毁全流程。
EntryAbility 完整源码(带日志调试)
typescript
import { AbilityConstant, ConfigurationConstant, UIAbility, Want } from '@kit.AbilityKit';
import { hilog } from '@kit.PerformanceAnalysisKit';
import { window } from '@kit.ArkUI';

const DOMAIN = 0x0000;

export default class EntryAbility extends UIAbility {
  // 进程创建:全局初始化配置
  onCreate(want: Want, launchParam: AbilityConstant.LaunchParam): void {
    hilog.info(DOMAIN, 'testTag', 'Ability onCreate 应用进程创建');
    // 设置跟随系统主题配色
    this.context.getApplicationContext().setColorMode(ConfigurationConstant.ColorMode.COLOR_MODE_NOT_SET);
  }

  // 窗口创建:加载首页UI
  onWindowStageCreate(windowStage: window.WindowStage): void {
    hilog.info(DOMAIN, 'testTag', 'Ability onWindowStageCreate 窗口创建');
    windowStage.loadContent('pages/Index', (err) => {
      if (err.code) {
        hilog.error(DOMAIN, 'testTag', '页面加载失败:%{public}s', JSON.stringify(err));
        return;
      }
      hilog.info(DOMAIN, 'testTag', '天气卡片页面加载成功');
    });
  }

  // 切前台:页面可见
  onForeground(): void {
    hilog.info(DOMAIN, 'testTag', '应用切换至前台');
  }

  // 切后台:页面隐藏
  onBackground(): void {
    hilog.info(DOMAIN, 'testTag', '应用切换至后台');
  }

  // 窗口销毁
  onWindowStageDestroy(): void {
    hilog.info(DOMAIN, 'testTag', '窗口资源销毁');
  }

  // 进程销毁:释放资源
  onDestroy(): void {
    hilog.info(DOMAIN, 'testTag', '应用进程销毁');
  }
}
生命周期执行逻辑
1.应用启动:onCreate → onWindowStageCreate → onForeground
2.按返回键退后台:onBackground
3.重新打开应用:onForeground
4.彻底退出应用:onWindowStageDestroy → onDestroy
💡 项目运行指南 & 踩坑总结
- 快速运行步骤
1.新建API23空项目,替换对应配置文件与页面代码
2.等待依赖自动同步完成
3.连接真机/模拟器,点击运行按钮即可看到成品效果 - 新手高频踩坑汇总
•资源报错:资源文件名、字段名必须和代码引用完全一致,区分大小写
•页面空白:检查main_pages.json路由路径是否正确
•样式错乱:布局尺寸统一使用vp/fp,禁止使用px固定像素
•构建失败:清理项目缓存,重新同步依赖即可解决
🚀 项目进阶拓展方向
静态卡片只是起点,大家可以自主拓展功能,升级为完整天气应用:
•根据天气状态动态切换图标与背景色
•接入公开天气API,实现实时网络天气数据展示
•新增多城市切换、天气预警、未来几日预报功能
•适配深色模式,实现昼夜主题切换
•添加卡片入场动画、点击交互反馈
📝 项目总结
这款天气卡片项目,是鸿蒙NEXT从理论学习落地到实战开发的绝佳案例。没有复杂逻辑,却完整覆盖了鸿蒙UI开发的核心规范与高频知识点。
通过本文实战,你可以彻底掌握:资源解耦开发、响应式状态管理、弹性自适应布局、渐变与阴影美化、应用生命周期运行机制。
对于新手来说,吃透这个项目,就能摆脱“只会抄代码、不会写页面”的困境,建立标准的鸿蒙开发思维,为后续复杂项目开发夯实基础!
欢迎点赞收藏,后续持续更新更多鸿蒙零基础实战项目!
版权声明:本文为CSDN原创文章,遵循CC 4.0 BY-SA版权协议,转载请注明原文出处!

作为“人工智能6S店”的官方数字引擎,为AI开发者与企业提供一个覆盖软硬件全栈、一站式门户。
更多推荐



 4
4 0
0- 0


 已为社区贡献8条内容

所有评论(0)