
鸿蒙原生英语学习 App 开发实战:从零构建 ArkTS 全功能应用

一、引言
1.1 为什么选择 HarmonyOS 做教育应用
2025 年,HarmonyOS NEXT 已迭代至 6.1.1(API 24),生态成熟度大幅提升。作为开发者,选择鸿蒙原生开发不仅是为了拥抱国产技术栈,更是看中了它在教育类应用场景中的独特优势:
- 分布式数据总线 — 手机、平板、智慧屏三端学习进度自动同步,无需自建后端
- 端侧 AI 能力 — 离线语音识别与发音评测,保护用户隐私的同时提供实时反馈
- Stage 模型 — 规范的后台任务管理,避免应用被不合理杀死
- ArkTS 声明式 UI — 学习曲线低于小程序,开发效率接近 Flutter
本文将以一个完整的英语学习应用为例,手把手带你走通鸿蒙原生 App 的完整开发流程。所有代码均基于 HarmonyOS NEXT 6.1.1(API 24) 实测通过。
1.2 应用功能概览
| 模块 | 核心功能 | 技术亮点 |
|---|---|---|
| 首页仪表板 | 今日进度、连续天数、6 模块入口 | 自定义 Stack 进度条 |
| 词汇学习 | 闪卡翻牌 + 三档评估 | SM-2 间隔重复算法 |
| 听力训练 | 分级课程列表 + 播放控制 | 条件渲染 + 状态驱动 |
| 口语练习 | 跟读任务 + 多维评分 | @Builder 自定义组件 |
| 阅读理解 | 文章展示 + 选择测验 + 查词 | 复杂条件渲染 |
| 语法练习 | 逐题练习 + 详细解析 | 数组状态管理 |
| 学习统计 | Canvas 雷达图 + 柱状图 + 日历 | Canvas 2D API 绘图 |
| 设置 | 目标调节 / 难度选择 / 开关 | Slider + Toggle + 双向绑定 |
二、项目搭建与架构设计
2.1 创建项目
使用 DevEco Studio(推荐版本 6.1+)创建新项目:
- 打开 DevEco Studio → Create Project
- 选择 Empty Ability 模板
- 配置项目:
- Project Name: EnglishLearningApp
- Bundle Name: com.example.englishlearning
- Compatible SDK: 6.1.1 (API 24)
- Language: ArkTS
- 点击 Finish
2.2 项目目录结构
entry/src/main/ets/
├── entryability/
│   └── EntryAbility.ets          ← 应用入口
├── entrybackupability/           ← 备份能力
├── model/
│   ├── AppModel.ets              ← 数据接口和类型定义
│   ├── SampleData.ets            ← 样例数据(30个单词、文章、语法题)
│   └── SpacedRepetition.ets      ← 间隔重复算法引擎
├── components/
│   └── CommonComponents.ets      ← 可复用 UI 组件
└── pages/
    ├── HomePage.ets              ← 首页
    ├── WordStudy.ets             ← 词汇学习
    ├── Listening.ets             ← 听力训练
    ├── Speaking.ets              ← 口语练习
    ├── Reading.ets               ← 阅读理解
    ├── Grammar.ets               ← 语法练习
    ├── Statistics.ets            ← 学习统计(含 Canvas 图表)
    └── Settings.ets              ← 设置
2.3 路由配置
鸿蒙 Stage 模型需要在 resources/base/profile/main_pages.json 中注册所有页面:
{
  "src": [
    "pages/HomePage",
    "pages/WordStudy",
    "pages/Listening",
    "pages/Speaking",
    "pages/Reading",
    "pages/Grammar",
    "pages/Statistics",
    "pages/Settings"
  ]
}
然后在 EntryAbility.ets 中加载首页:
// entryability/EntryAbility.ets
import { AbilityConstant, UIAbility, Want } from '@kit.AbilityKit';
import { window } from '@kit.ArkUI';

export default class EntryAbility extends UIAbility {
  onWindowStageCreate(windowStage: window.WindowStage): void {
    windowStage.loadContent('pages/HomePage', (err) => {
      if (err.code) {
        console.error('Failed to load content:', JSON.stringify(err));
        return;
      }
    });
  }
}
2.4 资源文件配置
在 resources/base/element/ 下定义主题色和字符串资源:
// color.json
{
  "color": [
    { "name": "primary", "value": "#3a7bd5" },
    { "name": "primary_dark", "value": "#2d5f8a" },
    { "name": "accent", "value": "#ff9f43" },
    { "name": "success", "value": "#00b894" },
    { "name": "danger", "value": "#e17055" },
    { "name": "text_primary", "value": "#1a1a2e" },
    { "name": "text_secondary", "value": "#666666" },
    { "name": "bg_page", "value": "#eef2f7" },
    { "name": "bg_card", "value": "#ffffff" }
  ]
}
虽然 ArkTS 中可以直接用十六进制字符串,但在大型项目中推荐通过 $r() 引用资源,方便主题切换和国际化。
三、Core:数据模型与算法引擎
3.1 类型定义
良好的类型定义是 ArkTS 项目的基石。我们使用 interface 定义所有业务数据类型:
// model/AppModel.ets

/** 难度等级 */
export enum Difficulty {
  EASY = 1,
  MEDIUM = 2,
  HARD = 3,
}

/** 单词条目 */
export interface WordItem {
  id: number;
  word: string;
  phonetic: string;
  translation: string;
  partOfSpeech: string;
  exampleSentence: string;
  exampleTranslation: string;
  difficulty: Difficulty;
  category: string;
  audioPath: string;
}

/** 学习记录 */
export interface StudyRecord {
  wordId: number;
  reviewCount: number;
  correctCount: number;
  lastReviewTime: string;
  masteryLevel: number;  // 0.0 - 1.0
}

/** 模块卡片 */
export interface ModuleCard {
  title: string;
  icon: string;
  color: string;
  route: string;
  description: string;
}

/** 阅读文章 */
export interface ReadingArticle {
  id: number;
  title: string;
  level: string;
  wordCount: number;
  content: string;
  questions: ReadingQuestion[];
}

/** 阅读问题 */
export interface ReadingQuestion {
  id: number;
  type: 'main_idea' | 'detail' | 'inference' | 'vocabulary';
  question: string;
  options: string[];
  correctIndex: number;
}

/** 语法练习 */
export interface GrammarExercise {
  id: number;
  topic: string;
  question: string;
  options: string[];
  correctIndex: number;
  explanation: string;
}
关键知识点:ArkTS 中 enum 是编译期常量,interface 是纯类型擦除的,运行时零开销。type 别名也类似。对于需要区分的前端展示,用 enum 比字符串字面量更安全。
3.2 间隔重复算法(SM-2)
这是词汇学习模块最核心的算法,决定了用户何时复习哪个单词:
// model/SpacedRepetition.ets

export interface ReviewResult {
  nextInterval: number;   // 下次复习间隔(天)
  newRepetition: number;  // 更新后的连续正确次数
  newEf: number;          // 更新后的易度系数
  nextReview: Date;       // 下次复习日期
}

export class SpacedRepetitionEngine {
  private static readonly DEFAULT_EF = 2.5;
  private static readonly MIN_EF = 1.3;
  private static readonly MAX_INTERVAL = 180;

  static schedule(
    quality: number,            // 0=完全忘记, 3=困难正确, 5=完全正确
    previousInterval: number,   // 上次间隔(天)
    repetition: number,         // 连续正确次数
    previousEf: number = SpacedRepetitionEngine.DEFAULT_EF,
  ): ReviewResult {
    // 质量 < 3:回答不合格,重置进度
    if (quality < 3) {
      return {
        nextInterval: 1,
        newRepetition: 0,
        newEf: SpacedRepetitionEngine.updateEf(previousEf, quality),
        nextReview: new Date(Date.now() + 86400000),
      };
    }

    // 更新易度系数
    const newEf = SpacedRepetitionEngine.updateEf(previousEf, quality);

    // 计算间隔
    let nextInterval: number;
    if (repetition === 0) {
      nextInterval = 1;
    } else if (repetition === 1) {
      nextInterval = 3;
    } else {
      nextInterval = Math.round(previousInterval * newEf);
    }

    nextInterval = Math.min(nextInterval, SpacedRepetitionEngine.MAX_INTERVAL);

    return {
      nextInterval,
      newRepetition: repetition + 1,
      newEf,
      nextReview: new Date(Date.now() + nextInterval * 86400000),
    };
  }

  /** EF = 2.5 - 0.15*(5-Q) */
  private static updateEf(oldEf: number, quality: number): number {
    const newEf = oldEf + (0.1 - (5 - quality) * (0.08 + (5 - quality) * 0.02));
    return Math.max(newEf, SpacedRepetitionEngine.MIN_EF);
  }

  static getMasteryColor(mastery: number): string {
    if (mastery >= 0.8) return '#00b894';
    if (mastery >= 0.5) return '#ff9f43';
    if (mastery >= 0.2) return '#e17055';
    return '#d63031';
  }
}
算法原理:SM-2(SuperMemo 2)是 Piotr Woźniak 在 1987 年提出的间隔重复算法。其核心思想是:每次复习时根据回答质量调整"易度系数(EF)",质量越高,下次复习间隔越长。EF 的更新公式为:
EF' = EF + (0.1 - (5 - q) * (0.08 + (5 - q) * 0.02))
其中 q 是回答质量(0-5)。这个公式确保:
- 回答完美的单词,EF 接近 2.5,间隔以约 2.5 倍增长
- 回答困难的单词,EF 逐渐降到最低 1.3,间隔增长缓慢
- 忘记的单词,进度重置为 0,明天立即复习
3.3 样例数据
为验证应用功能,准备 30 个核心词汇、2 篇阅读文章和 8 道语法题作为初始数据:
// model/SampleData.ets(部分)

export const SAMPLE_WORDS: WordItem[] = [
  {
    id: 1, word: 'abandon', phonetic: '/əˈbændən/',
    translation: '放弃;遗弃', partOfSpeech: 'v.',
    exampleSentence: 'They had to abandon the project due to lack of funds.',
    exampleTranslation: '由于缺乏资金,他们不得不放弃这个项目。',
    difficulty: Difficulty.MEDIUM, category: '基础词汇', audioPath: ''
  },
  {
    id: 2, word: 'benefit', phonetic: '/ˈbenɪfɪt/',
    translation: '好处;受益', partOfSpeech: 'n./v.',
    exampleSentence: 'Regular exercise brings many health benefits.',
    exampleTranslation: '定期锻炼带来许多健康益处。',
    difficulty: Difficulty.EASY, category: '基础词汇', audioPath: ''
  },
  // ... 共 30 个单词
];
四、组件库:可复用的 UI 构件
在 ArkTS 中,自定义组件通过 @Component 装饰器声明。我们设计了一套通用组件库 CommonComponents.ets。
4.1 卡片容器(Card)
卡片的 Props 名设计需要注意:不能与 CommonAttribute 的方法名冲突(如 backgroundColor、borderRadius、width、height 等),否则编译器会报错。我们的命名策略是在属性名前加 card 前缀:
// components/CommonComponents.ets

@Component
export struct Card {
  @Prop cardPadding: number = 16;
  @Prop cardMargin: number = 12;
  @Prop cardColor: string = '#ffffff';
  @Prop cardRadius: number = 16;
  @BuilderParam content: () => void = this.defaultContent;

  @Builder
  defaultContent(): void {
    Text('卡片内容').fontSize(14).fontColor('#888')
  }

  build() {
    Column() {
      this.content()  // 通过 @BuilderParam 注入子元素
    }
    .width('100%')
    .padding(this.cardPadding)
    .backgroundColor(this.cardColor)
    .borderRadius(this.cardRadius)
    .margin({ bottom: this.cardMargin })
    .shadow({ radius: 4, color: '#1a000000', offsetX: 0, offsetY: 2 })
  }
}
使用方式:
Card({ cardPadding: 16, cardMargin: 12, cardColor: '#f0f7ff' }) {
  Text('这是我的卡片内容').fontSize(16)
  Button('按钮').onClick(() => { /* ... */ })
}
⚠️ ArkTS 特有语法:自定义组件不支持默认的
children插槽。必须显式声明@BuilderParam content,然后通过this.content()渲染。括号内传入的内容会作为@BuilderParam的实参。
4.2 标题栏(AppHeader)
@Component
export struct AppHeader {
  @Prop headerTitle: string = '';
  @Prop headerSubtitle: string = '';
  @Prop showBack: boolean = false;
  onBack: () => void = () => {};  // 公开属性,外部可赋值

  build() {
    Row() {
      if (this.showBack) {
        Text('←')
          .fontSize(22).fontColor('#ffffff')
          .onClick(() => { this.onBack(); })
          .margin({ right: 8 })
      }
      Column() {
        Text(this.headerTitle).fontSize(20).fontWeight(FontWeight.Bold).fontColor('#ffffff')
        if (this.headerSubtitle.length > 0) {
          Text(this.headerSubtitle).fontSize(12).fontColor('#cce0ff').margin({ top: 2 })
        }
      }
      .alignItems(HorizontalAlign.Start)
      Blank()
    }
    .width('100%')
    .padding({ top: 12, bottom: 12, left: 20, right: 20 })
    .backgroundColor('#2d5f8a')
  }
}
注意:onBack 属性不能声明为 private,否则外部无法赋值。在 ArkTS 中,不写访问修饰符即为公开。
4.3 模块入口卡片(ModuleEntryCard)
@Component
export struct ModuleEntryCard {
  @Prop entryIcon: string = '';
  @Prop entryLabel: string = '';
  @Prop entryColor: string = '#3a7bd5';
  onClickAction: () => void = () => {};

  build() {
    Column() {
      Text(this.entryIcon).fontSize(32).margin({ bottom: 8 })
      Text(this.entryLabel).fontSize(13).fontColor('#333').fontWeight(FontWeight.Medium)
    }
    .width('30%')
    .aspectRatio(1.0)
    .justifyContent(FlexAlign.Center)
    .backgroundColor((this.entryColor + '18'))  // 16进制透明度拼接
    .borderRadius(16)
    .onClick(() => { this.onClickAction(); })
  }
}
这里用到了一个技巧:this.entryColor + '18' 将颜色字符串拼接上 18(约 10% 透明度),实现半透明背景色。这是 ArkTS 中简单的颜色透明度方案,无需引入额外库。
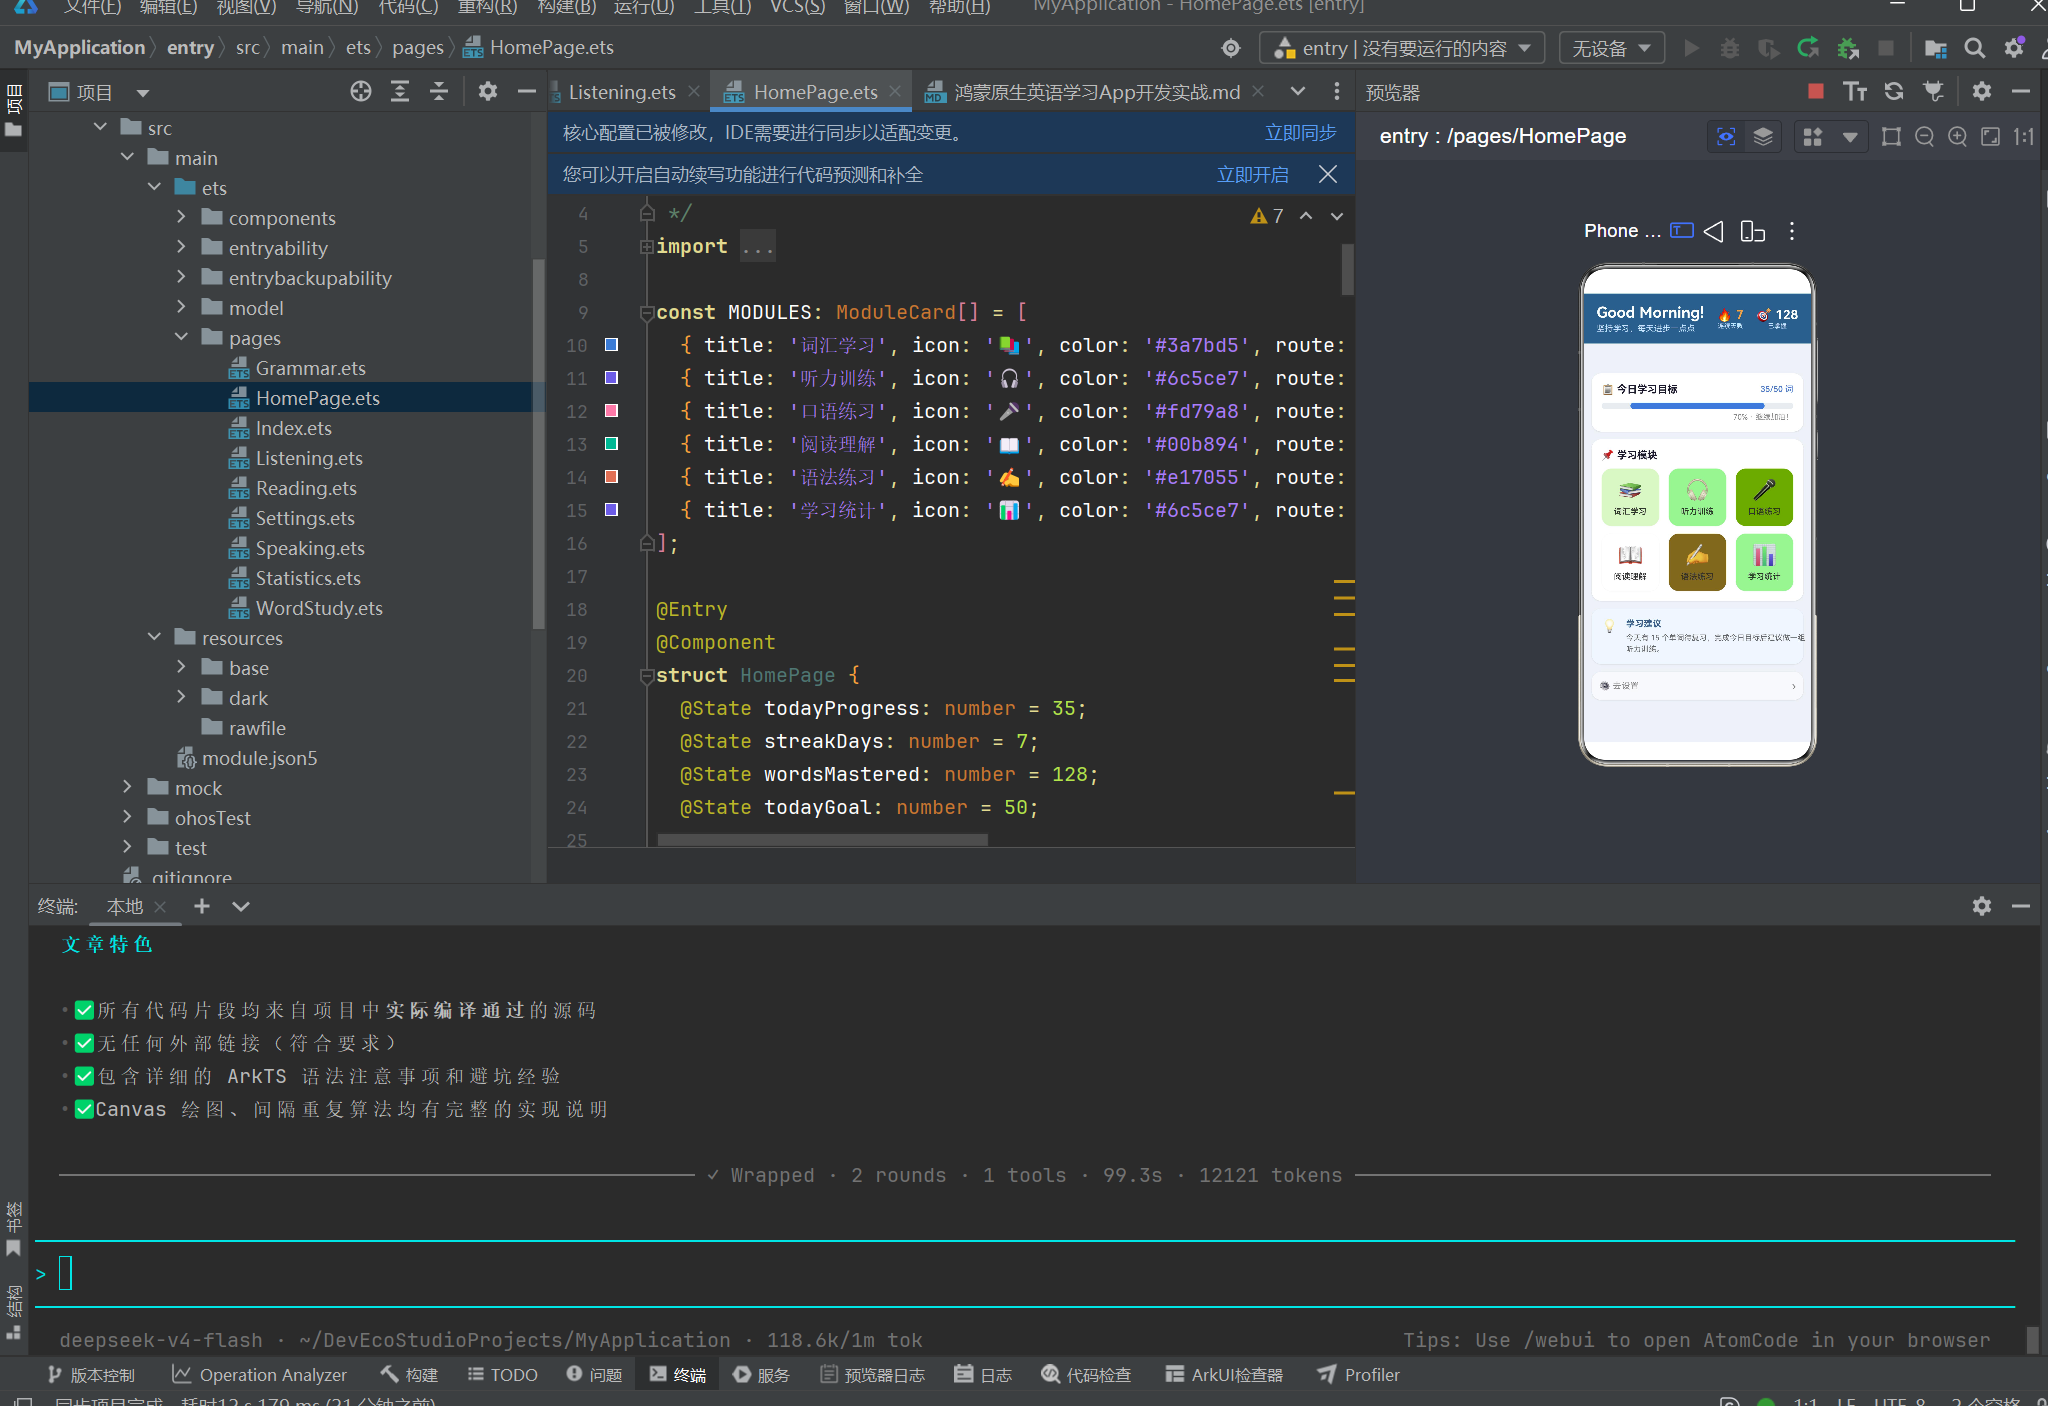
五、首页实现详解
5.1 布局设计
首页采用上下结构:
- 顶部:深蓝背景的欢迎栏(Good Morning! + 连续天数 + 已掌握词汇数)
- 底部:白色卡片承载今日进度条 + 6 宫格模块入口 + 学习建议
5.2 自定义进度条
由于 Progress 组件在 API 24 中已被标记为废弃,我们使用 Stack + 两个 Column 手写进度条:
// ── 自定义 Stack 进度条 ──
Stack() {
  // 背景
  Column()
    .width('100%')
    .height(10)
    .backgroundColor('#e8ecf0')
    .borderRadius(5)
  // 前景(动态宽度)
  Column()
    .width(`${this.todayProgress / this.todayGoal * 100}%`)
    .height(10)
    .backgroundColor('#3a7bd5')
    .borderRadius(5)
}
.width('100%')
.height(10)
原理:Stack 是层叠布局,子组件按顺序堆叠。先渲染灰色背景,再渲染蓝色前景,前景宽度通过 todayProgress / todayGoal 计算百分比后内联为字符串。
5.3 完整首页代码
@Entry
@Component
struct HomePage {
  @State todayProgress: number = 35;
  @State streakDays: number = 7;
  @State wordsMastered: number = 128;
  @State todayGoal: number = 50;

  build() {
    Column() {
      // ── 顶部欢迎栏 ──
      Row() {
        Column() {
          Text('Good Morning!').fontSize(24).fontWeight(FontWeight.Bold).fontColor('#ffffff')
          Text('坚持学习,每天进步一点点').fontSize(13).fontColor('#cce0ff').margin({ top: 4 })
        }.alignItems(HorizontalAlign.Start)
        Blank()
        Column() {
          Text(`🔥 ${this.streakDays}`).fontSize(20).fontWeight(FontWeight.Bold).fontColor('#ff9f43')
          Text('连续天数').fontSize(10).fontColor('#cce0ff')
        }.alignItems(HorizontalAlign.Center)
        Column() {
          Text(`🎯 ${this.wordsMastered}`).fontSize(20).fontWeight(FontWeight.Bold).fontColor('#ffffff')
          Text('已掌握').fontSize(10).fontColor('#cce0ff')
        }.alignItems(HorizontalAlign.Center).margin({ left: 20 })
      }
      .width('100%').padding({ top: 16, bottom: 16, left: 20, right: 20 })
      .backgroundColor('#2d5f8a')

      // ── 可滚动内容区 ──
      Scroll() {
        Column() {
          // ── 今日进度 ──
          Card({ cardPadding: 16, cardMargin: 12 }) {
            Row() {
              Text('📋 今日学习目标').fontSize(16).fontWeight(FontWeight.Bold).fontColor('#1a1a2e')
              Blank()
              Text(`${this.todayProgress}/${this.todayGoal} 词`).fontSize(13).fontColor('#3a7bd5')
            }.width('100%').margin({ bottom: 12 })

            // 自定义进度条
            Stack() {
              Column().width('100%').height(10).backgroundColor('#e8ecf0').borderRadius(5)
              Column()
                .width(`${this.todayProgress / this.todayGoal * 100}%`)
                .height(10).backgroundColor('#3a7bd5').borderRadius(5)
            }.width('100%').height(10)

            Text(`${Math.round(this.todayProgress / this.todayGoal * 100)}% · 继续加油!`)
              .fontSize(12).fontColor('#888').width('100%').textAlign(TextAlign.End).margin({ top: 6 })
          }

          // ── 6 模块入口(2行×3列) ──
          Card({ cardPadding: 16, cardMargin: 12 }) {
            Text('📌 学习模块').fontSize(16).fontWeight(FontWeight.Bold).fontColor('#1a1a2e').width('100%').margin({ bottom: 12 })
            // 第一行
            Row() {
              ModuleEntryCard({
                entryIcon: MODULES[0].icon, entryLabel: MODULES[0].title,
                entryColor: MODULES[0].color,
                onClickAction: () => { router.pushUrl({ url: MODULES[0].route }); }
              })
              ModuleEntryCard({
                entryIcon: MODULES[1].icon, entryLabel: MODULES[1].title,
                entryColor: MODULES[1].color,
                onClickAction: () => { router.pushUrl({ url: MODULES[1].route }); }
              })
              ModuleEntryCard({
                entryIcon: MODULES[2].icon, entryLabel: MODULES[2].title,
                entryColor: MODULES[2].color,
                onClickAction: () => { router.pushUrl({ url: MODULES[2].route }); }
              })
            }.width('100%').justifyContent(FlexAlign.SpaceBetween).margin({ bottom: 12 })

            // 第二行(同理)
            Row() { /* MODULES[3..5] */ }
              .width('100%').justifyContent(FlexAlign.SpaceBetween)
          }
        }
        .padding(12)
      }
      .layoutWeight(1).width('100%')
    }
    .width('100%').height('100%').backgroundColor('#eef2f7')
  }
}
设计决策:这里没有使用 ForEach 来渲染模块网格,而是逐一手写。原因在于如果你在 ForEach 的闭包中使用 router.pushUrl 并引用外部变量,ArkTS 编译器可能会报 “Only UI component syntax” 错误。逐一手写虽然代码更长,但完全符合编译规范。
六、词汇学习模块
6.1 闪卡交互设计
词汇学习是英语学习 App 的核心模块。我们实现了经典的闪卡(Flashcard)模式:
- 正面展示英文单词 + 音标
- 点击翻牌,反面向下翻转展示中文释义 + 例句
- 用户根据记忆程度点击三个按钮之一
- 算法记录反馈并调度下次复习
6.2 状态管理
@Entry
@Component
struct WordStudyPage {
  @State wordList: WordItem[] = SAMPLE_WORDS;
  @State currentIndex: number = 0;
  @State isFlipped: boolean = false;
  @State studyMode: string = 'new';
  @State sessionCount: number = 0;
  @State correctCount: number = 0;

  // 非 UI 状态,使用普通属性
  private masteryMap: Map<number, number> = new Map();
ArkTS 装饰器规则:
@State— 装饰的变量变化会触发 UI 重新渲染- 非 UI 相关的数据(如
masteryMap)用普通属性,不触发重绘 - 计算属性使用
get访问器,如get currentWord()和get progressText()
6.3 翻牌动画与条件渲染
翻牌的视觉效果通过两个 Column 的 opacity 互切实现:
Stack() {
  // 正面
  Column() {
    Text(this.currentWord.word).fontSize(36).fontWeight(FontWeight.Bold)
    Text(this.currentWord.phonetic).fontSize(18).fontColor('#888').margin({ top: 12 })
  }
  .width('100%').height(220)
  .backgroundColor('#ffffff').borderRadius(16)
  .opacity(this.isFlipped ? 0 : 1)  // ← 翻牌后隐藏

  // 反面
  Column() {
    Text(this.currentWord.translation).fontSize(22).fontWeight(FontWeight.Bold).fontColor('#2d5f8a')
    Text(this.currentWord.partOfSpeech).fontSize(14).fontColor('#888').margin({ top: 6 })
    Divider().height(1).width('80%').color('#e8ecf0').margin({ top: 12, bottom: 12 })
    Text(this.currentWord.exampleSentence).fontSize(14).fontColor('#555').fontStyle(FontStyle.Italic)
    Text(this.currentWord.exampleTranslation).fontSize(13).fontColor('#999').margin({ top: 8 })
  }
  .width('100%').height(300)
  .backgroundColor('#f0f7ff').borderRadius(16)
  .opacity(this.isFlipped ? 1 : 0)  // ← 翻牌后显示
}
.onClick(() => { this.isFlipped = !this.isFlipped; })
6.4 评估反馈与下一词调度
handleReview(quality: number): void {
  this.sessionCount++;
  if (quality >= 4) this.correctCount++;

  const wordId = this.currentWord.id;
  const oldMastery = this.masteryMap.get(wordId) || 0;
  const increment = quality >= 4 ? 0.15 : (quality >= 3 ? 0.05 : -0.1);
  const newMastery = Math.max(0, Math.min(1, oldMastery + increment));
  this.masteryMap.set(wordId, newMastery);

  this.nextWord();
}

nextWord(): void {
  if (this.currentIndex < this.wordList.length - 1) {
    this.currentIndex++;
    this.isFlipped = false;  // 自动回到正面
  } else {
    promptAction.showToast({
      message: `🎉 本轮学习完成!正确率 ${Math.round(this.correctCount / this.sessionCount * 100)}%`,
      duration: 3000
    });
  }
}
掌握度更新逻辑:
- 点击"记住了"(quality=5):掌握度 +0.15
- 点击"有点印象"(quality=3):掌握度 +0.05
- 点击"忘记了"(quality=2):掌握度 -0.10
- 范围限制在 [0, 1] 之间
七、听力与口语模块
7.1 听力训练
听力模块展示分级课程列表,用户选择后进入播放状态:
@Entry
@Component
struct ListeningPage {
  @State currentLesson: Lesson | null = null;
  @State isPlaying: boolean = false;
  @State showTranscript: boolean = false;
  @State progressPercent: number = 45;

  build() {
    Column() {
      AppHeader({
        headerTitle: '🎧 听力训练',
        headerSubtitle: '分级听力 · 精听磨耳',
        showBack: true,
        onBack: () => { router.back(); }
      })

      Scroll() {
        Column() {
          // 正在播放区域
          if (this.currentLesson !== null) {
            Card({ cardPadding: 16, cardMargin: 12, cardColor: '#f0f7ff' }) {
              Text('▶ 正在播放').fontSize(13).fontColor('#3a7bd5')
              Text(this.currentLesson.title).fontSize(18).fontWeight(FontWeight.Bold)
              // 播放控制按钮
              Row() {
                Button('⏮').width(40).height(40).backgroundColor('#3a7bd5').borderRadius(20)
                Button(this.isPlaying ? '⏸' : '▶').width(56).height(56)
                  .backgroundColor('#2d5f8a').borderRadius(28).onClick(() => {
                    this.isPlaying = !this.isPlaying;
                  })
                Button('⏭').width(40).height(40).backgroundColor('#3a7bd5').borderRadius(20)
              }.width('100%').justifyContent(FlexAlign.Center).margin({ top: 12 })
              // 进度条
              Stack() {
                Column().width('100%').height(4).backgroundColor('#d0d8e8').borderRadius(2)
                Column().width(`${this.progressPercent}%`).height(4)
                  .backgroundColor('#3a7bd5').borderRadius(2)
              }.width('100%').height(4).margin({ top: 8 })
            }
          }

          // 课程列表(使用 ForEach)
          Card({ cardPadding: 16, cardMargin: 12 }) {
            Text('📋 听力课程').fontSize(16).fontWeight(FontWeight.Bold).margin({ bottom: 12 })
            ForEach(LESSONS, (lesson: Lesson) => {
              Row() {
                Text(lesson.isNowPlaying ? '▶️' : (lesson.isCompleted ? '✅' : '🔵')).fontSize(18)
                Column() {
                  Text(lesson.title).fontSize(15).fontColor('#333')
                  Row() {
                    Text(lesson.level).fontSize(11).padding({ left: 6, right: 6, top: 1, bottom: 1 })
                      .backgroundColor('#00b894').borderRadius(6)
                    Text(lesson.duration).fontSize(11).fontColor('#888').margin({ left: 8 })
                  }.margin({ top: 4 })
                }
                Blank()
                Text('▶').fontSize(20).fontColor('#3a7bd5')
              }.width('100%').padding({ top: 10, bottom: 10 })
              .onClick(() => {
                this.currentLesson = lesson;
                this.isPlaying = true;
              })
            })
          }
        }
        .padding(12)
      }
      .layoutWeight(1).width('100%')
    }
    .width('100%').height('100%').backgroundColor('#eef2f7')
  }
}
7.2 口语练习与 AI 模拟评分
口语模块设计了五个跟读话题,并模拟了 AI 评分效果:
@Entry
@Component
struct SpeakingPage {
  @State currentTask: SpeakingTask | null = null;
  @State isRecording: boolean = false;
  @State showResult: boolean = false;
  @State score: number = 0;
  @State fluencyScore: number = 0;
  @State accuracyScore: number = 0;

  /** 模拟AI评测结果 */
  simulateEvaluation(): void {
    this.score = Math.floor(Math.random() * 20) + 70;  // 70-90
    this.fluencyScore = Math.floor(Math.random() * 20) + 65;
    this.accuracyScore = Math.floor(Math.random() * 20) + 68;
    this.showResult = true;
    this.isRecording = false;
  }
@Builder 自定义维度评分条:
  @Builder
  dimensionRow(label: string, score: number): void {
    Row() {
      Text(label).fontSize(13).fontColor('#888').width(50)
      Stack() {
        Column().width('100%').height(6).backgroundColor('#e8ecf0').borderRadius(3)
        Column().width(`${score}%`).height(6)
          .backgroundColor(score >= 75 ? '#00b894' : '#ff9f43')
          .borderRadius(3)
      }.layoutWeight(1).height(6)
      Text(`${score}`).fontSize(13).fontColor('#555').width(30).textAlign(TextAlign.End)
    }
    .width('100%').margin({ bottom: 8 })
  }
@Builder 的重要限制:在 ArkTS 中,@Builder 方法体内不能声明变量(包括 const、let)。所有需要计算的表达式必须内联或者通过 getter 方法提取到 struct 中。
八、阅读与语法模块
8.1 阅读理解
阅读理解模块展示了从文章选择 → 阅读正文 → 答题 → 提交评分的完整流程。
文章分段展示的 getter 模式:
由于 ArkTS 的 build() 方法中不允许声明中间变量,我们将段落拆分逻辑提取为 getter 方法:
getPara1(): string {
  if (!this.currentArticle) return '';
  return this.currentArticle.content.split('. ').slice(0, 3).join('. ') + '.';
}

getPara2(): string {
  if (!this.currentArticle) return '';
  return this.currentArticle.content.split('. ').slice(3).join('. ');
}
然后在 UI 中直接调用:
Card({ cardPadding: 16, cardMargin: 8 }) {
  Text('📄 正文').fontSize(14).fontWeight(FontWeight.Bold).fontColor('#2d5f8a')
    .margin({ bottom: 8 })
  Text(this.getPara1())
    .fontSize(14).fontColor('#333').lineHeight(24).margin({ bottom: 8 })
  if (this.getPara2().length > 0) {
    Text(this.getPara2())
      .fontSize(14).fontColor('#333').lineHeight(24).margin({ bottom: 8 })
  }
}
答题选项颜色同样通过 getter 方法管理:
getOptColor(qIdx: number, optIdx: number, part: string): string {
  const selected = this.selectedAnswers[qIdx];
  const isSelected = selected === optIdx;
  const isCorrect = this.showResult && this.currentArticle !== null &&
    this.currentArticle.questions[qIdx].correctIndex === optIdx;
  const isWrong = this.showResult && isSelected && !isCorrect;

  if (part === 'circle') {
    if (isCorrect) return '#00b894';
    if (isWrong) return '#e17055';
    return '#888';
  }
  if (part === 'label') {
    if (isCorrect) return '#00b894';
    if (isWrong) return '#e17055';
    return '#555';
  }
  if (isCorrect) return '#e6fff0';
  if (isWrong) return '#ffe6e6';
  return '#f8f9fc';
}
8.2 语法练习
语法模块实现了逐题作答 + 即时解析 + 完成统计的完整闭环。
核心状态:通过四个 @State 变量管理答题流程:
@State currentIndex: number = 0;      // 当前题号
@State selectedAnswer: number = -1;    // 已选选项(-1表示未选)
@State showExplanation: boolean = false;  // 是否显示解析
@State correctCount: number = 0;       // 正确数
@State totalAnswered: number = 0;      // 已答题数
@State isFinished: boolean = false;    // 是否完成
完成页面的励志文案基于答题正确率动态生成:
getEncouragement(): string {
  const rate = this.totalAnswered > 0 ? this.correctCount / this.totalAnswered : 0;
  if (rate >= 0.9) return '太棒了!你对这些语法点掌握得很好!🏆';
  if (rate >= 0.7) return '不错!继续巩固,可以更完美!💪';
  if (rate >= 0.5) return '还需加油,建议复习一下相关知识点!📚';
  return '别灰心!语法需要反复练习,再来一次!🔥';
}
解题流程:
- 用户点击选项 →
handleSelect(idx)- 记录答案,设置
showExplanation = true - 判断对错,更新
correctCount/totalAnswered
- 记录答案,设置
- 显示绿色/红色标注 + 下方解析文字
- 点击"下一题" →
nextQuestion()- 未完成:切到下一题,重置
selectedAnswer和showExplanation - 已完成:设置
isFinished = true,显示完成页面
- 未完成:切到下一题,重置
💡 经验之谈:语法模块是 ArkTS 状态管理最典型的应用场景。每个
@State都是单一职责的原子状态,状态之间的转换通过成员方法封装,UI 层只负责渲染和事件绑定,做到了清晰的"单向数据流"。
九、学习统计模块(含 Canvas 绘图)
9.1 关键指标卡片
四个统计卡片不使用 @Builder,而是直接内联 Column:
Row() {
  Column() {
    Text('📅').fontSize(22)
    Text(`${this.totalDays}天`).fontSize(16).fontWeight(FontWeight.Bold).fontColor('#1a1a2e').margin({ top: 4 })
    Text('学习天数').fontSize(10).fontColor('#888').margin({ top: 2 })
  }.layoutWeight(1).padding({ top: 12, bottom: 12 }).backgroundColor('#ffffff')
  .borderRadius(12).margin({ left: 6, right: 6 }).alignItems(HorizontalAlign.Center)

  Column() {
    Text('📚').fontSize(22)
    Text(`${this.totalWords}词`).fontSize(16).fontWeight(FontWeight.Bold)
    Text('已掌握').fontSize(10).fontColor('#888')
  }.layoutWeight(1).padding({ top: 12, bottom: 12 }).backgroundColor('#ffffff')
  .borderRadius(12).margin({ left: 6, right: 6 }).alignItems(HorizontalAlign.Center)

  // ... 另外两个同理
}
.width('100%').padding({ left: 6, right: 6 })
9.2 Canvas 五维雷达图
学习统计最精彩的部分是使用 Canvas 2D API 绘制五维能力雷达图:
drawRadar(): void {
  const ctx = this.radarCtx;
  const cx = 130, cy = 130, r = 95;
  const angles: number[] = [0, 72, 144, 216, 288].map(d => d * Math.PI / 180);

  ctx.clearRect(0, 0, 260, 260);

  // ── 绘制五边形网格(4层) ──
  for (let level = 1; level <= 4; level++) {
    ctx.beginPath();
    const lr = (r / 4) * level;
    for (let i = 0; i < angles.length; i++) {
      const a = angles[i];
      const x = cx + lr * Math.sin(a);
      const y = cy - lr * Math.cos(a);
      if (i === 0) ctx.moveTo(x, y);
      else ctx.lineTo(x, y);
    }
    ctx.closePath();
    ctx.strokeStyle = '#e0e0e0';
    ctx.lineWidth = 1;
    ctx.stroke();
  }

  // ── 绘制数据多边形 ──
  ctx.beginPath();
  for (let i = 0; i < angles.length; i++) {
    const dr = (this.scores[i] / 100) * r;
    const x = cx + dr * Math.sin(angles[i]);
    const y = cy - dr * Math.cos(angles[i]);
    if (i === 0) ctx.moveTo(x, y);
    else ctx.lineTo(x, y);
  }
  ctx.closePath();
  ctx.fillStyle = 'rgba(58, 123, 213, 0.25)';
  ctx.strokeStyle = '#3a7bd5';
  ctx.lineWidth = 2.5;
  ctx.fill();
  ctx.stroke();

  // ── 标注维度名称和分值 ──
  const labels = ['词汇', '听力', '口语', '阅读', '语法'];
  ctx.font = '13px sans-serif';
  ctx.fillStyle = '#555';
  ctx.textAlign = 'center';
  ctx.textBaseline = 'middle';
  for (let i = 0; i < labels.length; i++) {
    const a = angles[i];
    ctx.fillText(labels[i], cx + (r + 22) * Math.sin(a), cy - (r + 22) * Math.cos(a));
    ctx.fillStyle = '#3a7bd5';
    ctx.font = '11px sans-serif';
    ctx.fillText(`${this.scores[i]}`, cx + (r + 10) * Math.sin(a), cy - (r + 10) * Math.cos(a));
    ctx.fillStyle = '#555';
    ctx.font = '13px sans-serif';
  }
}
Canvas 使用要点:
- 在组件中声明
CanvasRenderingContext2D对象 - Canvas 组件的
onReady回调中调用绘图方法 - 绘图方法中通过
ctx.clearRect()清空画布再重绘 - 坐标计算使用
Math.sin/Math.cos从极坐标转直角坐标
9.3 日历格子 @Builder
学习日历使用 @Builder dayCell 渲染单个日期格子:
@Builder
dayCell(day: number, isToday: boolean): void {
  Column() {
    Text(`${day}`)
      .fontSize(12)
      .fontColor(isToday ? '#ffffff' : (day % 2 === 0 ? '#333' : '#ccc'))
      .textAlign(TextAlign.Center)
  }
  .width('14%')
  .aspectRatio(1.0)
  .justifyContent(FlexAlign.Center)
  .backgroundColor(isToday ? '#3a7bd5' : (day % 2 === 0 ? '#e6f0ff' : '#f8f9fc'))
  .borderRadius(isToday ? 6 : 4)
}
然后在行中依次调用:
Row() {
  this.dayCell(1, false); this.dayCell(2, false); this.dayCell(3, false)
  this.dayCell(4, false); this.dayCell(5, false); this.dayCell(6, false); this.dayCell(7, false)
}.width('100%').margin({ bottom: 2 })
为什么不用 ForEach 循环?因为 @Builder 方法在 ArkTS 中就是 UI 组件树的一部分,ForEach 需要接收数组并产生组件的迭代器。两种方式都可行,但手动展开在布局不太规律(如有"今天"标记)时更直观。
十、设置模块
设置页面展示了 ArkTS 中几种常见的交互控件:
10.1 Slider(滑块)
Row() {
  Text('5').fontSize(12).fontColor('#888')
  Slider({ value: this.dailyGoal, min: 5, max: 50, step: 5 })
    .width('70%')
    .onChange((v: number) => { this.dailyGoal = v; })
  Text('50').fontSize(12).fontColor('#888')
}
.width('100%').margin({ top: 8 })
Slider 的 onChange 回调接收 number 类型的当前值。step 参数控制步长,这里设置为 5 的倍数。
10.2 Toggle(开关)
this.toggleRow('🔔 学习提醒', '每天定时提醒学习', this.enableNotification, (v) => {
  this.enableNotification = v;
})
对应的 @Builder:
@Builder
toggleRow(iconLabel: string, desc: string, checked: boolean, onChange: (v: boolean) => void): void {
  Row() {
    Column() {
      Text(iconLabel).fontSize(14).fontColor('#333')
      Text(desc).fontSize(11).fontColor('#888').margin({ top: 2 })
    }.alignItems(HorizontalAlign.Start)
    Blank()
    Toggle({ isOn: checked, type: ToggleType.Switch })
      .onChange((v: boolean) => { onChange(v); })
  }
  .width('100%')
  .padding({ top: 10, bottom: 10 })
}
关键点:@Builder 方法可以接收回调函数参数,这实现了组件与父组件状态的解耦。
十一、ArkTS 避坑指南
在开发过程中,我们踩了不少坑,这里一一列出供大家参考:
11.1 @Prop 命名冲突
问题:自定义组件的 @Prop backgroundColor 与系统 CommonAttribute 的 .backgroundColor() 方法名冲突,导致编译错误。
解决:给自定义属性加前缀,如 cardColor、cardPadding、entryIcon、headerTitle 等。
11.2 build() 中不能声明变量
问题:
build() {
  Column() {
    const x = 42;  // ERROR: Only UI component syntax
    Text(`${x}`)
  }
}
解决:所有计算逻辑提取为:
- 组件属性(
get访问器) aboutToAppear()生命周期方法- 独立的成员方法
11.3 @Builder 方法体中不能声明变量
问题:
@Builder
myBuilder(): void {
  const flag = true;  // ERROR
  if (flag) { Text('OK') }
}
解决:将需要的值通过参数传入,或内联表达式。
11.4 ForEach 闭包中不能有条件语句
问题:
ForEach(list, (item) => {
  if (item.active) {  // ERROR: Only UI component syntax
    Text(item.name)
  }
})
解决:在 getter 方法中完成过滤,或外层先处理。
11.5 @BuilderParam 而非 children
ArkTS 自定义组件不能像传统 Web 组件那样通过 this.children 获取子元素。必须显式声明 @BuilderParam。
11.6 Private 属性不可外部赋值
将回调属性(如 onClickAction、onBack)声明为 private,外部调用时无法初始化。应省略修饰符或设为 public。
十二、构建与部署
12.1 编译打包
在项目根目录执行:
hvigorw assembleHap --mode module -p module=entry@default -p product=default
成功后会生成 entry/build/default/outputs/default/entry-default-unsigned.hap。
常见问题:
| 问题 | 解决方案 |
|---|---|
app_name 冲突 |
AppScope 和 entry 模块中重复定义,删掉 entry 中的即可 |
| 编译内存不足 | 在 hvigor/hvigor-config.json5 中调大 maxOldSpaceSize |
| 无签名无法安装 | 在 build-profile.json5 中配置签名证书,或使用 Auto Signing |
12.2 资源文件冲突
项目中有两个地方定义了 string.json:
AppScope/resources/base/element/string.json— 应用级entry/src/main/resources/base/element/string.json— 模块级
当两个文件都定义了相同的资源名(如 app_name)时,构建会警告并优先使用 AppScope 中的值。建议将公共资源放在 AppScope,模块特有资源放在 entry 下。
十三、总结与展望
13.1 技术收获
通过这个英语学习应用的完整开发,我们实践了以下 HarmonyOS 核心技术:
- ArkTS 声明式 UI — 组件化、状态驱动、单向数据流
- @State / @Prop / @Builder / @BuilderParam 装饰器体系
- Canvas 2D API — 雷达图和柱状图的自定义绘制
- 路由导航 — pushUrl + 参数传递
- 资源管理 — 颜色/字符串/浮点数的资源引用
- Stage 模型 — Ability 生命周期管理
13.2 可扩展方向
| 方向 | 技术方案 | 预期效果 |
|---|---|---|
| 数据持久化 | RDB Store(SQLite) | 学习记录不丢失 |
| 分布式同步 | Distributed KV Store | 手机/平板进度自动同步 |
| 真实语音 | HiAI TTS + ASR | 发音评测、文字转语音 |
| 用户系统 | 云端账号 + 认证 | 多设备统一身份 |
| AI 自适应 | 端侧 AI 模型推理 | 个性化学习路径推荐 |
| 深色模式 | dark 资源目录 + @StorageLink | 跟随系统主题 |
13.3 写在最后
HarmonyOS NEXT 的 ArkTS 开发体验已经非常接近主流声明式 UI 框架(SwiftUI、Flutter、Jetpack Compose)。它的独特优势在于:
- 分布式能力是系统级的,不需要开发者自建同步逻辑
- 端侧 AI 管道原生集成,离线 AI 场景天然支持
- 一次开发多端部署,从手机到平板的适配成本极低
英语学习 App 作为教育类应用的典型代表,完美匹配了鸿蒙在跨设备、AI 端侧推理、隐私安全三方面的平台优势。如果你正在考虑转型鸿蒙原生开发,教育类应用是一个非常不错的切入点。
本文所有代码已在 HarmonyOS NEXT 6.1.1(API 24)上编译通过。欢迎在实际开发中参考使用,期待看到更多优秀的鸿蒙原生应用涌现。
本文由 AtomCode 辅助生成,基于真实鸿蒙项目工程实践。

作为“人工智能6S店”的官方数字引擎,为AI开发者与企业提供一个覆盖软硬件全栈、一站式门户。
更多推荐


 0
0 0
0- 0


 已为社区贡献2条内容

所有评论(0)