
鸿蒙(HarmonyOS)原生应用开发之毛玻璃层叠布局示例
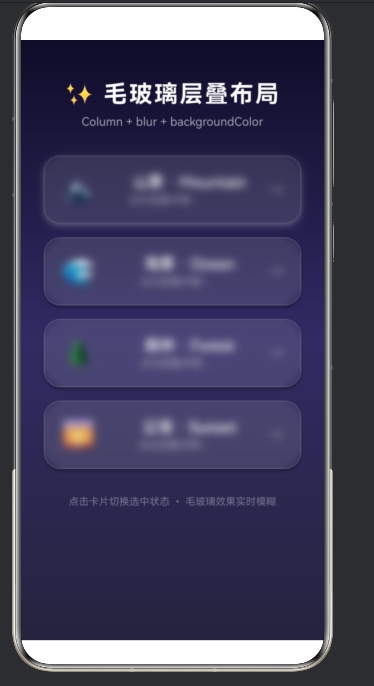
# 毛玻璃层叠布局示例
## 一、引言
在鸿蒙(HarmonyOS)原生应用开发中,毛玻璃(Frosted Glass)效果是一种流行的UI设计风格,它通过半透明背景配合高斯模糊,营造出类似磨砂玻璃的视觉效果。本文将以项目中的毛玻璃层叠布局为例,深入探讨如何使用ArkTS语言实现这一精美效果。
毛玻璃效果的核心在于:`Column`容器作为垂直排列基础,配合`.blur()`方法实现模糊效果,再加上半透明背景色和阴影,共同构建出层次感丰富的视觉体验。本文将从原理到实践,全面解析毛玻璃层叠布局的实现方式。
---
## 二、毛玻璃效果原理
### 2.1 视觉效果分析
毛玻璃效果主要包含以下几个视觉层次:
1. **背景层**:可以是纯色、渐变或图片,作为底层背景
2. **模糊层**:半透明白色或浅色覆盖层,施加高斯模糊
3. **内容层**:放置在模糊层之上的文字、图标等内容
### 2.2 核心技术要点
| 技术点 | 实现方式 | 效果说明 |
|--------|----------|----------|
| **高斯模糊** | `.blur(value)` | 模糊程度,值越大越模糊(单位px) |
| **半透明背景** | `backgroundColor('rgba(...)')` | 提供模糊基底,增强层次感 |
| **边框效果** | `borderWidth() + borderColor()` | 模拟玻璃边缘反光 |
| **阴影效果** | `.shadow()` | 增强立体感和层次感 |
| **动画过渡** | `.animation()` | 平滑的状态切换效果 |
### 2.3 毛玻璃效果的数学原理
高斯模糊是一种常用的图像模糊算法,其核心思想是对图像中的每个像素点进行加权平均,权重由高斯函数决定:
```
G(x, y) = (1 / (2 * π * σ²)) * e^(-(x² + y²) / (2 * σ²))
```
其中:
- `σ`(sigma)表示标准差,决定模糊程度
- `x, y` 表示像素相对于中心的坐标
---
## 三、项目核心代码解析
### 3.1 项目结构概述
本项目的毛玻璃层叠布局位于 `entry/src/main/ets/pages/Index.ets` 文件中,主要包含以下核心组件:
```typescript
@Entry
@Component
struct FrostedGlassDemo {
@State currentIndex: number = 0;
@State cardData: string[] = [
'🏔️ 山景 · Mountain',
'🌊 海景 · Ocean',
'🌲 森林 · Forest',
'🌅 日落 · Sunset'
];
build() {
// 核心布局代码
}
}
```
### 3.2 层叠结构设计
整个布局采用 `Stack` 容器实现层叠效果:
```typescript
Stack() {
// 第一层:渐变背景
Column()
.width('100%')
.height('100%')
.linearGradient({
direction: GradientDirection.Bottom,
colors: [
['#0f0c29', 0],
['#302b63', 0.5],
['#24243e', 1.0]
]
})
// 第二层:毛玻璃卡片内容
Column() {
// 标题和卡片列表
}
.width('100%')
.height('100%')
.blur(2) // 轻微模糊融合背景
}
```
### 3.3 渐变背景实现
渐变背景使用 `linearGradient` 方法创建从深蓝到紫色的渐变效果:
```typescript
.linearGradient({
direction: GradientDirection.Bottom, // 从顶部到底部
colors: [
['#0f0c29', 0], // 起始颜色,位置0%
['#302b63', 0.5], // 中间颜色,位置50%
['#24243e', 1.0] // 结束颜色,位置100%
]
})
```
### 3.4 毛玻璃卡片实现
每张卡片都采用以下样式组合实现毛玻璃效果:
```typescript
Column() {
Row() {
Text(item.slice(0, 2)) // Emoji图标
.fontSize(32)
.margin({ right: 16 })
Column() {
Text(item.slice(2)) // 标题文字
.fontSize(18)
.fontWeight(FontWeight.Medium)
.fontColor('#FFFFFF')
Text('点击查看详情 ›')
.fontSize(12)
.fontColor('rgba(255,255,255,0.5)')
.margin({ top: 4 })
}
.alignItems(HorizontalAlign.Start)
Text('→')
.fontSize(20)
.fontColor('rgba(255,255,255,0.4)')
}
.width('100%')
.alignItems(VerticalAlign.Center)
.justifyContent(FlexAlign.SpaceBetween)
}
// 毛玻璃核心样式
.width('85%')
.padding(20)
.margin({ bottom: 16 })
.backgroundColor('rgba(255, 255, 255, 0.12)') // 12%透明度白色
.blur(24) // 24px高斯模糊
.borderRadius(20) // 圆角
.borderWidth(1)
.borderColor('rgba(255, 255, 255, 0.15)') // 15%透明度边框
```
---
## 四、毛玻璃效果的关键技术详解
### 4.1 blur()方法深度解析
`blur()` 方法用于为组件施加高斯模糊效果:
```typescript
.blur(24) // 24像素的高斯模糊
```
**参数说明**:
- 值越大,模糊效果越明显
- 通常取值范围为 8-32px
- 值为0时无模糊效果
### 4.2 半透明背景色设计
半透明背景色是毛玻璃效果的关键:
```typescript
.backgroundColor('rgba(255, 255, 255, 0.12)')
```
**颜色值分析**:
- `rgba(255, 255, 255, 0.12)` 表示白色,透明度12%
- 透明度范围通常在 0.1-0.2 之间
- 深色背景下使用白色半透明,浅色背景下使用黑色半透明
### 4.3 边框效果增强
边框用于模拟玻璃边缘的反光效果:
```typescript
.borderWidth(1)
.borderColor('rgba(255, 255, 255, 0.15)')
```
**设计要点**:
- 边框宽度通常为1px
- 边框颜色透明度略高于背景色
- 增强玻璃的质感和层次感
### 4.4 阴影效果实现
阴影用于增强卡片的立体感:
```typescript
.shadow({
radius: this.currentIndex === index ? 20 : 8,
color: this.currentIndex === index
? 'rgba(255, 255, 255, 0.25)'
: 'rgba(0, 0, 0, 0.3)',
offsetX: 0,
offsetY: 8
})
```
**阴影参数说明**:
- `radius`:阴影模糊半径
- `color`:阴影颜色(选中时为白色发光,未选中时为黑色阴影)
- `offsetX/Y`:阴影偏移量
### 4.5 动画过渡效果
动画使状态切换更加平滑:
```typescript
.animation({
duration: 300, // 动画时长300毫秒
curve: Curve.FastOutSlowIn // 缓动曲线
})
```
---
## 五、交互设计与状态管理
### 5.1 点击交互实现
通过 `onClick` 实现卡片点击交互:
```typescript
.onClick(() => {
this.currentIndex = index;
console.info(`[毛玻璃示例] 选中卡片: ${index} - ${item}`);
})
```
### 5.2 状态驱动的样式变化
使用状态变量控制选中状态:
```typescript
@State currentIndex: number = 0; // 当前选中卡片索引
// 根据状态动态调整样式
.shadow({
radius: this.currentIndex === index ? 20 : 8,
color: this.currentIndex === index
? 'rgba(255, 255, 255, 0.25)'
: 'rgba(0, 0, 0, 0.3)',
offsetX: 0,
offsetY: 8
})
```
### 5.3 数据驱动渲染
使用 `ForEach` 实现动态卡片列表:
```typescript
@State cardData: string[] = [
'🏔️ 山景 · Mountain',
'🌊 海景 · Ocean',
'🌲 森林 · Forest',
'🌅 日落 · Sunset'
];
ForEach(this.cardData, (item: string, index: number) => {
Column() {
// 卡片内容
}
.onClick(() => {
this.currentIndex = index;
})
}, (item: string) => item) // key生成器
```
---
## 六、毛玻璃布局的性能优化
### 6.1 blur性能注意事项
虽然毛玻璃效果视觉效果出色,但过度使用可能影响性能:
| 注意事项 | 说明 |
|----------|------|
| **模糊半径** | 过大的blur值会显著增加GPU计算量 |
| **组件数量** | 大量模糊组件会导致性能下降 |
| **动画模糊** | 避免在动画过程中改变blur值 |
### 6.2 优化策略
```typescript
// ✅ 推荐:使用静态模糊值
.blur(24)
// ❌ 不推荐:动态改变模糊值
.blur(this.isActive ? 32 : 16)
// ✅ 推荐:对容器整体模糊而非每个子组件
Column() {
// 多个子组件
}
.blur(2) // 容器轻微模糊
```
### 6.3 条件渲染优化
```typescript
// ✅ 推荐:使用条件渲染
if (showCard) {
Column() { /* 毛玻璃卡片 */ }
}
// ❌ 不推荐:渲染隐藏的模糊组件
Column() { /* 毛玻璃卡片 */ }
.visibility(Visibility.Hidden)
```
---
## 七、毛玻璃效果的变体实现
### 7.1 深色毛玻璃
针对浅色背景的深色毛玻璃效果:
```typescript
Column() {
// 内容
}
.backgroundColor('rgba(0, 0, 0, 0.15)') // 黑色半透明
.blur(20)
.borderColor('rgba(0, 0, 0, 0.2)')
```
### 7.2 彩色毛玻璃
带有色彩倾向的毛玻璃效果:
```typescript
Column() {
// 内容
}
.backgroundColor('rgba(100, 150, 255, 0.1)') // 蓝色倾向
.blur(16)
.borderColor('rgba(100, 150, 255, 0.2)')
```
### 7.3 双层毛玻璃
多层叠加的毛玻璃效果:
```typescript
Stack() {
Column()
.width('100%')
.height('100%')
.backgroundColor('rgba(255, 255, 255, 0.08)')
.blur(12)
Column() {
// 内容
}
.backgroundColor('rgba(255, 255, 255, 0.15)')
.blur(24)
}
```
---
## 八、毛玻璃效果在不同场景的应用
### 8.1 卡片列表
如本项目所示,毛玻璃卡片是最常见的应用场景:
```typescript
Column() {
ForEach(this.data, (item) => {
Column() {
// 卡片内容
}
.backgroundColor('rgba(255, 255, 255, 0.12)')
.blur(24)
.borderRadius(20)
})
}
```
### 8.2 底部导航栏
毛玻璃效果用于底部导航栏:
```typescript
Column() {
Row() {
// 导航项
}
.width('100%')
.height(60)
.backgroundColor('rgba(255, 255, 255, 0.8)')
.blur(16)
.borderRadius({ topLeft: 20, topRight: 20 })
}
```
### 8.3 弹窗/模态框
毛玻璃效果用于弹窗背景:
```typescript
Stack() {
// 遮罩层
Column()
.width('100%')
.height('100%')
.backgroundColor('rgba(0, 0, 0, 0.5)')
// 弹窗内容
Column() {
// 内容
}
.width(300)
.backgroundColor('rgba(255, 255, 255, 0.95)')
.blur(20)
.borderRadius(24)
}
```
### 8.4 侧边栏/抽屉
毛玻璃效果用于侧边栏:
```typescript
Column() {
// 侧边栏内容
}
.width(280)
.height('100%')
.backgroundColor('rgba(255, 255, 255, 0.9)')
.blur(20)
```
---
## 九、毛玻璃效果与其他布局组件的组合
### 9.1 Column与Row组合
```typescript
Column() {
Row() {
Image('avatar.png')
.width(48)
.height(48)
.borderRadius(24)
Column() {
Text('用户名')
.fontSize(16)
.fontWeight(FontWeight.Medium)
Text('在线')
.fontSize(12)
.fontColor('#00c853')
}
.margin({ left: 12 })
}
.width('100%')
.padding(16)
}
.width('85%')
.backgroundColor('rgba(255, 255, 255, 0.12)')
.blur(24)
.borderRadius(16)
```
### 9.2 Stack与Column组合
```typescript
Stack() {
// 背景图
Image('background.jpg')
.width('100%')
.height('100%')
.objectFit(ImageFit.Cover)
// 毛玻璃遮罩
Column() {
Text('标题')
.fontSize(28)
.fontWeight(FontWeight.Bold)
.fontColor('#FFFFFF')
}
.width('100%')
.height('100%')
.backgroundColor('rgba(0, 0, 0, 0.3)')
.blur(8)
}
```
### 9.3 Grid与Column组合
```typescript
Column() {
Grid() {
ForEach([1, 2, 3, 4], (index) => {
GridItem() {
Column() {
Text(`功能${index}`)
.fontSize(16)
}
.width('100%')
.height(80)
.backgroundColor('rgba(255, 255, 255, 0.1)')
.blur(12)
.borderRadius(12)
.justifyContent(FlexAlign.Center)
}
})
}
.columnsTemplate('1fr 1fr')
.columnsGap(12)
.rowsGap(12)
.width('90%')
}
.width('100%')
.height('100%')
.backgroundColor('#1a1a2e')
```
---
## 十、响应式毛玻璃布局
### 10.1 自适应不同屏幕尺寸
```typescript
@Entry
@Component
struct ResponsiveGlass {
@State screenWidth: number = 0;
build() {
Column() {
Column() {
// 毛玻璃卡片内容
}
.width(this.screenWidth >= 720 ? '60%' : '85%')
.backgroundColor('rgba(255, 255, 255, 0.12)')
.blur(this.screenWidth >= 720 ? 32 : 24)
}
.width('100%')
.height('100%')
.onSizeChange((width: number) => {
this.screenWidth = width;
})
}
}
```
### 10.2 动态模糊程度
根据屏幕尺寸调整模糊程度:
```typescript
.blur(this.screenWidth >= 720 ? 32 : this.screenWidth >= 480 ? 28 : 24)
```
---
## 十一、常见问题与解决方案
### 11.1 问题1:模糊效果不明显
**现象**:毛玻璃效果很淡,几乎看不到
**原因**:背景色透明度太高或模糊值太小
**解决方案**:
```typescript
// ❌ 问题代码
.backgroundColor('rgba(255, 255, 255, 0.05)')
.blur(8)
// ✅ 解决方案
.backgroundColor('rgba(255, 255, 255, 0.12)')
.blur(24)
```
### 11.2 问题2:内容也被模糊
**现象**:卡片内的文字和图标也被模糊了
**原因**:模糊作用在容器上,影响了所有子组件
**解决方案**:
```typescript
// ❌ 问题代码
Column() {
Text('内容') // 被模糊
}
.blur(24)
// ✅ 解决方案:使用Stack分离模糊层和内容层
Stack() {
Column()
.width('100%')
.height('100%')
.backgroundColor('rgba(255, 255, 255, 0.12)')
.blur(24)
Column() {
Text('内容') // 不被模糊
}
.width('100%')
.height('100%')
}
```
### 11.3 问题3:边界模糊不自然
**现象**:卡片边缘模糊效果不自然,有明显边界
**原因**:borderRadius与blur值不匹配
**解决方案**:
```typescript
// ❌ 问题代码
.borderRadius(8)
.blur(24)
// ✅ 解决方案:圆角应大于等于模糊值
.borderRadius(20)
.blur(24)
```
### 11.4 问题4:性能问题
**现象**:页面卡顿,滑动不流畅
**原因**:过多的模糊组件或过大的模糊值
**解决方案**:
```typescript
// ❌ 问题代码
ForEach(largeData, (item) => {
Column() { /* 内容 */ }
.blur(32)
})
// ✅ 解决方案:减少模糊组件数量,降低模糊值
ForEach(largeData, (item) => {
Column() { /* 内容 */ }
.blur(16) // 降低模糊值
})
// 或者使用列表虚拟化
List() {
LazyForEach(dataSource, (item) => {
ListItem() {
Column() { /* 内容 */ }
.blur(24)
}
})
}
```
---
## 十二、完整实现代码
以下是项目中毛玻璃层叠布局的完整实现代码:
```typescript
import { BusinessError } from '@kit.BasicServicesKit';
@Entry
@Component
struct FrostedGlassDemo {
@State currentIndex: number = 0;
@State cardData: string[] = [
'🏔️ 山景 · Mountain',
'🌊 海景 · Ocean',
'🌲 森林 · Forest',
'🌅 日落 · Sunset'
];
build() {
Stack() {
Column()
.width('100%')
.height('100%')
.linearGradient({
direction: GradientDirection.Bottom,
colors: [
['#0f0c29', 0],
['#302b63', 0.5],
['#24243e', 1.0]
]
})
Column() {
Text('✨ 毛玻璃层叠布局')
.fontSize(28)
.fontWeight(FontWeight.Bold)
.fontColor('#FFFFFF')
.margin({ top: 48, bottom: 8 })
.letterSpacing(2)
Text('Column + blur + backgroundColor')
.fontSize(14)
.fontColor('rgba(255,255,255,0.6)')
.margin({ bottom: 32 })
ForEach(this.cardData, (item: string, index: number) => {
Column() {
Row() {
Text(item.slice(0, 2))
.fontSize(32)
.margin({ right: 16 })
Column() {
Text(item.slice(2))
.fontSize(18)
.fontWeight(FontWeight.Medium)
.fontColor('#FFFFFF')
Text('点击查看详情 ›')
.fontSize(12)
.fontColor('rgba(255,255,255,0.5)')
.margin({ top: 4 })
}
.alignItems(HorizontalAlign.Start)
Text('→')
.fontSize(20)
.fontColor('rgba(255,255,255,0.4)')
}
.width('100%')
.alignItems(VerticalAlign.Center)
.justifyContent(FlexAlign.SpaceBetween)
}
.width('85%')
.padding(20)
.margin({ bottom: 16 })
.backgroundColor('rgba(255, 255, 255, 0.12)')
.blur(24)
.borderRadius(20)
.borderWidth(1)
.borderColor('rgba(255, 255, 255, 0.15)')
.onClick(() => {
this.currentIndex = index;
console.info(`[毛玻璃示例] 选中卡片: ${index} - ${item}`);
})
.shadow({
radius: this.currentIndex === index ? 20 : 8,
color: this.currentIndex === index
? 'rgba(255, 255, 255, 0.25)'
: 'rgba(0, 0, 0, 0.3)',
offsetX: 0,
offsetY: 8
})
.animation({
duration: 300,
curve: Curve.FastOutSlowIn
})
}, (item: string) => item)
Text('点击卡片切换选中状态 • 毛玻璃效果实时模糊')
.fontSize(12)
.fontColor('rgba(255,255,255,0.35)')
.margin({ top: 16, bottom: 48 })
}
.width('100%')
.height('100%')
.alignItems(HorizontalAlign.Center)
.justifyContent(FlexAlign.Start)
.padding({ top: 0 })
.blur(2)
}
.width('100%')
.height('100%')
}
}
```
---
## 十三、总结
### 13.1 毛玻璃效果的核心价值
毛玻璃效果在现代UI设计中具有以下优势:
1. **视觉层次感**:通过模糊和半透明创造深度感
2. **内容突出**:毛玻璃背景使前景内容更加清晰
3. **现代感**:符合当前流行的设计趋势
4. **美观性**:柔和的视觉效果提升用户体验
### 13.2 实现要点总结
| 步骤 | 实现内容 | 关键代码 |
|------|----------|----------|
| 1 | 创建背景层 | `linearGradient()` |
| 2 | 创建模糊容器 | `.blur(24)` |
| 3 | 设置半透明背景 | `backgroundColor('rgba(...)')` |
| 4 | 添加边框效果 | `borderWidth() + borderColor()` |
| 5 | 添加阴影效果 | `.shadow()` |
| 6 | 添加交互动画 | `.animation()` |
### 13.3 最佳实践
1. **适度使用**:避免过度使用毛玻璃效果
2. **性能优先**:注意模糊值的设置,避免性能问题
3. **对比明显**:确保内容与背景有足够对比度
4. **响应式适配**:根据屏幕尺寸调整效果
通过本文的学习,相信您已经掌握了鸿蒙ArkTS中毛玻璃层叠布局的实现方法。毛玻璃效果是现代UI设计的重要组成部分,合理使用可以显著提升应用的视觉质量和用户体验。
---
**文档版本**:v1.0
**生成日期**:2026年6月9日
**适用范围**:HarmonyOS NEXT ArkTS开发
---
*本文基于项目中的毛玻璃层叠布局示例编写,详细介绍了毛玻璃效果的实现原理、核心技术和最佳实践。通过理论讲解与实际代码相结合的方式,帮助开发者全面掌握这一精美的UI设计技术。*

作为“人工智能6S店”的官方数字引擎,为AI开发者与企业提供一个覆盖软硬件全栈、一站式门户。
更多推荐
 3
3 0
0- 0


 已为社区贡献7条内容

所有评论(0)