
鸿蒙 ArkUI 实战:从计时器组件深入理解状态管理与生命周期
一、引言
在移动应用开发中,计时器是一个非常经典的功能需求——从健身应用的秒表到番茄工作法的专注计时,再到会议提醒的倒计时,计时功能无处不在。尽管实现思路看似简单,但一个正确且健壮的计时器组件却需要对框架的响应式机制和生命周期有深入的理解。
本文将以一段 ArkUI 计时器组件代码为起点,由浅入深地剖析计时器背后的核心概念:响应式状态更新、定时器的生命周期管理、竞态条件的预防、以及从 Demo 到生产级应用的演进路径。
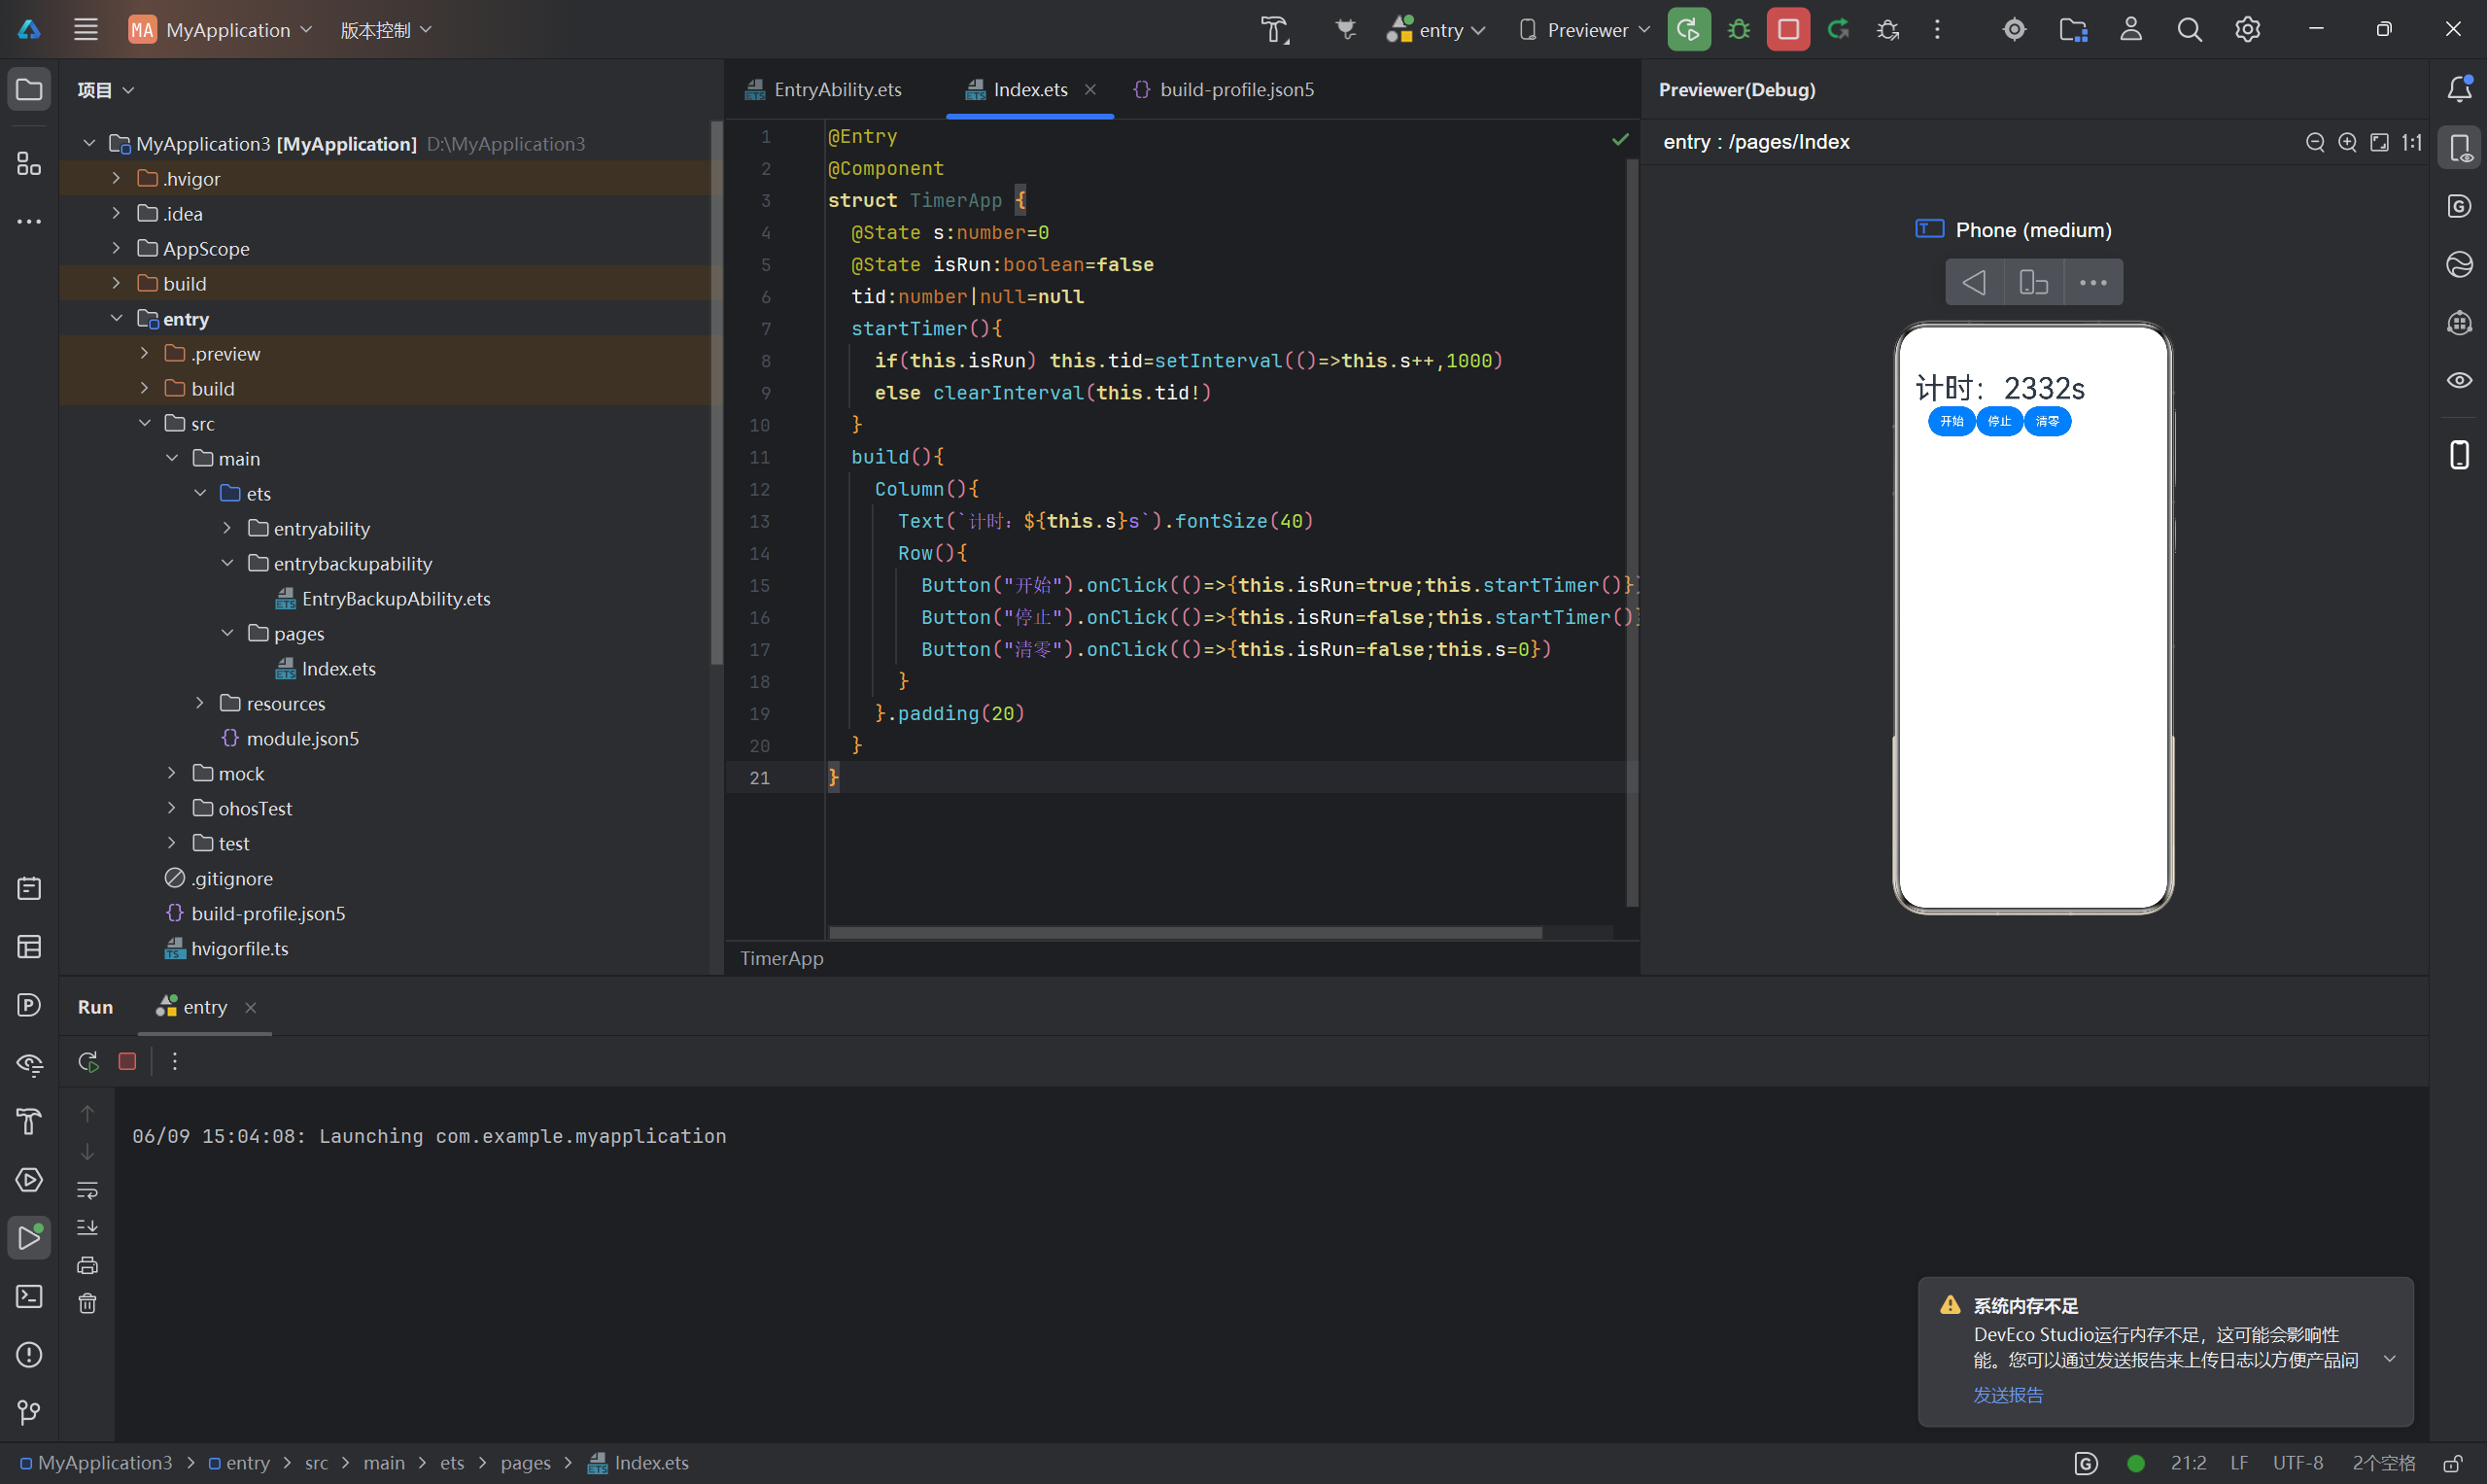
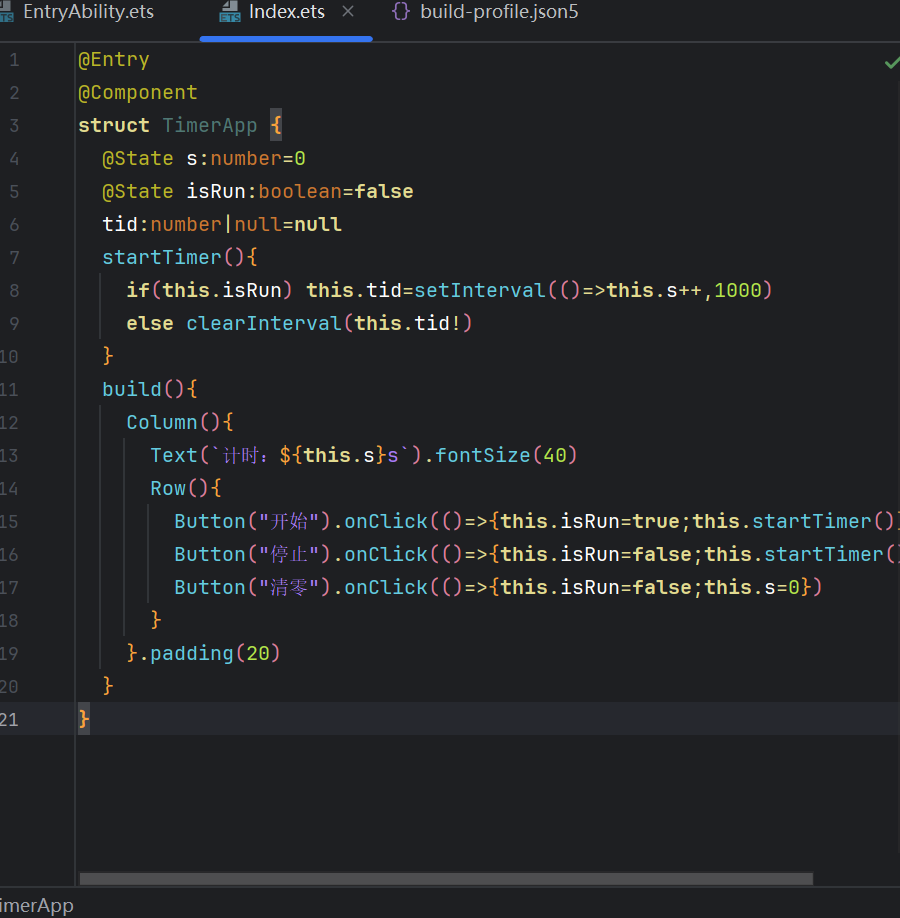
先看原始代码:
@Entry
@Component
struct TimerApp {
@State s:number=0
@State isRun:boolean=false
tid:number|null=null
startTimer(){
if(this.isRun) this.tid=setInterval(()=>this.s++,1000)
else clearInterval(this.tid!)
}
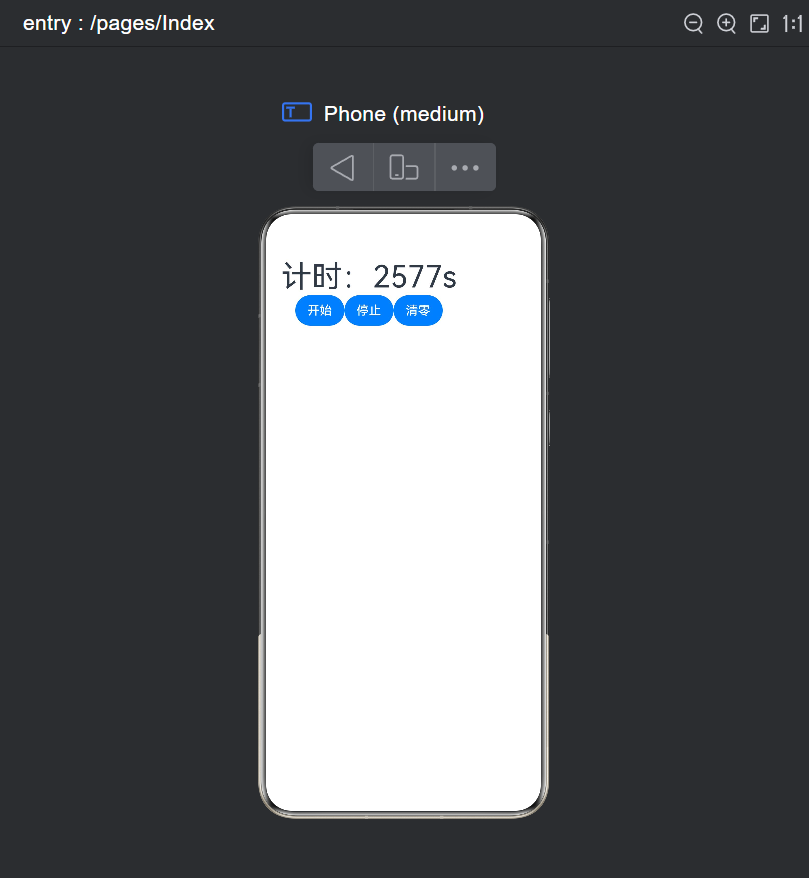
build(){
Column(){
Text(`计时:${this.s}s`).fontSize(40)
Row(){
Button("开始").onClick(()=>{this.isRun=true;this.startTimer()})
Button("停止").onClick(()=>{this.isRun=false;this.startTimer()})
Button("清零").onClick(()=>{this.isRun=false;this.s=0})
}
}.padding(20)
}
}这段代码虽然短小精悍,但存在三个关键问题:
| 问题 | 触发场景 | 后果 |
|---|---|---|
| 定时器叠加 | 连续多次点击"开始" | 多个定时器同时运行,秒数加速跳动 |
| 清零后仍在计时 | 点击"清零"按钮 | 秒数归零后继续增加 |
| 内存泄漏 | 组件销毁时未清理定时器 | 定时器继续运行,尝试更新已销毁的组件状态 |
二、代码逐层拆解
2.1 装饰器定义
@Entry
@Component
struct TimerApp {
@Entry 标记该组件为页面入口,@Component 声明它是一个 UI 组件。二者结合意味着这个组件拥有完整的页面生命周期(onPageShow、onPageHide、onBackPress)和组件生命周期(aboutToAppear、aboutToDisappear)。
对于计时器场景,aboutToDisappear 尤为重要——当用户导航离开此页面时,必须在这里清理定时器,否则会造成内存泄漏。
2.2 状态变量声明
@State s: number = 0
@State isRun: boolean = false
tid: number | null = null
这里有三个变量,但只有前两个用了 @State,第三个 tid 是普通成员变量。这是一个关键的设计决策:
-
@State s:计时的秒数,驱动 UI 显示。每秒自增一次,Text 通过绑定
this.s自动更新内容。这是必须用 @State 的,因为 UI 依赖它。 -
@State isRun:记录计时器是否正在运行。虽然当前代码没有用它控制 UI 样式,但在扩展场景中可以用来切换按钮文字("开始/暂停")或禁用状态。它也是 @State,因为未来 UI 会依赖它。
-
tid:定时器的 ID,没有用 @State 装饰。这是一个重要的最佳实践:
tid只在 JavaScript 逻辑层使用,不参与 UI 渲染。用普通成员变量而非 @State 可以避免每次赋值都触发不必要的组件重建。
这个区分体现了 ArkUI 的一个核心原则:只有需要驱动 UI 变化的数据才用 @State,纯逻辑数据用普通变量。
2.3 startTimer() 方法分析
startTimer() {
  if (this.isRun) this.tid = setInterval(() => this.s++, 1000)
  else clearInterval(this.tid!)
}
这是组件的核心逻辑,但存在严重缺陷。
问题一:定时器叠加
当 isRun 为 true 且定时器正在运行时,如果用户再次点击"开始",setInterval 会创建一个新的定时器,而旧的定时器仍然在运行。结果是多个定时器并行触发,秒数以数倍速度增加。这是一个典型的竞态条件(Race Condition)。
问题二:逻辑不完整
代码只处理了"启动"和"停止"两种场景,但没有处理"重启"场景——即先停止旧定时器再启动新定时器的逻辑。
2.4 UI 构建层
build() {
  Column() {
    Text(`计时:${this.s}s`).fontSize(40)
    Row() {
      Button("开始").onClick(() => { this.isRun = true; this.startTimer() })
      Button("停止").onClick(() => { this.isRun = false; this.startTimer() })
      Button("清零").onClick(() => { this.isRun = false; this.s = 0 })
    }
  }.padding(20)
}
UI 结构分为三层:
- Column 容器:垂直排列,20vp 内边距
- Text 展示:显示
计时:Xs,字号 40vp - Row 容器:水平排列三个按钮
清零按钮有一个隐蔽的 bug:它将 isRun 设为 false 并将 s 置为 0,但没有清理定时器。如果定时器还在运行(用户没有先点"停止"),下一秒 s 又会变成 1,用户会看到"清零后又自己涨了"的诡异现象。
2.5 修正方案
基于以上分析,修正后的核心逻辑应该是:
startTimer() {
  // 步骤一:总是先清理旧的定时器(幂等保证)
  if (this.tid !== null) {
    clearInterval(this.tid)
    this.tid = null
  }
  // 步骤二:如果正在运行,创建新定时器
  if (this.isRun) {
    this.tid = setInterval(() => this.s++, 1000)
  }
}
清零按钮也要调用 startTimer() 以确保定时器被清理:
Button("清零").onClick(() => {
  this.isRun = false
  this.startTimer()  // 确保清理定时器
  this.s = 0
})
三、定时器生命周期管理
3.1 定时器的工作原理
setInterval(callback, delay) 是 JavaScript/ETS 中的定时器 API。每次调用创建一个新的定时器,返回一个唯一的数字 ID,每隔 delay 毫秒执行一次 callback。通过 clearInterval(id) 停止定时器。
关键特性:定时器是全局的,不受组件生命周期约束。即使创建定时器的组件已被销毁,定时器仍然会继续执行回调函数。这正是内存泄漏的根源。
3.2 竞态条件的成因与解决方案
3.2.1 竞态条件详解
竞态条件(Race Condition)是指系统行为依赖于多个事件发生的顺序,当顺序不可控时,结果就会出现不确定性。
计时器场景中的两种典型竞态:
类型一:定时器叠加
t0: 用户点击"开始" → 定时器 A 创建 (tid=1)
t1: 用户再次点击"开始" → 定时器 B 创建 (tid=2),A 仍在运行
t2: 两个定时器同时递增 s,秒数双倍加速
类型二:状态与定时器不一致
t0: 用户点击"清零" → isRun=false, s=0(但没清理定时器)
t1: 定时器回调执行 → s++(s 变成 1)
t2: 用户看到 1,困惑
3.2.2 解决方案:幂等设计
解决竞态条件的核心思路是让 startTimer() 具有幂等性——无论调用多少次,结果都等同于调用一次:
startTimer() {
  if (this.tid !== null) {
    clearInterval(this.tid)
    this.tid = null
  }
  if (this.isRun) {
    this.tid = setInterval(() => this.s++, 1000)
  }
}
这个模式通用性很强,适用于任何需要"重置"的场景:先销毁旧资源,再按需创建新资源。
3.3 组件销毁时的定时器清理
3.3.1 生命周期钩子
ArkUI 提供的生命周期回调中,aboutToDisappear 是清理定时器的关键:
@Component
struct TimerApp {
  @State s: number = 0
  @State isRun: boolean = false
  tid: number | null = null

  aboutToAppear() {
    console.info('组件即将挂载')
  }

  aboutToDisappear() {
    // 必须在这里清理定时器!
    console.info('组件即将销毁,清理定时器')
    if (this.tid !== null) {
      clearInterval(this.tid)
      this.tid = null
    }
  }

  onPageShow() {
    console.info('页面可见')
  }

  onPageHide() {
    console.info('页面不可见')
  }
  // ...
}
各生命周期与定时器的关系:
| 生命周期 | 时机 | 对定时器的操作 |
|---|---|---|
| aboutToAppear | 组件即将显示 | 如果有需要,在这里启动定时器 |
| aboutToDisappear | 组件即将销毁 | 必须在这里清理定时器 |
| onPageShow | 页面可见 | 如果之前暂停了,在这里恢复 |
| onPageHide | 页面不可见 | 如果允许后台运行则保留,否则暂停 |
3.3.2 内存泄漏分析
如果不在 aboutToDisappear 中清理定时器,会发生什么?
场景:用户从计时器页面导航到设置页面
1. TimerApp 组件被销毁
2. 但 setInterval 的回调仍然是全局活跃的
3. 回调中试图修改 this.s(已被销毁的组件)
4. ArkUI 的安全机制会忽略这次修改(不会崩溃)
5. 但定时器仍然在后台持续执行,浪费 CPU 资源
6. 如果用户频繁进出页面,会积累大量"幽灵定时器"
这就是经典的内存泄漏。在定时器、事件监听器、WebSocket 连接等所有需要注册回调的场景中,必须在组件销毁时释放所有资源。
3.4 页面可见性处理
当用户切换到其他应用时,需要考虑行为策略:
@Component
struct TimerApp {
  @State s: number = 0
  @State isRun: boolean = false
  @State pausedByVisibility: boolean = false
  tid: number | null = null

  onPageHide() {
    if (this.isRun) {
      // 方案 A:暂停计时(适用于不需要后台运行的场景)
      this.pausedByVisibility = true
      this.isRun = false
      this.clearTimer()

      // 方案 B:继续后台运行(适用于秒表等场景)
      // 不做任何操作,定时器继续运行
    }
  }

  onPageShow() {
    if (this.pausedByVisibility) {
      this.isRun = true
      this.startTimer()
      this.pausedByVisibility = false
    }
  }

  clearTimer() {
    if (this.tid !== null) {
      clearInterval(this.tid)
      this.tid = null
    }
  }

  startTimer() {
    this.clearTimer()
    if (this.isRun) {
      this.tid = setInterval(() => this.s++, 1000)
    }
  }

  build() {
    Column() {
      Text(`计时:${this.s}s`).fontSize(40)
      Row() {
        Button("开始").onClick(() => {
          this.isRun = true
          this.startTimer()
        })
        Button("停止").onClick(() => {
          this.isRun = false
          this.startTimer()
        })
        Button("清零").onClick(() => {
          this.isRun = false
          this.startTimer()
          this.s = 0
        })
      }
    }.padding(20)
  }
}
3.5 精确计时问题
JavaScript 的 setInterval 并不是精确的计时工具:
- 最小间隔限制:浏览器/系统会将间隔限制在 4ms 以上
- 延迟累积:如果回调执行时间超过间隔,会产生"丢帧"
- 后台节流:页面在后台时,系统会降低定时器频率
对于需要精确计时的场景(如秒表),更好的方案是记录开始时间戳,每次更新时计算时间差:
@Component
struct PrecisionTimer {
  @State display: string = '00:00.0'
  @State isRun: boolean = false
  startTime: number = 0
  elapsedBeforePause: number = 0
  tid: number | null = null

  startTimer() {
    if (this.tid !== null) {
      clearInterval(this.tid)
      this.tid = null
    }
    if (this.isRun) {
      this.startTime = Date.now()
      // 每 50ms 刷新一次,但只更新显示,不丢精度
      this.tid = setInterval(() => this.updateDisplay(), 50)
    } else {
      // 暂停时累加已用时间
      this.elapsedBeforePause += Date.now() - this.startTime
    }
  }

  updateDisplay() {
    const totalMs = this.elapsedBeforePause + (Date.now() - this.startTime)
    const seconds = Math.floor(totalMs / 1000)
    const tenths = Math.floor((totalMs % 1000) / 100)
    const minutes = Math.floor(seconds / 60)
    const secs = seconds % 60
    this.display = `${String(minutes).padStart(2, '0')}:${String(secs).padStart(2, '0')}.${tenths}`
  }

  clearTimer() {
    if (this.tid !== null) {
      clearInterval(this.tid)
      this.tid = null
    }
  }

  reset() {
    this.isRun = false
    this.clearTimer()
    this.elapsedBeforePause = 0
    this.display = '00:00.0'
  }

  aboutToDisappear() {
    this.clearTimer()
  }

  build() {
    Column() {
      Text(this.display)
        .fontSize(48)
        .fontWeight(FontWeight.Bold)
      Row({ space: 12 }) {
        Button(this.isRun ? "暂停" : "开始").onClick(() => {
          this.isRun = !this.isRun
          this.startTimer()
        })
        Button("重置").onClick(() => this.reset())
      }
    }.padding(20)
  }
}
两种方式的对比:
| 对比项 | setInterval 累加 | Date.now() 时间差 |
|---|---|---|
| 精度 | 受定时器精度影响 | 精确 |
| 后台恢复 | 频率降低会变慢 | 可精确恢复 |
| 累积误差 | 逐秒累加会产生漂移 | 无累积误差 |
四、状态管理深入
4.1 @State 与定时器的交互细节
setInterval(() => this.s++, 1000)这行代码每秒执行一次 this.s++。在 ArkUI 中,对 @State 变量的赋值会触发 UI 重新渲染。但这里有一个性能细节:ArkUI 会批量处理在同一帧内的多次状态变更。也就是说,即使多次触发 this.s++,ArkUI 也只会触发一次渲染,而不是每次自增都触发一次。
4.2 非 @State 变量的使用
为什么 tid 不用 @State?
如果用 @State 装饰 tid:
@State tid: number | null = null // 错误的做法那么每次 startTimer() 给 tid 赋值时,无论新值是否参与 UI 渲染,框架都会触发组件重建。这是对性能的无谓浪费。
原则:UI 数据用 @State,逻辑数据用普通变量。
4.3 单例定时器服务
对于复杂的应用,可以将定时器逻辑抽取为单例服务:
export class TimerService {
  private static instance: TimerService
  private timers: Map<string, number> = new Map()

  static getInstance(): TimerService {
    if (!TimerService.instance) {
      TimerService.instance = new TimerService()
    }
    return TimerService.instance
  }

  start(key: string, callback: () => void, interval: number = 1000): void {
    this.stop(key)
    const tid = setInterval(callback, interval)
    this.timers.set(key, tid)
  }

  stop(key: string): void {
    const tid = this.timers.get(key)
    if (tid !== undefined) {
      clearInterval(tid)
      this.timers.delete(key)
    }
  }

  isRunning(key: string): boolean {
    return this.timers.has(key)
  }

  stopAll(): void {
    this.timers.forEach((tid) => clearInterval(tid))
    this.timers.clear()
  }
}
组件中使用:
@Component
struct TimerWithService {
  @State s: number = 0
  private timerService: TimerService = TimerService.getInstance()

  aboutToDisappear() {
    this.timerService.stop('main-timer')
  }

  build() {
    Column() {
      Text(`计时:${this.s}s`).fontSize(40)
      Row() {
        Button("开始").onClick(() => {
          this.timerService.start('main-timer', () => this.s++, 1000)
        })
        Button("停止").onClick(() => {
          this.timerService.stop('main-timer')
        })
        Button("清零").onClick(() => {
          this.timerService.stop('main-timer')
          this.s = 0
        })
      }
    }.padding(20)
  }
}
4.4 使用 @Watch 监听状态变化
@Watch 装饰器可以在 @State 变量变化时触发回调:
@Component
struct TimedActions {
  @State @Watch('onSecondsChange') s: number = 0
  @State isRun: boolean = false
  tid: number | null = null

  onSecondsChange() {
    console.info(`当前计时: ${this.s}s`)
    // 到达 60 秒时自动停止
    if (this.s >= 60 && this.isRun) {
      this.isRun = false
      this.clearTimer()
      console.info('计时达到 60 秒,自动停止')
    }
  }

  clearTimer() {
    if (this.tid !== null) {
      clearInterval(this.tid)
      this.tid = null
    }
  }

  startTimer() {
    this.clearTimer()
    if (this.isRun) {
      this.tid = setInterval(() => this.s++, 1000)
    }
  }

  aboutToDisappear() {
    this.clearTimer()
  }

  build() {
    Column() {
      Text(`计时:${this.s}s`).fontSize(40)
      Progress({ value: this.s, total: 60 }).width('80%').margin({ top: 12 })
      Row() {
        Button(this.isRun ? "暂停" : "开始").onClick(() => {
          this.isRun = !this.isRun
          this.startTimer()
        })
        Button("清零").onClick(() => {
          this.isRun = false
          this.clearTimer()
          this.s = 0
        })
      }
    }.padding(20)
  }
}
五、扩展功能实现
5.1 倒计时模式
@Component
struct CountdownTimer {
  @State remaining: number = 0
  @State isRun: boolean = false
  @State targetMinutes: number = 25
  tid: number | null = null

  startCountdown() {
    if (this.isRun) return
    this.remaining = this.targetMinutes * 60
    this.isRun = true
    this.tid = setInterval(() => {
      if (this.remaining > 0) {
        this.remaining--
      } else {
        this.isRun = false
        this.clearTimer()
        this.onComplete()
      }
    }, 1000)
  }

  clearTimer() {
    if (this.tid !== null) {
      clearInterval(this.tid)
      this.tid = null
    }
  }

  onComplete() {
    console.info('倒计时结束!')
  }

  aboutToDisappear() {
    this.clearTimer()
  }

  build() {
    Column() {
      Text(this.formatTime(this.remaining)).fontSize(48)
      Row({ space: 12 }) {
        Button('5分钟').onClick(() => { this.targetMinutes = 5 })
        Button('25分钟').onClick(() => { this.targetMinutes = 25 })
        Button('45分钟').onClick(() => { this.targetMinutes = 45 })
      }.margin({ top: 20 })
      Row({ space: 16 }) {
        Button(this.isRun ? '暂停' : '开始').onClick(() => {
          if (this.isRun) {
            this.isRun = false
            this.clearTimer()
          } else {
            this.startCountdown()
          }
        })
        Button('重置').onClick(() => {
          this.isRun = false
          this.clearTimer()
          this.remaining = 0
        })
      }.margin({ top: 20 })
    }.padding(20)
  }

  formatTime(totalSeconds: number): string {
    const m = Math.floor(totalSeconds / 60)
    const s = totalSeconds % 60
    return `${String(m).padStart(2, '0')}:${String(s).padStart(2, '0')}`
  }
}
5.2 圈记功能(Lap Timer)
@Component
struct LapTimer {
  @State s: number = 0
  @State laps: number[] = []
  @State isRun: boolean = false
  @State lastLapTime: number = 0
  tid: number | null = null
  private startTime: number = 0

  startTimer() {
    if (this.tid !== null) {
      clearInterval(this.tid)
      this.tid = null
    }
    if (this.isRun) {
      this.startTime = Date.now()
      this.lastLapTime = this.s
      this.tid = setInterval(() => {
        this.s = Math.floor((Date.now() - this.startTime) / 1000)
      }, 100)
    }
  }

  recordLap() {
    if (!this.isRun) return
    const currentDuration = this.s - this.lastLapTime
    this.laps = [...this.laps, currentDuration]
    this.lastLapTime = this.s
  }

  clearTimer() {
    if (this.tid !== null) {
      clearInterval(this.tid)
      this.tid = null
    }
  }

  reset() {
    this.isRun = false
    this.clearTimer()
    this.s = 0
    this.laps = []
    this.lastLapTime = 0
  }

  aboutToDisappear() {
    this.clearTimer()
  }

  build() {
    Column() {
      Text(`${this.s}s`).fontSize(48)
      Row({ space: 12 }) {
        Button(this.isRun ? '暂停' : '开始').onClick(() => {
          this.isRun = !this.isRun
          this.startTimer()
        })
        Button('圈记').onClick(() => this.recordLap())
        Button('重置').onClick(() => this.reset())
      }.margin({ top: 20 })
      if (this.laps.length > 0) {
        List({ space: 4 }) {
          ForEach(this.laps, (lap: number, index: number) => {
            ListItem() {
              Text(`第${index + 1}圈: ${lap}s`).fontSize(16).padding({ left: 12 })
            }
          })
        }
        .height(200)
        .margin({ top: 16 })
      }
    }.padding(20)
  }
}
六、测试与调试
6.1 单元测试思路
对于定时器逻辑,单元测试的核心是验证:
- 启动和停止:定时器是否按预期启动和停止
- 竞态条件:多次调用是否安全
- 边界条件:负数、超大值、空值等
// 测试示例(伪代码)
describe('TimerService', () => {
  it('should start a timer', (done) => {
    let count = 0
    timerService.start('test', () => count++, 100)
    setTimeout(() => {
      expect(count).to.be.at.least(1)
      done()
    }, 150)
  })

  it('should stop a timer', (done) => {
    let count = 0
    timerService.start('test', () => count++, 50)
    setTimeout(() => {
      timerService.stop('test')
      const before = count
      setTimeout(() => {
        expect(count).to.equal(before)
        done()
      }, 100)
    }, 100)
  })

  it('should not throw when stopping non-existent timer', () => {
    expect(() => timerService.stop('non-existent')).to.not.throw()
  })
})
6.2 调试技巧
定时器日志追踪:
startTimer() {
  this.clearTimer()
  if (this.isRun) {
    console.info(`[Timer] 启动定时器, 当前秒数: ${this.s}`)
    this.tid = setInterval(() => {
      this.s++
      console.info(`[Timer] Tick -> ${this.s}s`)
    }, 1000)
  } else {
    console.info(`[Timer] 停止定时器, 最终秒数: ${this.s}`)
  }
}
开发调试面板:
@Component
struct DebugPanel {
  @Prop s: number
  @Prop isRun: boolean
  @Prop tid: number | null

  build() {
    Column() {
      Text('调试信息').fontSize(16).fontWeight(FontWeight.Bold)
      Divider().margin({ top: 8, bottom: 8 })
      Text(`秒数: ${this.s}`)
      Text(`运行状态: ${this.isRun ? '运行中' : '已停止'}`)
      Text(`定时器ID: ${this.tid ?? '无'}`)
    }
    .padding(12)
    .backgroundColor('#F0F0F0')
    .borderRadius(8)
    .margin({ top: 20 })
  }
}
七、总结与核心要点
7.1 核心要点回顾
| 要点 | 说明 |
|---|---|
| 定时器必须幂等 | startTimer() 先清理旧定时器,再创建新定时器 |
| 生命周期绑定 | aboutToDisappear 中清理所有定时器 |
| 区分 UI/逻辑数据 | UI 数据用 @State,定时器 ID 用普通变量 |
| 精确计时用时间差 | Date.now() 计算差值,避免累积误差 |
| 页面可见性 | onPageHide 暂停,onPageShow 恢复 |
7.2 常见陷阱速查
| 陷阱 | 症状 | 解决方案 |
|---|---|---|
| 未清理旧定时器 | 计时加速 | startTimer 中先 clearInterval |
| 未清理 onDisappear | 内存泄漏 | aboutToDisappear 中清理 |
| 用累加代替时间差 | 后台回来不准 | 用 Date.now() 计算 |
| 逻辑变量也用 @State | 不必要渲染 | 区分 UI 和逻辑数据 |
7.3 从 Demo 到产品
一个生产级的计时器组件,需要综合考虑:
- 正确性:竞态条件处理、生命周期管理、精确计时算法
- 健壮性:异常捕获、降级策略、边界条件
- 性能:减少不必要的渲染、合理的刷新频率
- 体验:前后台切换处理、状态持久化、交互动画
- 可维护性:清晰的代码结构、完整的测试覆盖、合理的日志
7.4 写在最后
计时器组件看似简单,却是检验开发者对框架理解深度的试金石。一个小小的 setInterval,牵涉到响应式状态管理、组件生命周期、竞态条件处理、性能优化等多个方面。理解了计时器,你就理解了 ArkUI 中一半的异步编程模式。

作为“人工智能6S店”的官方数字引擎,为AI开发者与企业提供一个覆盖软硬件全栈、一站式门户。
更多推荐

 10
10 0
0- 0


 已为社区贡献4条内容

所有评论(0)