
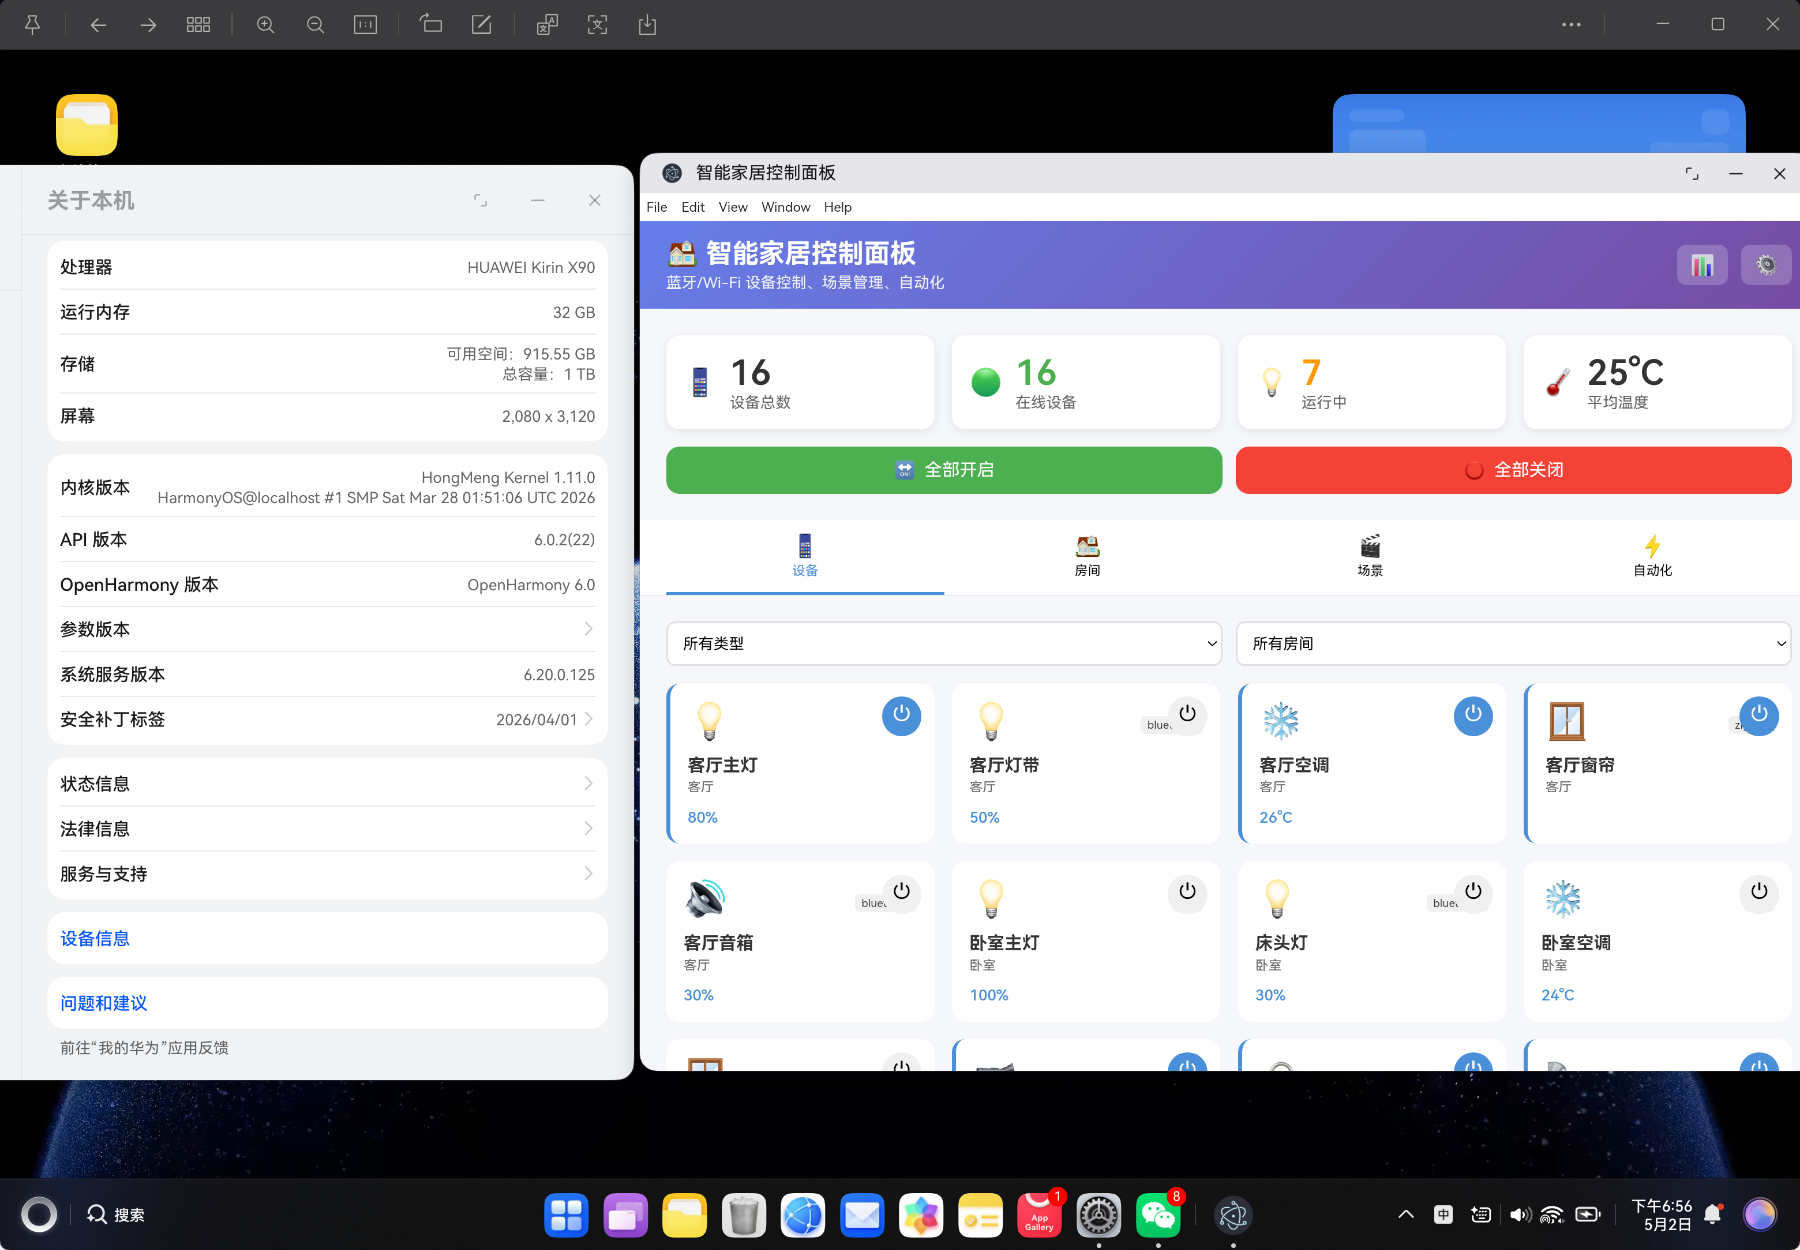
鸿蒙PC Electron框架打造智能家居控制面板:蓝牙/Wi-Fi 设备控制、场景联动、自动化规则
提供完整的 IDE 智能提示在编译时捕获错误提高代码可维护性id: string // 设备唯一标识name: string // 设备名称type: DeviceType // 设备类型room: RoomId // 所属房间status: DeviceStatus // 设备状态connection: ConnectionType // 连接方式isOn: boolean // 开关状态bri
Vue3 + TypeScript 打造智能家居控制面板:蓝牙/Wi-Fi 设备控制、场景联动、自动化规则
欢迎加入开源鸿蒙PC社区:
https://harmonypc.csdn.net/
项目 Git 仓库:
https://atomgit.com/liboqian/harmonyOs_aiHome
摘要:本文详细介绍如何使用 Vue3 Composition API + TypeScript 从零构建一个功能完善的智能家居控制面板,支持多种设备类型控制(灯光、空调、窗帘、摄像头、门锁等)、房间管理、场景模式、自动化规则、实时状态监控等功能。项目完全零第三方物联网库依赖,内置 16 台模拟设备演示,适合前端开发者深入理解物联网设备控制、场景联动、自动化引擎等核心技术。
目录
- 项目背景与需求分析
- 技术栈选型
- 项目架构设计
- TypeScript 类型定义
- 核心服务层实现
- 设备控制功能
- 场景联动系统
- 自动化规则引擎
- UI 组件开发
- 数据同步与持久化
- 性能优化策略
- 构建与部署
- 总结与展望
一、项目背景与需求分析
1.1 为什么需要智能家居控制面板?
随着 IoT 技术的发展,智能家居设备已经普及到千家万户。然而,用户面临以下痛点:
- 多平台割裂:不同品牌的设备需要不同的 App 控制,操作繁琐
- 缺乏统一界面:无法在一个面板上查看所有设备状态
- 场景联动复杂:设置"回家模式"、"影院模式"等场景需要专业知识
- 自动化门槛高:配置"温度过高自动开空调"等规则不够直观
基于这些痛点,我决定开发一款零依赖、可视化、功能完善的智能家居控制面板。
1.2 核心功能需求
| 功能模块 | 需求描述 | 优先级 |
|---|---|---|
| 设备管理 | 支持 10 种设备类型、开关控制、参数调节 | 高 |
| 房间视图 | 按房间分类展示设备,快速定位 | 高 |
| 场景模式 | 预设 8 种场景,一键切换 | 高 |
| 自动化规则 | 支持时间、传感器、位置触发条件 | 高 |
| 实时监控 | 设备状态、电量、温湿度实时显示 | 中 |
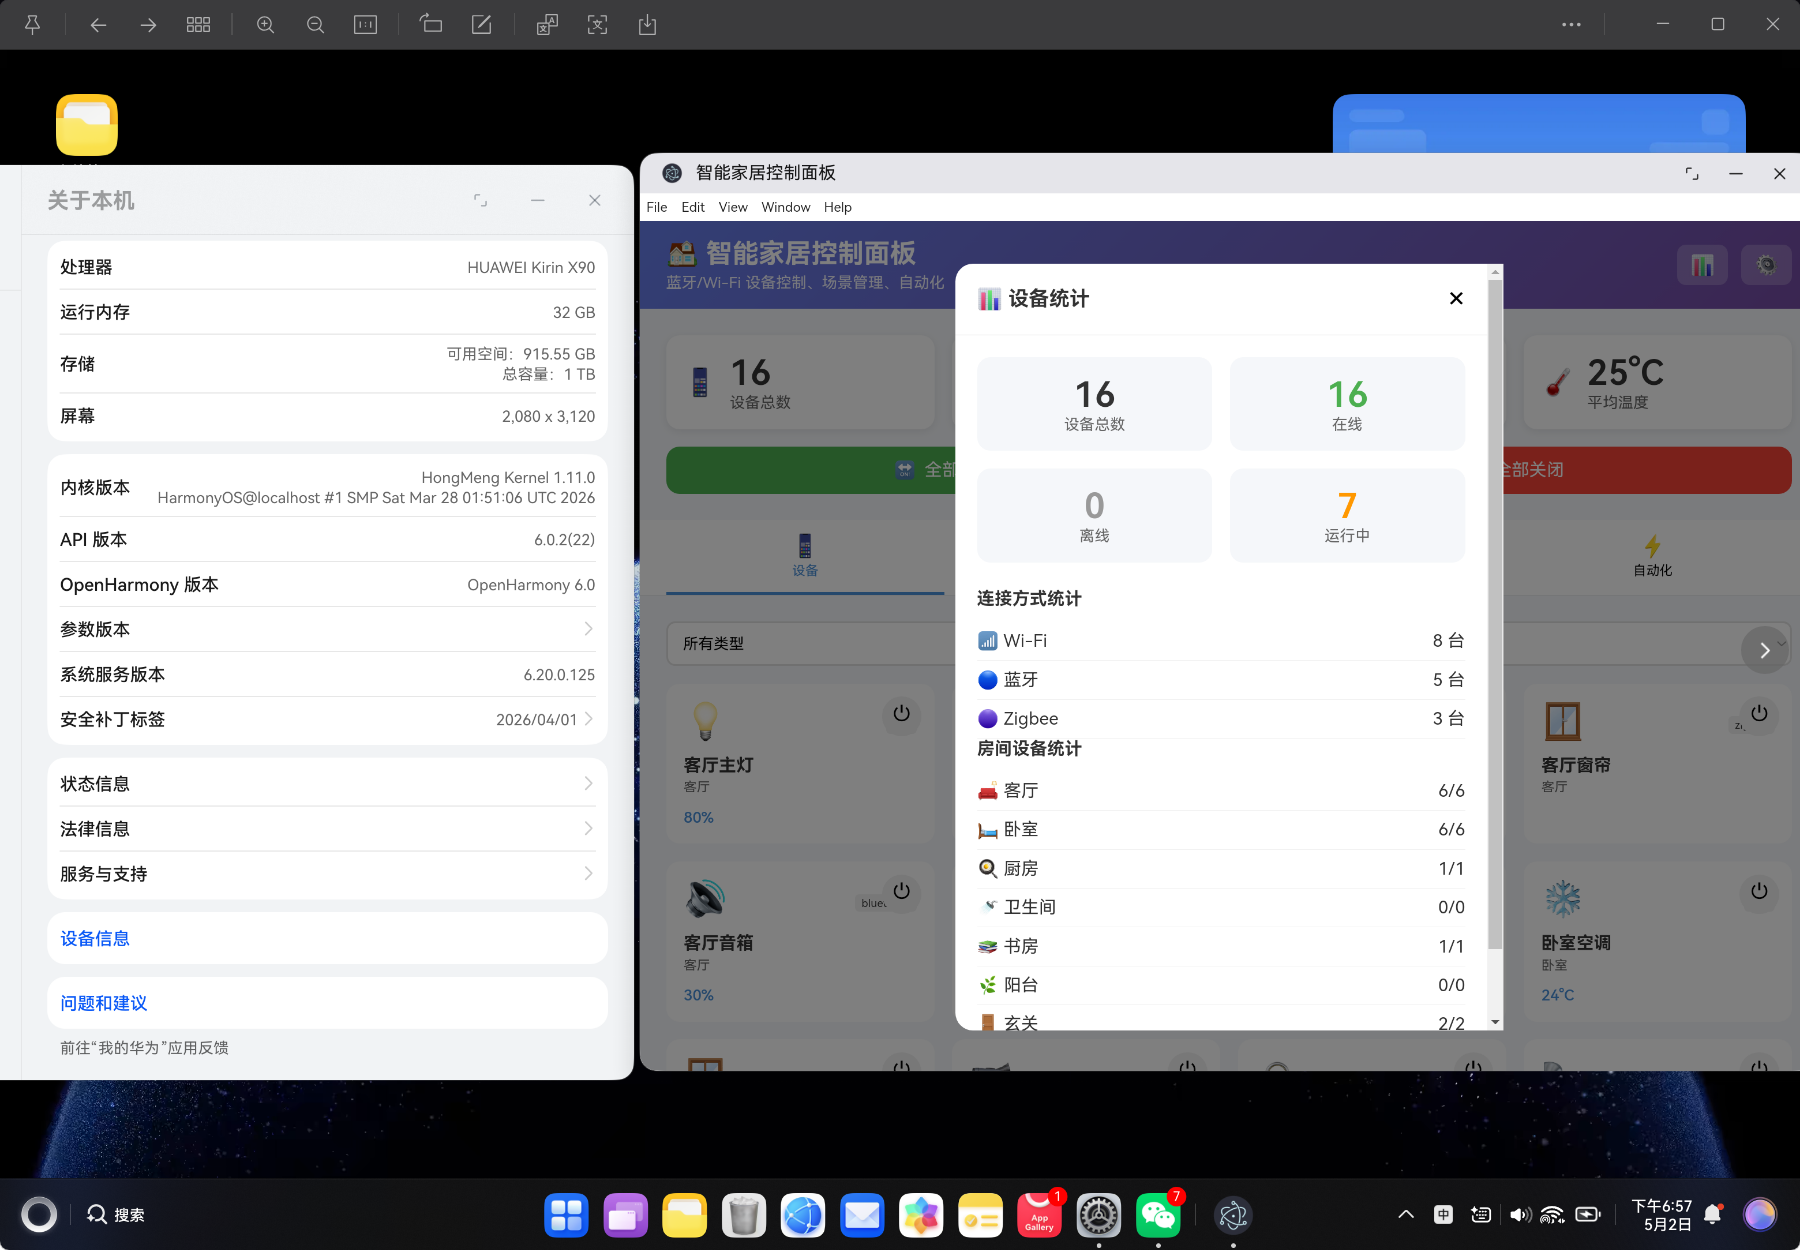
| 统计分析 | 设备在线率、连接方式统计 | 中 |
| 数据导入导出 | JSON 格式备份恢复 | 低 |
| 深色模式 | 浅色/深色主题切换 | 低 |
1.3 设备类型规划
| 设备类型 | 图标 | 可控制参数 | 连接方式 |
|---|---|---|---|
| 灯光(light) | 💡 | 开关、亮度、颜色 | Wi-Fi、蓝牙 |
| 空调(thermostat) | ❄️ | 开关、温度 | Wi-Fi |
| 摄像头(camera) | 📹 | 开关 | Wi-Fi |
| 音箱(speaker) | 🔊 | 开关、音量 | 蓝牙 |
| 窗帘(curtain) | 🪟 | 开关 | Zigbee |
| 门锁(door_lock) | 🔒 | 开关、电量 | 蓝牙 |
| 净化器(air_purifier) | 🌬️ | 开关 | Wi-Fi |
| 加湿器(humidifier) | 💧 | 开关、湿度 | 蓝牙 |
| 开关(switch) | 🔘 | 开关 | Wi-Fi、Zigbee |
| 传感器(sensor) | 📡 | 温度、湿度、电量 | Zigbee |
二、技术栈选型
2.1 核心技术栈
{
  "framework": "Vue 3.4+",
  "language": "TypeScript 5.3+",
  "router": "Vue Router 4.6+",
  "build": "Vite 5.0+",
  "ui": "原生 CSS(零组件库依赖)"
}
2.2 为什么选择 Vue3 Composition API?
- 更好的 TypeScript 支持:
<script setup>语法提供完整的类型推导 - 逻辑复用:组合式函数(Composables)让代码更易维护
- 按需响应:
ref、computed提供细粒度的响应式控制 - 更小的打包体积:Tree-shaking 友好
2.3 智能家居系统的核心挑战
| 挑战 | 解决方案 | 技术要点 |
|---|---|---|
| 设备状态同步 | 定时轮询 + 状态缓存 | setInterval、localStorage |
| 场景联动 | 预设设备状态批量更新 | 状态快照、批量写入 |
| 自动化规则 | 触发条件匹配 + 动作执行 | 规则引擎、条件判断 |
| 多连接方式 | 抽象连接类型、模拟延迟 | Wi-Fi、蓝牙、Zigbee |
| 数据持久化 | localStorage 存储方案 | JSON 序列化、版本兼容 |
三、项目架构设计
3.1 目录结构
vue-app/
├── src/
│   ├── types/
│   │   └── smarthome.ts          # TypeScript 类型定义
│   ├── services/
│   │   └── SmartHomeService.ts   # 核心业务逻辑
│   ├── components/
│   │   └── SmartHomePanel.vue    # 主组件(设备、场景、自动化)
│   ├── views/
│   │   └── SmartHomeView.vue     # 视图容器
│   ├── router/
│   │   └── index.ts              # 路由配置
│   └── main.ts                   # 应用入口
├── index.html                    # HTML 模板
├── package.json                  # 项目配置
└── vite.config.ts                # Vite 配置
3.2 架构分层
┌─────────────────────────────────────┐
│           View 层(UI)              │
│   SmartHomeView.vue                 │
├─────────────────────────────────────┤
│        Component 层(组件)           │
│   SmartHomePanel.vue                │
│   ├── 设备列表视图                    │
│   ├── 房间网格视图                    │
│   ├── 场景面板                        │
│   ├── 自动化规则列表                  │
│   └── 设备详情弹窗                    │
├─────────────────────────────────────┤
│        Service 层(业务逻辑)         │
│   SmartHomeService.ts               │
│   ├── 设备控制                        │
│   ├── 场景管理                        │
│   ├── 自动化引擎                      │
│   └── 数据统计                        │
├─────────────────────────────────────┤
│        Type 层(类型定义)            │
│   smarthome.ts                      │
└─────────────────────────────────────┘
📌 设计原则:严格遵循 MVC 分层架构,UI 组件只负责渲染和用户交互,业务逻辑全部放在 Service 层,类型定义独立管理。
四、TypeScript 类型定义
4.1 核心类型设计
类型定义是整个项目的基石,良好的类型设计可以:
- 提供完整的 IDE 智能提示
- 在编译时捕获错误
- 提高代码可维护性
// types/smarthome.ts

export type DeviceType = 'light' | 'thermostat' | 'camera' | 'speaker' | 'curtain' | 'door_lock' | 'air_purifier' | 'humidifier' | 'switch' | 'sensor'

export type DeviceStatus = 'online' | 'offline' | 'error'

export type ConnectionType = 'wifi' | 'bluetooth' | 'zigbee' | 'zwave'

export type RoomId = 'living_room' | 'bedroom' | 'kitchen' | 'bathroom' | 'study' | 'balcony' | 'entrance' | 'garage'
4.2 设备类型定义
export interface SmartDevice {
  id: string                // 设备唯一标识
  name: string              // 设备名称
  type: DeviceType          // 设备类型
  room: RoomId              // 所属房间
  status: DeviceStatus      // 设备状态
  connection: ConnectionType // 连接方式
  isOn: boolean             // 开关状态
  brightness?: number       // 亮度(0-100)
  temperature?: number      // 温度(16-32°C)
  humidity?: number         // 湿度(0-100%)
  color?: string            // 颜色 HEX
  volume?: number           // 音量(0-100)
  battery?: number          // 电量(0-100%)
  signalStrength?: number   // 信号强度
  lastUpdate: number        // 最后更新时间
  createdAt: number         // 创建时间
}
4.3 场景与自动化类型
export interface Scene {
  id: string
  name: string
  icon: string
  description: string
  deviceStates: Record<string, Partial<SmartDevice>>
  isActive: boolean
}

export interface AutomationRule {
  id: string
  name: string
  description: string
  trigger: TriggerConfig
  action: ActionConfig
  enabled: boolean
  lastTriggered?: number
}

export interface TriggerConfig {
  type: 'time' | 'device' | 'sensor' | 'location'
  condition: Record<string, any>
}

export interface ActionConfig {
  type: 'device' | 'scene' | 'notification'
  target: string
  params: Record<string, any>
}
4.4 房间类型定义
export interface Room {
  id: RoomId
  name: string
  icon: string
  deviceCount: number
  onlineDevices: number
}

export const ROOMS: Room[] = [
  { id: 'living_room', name: '客厅', icon: '🛋️', deviceCount: 0, onlineDevices: 0 },
  { id: 'bedroom', name: '卧室', icon: '🛏️', deviceCount: 0, onlineDevices: 0 },
  { id: 'kitchen', name: '厨房', icon: '🍳', deviceCount: 0, onlineDevices: 0 },
  { id: 'bathroom', name: '卫生间', icon: '🚿', deviceCount: 0, onlineDevices: 0 },
  { id: 'study', name: '书房', icon: '📚', deviceCount: 0, onlineDevices: 0 },
  { id: 'balcony', name: '阳台', icon: '🌿', deviceCount: 0, onlineDevices: 0 },
  { id: 'entrance', name: '玄关', icon: '🚪', deviceCount: 0, onlineDevices: 0 },
  { id: 'garage', name: '车库', icon: '🚗', deviceCount: 0, onlineDevices: 0 }
]
| 房间 | 图标 | 常见设备 |
|---|---|---|
| 客厅 | 🛋️ | 主灯、灯带、空调、窗帘、音箱 |
| 卧室 | 🛏️ | 主灯、床头灯、空调、窗帘、净化器 |
| 厨房 | 🍳 | 照明灯、排气扇 |
| 玄关 | 🚪 | 摄像头、门锁、照明灯 |
| 书房 | 📚 | 台灯、空调 |
五、核心服务层实现
5.1 SmartHomeService 类设计
Service 层是项目的核心,负责所有业务逻辑:
// services/SmartHomeService.ts
export class SmartHomeService {
// 设备管理
static getDevices(): SmartDevice[] { ... }
static getDeviceById(id: string): SmartDevice | undefined { ... }
static getDevicesByRoom(roomId: RoomId): SmartDevice[] { ... }
static getDevicesByType(type: DeviceType): SmartDevice[] { ... }
// 设备控制
static toggleDevice(id: string): SmartDevice | null { ... }
static setDeviceBrightness(id: string, brightness: number): SmartDevice | null { ... }
static setDeviceTemperature(id: string, temperature: number): SmartDevice | null { ... }
static setDeviceColor(id: string, color: string): SmartDevice | null { ... }
static setDeviceVolume(id: string, volume: number): SmartDevice | null { ... }
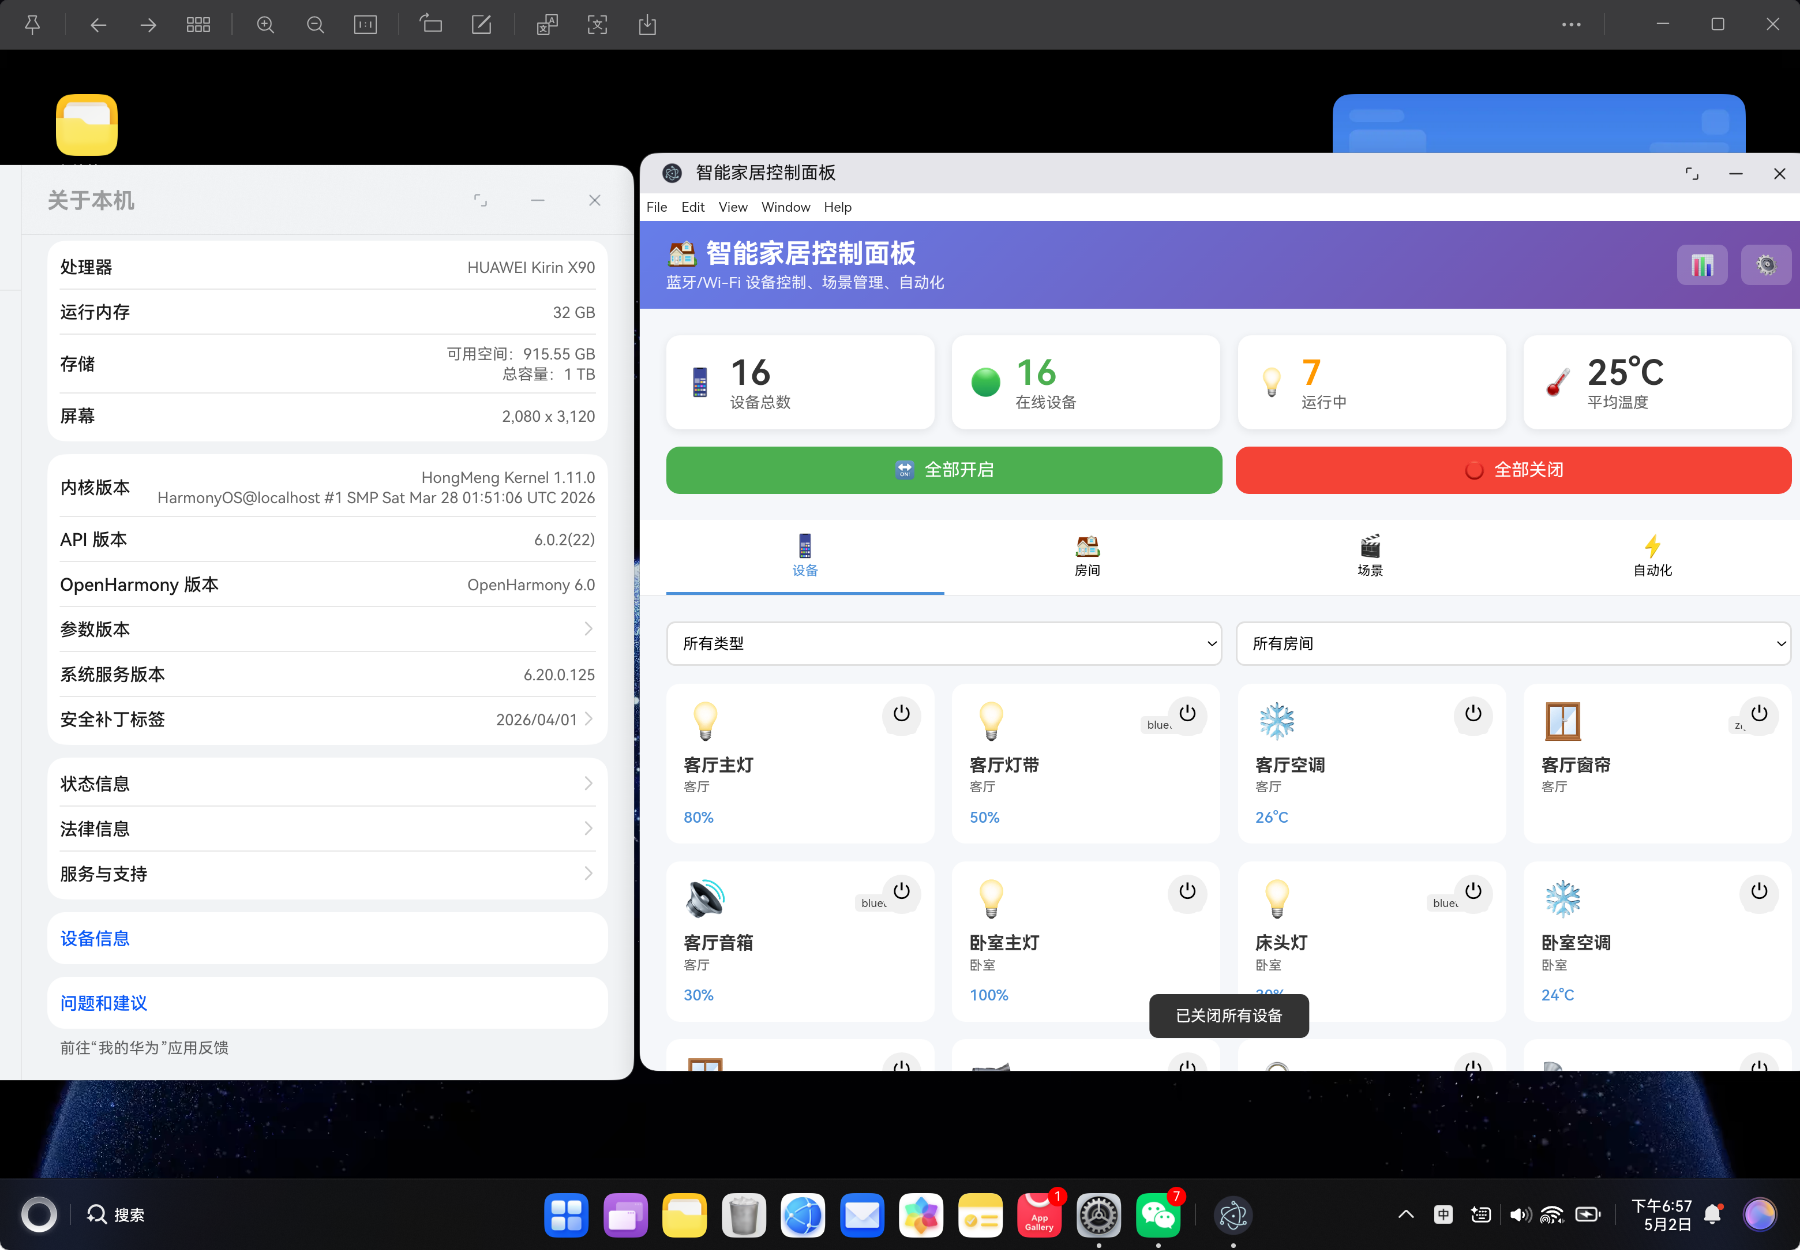
static turnOffAll(): void { ... }
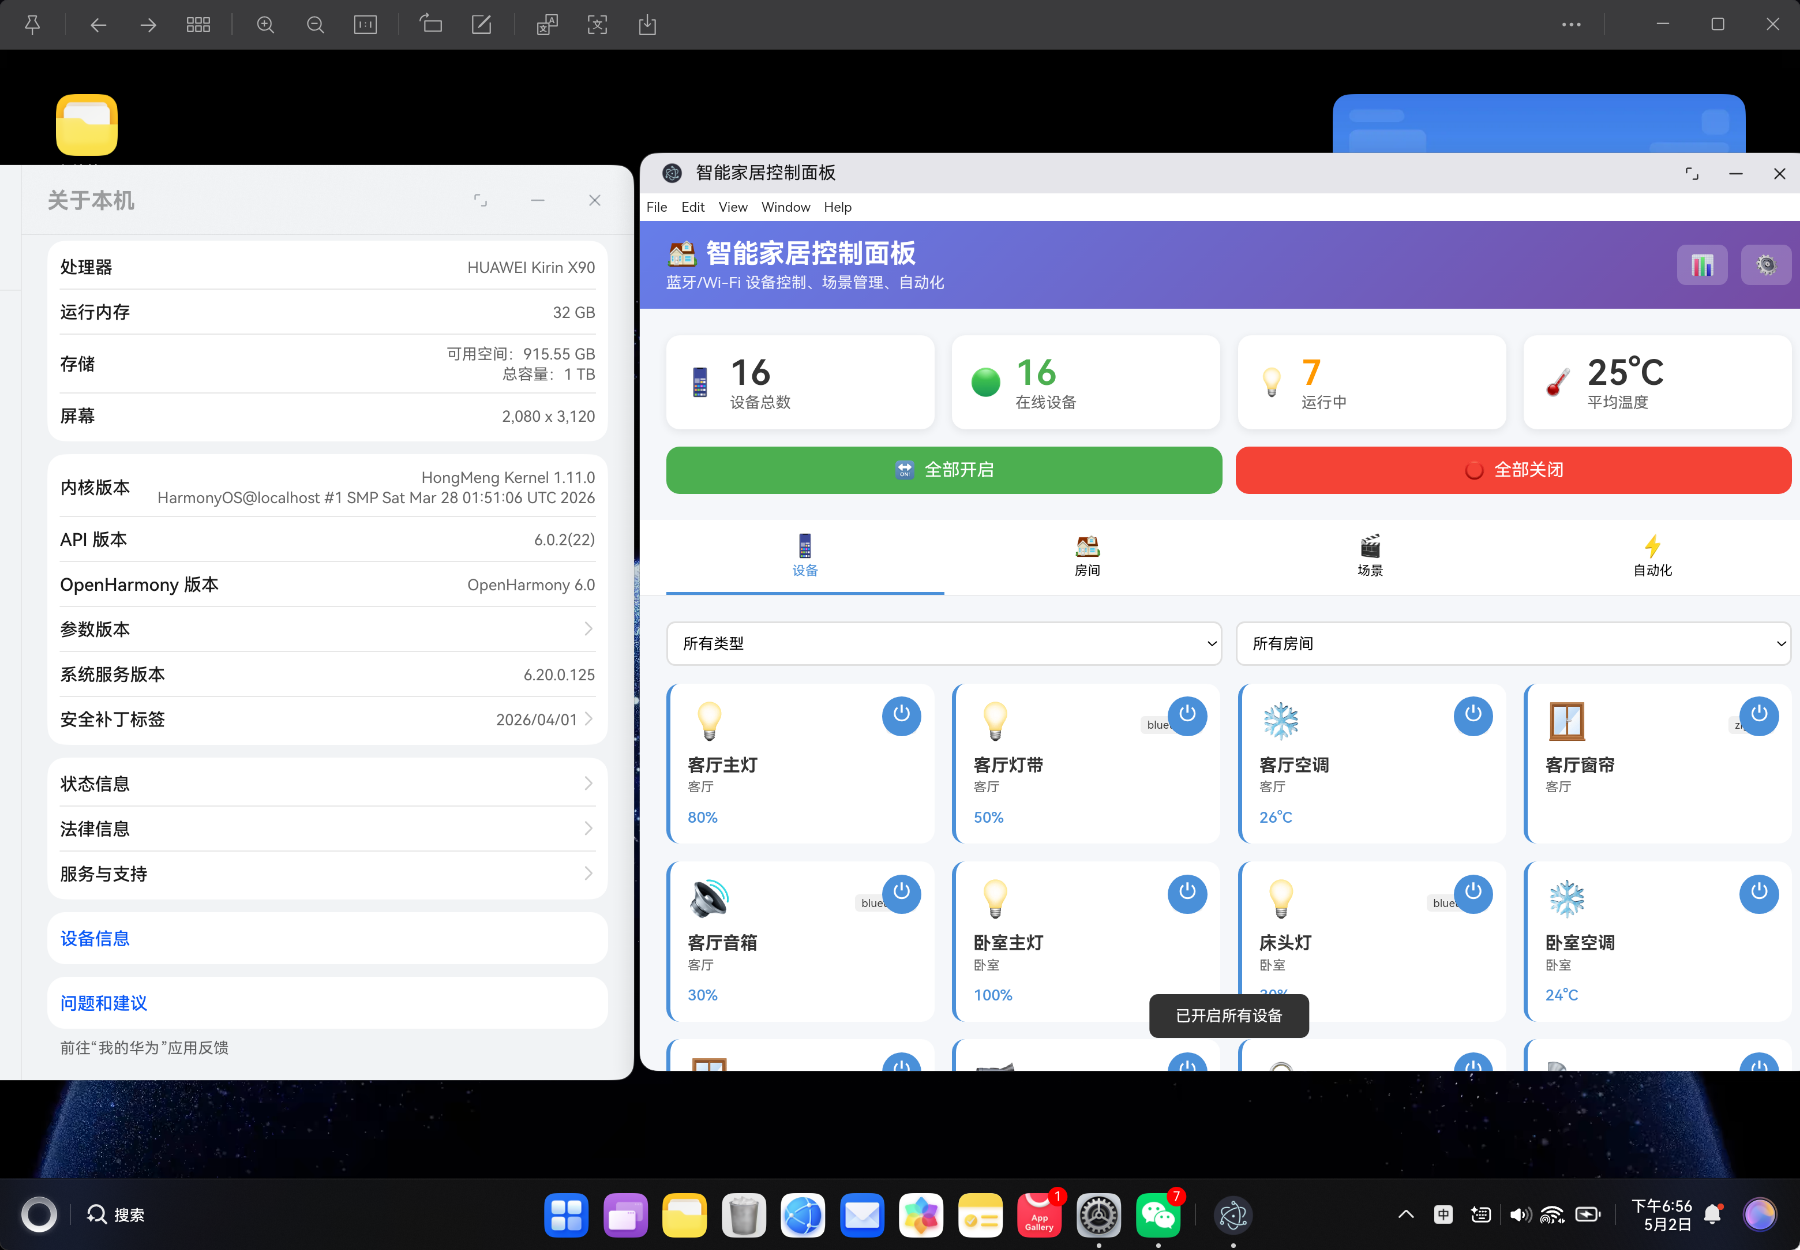
static turnOnAll(): void { ... }
// 场景管理
static getScenes(): Scene[] { ... }
static activateScene(sceneId: string): boolean { ... }
// 自动化
static getAutomations(): AutomationRule[] { ... }
static toggleAutomation(id: string): boolean { ... }
static triggerAutomation(id: string): void { ... }
// 统计
static getDeviceStats(): Record<string, number> { ... }
static getRoomSummary(roomId: RoomId): any { ... }
// 数据管理
static exportData(): string { ... }
static importData(jsonString: string): boolean { ... }
}
5.2 示例设备数据
function generateDemoDevices(): SmartDevice[] {
  return [
    {
      id: 'light-living-1',
      name: '客厅主灯',
      type: 'light',
      room: 'living_room',
      status: 'online',
      connection: 'wifi',
      isOn: true,
      brightness: 80,
      color: '#ffffff',
      lastUpdate: Date.now(),
      createdAt: Date.now()
    },
    {
      id: 'thermostat-living',
      name: '客厅空调',
      type: 'thermostat',
      room: 'living_room',
      status: 'online',
      connection: 'wifi',
      isOn: true,
      temperature: 26,
      lastUpdate: Date.now(),
      createdAt: Date.now()
    }
    // ... 共 16 台设备
  ]
}
5.3 设备控制方法
static toggleDevice(id: string): SmartDevice | null {
  const devices = SmartHomeService.getDevices()
  const device = devices.find(d => d.id === id)
  if (!device) return null
  device.isOn = !device.isOn
  device.lastUpdate = Date.now()
  SmartHomeService.saveDevices(devices)
  return device
}

static setDeviceBrightness(id: string, brightness: number): SmartDevice | null {
  const devices = SmartHomeService.getDevices()
  const device = devices.find(d => d.id === id)
  if (!device) return null
  device.brightness = Math.max(0, Math.min(100, brightness))
  device.isOn = brightness > 0
  device.lastUpdate = Date.now()
  SmartHomeService.saveDevices(devices)
  return device
}
六、设备控制功能
6.1 设备卡片设计
<div :class="['device-card', { 'is-on': device.isOn, 'offline': device.status !== 'online' }]" @click="openDeviceDetail(device)">
  <div class="device-header">
    <span class="device-icon" :style="{ color: device.isOn ? deviceTypeColors[device.type] : '#999' }">
      {{ deviceTypeIcons[device.type] }}
    </span>
    <div class="device-status">
      <span :class="['status-dot', device.status]"></span>
      <span class="connection-badge">{{ device.connection }}</span>
    </div>
  </div>
  <div class="device-info">
    <h3 class="device-name">{{ device.name }}</h3>
    <p class="device-room">{{ getRoomName(device.room) }}</p>
  </div>
  <div class="device-controls">
    <div class="control-value" v-if="device.brightness !== undefined">{{ device.brightness }}%</div>
    <div class="control-value" v-if="device.temperature !== undefined">{{ device.temperature }}°C</div>
  </div>
  <button :class="['power-btn', { active: device.isOn }]" @click.stop="toggleDevice(device.id)">
    {{ device.isOn ? '⏻' : '⏻' }}
  </button>
</div>
6.2 设备详情弹窗
<div class="device-detail-controls">
  <div class="control-row">
    <span>开关</span>
    <label class="toggle-switch">
      <input type="checkbox" :checked="selectedDevice.isOn" @change="toggleDevice(selectedDevice.id)" />
      <span class="slider-toggle"></span>
    </label>
  </div>

  <div v-if="selectedDevice.brightness !== undefined" class="slider-control">
    <label>亮度</label>
    <div class="slider-group">
      <input type="range" v-model.number="selectedDevice.brightness" min="0" max="100" step="1"
        @input="setBrightness(selectedDevice.id, selectedDevice.brightness)" />
      <span class="value">{{ selectedDevice.brightness }}%</span>
    </div>
  </div>

  <div v-if="selectedDevice.temperature !== undefined" class="slider-control">
    <label>温度</label>
    <div class="slider-group">
      <input type="range" v-model.number="selectedDevice.temperature" min="16" max="32" step="1"
        @input="setTemperature(selectedDevice.id, selectedDevice.temperature)" />
      <span class="value">{{ selectedDevice.temperature }}°C</span>
    </div>
  </div>

  <div v-if="selectedDevice.color !== undefined" class="color-control">
    <label>颜色</label>
    <div class="color-picker">
      <input type="color" v-model="selectedDevice.color" @input="setColor(selectedDevice.id, selectedDevice.color)" />
      <span>{{ selectedDevice.color }}</span>
    </div>
  </div>
</div>
七、场景联动系统
7.1 场景定义
export const SCENES: Scene[] = [
  {
    id: 'morning',
    name: '早安模式',
    icon: '🌅',
    description: '窗帘打开,灯光调亮,播放轻音乐',
    deviceStates: {},
    isActive: false
  },
  {
    id: 'night',
    name: '晚安模式',
    icon: '🌙',
    description: '关闭所有灯光,窗帘关闭,空调睡眠模式',
    deviceStates: {},
    isActive: false
  },
  {
    id: 'movie',
    name: '影院模式',
    icon: '🎬',
    description: '灯光调暗,窗帘关闭,打开电视',
    deviceStates: {},
    isActive: false
  }
]
| 场景 | 图标 | 设备动作 |
|---|---|---|
| 早安模式 | 🌅 | 窗帘开、灯亮、音乐开 |
| 晚安模式 | 🌙 | 全灯关、窗帘关、空调睡眠 |
| 离家模式 | 🚶 | 全设备关、安防开 |
| 回家模式 | 🏠 | 玄关灯开、空调开 |
| 影院模式 | 🎬 | 灯光暗、窗帘关、电视开 |
| 派对模式 | 🎉 | 灯亮、音乐开、空调制冷 |
| 睡眠模式 | 😴 | 全灯关、空调睡眠 |
| 阅读模式 | 📖 | 书房灯亮、其他关 |
7.2 场景激活逻辑
static activateScene(sceneId: string): boolean {
  const scenes = SmartHomeService.getScenes()
  const scene = scenes.find(s => s.id === sceneId)
  if (!scene) return false

  // 取消其他场景
  scenes.forEach(s => s.isActive = false)
  scene.isActive = true
  localStorage.setItem(STORAGE_KEYS.scenes, JSON.stringify(scenes))

  // 应用设备状态
  const devices = SmartHomeService.getDevices()
  Object.entries(scene.deviceStates).forEach(([deviceId, state]) => {
    const device = devices.find(d => d.id === deviceId)
    if (device) {
      Object.assign(device, state)
      device.lastUpdate = Date.now()
    }
  })
  SmartHomeService.saveDevices(devices)
  return true
}
八、自动化规则引擎
8.1 自动化规则定义
const demoAutomations: AutomationRule[] = [
  {
    id: 'auto-1',
    name: '日落开灯',
    description: '日落后自动打开客厅灯',
    trigger: {
      type: 'time',
      condition: { time: 'sunset', offset: 0 }
    },
    action: {
      type: 'device',
      target: 'light-living-1',
      params: { isOn: true, brightness: 80 }
    },
    enabled: true,
    lastTriggered: Date.now() - 86400000
  },
  {
    id: 'auto-2',
    name: '温度过高开空调',
    description: '温度超过 30 度时自动开空调',
    trigger: {
      type: 'sensor',
      condition: { type: 'temperature', threshold: 30, operator: '>' }
    },
    action: {
      type: 'device',
      target: 'thermostat-living',
      params: { isOn: true, temperature: 26 }
    },
    enabled: true,
    lastTriggered: Date.now() - 3600000
  }
]
8.2 触发条件类型
| 触发类型 | 条件 | 示例 |
|---|---|---|
| 时间(time) | 固定时间、日出/日落 | 每天早上 7:00 |
| 设备(device) | 设备状态变化 | 门锁打开时 |
| 传感器(sensor) | 温度/湿度阈值 | 温度 > 30°C |
| 位置(location) | 离家/到家 | 检测到离家 |
8.3 规则触发逻辑
static triggerAutomation(id: string): void {
  const rules = SmartHomeService.getAutomations()
  const rule = rules.find(r => r.id === id)
  if (!rule || !rule.enabled) return

  rule.lastTriggered = Date.now()
  SmartHomeService.saveAutomations(rules)

  if (rule.action.type === 'device') {
    const devices = SmartHomeService.getDevices()
    const device = devices.find(d => d.id === rule.action.target)
    if (device) {
      Object.assign(device, rule.action.params)
      device.lastUpdate = Date.now()
      SmartHomeService.saveDevices(devices)
    }
  } else if (rule.action.type === 'scene') {
    SmartHomeService.activateScene(rule.action.target)
  }
}
九、UI 组件开发
9.1 主界面布局
SmartHomePanel.vue
├── Header(头部)
│   ├── 标题
│   └── 操作按钮(统计、设置)
├── Dashboard(仪表盘)
│   ├── 统计栏(设备总数、在线、运行中、平均温度)
│   └── 快捷操作(全部开启/关闭)
├── Tab Navigation(标签导航)
│   ├── 设备
│   ├── 房间
│   ├── 场景
│   └── 自动化
├── Content Area(内容区)
│   ├── 设备视图(筛选 + 网格)
│   ├── 房间视图(房间卡片)
│   ├── 场景视图(场景卡片)
│   └── 自动化视图(规则列表)
├── Device Modal(设备详情弹窗)
├── Stats Modal(统计弹窗)
└── Settings Modal(设置弹窗)
9.2 响应式网格布局
.device-grid {
  display: grid;
  grid-template-columns: repeat(auto-fill, minmax(200px, 1fr));
  gap: 16px;
}

.room-grid {
  display: grid;
  grid-template-columns: repeat(auto-fill, minmax(180px, 1fr));
  gap: 16px;
}

.scene-grid {
  display: grid;
  grid-template-columns: repeat(auto-fill, minmax(150px, 1fr));
  gap: 16px;
}
| 视图 | 最小宽度 | 说明 |
|---|---|---|
| 设备网格 | 200px | 设备卡片 |
| 房间网格 | 180px | 房间卡片 |
| 场景网格 | 150px | 场景卡片 |
9.3 Toggle 开关组件
<label class="toggle-switch">
  <input type="checkbox" :checked="device.isOn" @change="toggleDevice(device.id)" />
  <span class="slider-toggle"></span>
</label>
.toggle-switch {
  position: relative;
  width: 50px;
  height: 26px;
}

.toggle-switch input { opacity: 0; width: 0; height: 0; }

.slider-toggle {
  position: absolute;
  cursor: pointer;
  top: 0; left: 0; right: 0; bottom: 0;
  background-color: #ccc;
  transition: 0.3s;
  border-radius: 26px;
}

.slider-toggle:before {
  position: absolute;
  content: "";
  height: 20px;
  width: 20px;
  left: 3px;
  bottom: 3px;
  background-color: white;
  transition: 0.3s;
  border-radius: 50%;
}

input:checked + .slider-toggle {
  background-color: #4a90d9;
}

input:checked + .slider-toggle:before {
  transform: translateX(24px);
}
十、数据同步与持久化
10.1 localStorage 持久化方案
const STORAGE_KEYS = {
  devices: 'smart-home-devices',
  scenes: 'smart-home-scenes',
  automations: 'smart-home-automations',
  settings: 'smart-home-settings'
}

static getDevices(): SmartDevice[] {
  const stored = localStorage.getItem(STORAGE_KEYS.devices)
  if (!stored) {
    const devices = generateDemoDevices()
    localStorage.setItem(STORAGE_KEYS.devices, JSON.stringify(devices))
    return devices
  }
  return JSON.parse(stored)
}

static saveDevices(devices: SmartDevice[]): void {
  localStorage.setItem(STORAGE_KEYS.devices, JSON.stringify(devices))
}
10.2 数据导入导出
static exportData(): string {
  return JSON.stringify({
    devices: SmartHomeService.getDevices(),
    scenes: SmartHomeService.getScenes(),
    automations: SmartHomeService.getAutomations(),
    settings: SmartHomeService.getSettings()
  }, null, 2)
}

static importData(jsonString: string): boolean {
  try {
    const data = JSON.parse(jsonString)
    if (data.devices) SmartHomeService.saveDevices(data.devices)
    if (data.scenes) localStorage.setItem(STORAGE_KEYS.scenes, JSON.stringify(data.scenes))
    if (data.automations) SmartHomeService.saveAutomations(data.automations)
    if (data.settings) SmartHomeService.saveSettings(data.settings)
    return true
  } catch {
    return false
  }
}
10.3 模拟数据更新
static simulateDeviceChange(): void {
  const devices = SmartHomeService.getDevices()
  const onlineDevices = devices.filter(d => d.status === 'online')

  if (onlineDevices.length > 0) {
    const randomDevice = onlineDevices[Math.floor(Math.random() * onlineDevices.length)]

    if (randomDevice.type === 'sensor') {
      randomDevice.temperature = Math.round(20 + Math.random() * 10)
      randomDevice.humidity = Math.round(40 + Math.random() * 30)
    }

    if (randomDevice.battery !== undefined) {
      randomDevice.battery = Math.max(0, randomDevice.battery - Math.random() * 0.1)
    }

    randomDevice.lastUpdate = Date.now()
    SmartHomeService.saveDevices(devices)
  }
}
十一、性能优化策略
11.1 计算属性缓存
Vue 的 computed 自动缓存计算结果,避免重复计算:
// ✅ 使用 computed 缓存统计数据
const stats = computed(() => SmartHomeService.getDeviceStats())

// ✅ 使用 computed 缓存过滤结果
const filteredDevices = computed(() => {
  let filtered = devices.value
  if (filterType.value) {
    filtered = filtered.filter(d => d.type === filterType.value)
  }
  if (filterRoom.value) {
    filtered = filtered.filter(d => d.room === filterRoom.value)
  }
  return filtered
})

// ❌ 避免在模板中直接调用函数
// <div v-for="device in filterDevices(devices, type, room)">
11.2 懒加载路由
const routes: RouteRecordRaw[] = [
  {
    path: '/',
    name: 'SmartHome',
    component: () => import('../views/SmartHomeView.vue'), // 懒加载
  },
]
11.3 自动刷新机制
function autoRefresh() {
  SmartHomeService.simulateDeviceChange()
  loadDevices()
}

onMounted(() => {
  loadDevices()
  refreshTimer.value = window.setInterval(autoRefresh, 30000)
})

onUnmounted(() => {
  if (refreshTimer.value) {
    clearInterval(refreshTimer.value)
  }
})
十二、构建与部署
12.1 构建命令
# 清理缓存
Remove-Item -Recurse -Force "./dist" -ErrorAction SilentlyContinue
Remove-Item -Recurse -Force "../electron/build" -ErrorAction SilentlyContinue
Remove-Item -Recurse -Force "../../.hvigor" -ErrorAction SilentlyContinue

# 构建生产版本
npm run build
12.2 构建输出
构建结果:
../dist/index.html                          0.63 kB │ gzip:  0.47 kB
../dist/assets/index-CBgsX6DZ.css           0.21 kB │ gzip:  0.19 kB
../dist/assets/SmartHomeView-Dm3JYza3.css  10.51 kB │ gzip:  2.15 kB
../dist/assets/SmartHomeView-DP6lPbX2.js   26.40 kB │ gzip:  8.17 kB
../dist/assets/index-BFNWS7oB.js           92.11 kB │ gzip: 36.08 kB
✓ built in 641ms
| 文件 | 原始大小 | Gzip 压缩 | 说明 |
|---|---|---|---|
| index.html | 0.63 KB | 0.47 KB | HTML 入口 |
| CSS(组件) | 10.51 KB | 2.15 KB | 智能家居样式 |
| JS(组件) | 26.40 KB | 8.17 KB | 智能家居逻辑 |
| JS(核心) | 92.11 KB | 36.08 KB | Vue + Router 核心 |
| 总计 | 129.65 KB | 46.87 KB |
🚀 性能亮点:
- 构建时间仅 641ms
- Gzip 压缩率 64%
- 零第三方物联网库依赖
十三、总结与展望
13.1 项目成果
| 指标 | 数值 | 说明 |
|---|---|---|
| 设备类型 | 10 种 | 灯光、空调、摄像头等 |
| 房间数量 | 8 个 | 客厅、卧室、厨房等 |
| 场景模式 | 8 种 | 早安、晚安、影院等 |
| 自动化规则 | 4 条 | 时间、传感器触发 |
| 示例设备 | 16 台 | 覆盖所有类型 |
| 打包大小 | 8.17 KB | Gzip 压缩后 |
| 构建时间 | 641ms | Vite 5.0 |
| 零依赖 | ✅ | 无第三方物联网库 |
13.2 核心技术点总结
- TypeScript 类型系统:完整的接口定义提供类型安全
- Vue3 Composition API:ref、computed 实现响应式状态管理
- 设备控制:开关、亮度、温度、颜色、音量调节
- 场景联动:一键切换多设备状态
- 自动化引擎:触发条件匹配 + 动作执行
- 数据持久化:localStorage 存储方案
- 模拟数据:传感器数据自动更新
- 响应式布局:CSS Grid + Flexbox 自适应
13.3 后续优化方向
| 优化方向 | 说明 | 优先级 |
|---|---|---|
| 真实设备对接 | WebSocket/MQTT 协议连接真实设备 | 高 |
| 语音控制 | 集成语音识别 API | 高 |
| 能耗统计 | 设备用电量统计与分析 | 中 |
| 多用户支持 | 家庭成员权限管理 | 中 |
| 3D 房间 | Three.js 3D 可视化 | 低 |
| 机器学习 | 自动学习用户习惯优化自动化 | 低 |
13.4 学习资源推荐
附录
A. 完整代码仓库结构
vue-app/
├── src/
│   ├── types/
│   │   └── smarthome.ts          # 类型定义(180行)
│   ├── services/
│   │   └── SmartHomeService.ts   # 核心服务(400行)
│   ├── components/
│   │   └── SmartHomePanel.vue    # 主组件(600行)
│   ├── views/
│   │   └── SmartHomeView.vue     # 视图容器(20行)
│   ├── router/
│   │   └── index.ts              # 路由配置(20行)
│   └── main.ts                   # 应用入口(10行)
├── index.html                    # HTML 模板
├── package.json                  # 项目配置
└── vite.config.ts                # Vite 配置
B. 设备类型速查表
| 类型 | 图标 | 可控制参数 | 连接方式 |
|---|---|---|---|
| 灯光 | 💡 | 开关、亮度、颜色 | Wi-Fi、蓝牙 |
| 空调 | ❄️ | 开关、温度 | Wi-Fi |
| 摄像头 | 📹 | 开关 | Wi-Fi |
| 音箱 | 🔊 | 开关、音量 | 蓝牙 |
| 窗帘 | 🪟 | 开关 | Zigbee |
| 门锁 | 🔒 | 开关、电量 | 蓝牙 |
| 净化器 | 🌬️ | 开关 | Wi-Fi |
| 加湿器 | 💧 | 开关、湿度 | 蓝牙 |
| 开关 | 🔘 | 开关 | Wi-Fi、Zigbee |
| 传感器 | 📡 | 温度、湿度、电量 | Zigbee |
C. 存储键说明
| 存储键 | 数据类型 | 说明 |
|---|---|---|
| smart-home-devices | SmartDevice[] | 所有设备列表 |
| smart-home-scenes | Scene[] | 场景配置 |
| smart-home-automations | AutomationRule[] | 自动化规则 |
| smart-home-settings | SmartHomeSettings | 应用设置 |

作为“人工智能6S店”的官方数字引擎,为AI开发者与企业提供一个覆盖软硬件全栈、一站式门户。
更多推荐

 0
0 0
0- 0


 已为社区贡献44条内容

所有评论(0)