
鸿蒙电子手表开发实战:从Canvas表盘绘制到实时时间更新
文章摘要 本项目基于HarmonyOS 5.0+,使用Canvas与MVVM架构开发了一款多功能电子手表应用,支持指针表盘/数字时钟切换、日期星期显示、计步模拟及触摸交互。通过数学公式精确计算刻度坐标,解决屏幕适配与指针虚化问题,实现每秒平滑刷新。技术亮点包括:Canvas矢量绘制、Path2D指针造型、vp2px单位转换、定时器资源管理,适用于各类仪表盘开发场景。源码已开源,提供工业级Canva
完整源码:HarmonyWatch
支持模拟指针表盘、数字时钟、日期星期、计步模拟、触摸交互
HarmonyOS 5.0+,基于 Canvas + MVVM 架构,适配不同屏幕密度
一、前言
之前分享过Canvas的使用案例,拼图游戏用Canvas绘制每一块碎片。拼图属于游戏对于大部分开发者几乎遇不到这种需求。
今日要分享的是使用Canvas从零实现一个功能完整的电子手表应用,涵盖 Canvas 绘制表盘、实时时间更新、触摸交互等核心功能,并解决不同屏幕密度下字体适配、指针尖角虚化等问题。在工业中这类绘制刻度表盘真的很常见,例如汽车仪表盘、网速测速仪表、温度、压力表、指南针这些都是常见的需求。总之Canvas功能很强大的,炒股用的K线图都是它来完成的。
核心需求
- 绘制精美圆形表盘,包含小时刻度(带数字)、分钟刻度(短细线)
- 实时获取系统时间,指针平滑旋转,每秒刷新
- 指针采用三角形尖角设计,根部圆润,中心红点覆盖指针根部
- 支持数字时钟模式(触摸表盘切换指针/数字显示)
- 显示当前日期(年/月/日)和星期
- 模拟计步功能(步数随机增长,支持重置)
- 适配不同屏幕密度,Canvas 字体使用 vp2px 转换保证视觉一致
- 页面退出时释放定时器,避免内存泄漏
二、技术选型与架构
| 模块 | 技术方案 | 作用 |
|---|---|---|
| UI 绘制 | Canvas + Path2D |
绘制表盘刻度、指针等矢量图形 |
| 时间更新 | setInterval + 系统时间 API |
每秒触发重绘,更新时间显示 |
| 数据存储 | @State 观察 ViewModel |
响应式管理步数、日期等状态 |
| 单位转换 | UIContext.vp2px |
将设计 vp 值转为 Canvas 使用的 px |
| 架构模式 | MVVM | 分离绘制逻辑、业务数据和视图 |
分层职责
- Model:无独立文件,数据以 ViewModel 属性形式存在(扁平化)
- ViewModel:
WatchViewModel核心业务层,负责时间获取、步数模拟、指针角度计算、Canvas 绘制 - View:
WatchPage负责 Canvas 容器、触摸事件分发、绑定 ViewModel 数据
三、项目结构
entry/src/main/ets/
├── pages/
│   └── WatchPage.ets               // 主页面,包含 Canvas 组件
├── viewmodel/
│   └── WatchViewModel.ets          // 表盘绘制逻辑、时间更新、步数模拟
└── utils/
    └── DateUtil.ets                // 日期格式化工具
运行效果
为了减少文件大小,gif图是压缩加速过得1.5倍。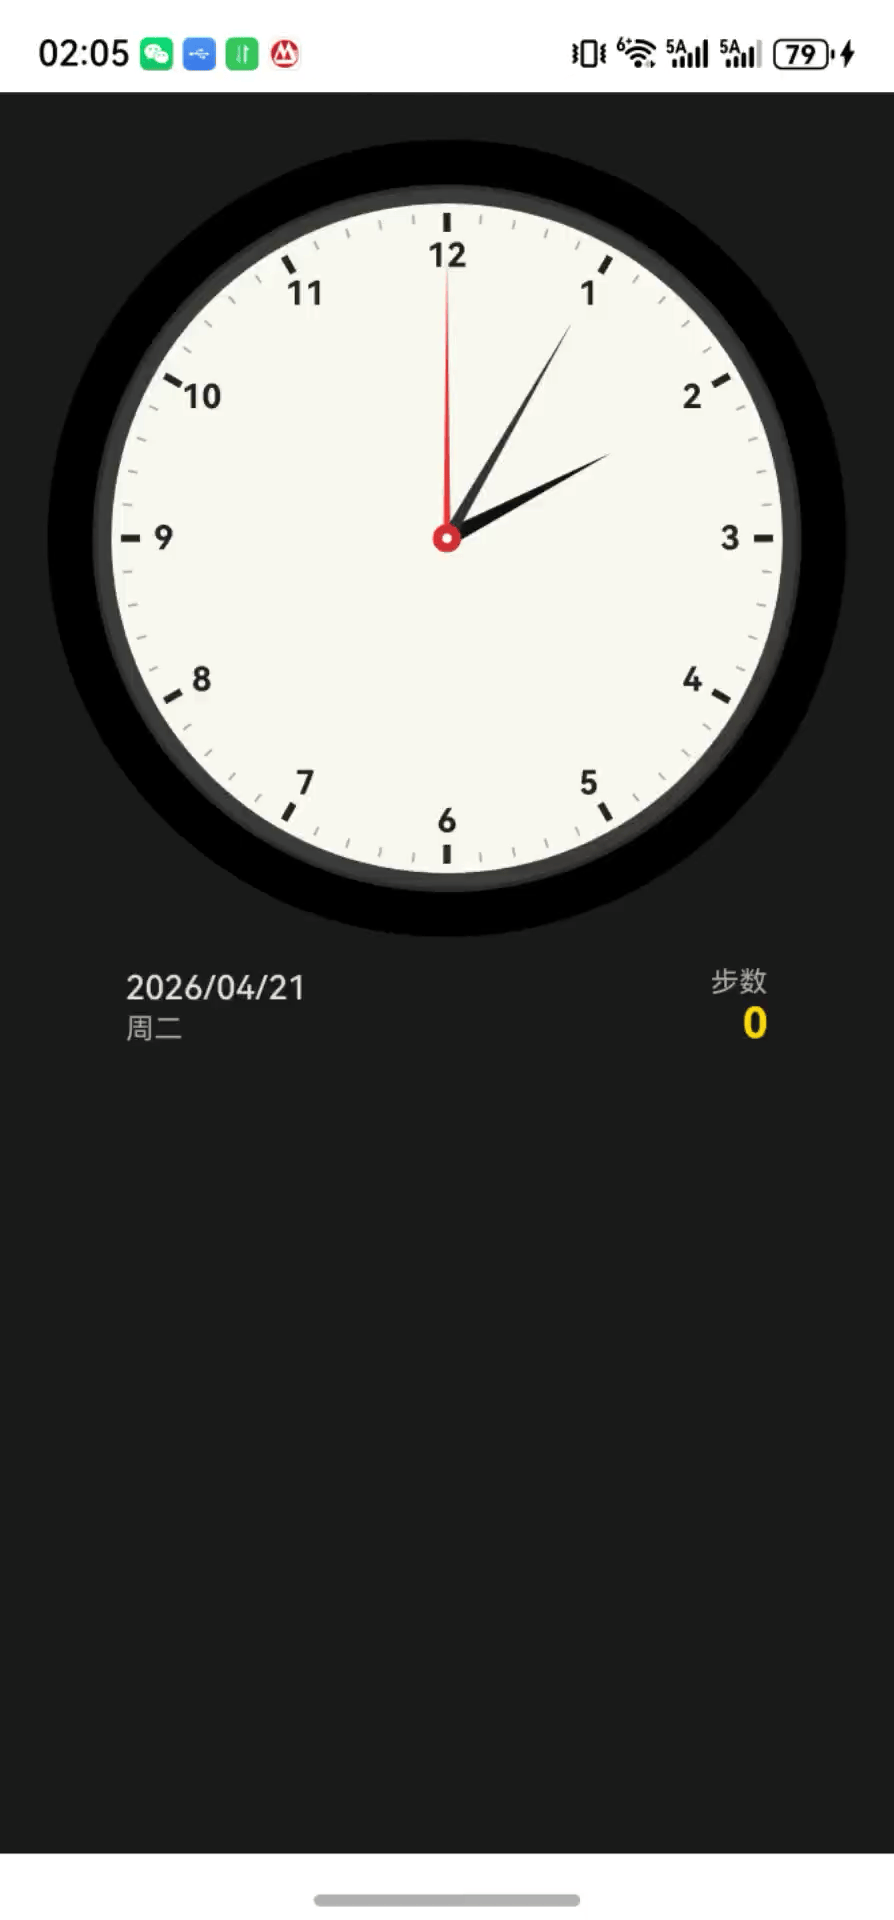
四、实现过程
4.1 页面布局
创建一个圆形背景容器,内部放置 Canvas 和底部信息栏。使用 clipShape 裁剪内容为圆形(适配圆形手表)。
import { WatchViewModel } from '../viewmodel/WatchViewModel';

@Entry
@Component
struct WatchPage {
  @State viewModel: WatchViewModel = new WatchViewModel();
  private settings: RenderingContextSettings = new RenderingContextSettings(true);
  private ctx: CanvasRenderingContext2D = new CanvasRenderingContext2D(this.settings);
  @State canvasWidth: number = 0;
  @State canvasHeight: number = 0;

  aboutToAppear() {
    // 获取 UIContext 的 vp2px 方法并传递给 ViewModel
    const uiContext = this.getUIContext();
    this.viewModel.setVp2px((vp: number) => uiContext.vp2px(vp));

    this.viewModel.init(this.ctx);
    this.viewModel.startTimer();
  }

  aboutToDisappear() {
    this.viewModel.stopTimer();
  }

  build() {
    Column() {
      Canvas(this.ctx)
        .width('100%')
        .aspectRatio(1)
        .backgroundColor($r('sys.color.black'))
        .clipShape(new Circle({ width: '100%', height: '100%' }))
        .onAreaChange((_, newValue) => {
          const width = newValue.width as number;
          const height = newValue.height as number;
          if (width > 0 && height > 0) {
            this.canvasWidth = width;
            this.canvasHeight = height;
            this.viewModel.setCanvasSize(width, height);
          }
        })
        .onTouch((event: TouchEvent) => this.handleTouch(event))

      Row() {
        Column() {
          Text(this.viewModel.dateStr)
            .fontSize(14)
            .fontColor('#E0E0E0')
            .fontWeight(FontWeight.Medium)
          Text(this.viewModel.weekday)
            .fontSize(12)
            .fontColor('#B0B0B0')
            .margin({ top: 2 })
        }
        .alignItems(HorizontalAlign.Start)

        Blank()

        Column() {
          Text(`步数`)
            .fontSize(12)
            .fontColor('#B0B0B0')
          Text(`${this.viewModel.steps}`)
            .fontSize(18)
            .fontColor('#FFD700')
            .fontWeight(FontWeight.Bold)
            .onClick(() => this.viewModel.resetSteps())
        }
        .alignItems(HorizontalAlign.End)
      }
      .width('90%')
      .padding({ left: 16, right: 16, top: 12, bottom: 16 })
      .margin({ bottom: 20 })
    }
    .width('100%')
    .height('100%')
    .padding(20)
    .backgroundColor('#1A1A1A')
  }

  private handleTouch(event: TouchEvent) {
    if (event.type === TouchType.Down) {
      this.viewModel.toggleDisplayMode();
    }
  }
}
4.2 表盘绘制:刻度坐标计算公式
4.2.1 圆上任意点坐标公式
设圆心为 O ( c x , c y ) O(cx, cy) O(cx,cy),半径为 R R R,点 P P P 与圆心连线相对于 12点钟方向 的夹角为 θ \theta θ(顺时针为正),则点 P P P 的坐标为:
{ x = c x + R ⋅ cos ( θ − 90 ∘ ) y = c y + R ⋅ sin ( θ − 90 ∘ ) \begin{cases} x = cx + R \cdot \cos(\theta - 90^\circ) \\[2mm] y = cy + R \cdot \sin(\theta - 90^\circ) \end{cases} ⎩ ⎨ ⎧x=cx+R⋅cos(θ−90∘)y=cy+R⋅sin(θ−90∘)
其中 θ \theta θ 的单位为度,计算前需转换为弧度。
- 减去 90 ∘ 90^\circ 90∘(即 − π / 2 -\pi/2 −π/2)是因为 Canvas 坐标系中 0 ∘ 0^\circ 0∘ 指向 3点钟方向,而表盘的 0 ∘ 0^\circ 0∘(12点钟)对应 − 90 ∘ -90^\circ −90∘。
- 若使用弧度,公式为:
x = c x + R ⋅ cos ( θ rad − π / 2 ) y = c y + R ⋅ sin ( θ rad − π / 2 ) \begin{aligned} x &= cx + R \cdot \cos(\theta_{\text{rad}} - \pi/2) \\ y &= cy + R \cdot \sin(\theta_{\text{rad}} - \pi/2) \end{aligned} xy=cx+R⋅cos(θrad−π/2)=cy+R⋅sin(θrad−π/2)
Canvas 的 0° 是三点钟,表盘 0° 是十二点钟,两者相差 -90°,所以减 90° 完成转换。
代码实现:
const angle = (theta_deg - 90) * Math.PI / 180;
const x = cx + R * Math.cos(angle);
const y = cy + R * Math.sin(angle);
4.2.2 分钟刻度与小时刻度分离
为保证刻度清晰不重叠,分钟刻度只绘制非5的倍数位置,长度为小时刻度的一半。
// 绘制分钟刻度(跳过整5分钟,长度为小时刻度的一半)
private drawMinuteTicks(ctx: CanvasRenderingContext2D, cx: number, cy: number, radius: number) {
  for (let i = 0; i < 60; i++) {
    if (i % 5 === 0) continue;
    const angle = (i * 6 - 90) * Math.PI / 180;
    const startX = cx + (radius - 8) * Math.cos(angle);
    const startY = cy + (radius - 8) * Math.sin(angle);
    const endX = cx + (radius - 4) * Math.cos(angle);
    const endY = cy + (radius - 4) * Math.sin(angle);
    ctx.beginPath();
    ctx.moveTo(startX, startY);
    ctx.lineTo(endX, endY);
    ctx.lineWidth = 1;
    ctx.strokeStyle = '#AAA';
    ctx.stroke();
  }
}

// 绘制小时刻度(12个)及数字
private drawHourTicks(ctx: CanvasRenderingContext2D, cx: number, cy: number, radius: number) {
  for (let i = 1; i <= 12; i++) {
    const angle = (i * 30 - 90) * Math.PI / 180;
    const startX = cx + (radius - 12) * Math.cos(angle);
    const startY = cy + (radius - 12) * Math.sin(angle);
    const endX = cx + (radius - 4) * Math.cos(angle);
    const endY = cy + (radius - 4) * Math.sin(angle);
    ctx.beginPath();
    ctx.moveTo(startX, startY);
    ctx.lineTo(endX, endY);
    ctx.lineWidth = 3;
    ctx.strokeStyle = '#222';
    ctx.stroke();

    // 刻度数字
    const numX = cx + (radius - 22) * Math.cos(angle);
    const numY = cy + (radius - 22) * Math.sin(angle);
    const fontSizePx = this.vp2px(this.DIAL_NUM_FONT_SIZE_VP);
    ctx.font = `bold ${fontSizePx}px "HarmonyOS Sans"`;
    ctx.fillStyle = '#222';
    ctx.textAlign = 'center';
    ctx.textBaseline = 'middle';
    ctx.fillText(i.toString(), numX, numY);
  }
}
4.3 指针绘制:三角形尖角 + 根部圆润 + 红白圆点
指针方向也采用上述角度公式计算。指针采用三角形填充,根部增加圆形过渡,最后绘制中心红点使其覆盖指针根部。
// 绘制尖形指针(三角形),根部加圆形
private drawHand(ctx: CanvasRenderingContext2D, cx: number, cy: number, angle: number, len: number, width: number, color: string) {
  const dx = Math.cos(angle);
  const dy = Math.sin(angle);
  const nx = -dy;
  const ny = dx;

  // 三角形指针主体
  const x1 = cx - nx * width / 2;
  const y1 = cy - ny * width / 2;
  const x2 = cx + nx * width / 2;
  const y2 = cy + ny * width / 2;
  const x3 = cx + dx * len;
  const y3 = cy + dy * len;

  ctx.beginPath();
  ctx.moveTo(x1, y1);
  ctx.lineTo(x2, y2);
  ctx.lineTo(x3, y3);
  ctx.closePath();
  ctx.fillStyle = color;
  ctx.fill();

  // 根部圆形(半径等于宽度的一半)
  ctx.beginPath();
  ctx.arc(cx, cy, width / 2, 0, 2 * Math.PI);
  ctx.fillStyle = color;
  ctx.fill();
}

// 绘制中心红点和白色小点(最上层)
private drawCenterDot(ctx: CanvasRenderingContext2D, w: number, h: number) {
  const centerX = w / 2;
  const centerY = h / 2;
  // 红色大圆
  ctx.beginPath();
  ctx.arc(centerX, centerY, 6, 0, 2 * Math.PI);
  ctx.fillStyle = '#D32F2F';
  ctx.fill();
  // 白色小点
  ctx.beginPath();
  ctx.arc(centerX, centerY, 2, 0, 2 * Math.PI);
  ctx.fillStyle = '#FFF';
  ctx.fill();
}

private draw() {
  if (!this.ctx) return;
  if (this.canvasWidth <= 0 || this.canvasHeight <= 0) return;

  const w = this.canvasWidth;
  const h = this.canvasHeight;

  this.ctx.clearRect(0, 0, w, h);

  if (this.displayMode === 'analog') {
    this.drawDial(this.ctx, w, h);
    this.drawHands(this.ctx, w, h);
    this.drawCenterDot(this.ctx, w, h);
  } else {
    this.drawSimpleDial(this.ctx, w, h);
    this.drawDigitalTime(this.ctx, w, h);
  }
}
4.4 实时时间更新与定时器管理
在页面启动时开启定时器,每秒更新时间并重绘,页面销毁时清除定时器。
startTimer() {
  this.timerId = setInterval(() => {
    this.updateTimeAndDate();
    this.draw();
  }, 1000);
  this.stepTimerInterval = setInterval(() => {
    this.simulateStepIncrease();
  }, 30000);
}

stopTimer() {
  clearInterval(this.timerId);
  clearInterval(this.stepTimerInterval);
}
4.5 数字时钟模式(触摸切换)
触摸表盘切换指针/数字模式,数字时钟字体通过 vp2px 转换。
toggleDisplayMode() {
  this.displayMode = this.displayMode === 'analog' ? 'digital' : 'analog';
  this.draw();
}

// 数字时间:大字体 + AM/PM
private drawDigitalTime(ctx: CanvasRenderingContext2D, w: number, h: number) {
  const now = new Date();
  const hours = now.getHours().toString().padStart(2, '0');
  const minutes = now.getMinutes().toString().padStart(2, '0');
  const seconds = now.getSeconds().toString().padStart(2, '0');
  const timeStr = `${hours}:${minutes}:${seconds}`;

  const centerX = w / 2;
  const centerY = h / 2;
  const fontSizePx = this.vp2px(this.DIGITAL_FONT_SIZE_VP);
  ctx.font = `bold ${fontSizePx}px "HarmonyOS Sans"`;
  ctx.fillStyle = '#1A1A1A';
  ctx.textAlign = 'center';
  ctx.textBaseline = 'middle';
  ctx.fillText(timeStr, centerX, centerY);

  const ampm = now.getHours() < 12 ? 'AM' : 'PM';
  const ampmSizePx = fontSizePx * 0.45;
  ctx.font = `${ampmSizePx}px "HarmonyOS Sans"`;
  ctx.fillStyle = '#666';
  ctx.fillText(ampm, centerX, centerY + fontSizePx * 0.7);
}
4.6 单位转换关键点:vp → px
Canvas 使用物理像素(px),而布局使用虚拟像素(vp)。通过传递 vp2px 函数给 ViewModel,所有字体大小先定义 vp 值,绘制时转换为 px。
// WatchPage 传递转换函数
this.viewModel.setVp2px((vp: number) => uiContext.vp2px(vp));

// WatchViewModel 内部使用
const fontSizePx = this.vp2px(14);
五、核心问题与解决方案
| 问题 | 原因 | 解决方案 |
|---|---|---|
| 指针尖角虚化 | 三角形太细,抗锯齿导致模糊 | 适当加宽指针(时针7px,分针5px,秒针3px),秒针末端加红点覆盖 |
| 分钟刻度与小时刻度重叠 | 都绘制在相同位置 | 分钟刻度跳过整5分钟位置,且长度减半 |
| 中心红点被指针覆盖 | 绘制顺序问题 | 先绘制指针,最后绘制红点和白点 |
| Canvas 字体大小与 UI 不协调 | 未进行 vp 到 px 转换 | 使用 vp2px 转换函数 |
| 定时器内存泄漏 | 页面退出未清除 | aboutToDisappear 中调用 stopTimer |
六、总结
本文从零实现了一款功能完整的鸿蒙电子手表应用,涵盖了 Canvas 高级绘图、定时器管理、触摸交互、MVVM 状态管理等核心技能。特别处理了 vp 到 px 的单位转换,解决了指针尖角虚化、刻度重叠等问题。

作为“人工智能6S店”的官方数字引擎,为AI开发者与企业提供一个覆盖软硬件全栈、一站式门户。
更多推荐

 4
4 0
0- 0


 已为社区贡献81条内容

所有评论(0)