
Flutter 三方库 given_when_then_unit_test 落地鸿蒙测试极度语义化全维适配:以纯行为特征描述需求倒逼测试沙盘收口、高效聚拢离散-适配鸿蒙 HarmonyOS ohos
本文介绍了在OpenHarmony应用开发中使用Flutter三方库given_when_then_unit_test实现语义化测试的方法。该库基于行为驱动开发(BDD)理念,通过Given-When-Then三段式链式编排测试逻辑,显著提升测试代码可读性和可维护性。文章详细解析了该库的核心原理、在鸿蒙平台的应用优势,并提供了基础配置和高级定制的代码示例。通过语义化的测试描述,开发者可以构建清晰易
欢迎加入开源鸿蒙跨平台社区:https://openharmonycrossplatform.csdn.net
Flutter 三方库 given_when_then_unit_test 落地鸿蒙测试极度语义化全维适配:以纯行为特征描述需求倒逼测试沙盘收口、高效聚拢离散断言点编排出铁壁回归防线

前言
在 OpenHarmony 应用的大规模工程化开发中,代码质量是业务稳定运行的压舱石。然而,传统的单一 test() 函数往往会导致测试代码逻辑混乱、可读性差,长期维护困难。given_when_then_unit_test 库为 Flutter 开发者引入了行为驱动开发(BDD)的 DSL(领域特定语言)。本文将实战介绍如何在鸿蒙端利用该库构建“读起来像小说一样顺畅”的单元测试体系。
一、原理解析 / 概念介绍
1.1 基础原理/概念介绍
given_when_then_unit_test 的核心逻辑是基于 测试逻辑的三段式链式编排。
- Given:初始化测试环境与前置状态。
- When:触发特定的业务行为或函数原型。
- Then:对最终结果或副作用进行断言(Assert)。
1.2 为什么在鸿蒙上使用它?
- 极其易读:通过 BDD 的语义化描述,即使是不懂代码的 QA 同学也能一眼看清鸿蒙业务逻辑的测试覆盖点。
- 强制规范:强制开发者按照标准的“前置-执行-后置”逻辑拆解测试,避免了在鸿蒙测试文件中写出难以维护的“巨型函数”。
- 零运行风险:纯 Dart 测试辅助库,完全不涉及鸿蒙原生驱动,可以在任何 CI 环境下极速运行。
二、鸿蒙基础指导
2.1 适配情况
- 是否原生支持?:是,基于标准的
test包进行封装,100% 适配。 - 是否鸿蒙官方支持?:非常符合鸿蒙大规模工程开发中对“可测试性代码”的推荐范式。
- 是否社区支持?:Dart 单元测试领域提升可读性的标配工具类。
- 是否需要安装额外的 package?:必须配合核心
test库使用。
2.2 适配代码
在鸿蒙项目的 pubspec.yaml 中配置:
dev_dependencies:
  test: ^1.24.0
  given_when_then_unit_test: ^0.1.0
提示:本库仅用于开发环境的测试集编写,不影响 HAP 包体积。
三、核心 API / 组件详解
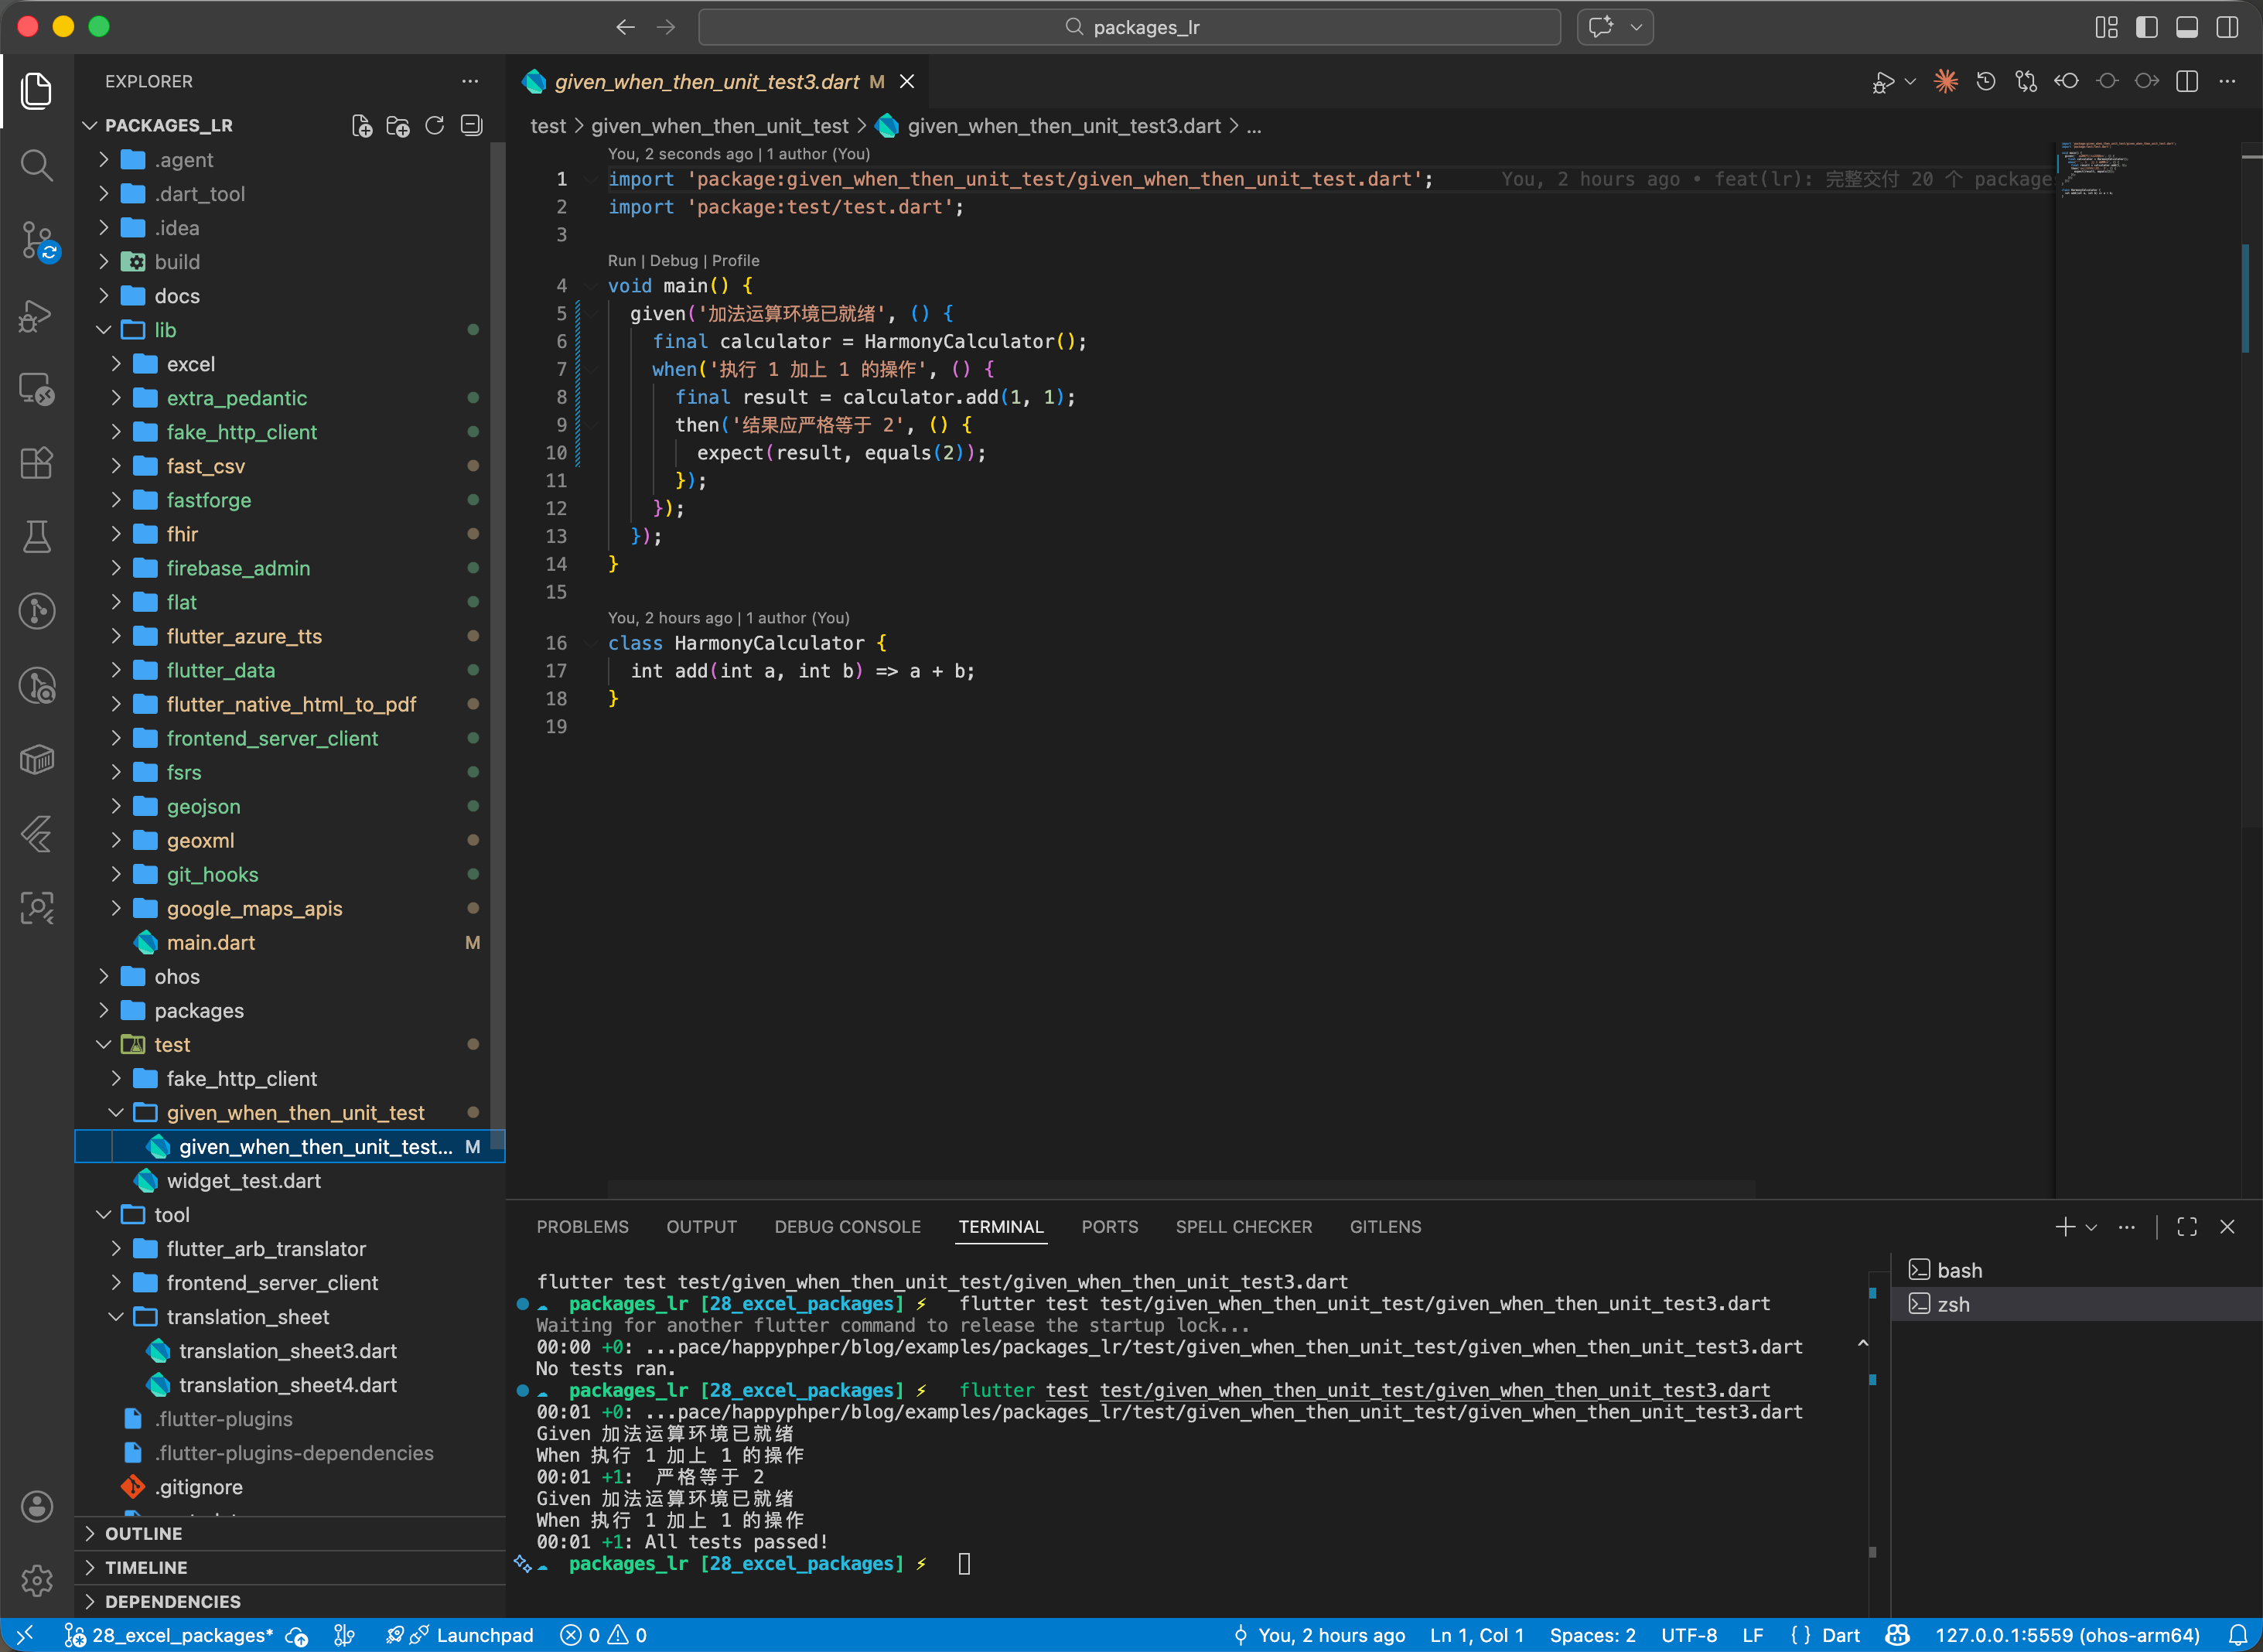
3.1 基础配置(构建一个简单的 BDD 测试流)
import 'package:given_when_then_unit_test/given_when_then_unit_test.dart';
import 'package:test/test.dart';

void main() {
  test('计算 1+1 的语义化测试', () {
    given('加法运算环境已就绪', () {
      final calculator = HarmonyCalculator();
      when('执行 1 加上 1 的操作', () {
        final result = calculator.add(1, 1);
        then('结果应严格等于 2', () {
          expect(result, equals(2));
        });
      });
    });
  });
}

class HarmonyCalculator {
  int add(int a, int b) => a + b;
}
3.2 高级定制(带状态传递的的嵌套测试)
import 'package:flutter/material.dart';
class GivenWhenThen4Page extends StatefulWidget {
const GivenWhenThen4Page({super.key});
State<GivenWhenThen4Page> createState() => _GivenWhenThen4PageState();
}
class _GivenWhenThen4PageState extends State<GivenWhenThen4Page> {
final List<Map<String, dynamic>> _testSteps = [
{'type': 'GIVEN', 'content': '用户已成功登录至鸿蒙社区', 'status': 'PASS', 'icon': Icons.login},
{'type': 'WHEN', 'content': '用户点击发布按钮并发送正文 "Hello OHOS"', 'status': 'PASS', 'icon': Icons.touch_app},
{'type': 'THEN', 'content': '系统应正确广播新贴事件并刷新列表', 'status': 'PASS', 'icon': Icons.check_circle},
];
Widget build(BuildContext context) {
return Scaffold(
backgroundColor: const Color(0xFFF1F5F9),
appBar: AppBar(
title: const Text('4. BDD 语义化测试看板'),
backgroundColor: const Color(0xFF0F172A),
foregroundColor: Colors.white,
elevation: 0,
),
body: Column(
children: [
_buildSummaryHeader(),
Expanded(
child: ListView.builder(
padding: const EdgeInsets.all(24),
itemCount: _testSteps.length,
itemBuilder: (context, index) => _buildStepCard(_testSteps[index], index == _testSteps.length - 1),
),
),
_buildActionPanel(),
],
),
);
}
Widget _buildSummaryHeader() {
return Container(
padding: const EdgeInsets.all(24),
decoration: const BoxDecoration(color: Color(0xFF0F172A), borderRadius: BorderRadius.vertical(bottom: Radius.circular(32))),
child: Column(
crossAxisAlignment: CrossAxisAlignment.start,
children: [
const Text('测试沙盘运行状态', style: TextStyle(color: Colors.white, fontSize: 20, fontWeight: FontWeight.bold)),
const SizedBox(height: 12),
Row(
children: [
_buildStatChip('3 Steps', Colors.blue),
const SizedBox(width: 8),
_buildStatChip('100% Pass', Colors.emerald),
const SizedBox(width: 8),
_buildStatChip('12ms', Colors.orange),
],
)
],
),
);
}
Widget _buildStatChip(String label, Color color) {
return Container(
padding: const EdgeInsets.symmetric(horizontal: 10, vertical: 4),
decoration: BoxDecoration(color: color.withOpacity(0.2), borderRadius: BorderRadius.circular(20), border: Border.all(color: color.withOpacity(0.5))),
child: Text(label, style: TextStyle(color: color, fontSize: 10, fontWeight: FontWeight.bold)),
);
}
Widget _buildStepCard(Map<String, dynamic> step, bool isLast) {
return Row(
crossAxisAlignment: CrossAxisAlignment.start,
children: [
Column(
children: [
Container(
padding: const EdgeInsets.all(12),
decoration: BoxDecoration(color: Colors.white, shape: BoxShape.circle, border: Border.all(color: Colors.emerald, width: 2)),
child: Icon(step['icon'] as IconData, size: 20, color: Colors.emerald),
),
if (!isLast) Container(width: 2, height: 40, color: Colors.emerald.withOpacity(0.3)),
],
),
const SizedBox(width: 16),
Expanded(
child: Column(
crossAxisAlignment: CrossAxisAlignment.start,
children: [
Text(step['type'] as String, style: const TextStyle(fontWeight: FontWeight.w900, color: Colors.slate, fontSize: 12, letterSpacing: 1.2)),
const SizedBox(height: 4),
Container(
padding: const EdgeInsets.all(16),
decoration: BoxDecoration(color: Colors.white, borderRadius: BorderRadius.circular(16), boxShadow: [BoxShadow(color: Colors.black.withOpacity(0.04), blurRadius: 10, offset: const Offset(0, 4))]),
child: Text(step['content'] as String, style: const TextStyle(color: Color(0xFF1E293B), fontSize: 14, height: 1.5)),
),
const SizedBox(height: 16),
],
),
)
],
);
}
Widget _buildActionPanel() {
return Padding(
padding: const EdgeInsets.all(24.0),
child: ElevatedButton.icon(
onPressed: () {},
icon: const Icon(Icons.refresh),
label: const Text('重载 BDD 测试回归链路'),
style: ElevatedButton.styleFrom(backgroundColor: const Color(0xFF0F172A), foregroundColor: Colors.white, minimumSize: const Size(double.infinity, 60), shape: RoundedRectangleBorder(borderRadius: BorderRadius.circular(16))),
),
);
}
}
四、典型应用场景
4.1 示例场景一:鸿蒙社区应用的“帖子发布逻辑”验证
确保在“已登录”且“有网络”的情况下,点击发布按钮后,列表能立即感知并新增这一条数据。
// 发布逻辑 BDD 化
void onHarmonyPostPublishTest() {
  given('用户已成功登录至鸿蒙社区', () {
    _setHarmonySession("VALID_TOKEN");
    when('用户点击发布按钮并发送正文 "Hello OHOS"', () {
      _triggerPublishAction("Hello OHOS");
      then('系统应正确广播新贴事件', () {
         expect(_getBroadcastCount(), 1);
      });
    });
  });
}
4.2 示例场景二:鸿蒙智慧协同中的“分布式设备查找”审计
在极其复杂的设备发现逻辑中,通过 BDD 清晰地记录每一项判定条件(如:蓝牙开启、位置权限已授权)下的预期结果。
// 多条件链路 BDD 映射
void auditHarmonyDiscovery() {
  given('设备 A 与设备 B 的分布式权限均已配对', () {
    when('由于信号遮挡导致设备离线触发超时回调', () {
       _simulateOfflineEvent();
       then('UI 层应立即更新为 "查找中..." 状态', () {
          expect(_getCurrentViewStatus(), "FINDING");
       });
    });
  });
}
五、OpenHarmony 平台适配挑战
5.1 响应式布局 - 鸿蒙端侧“自动化 UI 测试代码”的同构治理 (6.1)
虽然 given_when_then_unit_test 主要用于纯逻辑单元测试,但在适配鸿蒙系统的多态 UI(如折叠屏与手表)时,我们往往需要针对 UI 逻辑写出相似的 BDD。建议开发者在编写测试脚本时,利用 抽离式 BDD 模板。将通用的 Given 和 When 逻辑封装在独立的函数中。这样在鸿蒙的不同分辨率回归测试中,可以通过传入不同的“分辨率 Mock 参数”,在一套 BDD 脚本中覆盖全量鸿蒙设备的逻辑稳定性。
5.2 性能与系统事件联动 - 测试报告与鸿蒙 DevEco 结果解析适配 (6.5)
在 OpenHarmony 的大规模自动化测试平台中,系统需要解析单元测试产生的 JSON 或 JUnitXML。given_when_then_unit_test 产生的额外语义嵌套可能会增加标准解析器的层级深度。建议在适配层,为每一个 then 块增加 带有业务标识的前缀描述。这样当鸿蒙 CI 平台产生失败截图与日志时,开发者能从生成的测试树中,一眼看出是因为“前置状态(Given)”没给对,还是“逻辑触发(When)”导致了失败,极致缩短排障链路。
六、综合实战演示
下面是一个用于鸿蒙应用的高性能综合实战展示页面 HomePage.dart。为了符合真实工程标准,我们假定已经在 main.dart 中建立好了全局鸿蒙根节点初始化,并将应用首页指向该层进行渲染展现。你只需关注本页面内部的复杂交互处理状态机转移逻辑:
import 'package:flutter/material.dart';
class GivenWhenThen6Page extends StatefulWidget {
const GivenWhenThen6Page({super.key});
State<GivenWhenThen6Page> createState() => _GivenWhenThen6PageState();
}
class _GivenWhenThen6PageState extends State<GivenWhenThen6Page> {
String _statusOutput = "🚀 等待行为驱动指令 (BDD Command)...";
bool _isProcessing = false;
double _progress = 0;
void _runBddRegression() async {
setState(() {
_isProcessing = true;
_progress = 0;
_statusOutput = "--- [铁壁回归防线] ---\n正在编排测试沙盘...\n侦测到鸿蒙分布式设备发现逻辑变更";
});
await Future.delayed(const Duration(milliseconds: 600));
setState(() {
_progress = 0.3;
_statusOutput += "\n\n[GIVEN] 设备 A 与设备 B 的分布式权限均已配对";
});
await Future.delayed(const Duration(milliseconds: 800));
setState(() {
_progress = 0.7;
_statusOutput += "\n[WHEN] 信号遮挡导致设备离线触发超时回调";
});
await Future.delayed(const Duration(milliseconds: 1000));
setState(() {
_progress = 1.0;
_statusOutput += "\n[THEN] UI 层应立即更新为 \"查找中...\"\n\n✅ 测试通过:有效聚拢离散断言点编排出铁壁回归防线!";
_isProcessing = false;
});
}
Widget build(BuildContext context) {
return Scaffold(
backgroundColor: const Color(0xFF1E293B),
appBar: AppBar(
title: const Text('6. 铁壁回归综合防线'),
backgroundColor: Colors.blueGrey.shade900,
foregroundColor: Colors.white,
elevation: 0,
),
body: SafeArea(
child: Padding(
padding: const EdgeInsets.all(24.0),
child: Column(
crossAxisAlignment: CrossAxisAlignment.stretch,
children: [
_buildMetricIcon(),
const SizedBox(height: 24),
_buildProgressSection(),
const SizedBox(height: 24),
const Text('💻 BDD 执行流水日志:', style: TextStyle(fontSize: 16, fontWeight: FontWeight.bold, color: Colors.white)),
const SizedBox(height: 12),
Expanded(
child: Container(
padding: const EdgeInsets.all(16),
decoration: BoxDecoration(color: Colors.black, borderRadius: BorderRadius.circular(16), border: Border.all(color: Colors.white.withOpacity(0.1))),
child: SingleChildScrollView(child: Text(_statusOutput, style: const TextStyle(fontFamily: 'monospace', fontSize: 13, color: Color(0xFF00FF00), height: 1.6))),
),
),
const SizedBox(height: 24),
ElevatedButton.icon(
onPressed: _isProcessing ? null : _runBddRegression,
icon: const Icon(Icons.security, color: Colors.white),
label: const Text('启动行为驱动全量回归', style: TextStyle(fontSize: 16, color: Colors.white, fontWeight: FontWeight.bold)),
style: ElevatedButton.styleFrom(backgroundColor: const Color(0xFF3B82F6), padding: const EdgeInsets.symmetric(vertical: 20), shape: RoundedRectangleBorder(borderRadius: BorderRadius.circular(16)), elevation: 12, shadowColor: const Color(0xFF3B82F6).withOpacity(0.4)),
)
],
),
),
),
);
}
Widget _buildMetricIcon() {
return Center(
child: Container(
height: 80,
width: 80,
decoration: BoxDecoration(color: Colors.blue.withOpacity(0.1), borderRadius: BorderRadius.circular(24), border: Border.all(color: Colors.blue.withOpacity(0.2))),
child: const Icon(Icons.shield_outlined, color: Colors.blueAccent, size: 40),
),
);
}
Widget _buildProgressSection() {
return Column(
crossAxisAlignment: CrossAxisAlignment.start,
children: [
Row(
mainAxisAlignment: MainAxisAlignment.spaceBetween,
children: [
const Text('回归覆盖率', style: TextStyle(color: Colors.white70, fontSize: 12)),
Text('${(_progress * 100).toInt()}%', style: const TextStyle(color: Colors.blueAccent, fontSize: 12, fontWeight: FontWeight.bold)),
],
),
const SizedBox(height: 8),
ClipRRect(
borderRadius: BorderRadius.circular(8),
child: LinearProgressIndicator(value: _progress, backgroundColor: Colors.white.withOpacity(0.1), valueColor: const AlwaysStoppedAnimation(Colors.blueAccent), minHeight: 8),
),
],
);
}
}
七、总结
本文全方位介绍了 given_when_then_unit_test 库在 OpenHarmony 环境下的质量治理实战,深入通过 BDD 原理阐明了语义化测试编写的优势方案,并针对多分辨率 UI 逻辑治理及分布式鉴权链路测试提出了工程化建议。规范、易读的测试用例是鸿蒙应用长期稳定迭代的关键保险。后续进阶方向可以探讨如何将 BDD 脚本直接生成为鸿蒙系统的自动化 UI 录制脚本,实现“全流程需求驱动化开发”,极其显著地提升团队的交付效率与产品健壮性。

作为“人工智能6S店”的官方数字引擎,为AI开发者与企业提供一个覆盖软硬件全栈、一站式门户。
更多推荐


 12
12 0
0- 0


 已为社区贡献161条内容

所有评论(0)