
Flutter for OpenHarmony 进阶:Socket通信与消息传输深度解析
Flutter for OpenHarmony Socket通信与消息传输解析 摘要:本文深入探讨Flutter在OpenHarmony平台上的Socket通信技术,实现局域网聊天系统。文章涵盖服务器端设计与客户端实现,包括: Socket通信基础:讲解P2P架构、广播/点对点通信模式及消息类型 服务器端实现:详细解析服务器启动、客户端连接处理、消息广播等核心功能 客户端设计:展示连接服务器、消息
·
欢迎加入开源鸿蒙跨平台社区:开源鸿蒙跨平台开发者社区
Flutter for OpenHarmony 进阶:Socket通信与消息传输深度解析
文章目录
摘要
Socket通信是即时通讯应用的核心技术,局域网聊天系统展示了如何使用Socket实现用户之间的实时消息传输。本文深入讲解Dart Socket通信原理、客户端服务器架构、消息广播机制、用户在线状态同步等高级技术点。通过本文学习,读者将掌握Flutter在鸿蒙平台上的网络编程技巧,了解分布式聊天系统的实现方法。
一、Socket通信基础
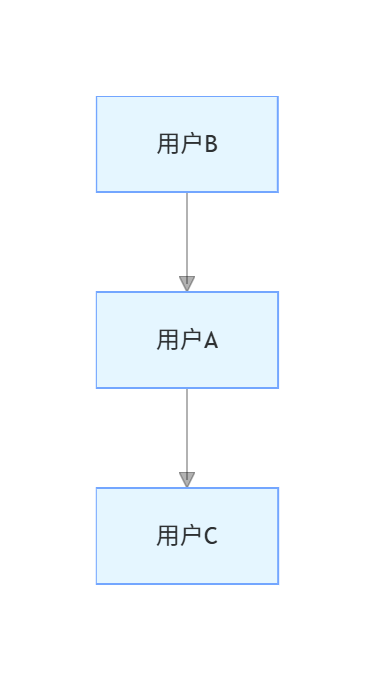
1.1 聊天系统架构
局域网聊天系统采用P2P架构:
1.2 通信模式
广播模式
- 一个用户发送消息
- 所有在线用户都能收到
- 适合群聊场景
点对点模式
- 指定接收用户
- 私聊消息
- 需要用户ID映射
1.3 消息类型
| 类型 | 说明 | 示例 |
|---|---|---|
| 登录 | 用户上线 | {“action”:“login”,“id”:“user1”} |
| 登出 | 用户下线 | {“action”:“logout”,“id”:“user1”} |
| 消息 | 聊天内容 | {“action”:“message”,“from”:“user1”,“content”:“你好”} |
| 心跳 | 保持连接 | {“action”:“heartbeat”} |
二、服务器端设计
2.1 服务器类定义
class ChatServer {
  ServerSocket? _server;
  final Map<String, Socket> _clients = {};  // clientId -> Socket
  final Map<String, String> _clientNames = {};  // clientId -> name
  final int port;

  // 回调函数
  Function(String clientId, String message)? onMessageReceived;
  Function(String clientId, String name)? onUserJoined;
  Function(String clientId)? onUserLeft;

  ChatServer(this.port);

  bool get isRunning => _server != null;
  List<String> get onlineUsers => _clients.keys.toList();
}
2.2 启动服务器
Future<void> start() async {
  try {
    _server = await ServerSocket.bind(
      InternetAddress.anyIPv4,
      port,
    );
    print('聊天服务器启动成功,监听端口: $port');

    // 监听客户端连接
    _server!.listen((Socket client) {
      _handleClientConnection(client);
    });

    return true;
  } catch (e) {
    print('服务器启动失败: $e');
    return false;
  }
}
2.3 处理客户端连接
void _handleClientConnection(Socket client) {
  final clientId = client.remoteAddress.address + ':' + client.remotePort.toString();
  _clients[clientId] = client;

  print('客户端连接: $clientId');

  // 监听客户端消息
  client.listen(
    (List<int> data) {
      final message = utf8.decode(data);
      _handleClientMessage(clientId, message);
    },
    onDone: () {
      print('客户端断开: $clientId');
      _clients.remove(clientId);
      _clientNames.remove(clientId);
      onUserLeft?.call(clientId);
    },
    onError: (error) {
      print('客户端错误: $clientId, $error');
    },
  );
}
2.4 处理客户端消息
void _handleClientMessage(String clientId, String message) {
  try {
    final data = jsonDecode(message);
    final action = data['action'];

    switch (action) {
      case 'login':
        // 用户登录
        final name = data['name'];
        _clientNames[clientId] = name;
        onUserJoined?.call(clientId, name);

        // 广播用户上线
        _broadcastMessage({
          'action': 'user_joined',
          'clientId': clientId,
          'name': name,
        });
        break;

      case 'message':
        // 聊天消息
        final content = data['content'];
        onMessageReceived?.call(clientId, content);

        // 广播消息
        _broadcastMessage({
          'action': 'message',
          'from': clientId,
          'fromName': _clientNames[clientId],
          'content': content,
          'timestamp': DateTime.now().toIso8601String(),
        }, exclude: clientId);
        break;

      case 'logout':
        // 用户登出
        _clientNames.remove(clientId);
        onUserLeft?.call(clientId);

        // 广播用户下线
        _broadcastMessage({
          'action': 'user_left',
          'clientId': clientId,
        });
        break;

      case 'heartbeat':
        // 心跳响应
        _sendMessage(clientId, {'action': 'heartbeat_ack'});
        break;
    }
  } catch (e) {
    print('消息处理错误: $e');
  }
}
2.5 广播消息
void _broadcastMessage(Map<String, dynamic> data, {String? exclude}) {
  final message = jsonEncode(data);
  final messageBytes = utf8.encode(message);

  _clients.forEach((clientId, client) {
    if (exclude != null && clientId == exclude) return;

    try {
      client.add(messageBytes);
    } catch (e) {
      print('发送失败: $clientId, $e');
    }
  });
}

void _sendMessage(String clientId, Map<String, dynamic> data) {
  final client = _clients[clientId];
  if (client == null) return;

  final message = jsonEncode(data);
  client.add(utf8.encode(message));
}
三、客户端设计
3.1 客户端类定义
class ChatClient {
  Socket? _socket;
  Timer? _heartbeatTimer;
  final String host;
  final int port;
  final String clientId;
  final String userName;

  bool isConnected = false;

  // 回调函数
  Function(String userName)? onUserJoined;
  Function(String clientId)? onUserLeft;
  Function(String fromName, String content)? onMessageReceived;

  ChatClient({
    required this.host,
    required this.port,
    required this.clientId,
    required this.userName,
  });
}
3.2 连接服务器
Future<bool> connect() async {
  try {
    _socket = await Socket.connect(host, port);
    isConnected = true;

    // 发送登录消息
    _sendMessage({
      'action': 'login',
      'clientId': clientId,
      'name': userName,
    });

    // 监听服务器消息
    _socket!.listen(_handleServerMessage,
      onDone: () {
        isConnected = false;
        _stopHeartbeat();
      },
      onError: (error) {
        isConnected = false;
        _stopHeartbeat();
      },
    );

    // 启动心跳
    _startHeartbeat();

    return true;
  } catch (e) {
    print('连接失败: $e');
    return false;
  }
}
3.3 发送消息
void sendMessage(String content) {
  if (!isConnected) return;

  _sendMessage({
    'action': 'message',
    'from': clientId,
    'content': content,
  });
}

void _sendMessage(Map<String, dynamic> data) {
  if (_socket == null) return;

  final message = jsonEncode(data);
  _socket!.add(utf8.encode(message));
}
3.4 接收消息
void _handleServerMessage(List<int> data) {
  final message = utf8.decode(data);
  final responseData = jsonDecode(message);
  final action = responseData['action'];

  switch (action) {
    case 'message':
      // 收到聊天消息
      final fromName = responseData['fromName'];
      final content = responseData['content'];
      onMessageReceived?.call(fromName, content);
      break;

    case 'user_joined':
      // 用户加入
      final name = responseData['name'];
      onUserJoined?.call(name);
      break;

    case 'user_left':
      // 用户离开
      final clientId = responseData['clientId'];
      onUserLeft?.call(clientId);
      break;

    case 'heartbeat_ack':
      // 心跳响应
      break;
  }
}
3.5 心跳机制
void _startHeartbeat() {
  _heartbeatTimer = Timer.periodic(const Duration(seconds: 30), (timer) {
    if (isConnected) {
      _sendMessage({'action': 'heartbeat'});
    }
  });
}

void _stopHeartbeat() {
  _heartbeatTimer?.cancel();
  _heartbeatTimer = null;
}
3.6 断开连接
Future<void> disconnect() async {
  if (_socket != null) {
    // 发送登出消息
    _sendMessage({'action': 'logout'});

    // 停止心跳
    _stopHeartbeat();

    // 关闭连接
    await _socket!.close();
    _socket = null;
    isConnected = false;
  }
}
四、Flutter与Socket集成
4.1 网络服务
class ChatService extends ChangeNotifier {
  ChatServer? _server;
  ChatClient? _client;

  final List<ChatMessage> _messages = [];
  final List<OnlineUser> _users = [];

  List<ChatMessage> get messages => _messages;
  List<OnlineUser> get users => _users;

  // 启动服务器
  Future<void> startServer(int port) async {
    _server = ChatServer(port);

    _server!.onUserJoined = (clientId, name) {
      _users.add(OnlineUser(
        id: clientId,
        name: name,
        ip: clientId,
      ));
      notifyListeners();
    };

    _server!.onUserLeft = (clientId) {
      _users.removeWhere((u) => u.id == clientId);
      notifyListeners();
    };

    _server!.onMessageReceived = (clientId, message) {
      // 服务器不需要处理消息内容
    };

    await _server!.start();
    notifyListeners();
  }

  // 连接服务器
  Future<void> connectServer(String host, int port, String name) async {
    _client = ChatClient(
      host: host,
      port: port,
      clientId: 'user_${DateTime.now().millisecondsSinceEpoch}',
      userName: name,
    );

    _client!.onUserJoined = (userName) {
      _users.add(OnlineUser(
        id: userName,
        name: userName,
        ip: '',
      ));
      notifyListeners();
    };

    _client!.onUserLeft = (clientId) {
      _users.removeWhere((u) => u.id == clientId);
      notifyListeners();
    };

    _client!.onMessageReceived = (fromName, content) {
      _messages.add(ChatMessage(
        id: DateTime.now().millisecondsSinceEpoch.toString(),
        senderId: fromName,
        senderName: fromName,
        content: content,
        timestamp: DateTime.now(),
        isSelf: false,
      ));
      notifyListeners();
    };

    await _client!.connect();
    notifyListeners();
  }

  // 发送消息
  void sendMessage(String content) {
    _client?.sendMessage(content);

    _messages.add(ChatMessage(
      id: DateTime.now().millisecondsSinceEpoch.toString(),
      senderId: _client!.clientId,
      senderName: _client!.userName,
      content: content,
      timestamp: DateTime.now(),
      isSelf: true,
    ));
    notifyListeners();
  }

  // 断开连接
  Future<void> disconnect() async {
    await _client?.disconnect();
    _client = null;
    _messages.clear();
    _users.clear();
    notifyListeners();
  }

  // 停止服务器
  Future<void> stopServer() async {
    await _server?.stop();
    _server = null;
    _messages.clear();
    _users.clear();
    notifyListeners();
  }
}
4.2 在Flutter中使用
class ChatPage extends StatefulWidget {
State<ChatPage> createState() => _ChatPageState();
}
class _ChatPageState extends State<ChatPage> {
final ChatService _chatService = ChatService();
void initState() {
super.initState();
// 连接到服务器
_chatService.connectServer('192.168.1.100', 8080, '用户A');
}
void dispose() {
_chatService.disconnect();
super.dispose();
}
Widget build(BuildContext context) {
return ChangeNotifierProvider.value(
value: _chatService,
child: Scaffold(
appBar: AppBar(title: const Text('聊天')),
body: Column(
children: [
Expanded(
child: Consumer<ChatService>(
builder: (context, service, child) {
return ListView.builder(
itemCount: service.messages.length,
itemBuilder: (context, index) {
return _buildMessageBubble(service.messages[index]);
},
);
},
),
),
// 输入框和发送按钮
],
),
),
);
}
}
五、消息协议设计
5.1 协议格式
// 基础消息结构
{
  "action": "message",      // 消息类型
  "from": "user_123",       // 发送者ID
  "fromName": "张三",       // 发送者名称
  "content": "你好",        // 消息内容
  "timestamp": "2024-02-02T10:30:00.000Z"  // 时间戳
}

// 用户加入
{
  "action": "user_joined",
  "clientId": "user_123",
  "name": "张三"
}

// 用户离开
{
  "action": "user_left",
  "clientId": "user_123"
}

// 心跳
{
  "action": "heartbeat"
}
5.2 消息编码
class MessageProtocol {
  static String encodeMessage(Map<String, dynamic> data) {
    return jsonEncode(data);
  }

  static List<int> encodeMessageBytes(Map<String, dynamic> data) {
    final jsonString = jsonEncode(data);
    return utf8.encode(jsonString);
  }

  static Map<String, dynamic>? decodeMessage(String message) {
    try {
      return jsonDecode(message);
    } catch (e) {
      return null;
    }
  }

  static Map<String, dynamic>? decodeMessageBytes(List<int> data) {
    try {
      final jsonString = utf8.decode(data);
      return jsonDecode(jsonString);
    } catch (e) {
      return null;
    }
  }
}
六、错误处理与重连
6.1 错误处理
void _handleServerMessage(List<int> data) {
  try {
    final message = utf8.decode(data);
    final responseData = jsonDecode(message);
    // 处理消息
  } on FormatException catch (e) {
    print('消息格式错误: $e');
  } catch (e) {
    print('处理消息错误: $e');
  }
}
6.2 自动重连
int _reconnectAttempts = 0;
static const int _maxReconnectAttempts = 5;

void _scheduleReconnect() {
  if (_reconnectAttempts >= _maxReconnectAttempts) {
    print('重连次数超限');
    return;
  }

  _reconnectAttempts++;
  final delay = Duration(seconds: _reconnectAttempts * 2);

  Future.delayed(delay, () {
    if (!isConnected) {
      print('尝试重连 ($_reconnectAttempts/$_maxReconnectAttempts)');
      connect().then((success) {
        if (success) {
          _reconnectAttempts = 0;
        }
      });
    }
  });
}
七、性能优化
7.1 消息队列
class MessageQueue {
  final List<String> _queue = [];
  final int maxSize;

  MessageQueue({this.maxSize = 1000});

  void add(String message) {
    if (_queue.length >= maxSize) {
      _queue.removeAt(0);  // 移除最老的消息
    }
    _queue.add(message);
  }

  List<String> getAll() {
    return List.from(_queue);
  }

  void clear() {
    _queue.clear();
  }
}
7.2 消息去重
class MessageDeduplicator {
  final Set<String> _messageIds = {};
  final int maxIds;

  MessageDeduplicator({this.maxIds = 1000});

  bool isDuplicate(String messageId) {
    if (_messageIds.contains(messageId)) {
      return true;
    }

    _messageIds.add(messageId);

    if (_messageIds.length > maxIds) {
      _messageIds.remove(_messageIds.first);
    }

    return false;
  }
}
八、安全考虑
8.1 消息加密
import 'package:crypto/crypto.dart';

String encryptMessage(String message, String key) {
  final bytes = utf8.encode(message + key);
  final hash = sha256.convert(bytes);
  return hash.toString();
}
8.2 用户验证
bool validateUser(String userName) {
  // 检查用户名格式
  if (userName.isEmpty || userName.length > 20) {
    return false;
  }

  // 检查特殊字符
  final validChars = RegExp(r'^[\u4e00-\u9fa5a-zA-Z0-9_]+$');
  return validChars.hasMatch(userName);
}
九、总结
本文深入讲解了局域网聊天系统中的Socket通信技术,主要内容包括:
- Socket基础:P2P架构、通信模式、消息类型
- 服务器实现:连接管理、消息处理、广播机制
- 客户端实现:连接服务器、发送接收消息、心跳检测
- Flutter集成:状态管理、UI更新、服务封装
- 消息协议:JSON格式、编码解码
- 错误处理:异常捕获、自动重连
- 性能优化:消息队列、去重机制
- 安全考虑:消息加密、用户验证
掌握这些技术可以让你开发出功能强大、稳定可靠的即时通讯应用。在实际项目中,还需要考虑数据安全、并发控制、性能优化等方面。
欢迎加入开源鸿蒙跨平台社区: 开源鸿蒙跨平台开发者社区

作为“人工智能6S店”的官方数字引擎,为AI开发者与企业提供一个覆盖软硬件全栈、一站式门户。
更多推荐


 2
2 0
0- 0


 已为社区贡献4条内容

所有评论(0)