
高级进阶 ReactNative for Harmony 项目鸿蒙化三方库集成实战:react-native-blurhash
是一个强大的图片模糊占位符库,它使用 Blurhash 算法将图片压缩成一个短的字符串(约 20-30 个字符),在图片加载前显示模糊的占位符,提供优雅的渐进式加载体验。该库完全兼容 Android、iOS、Web 和 HarmonyOS 多平台,是图片加载优化的最佳选择之一。库名称版本信息2.0.4: 支持 RN 0.72 版本2.1.0: 支持 RN 0.77 版本2.2.0: 支持 RN 0
欢迎加入开源鸿蒙跨平台社区:https://openharmonycrossplatform.csdn.net
📋 前言
react-native-blurhash 是一个强大的图片模糊占位符库,它使用 Blurhash 算法将图片压缩成一个短的字符串(约 20-30 个字符),在图片加载前显示模糊的占位符,提供优雅的渐进式加载体验。该库完全兼容 Android、iOS、Web 和 HarmonyOS 多平台,是图片加载优化的最佳选择之一。
🎯 库简介
基本信息
- 库名称: react-native-blurhash
- 版本信息:
2.0.4: 支持 RN 0.72 版本2.1.0: 支持 RN 0.77 版本2.2.0: 支持 RN 0.82 版本
- 鸿蒙适配包: @react-native-ohos/react-native-blurhash
- 官方仓库: https://github.com/mrousavy/react-native-blurhash
- 主要功能:
- Blurhash 编码与解码
- 模糊占位符显示
- 渐进式图片加载
- 异步解码支持
- 多种解码模式
- 圆角图片支持
- 自定义对比度调整
- 兼容性验证:
- RNOH: 0.72.96; SDK: HarmonyOS 6.0.0 Release SDK; IDE: DevEco Studio 6.0.0.858; ROM: 6.0.0.112;
- RNOH: 0.72.33; SDK: HarmonyOS NEXT B1; IDE: DevEco Studio 5.0.3.900; ROM: Next.0.0.71;
- RNOH: 0.77.18; SDK: HarmonyOS 6.0.0 Release SDK; IDE: DevEco Studio 6.0.0.858; ROM: 6.0.0.112;
- RNOH: 0.82.1; SDK: HarmonyOS 6.0.1 Release SDK; IDE: DevEco Studio 6.0.1 Release; ROM: 6.0.0.120 SP7
为什么需要这个库?
- 用户体验: 提供优雅的渐进式加载体验,避免白屏
- 性能优化: Blurhash 字符串极小,占用存储和网络资源少
- 跨平台: 在多平台提供一致的占位符体验
- 易于使用: API 简单直观,集成快速
- 高度可定制: 支持调整对比度、分辨率等参数
- 专业级: 图片密集型应用必备优化方案
📦 安装步骤
1. 使用 npm 安装
根据您的 RN 版本选择对应的版本:
# RN 0.72
npm install @react-native-ohos/react-native-blurhash@2.0.4-rc.1

# RN 0.77
npm install @react-native-ohos/react-native-blurhash

# RN 0.82
npm install @react-native-ohos/react-native-blurhash
2. 验证安装
安装完成后,检查 package.json 文件,应该能看到新增的依赖:
{
  "dependencies": {
    "@react-native-ohos/react-native-blurhash": "^2.0.4-rc.1",
    // ... 其他依赖
  }
}
🔧 HarmonyOS 平台配置 ⭐
手动配置步骤
1. 配置 overrides 字段
在工程根目录的 oh-package.json5 添加 overrides 字段:
{
  "overrides": {
    "@rnoh/react-native-openharmony": "./react_native_openharmony"
  }
}
2. 引入原生端代码
方法一:通过 har 包引入(不推荐)
打开 entry/oh-package.json5,添加以下依赖:
"dependencies": {
  "@rnoh/react-native-openharmony": "file:../react_native_openharmony",
  "@react-native-ohos/react-native-blurhash": "file:../../node_modules/@react-native-ohos/react-native-blurhash/harmony/blurhash.har"
}
点击右上角的 sync 按钮或在终端执行:
cd entry
ohpm install
方法二:直接链接源码
步骤 1: 把 <RN工程>/node_modules/@react-native-ohos/react-native-blurhash/harmony 目录下的源码 blurhash 复制到 harmony(鸿蒙壳工程)工程根目录下。
步骤 2: 在 harmony 工程根目录的 build-profile.template.json5(若存在)和 build-profile.json5 添加以下模块:
modules: [
  ...
  {
    name: 'blurhash',
    srcPath: './blurhash',
  }
]
步骤 3: 打开 blurhash/oh-package.json5,修改 react-native-openharmony 和项目的版本一致。
步骤 4: 打开 entry/oh-package.json5,添加以下依赖:
"dependencies": {
  "@rnoh/react-native-openharmony": "0.72.90",
  "@react-native-ohos/react-native-blurhash": "file:../blurhash"
}
步骤 5: 点击 DevEco Studio 右上角的 sync 按钮
3. 配置 CMakeLists 和引入 BlurhashPackage
打开 entry/src/main/cpp/CMakeLists.txt,添加:
project(rnapp)
cmake_minimum_required(VERSION 3.4.1)
set(CMAKE_SKIP_BUILD_RPATH TRUE)
set(OH_MODULE_DIR "${CMAKE_CURRENT_SOURCE_DIR}/../../../oh_modules")
set(NODE_MODULES "${CMAKE_CURRENT_SOURCE_DIR}/../../../../../node_modules")

set(RNOH_APP_DIR "${CMAKE_CURRENT_SOURCE_DIR}")

set(RNOH_CPP_DIR "${OH_MODULE_DIR}/@rnoh/react-native-openharmony/src/main/cpp")
set(CMAKE_ASM_FLAGS "-Wno-error:unused-command-line-argument -Qunused-arguments")
set(CMAKE_CXX_FLAGS "-fstack-protector-strong -Wl,-z,relro,-z,noexecstack -s -fPIE -pie")

add_compile_definitions(WITH_HITRACE_SYSTRACE)
set(WITH_HITRACE_SYSTRACE 1) # for other CMakeLists.txt files to use

add_subdirectory("${RNOH_CPP_DIR}" ./rn)

add_library(rnoh_app SHARED
    "${RNOH_CPP_DIR}/RNOHAppNapiBridge.cpp" "./PackageProvider.cpp")

target_link_libraries(rnoh_app PUBLIC rnoh)


set(OH_MODULES "${CMAKE_CURRENT_SOURCE_DIR}/../../../oh_modules")

+ add_subdirectory("${OH_MODULES}/@react-native-ohos/react-native-blurhash/src/main/cpp" ./blurhash)
+ target_link_libraries(rnoh_app PUBLIC rnoh_blurhash)
打开 entry/src/main/cpp/PackageProvider.cpp,添加:
#include "RNOH/PackageProvider.h"
#include "generated/RNOHGeneratedPackage.h"
#include "SamplePackage.h"
+ #include "BlurhashPackage.h"

using namespace rnoh;

std::vector<std::shared_ptr<Package>> PackageProvider::getPackages(Package::Context ctx) {
    return {
      std::make_shared<RNOHGeneratedPackage>(ctx),
      std::make_shared<SamplePackage>(ctx),
+     std::make_shared<BlurhashPackage>(ctx)
    };
}
4. 在 ArkTs 侧引入 BlurhashPackage
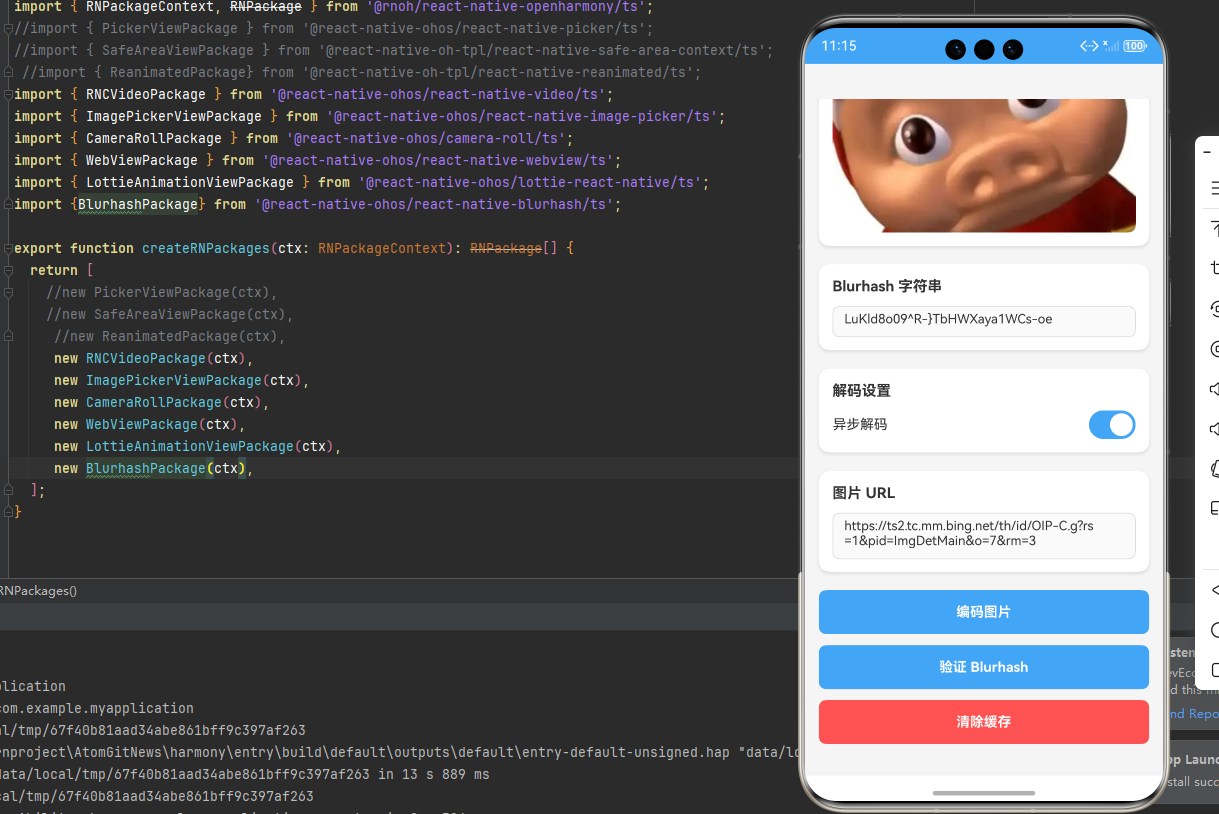
打开 entry/src/main/ets/RNPackagesFactory.ts,添加:
+ import {BlurhashPackage} from '@react-native-ohos/react-native-blurhash/ts';

export function createRNPackages(ctx: RNPackageContext): RNPackage[] {
  return [
    new SamplePackage(ctx),
+   new BlurhashPackage(ctx)
  ];
}
💻 完整代码示例
下面是一个完整的示例,展示了 react-native-blurhash 的各种使用场景:
import React, { useCallback, useMemo, useState } from 'react';
import {
  ActivityIndicator,
  Alert,
  SafeAreaView,
  StatusBar,
  StyleSheet,
  Switch,
  Text,
  TextInput,
  TouchableOpacity,
  View,
  Image,
  ScrollView,
} from 'react-native';
import { Blurhash } from '@react-native-ohos/react-native-blurhash';

const THEME = {
  primary: '#42a5f5',
  background: '#f5f5f5',
  white: '#ffffff',
  text: '#333333',
  textSecondary: '#666666',
  border: '#dddddd',
  shadow: '#000000',
};

function BlurhashDemo(): JSX.Element {
  // 状态管理
  const [blurhash, setBlurhash] = useState('LHK1gsM,rzD+4-xn,vWT~q=_ixS]');
  const [decodeAsync, setDecodeAsync] = useState(true);
  const [encodingImageUri, setEncodingImageUri] = useState(
    'http://gips2.baidu.com/it/u=3150002139,2124277596&fm=3028&app=3028&f=JPEG&fmt=auto?w=2048&h=2048'
  );
  const [isEncoding, setIsEncoding] = useState(false);
  const [imageLoaded, setImageLoaded] = useState(false);

  // 计算属性
  const buttonOpacity = useMemo(
    () => (encodingImageUri.length < 5 || isEncoding ? 0.5 : 1),
    [encodingImageUri.length, isEncoding],
  );

  const encodeButtonStyle = useMemo(
    () => [styles.button, { opacity: buttonOpacity }],
    [buttonOpacity],
  );

  // 事件处理
  const onLoadStart = useCallback(() => {
    console.log('Blurhash 开始加载');
  }, []);

  const onLoadEnd = useCallback(() => {
    console.log('Blurhash 加载完成');
  }, []);

  const onLoadError = useCallback((message?: string) => {
    console.log('Blurhash 加载错误:', message);
  }, []);

  const startEncoding = useCallback(async () => {
    try {
      if (encodingImageUri.length < 5) return;
      setIsEncoding(true);
      const _blurhash = await Blurhash.encode(encodingImageUri, 4, 3);
      setBlurhash(_blurhash);
      setIsEncoding(false);
      Alert.alert('编码成功', 'Blurhash 编码完成');
    } catch (e: any) {
      setIsEncoding(false);
      console.warn('编码失败:', e);
      Alert.alert('编码错误', e.message);
    }
  }, [encodingImageUri]);

  const validateBlurhash = useCallback(() => {
    const data = Blurhash.isBlurhashValid(blurhash);
    Alert.alert(
      '验证结果',
      data.isValid ? 'Blurhash 有效' : 'Blurhash 无效'
    );
    console.log(data);
  }, [blurhash]);

  const clearCache = useCallback(() => {
    Blurhash.clearCosineCache();
    Alert.alert('缓存已清除', 'Blurhash 缓存已成功清除');
  }, []);

  return (
    <>
      <StatusBar backgroundColor={THEME.primary} />
      <SafeAreaView style={styles.container}>
        <ScrollView style={styles.scrollView}>
          <View style={styles.content}>
            <Text style={styles.title}>Blurhash 模糊占位符</Text>

            {/* 图片展示区域 */}
            <View style={styles.imageSection}>
              <Text style={styles.sectionTitle}>图片展示</Text>
              <View style={styles.imageContainer}>
                <View style={styles.imageWrapper}>
                  {!imageLoaded && (
                    <Blurhash
                      blurhash={blurhash}
                      decodeWidth={32}
                      decodeHeight={32}
                      decodePunch={1}
                      decodeAsync={decodeAsync}
                      onLoadStart={onLoadStart}
                      onLoadEnd={onLoadEnd}
                      onLoadError={onLoadError}
                      style={styles.blurhash}
                      resizeMode="cover"
                    />
                  )}
                  <Image
                    source={{ uri: encodingImageUri }}
                    style={styles.image}
                    onLoad={() => setImageLoaded(true)}
                  />
                </View>
              </View>
            </View>

            {/* Blurhash 输入 */}
            <View style={styles.section}>
              <Text style={styles.sectionTitle}>Blurhash 字符串</Text>
              <TextInput
                value={blurhash}
                placeholder="请输入 Blurhash 字符串"
                onChangeText={setBlurhash}
                style={styles.input}
                multiline
                numberOfLines={2}
              />
            </View>

            {/* 解码设置 */}
            <View style={styles.section}>
              <Text style={styles.sectionTitle}>解码设置</Text>
              <View style={styles.settingRow}>
                <Text style={styles.settingLabel}>异步解码</Text>
                <Switch
                  thumbColor={THEME.white}
                  trackColor={{ false: '#cccccc', true: THEME.primary }}
                  value={decodeAsync}
                  onValueChange={setDecodeAsync}
                />
              </View>
            </View>

            {/* 图片 URL 输入 */}
            <View style={styles.section}>
              <Text style={styles.sectionTitle}>图片 URL</Text>
              <TextInput
                value={encodingImageUri}
                placeholder="请输入要编码的图片 URL"
                onChangeText={setEncodingImageUri}
                style={styles.input}
                multiline
                numberOfLines={3}
              />
            </View>

            {/* 操作按钮 */}
            <View style={styles.buttonGroup}>
              <TouchableOpacity
                style={encodeButtonStyle}
                disabled={encodingImageUri.length < 5}
                onPress={startEncoding}
              >
                {isEncoding ? (
                  <ActivityIndicator color={THEME.white} />
                ) : (
                  <Text style={styles.buttonText}>编码图片</Text>
                )}
              </TouchableOpacity>

              <TouchableOpacity
                style={styles.button}
                onPress={validateBlurhash}
              >
                <Text style={styles.buttonText}>验证 Blurhash</Text>
              </TouchableOpacity>

              <TouchableOpacity
                style={[styles.button, styles.secondaryButton]}
                onPress={clearCache}
              >
                <Text style={styles.buttonText}>清除缓存</Text>
              </TouchableOpacity>
            </View>

            {/* 功能说明 */}
            <View style={styles.infoBox}>
              <Text style={styles.infoTitle}>功能特性</Text>
              <Text style={styles.infoText}>• Blurhash 编码与解码</Text>
              <Text style={styles.infoText}>• 模糊占位符显示</Text>
              <Text style={styles.infoText}>• 渐进式图片加载</Text>
              <Text style={styles.infoText}>• 异步解码支持</Text>
              <Text style={styles.infoText}>• 多种解码模式</Text>
              <Text style={styles.infoText}>• 圆角图片支持</Text>
              <Text style={styles.infoText}>• 自定义对比度调整</Text>
            </View>

            {/* 使用建议 */}
            <View style={styles.tipBox}>
              <Text style={styles.tipTitle}>使用建议</Text>
              <Text style={styles.tipText}>• 长列表使用低分辨率(16x16)</Text>
              <Text style={styles.tipText}>• 单张大图使用高分辨率(32x32)</Text>
              <Text style={styles.tipText}>• 推荐开启异步解码避免卡顿</Text>
              <Text style={styles.tipText}>• decodePunch 可调整对比度</Text>
              <Text style={styles.tipText}>• 服务端预生成 Blurhash 更佳</Text>
            </View>
          </View>
        </ScrollView>
      </SafeAreaView>
    </>
  );
}

const styles = StyleSheet.create({
  container: {
    flex: 1,
    backgroundColor: THEME.background,
  },
  scrollView: {
    flex: 1,
  },
  content: {
    padding: 15,
  },
  title: {
    fontSize: 24,
    fontWeight: 'bold',
    marginBottom: 25,
    textAlign: 'center',
    color: THEME.text,
  },
  imageSection: {
    marginBottom: 20,
  },
  sectionTitle: {
    fontSize: 16,
    fontWeight: 'bold',
    marginBottom: 12,
    color: THEME.text,
  },
  imageContainer: {
    backgroundColor: THEME.white,
    borderRadius: 12,
    padding: 15,
    shadowColor: THEME.shadow,
    shadowOffset: { width: 0, height: 2 },
    shadowOpacity: 0.1,
    shadowRadius: 4,
    elevation: 3,
  },
  imageWrapper: {
    position: 'relative',
    width: '100%',
    aspectRatio: 1.5,
    borderRadius: 8,
    overflow: 'hidden',
    backgroundColor: '#f0f0f0',
  },
  blurhash: {
    position: 'absolute',
    top: 0,
    left: 0,
    width: '100%',
    height: '100%',
  },
  image: {
    width: '100%',
    height: '100%',
  },
  section: {
    marginBottom: 20,
    backgroundColor: THEME.white,
    borderRadius: 12,
    padding: 15,
    shadowColor: THEME.shadow,
    shadowOffset: { width: 0, height: 2 },
    shadowOpacity: 0.1,
    shadowRadius: 4,
    elevation: 3,
  },
  settingRow: {
    flexDirection: 'row',
    justifyContent: 'space-between',
    alignItems: 'center',
  },
  settingLabel: {
    fontSize: 15,
    color: THEME.text,
  },
  input: {
    borderWidth: 1,
    borderColor: THEME.border,
    borderRadius: 8,
    paddingHorizontal: 12,
    paddingVertical: 10,
    fontSize: 14,
    color: THEME.text,
    backgroundColor: '#fafafa',
  },
  buttonGroup: {
    gap: 12,
    marginBottom: 20,
  },
  button: {
    height: 48,
    backgroundColor: THEME.primary,
    borderRadius: 8,
    justifyContent: 'center',
    alignItems: 'center',
  },
  secondaryButton: {
    backgroundColor: '#ff5252',
  },
  buttonText: {
    color: THEME.white,
    fontSize: 15,
    fontWeight: 'bold',
  },
  infoBox: {
    backgroundColor: '#e3f2fd',
    borderRadius: 12,
    padding: 15,
    borderLeftWidth: 4,
    borderLeftColor: THEME.primary,
    marginBottom: 20,
  },
  infoTitle: {
    fontSize: 16,
    fontWeight: 'bold',
    marginBottom: 10,
    color: '#1565c0',
  },
  infoText: {
    fontSize: 14,
    color: '#1976d2',
    marginBottom: 5,
  },
  tipBox: {
    backgroundColor: '#fff3cd',
    borderRadius: 12,
    padding: 15,
    borderLeftWidth: 4,
    borderLeftColor: '#ffc107',
    marginBottom: 20,
  },
  tipTitle: {
    fontSize: 16,
    fontWeight: 'bold',
    marginBottom: 10,
    color: '#856404',
  },
  tipText: {
    fontSize: 14,
    color: '#856404',
    marginBottom: 5,
  },
});

export default BlurhashDemo;
<>`<StatusBar backgroundColor={COLORS.statusBar} />`
  `<SafeAreaView style={styles.container}>`
    `<View style={styles.content}>`
      `<Text style={styles.title}>`Blurhash 模糊占位符`</Text>`

{/* Blurhash 显示区域 */}`<View style={styles.blurhashContainer}>`
        `<View style={styles.blurhashRadiusMask}>`
          `<Blurhash
            blurhash={blurhash}
            decodeWidth={32}
            decodeHeight={32}
            decodePunch={1}
            decodeAsync={decodeAsync}
            onLoadStart={onLoadStart}
            onLoadEnd={onLoadEnd}
            onLoadError={onLoadError}
            style={styles.blurhashImage}
            resizeMode="cover"
          />`
        `</View>`
      `</View>`

{/* Blurhash 输入 */}`<TextInput
        value={blurhash}
        placeholder="Blurhash 字符串"
        onChangeText={setBlurhash}
        style={styles.textInput}
      />`

{/* Decode Async 开关 */}`<View style={styles.row}>`
        `<Text style={styles.text}>`Decode Async:`</Text>`
        `<Switch
          thumbColor={COLORS.switchThumb}
          trackColor={SWITCH_THUMB_COLORS}
          ios_backgroundColor={COLORS.switchDisabled}
          value={decodeAsync}
          onValueChange={setDecodeAsync}
        />`
      `</View>`

{/* 图片 URL 输入 */}`<TextInput
        value={encodingImageUri}
        placeholder="要编码的图片 URL"
        onChangeText={setEncodingImageUri}
        style={styles.textInput}
      />`

{/* 编码按钮 */}
      <TouchableOpacity
        style={encodeButtonStyle}
        disabled={encodingImageUri.length < 5}
        onPress={startEncoding}>
        {isEncoding ? (`<ActivityIndicator color="black" />`
        ) : (
          `<Text style={styles.buttonText}>`编码图片`</Text>`
        )}
      `</TouchableOpacity>`

{/* 验证按钮 */}
      <TouchableOpacity style={styles.validateButton} onPress={isValid}>`<Text style={styles.buttonText}>`验证 Blurhash`</Text>`
      `</TouchableOpacity>`

{/* 清除缓存按钮 */}
      <TouchableOpacity style={styles.clearButton} onPress={clearCache}>`<Text style={styles.buttonText}>`清除缓存`</Text>`
      `</TouchableOpacity>`

{/* 功能说明 */}`<View style={styles.infoSection}>`
        `<Text style={styles.infoTitle}>`功能说明:`</Text>`
        `<Text style={styles.infoText}>`• Blurhash 编码与解码`</Text>`
        `<Text style={styles.infoText}>`• 模糊占位符显示`</Text>`
        `<Text style={styles.infoText}>`• 渐进式图片加载`</Text>`
        `<Text style={styles.infoText}>`• 异步解码支持`</Text>`
        `<Text style={styles.infoText}>`• 多种解码模式`</Text>`
        `<Text style={styles.infoText}>`• 圆角图片支持`</Text>`
        `<Text style={styles.infoText}>`• 自定义对比度调整`</Text>`
      `</View>`

{/* 注意事项 */}`<View style={styles.noteSection}>`
        `<Text style={styles.noteTitle}>`注意事项:`</Text>`
        `<Text style={styles.noteText}>`• decodeWidth/decodeHeight 影响性能`</Text>`
        `<Text style={styles.noteText}>`• 长列表建议使用低分辨率(16)`</Text>`
        `<Text style={styles.noteText}>`• decodeAsync 避免阻塞 UI 线程`</Text>`
        `<Text style={styles.noteText}>`• decodePunch 调整对比度`</Text>`
      `</View>`
    `</View>`
  `</SafeAreaView>`
</>
);
}
const styles = StyleSheet.create({
container: {
flex: 1,
justifyContent: ‘center’,
alignItems: ‘center’,
backgroundColor: COLORS.background,
},
content: {
width: ‘100%’,
paddingHorizontal: 20,
},
title: {
fontSize: 24,
fontWeight: ‘bold’,
marginBottom: 30,
textAlign: ‘center’,
color: ‘#333’,
},
blurhashContainer: {
shadowRadius: 3,
shadowColor: COLORS.shadow,
shadowOffset: {
height: 2,
width: 0,
},
shadowOpacity: 0.4,
overflow: ‘visible’,
marginBottom: 20,
},
blurhashRadiusMask: {
elevation: 5,
borderRadius: 10,
overflow: ‘hidden’,
},
blurhashImage: {
width: 300,
height: 200,
},
textInput: {
marginTop: 20,
borderRadius: 8,
borderWidth: 1,
borderColor: COLORS.textInput,
width: ‘100%’,
height: 45,
paddingHorizontal: 15,
textAlign: ‘center’,
fontSize: 14,
},
row: {
marginTop: 30,
flexDirection: ‘row’,
alignItems: ‘center’,
justifyContent: ‘center’,
},
text: {
fontSize: 16,
marginRight: 15,
color: ‘#333’,
},
encodeButton: {
height: 45,
width: 150,
marginTop: 30,
backgroundColor: COLORS.button,
borderRadius: 10,
paddingVertical: 12,
paddingHorizontal: 35,
justifyContent: ‘center’,
alignSelf: ‘center’,
},
validateButton: {
height: 45,
width: 150,
marginTop: 15,
backgroundColor: ‘#42a5f5’,
borderRadius: 10,
paddingVertical: 12,
paddingHorizontal: 35,
justifyContent: ‘center’,
alignSelf: ‘center’,
},
clearButton: {
height: 45,
width: 150,
marginTop: 15,
backgroundColor: ‘#ff5252’,
borderRadius: 10,
paddingVertical: 12,
paddingHorizontal: 35,
justifyContent: ‘center’,
alignSelf: ‘center’,
},
buttonText: {
color: ‘white’,
fontWeight: ‘bold’,
fontSize: 14,
},
infoSection: {
marginTop: 30,
padding: 15,
backgroundColor: ‘#e3f2fd’,
borderRadius: 8,
borderLeftWidth: 4,
borderLeftColor: ‘#42a5f5’,
},
infoTitle: {
fontSize: 16,
fontWeight: ‘bold’,
marginBottom: 10,
color: ‘#1565c0’,
},
infoText: {
fontSize: 14,
color: ‘#1976d2’,
marginBottom: 5,
},
noteSection: {
marginTop: 20,
padding: 15,
backgroundColor: ‘#fff3cd’,
borderRadius: 8,
borderLeftWidth: 4,
borderLeftColor: ‘#ffc107’,
},
noteTitle: {
fontSize: 16,
fontWeight: ‘bold’,
marginBottom: 10,
color: ‘#856404’,
},
noteText: {
fontSize: 14,
color: ‘#856404’,
marginBottom: 5,
},
});
export default BlurhashDemo;
## 🎨 实际应用场景

react-native-blurhash 可以应用于以下实际场景:

1. **图片列表**: 用户相册、商品列表、新闻列表等
2. **社交应用**: 图片动态、朋友圈、微博等
3. **电商应用**: 商品图片、用户评价图片等
4. **新闻应用**: 新闻图片、封面图等
5. **旅游应用**: 景点图片、攻略图片等
6. **美食应用**: 菜品图片、餐厅图片等
7. **房产应用**: 房屋图片、小区图片等
8. **汽车应用**: 车辆图片、内饰图片等

## ⚠️ 注意事项与最佳实践

### 1. 性能优化

```typescript
// ✅ 推荐:长列表使用低分辨率
<Blurhash
  blurhash={blurhash}
  decodeWidth={16}  // 长列表建议使用 16
  decodeHeight={16}
/>

// ✅ 推荐:单张大图可以使用较高分辨率
<Blurhash
  blurhash={blurhash}
  decodeWidth={32}  // 单张图片可以使用 32
  decodeHeight={32}
/>
2. 异步解码
// ✅ 推荐:使用异步解码避免阻塞 UI
<Blurhash
  blurhash={blurhash}
  decodeAsync={true}  // 推荐开启
/>
3. 图片编码
// ✅ 推荐:服务端预生成 Blurhash
// 将图片编码为 Blurhash 字符串存储在数据库中
const blurhash = await Blurhash.encode(imageUri, 4, 3);

// ✅ 推荐:使用合适的组件数量
// componentsX 和 componentsY 决定 Blurhash 的复杂度
// 4x3 适用于大多数场景
// 6x4 适用于需要更高细节的场景
4. 圆角图片
// ✅ 推荐:父容器设置 borderRadius
<View style={{ borderRadius: 10, overflow: 'hidden' }}>
  <Blurhash
    blurhash={blurhash}
    style={{ width: 200, height: 200 }}
  />
</View>
5. 对比度调整
// ✅ 推荐:调整 decodePunch 优化视觉效果
// 默认值为 1,范围 0-1
// 值越小,对比度越低
// 值越大,对比度越高
<Blurhash
  blurhash={blurhash}
  decodePunch={1}  // 调整对比度
/>
6. HarmonyOS 特殊处理
在 HarmonyOS 上,需要注意:
- 性能: 高分辨率 Blurhash 可能影响性能
- 解码: 支持异步解码,推荐开启
- 圆角: 通过父容器实现
7. 最佳实践
// ✅ 推荐:封装 Blurhash 组件
interface BlurhashImageProps {
  blurhash: string;
  uri: string;
  style?: any;
}

const BlurhashImage: React.FC<BlurhashImageProps> = ({ blurhash, uri, style }) => {
  const [loaded, setLoaded] = useState(false);

  return (
    <View style={style}>
      {!loaded && (
        <Blurhash
          blurhash={blurhash}
          decodeWidth={32}
          decodeHeight={32}
          decodeAsync={true}
          style={StyleSheet.absoluteFill}
        />
      )}
      <Image
        source={{ uri }}
        style={StyleSheet.absoluteFill}
        onLoad={() => setLoaded(true)}
      />
    </View>
  );
};
🧪 测试验证
1. Android 平台测试
npm run android
测试要点:
- 测试不同 Blurhash 字符串渲染
- 验证异步解码功能
- 测试圆角效果
- 检查性能表现
2. iOS 平台测试
npm run ios
测试要点:
- 测试图片加载效果
- 验证动画流畅度
- 测试内存使用
- 检查解码性能
3. HarmonyOS 平台测试
npm run harmony
测试要点:
- 验证 Blurhash 渲染
- 测试异步解码
- 检查性能表现
- 验证圆角效果
4. 常见问题排查
问题 1: Blurhash 无法渲染
- 检查 Blurhash 字符串是否正确
- 确认 decodeWidth 和 decodeHeight 设置
- 验证网络图片 URL 是否可访问
问题 2: 解码性能差
- 降低 decodeWidth 和 decodeHeight
- 启用 decodeAsync
- 减少同时渲染的 Blurhash 数量
问题 3: Blurhash 与实际图片差异大
- 增加 componentsX 和 componentsY
- 调整 decodePunch 参数
- 重新生成 Blurhash
📊 API 参考
Blurhash 组件属性
| 属性 | 类型 | 必填 | 说明 |
|---|---|---|---|
| blurhash | string | 是 | Blurhash 字符串 |
| decodeWidth | number | 否 | 解码宽度,默认 32 |
| decodeHeight | number | 否 | 解码高度,默认 32 |
| decodePunch | number | 否 | 对比度,默认 1 |
| decodeAsync | boolean | 否 | 异步解码,默认 true |
| resizeMode | enum | 否 | 缩放模式 |
| onLoadStart | function | 否 | 加载开始回调 |
| onLoadEnd | function | 否 | 加载结束回调 |
| onLoadError | function | 否 | 加载错误回调 |
静态方法
| 方法 | 参数 | 返回值 | 说明 |
|---|---|---|---|
| encode | (imageUri, componentsX, componentsY) | Promise<string> | 编码图片为 Blurhash |
| clearCosineCache | () | void | 清除余弦缓存 |
| getAverageColor | (blurhash) | RGB| undefined | 获取平均颜色 |
| isBlurhashValid | (blurhash) | ReturnType<typeof isBlurhashValid> | 验证 Blurhash 有效性 |
📊 对比:占位图方案对比
| 特性 | 传统占位图 | react-native-blurhash |
|---|---|---|
| 视觉体验 | ⚠️ 简单 | ✅ 优雅 |
| 文件大小 | ⚠️ 较大 | ✅ 极小 |
| 加载速度 | ⚠️ 一般 | ✅ 优秀 |
| 内存占用 | ⚠️ 较高 | ✅ 低 |
| 跨平台一致性 | ⚠️ 一般 | ✅ 完全一致 |
| 可定制性 | ⚠️ 有限 | ✅ 高度可定制 |
📝 总结
通过集成 react-native-blurhash,我们为项目添加了优雅的图片模糊占位符功能。这个库使用 Blurhash 算法,将图片压缩成短字符串,提供渐进式加载体验,完全跨平台兼容。
关键要点回顾
- ✅ 安装依赖:
npm install @react-native-ohos/react-native-blurhash - ✅ 配置平台: 支持 Autolink,也支持手动配置(CMakeLists.txt、PackageProvider.cpp、RNPackagesFactory.ts)
- ✅ 集成代码: 使用
Blurhash组件 - ✅ 支持功能: 编码/解码、异步解码、圆角支持、对比度调整等
- ✅ 重要: 长列表使用低分辨率,单张大图使用较高分辨率

作为“人工智能6S店”的官方数字引擎,为AI开发者与企业提供一个覆盖软硬件全栈、一站式门户。
更多推荐


 0
0 0
0- 0


 已为社区贡献10条内容

所有评论(0)