
使用Flutter三方库retrofit请求和风天气API完成鸿蒙版天气预报应用城市天气信息卡片
本文介绍了使用Flutter的Retrofit库对接和风天气API的实战教程。主要内容包括: 项目概述与目标:通过Retrofit实现天气预报功能,展示如何在鸿蒙设备上运行 项目结构说明:详细介绍了API、模型和页面文件目录结构 引入三方库步骤:从添加依赖到验证安装的完整流程 二次封装实现:通过流程图展示从创建数据模型到封装API的完整过程 教程重点讲解了Retrofit的集成使用、和风天气API
Retrofit 和风天气 API 首页实战教程
目录
概述
本章节主要详细介绍在使用跨平台框架Flutter开发鸿蒙应用程序,使用Flutter三方库 retrofit 库进行网络请求,实现天气预报功能。retrofit是基于dio扩展的,是纯dart语言编写,无需进行鸿蒙化适配,可以直接使用的。
🎯 本教程目标
通过本教程,你将学会:
- ✅ 如何在 Flutter 项目中引入
retrofit相关依赖 - ✅ 如何创建数据模型和
retrofitAPI 接口 - ✅ 如何对
retrofit进行二次封装 - ✅ 如何在首页中使用
retrofit实现天气数据请求和展示 - ✅ 最终在鸿蒙设备上运行效果如下图所示
📁 项目文件结构
在开始之前,让我们先了解一下项目结构:
lib/
├── api/                          # API 相关文件目录
│   ├── qweather_api.dart        # 📡 Retrofit API 接口定义文件
│   ├── qweather_api.g.dart       # ⚙️ 自动生成的 Retrofit 实现代码
│   └── weather_service.dart      # 🔧 天气服务封装类(二次封装)
├── models/                       # 数据模型目录
│   ├── weather_models.dart      # 📊 天气数据模型定义
│   └── weather_models.g.dart    # ⚙️ 自动生成的 JSON 序列化代码
└── screens/                      # 页面文件目录
    └── home_page.dart           # 🏠 首页(展示天气数据,使用 Retrofit)
🎯 本教程将创建的文件(按顺序)
严格按照以下顺序创建文件,每个文件创建后立即验证:
lib/models/weather_models.dart- 📊 定义所有天气相关的数据模型lib/api/qweather_api.dart- 📡 使用 Retrofit 注解定义 API 接口lib/api/weather_service.dart- 🔧 对 API 进行二次封装,简化调用lib/screens/home_page.dart- 🏠 首页 UI,使用 Retrofit 进行网络请求
🛠️ 技术栈
- Retrofit: 类型安全的 HTTP 客户端,基于 Dio 实现
- Dio: 强大的 Dart HTTP 客户端
- json_annotation: JSON 序列化注解支持
- json_serializable: JSON 序列化代码生成器
- retrofit_generator: Retrofit 代码生成器
🌤️ 和风天气 API 简介
和风天气提供全球天气预报服务,包括:
- 🔍 城市搜索(GeoAPI)
- 🌡️ 实时天气查询
- 📅 每日天气预报(3/7/10/15/30天)
- 🔥 热门城市查询
- 📊 更多天气相关服务
API 文档地址:https://dev.qweather.com/docs/api/
引入三方库步骤
📋 流程图概览
📝 步骤 1:添加依赖到 pubspec.yaml
步骤 1.1:打开 pubspec.yaml 文件
文件路径: pubspec.yaml(项目根目录)
操作说明:
- 📂 在 IDE 中打开项目根目录
- 📄 找到并打开
pubspec.yaml文件 - 👀 确认文件内容,找到
dependencies:和dev_dependencies:部分
步骤 1.2:添加运行时依赖
位置: pubspec.yaml 文件的 dependencies: 部分
操作步骤:
- 📍 找到
dependencies:部分 - 📝 在
dependencies:下添加以下内容:
dependencies:
  flutter:
    sdk: flutter

  # HTTP 网络请求库
  dio: ^5.4.0

  # Retrofit 用于类型安全的 HTTP 客户端
  retrofit: ^4.0.3

  # JSON 序列化支持
  json_annotation: ^4.8.1
验证:
- ✅ 确认缩进正确(使用2个空格)
- ✅ 确认版本号正确
- ✅ 确认没有语法错误(冒号、引号等)
步骤 1.3:添加开发依赖
位置: pubspec.yaml 文件的 dev_dependencies: 部分
操作步骤:
- 📍 找到
dev_dependencies:部分(通常在dependencies:之后) - 📝 在
dev_dependencies:下添加以下内容:
dev_dependencies:
  flutter_test:
    sdk: flutter
  flutter_lints: ^5.0.0

  # 代码生成工具
  build_runner: ^2.4.7

  # JSON 序列化代码生成器
  json_serializable: ^6.7.1

  # Retrofit 代码生成器
  retrofit_generator: ^10.2.1
验证:
- ✅ 确认缩进正确
- ✅ 确认版本号正确
- ✅ 确认
retrofit_generator版本为^10.2.1(重要!)
步骤 1.4:保存文件
操作说明:
- 💾 保存
pubspec.yaml文件(Ctrl+S 或 Cmd+S) - ✅ 确认文件已保存
版本说明:
dio: ^5.4.0- HTTP 客户端库,Retrofit 的底层实现retrofit: ^4.0.3- Retrofit 库,提供类型安全的 API 定义json_annotation: ^4.8.1- JSON 序列化注解build_runner: ^2.4.7- 代码生成工具json_serializable: ^6.7.1- JSON 序列化代码生成器retrofit_generator: ^10.2.1- Retrofit 代码生成器(⚠️ 必须使用 10.2.1 或更高版本)
重要提示:
- ⚠️ 如果遇到代码生成错误,请确保使用最新版本的
retrofit_generator(推荐 10.2.1 或更高版本) - ⚠️ 如果版本冲突,可以运行
flutter pub upgrade升级所有依赖
⬇️ 步骤 2:安装依赖
操作步骤:
-
📂 打开终端(Terminal),切换到项目根目录
cd /path/to/your/project -
⌨️ 执行以下命令:
flutter pub get -
⏳ 等待安装完成(可能需要10-30秒)
命令说明:
flutter pub get- 下载并安装所有在pubspec.yaml中声明的依赖包- 安装成功后,依赖包会被下载到项目的
.dart_tool目录
预期输出:
Running "flutter pub get" in ffohnotes...
Resolving dependencies...
Got dependencies!
验证安装:
- ✅ 终端显示 “Got dependencies!” 表示安装成功
- ✅ 检查
pubspec.lock文件是否已更新 - ✅ 检查
.dart_tool/package_config.json文件是否存在
✅ 步骤 3:验证安装
操作步骤:
-
🔍 检查依赖是否已安装:
flutter pub deps | grep -E "dio|retrofit|json_annotation|build_runner|json_serializable|retrofit_generator"
预期输出:
dio 5.4.0
retrofit 4.0.3
json_annotation 4.8.1
build_runner 2.4.7
json_serializable 6.7.1
retrofit_generator 10.2.1
验证要点:
- ✅ 所有依赖都已列出
- ✅ 版本号与
pubspec.yaml中指定的版本匹配 - ✅ 没有错误信息
二次封装实现
🏗️ 二次封装实现流程图
1. 📊 创建数据模型
📄 文件说明:lib/models/weather_models.dart
文件作用: 定义所有和风天气 API 返回数据的 Dart 模型类
包含的模型类:
- 📍
Location- 城市位置信息 - 🔍
CitySearchResponse- 城市搜索响应 - 🌡️
Now- 当前天气数据 - 📋
WeatherResponse- 天气响应 - 📅
Daily- 每日预报数据 - 📊
DailyForecastResponse- 预报响应 - 🔥
TopCityResponse- 热门城市响应 - 📚
Refer- 数据来源信息
关键点:
- 使用
@JsonSerializable()注解标记需要序列化的类 - 使用
part声明引入自动生成的代码文件 - 字段类型要与 API 返回的 JSON 结构匹配
- 可能为空的字段使用
?标记为可空类型
步骤 1.1:创建文件
操作步骤:
- 📂 在项目根目录下,创建
lib/models/目录(如果不存在) - 📄 在
lib/models/目录下创建新文件weather_models.dart - ✅ 确认文件已创建
文件路径: lib/models/weather_models.dart
步骤 1.2:添加导入语句和 part 声明
操作步骤:
- 📝 在
weather_models.dart文件开头添加以下内容:
// 导入 json_annotation 包,提供 JSON 序列化注解
import 'package:json_annotation/json_annotation.dart';

// 声明引入自动生成的代码文件
// 这个文件会在运行 build_runner 后自动生成
part 'weather_models.g.dart';
验证:
- ✅ 确认导入语句正确
- ✅ 确认
part声明正确(文件名必须匹配:weather_models.g.dart)
步骤 1.3:定义 Location 类
操作步骤:
- 📝 在
part声明后添加Location类:
/// 📍 城市位置信息模型
/// 用于存储城市的基本信息,包括名称、ID、坐标等
() // 注解标记,告诉代码生成器为这个类生成序列化代码
class Location {
// 定义类的属性字段
final String name; // 城市名称,如"北京"
final String id; // 城市LocationID,用于查询天气,如"101010100"
final String lat; // 纬度坐标
final String lon; // 经度坐标
final String adm2; // 上级行政区,如"北京"
final String adm1; // 一级行政区,如"北京市"
final String country; // 所属国家,如"中国"
final String tz; // 时区,如"Asia/Shanghai"
final String utcOffset; // UTC偏移,如"+08:00"
final String isDst; // 是否夏令时,"0"表示否,"1"表示是
final String type; // 地区类型,如"city"
final String rank; // 地区评分,数值越小越重要
final String fxLink; // 天气链接,可用于网页展示
// 构造函数,定义如何创建 Location 对象
Location({
required this.name, // required 表示该参数必须提供
required this.id,
required this.lat,
required this.lon,
required this.adm2,
required this.adm1,
required this.country,
required this.tz,
required this.utcOffset,
required this.isDst,
required this.type,
required this.rank,
required this.fxLink,
});
// fromJson 工厂方法,用于将 JSON 转换为 Location 对象
// _$LocationFromJson 方法会在 weather_models.g.dart 中自动生成
factory Location.fromJson(Map<String, dynamic> json) =>
_$LocationFromJson(json);
// toJson 方法,用于将 Location 对象转换为 JSON
// _$LocationToJson 方法会在 weather_models.g.dart 中自动生成
Map<String, dynamic> toJson() => _$LocationToJson(this);
}
验证:
- ✅ 确认
@JsonSerializable()注解已添加 - ✅ 确认所有字段都已定义
- ✅ 确认
fromJson和toJson方法已添加
步骤 1.4:定义其他模型类
操作步骤:
- 📝 继续添加其他模型类:
/// 🔍 城市搜索响应模型
()
class CitySearchResponse {
final String code;
final String? updateTime;
final String? fxLink;
final List<Location>? location;
CitySearchResponse({
required this.code,
this.updateTime,
this.fxLink,
this.location,
});
factory CitySearchResponse.fromJson(Map<String, dynamic> json) =>
_$CitySearchResponseFromJson(json);
Map<String, dynamic> toJson() => _$CitySearchResponseToJson(this);
}
/// 🌡️ 当前天气数据模型
/// 用于存储实时天气信息,包括温度、湿度、风速等
() // 注解标记,生成序列化代码
class Now {
// 定义当前天气的所有字段
final String obsTime; // 观测时间,ISO 8601格式,如"2020-06-30T21:40+08:00"
final String temp; // 当前温度,单位:摄氏度,如"24"
final String feelsLike; // 体感温度,单位:摄氏度,如"26"
final String icon; // 天气图标代码,用于显示天气图标,如"101"
final String text; // 天气状况文字描述,如"多云"、"晴天"
final String wind360; // 风向360角度,0-360度,如"123"
final String windDir; // 风向文字描述,如"东南风"
final String windScale; // 风力等级,如"1"、"2-3"
final String windSpeed; // 风速,单位:公里/小时,如"3"
final String humidity; // 相对湿度,百分比数值,如"72"
final String precip; // 过去1小时降水量,单位:毫米,如"0.0"
final String pressure; // 大气压强,单位:百帕,如"1003"
final String vis; // 能见度,单位:公里,如"16"
final String? cloud; // 云量,百分比数值,可能为空(高纬度地区)
final String? dew; // 露点温度,单位:摄氏度,可能为空
// 构造函数
Now({
required this.obsTime, // 必填字段使用 required
required this.temp,
required this.feelsLike,
required this.icon,
required this.text,
required this.wind360,
required this.windDir,
required this.windScale,
required this.windSpeed,
required this.humidity,
required this.precip,
required this.pressure,
required this.vis,
this.cloud, // 可空字段不使用 required
this.dew, // 可空字段不使用 required
});
// fromJson 工厂方法,将 JSON 转换为 Now 对象
factory Now.fromJson(Map<String, dynamic> json) => _$NowFromJson(json);
// toJson 方法,将 Now 对象转换为 JSON
Map<String, dynamic> toJson() => _$NowToJson(this);
}
/// 📚 数据来源和许可信息模型
()
class Refer {
final List<String>? sources; // 原始数据来源,可能为空
final List<String>? license; // 数据许可或版权声明,可能为空
Refer({
this.sources,
this.license,
});
factory Refer.fromJson(Map<String, dynamic> json) => _$ReferFromJson(json);
Map<String, dynamic> toJson() => _$ReferToJson(this);
}
/// 📋 天气预报响应模型
()
class WeatherResponse {
final String code;
final String? updateTime;
final String? fxLink;
final Now? now;
final Refer? refer; // 注意:这里是 Refer 类型,不是 Location
WeatherResponse({
required this.code,
this.updateTime,
this.fxLink,
this.now,
this.refer,
});
factory WeatherResponse.fromJson(Map<String, dynamic> json) =>
_$WeatherResponseFromJson(json);
Map<String, dynamic> toJson() => _$WeatherResponseToJson(this);
}
/// 📅 未来几天天气预报模型
/// 参考文档:https://dev.qweather.com/docs/api/weather/weather-daily-forecast/
()
class Daily {
final String fxDate; // 预报日期
final String? sunrise; // 日出时间,在高纬度地区可能为空
final String? sunset; // 日落时间,在高纬度地区可能为空
final String? moonrise; // 当天月升时间,可能为空
final String? moonset; // 当天月落时间,可能为空
final String? moonPhase; // 月相名称
final String? moonPhaseIcon; // 月相图标代码
final String tempMax; // 最高温度
final String tempMin; // 最低温度
final String textDay; // 白天天气文字描述
final String textNight; // 夜间天气文字描述
final String iconDay; // 白天天气图标代码
final String iconNight; // 夜间天气图标代码
final String wind360Day; // 白天风向360角度
final String windDirDay; // 白天风向
final String windScaleDay; // 白天风力等级
final String windSpeedDay; // 白天风速
final String wind360Night; // 夜间风向360角度
final String windDirNight; // 夜间风向
final String windScaleNight; // 夜间风力等级
final String windSpeedNight; // 夜间风速
final String humidity; // 相对湿度
final String precip; // 降水量
final String pressure; // 大气压强
final String vis; // 能见度
final String? cloud; // 云量,可能为空
final String uvIndex; // 紫外线强度指数
Daily({
required this.fxDate,
this.sunrise,
this.sunset,
this.moonrise,
this.moonset,
this.moonPhase,
this.moonPhaseIcon,
required this.tempMax,
required this.tempMin,
required this.textDay,
required this.textNight,
required this.iconDay,
required this.iconNight,
required this.wind360Day,
required this.windDirDay,
required this.windScaleDay,
required this.windSpeedDay,
required this.wind360Night,
required this.windDirNight,
required this.windScaleNight,
required this.windSpeedNight,
required this.humidity,
required this.precip,
required this.pressure,
required this.vis,
this.cloud,
required this.uvIndex,
});
factory Daily.fromJson(Map<String, dynamic> json) => _$DailyFromJson(json);
Map<String, dynamic> toJson() => _$DailyToJson(this);
}
/// 📊 每日天气预报响应模型
()
class DailyForecastResponse {
final String code;
final String? updateTime;
final String? fxLink;
final List<Daily>? daily;
final Refer? refer; // 注意:这里是 Refer 类型
DailyForecastResponse({
required this.code,
this.updateTime,
this.fxLink,
this.daily,
this.refer,
});
factory DailyForecastResponse.fromJson(Map<String, dynamic> json) =>
_$DailyForecastResponseFromJson(json);
Map<String, dynamic> toJson() => _$DailyForecastResponseToJson(this);
}
/// 🔥 热门城市查询响应模型
/// 根据和风天气 API 文档:https://dev.qweather.com/docs/api/geoapi/top-city/
()
class TopCityResponse {
final String code;
final List<Location>? topCityList; // 热门城市列表
final Refer? refer; // 数据来源和许可信息
TopCityResponse({
required this.code,
this.topCityList,
this.refer,
});
factory TopCityResponse.fromJson(Map<String, dynamic> json) =>
_$TopCityResponseFromJson(json);
Map<String, dynamic> toJson() => _$TopCityResponseToJson(this);
}
验证:
- ✅ 确认所有模型类都已添加
- ✅ 确认所有类都有
@JsonSerializable()注解 - ✅ 确认所有类都有
fromJson和toJson方法 - ✅ 确认可空字段使用了
?标记
步骤 1.5:保存文件
操作步骤:
- 💾 保存
weather_models.dart文件 - ✅ 确认文件已保存
步骤 1.6:运行代码生成器
操作步骤:
-
📂 打开终端,切换到项目根目录
-
⌨️ 执行以下命令:
flutter pub run build_runner build --delete-conflicting-outputs -
⏳ 等待代码生成完成(可能需要10-30秒)
命令说明:
build_runner build- 运行代码生成器,生成所有标记了注解的类的序列化代码--delete-conflicting-outputs- 删除冲突的输出文件,避免手动删除旧文件
预期输出:
[INFO] Generating build script...
[INFO] Generating build script completed, took 123ms
[INFO] Creating build script snapshot...
[INFO] Creating build script snapshot completed, took 2.3s
[INFO] Building new asset graph...
[INFO] Building new asset graph completed, took 456ms
[INFO] Running build...
[INFO] Running build completed, took 3.2s
[INFO] Succeeded after 3.2s with 1 outputs
验证生成是否成功:
-
📂 检查文件是否存在:
ls lib/models/weather_models.g.dart -
✅ 确认文件存在且没有编译错误
-
✅ IDE 中可以看到
_$开头的方法定义(如_$LocationFromJson) -
✅ 运行
flutter analyze没有报错
如果生成失败:
- ❌ 检查
part 'weather_models.g.dart';声明是否正确 - ❌ 检查所有类是否都有
@JsonSerializable()注解 - ❌ 检查导入语句是否正确
- ❌ 运行
flutter clean后重新生成
2. 📡 创建 Retrofit API 接口
📄 文件说明:lib/api/qweather_api.dart
文件作用: 使用 Retrofit 注解定义和风天气 API 的所有接口端点
包含的接口:
- 🔍
cityLookup- 城市搜索接口(/geo/v2/city/lookup) - 🌡️
weatherNow- 实时天气接口(/v7/weather/now) - 📅
weatherDaily- 每日预报接口(/v7/weather/{days}) - 🔥
topCity- 热门城市接口(/geo/v2/city/top)
关键点:
- 使用
@RestApi定义基础 URL - 使用
@GET、@POST等注解定义 HTTP 方法 - 使用
@Query、@Path等注解定义参数 - 返回类型使用
Future<T>表示异步操作 - 使用
factory构造函数创建实例
步骤 2.1:创建文件
操作步骤:
- 📂 在项目根目录下,创建
lib/api/目录(如果不存在) - 📄 在
lib/api/目录下创建新文件qweather_api.dart - ✅ 确认文件已创建
文件路径: lib/api/qweather_api.dart
步骤 2.2:添加导入语句和 part 声明
操作步骤:
- 📝 在
qweather_api.dart文件开头添加以下内容:
// 导入 Dio 包,用于 HTTP 请求
import 'package:dio/dio.dart';
// 导入 Retrofit 包,提供注解和类型安全的 API 定义
import 'package:retrofit/retrofit.dart';
// 导入数据模型,用于定义返回类型
import '../models/weather_models.dart';

// 声明引入自动生成的 Retrofit 实现代码
part 'qweather_api.g.dart';
验证:
- ✅ 确认所有导入语句正确
- ✅ 确认
part声明正确(文件名必须匹配:qweather_api.g.dart)
步骤 2.3:定义基础 URL 和 API 接口类
操作步骤:
- 📝 在
part声明后添加以下内容:
/// 🌐 和风天气 API 基础地址
/// 注意:城市搜索接口使用 /geo/v2 路径,天气接口使用 /v7 路径
// 定义 API 的基础 URL,所有接口都会基于这个地址
const String baseUrl = '在和风天气后台控制台获取API HOST';
/// 📡 和风天气 API 服务接口
/// 使用 Retrofit 注解定义 API 端点
/// 这是一个抽象类,具体实现会在 qweather_api.g.dart 中自动生成
(baseUrl: baseUrl) // 注解标记,指定 API 的基础 URL
abstract class QWeatherApi {
// factory 构造函数,用于创建 API 服务实例
// _QWeatherApi 是自动生成的实现类
factory QWeatherApi(Dio dio, {String baseUrl}) = _QWeatherApi;
验证:
- ✅ 确认
baseUrl常量已定义 - ✅ 确认
@RestApi注解已添加 - ✅ 确认
factory构造函数已添加
步骤 2.4:定义城市搜索接口
操作步骤:
- 📝 在
factory构造函数后添加城市搜索方法:
/// 🔍 城市搜索接口
///
/// **接口路径:** `/geo/v2/city/lookup`
/// **请求方法:** GET
/// **功能说明:** 根据城市名称搜索城市信息,支持模糊搜索
///
/// **参数说明:**
/// - [location] 必填 - 城市名称,支持模糊搜索(最少一个汉字或2个字符)
/// 也可以传入经纬度坐标(如"116.41,39.92")或 LocationID
/// - [adm] 可选 - 上级行政区划,用于排除重名城市
/// 例如:`location=西安&adm=陕西` 只搜索陕西省的西安市
/// - [range] 可选 - 搜索范围,ISO 3166 国家代码
/// 例如:`range=cn` 只在中国范围内搜索
/// - [number] 可选 - 返回结果数量,取值范围1-20,默认10个
/// - [lang] 可选 - 多语言设置,默认中文('zh')
///
/// **返回说明:** 返回 `CitySearchResponse`,包含城市列表
/// 结果按相关性和 Rank 值排序,Rank 值越小越重要
///
/// **注意:** API Key 通过请求头 `X-QW-Api-Key` 传递,不需要在此方法中传递
('/geo/v2/city/lookup') // GET 请求注解,定义接口路径
Future<CitySearchResponse> cityLookup( // 异步方法,返回城市搜索响应
('location') String location, { // @Query 注解,将参数作为查询参数
('adm') String? adm, // 可选参数,上级行政区划
('range') String? range, // 可选参数,搜索范围
('number') int? number, // 可选参数,返回数量
('lang') String? lang, // 可选参数,语言设置
});
验证:
- ✅ 确认
@GET注解路径正确(/geo/v2/city/lookup) - ✅ 确认方法返回类型为
Future<CitySearchResponse> - ✅ 确认所有参数都有正确的注解
步骤 2.5:定义实时天气接口
操作步骤:
- 📝 在
cityLookup方法后添加实时天气方法:
/// 🌡️ 实时天气接口
///
/// **接口路径:** `/v7/weather/now`
/// **请求方法:** GET
/// **功能说明:** 获取指定城市的实时天气数据
///
/// **参数说明:**
/// - [location] 必填 - LocationID(如"101010100")或经纬度坐标(如"116.41,39.92")
/// LocationID 可通过城市搜索接口获取
/// - [lang] 可选 - 多语言设置,默认中文('zh')
///
/// **返回说明:** 返回 `WeatherResponse`,包含当前天气信息
/// 数据为近实时数据,有5-20分钟延迟,可通过 `obsTime` 字段查看观测时间
///
/// **注意:** API Key 通过请求头 `X-QW-Api-Key` 传递,不需要在此方法中传递
('/v7/weather/now') // GET 请求注解
Future<WeatherResponse> weatherNow( // 异步方法,返回天气响应
('location') String location, { // 必填参数,城市位置
('lang') String? lang, // 可选参数,语言设置
});
验证:
- ✅ 确认
@GET注解路径正确(/v7/weather/now) - ✅ 确认方法返回类型为
Future<WeatherResponse>
步骤 2.6:定义每日预报接口
操作步骤:
- 📝 在
weatherNow方法后添加每日预报方法:
/// 📅 每日天气预报接口
///
/// **接口路径:** `/v7/weather/{days}`
/// **请求方法:** GET
/// **功能说明:** 获取指定天数的每日天气预报
///
/// **参数说明:**
/// - [days] 必填 - 预报天数,支持 '3d'、'7d'、'10d'、'15d'、'30d'
/// - [location] 必填 - LocationID 或经纬度坐标
/// - [lang] 可选 - 多语言设置,默认中文('zh')
///
/// **返回说明:** 返回 `DailyForecastResponse`,包含每日天气预报列表
///
/// **注意:** API Key 通过请求头 `X-QW-Api-Key` 传递
('/v7/weather/{days}') // GET 请求注解,使用路径参数
Future<DailyForecastResponse> weatherDaily( // 异步方法
('days') String days, // 路径参数,指定预报天数
('location') String location, { // 查询参数,城市位置
('lang') String? lang, // 可选参数,语言设置
});
/// 📅 7天天气预报(兼容旧接口)
///
/// **接口路径:** `/v7/weather/7d`
/// **请求方法:** GET
/// **功能说明:** 获取7天天气预报的便捷方法
///
/// **参数说明:**
/// - [location] 必填 - LocationID 或经纬度坐标
/// - [lang] 可选 - 多语言设置,默认中文('zh')
///
/// **返回说明:** 返回 `DailyForecastResponse`,包含7天天气预报
('/v7/weather/7d') // GET 请求注解
Future<DailyForecastResponse> weather7d( // 异步方法
('location') String location, { // 查询参数
('lang') String? lang, // 可选参数
});
验证:
- ✅ 确认
weatherDaily使用@Path注解 - ✅ 确认
weather7d使用固定路径/v7/weather/7d
步骤 2.7:定义热门城市接口
操作步骤:
- 📝 在
weather7d方法后添加热门城市方法:
/// 🔥 热门城市查询接口
///
/// **接口路径:** `/geo/v2/city/top`
/// **请求方法:** GET
/// **功能说明:** 获取全球各国热门城市列表
///
/// **参数说明:**
/// - [range] 可选 - 搜索范围,ISO 3166 国家代码(如 'cn')
/// 如果不设置,则返回全球热门城市
/// - [number] 可选 - 返回结果数量,取值范围1-20,默认10个
/// - [lang] 可选 - 多语言设置,默认中文('zh')
///
/// **返回说明:** 返回 `TopCityResponse`,包含热门城市列表
///
/// **注意:** API Key 通过请求头 `X-QW-Api-Key` 传递
('/geo/v2/city/top') // GET 请求注解
Future<TopCityResponse> topCity({ // 异步方法,返回热门城市响应
('range') String? range, // 可选参数,国家代码
('number') int? number, // 可选参数,返回数量
('lang') String? lang, // 可选参数,语言设置
});
}
验证:
- ✅ 确认
@GET注解路径正确(/geo/v2/city/top) - ✅ 确认方法返回类型为
Future<TopCityResponse> - ✅ 确认类定义已闭合(有结束的大括号
})
步骤 2.8:保存文件
操作步骤:
- 💾 保存
qweather_api.dart文件 - ✅ 确认文件已保存
步骤 2.9:运行代码生成器
操作步骤:
-
📂 打开终端,切换到项目根目录
-
⌨️ 执行以下命令:
flutter pub run build_runner build --delete-conflicting-outputs -
⏳ 等待代码生成完成(可能需要10-30秒)
验证生成是否成功:
-
📂 检查文件是否存在:
ls lib/api/qweather_api.g.dart -
✅ 确认文件存在且没有编译错误
-
✅ IDE 中可以看到
_QWeatherApi类的实现 -
✅ 所有 API 方法都有对应的实现代码
3. 🔧 创建服务封装类
📄 文件说明:lib/api/weather_service.dart
文件作用: 对 Retrofit API 进行二次封装,提供更便捷的调用方式
封装内容:
- 🔧 单例模式实现,确保全局只有一个服务实例
- ⚙️ Dio 实例初始化和配置
- 📝 请求拦截器配置(日志记录)
- 🔄 API 方法封装,简化调用并统一错误处理
- 🔑 API Key 管理(通过请求头传递)
封装优势:
- ✅ 简化调用:不需要每次都传递 API Key
- ✅ 统一错误处理:统一处理 API 返回的错误码
- ✅ 日志记录:自动记录请求和响应
- ✅ 超时配置:统一配置请求超时时间
- ✅ 单例模式:全局唯一实例,节省资源
步骤 3.1:创建文件
操作步骤:
- 📂 确认
lib/api/目录存在 - 📄 在
lib/api/目录下创建新文件weather_service.dart - ✅ 确认文件已创建
文件路径: lib/api/weather_service.dart
步骤 3.2:添加导入语句
操作步骤:
- 📝 在
weather_service.dart文件开头添加以下内容:
// 导入 Dio 包,用于 HTTP 请求
import 'package:dio/dio.dart';
// 导入 Retrofit API 接口定义
import 'qweather_api.dart';
// 导入数据模型
import '../models/weather_models.dart';
验证:
- ✅ 确认所有导入语句正确
步骤 3.3:定义类结构和单例模式
操作步骤:
- 📝 添加类定义和单例模式实现:
/// 🔧 天气服务封装类
/// 对 Retrofit API 进行二次封装,提供更便捷的调用方式
///
/// **使用方式:**
/// ```dart
/// // 1. 初始化服务(在应用启动时调用一次)
/// WeatherService().init();
///
/// // 2. 在页面中使用
/// final service = WeatherService();
/// final weather = await service.getCurrentWeather('101010100');
/// ```
class WeatherService {
  // 单例模式实现
  // _instance 是类的唯一实例
  static final WeatherService _instance = WeatherService._internal();
  // factory 构造函数,返回唯一实例
  factory WeatherService() => _instance;
  // 私有构造函数,防止外部直接创建实例
  WeatherService._internal();

  // API 密钥常量
  // ⚠️ 重要:实际使用时应该从配置文件或环境变量读取
  // 不要将真实密钥提交到版本控制系统!
  static const String _apiKey = '和风天气控制台获取API KEY';

  // Dio 实例,用于发送 HTTP 请求
  late Dio _dio;

  // Retrofit API 服务实例
  late QWeatherApi _api;
验证:
- ✅ 确认单例模式实现正确
- ✅ 确认 API Key 常量已定义
- ✅ 确认 Dio 和 API 实例变量已声明
步骤 3.4:实现初始化方法
操作步骤:
- 📝 添加
init()方法:
  /// ⚙️ 初始化服务
  /// 配置 Dio 实例和拦截器,创建 API 服务实例
  ///
  /// **调用时机:** 在应用启动时调用一次,通常在 main.dart 或首页的 initState 中
  ///
  /// **配置内容:**
  /// - 设置基础 URL
  /// - 配置请求超时时间
  /// - 添加请求头(包括 API Key)
  /// - 添加日志拦截器
  void init() {
    // 创建 Dio 实例并配置基础选项
    _dio = Dio(
      BaseOptions(
        baseUrl: '和风天气控制台获取API HOST',  // API 基础地址
        connectTimeout: const Duration(seconds: 10),        // 连接超时时间
        receiveTimeout: const Duration(seconds: 10),       // 接收超时时间
        headers: {
          'Content-Type': 'application/json',               // 请求内容类型
          'X-QW-Api-Key': _apiKey,                          // 在请求头中添加 API Key
        },
      ),
    );

    // 添加日志拦截器,用于调试
    // 拦截器会在请求发送前和响应接收后执行
    _dio.interceptors.add(
      LogInterceptor(
        requestBody: true,      // 记录请求体
        responseBody: true,     // 记录响应体
        requestHeader: true,    // 记录请求头
        responseHeader: false,   // 不记录响应头(减少日志量)
      ),
    );

    // 创建 Retrofit API 服务实例
    // 传入 Dio 实例,Retrofit 会自动使用配置好的请求头
    _api = QWeatherApi(_dio);
  }
验证:
- ✅ 确认
init()方法已添加 - ✅ 确认
baseUrl正确 - ✅ 确认 API Key 已添加到请求头
- ✅ 确认日志拦截器已添加
步骤 3.5:实现城市搜索方法
操作步骤:
- 📝 添加
searchCity()方法:
  /// 🔍 城市搜索方法
  ///
  /// **功能说明:** 根据城市名称搜索城市信息,支持模糊搜索
  ///
  /// **参数说明:**
  /// - [cityName] 必填 - 城市名称,支持模糊搜索(最少一个汉字或2个字符)
  ///   也可以传入经纬度坐标或 LocationID
  /// - [adm] 可选 - 上级行政区划,用于排除重名城市
  /// - [range] 可选 - 搜索范围,ISO 3166 国家代码(如 'cn')
  /// - [number] 可选 - 返回结果数量,取值范围1-20,默认10个
  ///
  /// **返回值:** `List<Location>` - 城市列表,按相关性和 Rank 值排序
  ///
  /// **使用示例:**
  /// ```dart
  /// final cities = await WeatherService().searchCity('北京', number: 5);
  /// ```
  Future<List<Location>> searchCity(
    String cityName, {  // 必填参数,城市名称
    String? adm,        // 可选参数,上级行政区划
    String? range,      // 可选参数,搜索范围
    int number = 10,    // 可选参数,返回数量,默认10个
  }) async {
    try {
      // 调用 Retrofit API 接口
      // 注意:API Key 已经在请求头中配置,不需要在此传递
      final response = await _api.cityLookup(
        cityName,           // 传递城市名称
        adm: adm,           // 传递上级行政区划(如果有)
        range: range,       // 传递搜索范围(如果有)
        number: number,     // 传递返回数量
        lang: 'zh',         // 设置语言为中文
      );

      // 检查响应状态码
      if (response.code == '200') {  // 200 表示成功
        return response.location ?? [];  // 返回城市列表,如果为空则返回空列表
      } else {
        throw Exception('搜索失败: ${response.code}');  // 抛出异常
      }
    } catch (e) {
      // 捕获异常并重新抛出,添加更友好的错误信息
      throw Exception('城市搜索失败: $e');
    }
  }
验证:
- ✅ 确认方法签名正确
- ✅ 确认调用了
_api.cityLookup() - ✅ 确认错误处理已添加
步骤 3.6:实现获取实时天气方法
操作步骤:
- 📝 添加
getCurrentWeather()方法:
  /// 🌡️ 获取实时天气方法
  ///
  /// **功能说明:** 获取指定城市的实时天气数据
  ///
  /// **参数说明:**
  /// - [locationId] 必填 - LocationID(如"101010100")或经纬度坐标(如"116.41,39.92")
  ///   LocationID 可通过城市搜索接口获取
  ///
  /// **返回值:** `WeatherResponse` - 包含当前天气信息的响应对象
  ///
  /// **使用示例:**
  /// ```dart
  /// final weather = await WeatherService().getCurrentWeather('101010100');
  /// print('当前温度: ${weather.now?.temp}°C');
  /// ```
  Future<WeatherResponse> getCurrentWeather(String locationId) async {
    try {
      // 调用实时天气接口
      // API Key 已在请求头中配置,不需要在此传递
      final response = await _api.weatherNow(
        locationId,    // 传递城市位置ID或坐标
        lang: 'zh',    // 设置语言为中文
      );

      // 检查响应状态码
      if (response.code == '200') {  // 200 表示成功
        return response;              // 返回天气数据
      } else {
        throw Exception('获取天气失败: ${response.code}');  // 抛出异常
      }
    } catch (e) {
      // 捕获异常并重新抛出,添加更友好的错误信息
      throw Exception('获取实时天气失败: $e');
    }
  }
验证:
- ✅ 确认方法签名正确
- ✅ 确认调用了
_api.weatherNow() - ✅ 确认错误处理已添加
步骤 3.7:实现其他 API 方法
操作步骤:
- 📝 继续添加其他方法(参考实际代码):
getDailyForecast()- 获取每日预报get7DayForecast()- 获取7天预报(兼容方法)getTopCities()- 获取热门城市getWeatherByCityName()- 根据城市名称获取天气
完整代码请参考: lib/api/weather_service.dart 文件
步骤 3.8:保存文件
操作步骤:
- 💾 保存
weather_service.dart文件 - ✅ 确认文件已保存
4. 📱 在首页使用 Retrofit
📄 文件说明:lib/screens/home_page.dart
文件作用: 首页 UI 实现,使用 Retrofit 进行网络请求
关键点:
- 在
initState()中初始化WeatherService - 使用
WeatherService的方法进行网络请求 - 处理加载状态和错误状态
- 显示天气数据
步骤 4.1:打开首页文件
操作步骤:
- 📂 打开
lib/screens/home_page.dart文件 - ✅ 确认文件存在
步骤 4.2:添加导入语句
操作步骤:
- 📝 在文件开头添加导入语句:
// 导入 Flutter Material 设计库
import 'package:flutter/material.dart';
// 导入 shared_preferences(用于读取当前城市)
import 'package:shared_preferences/shared_preferences.dart';
// 导入天气服务(Retrofit 封装)
import '../api/weather_service.dart';
// 导入天气数据模型
import '../models/weather_models.dart';
验证:
- ✅ 确认所有导入语句正确
步骤 4.3:在 initState 中初始化服务
操作步骤:
- 📝 在
_HomePageState类的initState()方法中添加:
void initState() {
super.initState();
// 初始化天气服务(配置 Dio、拦截器、API Key)
_weatherService.init();
// 加载天气数据
_loadWeatherData();
// 加载热门城市
_loadTopCities();
}
验证:
- ✅ 确认
_weatherService.init()已调用 - ✅ 确认在
initState()中调用
步骤 4.4:实现加载天气数据方法
操作步骤:
- 📝 添加
_loadWeatherData()方法:
  /// 🔄 加载天气数据方法
  ///
  /// **功能说明:** 使用 Retrofit 获取实时天气数据
  /// **使用 Retrofit:** 通过 WeatherService 调用 Retrofit API
  Future<void> _loadWeatherData() async {
    // 设置加载状态
    setState(() {
      _isLoading = true;      // 开始加载
      _errorMessage = null;  // 清除之前的错误信息
    });

    try {
      // 使用 Retrofit 获取实时天气
      // WeatherService 内部使用 Retrofit API 进行网络请求
      final weather = await _weatherService.getCurrentWeather(_currentLocationId);

      // 更新状态,显示天气数据
      setState(() {
        _currentWeather = weather;   // 保存天气数据
        _isLoading = false;   // 加载完成
      });
    } catch (e) {
      // 捕获异常,显示错误信息
      setState(() {
        _errorMessage = '加载失败: $e';  // 保存错误信息
        _isLoading = false;             // 加载完成(失败)
      });
    }
  }
验证:
- ✅ 确认使用了
_weatherService.getCurrentWeather() - ✅ 确认错误处理已添加
步骤 4.5:实现加载热门城市方法
操作步骤:
- 📝 添加
_loadTopCities()方法:
  /// 🔥 加载热门城市方法
  ///
  /// **功能说明:** 使用 Retrofit 获取热门城市列表
  /// **使用 Retrofit:** 通过 WeatherService 调用 Retrofit API
  Future<void> _loadTopCities() async {
    try {
      // 使用 Retrofit 获取热门城市
      // WeatherService 内部使用 Retrofit API 进行网络请求
      final cities = await _weatherService.getTopCities(range: 'cn', number: 5);

      // 更新状态,显示热门城市
      setState(() {
        _topCities = cities;
      });
    } catch (e) {
      // 热门城市加载失败不影响主功能
      debugPrint('加载热门城市失败: $e');
    }
  }
验证:
- ✅ 确认使用了
_weatherService.getTopCities() - ✅ 确认错误处理已添加
步骤 4.6:在 UI 中显示数据
操作步骤:
- 📝 在
build()方法中使用天气数据:
Widget build(BuildContext context) {
return Scaffold(
backgroundColor: Colors.grey.shade50,
appBar: AppBar(
title: Text(
_currentCity,
style: const TextStyle(
fontWeight: FontWeight.w600,
fontSize: 18,
color: Colors.black87,
),
),
backgroundColor: Colors.white,
elevation: 0,
centerTitle: true,
actions: [
IconButton(
icon: Icon(Icons.search, color: Colors.grey.shade700),
onPressed: () {
_showCitySearchDialog(); // 使用 Retrofit 搜索城市
},
tooltip: '搜索城市',
),
IconButton(
icon: Icon(Icons.refresh, color: Colors.grey.shade700),
onPressed: _loadWeatherData, // 使用 Retrofit 刷新天气
tooltip: '刷新',
),
],
),
body: _isLoading
? Center(
child: Column(
mainAxisAlignment: MainAxisAlignment.center,
children: [
const CircularProgressIndicator(
valueColor: AlwaysStoppedAnimation<Color>(Color(0xFF6366F1)),
),
const SizedBox(height: 16),
Text(
'加载中...',
style: TextStyle(
fontSize: 14,
color: Colors.grey.shade600,
),
),
],
),
)
: _errorMessage != null
? Center(
child: Column(
mainAxisAlignment: MainAxisAlignment.center,
children: [
Icon(
Icons.error_outline,
size: 64,
color: Colors.grey.shade400,
),
const SizedBox(height: 16),
Text(
_errorMessage!,
style: TextStyle(
fontSize: 14,
color: Colors.grey.shade700,
),
textAlign: TextAlign.center,
),
const SizedBox(height: 24),
ElevatedButton(
onPressed: _loadWeatherData, // 重试:使用 Retrofit
style: ElevatedButton.styleFrom(
backgroundColor: const Color(0xFF6366F1),
foregroundColor: Colors.white,
padding: const EdgeInsets.symmetric(
horizontal: 24,
vertical: 12,
),
shape: RoundedRectangleBorder(
borderRadius: BorderRadius.circular(12),
),
elevation: 0,
),
child: const Text('重试'),
),
],
),
)
: RefreshIndicator(
onRefresh: _loadWeatherData, // 下拉刷新:使用 Retrofit
color: const Color(0xFF6366F1),
child: SingleChildScrollView(
physics: const AlwaysScrollableScrollPhysics(),
child: Column(
children: [
const SizedBox(height: 8),
// 热门城市卡片(使用 Retrofit 获取的数据)
if (_topCities != null && _topCities!.isNotEmpty)
_buildTopCitiesCard(),
if (_topCities != null && _topCities!.isNotEmpty)
const SizedBox(height: 16),
// 当前天气卡片(使用 Retrofit 获取的数据)
if (_currentWeather?.now != null)
_buildCurrentWeatherCard(_currentWeather!.now!),
const SizedBox(height: 16),
// 详细信息卡片(使用 Retrofit 获取的数据)
if (_currentWeather?.now != null)
_buildDetailWeatherCard(_currentWeather!.now!),
const SizedBox(height: 24),
],
),
),
),
);
}
验证:
- ✅ 确认使用了
_currentWeather和_topCities数据 - ✅ 确认加载状态和错误状态已处理
步骤 4.7:实现城市搜索对话框
操作步骤:
- 📝 添加
_showCitySearchDialog()方法(使用 Retrofit 搜索):
  /// 🔍 显示城市搜索对话框
  ///
  /// **功能说明:** 使用 Retrofit 搜索城市并切换
  void _showCitySearchDialog() {
    final TextEditingController controller = TextEditingController();

    showDialog(
      context: context,
      builder: (context) => AlertDialog(
        title: const Text('搜索城市'),
        content: TextField(
          controller: controller,
          decoration: const InputDecoration(
            hintText: '请输入城市名称',
            border: OutlineInputBorder(),
          ),
        ),
        actions: [
          TextButton(
            onPressed: () => Navigator.pop(context),
            child: const Text('取消'),
          ),
          TextButton(
            onPressed: () async {
              if (controller.text.trim().isNotEmpty) {
                Navigator.pop(context);
                try {
                  // 使用 Retrofit 搜索城市
                  final cities = await _weatherService.searchCity(
                    controller.text.trim(),
                    range: 'cn',
                    number: 1,
                  );
                  if (cities.isNotEmpty) {
                    await _switchCity(cities.first.name, cities.first.id);
                  } else {
                    ScaffoldMessenger.of(context).showSnackBar(
                      const SnackBar(content: Text('未找到城市')),
                    );
                  }
                } catch (e) {
                  ScaffoldMessenger.of(context).showSnackBar(
                    SnackBar(content: Text('搜索失败: $e')),
                  );
                }
              }
            },
            child: const Text('搜索'),
          ),
        ],
      ),
    );
  }
验证:
- ✅ 确认使用了
_weatherService.searchCity() - ✅ 确认错误处理已添加
首页实战案例
📄 文件说明:lib/screens/home_page.dart
文件作用: 首页 UI 实现,使用 Retrofit 进行所有网络请求
Retrofit 使用位置:
- 初始化:
initState()中调用_weatherService.init() - 加载天气:
_loadWeatherData()中使用getCurrentWeather() - 加载热门城市:
_loadTopCities()中使用getTopCities() - 搜索城市:
_showCitySearchDialog()中使用searchCity() - 切换城市:
_switchCity()中重新调用_loadWeatherData() - 下拉刷新:
RefreshIndicator的onRefresh回调中使用_loadWeatherData() - 手动刷新:AppBar 刷新按钮使用
_loadWeatherData()
📋 首页功能实现流程图
🎯 首页实现的功能模块
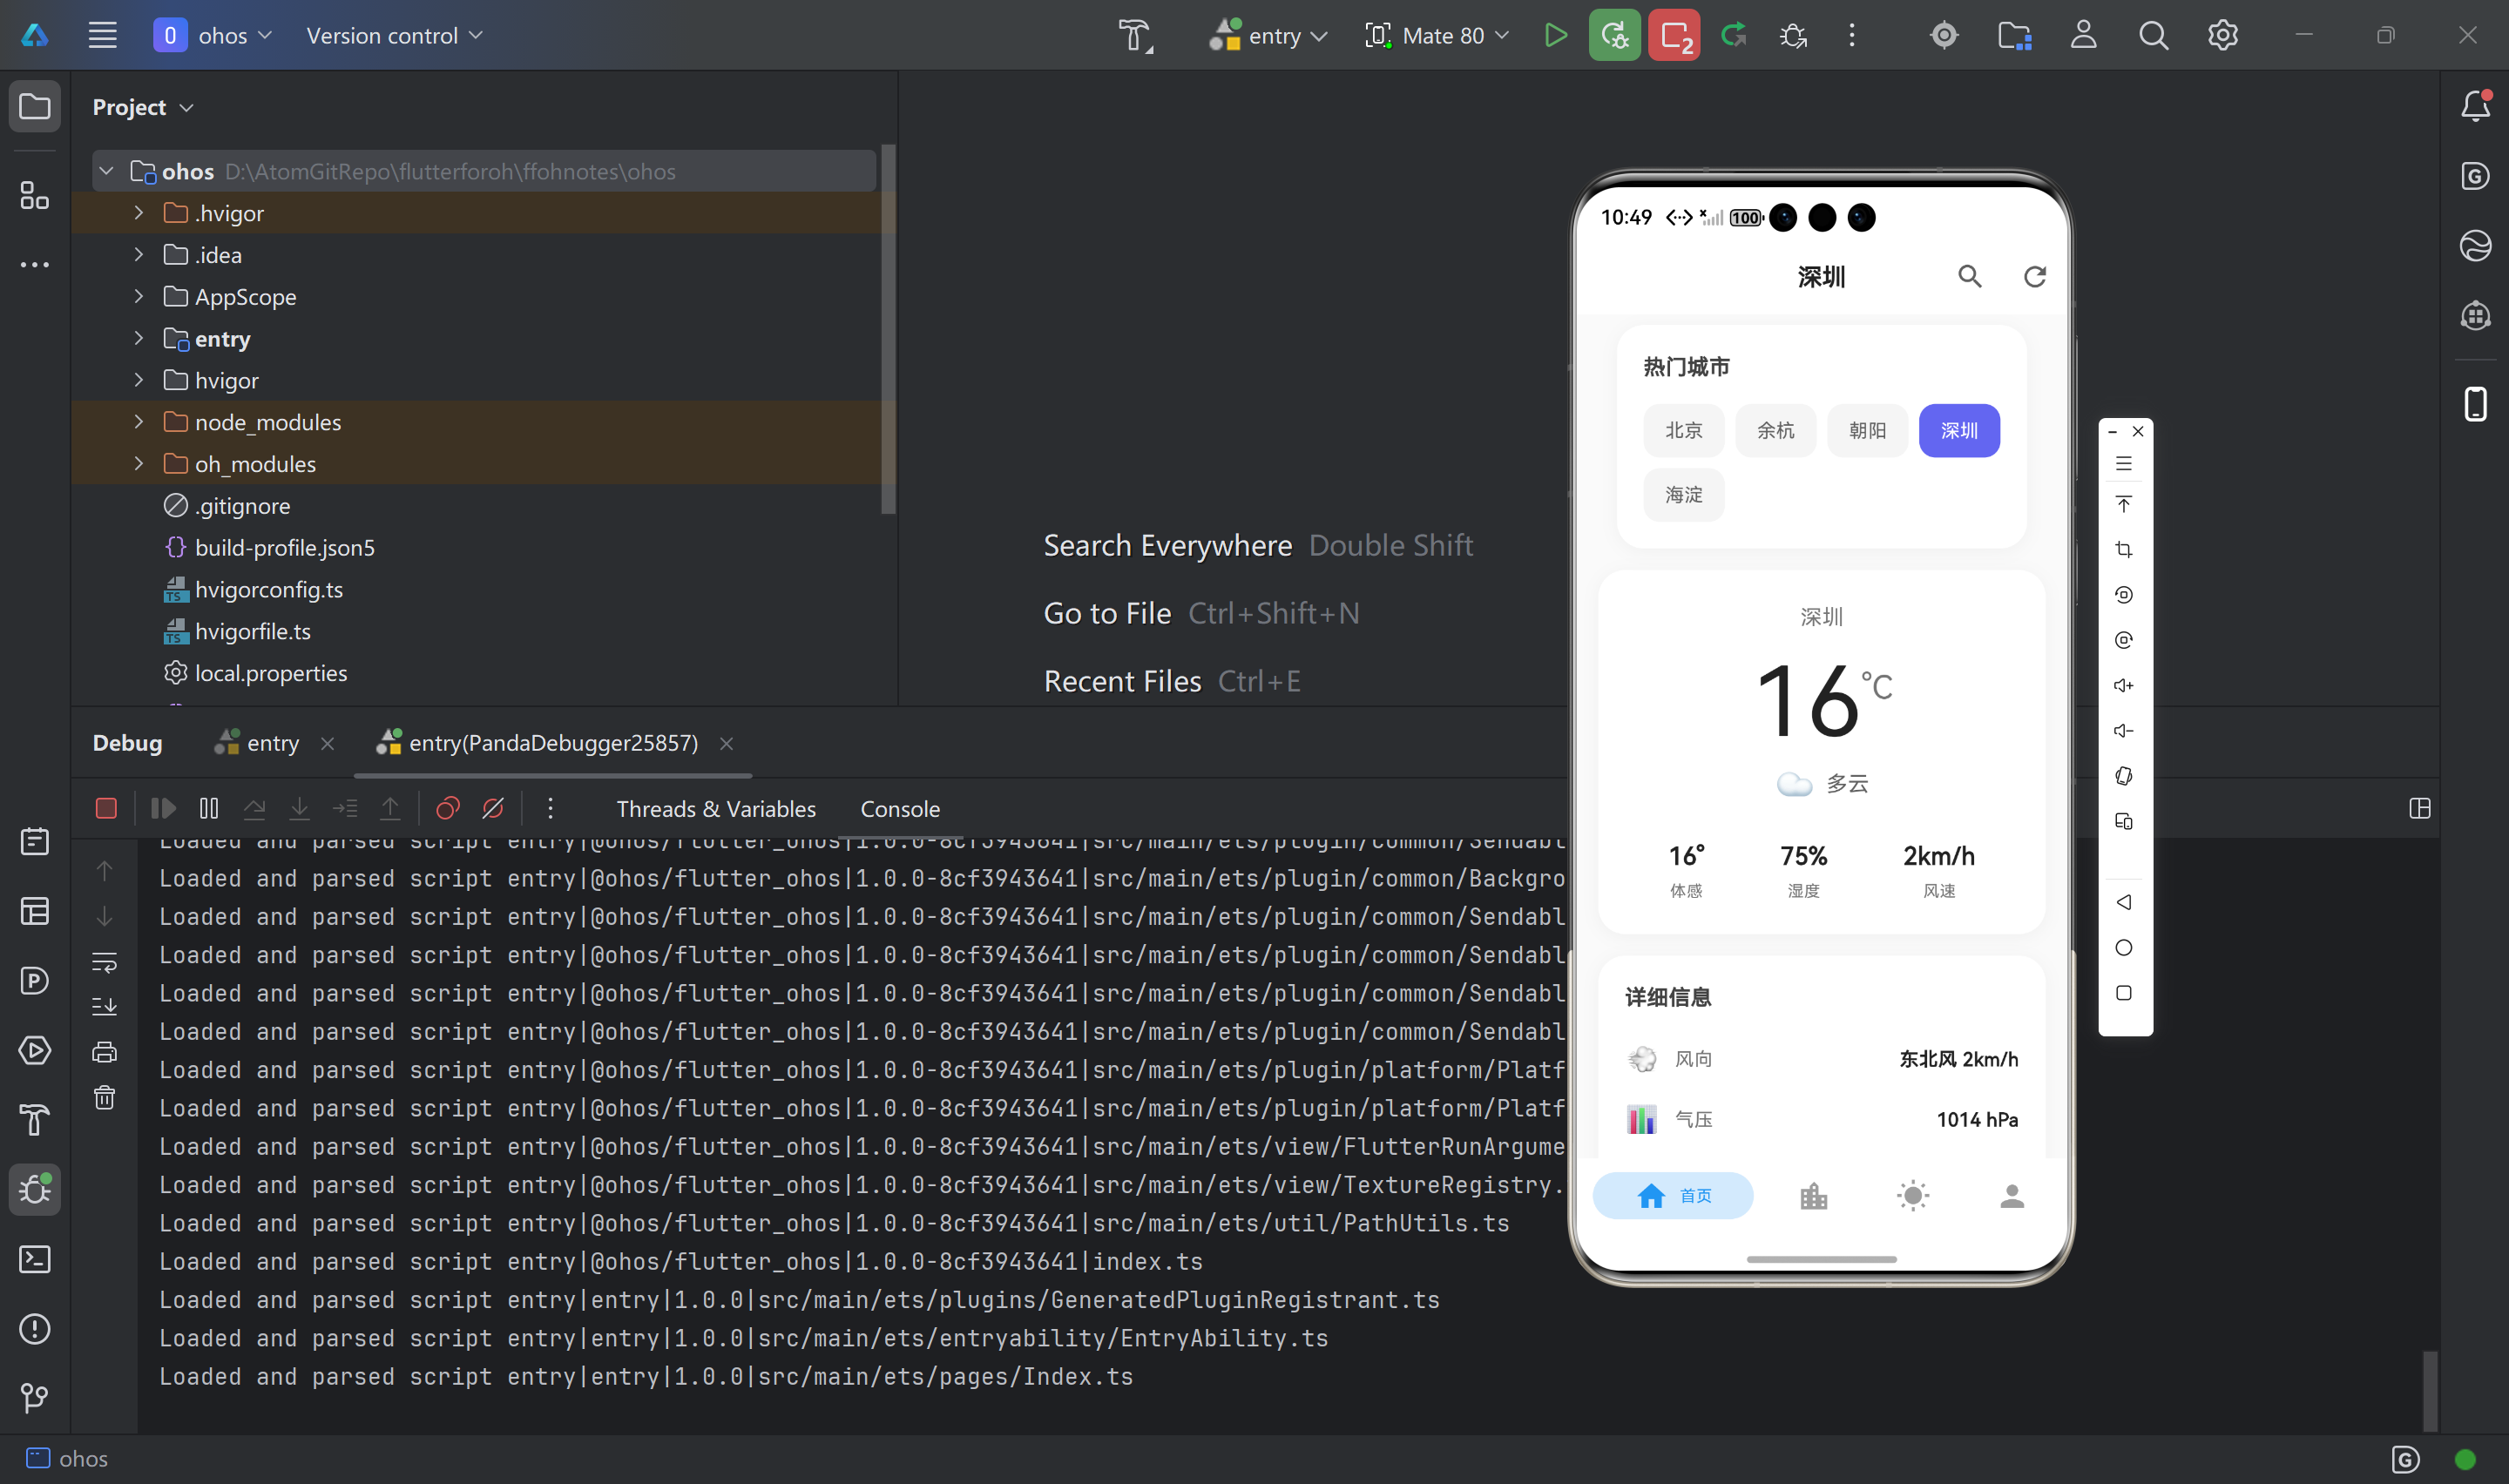
1. 🌡️ 当前天气卡片 (_buildCurrentWeatherCard)
功能说明: 显示当前城市的实时天气信息
使用 Retrofit 数据: _currentWeather.now(通过 getCurrentWeather() 获取)
显示内容:
- 城市名称
- 当前温度(大号字体)
- 天气状况文字和 Emoji 图标
- 体感温度、湿度、风速
代码位置: lib/screens/home_page.dart
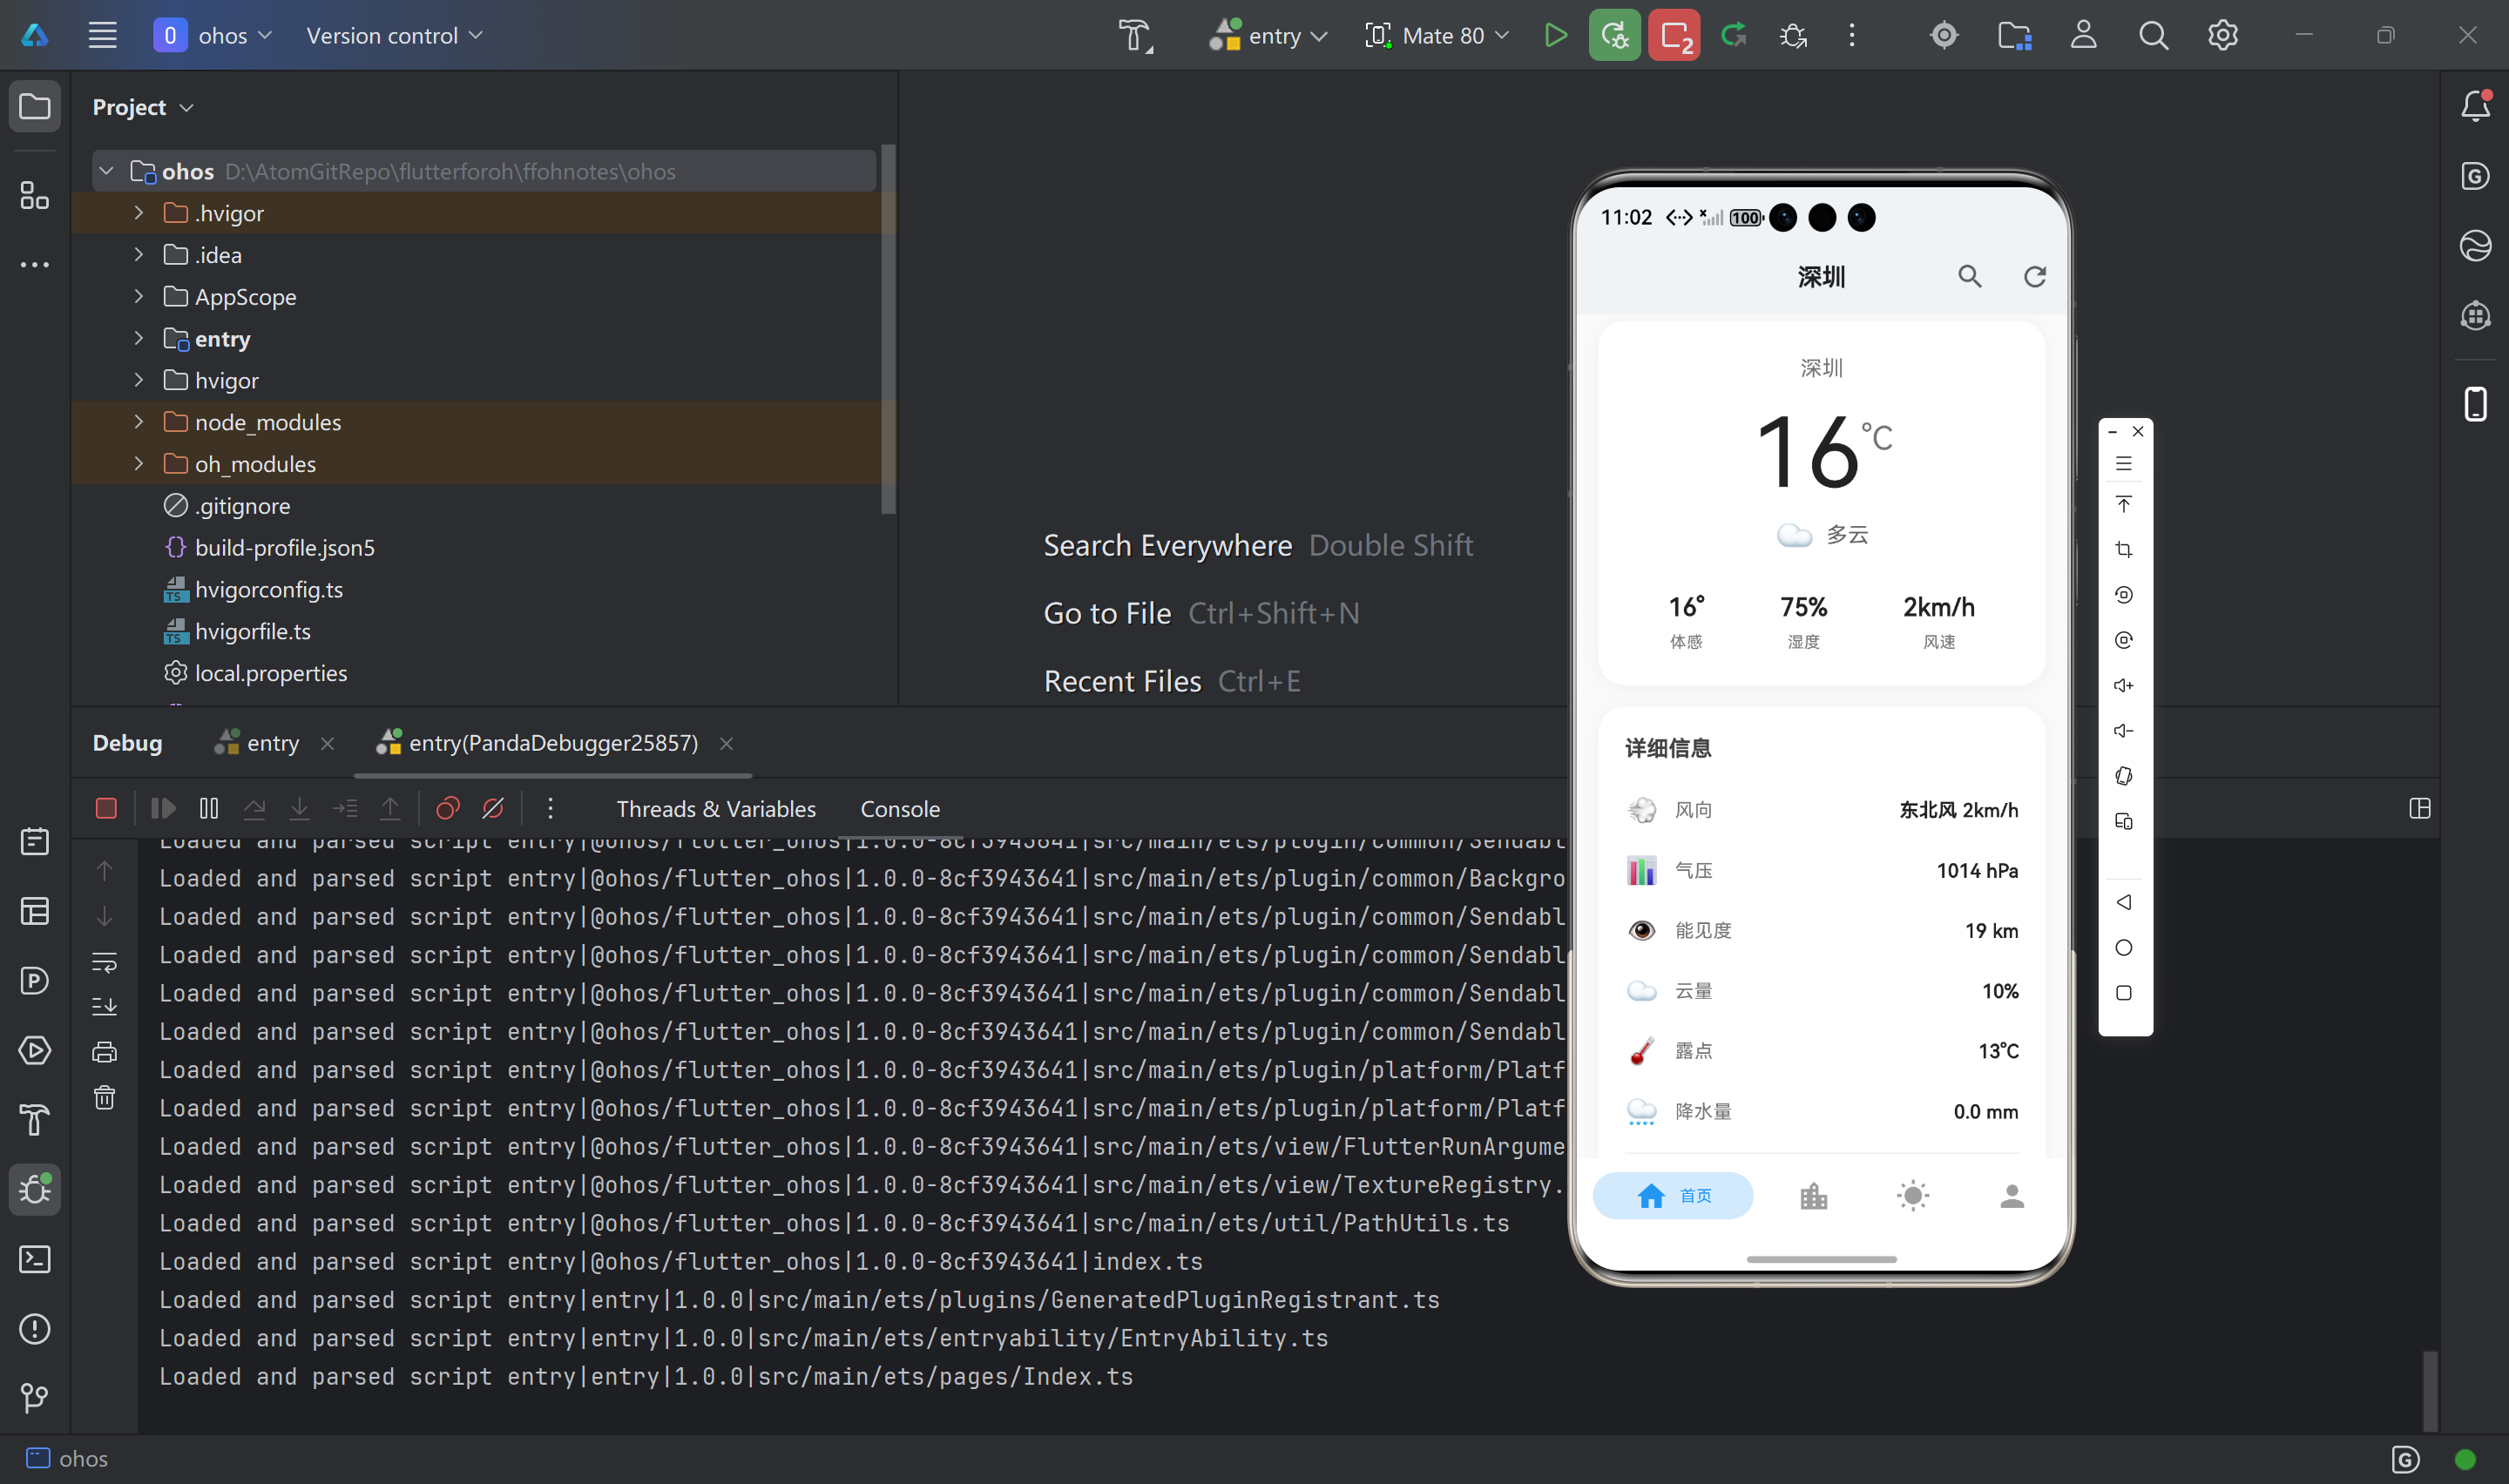
2. 📊 详细信息卡片 (_buildDetailWeatherCard)
功能说明: 显示更多实时天气详细信息
使用 Retrofit 数据: _currentWeather.now(通过 getCurrentWeather() 获取)
显示内容:
- 风向和风速
- 气压
- 能见度
- 云量
- 露点温度
- 降水量
- 观测时间
代码位置: lib/screens/home_page.dart
3. 🔥 热门城市卡片 (_buildTopCitiesCard)
功能说明: 显示热门城市列表,支持快速切换
使用 Retrofit 数据: _topCities(通过 getTopCities() 获取)
功能特点:
- 显示热门城市列表
- 支持点击切换城市
- 选中状态高亮显示
- 动画效果
代码位置: lib/screens/home_page.dart
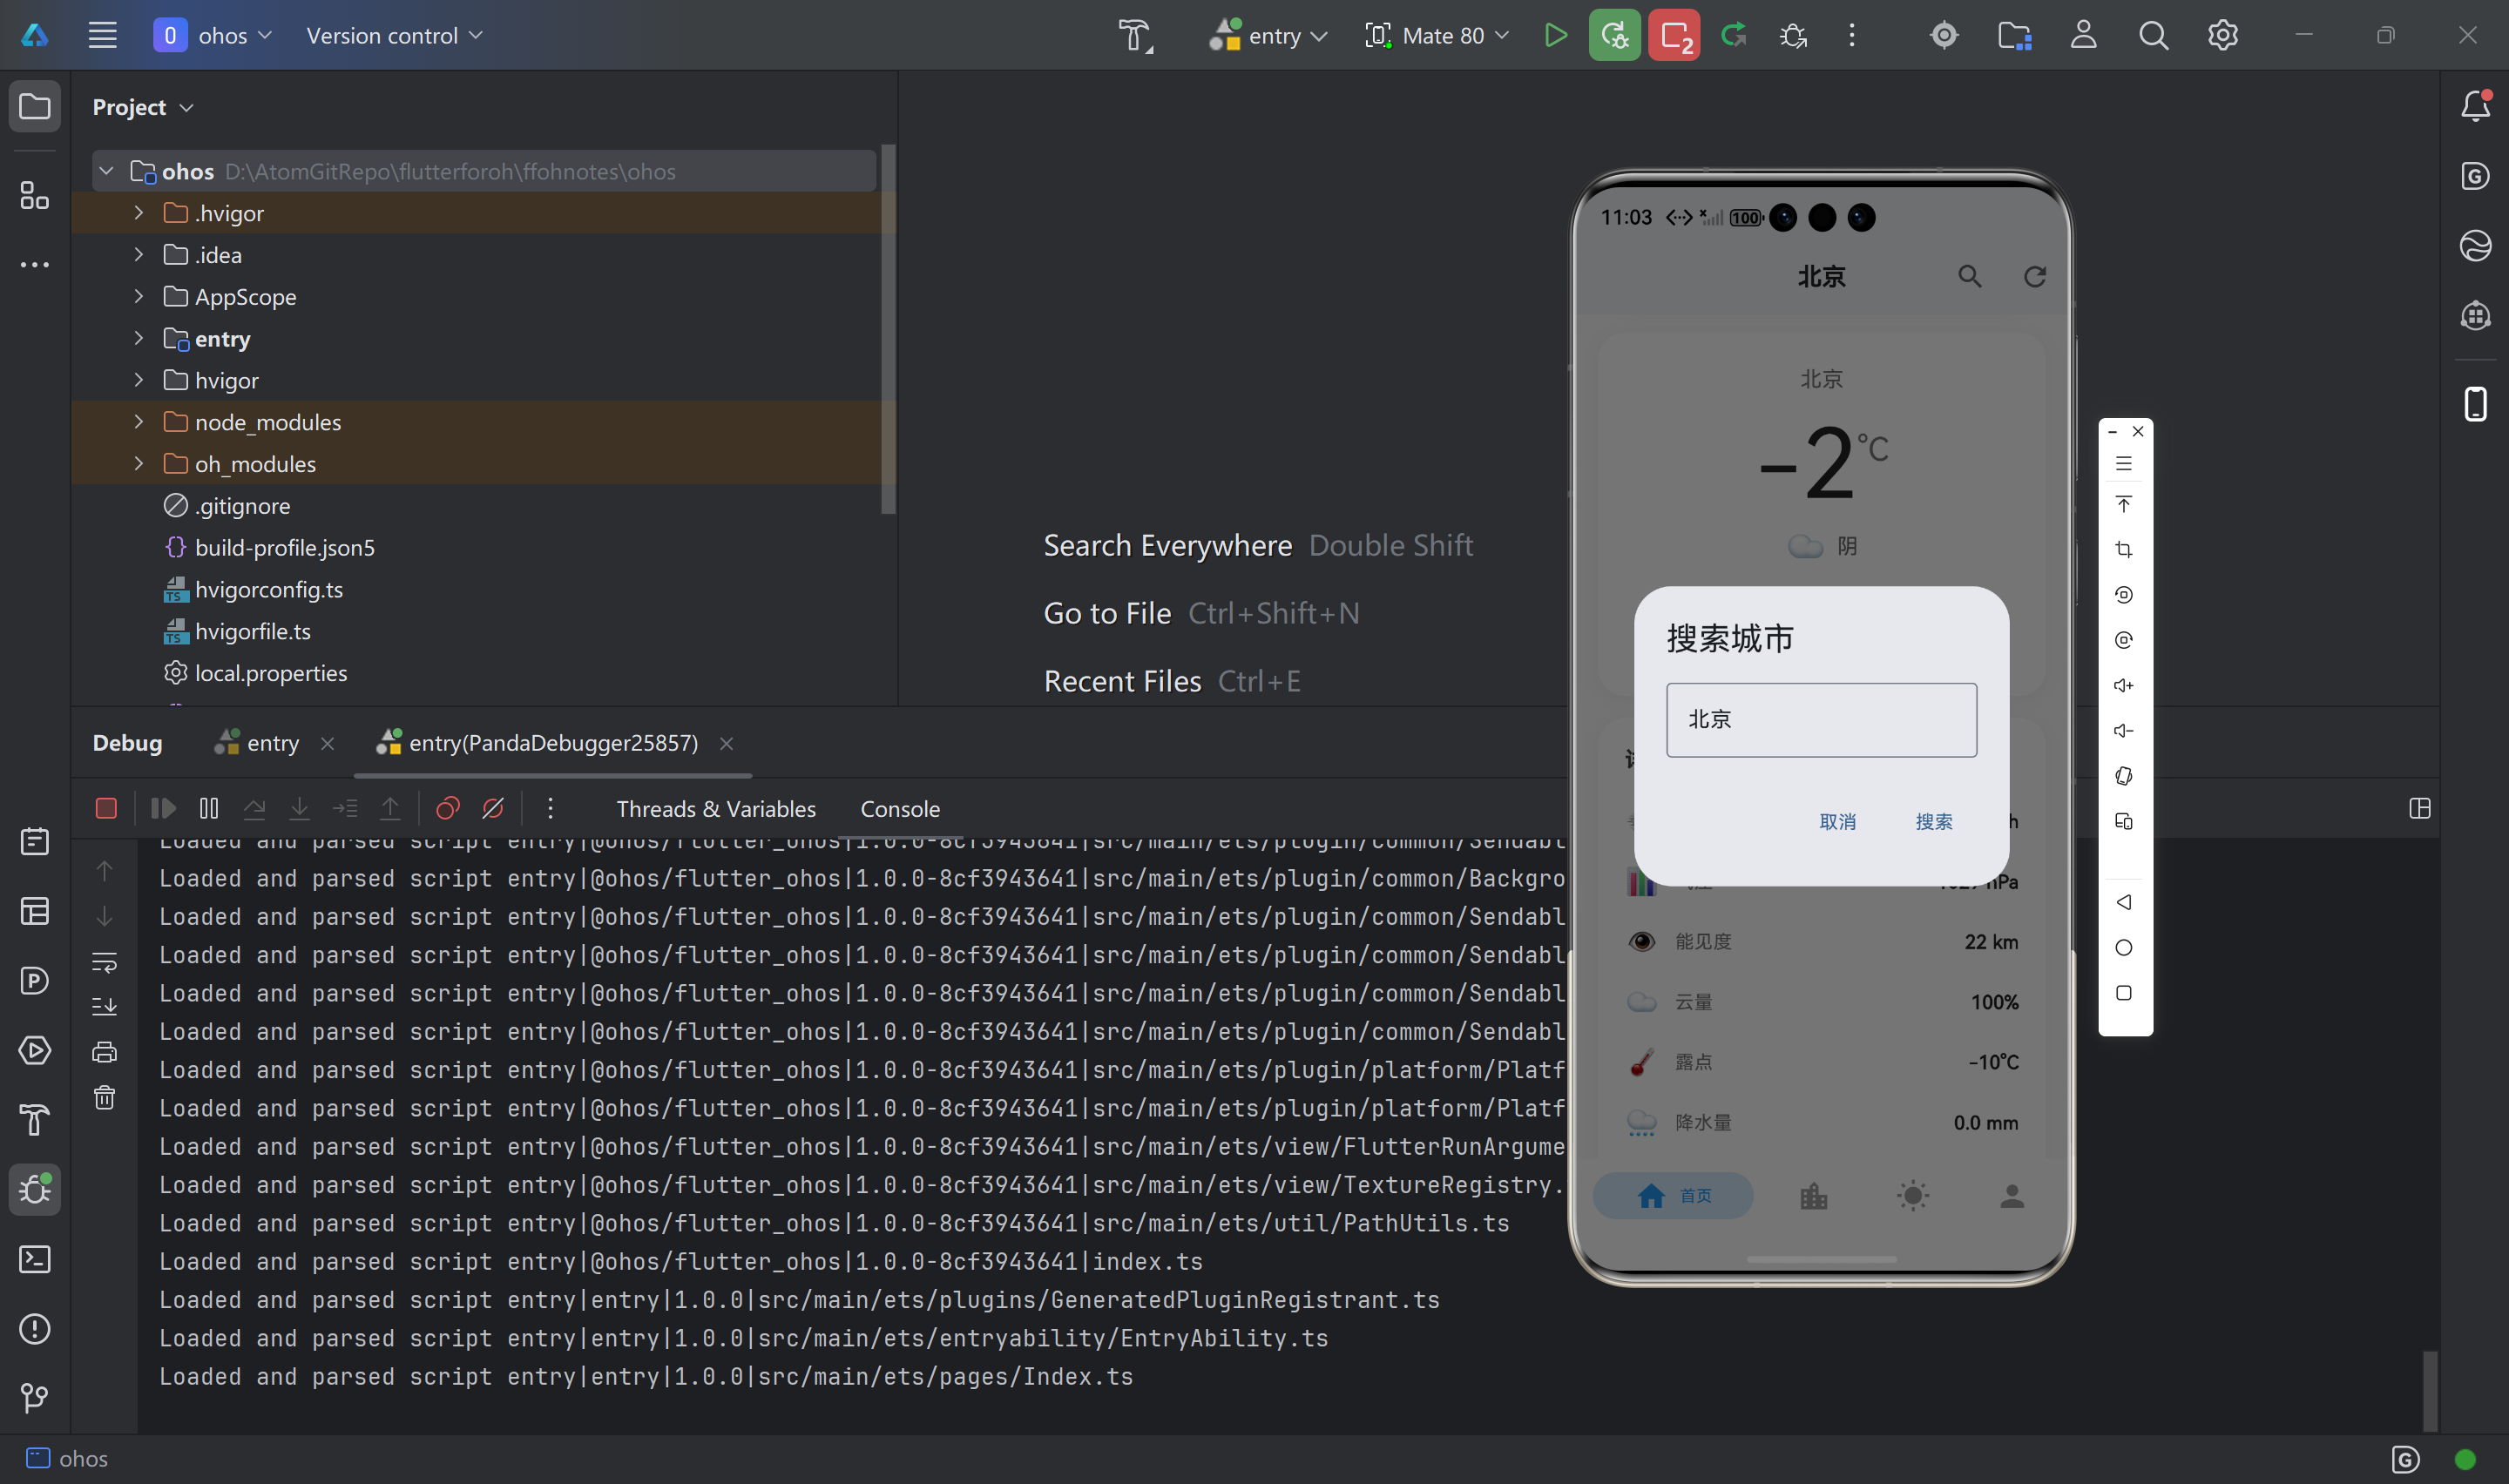
4. 🔍 搜索城市功能 (_showCitySearchDialog)
功能说明: 通过对话框搜索城市并切换
使用 Retrofit: _weatherService.searchCity()
功能特点:
- 点击 AppBar 搜索图标打开对话框
- 输入城市名称搜索
- 使用 Retrofit 调用搜索 API
- 自动切换到搜索结果
代码位置: lib/screens/home_page.dart
5. 🔄 下拉刷新功能
功能说明: 支持下拉手势刷新天气数据
使用 Retrofit: RefreshIndicator.onRefresh 回调调用 _loadWeatherData()
代码位置: lib/screens/home_page.dart
6. 🔄 手动刷新功能
功能说明: 点击 AppBar 刷新按钮重新加载数据
使用 Retrofit: AppBar 刷新按钮的 onPressed 调用 _loadWeatherData()
代码位置: lib/screens/home_page.dart
🎨 UI 设计要点
- 🎨 现代简约风格:使用浅灰色背景(
Colors.grey.shade50)、白色卡片、圆角设计(20px) - 📦 卡片设计:使用白色背景、阴影效果,提升视觉层次
- 📱 响应式布局:适配不同屏幕尺寸,使用
SingleChildScrollView - ⏳ 加载状态:显示紫色加载指示器(
Color(0xFF6366F1))和友好的加载提示 - ❌ 错误处理:友好的错误提示和重试按钮
- 🎯 交互反馈:热门城市选中状态高亮,动画过渡效果
常见错误及解决方案
🔧 错误处理流程图
错误 1:代码生成失败
错误信息:
Error: Could not find a file named "pubspec.yaml" in ...
解决方案:
- 📂 确保在项目根目录运行命令
- 📄 检查
pubspec.yaml文件是否存在 - 📦 运行
flutter pub get确保依赖已安装
错误 2:找不到生成的代码
错误信息:
Error: The getter '_$LocationFromJson' isn't defined
解决方案:
-
⚙️ 运行代码生成命令:
flutter pub run build_runner build --delete-conflicting-outputs -
📝 检查
part声明是否正确 -
📂 确保生成的
.g.dart文件存在
错误 3:retrofit_generator 版本不兼容
错误信息:
Error: Final variable 'mapperCode' must be assigned before it can be used.
解决方案:
-
📄 更新
pubspec.yaml中的retrofit_generator版本:dev_dependencies: retrofit_generator: ^10.2.1 # 必须使用 10.2.1 或更高版本 -
🧹 清理项目:
flutter clean -
📦 重新安装依赖:
flutter pub get -
⚙️ 重新运行代码生成:
flutter pub run build_runner build --delete-conflicting-outputs
错误 4:build_runner 编译失败
错误信息:
Error: Couldn't resolve the package 'build_runner_core'
解决方案:
-
🧹 清理项目:
flutter clean -
🗑️ 删除
.dart_tool目录(如果存在):rm -rf .dart_tool -
📦 重新安装依赖:
flutter pub get -
⚙️ 重新运行代码生成:
flutter pub run build_runner build --delete-conflicting-outputs
错误 5:JSON 解析失败
错误信息:
Exception: type 'Null' is not a subtype of type 'String'
解决方案:
- 📋 检查模型类中的字段是否都声明为可空(使用
?) - 🔍 确保 API 返回的数据结构与模型匹配
- 📝 参考 API 文档,确认哪些字段可能为空
示例修复:
// 错误:字段可能为 null,但未标记为可空
final String cloud;

// 正确:标记为可空类型
final String? cloud;
总结
📊 完整实现流程图
📋 本教程完成的内容
本教程详细介绍了如何在 Flutter 项目首页中使用 Retrofit 进行网络请求,实现天气预报功能。主要内容包括:
- ✅ 📦 引入三方库:添加 Retrofit、Dio、json_annotation 等依赖到
pubspec.yaml - ✅ 📊 创建数据模型:在
lib/models/weather_models.dart中定义所有天气相关的数据模型 - ✅ 🌐 创建 API 接口:在
lib/api/qweather_api.dart中使用 Retrofit 注解定义 API 端点 - ✅ 🔧 二次封装:在
lib/api/weather_service.dart中创建服务类,简化 API 调用 - ✅ 📱 首页实现:在
lib/screens/home_page.dart中实现首页 UI,使用 Retrofit 进行所有网络请求- 🌡️ 实时天气显示(
getCurrentWeather) - 🔥 热门城市列表(
getTopCities) - 🔍 城市搜索功能(
searchCity) - 🔄 下拉刷新和手动刷新
- 📊 详细信息展示
- 🌡️ 实时天气显示(
- ✅ 🔧 错误处理:提供常见错误及解决方案,帮助新手快速解决问题
💡 关键要点
- ⚙️ 代码生成:使用
build_runner自动生成序列化和 Retrofit 代码 - 🔒 类型安全:Retrofit 提供类型安全的 API 调用
- 🛡️ 错误处理:统一处理 API 错误和异常
- 📦 封装优势:二次封装简化调用,API Key 自动添加到请求头,提高代码复用性
- 🏠 首页使用 Retrofit:首页的所有网络请求都通过 Retrofit 完成,包括:
- 初始化时加载天气和热门城市
- 下拉刷新重新加载数据
- 搜索城市并切换
- 点击热门城市切换
📚 参考资源
- 📖 Retrofit 官方文档
- 📖 Dio 官方文档
- 📖 和风天气 API 文档
- 📖 JSON 序列化文档
💬 遇到问题? 查看 常见错误及解决方案 章节,或参考官方文档。
⚠️ 重要提示: 本教程中的 API 密钥需要替换为你的真实密钥。在生产环境中,请使用安全的方式存储和管理 API 密钥。
🎉 祝你开发顺利! 🚀
欢迎加入开源鸿蒙跨平台社区

作为“人工智能6S店”的官方数字引擎,为AI开发者与企业提供一个覆盖软硬件全栈、一站式门户。
更多推荐

 18
18 0
0- 0


 已为社区贡献21条内容

所有评论(0)