
React Native鸿蒙跨平台使用fabPosition 三态 bottomRight/bottomLeft/center 通过容器绝对定位实现挂点
悬浮按钮组件实现方案 核心特性 参数化设计:通过icon/onPress/color/size/label等参数实现高度复用 响应式布局:支持bottomRight/bottomLeft/center三种定位方式 动态样式:支持small/normal/large三种尺寸和自定义颜色 技术实现 使用绝对定位实现悬浮效果 通过StyleSheet管理样式 支持无障碍访问标签 提供默认参数简化调用 跨
高阶组件抽象模式
悬浮按钮组件采用了高度抽象的设计模式,通过可配置的属性接口实现灵活复用:
const FloatingActionButton = ({
  icon,
  onPress,
  color = '#3b82f6',
  size = 56,
  label = ''
}: {
  icon: string;
  onPress: () => void;
  color?: string;
  size?: number;
  label?: string;
}) => {
  // 组件实现
};
这种设计在跨平台开发中具有战略意义。通过将按钮的图标、点击事件、颜色、尺寸和标签等核心属性参数化,组件可以在不同平台上保持一致的API,同时内部实现可以根据平台特性进行优化。在鸿蒙平台上,这样的组件设计可以轻松适配鸿蒙的分布式UI特性,如跨设备悬浮按钮同步等。
复合组件设计体系
代码中构建了完整的组件层级体系:
- 原子组件:基础的FloatingActionButton
- 模板组件:ButtonStyleExample展示不同风格的按钮
- 容器组件:ElevatedButtonDemo整合所有子组件
这种分层架构在跨平台开发中尤为重要。当应用需要运行在鸿蒙平台时,不同层级的组件可以独立进行平台适配,而不影响整体架构。例如,可以仅替换原子组件的鸿蒙实现,而保持上层业务逻辑不变。
交互设计工程化实践
动态样式切换机制
代码实现了基于状态的条件样式应用:
<TouchableOpacity
  style={[styles.optionButton, fabPosition === 'bottomRight' && styles.selectedOption]}
  onPress={() => setFabPosition('bottomRight')}
>
  <Text style={styles.optionText}>右下角</Text>
</TouchableOpacity>
这种模式通过数组样式合并的方式实现条件样式应用,是React Native中处理动态样式的标准做法。在鸿蒙平台上,这种动态样式的实现方式需要考虑以下技术细节:
- 样式属性兼容性:确保使用的样式属性在鸿蒙上都有对应实现
- 动画性能优化:鸿蒙的动画系统与Android/iOS有所不同,需要针对性优化
- 渲染管线差异:鸿蒙的渲染管线可能对样式更新有不同处理
多状态管理架构
组件管理了多种交互状态:
const [fabPosition, setFabPosition] = useState<'bottomRight' | 'bottomLeft' | 'center'>('bottomRight');
const [fabSize, setFabSize] = useState<'normal' | 'large' | 'small'>('normal');
const [fabColor, setFabColor] = useState('#3b82f6');
这种细粒度的状态拆分遵循了React状态管理的最佳实践。在跨平台场景下,这种设计可以确保状态更新逻辑在各个平台上表现一致。值得注意的是,在鸿蒙的分布式场景中,这些状态可能需要在不同设备间同步,因此需要考虑状态序列化和冲突解决策略。
样式系统与布局架构
响应式定位系统
代码实现了灵活的悬浮按钮定位:
const styles = StyleSheet.create({
  fabWrapper: {
    position: 'absolute',
    bottom: 80,
  },
  fabBottomRight: {
    right: 20,
  },
  fabBottomLeft: {
    left: 20,
  },
  fabCenter: {
    left: (width - 56) / 2,
  },
});
这种响应式定位方案在跨平台开发中需要特别注意:
- 屏幕尺寸适配:鸿蒙设备的屏幕尺寸和比例可能与标准Android/iOS设备不同
- 安全区域处理:鸿蒙的刘海屏、圆角等特殊屏幕形态需要额外处理
- DPI适配:不同设备的像素密度差异需要考虑
阴影系统跨平台抽象
fab: {
  elevation: 6,
  shadowColor: '#000',
  shadowOffset: { width: 0, height: 4 },
  shadowOpacity: 0.3,
  shadowRadius: 6,
}
React Native通过同时支持Android的elevation和iOS的shadow属性来实现跨平台阴影效果。在鸿蒙平台上,开发者需要:
- 测试这些属性在鸿蒙上的实际表现
- 必要时通过Platform.select实现平台特定样式
- 考虑使用鸿蒙的原生阴影API获得最佳性能
鸿蒙跨端适配关键技术
分布式UI适配策略
鸿蒙的分布式能力可以为悬浮按钮带来创新体验:
// 伪代码:分布式悬浮按钮
const DistributedFAB = {
  syncAcrossDevices: (fabState) => {
    if (Platform.OS === 'harmony') {
      harmonyNative.syncUIElement('fab', fabState);
    }
  }
};
具体实现需要考虑:
- 状态同步机制:按钮位置、状态在多设备间的实时同步
- 交互事件路由:点击事件在不同设备间的传递处理
- 性能优化:减少分布式同步带来的延迟
方舟编译器优化
利用鸿蒙的方舟编译器提升性能:
// 伪代码:性能优化配置
const HarmonyPerformance = {
  optimizeFAB: () => {
    if (Platform.OS === 'harmony') {
      harmonyNative.enableHardwareAcceleration('fab');
      harmonyNative.setRenderPriority('fab', 'high');
    }
  }
};
优化要点包括:
- AOT编译:将关键路径代码提前编译
- 内存优化:减少悬浮按钮的内存占用
- 渲染管线优化:利用鸿蒙的声明式渲染引擎
平台能力集成
深度集成鸿蒙特有功能:
// 伪代码:鸿蒙能力集成
const HarmonyFeatures = {
  enableFABDrag: () => {
    if (Platform.OS === 'harmony') {
      harmonyNative.enableDragGesture('fab');
    }
  },
  connectToServiceWidget: () => {
    if (Platform.OS === 'harmony') {
      harmonyNative.connectToServiceWidget('fab');
    }
  }
};
概览
- 页面由两个语义组件组成:FloatingActionButton(FAB)承载主操作;ButtonStyleExample 用于演示风格与说明。状态位驱动 FAB 的位置、尺寸与颜色,点击行为通过 Alert 占位。
- 重点不在样式,而在交互语义、层级与覆盖、事件与可访问性、以及 React Native 与鸿蒙 ArkUI 的能力映射与实现差异。
组件语义
- FloatingActionButton 接口参数化 icon/onPress/color/size/label,实现“主操作”在任何页面的可复用挂载;label 独立显示,不与点击区域耦合,确保语义清晰。
- ButtonStyleExample 用 title/description/icon 描述“按钮风格 + 使用场景”语义,不承担能力执行,事件仅上推。
状态与行为
- fabPosition 三态 bottomRight/bottomLeft/center 通过容器绝对定位实现挂点;fabSize small/normal/large 映射到像素尺寸;fabColor 有一个聚合色盘驱动主色。
- 点击防抖建议在 onPress 层做去重(如 300ms),避免双击产生重复提交;长按与无障碍行为需要额外语义(确认、菜单、拖拽)。
布局与层级
- FAB 通过绝对定位覆盖页面,挂点相对屏幕宽度计算 center(left: (width - 56)/2);横竖屏切换或窗口尺寸变化要用 useWindowDimensions 或 onLayout 动态更新,避免居中偏移。
- 底部导航与 FAB 有层级重叠,按钮底边距(bottom:80)应考虑安全区与导航高度;键盘弹出时避免 FAB 遮挡输入,建议在键盘打开时自动隐藏或上移。
动画与物理
- 悬停/阴影加深在 RN 侧用 Animated/Pressable 触摸态模拟;位移动画(出现/收起/位置切换)建议 useNativeDriver:true 仅做 opacity/scale/translate,避免布局动画在低端机抖动。
- ArkUI 侧使用弹性或曲线插值(如 spring/curve)实现一致体感;颜色渐变与阴影变化在两端都尽量用状态映射而非频繁重绘。
可访问性
- 为 FAB 与示例按钮提供 accessibilityLabel/role(button),描述主操作含义(如 “添加内容”);label 是视觉说明,读屏应集中在按钮实体上而非重复朗读。
- 焦点顺序:FAB 优先级通常高于底部导航;有覆盖层时确保读屏不穿透;禁用态应可读(“不可用:缺少权限/网络”)。
完整代码演示:
// app.tsx
import React, { useState } from 'react';
import { SafeAreaView, View, Text, StyleSheet, TouchableOpacity, ScrollView, Dimensions, Alert } from 'react-native';

// 图标库
const ICONS = {
  home: '🏠',
  favorite: '❤️',
  share: '📤',
  settings: '⚙️',
  add: '➕',
  delete: '🗑️',
  edit: '✏️',
  back: '↩️',
};

const { width } = Dimensions.get('window');

// 悬浮按钮组件
const FloatingActionButton = ({
  icon,
  onPress,
  color = '#3b82f6',
  size = 56,
  label = ''
}: {
  icon: string;
  onPress: () => void;
  color?: string;
  size?: number;
  label?: string;
}) => {
  return (
    <View style={styles.fabContainer}>
      <TouchableOpacity
        style={[styles.fab, { backgroundColor: color, width: size, height: size }]}
        onPress={onPress}
      >
        <Text style={styles.fabIcon}>{icon}</Text>
      </TouchableOpacity>
      {label ? <Text style={styles.fabLabel}>{label}</Text> : null}
    </View>
  );
};

// 按钮样式示例组件
const ButtonStyleExample = ({
  title,
  description,
  icon,
  onPress
}: {
  title: string;
  description: string;
  icon: string;
  onPress: () => void
}) => {
  return (
    <TouchableOpacity style={styles.buttonExample} onPress={onPress}>
      <View style={styles.buttonIcon}>{icon}</View>
      <View style={styles.buttonContent}>
        <Text style={styles.buttonTitle}>{title}</Text>
        <Text style={styles.buttonDescription}>{description}</Text>
      </View>
    </TouchableOpacity>
  );
};

const ElevatedButtonDemo: React.FC = () => {
  const [fabPosition, setFabPosition] = useState<'bottomRight' | 'bottomLeft' | 'center'>('bottomRight');
  const [fabSize, setFabSize] = useState<'normal' | 'large' | 'small'>('normal');
  const [fabColor, setFabColor] = useState('#3b82f6');

  const handleFabPress = () => {
    Alert.alert('悬浮按钮点击', '您点击了悬浮按钮');
  };

  const handleStyleChange = (type: string) => {
    Alert.alert('样式变更', `已应用 ${type} 样式`);
  };

  return (
    <SafeAreaView style={styles.container}>
      {/* 头部 */}
      <View style={styles.header}>
        <TouchableOpacity style={styles.backButton}>
          <Text style={styles.backButtonText}>{ICONS.back}</Text>
        </TouchableOpacity>
        <Text style={styles.title}>悬浮按钮详解</Text>
        <View style={styles.placeholder} />
      </View>

      {/* 内容区域 */}
      <ScrollView style={styles.content}>
        <Text style={styles.sectionTitle}>悬浮按钮 (Floating Action Button)</Text>
        <Text style={styles.sectionDescription}>
          悬浮按钮是突出重要操作的圆形按钮,常用于执行主要或常见的操作。
        </Text>

        {/* 按钮样式示例 */}
        <Text style={styles.subTitle}>按钮样式示例</Text>
        <ButtonStyleExample
          title="默认样式"
          description="标准蓝色圆形按钮"
          icon={ICONS.add}
          onPress={() => handleStyleChange('默认')}
        />

        <ButtonStyleExample
          title="红色样式"
          description="用于删除等危险操作"
          icon={ICONS.delete}
          onPress={() => handleStyleChange('红色')}
        />

        <ButtonStyleExample
          title="绿色样式"
          description="用于确认或添加操作"
          icon={ICONS.favorite}
          onPress={() => handleStyleChange('绿色')}
        />

        {/* 位置选项 */}
        <Text style={styles.subTitle}>按钮位置</Text>
        <View style={styles.optionGroup}>
          <TouchableOpacity
            style={[styles.optionButton, fabPosition === 'bottomRight' && styles.selectedOption]}
            onPress={() => setFabPosition('bottomRight')}
          >
            <Text style={styles.optionText}>右下角</Text>
          </TouchableOpacity>
          <TouchableOpacity
            style={[styles.optionButton, fabPosition === 'bottomLeft' && styles.selectedOption]}
            onPress={() => setFabPosition('bottomLeft')}
          >
            <Text style={styles.optionText}>左下角</Text>
          </TouchableOpacity>
          <TouchableOpacity
            style={[styles.optionButton, fabPosition === 'center' && styles.selectedOption]}
            onPress={() => setFabPosition('center')}
          >
            <Text style={styles.optionText}>居中</Text>
          </TouchableOpacity>
        </View>

        {/* 尺寸选项 */}
        <Text style={styles.subTitle}>按钮尺寸</Text>
        <View style={styles.optionGroup}>
          <TouchableOpacity
            style={[styles.optionButton, fabSize === 'small' && styles.selectedOption]}
            onPress={() => setFabSize('small')}
          >
            <Text style={styles.optionText}>小号 (40px)</Text>
          </TouchableOpacity>
          <TouchableOpacity
            style={[styles.optionButton, fabSize === 'normal' && styles.selectedOption]}
            onPress={() => setFabSize('normal')}
          >
            <Text style={styles.optionText}>标准 (56px)</Text>
          </TouchableOpacity>
          <TouchableOpacity
            style={[styles.optionButton, fabSize === 'large' && styles.selectedOption]}
            onPress={() => setFabSize('large')}
          >
            <Text style={styles.optionText}>大号 (72px)</Text>
          </TouchableOpacity>
        </View>

        {/* 颜色选项 */}
        <Text style={styles.subTitle}>按钮颜色</Text>
        <View style={styles.colorOptions}>
          <TouchableOpacity
            style={[styles.colorOption, { backgroundColor: '#3b82f6' }]}
            onPress={() => setFabColor('#3b82f6')}
          />
          <TouchableOpacity
            style={[styles.colorOption, { backgroundColor: '#ef4444' }]}
            onPress={() => setFabColor('#ef4444')}
          />
          <TouchableOpacity
            style={[styles.colorOption, { backgroundColor: '#10b981' }]}
            onPress={() => setFabColor('#10b981')}
          />
          <TouchableOpacity
            style={[styles.colorOption, { backgroundColor: '#f59e0b' }]}
            onPress={() => setFabColor('#f59e0b')}
          />
          <TouchableOpacity
            style={[styles.colorOption, { backgroundColor: '#8b5cf6' }]}
            onPress={() => setFabColor('#8b5cf6')}
          />
        </View>

        {/* 使用场景说明 */}
        <Text style={styles.subTitle}>使用场景</Text>
        <View style={styles.scenarioContainer}>
          <View style={styles.scenarioItem}>
            <Text style={styles.scenarioIcon}>📝</Text>
            <Text style={styles.scenarioText}>创建新内容</Text>
          </View>
          <View style={styles.scenarioItem}>
            <Text style={styles.scenarioIcon}>❤️</Text>
            <Text style={styles.scenarioText}>收藏/点赞</Text>
          </View>
          <View style={styles.scenarioItem}>
            <Text style={styles.scenarioIcon}>📤</Text>
            <Text style={styles.scenarioText}>分享内容</Text>
          </View>
          <View style={styles.scenarioItem}>
            <Text style={styles.scenarioIcon}>📞</Text>
            <Text style={styles.scenarioText}>发起通话</Text>
          </View>
        </View>

        {/* 交互说明 */}
        <Text style={styles.subTitle}>交互效果</Text>
        <View style={styles.interactionContainer}>
          <Text style={styles.interactionText}>• 按下时有水波纹效果</Text>
          <Text style={styles.interactionText}>• 悬停时有阴影加深效果</Text>
          <Text style={styles.interactionText}>• 可添加标签说明按钮功能</Text>
          <Text style={styles.interactionText}>• 遵循 Material Design 规范</Text>
        </View>
      </ScrollView>

      {/* 悬浮按钮 */}
      <View style={[
        styles.fabWrapper,
        fabPosition === 'bottomRight' && styles.fabBottomRight,
        fabPosition === 'bottomLeft' && styles.fabBottomLeft,
        fabPosition === 'center' && styles.fabCenter
      ]}>
        <FloatingActionButton
          icon={ICONS.add}
          onPress={handleFabPress}
          color={fabColor}
          size={fabSize === 'large' ? 72 : fabSize === 'small' ? 40 : 56}
          label="添加"
        />
      </View>

      {/* 底部导航 */}
      <View style={styles.bottomNav}>
        <TouchableOpacity style={styles.navItem}>
          <Text style={styles.navIcon}>{ICONS.home}</Text>
          <Text style={styles.navText}>首页</Text>
        </TouchableOpacity>
        <TouchableOpacity style={styles.navItem}>
          <Text style={styles.navIcon}>{ICONS.settings}</Text>
          <Text style={styles.navText}>设置</Text>
        </TouchableOpacity>
        <TouchableOpacity style={styles.navItem}>
          <Text style={styles.navIcon}>{ICONS.favorite}</Text>
          <Text style={styles.navText}>收藏</Text>
        </TouchableOpacity>
        <TouchableOpacity style={styles.navItem}>
          <Text style={styles.navIcon}>{ICONS.share}</Text>
          <Text style={styles.navText}>分享</Text>
        </TouchableOpacity>
      </View>
    </SafeAreaView>
  );
};

const styles = StyleSheet.create({
  container: {
    flex: 1,
    backgroundColor: '#f8fafc',
  },
  header: {
    flexDirection: 'row',
    alignItems: 'center',
    justifyContent: 'space-between',
    padding: 20,
    backgroundColor: '#ffffff',
    borderBottomWidth: 1,
    borderBottomColor: '#e2e8f0',
  },
  backButton: {
    padding: 8,
  },
  backButtonText: {
    fontSize: 18,
    color: '#3b82f6',
  },
  title: {
    fontSize: 18,
    fontWeight: 'bold',
    color: '#1e293b',
  },
  placeholder: {
    width: 30,
  },
  content: {
    flex: 1,
    padding: 16,
  },
  sectionTitle: {
    fontSize: 20,
    fontWeight: 'bold',
    color: '#1e293b',
    marginBottom: 8,
  },
  sectionDescription: {
    fontSize: 14,
    color: '#64748b',
    lineHeight: 20,
    marginBottom: 20,
  },
  subTitle: {
    fontSize: 16,
    fontWeight: '600',
    color: '#1e293b',
    marginTop: 20,
    marginBottom: 12,
  },
  buttonExample: {
    flexDirection: 'row',
    alignItems: 'center',
    backgroundColor: '#ffffff',
    padding: 16,
    borderRadius: 8,
    marginBottom: 12,
    elevation: 1,
    shadowColor: '#000',
    shadowOffset: { width: 0, height: 1 },
    shadowOpacity: 0.1,
    shadowRadius: 2,
  },
  buttonIcon: {
    fontSize: 24,
    marginRight: 12,
  },
  buttonContent: {
    flex: 1,
  },
  buttonTitle: {
    fontSize: 16,
    fontWeight: '500',
    color: '#1e293b',
    marginBottom: 4,
  },
  buttonDescription: {
    fontSize: 14,
    color: '#64748b',
  },
  optionGroup: {
    flexDirection: 'row',
    justifyContent: 'space-between',
    marginBottom: 16,
  },
  optionButton: {
    flex: 1,
    padding: 12,
    borderWidth: 1,
    borderColor: '#cbd5e1',
    borderRadius: 8,
    alignItems: 'center',
    marginRight: 8,
  },
  selectedOption: {
    backgroundColor: '#dbeafe',
    borderColor: '#3b82f6',
  },
  optionText: {
    fontSize: 14,
    color: '#1e293b',
  },
  colorOptions: {
    flexDirection: 'row',
    justifyContent: 'space-between',
    marginBottom: 16,
  },
  colorOption: {
    width: 40,
    height: 40,
    borderRadius: 20,
    elevation: 2,
  },
  scenarioContainer: {
    flexDirection: 'row',
    flexWrap: 'wrap',
    justifyContent: 'space-between',
  },
  scenarioItem: {
    flexDirection: 'row',
    alignItems: 'center',
    width: '48%',
    backgroundColor: '#ffffff',
    padding: 12,
    borderRadius: 8,
    marginBottom: 12,
    elevation: 1,
    shadowColor: '#000',
    shadowOffset: { width: 0, height: 1 },
    shadowOpacity: 0.1,
    shadowRadius: 2,
  },
  scenarioIcon: {
    fontSize: 20,
    marginRight: 8,
  },
  scenarioText: {
    fontSize: 14,
    color: '#1e293b',
  },
  interactionContainer: {
    backgroundColor: '#f1f5f9',
    padding: 16,
    borderRadius: 8,
  },
  interactionText: {
    fontSize: 14,
    color: '#475569',
    marginBottom: 8,
  },
  fabWrapper: {
    position: 'absolute',
    bottom: 80,
  },
  fabBottomRight: {
    right: 20,
  },
  fabBottomLeft: {
    left: 20,
  },
  fabCenter: {
    left: (width - 56) / 2,
  },
  fabContainer: {
    alignItems: 'center',
  },
  fab: {
    borderRadius: 28,
    alignItems: 'center',
    justifyContent: 'center',
    elevation: 6,
    shadowColor: '#000',
    shadowOffset: { width: 0, height: 4 },
    shadowOpacity: 0.3,
    shadowRadius: 6,
  },
  fabIcon: {
    fontSize: 24,
    color: '#ffffff',
  },
  fabLabel: {
    fontSize: 12,
    color: '#64748b',
    marginTop: 4,
  },
  bottomNav: {
    flexDirection: 'row',
    justifyContent: 'space-around',
    backgroundColor: '#ffffff',
    borderTopWidth: 1,
    borderTopColor: '#e2e8f0',
    paddingVertical: 12,
  },
  navItem: {
    alignItems: 'center',
  },
  navIcon: {
    fontSize: 20,
    color: '#94a3b8',
    marginBottom: 4,
  },
  navText: {
    fontSize: 12,
    color: '#94a3b8',
  },
});

export default ElevatedButtonDemo;

打包
接下来通过打包命令npn run harmony将reactNative的代码打包成为bundle,这样可以进行在开源鸿蒙OpenHarmony中进行使用。

打包之后再将打包后的鸿蒙OpenHarmony文件拷贝到鸿蒙的DevEco-Studio工程目录去:
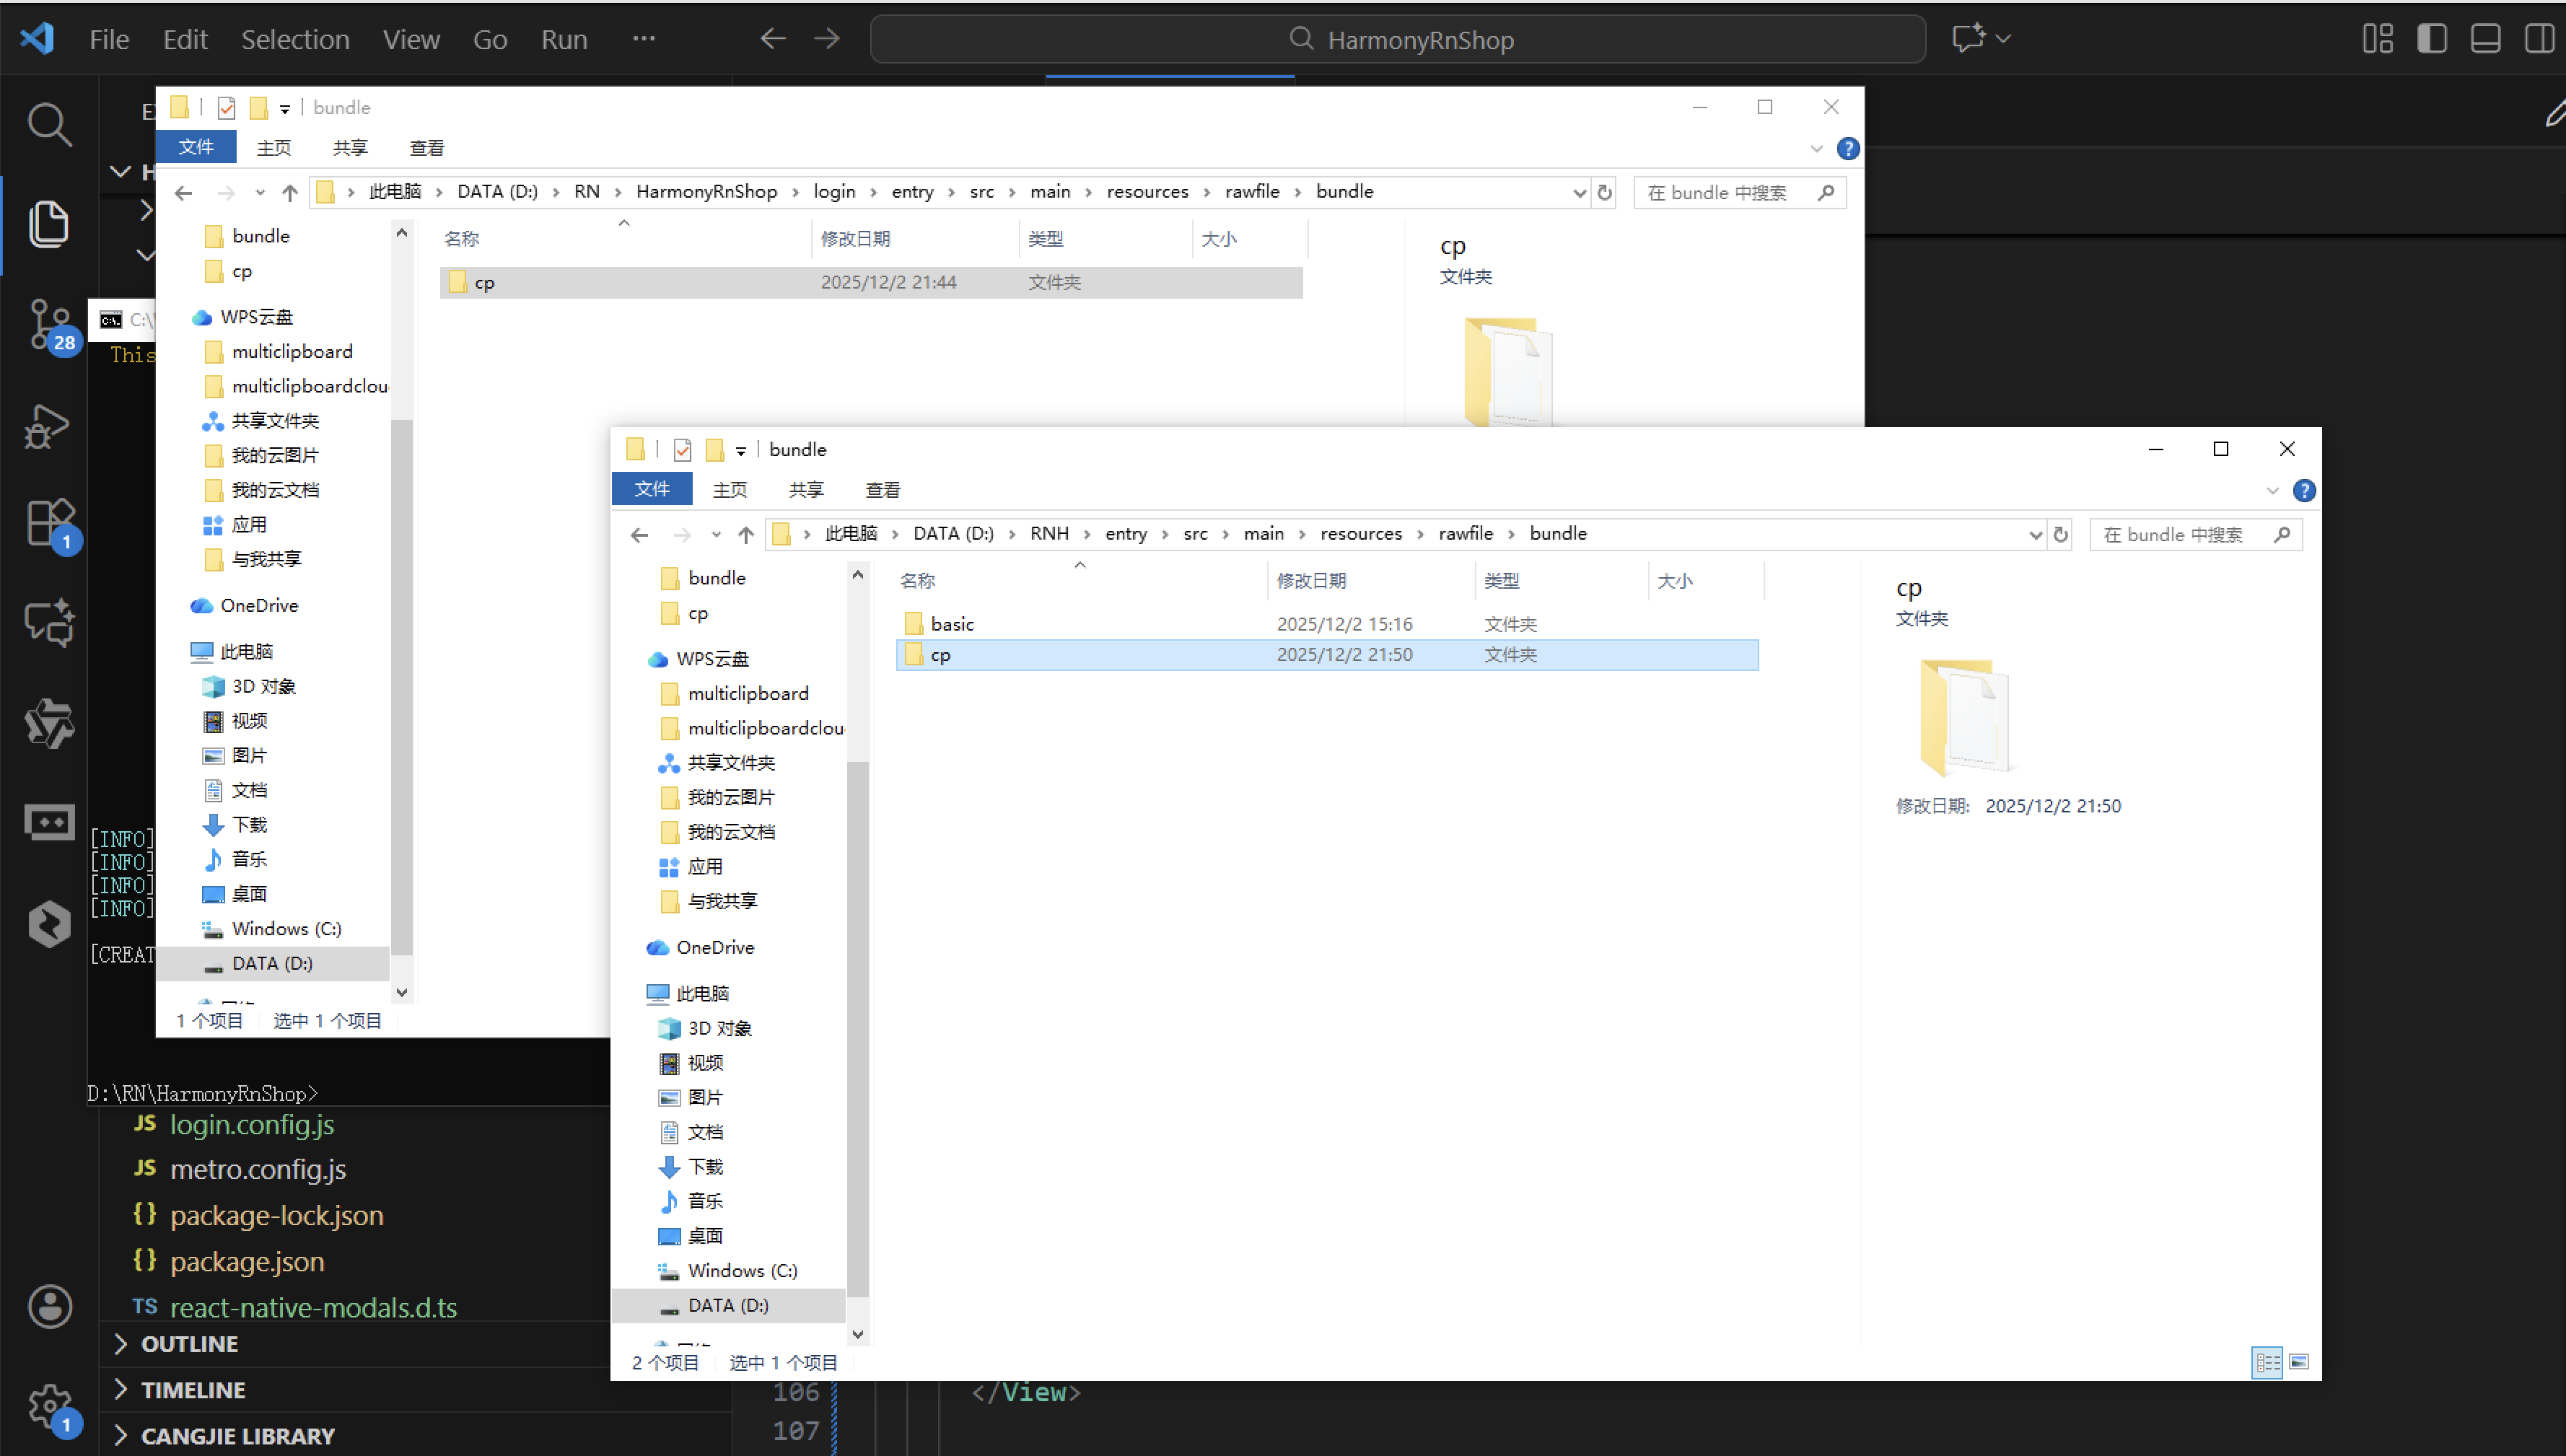
最后运行效果图如下显示:

欢迎大家加入开源鸿蒙跨平台开发者社区,一起共建开源鸿蒙跨平台生态。

作为“人工智能6S店”的官方数字引擎,为AI开发者与企业提供一个覆盖软硬件全栈、一站式门户。
更多推荐


 3
3 0
0- 0


 已为社区贡献5条内容

所有评论(0)