
Animated.Value 在每次渲染时用 new 初始化会导致状态重置、动画丢失或跳变,完成React Native鸿蒙跨平台 动画状态的生命周期需要稳态持有
本文分析了一个基于React Native构建的打卡管理应用,采用组件化架构设计,核心功能包括动画开关组件、打卡状态追踪和进度可视化。应用通过Animated动画系统实现流畅交互,采用三层组件架构(展示层、组合层、容器层)实现职责分离和复用性。状态管理采用响应式更新策略,与鸿蒙ArkUI体系形成技术对比。该案例为跨平台习惯养成类应用开发提供了典型参考,尤其在复杂动画和状态管理方面具有实践价值。
概述
本文分析的是一个基于React Native构建的日常打卡管理应用,集成了自定义动画开关、打卡状态追踪、进度可视化等核心功能。该应用采用了Animated动画系统、组件化架构和响应式状态管理,展现了习惯养成类应用的典型技术架构。在鸿蒙OS的跨端适配场景中,这种涉及复杂动画交互和实时状态更新的应用具有重要的技术参考价值。
核心架构设计深度解析
动画驱动的开关组件
ToggleSwitch组件是应用中最具技术含量的组件,它实现了完整的动画驱动的开关交互:
const ToggleSwitch = ({
  value,
  onToggle,
  activeText = "已打卡",
  inactiveText = "未打卡",
  activeColor = "#10b981",
  inactiveColor = "#9ca3af"
}: {
  value: boolean;
  onToggle: () => void;
  activeText?: string;
  inactiveText?: string;
  activeColor?: string;
  inactiveColor?: string;
}) => {
  const animation = new Animated.Value(value ? 1 : 0);

  const animateToggle = () => {
    Animated.timing(animation, {
      toValue: value ? 0 : 1,
      duration: 300,
      useNativeDriver: false,
    }).start();
  };

  const translateX = animation.interpolate({
    inputRange: [0, 1],
    outputRange: [4, 32],
  });

  return (
    <TouchableOpacity
      style={[
        styles.toggleContainer,
        { backgroundColor: value ? activeColor : inactiveColor }
      ]}
      onPress={() => {
        onToggle();
        animateToggle();
      }}
    >
      <Animated.View
        style={[
          styles.toggleThumb,
          { transform: [{ translateX }] }
        ]}
      />
      <Text style={styles.toggleText}>
        {value ? activeText : inactiveText}
      </Text>
    </TouchableOpacity>
  );
};
这种动画实现的核心在于Animated.Value的使用,它创建了一个0到1的数值区间,通过Animated.timing驱动数值变化,再通过interpolate将数值映射为具体的位移量。这种分离设计和链式操作是React Native动画系统的核心概念。
在鸿蒙ArkUI体系中,动画实现采用完全不同的机制:
@Component
struct ToggleSwitch {
  @Prop value: boolean = false;
  @Prop activeText: string = '已打卡';
  @Prop inactiveText: string = '未打卡';
  @Prop activeColor: string = '#10b981';
  @Prop inactiveColor: string = '#9ca3af';

  @State thumbPosition: number = 4;

  animateToggle() {
    animateTo({
      duration: 300,
      onFinish: () => {
        this.value = !this.value;
      }
    }, () => {
      this.thumbPosition = this.value ? 4 : 32;
    });
  }

  build() {
    Row() {
      Text(this.value ? this.activeText : this.inactiveText)
        .fontColor(Color.White)
        .fontSize(10)
        .margin({ left: this.thumbPosition + 24 })
    }
    .width(60)
    .height(30)
    .borderRadius(15)
    .backgroundColor(this.value ? this.activeColor : this.inactiveColor)
    .onClick(() => this.animateToggle())
  }
}
组件化架构体系
应用采用了清晰的三层组件架构:
// 统计卡片 - 展示层
const StatsCard = ({ title, value, icon }: { title: string; value: string; icon: string }) => {
  return (
    <View style={styles.statsCard}>
      <Text style={styles.statsIcon}>{icon}</Text>
      <Text style={styles.statsValue}>{value}</Text>
      <Text style={styles.statsTitle}>{title}</Text>
    </View>
  );
};

// 打卡项 - 组合层
const CheckInItem = ({
  title,
  description,
  checked,
  onToggle,
  icon
}: {
  title: string;
  description: string;
  checked: boolean;
  onToggle: () => void;
  icon: string;
}) => {
  return (
    <View style={styles.checkInItem}>
      <View style={styles.itemHeader}>
        <View style={styles.itemIcon}>
          <Text style={styles.itemIconText}>{icon}</Text>
        </View>
        <View style={styles.itemInfo}>
          <Text style={styles.itemTitle}>{title}</Text>
          <Text style={styles.itemDescription}>{description}</Text>
        </View>
      </View>
      <ToggleSwitch value={checked} onToggle={onToggle} />
    </View>
  );
};

// 主页面 - 容器层
const CheckInSwitchApp: React.FC = () => {
  const [checkInItems, setCheckInItems] = useState([...]);

  return (
    <View>
      <StatsCard />
      <CheckInItem />
      <ProgressBar />
    </View>
  );
};
这种分层设计的优势在于职责清晰和复用性高。StatsCard只负责数值展示,CheckInItem负责卡片组合,CheckInSwitchApp负责状态管理。层级之间通过props接口通信,形成了清晰的数据流。
鸿蒙平台上的组件化实现:
// 统计卡片组件
@Component
struct StatsCard {
  @Prop title: string;
  @Prop value: string;
  @Prop icon: string;

  build() {
    Column() {
      Text(this.icon)
      Text(this.value)
      Text(this.title)
    }
    .backgroundColor('#f8fafc')
    .borderRadius(8)
    .padding(12)
  }
}

// 打卡项组件
@Component
struct CheckInItem {
  @Prop title: string;
  @Prop description: string;
  @Prop checked: boolean;
  @Prop icon: string;
  @Event onToggle: () => void;

  build() {
    Row() {
      Row() {
        Column() { Text(this.icon) }
        Column() {
          Text(this.title)
          Text(this.description)
        }
      }

      ToggleSwitch({
        value: this.checked,
        onToggle: this.onToggle
      })
    }
  }
}
状态管理与业务逻辑
响应式状态更新
应用实现了精细的状态管理策略:
const [checkInItems, setCheckInItems] = useState([
  { id: '1', title: '晨跑', description: '完成30分钟晨跑', checked: false, icon: '🏃' },
  // ...更多项目
]);

const [streak, setStreak] = useState(3);
const [todayChecked, setTodayChecked] = useState(2);
const [totalChecked, setTotalChecked] = useState(15);

const handleToggle = (id: string) => {
  setCheckInItems(prev =>
    prev.map(item =>
      item.id === id ? { ...item, checked: !item.checked } : item
    )
  );

  // 联动更新统计
  setTodayChecked(prev => prev + (checkInItems.find(i => i.id === id)?.checked ? -1 : 1));

  if (!checkInItems.find(i => i.id === id)?.checked) {
    setStreak(prev => prev + 1);
  }
};
这种状态更新模式体现了React的核心原则——不可变数据更新。通过函数式更新确保状态准确性,通过联动更新保持数据一致性。
鸿蒙的状态管理采用直接赋值模式:
@State checkInItems: CheckInItem[] = [];
@State streak: number = 3;
@State todayChecked: number = 2;

handleToggle(id: string) {
  this.checkInItems = this.checkInItems.map(item =>
    item.id === id ? { ...item, checked: !item.checked } : item
  );

  const item = this.checkInItems.find(i => i.id === id);
  this.todayChecked = this.todayChecked + (item?.checked ? -1 : 1);

  if (!item?.checked) {
    this.streak++;
  }
}
进度可视化系统
应用实现了动态的进度条展示:
const completedCount = checkInItems.filter(item => item.checked).length;
const totalCount = checkInItems.length;

<View style={styles.progressBar}>
  <View
    style={[
      styles.progressFill,
      { width: `${(completedCount / totalCount) * 100}%` }
    ]}
  />
</View>
这种百分比宽度的计算方式简洁直观,将抽象的完成度转化为具体的视觉反馈。
鸿蒙平台的实现同样直接:
@State completedCount: number = 0;
@State totalCount: number = 5;

get progressWidth(): string {
  return `${(this.completedCount / this.totalCount) * 100}%`;
}

build() {
  Column() {
    Row() {
      Column()
        .width(this.progressWidth)
        .height(8)
        .backgroundColor('#3b82f6')
    }
  }
}
跨端适配技术方案
动画系统迁移
React Native的Animated模块与鸿蒙动画API存在本质差异:
| React Native | 鸿蒙ArkUI | 适配说明 |
|---|---|---|
| Animated.Value | @State | 状态值定义 |
| Animated.timing | animateTo | 动画驱动 |
| interpolate | 直接计算 | 值映射方式 |
| useNativeDriver | 默认启用 | 性能优化 |
具体迁移示例:
// React Native动画
const animation = new Animated.Value(value ? 1 : 0);
Animated.timing(animation, {
  toValue: value ? 0 : 1,
  duration: 300,
  useNativeDriver: false,
}).start();

const translateX = animation.interpolate({
  inputRange: [0, 1],
  outputRange: [4, 32],
});

// 鸿蒙动画
@State thumbPosition: number = 4;

animateToggle() {
  animateTo({ duration: 300 }, () => {
    this.thumbPosition = this.value ? 4 : 32;
  });
}
组件映射策略
| React Native组件 | 鸿蒙ArkUI组件 | 关键适配点 |
|---|---|---|
| TouchableOpacity | Button/Gesture | 触摸反馈机制 |
| ScrollView | Scroll | 滚动行为一致 |
| View | Column/Row/Stack | 布局方式转换 |
| StyleSheet | Text/Column样式 | 样式定义迁移 |
样式系统转换
// React Native样式
toggleContainer: {
  width: 60,
  height: 30,
  borderRadius: 15,
  padding: 2,
  flexDirection: 'row',
  backgroundColor: '#10b981',
},

// 鸿蒙样式
toggleContainer: ViewStyle = {
  width: 60,
  height: 30,
  borderRadius: 15,
  padding: 2,
  backgroundColor: '#10b981'
}
性能优化与最佳实践
动画性能优化
对于动画密集型组件,建议使用useNativeDriver提升性能:
Animated.timing(animation, {
  toValue: value ? 0 : 1,
  duration: 300,
  useNativeDriver: true, // 启用原生驱动
}).start();
鸿蒙平台的动画默认使用高效渲染路径,无需额外配置。
状态更新优化
对于频繁更新的场景,使用useCallback包装回调函数:
const handleToggle = useCallback((id: string) => {
  setCheckInItems(prev =>
    prev.map(item =>
      item.id === id ? { ...item, checked: !item.checked } : item
    )
  );
}, []);
React Native × 鸿蒙跨端技术解读:自定义开关、打卡项与统计逻辑
这段页面围绕“每日打卡”构建:顶部统计与进度、打卡项列表以及一个自定义 ToggleSwitch 动画组件,整体用函数式组件和本地状态驱动。它在 iOS/Android 属于标准 React Native 组件栈;在鸿蒙(OpenHarmony)落地时,需要通过 RN 的鸿蒙适配层把动画、触觉反馈与窗口事件等能力桥接到 ArkUI/系统服务,确保交互和体验一致。下面聚焦核心实现与跨端关键点,不展开样式细节。
自定义开关 ToggleSwitch:动画与状态衔接
ToggleSwitch 使用 Animated.Value 和插值驱动“拇指滑动”,通过 TouchableOpacity 切换状态与播放动画,形成轻量的自定义开关。
const ToggleSwitch = ({
  value, onToggle, activeText = "已打卡", inactiveText = "未打卡",
  activeColor = "#10b981", inactiveColor = "#9ca3af"
}: { value: boolean; onToggle: () => void; /* ... */ }) => {
  const animation = new Animated.Value(value ? 1 : 0);

  const animateToggle = () => {
    Animated.timing(animation, { toValue: value ? 0 : 1, duration: 300, useNativeDriver: false }).start();
  };

  const translateX = animation.interpolate({ inputRange: [0, 1], outputRange: [4, 32] });

  return (
    <TouchableOpacity
      style={{ backgroundColor: value ? activeColor : inactiveColor }}
      onPress={() => { onToggle(); animateToggle(); }}
    >
      <Animated.View style={{ transform: [{ translateX }] }} />
      <Text>{value ? activeText : inactiveText}</Text>
    </TouchableOpacity>
  );
};
- 动画状态的生命周期需要稳态持有。Animated.Value 在每次渲染时用 new 初始化会导致状态重置、动画丢失或跳变。生产建议通过
useRef(new Animated.Value(initial))持有,并在useEffect同步value → Animated.Value,保证动画与业务状态一致。 useNativeDriver: false是因为动画的是布局属性(translateX 与背景色)。如需高性能原生驱动,建议把动画限定在 transform/opacity 等原生可驱动的属性,并避免颜色直接动画(可以通过多层叠加或渐变方案)。- 切换时先
onToggle再animateToggle可能导致用旧值计算目标动画。更稳妥的方式是让动画的目标来源于最新value的 effect,而非点击顺序判断。
示例改进:
const ToggleSwitch = ({ value, onToggle, activeText = "已打卡", inactiveText = "未打卡" }: { value: boolean; onToggle: () => void }) => {
  const animRef = React.useRef(new Animated.Value(value ? 1 : 0));

  React.useEffect(() => {
    Animated.timing(animRef.current, { toValue: value ? 1 : 0, duration: 220, useNativeDriver: true }).start();
  }, [value]);

  const translateX = animRef.current.interpolate({ inputRange: [0, 1], outputRange: [4, 32] });

  return (
    <Pressable onPress={onToggle}>
      <Animated.View style={{ transform: [{ translateX }] }} />
      <Text>{value ? activeText : inactiveText}</Text>
    </Pressable>
  );
};
- 交互控件建议用 Pressable 并注入一致的涟漪与触觉反馈,鸿蒙端通过 ArkUI 的交互能力桥接,获得“原生感”。如果需要轻量布局动画,可以用
LayoutAnimation或鸿蒙端 ArkUI 的布局动画能力做跨端统一。
打卡项与列表:数据驱动的组件边界
CheckInItem 聚合图标+标题/描述与右侧的 ToggleSwitch,避免在内部修改统计,保持展示组件的单一职责。列表由页面状态 checkInItems 驱动,点击调用 handleToggle 更新对应项 checked。
const CheckInItem = ({ title, description, checked, onToggle, icon }: { /* ... */ }) => {
  return (
    <View>
      <View>
        <View><Text>{icon}</Text></View>
        <View>
          <Text>{title}</Text>
          <Text>{description}</Text>
        </View>
      </View>
      <ToggleSwitch value={checked} onToggle={onToggle} />
    </View>
  );
};
- 图标当前使用 emoji,跨端在不同系统字体下可能出现对齐与渲染差异。生产建议迁移到统一的矢量/字体图标栈,并在鸿蒙端通过 ArkUI 图形能力映射,确保像素与基线一致。
- 列表当前用 ScrollView 映射数组,数据增多时建议用 FlatList 获得虚拟化性能与稳定滚动事件。
页面状态与统计:更新顺序与数据来源
页面维护 streak(连续天数)、todayChecked(今日完成量)与 totalChecked(累计量),并通过 handleToggle 更新状态与统计。
const handleToggle = (id: string) => {
  setCheckInItems(prev => prev.map(item => item.id === id ? { ...item, checked: !item.checked } : item));

  setTodayChecked(prev => prev + (checkInItems.find(i => i.id === id)?.checked ? -1 : 1));

  if (!checkInItems.find(i => i.id === id)?.checked) {
    setStreak(prev => prev + 1);
  }
};
- 统计更新使用了外层
checkInItems的旧值,存在竞态和过时引用问题。生产应基于函数式更新的“next 状态”计算统计,或通过useEffect在checkInItems变化时派生统计值,避免逻辑分散与不同步。 - 连续打卡 streak 的语义应与“每天完成任意一项即+1”或“当天全部完成才+1”一致,这里使用“单项由未→已就+1”,有偏差。建议明确业务规则并在状态变更后统一派生。
更稳妥的改法:
const handleToggle = (id: string) => {
  setCheckInItems(prev => {
    const next = prev.map(item => item.id === id ? { ...item, checked: !item.checked } : item);
    const completedToday = next.filter(i => i.checked).length;
    setTodayChecked(completedToday);
    return next;
  });
};

React.useEffect(() => {
  const completedCount = checkInItems.filter(item => item.checked).length;
  const totalCount = checkInItems.length;
  // 根据业务规则派生 streak / totalChecked
}, [checkInItems]);
- 完成全部的函数
handleCompleteAll也引用了旧的checkInItems.length更新 todayChecked,尽量在状态更新后用新值进行计算,或在 effect 中派生。
进度与统计卡片:派生展示与一致性
顶部统计卡片 StatsCard 与进度条由 streak、todayChecked、totalChecked 与 completedCount/totalCount 派生。为了提高一致性与可维护性,建议把“今日完成/累计打卡/连续打卡”的计算统一在一个派生层(例如 selectors 或 useMemo/useEffect),而不是分散在多个事件中。
const completedCount = checkInItems.filter(item => item.checked).length;
const totalCount = checkInItems.length;
- 进度百分比与文本通过同一组
completedCount/totalCount派生,避免出现“一处更新另一处未同步”的问题。 - 大数据场景应避免重复 O(n) 派生,可以在变更时增量更新,或对列表加 memo。
完整代码:
// app.tsx
import React, { useState } from 'react';
import { SafeAreaView, View, Text, StyleSheet, TouchableOpacity, ScrollView, Dimensions, Alert, Animated } from 'react-native';

// 图标库
const ICONS = {
  check: '✅',
  unchecked: '⭕',
  complete: '🎉',
  exercise: '🏃',
  water: '💧',
  sleep: '😴',
  meal: '🍽️',
  mood: '😊',
};

const { width } = Dimensions.get('window');

// 自定义滑动开关组件
const ToggleSwitch = ({
  value,
  onToggle,
  activeText = "已打卡",
  inactiveText = "未打卡",
  activeColor = "#10b981",
  inactiveColor = "#9ca3af"
}: {
  value: boolean;
  onToggle: () => void;
  activeText?: string;
  inactiveText?: string;
  activeColor?: string;
  inactiveColor?: string;
}) => {
  const animation = new Animated.Value(value ? 1 : 0);

  const animateToggle = () => {
    Animated.timing(animation, {
      toValue: value ? 0 : 1,
      duration: 300,
      useNativeDriver: false,
    }).start();
  };

  const translateX = animation.interpolate({
    inputRange: [0, 1],
    outputRange: [4, 32],
  });

  return (
    <TouchableOpacity
      style={[
        styles.toggleContainer,
        { backgroundColor: value ? activeColor : inactiveColor }
      ]}
      onPress={() => {
        onToggle();
        animateToggle();
      }}
    >
      <Animated.View
        style={[
          styles.toggleThumb,
          { transform: [{ translateX }] }
        ]}
      />
      <Text style={styles.toggleText}>
        {value ? activeText : inactiveText}
      </Text>
    </TouchableOpacity>
  );
};

// 打卡项组件
const CheckInItem = ({
  title,
  description,
  checked,
  onToggle,
  icon
}: {
  title: string;
  description: string;
  checked: boolean;
  onToggle: () => void;
  icon: string;
}) => {
  return (
    <View style={styles.checkInItem}>
      <View style={styles.itemHeader}>
        <View style={styles.itemIcon}>
          <Text style={styles.itemIconText}>{icon}</Text>
        </View>
        <View style={styles.itemInfo}>
          <Text style={styles.itemTitle}>{title}</Text>
          <Text style={styles.itemDescription}>{description}</Text>
        </View>
      </View>
      <ToggleSwitch value={checked} onToggle={onToggle} />
    </View>
  );
};

// 统计卡片组件
const StatsCard = ({ title, value, icon }: { title: string; value: string; icon: string }) => {
  return (
    <View style={styles.statsCard}>
      <Text style={styles.statsIcon}>{icon}</Text>
      <Text style={styles.statsValue}>{value}</Text>
      <Text style={styles.statsTitle}>{title}</Text>
    </View>
  );
};

// 主页面组件
const CheckInSwitchApp: React.FC = () => {
  const [checkInItems, setCheckInItems] = useState([
    { id: '1', title: '晨跑', description: '完成30分钟晨跑', checked: false, icon: ICONS.exercise },
    { id: '2', title: '饮水', description: '今日饮水达到2升', checked: true, icon: ICONS.water },
    { id: '3', title: '睡眠', description: '保证8小时充足睡眠', checked: false, icon: ICONS.sleep },
    { id: '4', title: '饮食', description: '按时吃早餐', checked: false, icon: ICONS.meal },
    { id: '5', title: '心情', description: '记录今日心情', checked: true, icon: ICONS.mood },
  ]);

  const [streak, setStreak] = useState(3);
  const [todayChecked, setTodayChecked] = useState(2);
  const [totalChecked, setTotalChecked] = useState(15);

  const handleToggle = (id: string) => {
    setCheckInItems(prev =>
      prev.map(item =>
        item.id === id ? { ...item, checked: !item.checked } : item
      )
    );

    // 更新统计
    setTodayChecked(prev => prev + (checkInItems.find(i => i.id === id)?.checked ? -1 : 1));

    if (!checkInItems.find(i => i.id === id)?.checked) {
      setStreak(prev => prev + 1);
    }
  };

  const handleCompleteAll = () => {
    Alert.alert(
      '完成所有打卡',
      '确定要完成所有打卡项目吗?',
      [
        { text: '取消', style: 'cancel' },
        {
          text: '确定',
          onPress: () => {
            setCheckInItems(prev =>
              prev.map(item => ({ ...item, checked: true }))
            );
            setStreak(prev => prev + 1);
            setTodayChecked(prev => checkInItems.length);
          }
        }
      ]
    );
  };

  const completedCount = checkInItems.filter(item => item.checked).length;
  const totalCount = checkInItems.length;

  return (
    <SafeAreaView style={styles.container}>
      {/* 头部 */}
      <View style={styles.header}>
        <Text style={styles.title}>打卡开关</Text>
        <TouchableOpacity style={styles.completeButton} onPress={handleCompleteAll}>
          <Text style={styles.completeText}>{ICONS.complete} 完成全部</Text>
        </TouchableOpacity>
      </View>

      {/* 统计卡片 */}
      <View style={styles.statsContainer}>
        <StatsCard title="连续打卡" value={`${streak}天`} icon={ICONS.check} />
        <StatsCard title="今日完成" value={`${todayChecked}/${totalCount}`} icon={ICONS.check} />
        <StatsCard title="累计打卡" value={`${totalChecked}次`} icon={ICONS.check} />
      </View>

      {/* 进度条 */}
      <View style={styles.progressContainer}>
        <Text style={styles.progressLabel}>今日进度: {completedCount}/{totalCount}</Text>
        <View style={styles.progressBar}>
          <View
            style={[
              styles.progressFill,
              { width: `${(completedCount / totalCount) * 100}%` }
            ]}
          />
        </View>
        <Text style={styles.progressPercent}>{Math.round((completedCount / totalCount) * 100)}%</Text>
      </View>

      {/* 打卡列表 */}
      <ScrollView style={styles.content}>
        {checkInItems.map(item => (
          <CheckInItem
            key={item.id}
            title={item.title}
            description={item.description}
            checked={item.checked}
            onToggle={() => handleToggle(item.id)}
            icon={item.icon}
          />
        ))}

        {/* 打卡说明 */}
        <Text style={styles.sectionTitle}>打卡说明</Text>
        <View style={styles.instructionCard}>
          <Text style={styles.instructionText}>• 每完成一项任务后,点击右侧开关打卡</Text>
          <Text style={styles.instructionText}>• 连续打卡可以获得奖励积分</Text>
          <Text style={styles.instructionText}>• 打卡完成后可以查看统计数据</Text>
          <Text style={styles.instructionText}>• 养成良好习惯从每日打卡开始</Text>
        </View>

        {/* 奖励提示 */}
        <Text style={styles.sectionTitle}>奖励机制</Text>
        <View style={styles.rewardCard}>
          <Text style={styles.rewardText}>连续打卡7天 → 获得徽章</Text>
          <Text style={styles.rewardText}>连续打卡30天 → 获得专属称号</Text>
          <Text style={styles.rewardText}>连续打卡100天 → 获得神秘大奖</Text>
        </View>
      </ScrollView>

      {/* 底部导航 */}
      <View style={styles.bottomNav}>
        <TouchableOpacity style={styles.navItem}>
          <Text style={styles.navIcon}>{ICONS.exercise}</Text>
          <Text style={styles.navText}>运动</Text>
        </TouchableOpacity>
        <TouchableOpacity style={styles.navItem}>
          <Text style={styles.navIcon}>{ICONS.water}</Text>
          <Text style={styles.navText}>健康</Text>
        </TouchableOpacity>
        <TouchableOpacity style={[styles.navItem, styles.activeNavItem]}>
          <Text style={styles.navIcon}>{ICONS.check}</Text>
          <Text style={styles.navText}>打卡</Text>
        </TouchableOpacity>
        <TouchableOpacity style={styles.navItem}>
          <Text style={styles.navIcon}>{ICONS.mood}</Text>
          <Text style={styles.navText}>统计</Text>
        </TouchableOpacity>
      </View>
    </SafeAreaView>
  );
};

const styles = StyleSheet.create({
  container: {
    flex: 1,
    backgroundColor: '#f8fafc',
  },
  header: {
    flexDirection: 'row',
    alignItems: 'center',
    justifyContent: 'space-between',
    padding: 20,
    backgroundColor: '#ffffff',
    borderBottomWidth: 1,
    borderBottomColor: '#e2e8f0',
  },
  title: {
    fontSize: 20,
    fontWeight: 'bold',
    color: '#1e293b',
  },
  completeButton: {
    backgroundColor: '#3b82f6',
    paddingHorizontal: 16,
    paddingVertical: 8,
    borderRadius: 20,
  },
  completeText: {
    color: '#ffffff',
    fontSize: 14,
    fontWeight: '500',
  },
  statsContainer: {
    flexDirection: 'row',
    justifyContent: 'space-around',
    padding: 16,
    backgroundColor: '#ffffff',
    marginBottom: 16,
  },
  statsCard: {
    alignItems: 'center',
    padding: 12,
    backgroundColor: '#f8fafc',
    borderRadius: 8,
    width: (width - 48) / 3,
  },
  statsIcon: {
    fontSize: 20,
    marginBottom: 4,
  },
  statsValue: {
    fontSize: 16,
    fontWeight: 'bold',
    color: '#1e293b',
  },
  statsTitle: {
    fontSize: 12,
    color: '#64748b',
    marginTop: 4,
  },
  progressContainer: {
    backgroundColor: '#ffffff',
    padding: 16,
    marginHorizontal: 16,
    borderRadius: 12,
    marginBottom: 16,
  },
  progressLabel: {
    fontSize: 14,
    color: '#64748b',
    marginBottom: 8,
  },
  progressBar: {
    height: 8,
    backgroundColor: '#e2e8f0',
    borderRadius: 4,
    overflow: 'hidden',
    marginBottom: 8,
  },
  progressFill: {
    height: '100%',
    backgroundColor: '#3b82f6',
  },
  progressPercent: {
    fontSize: 12,
    color: '#64748b',
    alignSelf: 'flex-end',
  },
  content: {
    flex: 1,
    padding: 16,
  },
  checkInItem: {
    backgroundColor: '#ffffff',
    borderRadius: 12,
    padding: 16,
    marginBottom: 12,
    flexDirection: 'row',
    alignItems: 'center',
    elevation: 1,
    shadowColor: '#000',
    shadowOffset: { width: 0, height: 1 },
    shadowOpacity: 0.1,
    shadowRadius: 2,
  },
  itemHeader: {
    flex: 1,
    flexDirection: 'row',
    alignItems: 'center',
  },
  itemIcon: {
    width: 40,
    height: 40,
    borderRadius: 20,
    backgroundColor: '#f1f5f9',
    alignItems: 'center',
    justifyContent: 'center',
    marginRight: 12,
  },
  itemIconText: {
    fontSize: 20,
  },
  itemInfo: {
    flex: 1,
  },
  itemTitle: {
    fontSize: 16,
    fontWeight: 'bold',
    color: '#1e293b',
  },
  itemDescription: {
    fontSize: 14,
    color: '#64748b',
    marginTop: 4,
  },
  sectionTitle: {
    fontSize: 18,
    fontWeight: 'bold',
    color: '#1e293b',
    marginVertical: 12,
  },
  instructionCard: {
    backgroundColor: '#ffffff',
    borderRadius: 12,
    padding: 16,
    marginBottom: 16,
  },
  instructionText: {
    fontSize: 14,
    color: '#64748b',
    lineHeight: 22,
    marginBottom: 8,
  },
  rewardCard: {
    backgroundColor: '#ffffff',
    borderRadius: 12,
    padding: 16,
  },
  rewardText: {
    fontSize: 14,
    color: '#3b82f6',
    marginBottom: 8,
  },
  toggleContainer: {
    width: 60,
    height: 30,
    borderRadius: 15,
    padding: 2,
    flexDirection: 'row',
    alignItems: 'center',
    paddingHorizontal: 8,
  },
  toggleThumb: {
    width: 24,
    height: 24,
    borderRadius: 12,
    backgroundColor: '#ffffff',
    position: 'absolute',
  },
  toggleText: {
    color: '#ffffff',
    fontSize: 10,
    fontWeight: 'bold',
    marginLeft: 26,
  },
  bottomNav: {
    flexDirection: 'row',
    justifyContent: 'space-around',
    backgroundColor: '#ffffff',
    borderTopWidth: 1,
    borderTopColor: '#e2e8f0',
    paddingVertical: 12,
  },
  navItem: {
    alignItems: 'center',
    flex: 1,
  },
  activeNavItem: {
    paddingBottom: 2,
    borderBottomWidth: 2,
    borderBottomColor: '#3b82f6',
  },
  navIcon: {
    fontSize: 20,
    color: '#94a3b8',
    marginBottom: 4,
  },
  activeNavIcon: {
    color: '#3b82f6',
  },
  navText: {
    fontSize: 12,
    color: '#94a3b8',
  },
  activeNavText: {
    color: '#3b82f6',
    fontWeight: '500',
  },
});

export default CheckInSwitchApp;
打包
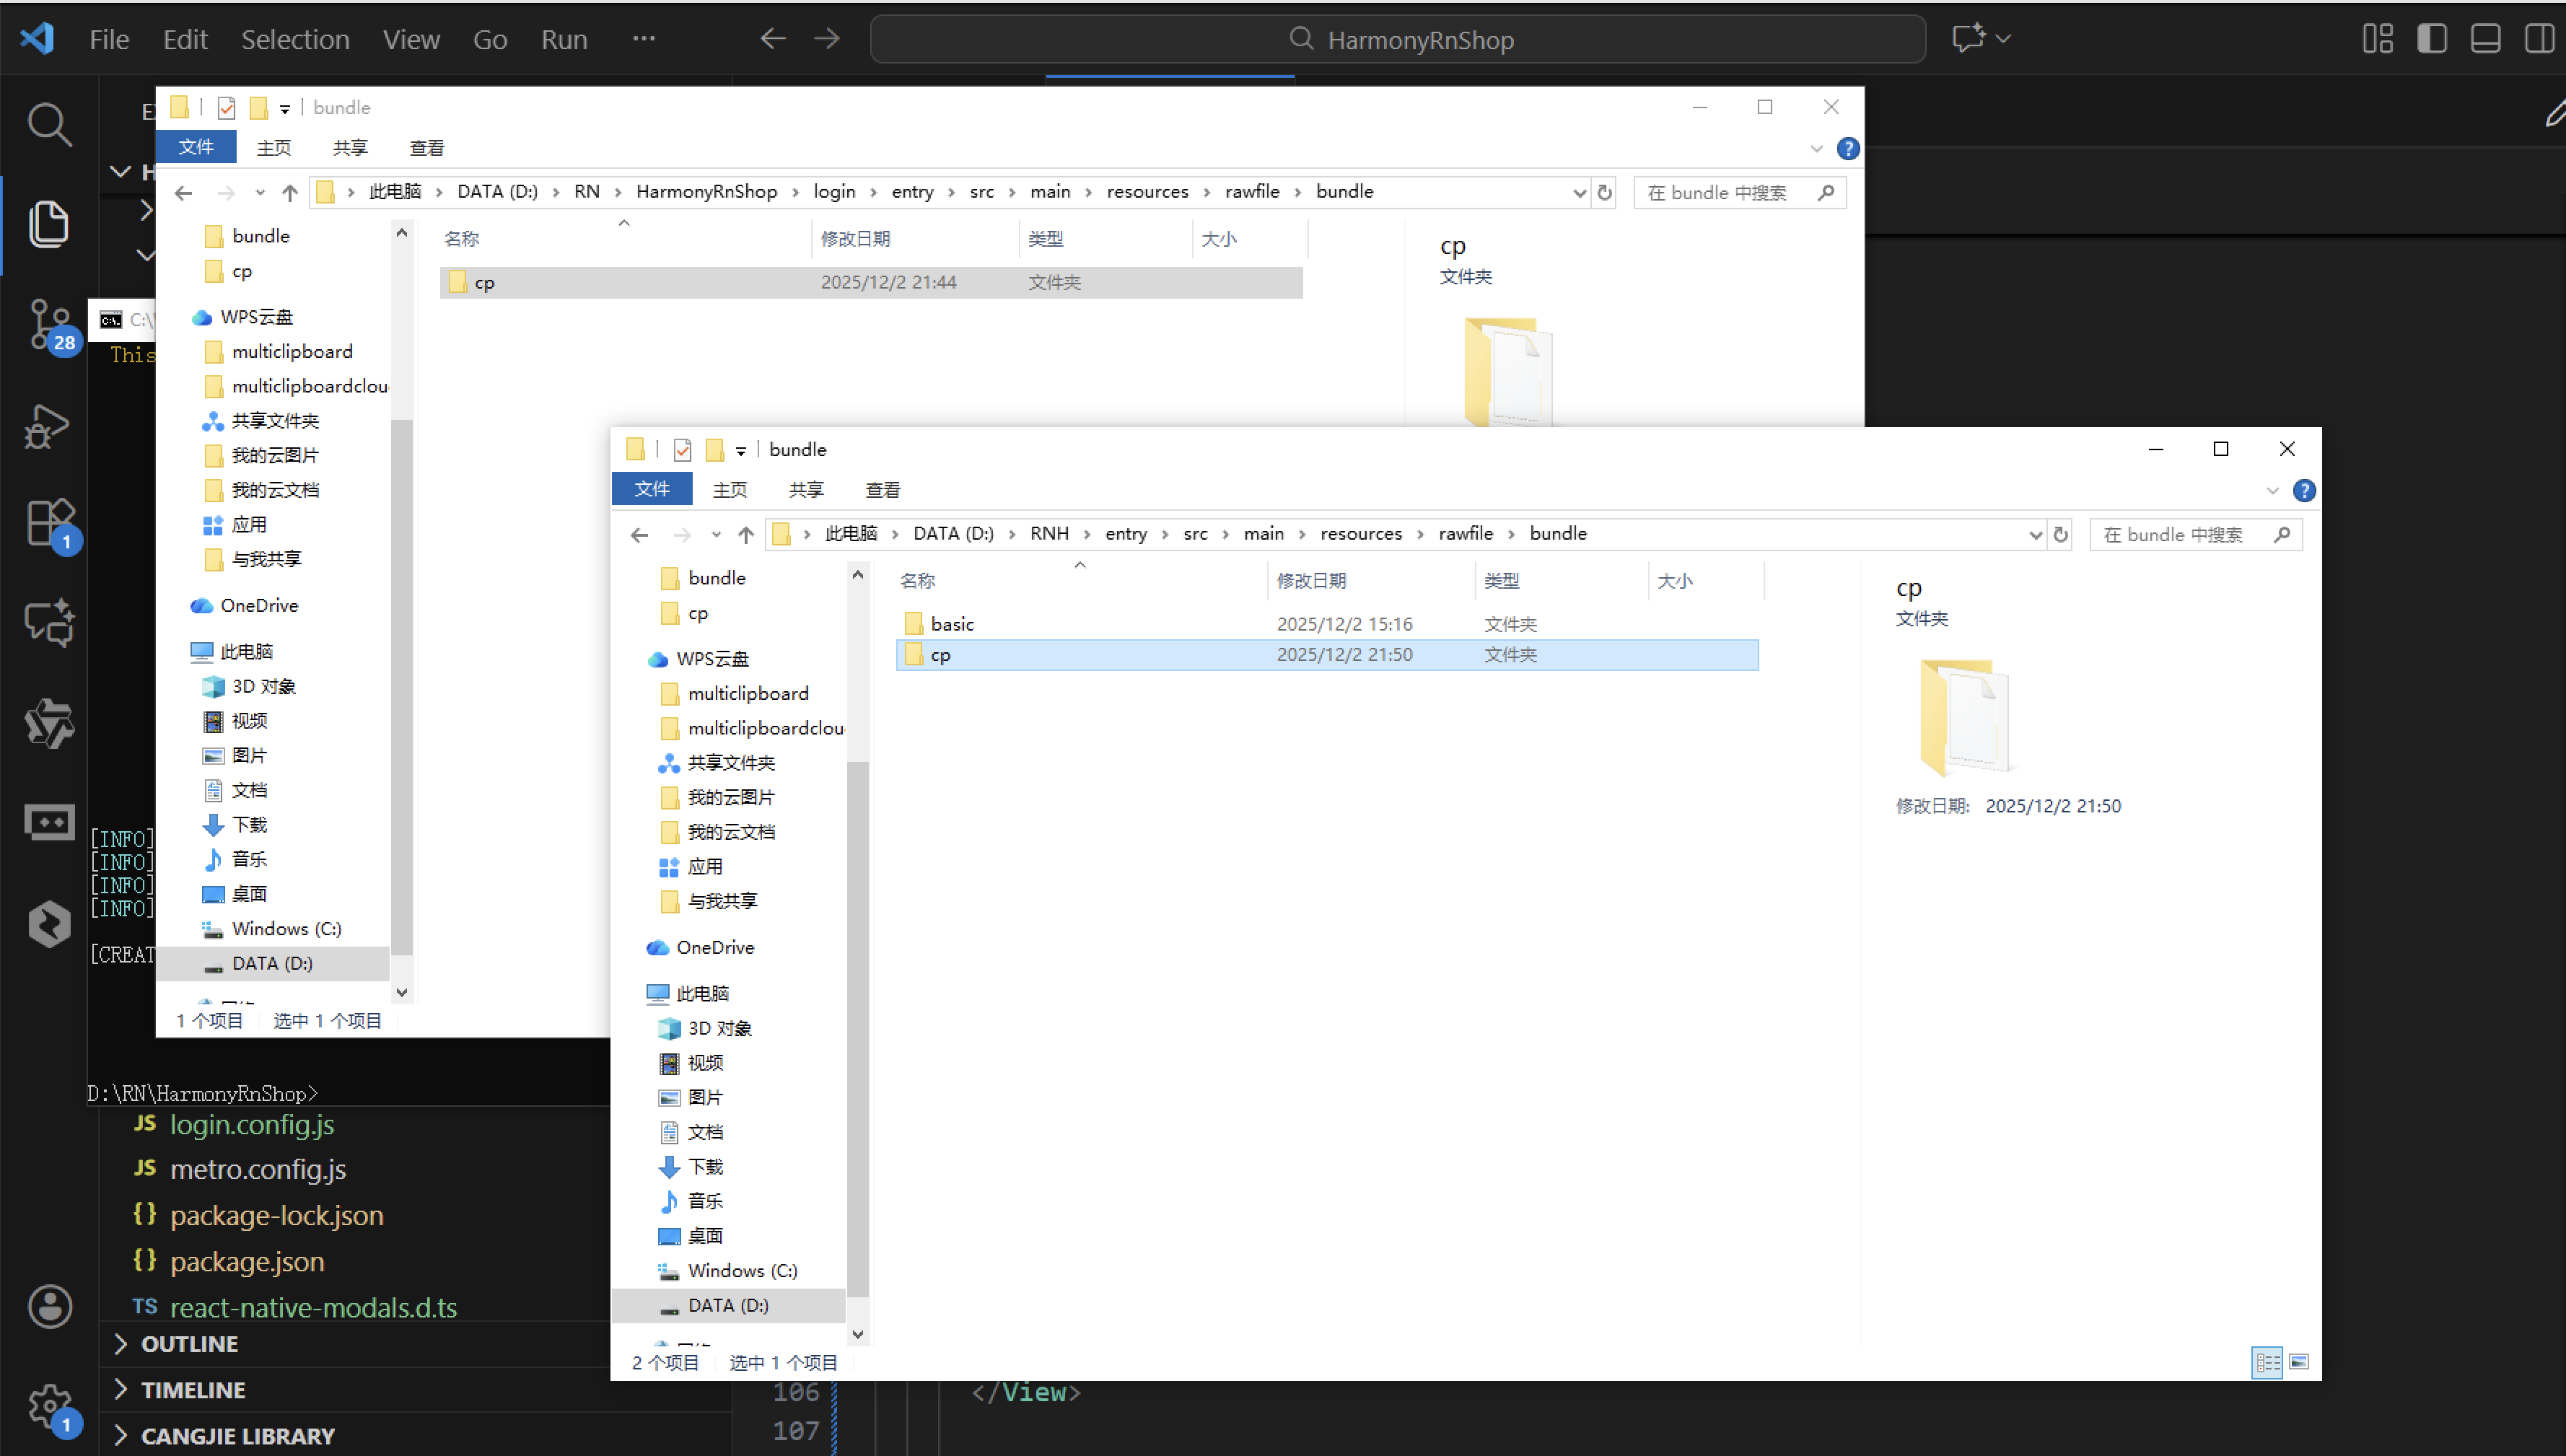
接下来通过打包命令npn run harmony将reactNative的代码打包成为bundle,这样可以进行在开源鸿蒙OpenHarmony中进行使用。

打包之后再将打包后的鸿蒙OpenHarmony文件拷贝到鸿蒙的DevEco-Studio工程目录去:
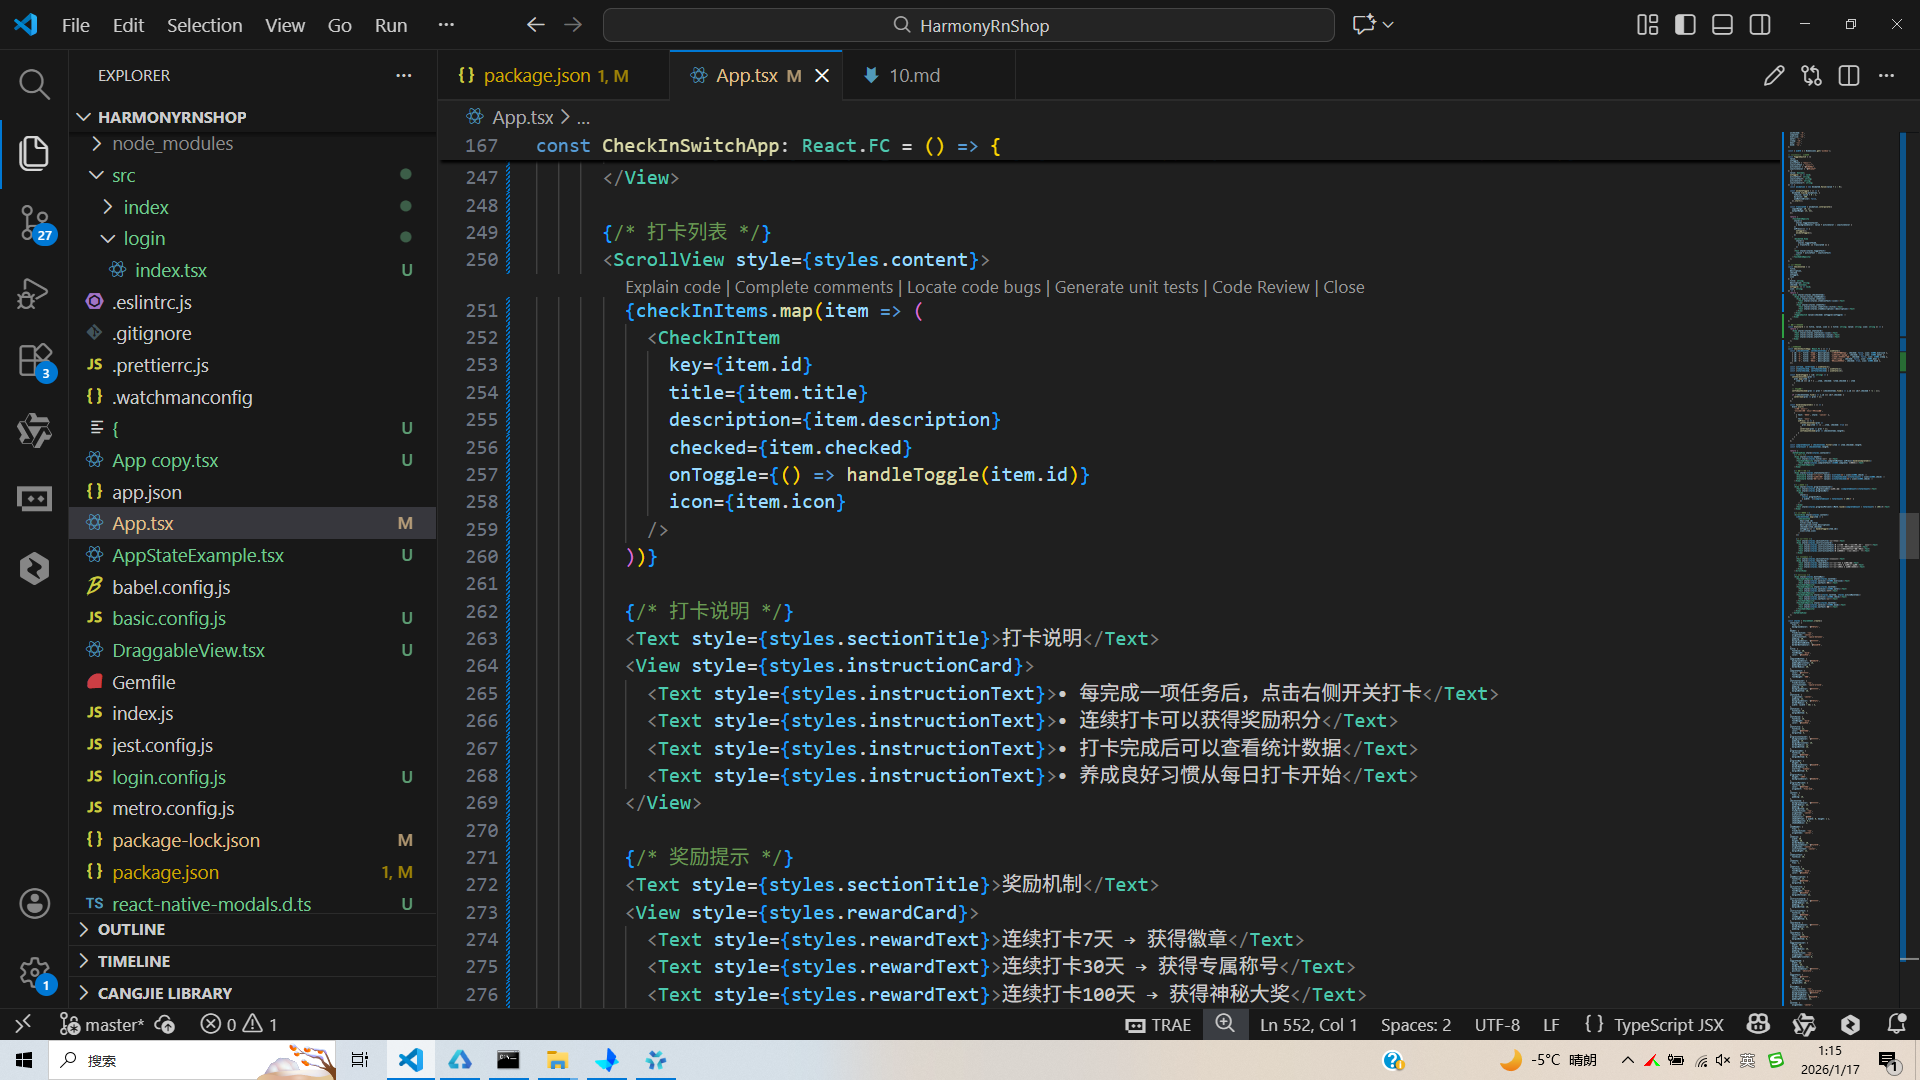
最后运行效果图如下显示:
欢迎大家加入开源鸿蒙跨平台开发者社区,一起共建开源鸿蒙跨平台生态。

作为“人工智能6S店”的官方数字引擎,为AI开发者与企业提供一个覆盖软硬件全栈、一站式门户。
更多推荐
 5
5 0
0- 0


 已为社区贡献4条内容

所有评论(0)