
鸿蒙 7 网络请求 http,接口请求、异常捕获、加载状态实战
几乎所有 App 都要和后端接口打交道,拿列表数据、提交表单。很多新手直接上手http请求,遇到一堆问题:请求跨域、权限忘记配置、接口报错不会捕获异常、加载转圈不会处理,连续多次点击重复发请求,还有返回的 JSON 解析报错。
注意:鸿蒙 7 网络模块包名和旧版本不一样,直接复制网上老代码会导入失败。本章全部代码适配鸿蒙 7,可直接在 DevEco 运行。
一、前置准备:配置网络权限
想要发起 http/https 请求,必须在 module.json5 里面申请网络权限,否则请求直接失败,不会有明显提示。 打开 entry/module.json5,在 requestPermissions 增加:
"requestPermissions": [
{
"name": "ohos.permission.INTERNET"
}
]
补充:如果要访问 http 非加密地址(不是 https),还需要在 module.json5 里配置网络明文访问权限,否则 http 请求会被系统拦截。
"network": {
"cleartextTraffic": true
}
生产环境建议尽量使用 https,明文 http 有安全风险。
二、http 基础 GET 请求,带加载状态 + 异常捕获
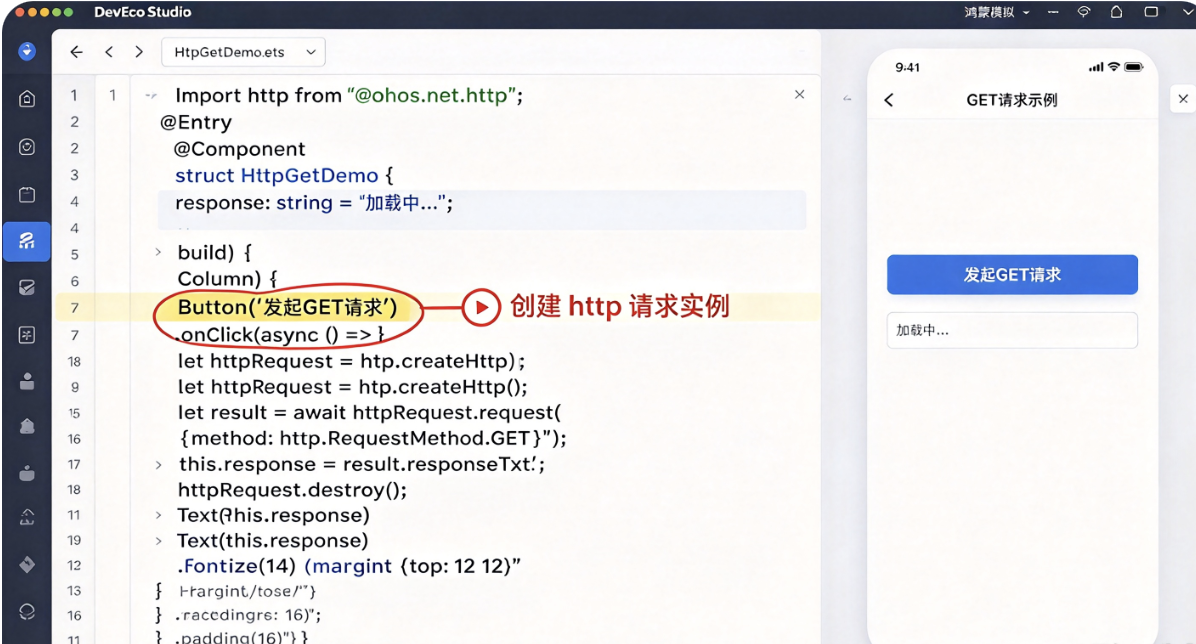
GET 一般用来查询数据,比如获取列表、详情。
import http from '@ohos.net.http';
@Entry
@Component
struct HttpGetDemo {
@State loading: boolean = false;
@State resultText: string = "等待请求";
// 发起GET请求
async requestGet() {
// 开启加载状态
this.loading = true;
this.resultText = "请求中...";
// 创建http请求实例
const httpRequest = http.createHttp();
try {
// 发起请求
const res = await httpRequest.request(
"https://jsonplaceholder.typicode.com/todos/1",
{
method: http.RequestMethod.GET,
header: {
"Content-Type": "application/json"
}
}
)
// 判断响应码 200 代表成功
if (res.responseCode === 200) {
// 解析返回的json字符串
const data = JSON.parse(res.result as string);
this.resultText = `请求成功:title = ${data.title}`;
} else {
this.resultText = `请求失败,响应码:${res.responseCode}`;
}
} catch (err) {
// 捕获网络异常:断网、超时、地址错误都会进这里
this.resultText = `异常:${JSON.stringify(err)}`;
} finally {
// 无论成功失败,都释放实例,关闭loading
httpRequest.destroy();
this.loading = false;
}
}
build() {
Column() {
Text(this.resultText)
.fontSize(16)
.padding(16)
Button(this.loading ? "加载中..." : "发起GET请求")
.enabled(!this.loading) // loading时按钮禁用,防止重复点击
.onClick(() => {
this.requestGet();
})
}
.width('100%')
.height('100%')
.justifyContent(FlexAlign.Center)
.padding(20)
}
}
代码拆解
http.createHttp()创建请求实例;请求用完必须调用destroy()销毁,否则会内存泄漏。async / await异步写法,比回调地狱更易读,业务开发优先用这种。try catch:捕获断网、域名错误、JSON 解析失败等异常。- loading 状态 + 按钮 enabled 禁用:防止用户快速点击重复发起请求。
三、POST 请求,提交 JSON 数据
新增、提交表单一般使用 POST,把 json 数据放到请求 body 传给后端。
import http from '@ohos.net.http';
@Entry
@Component
struct HttpPostDemo {
@State loading: boolean = false;
@State resultText: string = "等待提交";
async requestPost() {
this.loading = true;
this.resultText = "提交中...";
const httpRequest = http.createHttp();
try {
// 要传给后端的数据
const postData = {
title: "鸿蒙测试",
completed: false,
userId: 1
};
const res = await httpRequest.request(
"https://jsonplaceholder.typicode.com/posts",
{
method: http.RequestMethod.POST,
header: {
"Content-Type": "application/json"
},
extraData: JSON.stringify(postData)
}
)
if (res.responseCode === 201 || res.responseCode === 200) {
const data = JSON.parse(res.result as string);
this.resultText = `提交成功,返回id:${data.id}`;
} else {
this.resultText = `提交失败,code:${res.responseCode}`;
}
} catch (err) {
this.resultText = `请求异常:${JSON.stringify(err)}`;
} finally {
httpRequest.destroy();
this.loading = false;
}
}
build() {
Column() {
Text(this.resultText).fontSize(16).padding(16)
Button(this.loading ? "提交中..." : "发起POST提交")
.enabled(!this.loading)
.onClick(() => this.requestPost())
}
.width('100%')
.height('100%')
.justifyContent(FlexAlign.Center)
.padding(20)
}
}
关键点
extraData:POST 请求放请求体,必须转成 JSON 字符串,不能直接传 js 对象。- header 指定
Content-Type: application/json,告诉后端本次是 json 格式数据。

四、封装通用请求工具类(工程化必用)
项目接口很多,不要每个页面都重复写 http 创建、销毁、try/catch,单独抽成工具httpUtil.ets。 新建 common/httpUtil.ets
import http from '@ohos.net.http';
// 通用请求封装
export class HttpUtil {
static async request<T>(
url: string,
method: http.RequestMethod,
data?: Object
): Promise<T> {
const httpRequest = http.createHttp();
try {
const opt: http.HttpRequestOptions = {
method: method,
header: {
"Content-Type": "application/json"
}
}
if (data) {
opt.extraData = JSON.stringify(data);
}
const res = await httpRequest.request(url, opt);
if (res.responseCode >= 200 && res.responseCode < 300) {
return JSON.parse(res.result as string) as T;
} else {
throw new Error(`接口错误码:${res.responseCode}`);
}
} finally {
httpRequest.destroy();
}
}
static get<T>(url: string) {
return this.request<T>(url, http.RequestMethod.GET)
}
static post<T>(url: string, data: Object) {
return this.request<T>(url, http.RequestMethod.POST, data)
}
}
页面中使用:
import { HttpUtil } from '../common/httpUtil';
@Entry
@Component
struct UtilHttpDemo {
@State text:string = "";
async load() {
const data = await HttpUtil.get("https://jsonplaceholder.typicode.com/todos/1");
this.text = data.title;
}
build(){
Column(){
Text(this.text)
Button("请求").onClick(()=>this.load())
}
}
}
封装好处:统一处理请求头、统一解析 JSON,后续加 token、超时时间、全局错误提示只改这一处。
五、网络请求高频踩坑汇总
坑 1:忘记配置 INTERNET 权限,请求直接无响应
现象:请求一直卡在 pending,不会进入成功回调。解决:module.json5 配置网络权限。
坑 2:访问 http 地址直接失败
鸿蒙默认禁止明文 http,需要配置cleartextTraffic:true,正式环境优先 https。
坑 3:http 实例不 destroy,内存泄漏
循环多次请求不销毁实例,App 内存持续上涨,长时间使用闪退。finally 里面一定要 destroy。
坑 4:extraData 直接传对象,没有 JSON.stringify
后端收到 [object Object],解析失败。POST 提交 json 必须序列化。
坑 5:没有 loading 锁,多次点击重复请求
快速点击按钮,同时发出多个相同请求,数据错乱。用 loading 状态禁用按钮。
坑 6:JSON.parse 解析报错
后端返回空字符串或者非 json 文本,JSON.parse 直接抛异常,必须放在 try-catch 中。
六、http 请求 API 选型速查表
| 功能 | API | 适用场景 |
|---|---|---|
| GET 查询数据 | http.RequestMethod.GET | 获取列表、详情查询 |
| POST 提交数据 | http.RequestMethod.POST | 新增、表单提交 |
| 创建请求实例 | http.createHttp() | 每次请求创建 |
| 释放资源 | httpRequest.destroy() | 请求结束必须执行,防止内存泄漏 |
结尾总结
鸿蒙 7 网络请求使用@ohos.net.http模块。
- 网络请求必须配置 INTERNET 权限;http 明文地址额外开启 cleartextTraffic;
- GET 用于查询,POST 提交 JSON,extraData 需要序列化;
- 每个 http 实例用完调用 destroy 释放,搭配 try/catch 捕获异常;
- 增加 loading 状态,防止重复请求;
- 工程项目建议封装统一 http 工具类,统一拦截、统一添加 token。
实操指南
使用封装好的 HttpUtil 工具,请求 todo 列表接口,拿到数据渲染到上一章学习的 List 列表中,增加 loading 加载提示。

作为“人工智能6S店”的官方数字引擎,为AI开发者与企业提供一个覆盖软硬件全栈、一站式门户。
更多推荐

 0
0 0
0- 0


 已为社区贡献2条内容

所有评论(0)