
ArkTS鸿蒙--WaterFlow瀑布流构建
一、WaterFlow介绍
瀑布流容器,由“行”和“列”分割的单元格所组成,通过容器自身的排列规则,将不同大小的“项目”自上而下,如瀑布般紧密布局。支持多列布局、分组混合布局、懒加载、自动计算列数和边缘渐隐等功能,适用于图片画廊、商品展示、内容信息流等需要展示不同尺寸内容的场景。
子组件仅支持FlowItem子组件和自定义组件。自定义组件在WaterFlow下使用时,建议使用FlowItem作为自定义组件的顶层组件,不建议给自定义组件设置属性和事件方法。
二、WaterFlow瀑布流和Grid网格布局的区别
Grid:同一行所有元素高度一致,由该行最高元素决定。如果一行中有一个 100vp 的卡片和一个 50vp 的卡片,50vp 的卡片下方会有 50vp 的空白。
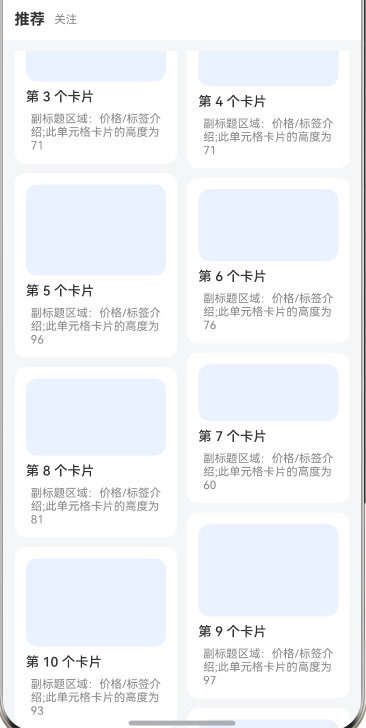
WaterFlow:高度独立,每列独立累加高度,新卡片总是插入当前高度最低的那一列下方。每个卡片紧贴上方内容,无额外空白。内容像瀑布一样自然流动、紧密排列。
三、适用场景
- 内容包含可变高度的视觉元素(不同比例的图片、不同长度的文案)
- 以"发现/探索"而非"搜索/查找"为主要用户行为模式
- 需要营造丰富、充满活力的视觉体验
四、示例代码
1、界面视图部分,构建瀑布流结构,使用ForEach循环遍历数据,渲染元素。
WaterFlow() {
        ForEach(this.items, (n: number) => {
          FlowItem() {

            Column({ space: 8 }) {
              // 模拟封面:矩形绘制组件,用于在界面中绘制矩形图形
              Rect()
                .width('100%')
                .height(this.itemsHeight[n - 1]) // 高度变化
                .fill(0xFFEAF2FF)
                .radius(12)

              Text(`第 ${n} 个卡片`)
                .fontSize(14)
                .width('100%')
                .align(Alignment.TopStart)
                .fontWeight(FontWeight.Medium)

              Text(`副标题区域:价格/标签介绍;此单元格卡片的高度为${this.itemsHeight[n - 1]}`)
                .fontSize(12)
                .fontColor(0xFF888888)
            }
            .padding(12)
            .backgroundColor(0xFFFFFFFF)
            .borderRadius(12)
          }.width('100%')
        }, (n: number) => `${n}`)

        // 底部加载区域
        FlowItem() {
          Row() {
            Text(this.isLoading ? '正在加载更多…' : '加载完成')
              .fontSize(12)
              .fontColor(0xFF999999)
            Blank()
          }
          .padding(12)
        }

      }
      .columnsTemplate('1fr 1fr') // 控制列数,这里设置两列
      .columnsGap(10) // 列与列之间的间距
      .rowsGap(10) //行与行之间的间距
      .padding(12)
      .backgroundColor(0xFFF5F6F8)
      .width('100%')
      .height('100%')
2、上拉加载实现
onReachEnd(event: () => void)
瀑布流内容到达末尾位置时触发。
.onReachEnd(() => this.loadMore()) //当瀑布流滑动到底部时,触发加载函数
函数实现:1)加载更多的数据;2)同步加载卡片的高度属性值
  private async loadMore() {
    if (this.isLoading) {
      return
    }
    this.isLoading = true
    let heightValue = 0
    // 模拟网络延迟
    await new Promise<void>((r) => setTimeout(() => r(), 700))

    const start = this.items.length + 1
    const more: number[] = new Array(20)
    for (let i = 0; i < 20; i++) {
      more[i] = start + i;
    }
    this.items = [...this.items, ...more]

    // 使用随机数来定义卡片的高度,才能看到“瀑布”效果
    for (let index = 0; index < 20; index++) {
      heightValue = Math.floor(Math.random() * 40 + 60) // [60, 100)
      this.itemsHeight.push(heightValue)
    }

    this.isLoading = false
    console.log(`isLoading的状态为:${this.isLoading}`)
  }

  //模拟加载或刷新更多卡片
  private addMoreItem(num: number): void {
    let value = 0
    let heightValue = 0
    let moreData: number[] = []
    for (let index = 1; index <= num; index++) {
      moreData.push(index)
      value = index * 100 / num
      console.log(`瀑布流数据初始化进度:${value}%`);
    }
    console.log("瀑布流数据初始化完成");
    this.items = [...this.items, ...moreData]

    // 使用随机数来定义卡片的高度,才能看到“瀑布”效果
    for (let index = 0; index < num; index++) {
      heightValue = Math.floor(Math.random() * 40 + 60) // [60, 100)
      this.itemsHeight.push(heightValue)
    }
    console.log(`items数组的长度为:${this.items.length}`)
    console.log(`items数组为:${this.items}`)
  }
3、完整代码
@Entry
@Component
struct Index {
  @State private items: number[] = []
  @State private itemsHeight: number[] = []
  @State private isLoading: boolean = false
  @State isRefreshing: boolean = false

  private async loadMore() {
    if (this.isLoading) {
      return
    }
    this.isLoading = true
    let heightValue = 0
    // 模拟网络延迟
    await new Promise<void>((r) => setTimeout(() => r(), 700))

    const start = this.items.length + 1
    const more: number[] = new Array(20)
    for (let i = 0; i < 20; i++) {
      more[i] = start + i;
    }
    this.items = [...this.items, ...more]

    // 使用随机数来定义卡片的高度,才能看到“瀑布”效果
    for (let index = 0; index < 20; index++) {
      heightValue = Math.floor(Math.random() * 40 + 60) // [60, 100)
      this.itemsHeight.push(heightValue)
    }

    this.isLoading = false
    console.log(`isLoading的状态为:${this.isLoading}`)
  }

  //模拟加载或刷新更多卡片
  private addMoreItem(num: number): void {
    let value = 0
    let heightValue = 0
    let moreData: number[] = []
    for (let index = 1; index <= num; index++) {
      moreData.push(index)
      value = index * 100 / num
      console.log(`瀑布流数据初始化进度:${value}%`);
    }
    console.log("瀑布流数据初始化完成");
    this.items = [...this.items, ...moreData]

    // 使用随机数来定义卡片的高度,才能看到“瀑布”效果
    for (let index = 0; index < num; index++) {
      heightValue = Math.floor(Math.random() * 40 + 60) // [60, 100)
      this.itemsHeight.push(heightValue)
    }
    console.log(`items数组的长度为:${this.items.length}`)
    console.log(`items数组为:${this.items}`)
  }

  aboutToAppear(): void {
    this.addMoreItem(40)
  }

  build() {
    Column() {

      Row({ space: 10 }) {
        Text('推荐').fontSize(16).fontWeight(FontWeight.Bold)
        Text('关注').fontSize(12).fontColor(0xFF888888)
        Blank()
      }
      .width('100%')
      .justifyContent(FlexAlign.Start)
      .padding(12)
      .backgroundColor(0xFFFFFFFF)

      WaterFlow() {
        ForEach(this.items, (n: number) => {
          FlowItem() {

            Column({ space: 8 }) {
              // 模拟封面:矩形绘制组件,用于在界面中绘制矩形图形
              Rect()
                .width('100%')
                .height(this.itemsHeight[n - 1]) // 高度变化
                .fill(0xFFEAF2FF)
                .radius(12)

              Text(`第 ${n} 个卡片`)
                .fontSize(14)
                .width('100%')
                .align(Alignment.TopStart)
                .fontWeight(FontWeight.Medium)

              Text(`副标题区域:价格/标签介绍;此单元格卡片的高度为${this.itemsHeight[n - 1]}`)
                .fontSize(12)
                .fontColor(0xFF888888)
            }
            .padding(12)
            .backgroundColor(0xFFFFFFFF)
            .borderRadius(12)
          }.width('100%')
        }, (n: number) => `${n}`)

        // 底部加载区域
        FlowItem() {
          Row() {
            Text(this.isLoading ? '正在加载更多…' : '加载完成')
              .fontSize(12)
              .fontColor(0xFF999999)
            Blank()
          }
          .padding(12)
        }

      }
      .columnsTemplate('1fr 1fr') // 控制列数,这里设置两列
      .columnsGap(10) // 列与列之间的间距
      .rowsGap(10) //行与行之间的间距
      .padding(12)
      .backgroundColor(0xFFF5F6F8)
      .width('100%')
      .height('100%')
      .onReachEnd(() => this.loadMore()) //当瀑布流滑动到底部时,触发加载函数

    }
    .width('100%')
    .height('100%')
  }
}
界面运行效果
五、使用WaterFlow瀑布流的优化建议
1、如果使用ForEach循环,可以添加一个key,这样在刷新或分页时出现抖动的情况;
2、WaterFlow组件也是支持LazyForEach加载思路的,特别是在数据量大的情况下,使用懒加载思路对性能也是有很好的优化的;
3、columnsGap/rowsGap属性需要去根据需求定义。未定义时,可能会出现布局时界面拥挤的情况。

作为“人工智能6S店”的官方数字引擎,为AI开发者与企业提供一个覆盖软硬件全栈、一站式门户。
更多推荐



 3
3 0
0- 0


 已为社区贡献2条内容

所有评论(0)