
React Native 鸿蒙实战:blur 视图模糊效果在 HarmonyOS 上的接入与使用
React Native 鸿蒙实战:blur 视图模糊效果在 HarmonyOS 上的接入与使用
库版本:@react-native-ohos/blur 4.6.1-beta.1(OpenHarmony 适配版)
上游依赖:@react-native-community/blur ^4.4.1
适配仓库:https://atomgit.com/CPF-RN/rntpc_react-native-blur
验证环境:RNOH 0.86.1(对齐 React Native 0.86.3)
设备:鸿蒙 PC(OpenHarmony,2in1 形态)
一、环境搭建
React Native 鸿蒙环境搭建请参考官方文档:RNOH 环境搭建指南
本章不重复展开。搭建完成后,确认 pnpm --version 输出 10.x 以上,DevEco Studio 可正常创建鸿蒙工程即可。
二、应用背景
2.1 当前的应用场景与痛点
毛玻璃模糊效果是现代 UI 设计中的常见元素,用于导航栏半透明背景、弹窗遮罩层、卡片叠加层次等场景。React Native 在 Android 和 iOS 上通过 @react-native-community/blur 提供成熟的模糊视图方案,但鸿蒙系统使用完全不同的 ArkUI 模糊渲染体系(NODE_FOREGROUND_BLUR_STYLE / NODE_BLUR),开发者如果自行适配,需要:
- 对接鸿蒙 ArkUI 的 21 种模糊样式(ARKUI_BLUR_STYLE_* 系列常量),与 RN 的 blurType 枚举映射关系复杂;
- 处理 Fabric 原生组件的布局行为,BlurView 在 RNOH 中是 Stack 节点而非普通 View;
- 编写 C++ 层的 ComponentInstance、Node、Props、ShadowNodes 等 Fabric 组件全套代码;
- 配置 codegen spec、HAR 包编译、autolinking 注册等 RNOH 构建流程。
2.2 为什么需要这个库
@react-native-ohos/blur 是 RNOH 社区基于 @react-native-community/blur 进行鸿蒙适配的三方库,在 OpenHarmony 平台上通过 C++ Fabric 组件重新实现了原生层:BlurView 底层是 ArkUI Stack 节点,使用 NODE_FOREGROUND_BLUR_STYLE 实现毛玻璃效果,使用 NODE_BLUR 实现内容模糊半径。JS 层 API 与上游 @react-native-community/blur 保持一致,React Native 鸿蒙应用无需编写原生代码,即可使用 21 种模糊样式。
2.3 解决什么问题
一句话总结:为 React Native 鸿蒙应用提供开箱即用的视图模糊能力。具体包括:
- 21 种模糊样式(dark / light / thickMaterialDark / thinMaterialDark 等);
- 模糊程度控制(blurAmount,1-100 映射到 0.0-1.0 的模糊缩放系数);
- 内容模糊半径(blurRadius,直接传 vp 单位给 NODE_BLUR);
- 叠加颜色(overlayColor,设置节点背景色);
- 启用开关(enabled,关闭时清除模糊效果);
- 容器模式(BlurView 可包含子组件,子组件随父节点一起模糊)。
三、功能介绍
| 功能 | 说明 | 适用场景 |
|---|---|---|
| 模糊样式 | blurType 支持 21 种样式 | 导航栏、弹窗、卡片背景 |
| 模糊程度 | blurAmount 1-100,映射 0.0-1.0 | 控制模糊强度 |
| 内容模糊 | blurRadius 指定模糊半径(vp) | 精确控制模糊范围 |
| 叠加颜色 | overlayColor 设置背景色 | 调色、品牌色叠加 |
| 启用开关 | enabled 控制模糊开关 | 动态切换效果 |
| 容器模式 | BlurView 可包含子组件 | 子内容随父节点模糊 |
四、使用方法
4.1 引入三方库
在 RNOH 工程中接入该库需要完成两个配置(npm 依赖本地引入、HAR 包引用),另需修复当前发布版 HAR 的两处打包缺陷。该库支持 autolinking,无需手动注册 Package。
第一步:克隆适配仓库并添加 npm 依赖
将适配仓库克隆到根 node_modules:
cd node_modules/@react-native-oh-tpl
git clone https://atomgit.com/CPF-RN/rntpc_react-native-blur.git react-native-blur
在 tester 的 package.json 的 dependencies 中添加:
{
  "dependencies": {
    "@react-native-oh-tpl/react-native-blur": "file:../../node_modules/@react-native-oh-tpl/react-native-blur"
  }
}
执行 pnpm install 拉取依赖。
第二步:添加 HAR 包引用
在 harmony/oh-package.json5 的 dependencies 中添加 HAR 文件引用:
{
  "dependencies": {
    "@react-native-ohos/blur": "file:../../../node_modules/@react-native-oh-tpl/react-native-blur/harmony/blur.har"
  }
}
注意 HAR 路径从 oh-package.json5 所在目录(harmony/)算起,回退三级到根 node_modules。路径写错会导致 ohpm 安装失败。
第三步:修复 HAR 打包缺陷(重要)
当前发布的 blur.har 存在两处打包缺陷,会导致 autolinking 不注册和 ohpm 安装失败:
缺陷一:oh-package.json5 使用 src 字段而非 main 字段,autolinking 找不到入口文件:
// 旧版(缺陷),autolinking 不识别 src 字段
"src": "index.ets",
// 修复后,autolinking 正常注册 BlurPackage
"main": "index.ets",
缺陷二:HAR 根目录是 blur/ 而非 package/,ohpm 解压后找不到 oh-package.json5:
// 旧版(缺陷),ohpm 报错
blur/oh-package.json5
// 修复后,ohpm 正常安装
package/oh-package.json5
解决方法是从源码目录重建 HAR。手动执行以下步骤:
cd node_modules/@react-native-oh-tpl/react-native-blur/harmony
# 修改 oh-package.json5 中的 src 为 main
# 重建 HAR(根目录必须是 package/)
rm -f blur.har
mv blur package
tar -czf blur.har package
mv package blur
重建完成后,清除 ohpm 缓存并重新安装:
cd packages/tester/harmony
rm -rf oh_modules/.ohpm/@react-native-ohos+blur*
rm -rf oh_modules/@react-native-ohos/blur
ohpm install
4.2 核心 API
库导出一个 BlurView 组件:
import {BlurView} from '@react-native-oh-tpl/react-native-blur';

// 基本用法:作为容器包含子内容
<BlurView
  style={{width: '100%', height: 200, borderRadius: 12, overflow: 'hidden'}}
  blurType="dark"           // 模糊样式:dark | light | thickMaterialDark 等 21 种
  blurAmount={10}           // 模糊程度:1-100
  blurRadius={0}            // 内容模糊半径(vp),0 时使用 blurType 的毛玻璃效果
  overlayColor="rgba(0,0,0,0.3)"  // 叠加颜色
  enabled={true}>           // 是否启用
  {/* 子内容会随父节点一起模糊 */}
  <Text style={{color: '#fff'}}>Blurred Content</Text>
</BlurView>
注意:BlurView 在鸿蒙上是原生 Stack 节点,建议作为容器使用(子内容放在 BlurView 内部),而非用绝对定位叠加。绝对定位叠加在 RNOH 原生组件上可能导致布局异常。
4.3 完整示例代码
以下是在 RNOH tester 工程中验证通过的完整示例(BlurExample.tsx),提供模糊预览、控制面板、类型选择和小尺寸对比四个区域:
import React, {useState} from 'react';
import {
  View,
  Text,
  StyleSheet,
  ScrollView,
  Switch,
  Platform,
} from 'react-native';
import {BlurView} from '@react-native-oh-tpl/react-native-blur';

type BlurType =
  | 'dark'
  | 'light'
  | 'thickMaterialDark'
  | 'thinMaterialDark'
  | 'thickMaterialLight'
  | 'thinMaterialLight';

const BLUR_TYPES: BlurType[] = [
  'dark',
  'light',
  'thickMaterialDark',
  'thinMaterialDark',
  'thickMaterialLight',
  'thinMaterialLight',
];

export function BlurExample() {
  const [blurAmount, setBlurAmount] = useState(10);
  const [enabled, setEnabled] = useState(true);
  const [selectedType, setSelectedType] = useState<BlurType>('dark');

  const adjustBlur = (delta: number) => {
    setBlurAmount(prev => Math.max(1, Math.min(25, prev + delta)));
  };

  return (
    <ScrollView style={styles.container}>
      <Text style={styles.title}>BlurView Demo</Text>
      <Text style={styles.subtitle}>
        Platform: {Platform.OS === 'harmony' ? 'HarmonyOS' : Platform.OS}
      </Text>

      {/* 单个大预览 */}
      <View style={styles.card}>
        <Text style={styles.cardTitle}>Blur Preview</Text>
        <BlurView
          style={[styles.mainBlur, {height: 200}]}
          blurType={selectedType}
          blurAmount={blurAmount}
          enabled={enabled}>
          <View style={styles.blurContent}>
            <Text style={styles.contentTitle}>Blurred Content</Text>
            <Text style={styles.contentText}>
              {selectedType} | Amount: {blurAmount}
            </Text>
            <View style={styles.contentBoxes}>
              <View style={[styles.box, {backgroundColor: '#FF6B6B'}]} />
              <View style={[styles.box, {backgroundColor: '#4ECDC4'}]} />
              <View style={[styles.box, {backgroundColor: '#45B7D1'}]} />
            </View>
          </View>
        </BlurView>
      </View>

      {/* 控制面板 */}
      <View style={styles.card}>
        <Text style={styles.cardTitle}>Controls</Text>

        <View style={styles.controlRow}>
          <Text style={styles.controlLabel}>Blur Amount:</Text>
          <View style={styles.blurButtons}>
            <View style={styles.blurButton} onTouchEnd={() => adjustBlur(-1)}>
              <Text style={styles.buttonText}>-</Text>
            </View>
            <Text style={styles.blurValue}>{blurAmount}</Text>
            <View style={styles.blurButton} onTouchEnd={() => adjustBlur(1)}>
              <Text style={styles.buttonText}>+</Text>
            </View>
          </View>
        </View>

        <View style={styles.controlRow}>
          <Text style={styles.controlLabel}>Enabled:</Text>
          <Switch value={enabled} onValueChange={setEnabled} />
        </View>
      </View>

      {/* Blur Type 选择 */}
      <View style={styles.card}>
        <Text style={styles.cardTitle}>Blur Type</Text>
        <View style={styles.typeGrid}>
          {BLUR_TYPES.map(type => (
            <View
              key={type}
              style={[
                styles.typeButton,
                selectedType === type && styles.typeButtonSelected,
              ]}
              onTouchEnd={() => setSelectedType(type)}>
              <Text
                style={[
                  styles.typeText,
                  selectedType === type && styles.typeTextSelected,
                ]}>
                {type}
              </Text>
            </View>
          ))}
        </View>
      </View>

      {/* 小尺寸对比 */}
      <View style={styles.card}>
        <Text style={styles.cardTitle}>Small Blur Views (with background)</Text>
        <View style={styles.smallGrid}>
          {(['dark', 'light', 'thickMaterialDark'] as BlurType[]).map((type, i) => (
            <View key={type} style={styles.smallBlurWrapper}>
              <View style={[styles.smallBlurBg, {backgroundColor: ['#FF6B6B', '#4ECDC4', '#45B7D1'][i]}]} />
              <BlurView
                style={styles.smallBlur}
                blurType={type}
                blurAmount={blurAmount}
                enabled={enabled}>
                <View style={styles.smallBlurContent}>
                  <Text style={styles.smallBlurText}>{type}</Text>
                </View>
              </BlurView>
            </View>
          ))}
        </View>
      </View>
    </ScrollView>
  );
}

const styles = StyleSheet.create({
  container: {flex: 1, padding: 16, backgroundColor: '#F2F2F7'},
  title: {fontSize: 24, fontWeight: '700', marginBottom: 4, color: '#000'},
  subtitle: {fontSize: 14, color: '#666', marginBottom: 20},
  card: {
    backgroundColor: '#fff',
    borderRadius: 12,
    padding: 16,
    marginBottom: 16,
  },
  cardTitle: {fontSize: 16, fontWeight: '600', color: '#333', marginBottom: 12},
  mainBlur: {
    borderRadius: 12,
    overflow: 'hidden',
  },
  blurContent: {
    flex: 1,
    justifyContent: 'center',
    alignItems: 'center',
    padding: 20,
  },
  contentTitle: {fontSize: 20, fontWeight: '700', color: '#fff', marginBottom: 8},
  contentText: {fontSize: 14, color: 'rgba(255,255,255,0.8)', marginBottom: 16},
  contentBoxes: {
    flexDirection: 'row',
    gap: 12,
  },
  box: {
    width: 40,
    height: 40,
    borderRadius: 8,
  },
  controlRow: {
    flexDirection: 'row',
    justifyContent: 'space-between',
    alignItems: 'center',
    marginBottom: 12,
  },
  controlLabel: {fontSize: 14, color: '#333'},
  blurButtons: {
    flexDirection: 'row',
    alignItems: 'center',
    gap: 12,
  },
  blurButton: {
    width: 36,
    height: 36,
    borderRadius: 18,
    backgroundColor: '#007AFF',
    justifyContent: 'center',
    alignItems: 'center',
  },
  buttonText: {color: '#fff', fontSize: 20, fontWeight: '600'},
  blurValue: {fontSize: 18, fontWeight: '600', color: '#000', minWidth: 30, textAlign: 'center'},
  typeGrid: {
    flexDirection: 'row',
    flexWrap: 'wrap',
    gap: 8,
  },
  typeButton: {
    paddingHorizontal: 12,
    paddingVertical: 8,
    borderRadius: 8,
    backgroundColor: '#F0F0F0',
    borderWidth: 2,
    borderColor: 'transparent',
  },
  typeButtonSelected: {
    backgroundColor: '#E3F0FF',
    borderColor: '#007AFF',
  },
  typeText: {fontSize: 12, color: '#666'},
  typeTextSelected: {color: '#007AFF', fontWeight: '600'},
  smallGrid: {
    flexDirection: 'row',
    gap: 12,
  },
  smallBlurWrapper: {
    flex: 1,
    height: 80,
    borderRadius: 8,
    overflow: 'hidden',
    position: 'relative',
  },
  smallBlurBg: {
    position: 'absolute',
    top: 0,
    left: 0,
    right: 0,
    bottom: 0,
  },
  smallBlur: {
    ...StyleSheet.absoluteFill,
  },
  smallBlurContent: {
    flex: 1,
    justifyContent: 'center',
    alignItems: 'center',
  },
  smallBlurText: {fontSize: 11, color: '#fff', fontWeight: '500'},
});
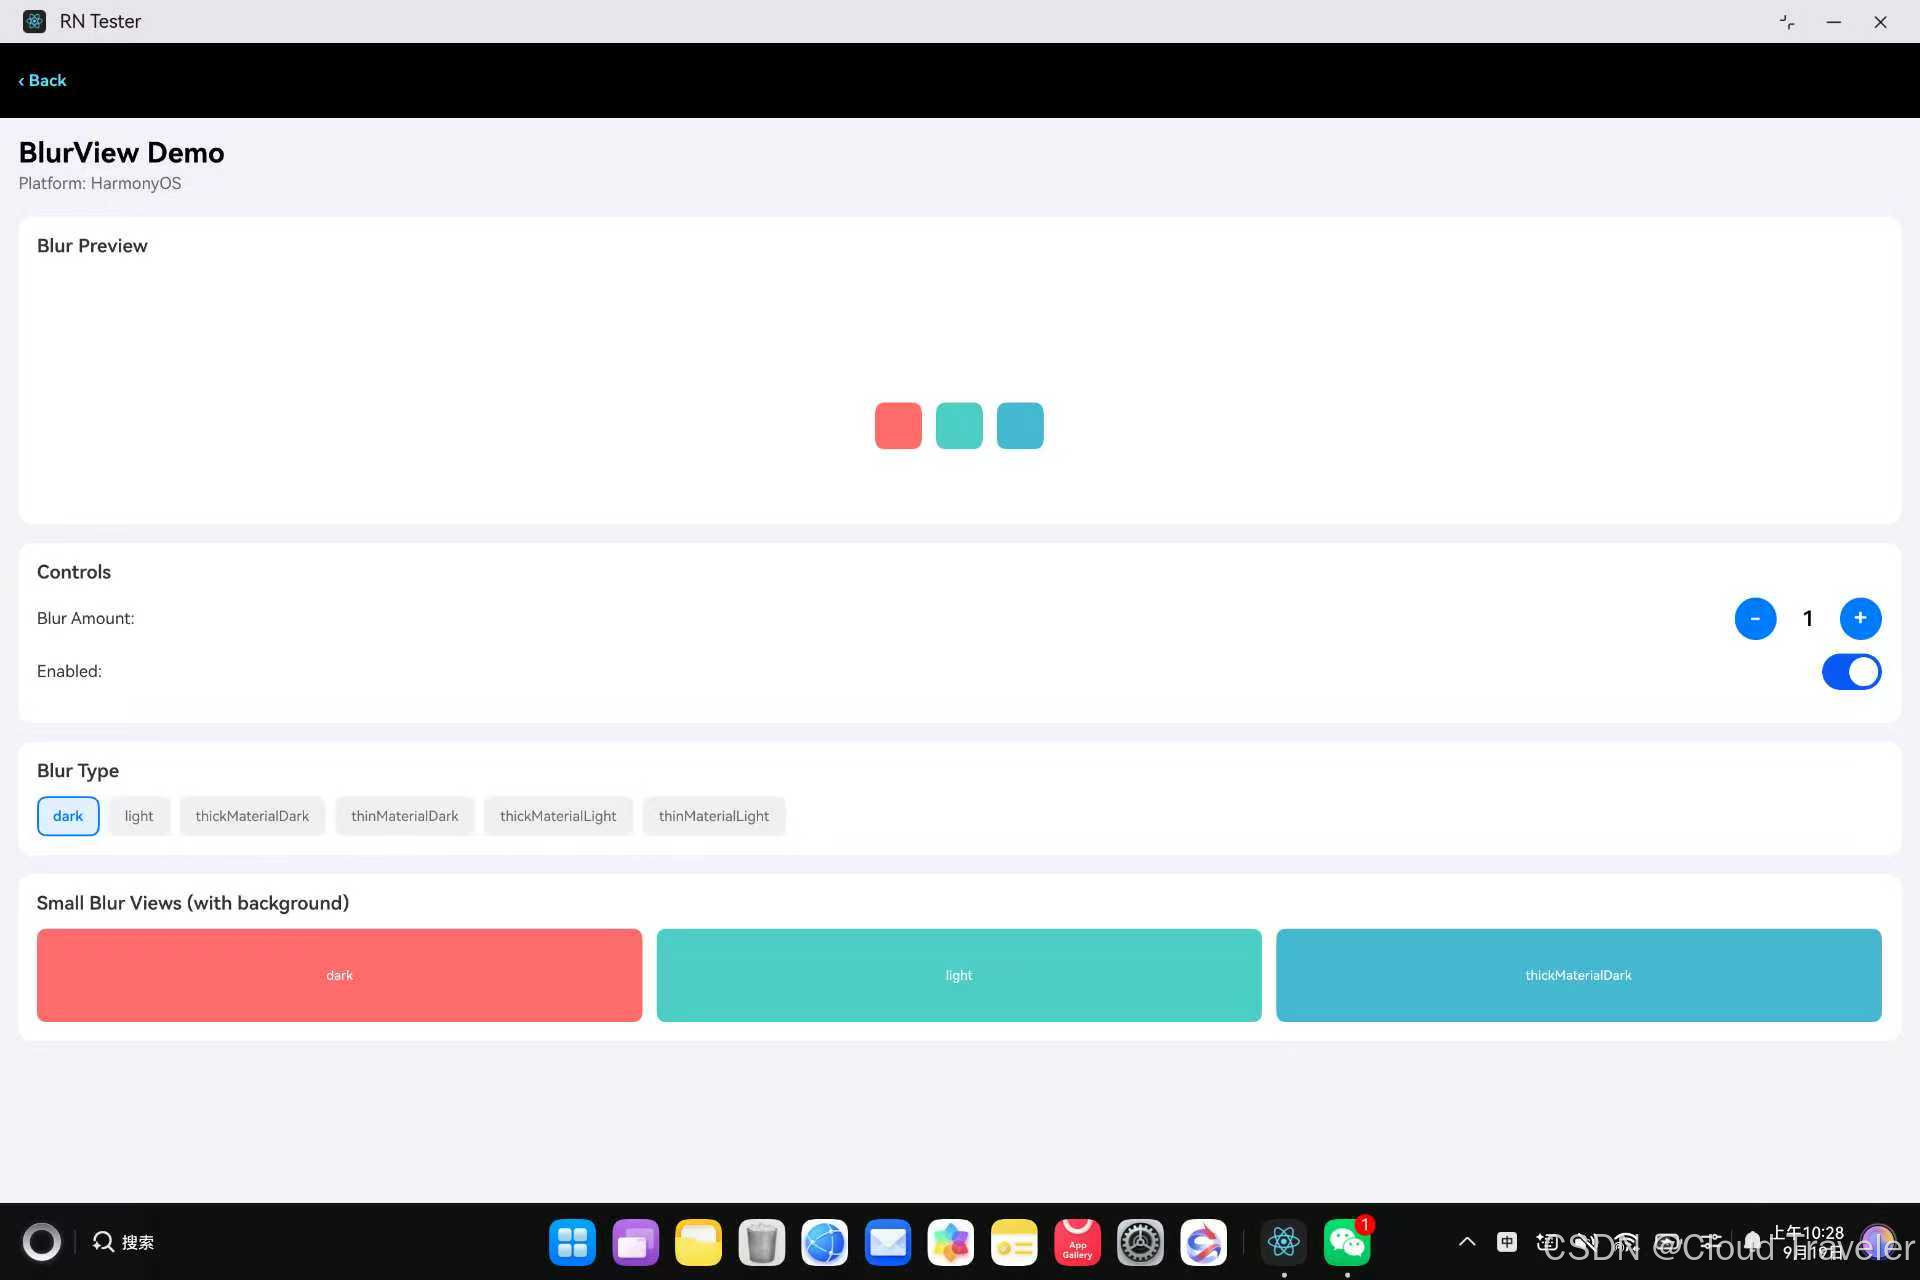
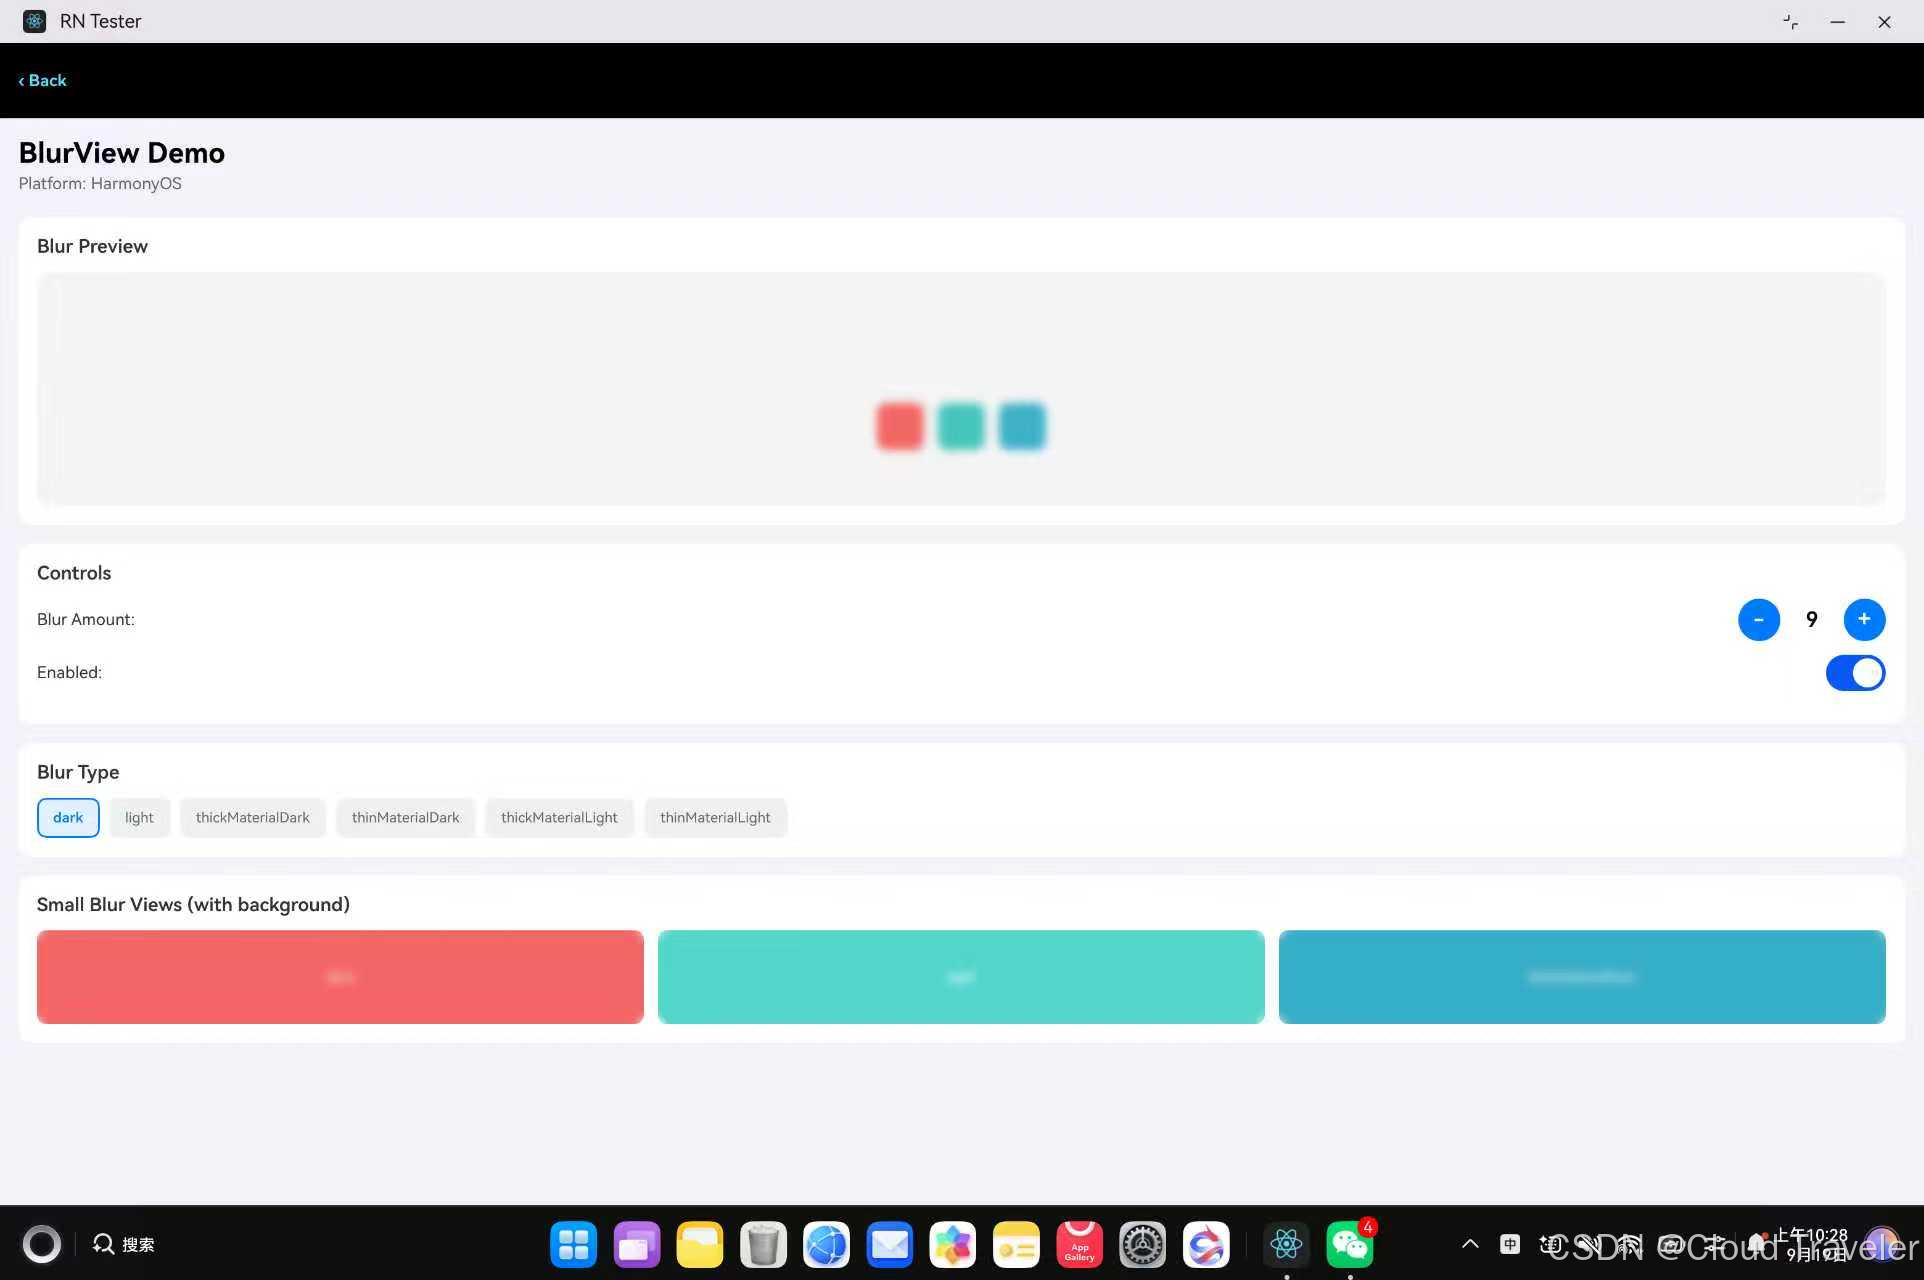
运行效果:页面显示四张白色圆角卡片——第一张是模糊预览区(彩色方块和文字被模糊),第二张是控制面板(blurAmount 加减和 enabled 开关),第三张是 6 种 blurType 选择按钮,第四张是 3 个小模糊视图并排对比(红/青/蓝背景上的 dark/light/thickMaterialDark 效果)。
五、FAQ
5.1 常见问题
Q1:编译报 Cannot find module ‘./components/VibrancyView.harmony’
TypeScript 编译期错误。库的 src/index.tsx 导入了 VibrancyView.harmony,但 src/components/ 目录下只有 BlurView.harmony.tsx,缺少 VibrancyView.harmony.tsx 文件。VibrancyView 是 iOS 专属组件,鸿蒙平台不支持。
解决方法是在 src/components/ 下创建 VibrancyView.harmony.tsx 空实现:
import React from 'react';
import {View, Text} from 'react-native';

export type VibrancyViewProps = {
  blurType?: string;
  blurAmount?: number;
};

const VibrancyView = React.forwardRef<View, VibrancyViewProps>((props, ref) => {
  return (
    <View ref={ref} style={props.style}>
      <Text>VibrancyView is not supported on HarmonyOS</Text>
    </View>
  );
});

export default VibrancyView;
这是纯类型层面的兼容,运行时 VibrancyView 不会在鸿蒙平台使用。
Q2:autolinking 不注册 BlurPackage(RNOHPackagesFactory.ets 没有 BlurPackage)
ohpm install 成功但 DevEco Studio Sync 后 RNOHPackagesFactory.ets 没有生成 BlurPackage 的导入和注册代码。
根因是 blur.har 的 oh-package.json5 使用 src 字段而非 main 字段,autolinking 找不到入口文件:
// 缺陷版本,autolinking 不识别
"src": "index.ets",
// 修复后,autolinking 正常
"main": "index.ets",
解决方法是修改源码目录的 oh-package.json5,将 src 改为 main,然后重建 HAR(参考 4.1 第三步)。
Q3:ohpm install 报错 Fetch local package error, the oh-package.json5 file is missing
ohpm 解压 HAR 后找不到 oh-package.json5。根因是 HAR 根目录是 blur/ 而非 package/,ohpm 期望的目录结构是 package/oh-package.json5:
// 错误结构(blur.har 解压后)
blur/oh-package.json5
// 正确结构(ohpm 期望)
package/oh-package.json5
解决方法是重建 HAR 时确保根目录是 package/:
cd harmony
mv blur package
tar -czf blur.har package
mv package blur
Q4:BlurView 页面很乱、很模糊
BlurView 在鸿蒙上是原生 Stack 节点,使用 NODE_FOREGROUND_BLUR_STYLE 实现毛玻璃效果。如果用绝对定位(position: absolute + top/left/right/bottom: 0)将 BlurView 叠加在其他组件上方,可能导致模糊效果溢出或布局异常。
解决方法是将 BlurView 作为容器使用(子内容放在 BlurView 内部),而非叠加层:
// 错误用法:绝对定位叠加,可能布局异常
<View style={{position: 'relative'}}>
  <View style={styles.background} />
  <BlurView style={StyleSheet.absoluteFill} blurType="dark" />
</View>

// 正确用法:容器模式,子内容随父节点模糊
<BlurView style={{height: 200}} blurType="dark">
  <View style={styles.content}>
    <Text>Blurred Content</Text>
  </View>
</BlurView>
小尺寸对比场景中,如果需要背景色 + 模糊效果,用 View 包裹背景色 + BlurView 绝对定位的方式,给外层 View 设置 overflow: hidden 和明确高度。
Q5:重建或替换 HAR 后 Sync,运行行为仍是旧版
ohpm 有缓存机制。即使 HAR 文件已更新,只要包名 + 版本哈希没变,ohpm 不会重新解压到 oh_modules,编译时读到的仍然是旧文件。
解决方法是手动清除 ohpm 缓存目录,然后重新安装:
rm -rf harmony/oh_modules/.ohpm/@react-native-ohos+blur*
rm -rf harmony/oh_modules/@react-native-ohos/blur
ohpm install
Q6:真机安装失败(HAP 安装报错)
用 DevEco Studio 打开工程,进入 File > Project Structure > Signing Configs,勾选 Automatically generate signature 后重新运行。
5.2 库本身存在问题:如何提交 Issue
- 打开适配仓库 https://atomgit.com/CPF-RN/rntpc_react-native-blur 的 Issues 页面,点击"新建 Issue";
- 标题格式:[Bug] 一句话现象,例如 [Bug] HAR 根目录不是 package/ 导致 ohpm 安装失败;
- 正文必须包含:复现步骤 / 期望结果 / 实际结果 / 设备与系统版本 / RNOH 版本 / 最小复现代码、日志或截图;
- 提交后跟踪仓库维护者回复,修复发布后关注对应 Tag 更新依赖版本。
5.3 能自己解决:如何提交 PR
- Fork 适配仓库 https://atomgit.com/CPF-RN/rntpc_react-native-blur 到个人 AtomGit 账号;
- git clone 自己的 fork,基于 master 新建分支:git checkout -b fix/xxx;
- 修改代码(如 C++ 层 BlurViewNode 实现、JS 侧类型声明)并 commit;
- push 到自己的 fork,在原仓库发起 Pull Request;
- PR 描述写清:问题背景 / 修改点 / 鸿蒙真机验证结果(附运行截图),等待维护者评审合入。
六、其他内容
6.1 总结
@react-native-ohos/blur 为 React Native 鸿蒙应用补齐了视图模糊能力。底层是 C++ Fabric 组件:BlurView 是 ArkUI Stack 节点,使用 NODE_FOREGROUND_BLUR_STYLE 实现 21 种毛玻璃样式,使用 NODE_BLUR 实现内容模糊半径。接入时注意四点:oh-package.json5 中 HAR 路径层级要正确、发布版 HAR 存在 src 字段和根目录命名两处缺陷需手动重建、BlurView 建议作为容器使用而非绝对定位叠加、VibrancyView 是 iOS 专属需创建空实现避免编译错误。建议生产环境锁定依赖版本,遇到问题优先查看适配仓库 Issues。
6.2 参考链接
RNOH 社区入口和三方库资源统一在这里:

作为“人工智能6S店”的官方数字引擎,为AI开发者与企业提供一个覆盖软硬件全栈、一站式门户。
更多推荐

 0
0 0
0- 0


 已为社区贡献2条内容

所有评论(0)