
基于HarmonyOS API 24的HarmonyOS 6.1.1 ArkTS在线自习室打卡App实战开发详解——HarmonyOS ArkTS API 24全流程架构与组件深度剖析
本文以"QQ自习·学习馆"在线自习室打卡应用为实战案例,深入讲解HarmonyOS 6.1.1与HarmonyOS ArkTS API 24的声明式UI开发范式、状态管理、组件生命周期、动画特效、数据建模与交互设计,涵盖从色彩体系定义到多弹窗管理、从粒子动画到热力图渲染的完整技术栈,是一篇面向中高级开发者的全流程实战技术博文。
技术引言
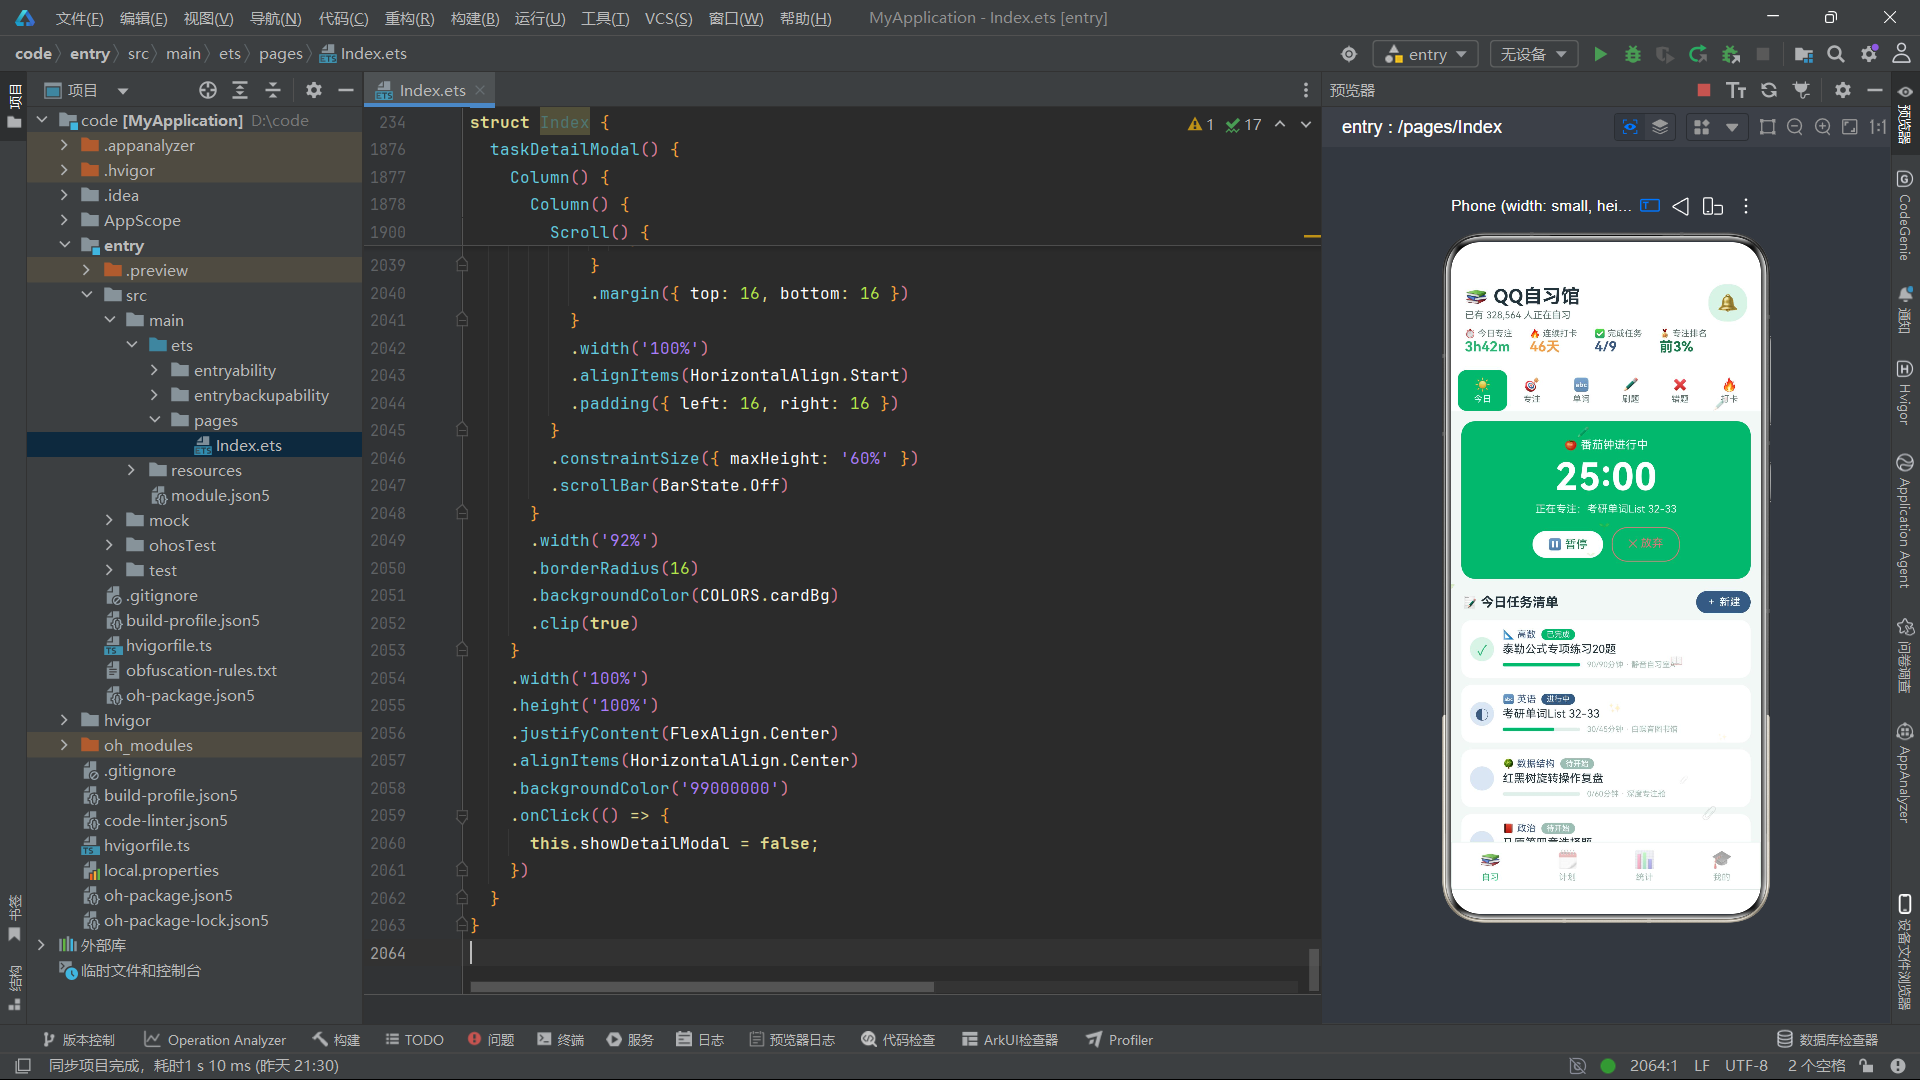
HarmonyOS 6.1.1作为华为鸿蒙生态的最新演进版本,带来了全新的HarmonyOS ArkTS API 24开发框架。ArkTS是在TypeScript基础上扩展而来的声明式编程语言,它保留了TypeScript的静态类型检查能力,同时深度集成了鸿蒙系统的分布式能力与声明式UI渲染引擎。API 24版本进一步强化了@Observed状态观察机制、@Builder装饰器的组件化能力以及ForEach的高性能列表渲染,使得开发者能够以更简洁的代码实现更复杂的交互界面。本文以"QQ自习·学习馆"在线自习室打卡应用为实战场景,从零开始拆解每一个技术细节,展示如何利用HarmonyOS ArkTS API 24构建一个包含底部四Tab导航、顶部六Tab切换、四种弹窗交互、粒子动画特效、柱状图统计与打卡热力图的完整应用页面,涵盖状态驱动渲染、组件化拆分、生命周期管理、定时器动画、模态对话框等核心技术点。
一、整体架构概览
在正式进入代码逐段分析之前,我们先从全局视角了解这个应用的整体架构设计。该应用采用了典型的"导航骨架 + 内容区域 + 弹窗层 + 特效层"四层架构模式,每一层各司其职,通过状态变量进行层间通信。
架构分层示意图
从架构图中可以看出,四层之间是自底向上的支撑关系。骨架层提供页面基础结构布局,内容层根据用户当前选中的Tab动态切换不同内容区域,弹窗层在用户触发特定操作时叠加显示,特效层则始终浮在最顶层,为整个页面提供持续的视觉动态效果。
下面我们开始逐段分析源代码。
二、代码逐段深度解析
第一段:色彩体系定义——ColorPalette接口与COLORS常量
interface ColorPalette {
  mint: string;
  mintLight: string;
  mintDark: string;
  indigo: string;
  indigoLight: string;
  bg: string;
  cardBg: string;
  textPrimary: string;
  textSecondary: string;
  textHint: string;
  white: string;
  border: string;
  danger: string;
  warning: string;
  success: string;
}

const COLORS: ColorPalette = {
  mint: '#2BB673',
  mintLight: '#DDF3E8',
  mintDark: '#1B7A4C',
  indigo: '#3D5A80',
  indigoLight: '#DCE6F2',
  bg: '#F3F8F5',
  cardBg: '#FFFFFF',
  textPrimary: '#22333B',
  textSecondary: '#5C7470',
  textHint: '#A3BDB4',
  white: '#FFFFFF',
  border: '#E2EFE8',
  danger: '#E57373',
  warning: '#F0A04B',
  success: '#2BB673'
};
色彩体系是任何一个UI应用的视觉基石。在本段代码中,开发者首先定义了一个ColorPalette接口,用TypeScript的接口语法将应用所需的所有颜色以类型化的方式声明出来。这种做法的优势在于:编译器能够在构建阶段对颜色字段的访问进行类型检查,如果开发者拼错了某个颜色名称,IDE和编译器会立即报错,从而避免了运行时因颜色未定义而导致的UI渲染异常。
COLORS常量是这个接口的具体实现。应用采用了"薄荷绿 + 靛蓝"的双主色调设计,薄荷绿#2BB673作为主要品牌色,用于强调完成状态、主按钮和选中态;靛蓝#3D5A80作为辅助色,用于进行中状态、次级按钮和信息标签。三档薄荷色(mintDark、mint、mintLight)构成了一个完整的色阶梯度,分别用于深色强调、正常状态和浅色背景填充。文本颜色也分为三档:textPrimary用于主要内容、textSecondary用于次要描述、textHint用于占位提示,这种分级保证了信息层次的可读性。此外,danger、warning、success三个语义色分别对应删除/放弃、提醒/排行、成功/完成三种交互语境,使整个应用的色彩语言保持一致性。
第二段:导航配置——TabItem接口与底部/顶部Tab常量
interface TabItem {
  label: string;
  icon: string;
}

const BOTTOM_TABS: TabItem[] = [
  { label: '自习', icon: '📚' },
  { label: '计划', icon: '🗓' },
  { label: '统计', icon: '📊' },
  { label: '我的', icon: '🎓' }
];

const TOP_TABS: TabItem[] = [
  { label: '今日', icon: '☀️' },
  { label: '专注', icon: '🎯' },
  { label: '单词', icon: '🔤' },
  { label: '刷题', icon: '✏️' },
  { label: '错题', icon: '❌' },
  { label: '打卡', icon: '🔥' }
];

const WEEK_DAYS: string[] = ['一', '二', '三', '四', '五', '六', '日'];
const FOCUS_HOURS: number[] = [2.5, 3.2, 1.8, 4.0, 3.6, 5.2, 4.4];
导航系统是这个应用的用户入口骨架。代码首先定义了TabItem接口,包含label和icon两个字段,用于描述每个导航项的文字标签和图标。这里使用的是Emoji字符作为图标,这是一种轻量级的视觉方案,无需引入额外的图标资源文件,在跨平台渲染时也具有良好的一致性。
BOTTOM_TABS定义了底部四个主Tab——自习、计划、统计、我的,构成了应用的一级导航结构。这四个Tab分别对应学习执行、目标规划、数据分析和个人信息四大功能域,是学习类App最经典的信息架构。TOP_TABS定义了六个子Tab,仅在"自习"一级Tab下展示,对应今日任务、自习室座位、单词背诵、刷题记录、错题本和打卡日历六个子功能页面。这种"底部主导航 + 顶部子导航"的双层Tab设计,在有限的移动端屏幕空间内实现了丰富的功能切换。
WEEK_DAYS和FOCUS_HOURS两个数组为常量数据,分别存储星期标签和每日计划专注时长。FOCUS_HOURS中的数据被用于统计页面的柱状图渲染和计划页面的周安排展示。将这类静态数据抽离为顶层常量,使得数据与视图逻辑分离,便于后续维护和替换为真实接口数据。
第三段:数据模型——@Observed StudyTask类
@Observed
class StudyTask {
  id: number;
  subject: string;
  subjectIcon: string;
  content: string;
  minutes: number;
  doneMinutes: number;
  status: string;
  room: string;
  priority: number;

  constructor(id: number, subject: string, subjectIcon: string, content: string,
    minutes: number, doneMinutes: number, status: string, room: string, priority: number) {
    this.id = id;
    this.subject = subject;
    this.subjectIcon = subjectIcon;
    this.content = content;
    this.minutes = minutes;
    this.doneMinutes = doneMinutes;
    this.status = status;
    this.room = room;
    this.priority = priority;
  }
}
StudyTask类是整个应用最核心的数据模型,它使用@Observed装饰器进行标记。在HarmonyOS ArkTS API 24中,@Observed装饰器的作用是使类的实例成为可观察对象——当该对象的属性发生变化时,所有引用了该对象的UI组件都会自动触发重新渲染。这是ArkTS响应式编程范式的核心机制之一。
StudyTask类包含九个属性字段:id为唯一标识符,用于ForEach列表渲染的key生成;subject和subjectIcon分别表示科目名称和科目图标;content为任务内容描述;minutes为计划总时长(分钟),doneMinutes为已完成时长,两者配合计算进度百分比;status为任务状态(已完成/进行中/待开始);room为所属自习室名称;priority为优先级等级。构造函数采用全参数注入的方式,确保每个实例在创建时属性都被完整初始化,避免了可选属性可能带来的undefined风险。
值得注意的是,虽然@Observed使类实例可观察,但在本应用中任务列表是作为常量TASKS定义的(通过buildTasks()函数构建),并未直接绑定到@State状态变量上。这意味着任务数据本身是静态的演示数据,实际项目中可以将其替换为从网络请求获取的可变数据源,并配合@State实现动态增删改查后的自动UI刷新。
第四段:模拟数据构建——buildTasks函数
function buildTasks(): StudyTask[] {
  return [
    new StudyTask(1, '高数', '📐', '泰勒公式专项练习20题', 90, 90, '已完成', '静音自习室A', 1),
    new StudyTask(2, '英语', '🔤', '考研单词List 32-33', 45, 30, '进行中', '白噪音图书馆', 1),
    new StudyTask(3, '数据结构', '🌳', '红黑树旋转操作复盘', 60, 0, '待开始', '深度专注舱', 2),
    new StudyTask(4, '政治', '📕', '马原第四章选择题', 40, 0, '待开始', '静音自习室B', 3),
    new StudyTask(5, '专业课', '💾', '操作系统PV操作大题', 75, 45, '进行中', '考研冲刺房', 1),
    new StudyTask(6, '高数', '📐', '线代特征值计算速练', 50, 50, '已完成', '静音自习室A', 2),
    new StudyTask(7, '英语', '🔤', '阅读精读Text 3', 55, 0, '待开始', '白噪音图书馆', 2),
    new StudyTask(8, '编程', '💻', 'LeetCode链表五题', 80, 20, '进行中', '代码自习室', 1),
    new StudyTask(9, '政治', '📕', '时政热点整理', 30, 0, '待开始', '碎片时间房', 3),
    new StudyTask(10, '专业课', '💾', '计算机网络TCP拥塞控制', 65, 65, '已完成', '考研冲刺房', 2),
    new StudyTask(11, '英语', '🔤', '作文模板背诵', 35, 0, '待开始', '晨读房', 2),
    new StudyTask(12, '高数', '📐', '概率论大数定律笔记', 45, 0, '待开始', '静音自习室B', 3),
    new StudyTask(13, '编程', '💻', '整理算法错题本', 40, 40, '已完成', '代码自习室', 3),
    new StudyTask(14, '专业课', '💾', '组成原理Cache映射', 70, 10, '进行中', '深度专注舱', 1),
    new StudyTask(15, '英语', '🔤', '长难句每日三句', 20, 0, '待开始', '碎片时间房', 3)
  ];
}

const TASKS: StudyTask[] = buildTasks();
buildTasks()函数是一个工厂函数,负责构建应用的模拟任务数据集。它返回一个包含15条StudyTask实例的数组,覆盖了高数、英语、数据结构、政治、专业课、编程等六大学科领域。每条任务都有不同的状态组合——已完成、进行中、待开始三种状态均有覆盖,使得UI界面能够充分展示各种状态下的视觉效果差异。
任务数据的编排并非随机,而是经过了精心设计。例如,第1条任务doneMinutes等于minutes(90/90),展示已完成的全进度条效果;第2条任务doneMinutes为30而minutes为45(30/45),展示进行中的半进度效果;第3条任务doneMinutes为0,展示待开始的空进度条效果。三种进度状态的并存使得开发者在调试UI时能够一次性验证所有渲染路径。
const TASKS将函数返回值赋值为模块级常量,这个常量在后续多个@Builder方法中被ForEach引用。在HarmonyOS ArkTS中,模块级常量在应用启动时即完成初始化,其生命周期贯穿整个页面。将数据构建逻辑封装在独立函数中而非直接内联,是一种良好的关注点分离实践——当需要替换为真实API数据时,只需修改这一个函数,而无需改动UI代码。
第五段:座位信息模型——SeatInfo接口与SEATS数据
interface SeatInfo {
  seatNo: number;
  occupant: string;
  avatar: string;
  status: string;
  minutes: number;
}

const SEATS: SeatInfo[] = [
  { seatNo: 1, occupant: '上岸锦鲤', avatar: '🐟', status: '专注中', minutes: 186 },
  { seatNo: 2, occupant: '空位', avatar: '🪑', status: '可预约', minutes: 0 },
  { seatNo: 3, occupant: '微分骑士', avatar: '⚔️', status: '专注中', minutes: 142 },
  { seatNo: 4, occupant: '单词收割机', avatar: '🌾', status: '小憩', minutes: 98 },
  { seatNo: 5, occupant: '空位', avatar: '🪑', status: '可预约', minutes: 0 },
  { seatNo: 6, occupant: '深夜修仙', avatar: '🌙', status: '专注中', minutes: 220 },
  { seatNo: 7, occupant: '小睡五分钟', avatar: '😴', status: '小憩', minutes: 45 },
  { seatNo: 8, occupant: '考研上岸', avatar: '🏔', status: '专注中', minutes: 165 },
  { seatNo: 9, occupant: '空位', avatar: '🪑', status: '可预约', minutes: 0 },
  { seatNo: 10, occupant: '刷题机器', avatar: '🤖', status: '专注中', minutes: 310 }
];
SeatInfo接口定义了自习室座位的数据结构。与StudyTask使用@Observed类不同,SeatInfo使用的是普通接口配合对象字面量的方式,这体现了ArkTS中数据建模的灵活性——对于不需要动态修改的静态展示数据,使用接口+字面量的方式更加轻量,无需类的实例化开销。
SEATS数组包含10个座位信息,其中3个为空位(可预约状态),其余7个被不同用户占用,状态分为"专注中"和"小憩"两种。座位数据的设计模拟了一个真实的在线自习室场景:有的同学正在全神贯注地学习(专注中),有的暂时休息(小憩),有的座位空着等待预约(可预约)。这种多状态并存的设计使得座位图的UI渲染需要根据status字段进行条件分支着色——专注中的座位使用薄荷绿背景,小憩的使用靛蓝浅色背景,可预约的使用灰色背景。
座位编号从1到10,在排行榜功能中还会按专注时长排序。注意座位6的minutes为220,座位10为310,这些数值差异使得排行榜的排序展示具有视觉层次感。头像字段同样使用Emoji,与TabItem的设计理念保持一致,构建了一套统一的轻量级视觉语言。
第六段:单词数据模型——WordItem接口与WORDS数据
interface WordItem {
  id: number;
  word: string;
  phonetic: string;
  meaning: string;
  mastered: boolean;
  reviewCount: number;
}

const WORDS: WordItem[] = [
  { id: 1, word: 'perseverance', phonetic: '/ˌpɜːsəˈvɪərəns/', meaning: 'n. 坚持不懈', mastered: true, reviewCount: 12 },
  { id: 2, word: 'meticulous', phonetic: '/məˈtɪkjələs/', meaning: 'adj. 一丝不苟的', mastered: true, reviewCount: 8 },
  { id: 3, word: 'ambiguous', phonetic: '/æmˈbɪɡjuəs/', meaning: 'adj. 模棱两可的', mastered: false, reviewCount: 5 },
  { id: 4, word: 'pragmatic', phonetic: '/præɡˈmætɪk/', meaning: 'adj. 务实的', mastered: false, reviewCount: 3 },
  { id: 5, word: 'resilience', phonetic: '/rɪˈzɪliəns/', meaning: 'n. 韧性;恢复力', mastered: true, reviewCount: 15 },
  { id: 6, word: 'substantiate', phonetic: '/səbˈstænʃieɪt/', meaning: 'v. 证实;证明', mastered: false, reviewCount: 2 },
  { id: 7, word: 'ubiquitous', phonetic: '/juːˈbɪkwɪtəs/', meaning: 'adj. 无处不在的', mastered: false, reviewCount: 4 },
  { id: 8, word: 'epitomize', phonetic: '/ɪˈpɪtəmaɪz/', meaning: 'v. 成为……的缩影', mastered: false, reviewCount: 1 }
];
WordItem接口为单词背诵功能模块的数据结构定义。它包含六个字段:id为唯一标识,word为英文单词,phonetic为音标,meaning为中文释义,mastered为布尔值表示是否已掌握,reviewCount为复习次数。这个数据结构的设计直接映射了单词学习App的核心交互需求——展示单词信息、标记掌握状态、追踪复习频率。
WORDS数组提供了8个考研高频词汇的模拟数据。其中perseverance、meticulous、resilience三个单词的mastered为true,其余为false,对应了UI中"已背2/8"的进度提示。复习次数reviewCount从1到15不等,为"复习N次"的文案展示提供了数据支撑。音标字段使用了完整的国际音标格式,包含斜杠和重音符号,确保了展示的专业性和准确性。
在UI渲染层面,mastered布尔值直接影响卡片的边框颜色——已掌握的单词卡片使用薄荷绿浅色边框,未掌握的使用默认边框色。这种数据驱动的视觉差异,是ArkTS声明式UI的典型应用场景:开发者只需描述数据与视觉的映射关系,框架负责在数据变化时自动更新视图。
第七段:粒子动画系统——ParticleItem接口与粒子构建函数
interface ParticleItem {
  id: number;
  x: number;
  y: number;
  size: number;
  opacity: number;
  icon: string;
}

const PARTICLE_ICONS: string[] = ['✏️', '🌱', '📖', '✨', '📎'];

function buildParticles(): ParticleItem[] {
  const arr: ParticleItem[] = [];
  for (let i = 0; i < 12; i++) {
    arr.push({
      id: i,
      x: (i * 49) % 330 + 12,
      y: 130 + (i * 87) % 470,
      m: 9 + (i * 6) % 9,
      opacity: 0.18 + (i % 3) * 0.08,
      icon: PARTICLE_ICONS[i % PARTICLE_ICONS.length]
    });
  }
  return arr;
}
ParticleItem接口定义了粒子动画系统中每个粒子节点的数据结构。每个粒子包含id(唯一标识)、x和y(坐标位置)、size(字体大小,决定粒子视觉大小)、opacity(透明度)和icon(Emoji图标)。PARTICLE_ICONS数组提供了五种学习相关的Emoji图标——铅笔、幼苗、书本、闪光、回形针,这些图标在粒子动画中循环使用,营造出一种"知识飘散"的视觉效果。
buildParticles()函数使用for循环生成了12个粒子节点。粒子坐标的计算采用了取模运算(%)来生成伪随机分布——x坐标通过(i * 49) % 330 + 12计算,使得12个粒子的x坐标在12到342范围内分散分布;y坐标通过130 + (i * 87) % 470计算,分布在130到600范围内。这种取模分布方式虽然不是真正的随机数,但其分布效果足以模拟自然飘散的视觉感受,且具有确定性——每次应用启动时粒子初始位置完全一致,便于调试和测试。
粒子大小通过9 + (i * 6) % 9计算,范围在9到17之间,透明度通过0.18 + (i % 3) * 0.08计算,范围在0.18到0.34之间。低透明度保证了粒子不会干扰前景内容的可读性,大小差异则增加了视觉层次感。整个粒子系统是应用"清新学霸风"设计风格的重要视觉元素,它通过持续的运动为静态页面注入了生命力。
第八段:粒子漂移算法——driftParticles函数
function driftParticles(list: ParticleItem[]): ParticleItem[] {
  const next: ParticleItem[] = [];
  for (let i = 0; i < list.length; i++) {
    const p = list[i];
    const ny = p.y - 5;
    next.push({
      id: p.id,
      x: p.x + Math.sin(p.id + p.y / 45) * 1.8,
      y: ny < 105 ? 630 : ny,
      size: p.size,
      opacity: p.opacity,
      icon: p.icon
    });
  }
  return next;
}
driftParticles()函数是粒子动画的核心驱动算法。它接收当前的粒子列表,返回一个新的粒子列表,每个粒子的位置都经过了一次"漂移"计算。这个函数被setInterval定时器每130毫秒调用一次,每次调用都会生成新的粒子位置数据,从而驱动UI的持续重绘。
粒子的运动逻辑包含两个维度的计算。垂直方向上,每个粒子的y坐标减少5个单位(p.y - 5),模拟粒子向上漂浮的效果。当粒子飘出顶部边界(y < 105)时,它会被重置到底部(y = 630),形成无限循环的飘散动画。水平方向上,x坐标通过Math.sin(p.id + p.y / 45) * 1.8进行微调,正弦函数的周期性使得粒子在上升过程中会有轻微的左右摆动,模拟了空气中漂浮物体的自然运动轨迹。
这种"纯函数式"的粒子更新方式——输入旧状态、输出新状态、不修改原数组——是响应式编程的典型范式。在HarmonyOS ArkTS API 24中,当@State particles被赋值为新数组时,框架会自动进行diff比较,仅更新发生变化的粒子节点,而不是全量重建所有粒子组件。这种细粒度的更新优化,使得12个粒子的动画在每130ms一次的频率下依然保持流畅,不会造成明显的性能开销。
第九段:辅助工具函数——状态着色、柱状图高度与热力图配色
function statusColor(status: string): string {
  if (status === '已完成') {
    return COLORS.mint;
  }
  if (status === '进行中') {
    return COLORS.indigo;
  }
  return COLORS.textHint;
}

function focusBarHeight(h: number): string {
  return (h * 24).toFixed(0) + 'vp';
}

function heatCellColor(level: number): string {
  if (level >= 4) {
    return COLORS.mintDark;
  }
  if (level === 3) {
    return COLORS.mint;
  }
  if (level === 2) {
    return '#8AD5B0';
  }
  if (level === 1) {
    return COLORS.mintLight;
  }
  return '#EEF6F1';
}

const HEAT_LEVELS: number[] = [3, 2, 4, 1, 0, 2, 3, 4, 4, 2, 1, 3, 0, 0, 2, 4, 3, 1, 2, 4, 3, 2, 1, 0, 4, 4, 2, 3];
本段代码定义了三个工具函数和一个热力图数据常量,它们在UI渲染中扮演"数据到视觉"的转换桥梁角色。
statusColor()函数接收任务状态字符串,返回对应的主题色。已完成返回薄荷绿,进行中返回靛蓝,其他状态(即待开始)返回浅灰色。这个函数在任务卡片的状态标签背景色、任务详情弹窗的状态标签等多处被调用,确保了状态颜色映射的统一性。如果未来需要新增状态类型(如"已逾期"),只需修改这一个函数即可全局生效。
focusBarHeight()函数将专注时长数值转换为柱状图高度字符串。它将小时数乘以24,再通过toFixed(0)取整并拼接'vp'单位后缀。例如,5.2小时对应124vp高度的柱子。vp(virtual pixel)是HarmonyOS的虚拟像素单位,框架会根据设备屏幕密度自动进行物理像素换算,保证了在不同分辨率设备上柱状图比例的一致性。
heatCellColor()函数实现了热力图的颜色梯度映射。热力等级从0到4,共5档颜色:0为最浅的灰绿色#EEF6F1(无打卡),1为薄荷浅色,2为中间过渡色#8AD5B0,3为标准薄荷绿,4为深薄荷绿。这种五级渐变色阶的设计参考了GitHub贡献图的经典配色方案,能够直观地传达打卡频率的密集程度。
HEAT_LEVELS数组包含28个热力等级值,对应4周(28天)的打卡数据。数据中0到4各等级均有分布,使得热力图呈现出深浅交替的视觉效果,直观展示了学习打卡的连续性和频率变化。
第十段:组件状态声明——@Entry struct Index与@State变量
@Entry
struct Index {
  @State currentBottomTab: number = 0;
  @State currentTopTab: number = 0;
  @State showNewTaskModal: boolean = false;
  @State showGoalModal: boolean = false;
  @State showGiveupModal: boolean = false;
  @State showDetailModal: boolean = false;
  @State selectedTask: StudyTask | null = null;
  @State particles: ParticleItem[] = buildParticles();
  @State newTaskContent: string = '';
  @State newTaskSubject: number = 0;
  @State newTaskMinutes: number = 1;
  @State goalHours: string = '4';
  @State goalDays: string = '6';
  @State goalReward: string = '一杯奶茶';
  private timerId: number = -1;
@Entry装饰器标记Index结构体为应用的入口组件,它会被自动渲染为页面的根节点。@State装饰器声明的变量是ArkTS响应式系统的核心——当这些变量的值发生变化时,引用了该变量的所有UI片段都会自动重新渲染。
状态变量可以分为四组来理解。第一组是导航状态:currentBottomTab和currentTopTab分别记录当前选中的底部Tab和顶部Tab索引,初始值均为0,即默认展示"自习"Tab下的"今日"子页面。第二组是弹窗控制状态:showNewTaskModal、showGoalModal、showGiveupModal、showDetailModal四个布尔值分别控制四种弹窗的显示与隐藏,初始值均为false。第三组是粒子动画状态:particles数组初始值为buildParticles()的返回值,后续由定时器驱动持续更新。第四组是表单输入状态:newTaskContent、newTaskSubject、newTaskMinutes用于新建任务弹窗的表单数据,goalHours、goalDays、goalReward用于编辑目标弹窗的表单数据。
selectedTask是一个类型为StudyTask | null的联合类型变量,初始值为null。当用户点击某个任务卡片时,该变量被赋值为对应的StudyTask实例,任务详情弹窗通过这个变量渲染对应任务的详细信息。private timerId是一个普通变量(非@State),用于存储定时器ID,在组件销毁时用于清理定时器,防止内存泄漏。值得注意的是,private关键字在ArkTS中用于标记组件内部私有变量,不参与响应式渲染。
第十一段:组件生命周期——aboutToAppear与aboutToDisappear
  aboutToAppear() {
    this.timerId = setInterval(() => {
      this.particles = driftParticles(this.particles);
    }, 130);
  }

  aboutToDisappear() {
    if (this.timerId >= 0) {
      clearInterval(this.timerId);
    }
  }
aboutToAppear()和aboutToDisappear()是ArkTS组件生命周期的两个关键回调函数。aboutToAppear在组件创建后、UI渲染前被调用,通常用于初始化数据、启动定时器或发起网络请求。aboutToDisappear在组件被销毁前被调用,用于执行资源清理工作。
在aboutToAppear中,开发者通过setInterval注册了一个每130毫秒执行一次的定时器回调。回调函数将当前粒子列表传入driftParticles()函数,生成漂移后的新粒子数组,然后赋值给this.particles。由于particles是@State变量,每次赋值都会触发ArkTS的diff算法,将变化后的粒子位置更新到UI层。定时器ID被保存在this.timerId中,以便后续清理。
aboutToDisappear中通过clearInterval(this.timerId)清除了定时器。这是一个极其重要的操作——如果组件被销毁但定时器仍在运行,定时器回调会持续尝试更新已不存在的组件状态,导致内存泄漏和潜在的运行时错误。if (this.timerId >= 0)的守卫检查确保只有在定时器确实被创建过的情况下才执行清除操作,避免对未初始化的定时器ID调用clearInterval。
第十二段:主布局结构——build方法与Stack/Column嵌套
  build() {
    Stack() {
      Column() {
        this.headerBuilder()
        this.topTabsBuilder()
        Scroll() {
          Column() {
            if (this.currentBottomTab === 0) {
              this.studyContent()
            } else if (this.currentBottomTab === 1) {
              this.planContent()
            } else if (this.currentBottomTab === 2) {
              this.statsContent()
            } else {
              this.mineContent()
            }
          }
          .width('100%')
          .alignItems(HorizontalAlign.Start)
        }
        .layoutWeight(1)
        .scrollable(ScrollDirection.Vertical)
        .scrollBar(BarState.Off)
        this.bottomTabs()
      }
      .width('100%')
      .height('100%')
      .backgroundColor(COLORS.bg)

      ForEach(this.particles, (p: ParticleItem) => {
        Text(p.icon)
          .fontSize(p.size)
          .opacity(p.opacity)
          .position({ x: p.x, y: p.y })
      }, (p: ParticleItem) => p.id.toString() + '_' + p.y.toFixed(0))

      if (this.showNewTaskModal) {
        this.newTaskModal()
      }
      if (this.showGoalModal) {
        this.goalEditModal()
      }
      if (this.showGiveupModal) {
        this.giveupTaskModal()
      }
      if (this.showDetailModal) {
        this.taskDetailModal()
      }
    }
    .width('100%')
    .height('100%')
  }
build()方法是ArkTS组件的核心,它使用声明式语法定义了整个页面的UI结构。最外层使用Stack布局容器,Stack的特点是子元素按声明顺序从底到上层叠排列,后声明的元素覆盖在先声明的元素之上。这种层叠布局是实现"内容层 + 特效层 + 弹窗层"叠加效果的关键。
Stack内部的第一层是一个Column,它构成了页面的主骨架——从上到下依次排列头部信息栏(headerBuilder)、顶部Tab栏(topTabsBuilder)、可滚动的内容区域(Scroll)和底部Tab栏(bottomTabs)。Scroll组件通过layoutWeight(1)占据头部和底部之间的所有剩余空间,scrollable(ScrollDirection.Vertical)指定只能垂直滚动,scrollBar(BarState.Off)隐藏了滚动条以保持界面整洁。内容区域内通过if-else条件分支,根据currentBottomTab的值动态切换四个内容组件。
Stack内部的第二层是ForEach粒子渲染。粒子通过Text组件展示Emoji图标,使用position属性进行绝对定位。ForEach的第三个参数是键值生成函数,这里使用了p.id.toString() + '_' + p.y.toFixed(0)——将粒子ID和取整后的y坐标拼接为键值。这种设计使得当粒子y坐标变化时键值也随之变化,ArkTS会判定该粒子为"已变化"并更新其位置,同时保持ID不变的粒子组件复用。
Stack内部的第三层是四个弹窗的条件渲染。每个弹窗通过对应的@State布尔变量控制,当变量为true时弹窗组件被渲染到Stack的最上层,覆盖在所有内容之上。这种"状态驱动弹窗"的方式避免了命令式的show/hide调用,代码更加声明式和可预测。
第十三段:头部信息栏——headerBuilder方法
  @Builder
  headerBuilder() {
    Column() {
      Row() {
        Column() {
          Text('📚 QQ自习馆')
            .fontSize(22)
            .fontWeight(FontWeight.Bold)
            .fontColor(COLORS.textPrimary)
          Text('已有 328,564 人正在自习')
            .fontSize(11)
            .fontColor(COLORS.textSecondary)
            .margin({ top: 2 })
        }
        .alignItems(HorizontalAlign.Start)

        Column() {
          Text('🔔')
            .fontSize(20)
        }
        .padding(10)
        .borderRadius(20)
        .backgroundColor(COLORS.mintLight)
      }
      .width('100%')
      .justifyContent(FlexAlign.SpaceBetween)
      .padding({ left: 16, right: 16, top: 10, bottom: 8 })

      Row() {
        Column() {
          Text('⏱ 今日专注')
            .fontSize(10)
            .fontColor(COLORS.textSecondary)
          Text('3h42m')
            .fontSize(16)
            .fontWeight(FontWeight.Bold)
            .fontColor(COLORS.mint)
        }
        .alignItems(HorizontalAlign.Start)

        Column() {
          Text('🔥 连续打卡')
            .fontSize(10)
            .fontColor(COLORS.textSecondary)
          Text('46天')
            .fontSize(16)
            .fontWeight(FontWeight.Bold)
            .fontColor(COLORS.warning)
        }
        .alignItems(HorizontalAlign.Start)
        .margin({ left: 20 })

        Column() {
          Text('✅ 完成任务')
            .fontSize(10)
            .fontColor(COLORS.textSecondary)
          Text('4/9')
            .fontSize(16)
            .fontWeight(FontWeight.Bold)
            .fontColor(COLORS.indigo)
        }
        .alignItems(HorizontalAlign.Start)
        .margin({ left: 20 })

        Column() {
          Text('🥇 专注排名')
            .fontSize(10)
            .fontColor(COLORS.textSecondary)
          Text('前3%')
            .fontSize(16)
            .fontWeight(FontWeight.Bold)
            .fontColor(COLORS.mintDark)
        }
        .alignItems(HorizontalAlign.Start)
        .margin({ left: 20 })
      }
      .width('100%')
      .padding({ left: 16, right: 16, bottom: 10 })
    }
    .width('100%')
    .backgroundColor(COLORS.cardBg)
  }
@Builder装饰器是ArkTS API 24中用于定义可复用UI构建块的关键装饰器。被@Builder标记的方法可以在build()或其他@Builder方法中通过this.methodName()的方式调用,类似于其他框架中的"子组件"概念,但语法更加轻量——无需定义独立的struct,直接以方法形式内联。
headerBuilder()构建了头部信息栏,分为上下两行。第一行使用Row的justifyContent(FlexAlign.SpaceBetween)实现两端对齐——左侧展示应用名称和在线人数,右侧是一个通知铃铛按钮。第二行展示四个关键指标卡片:今日专注时长(3h42m,薄荷绿)、连续打卡天数(46天,警告橙色)、完成任务进度(4/9,靛蓝色)、专注排名(前3%,深薄荷绿)。每个指标使用不同的主题色,与功能语义相呼应——学习相关用薄荷绿,坚持/激励用橙色,任务管理用靛蓝。
指标卡片的设计体现了"信息密度与可读性平衡"的原则。每个卡片由两行Text组成——上方10号字的小标签和下方16号粗体的数值,字号差异形成了清晰的主次层级。margin({ left: 20 })为后三个卡片设置了左间距,使四个卡片在水平方向均匀分布。整个头部背景为白色cardBg,与页面主背景bg的浅薄荷色形成微妙的层次差异。
第十四段:顶部Tab栏——topTabsBuilder方法
  @Builder
  topTabsBuilder() {
    Column() {
      Row() {
        ForEach(TOP_TABS, (t: TabItem, idx: number) => {
          Column() {
            Text(t.icon)
              .fontSize(15)
            Text(t.label)
              .fontSize(10)
              .fontColor(this.currentTopTab === idx ? COLORS.white : COLORS.textSecondary)
              .margin({ top: 2 })
          }
          .layoutWeight(1)
          .padding({ top: 8, bottom: 8 })
          .borderRadius(10)
          .backgroundColor(this.currentTopTab === idx ? COLORS.mint : 'transparent')
          .onClick(() => {
            this.currentTopTab = idx;
          })
        }, (t: TabItem) => t.label)
      }
      .width('100%')
      .padding({ left: 8, right: 8, top: 8 })
    }
    .width('100%')
    .backgroundColor(COLORS.cardBg)
  }
topTabsBuilder()方法构建了顶部六个子Tab的导航栏。它使用ForEach遍历TOP_TABS常量数组,为每个Tab生成一个Column容器,内含Emoji图标(15号字)和文字标签(10号字)。
Tab的选中态通过this.currentTopTab === idx条件判断实现。选中时背景色为薄荷绿COLORS.mint,文字颜色为白色COLORS.white;未选中时背景为透明'transparent',文字颜色为次要文本色COLORS.textSecondary。这种高对比度的选中态视觉反馈,使得用户能够一眼辨认当前所在页面。
每个Tab容器使用layoutWeight(1)实现等宽分布——六个Tab各占六分之一的宽度。onClick回调将this.currentTopTab设置为被点击Tab的索引值,触发ArkTS的响应式更新,自动切换内容区域的渲染。ForEach的键值函数使用t.label作为唯一标识,当Tab数据不变时ArkTS可以高效复用已有组件实例,仅更新选中态的样式属性。
第十五段:今日Tab内容——番茄钟与任务清单
  @Builder
  studyContent() {
    Column() {
      if (this.currentTopTab === 0) {
        this.todayContent()
      } else if (this.currentTopTab === 1) {
        this.focusRoomContent()
      } else if (this.currentTopTab === 2) {
        this.wordContent()
      } else if (this.currentTopTab === 3) {
        this.quizContent()
      } else if (this.currentTopTab === 4) {
        this.wrongContent()
      } else {
        this.punchContent()
      }
    }
    .width('100%')
    .padding(12)
    .alignItems(HorizontalAlign.Start)
  }

  @Builder
  todayContent() {
    Column() {
      Column() {
        Text('🍅 番茄钟进行中')
          .fontSize(13)
          .fontColor(COLORS.white)
        Text('25:00')
          .fontSize(44)
          .fontWeight(FontWeight.Bold)
          .fontColor(COLORS.white)
          .margin({ top: 4 })
        Text('正在专注:考研单词List 32-33')
          .fontSize(12)
          .fontColor('#E8F7EF')
          .margin({ top: 4 })
        Row() {
          Text('⏸ 暂停')
            .fontSize(13)
            .fontColor(COLORS.mintDark)
            .padding({ left: 18, right: 18, top: 8, bottom: 8 })
            .borderRadius(18)
            .backgroundColor(COLORS.white)
          Text('✕ 放弃')
            .fontSize(13)
            .fontColor(COLORS.danger)
            .padding({ left: 18, right: 18, top: 8, bottom: 8 })
            .borderRadius(18)
            .border({ width: 1, color: COLORS.danger })
            .margin({ left: 10 })
            .onClick(() => {
              this.showGiveupModal = true;
            })
        }
        .margin({ top: 14 })
      }
      .width('100%')
      .padding(20)
      .borderRadius(16)
      .backgroundColor(COLORS.mint)
      .alignItems(HorizontalAlign.Center)

      Row() {
        Text('📝 今日任务清单')
          .fontSize(15)
          .fontWeight(FontWeight.Bold)
          .fontColor(COLORS.textPrimary)
          .layoutWeight(1)
        Text('+ 新建')
          .fontSize(12)
          .fontColor(COLORS.white)
          .padding({ left: 12, right: 12, top: 6, bottom: 6 })
          .borderRadius(14)
          .backgroundColor(COLORS.indigo)
          .onClick(() => {
            this.showNewTaskModal = true;
          })
      }
      .width('100%')
      .margin({ top: 14, bottom: 8 })

      ForEach(TASKS, (t: StudyTask) => {
        Row() {
          Column() {
            Text(t.doneMinutes >= t.minutes ? '✓' : (t.status === '进行中' ? '◐' : ''))
              .fontSize(16)
              .fontColor(t.doneMinutes >= t.minutes ? COLORS.mint : COLORS.indigo)
          }
          .width(28)
          .height(28)
          .borderRadius(14)
          .backgroundColor(t.doneMinutes >= t.minutes ? COLORS.mintLight : COLORS.indigoLight)
          .justifyContent(FlexAlign.Center)

          Column() {
            Row() {
              Text(t.subjectIcon + ' ' + t.subject)
                .fontSize(11)
                .fontColor(COLORS.indigo)
              Text(t.status)
                .fontSize(9)
                .fontColor(COLORS.white)
                .padding({ left: 6, right: 6, top: 1, bottom: 1 })
                .borderRadius(6)
                .backgroundColor(statusColor(t.status))
                .margin({ left: 6 })
            }
            Text(t.content)
              .fontSize(13)
              .fontColor(COLORS.textPrimary)
              .maxLines(1)
              .textOverflow({ overflow: TextOverflow.Ellipsis })
              .margin({ top: 3 })
            Row() {
              Column() {
                Row() {
                  Text('')
                    .width(t.minutes > 0 ? t.doneMinutes * 90 / t.minutes : 0)
                    .height(4)
                    .borderRadius(2)
                    .backgroundColor(COLORS.mint)
                }
                .width(90)
                .height(4)
                .borderRadius(2)
                .backgroundColor(COLORS.border)
              }
              Text(t.doneMinutes + '/' + t.minutes + '分钟 · ' + t.room)
                .fontSize(9)
                .fontColor(COLORS.textHint)
                .margin({ left: 8 })
            }
            .margin({ top: 5 })
          }
          .alignItems(HorizontalAlign.Start)
          .layoutWeight(1)
          .margin({ left: 10 })
        }
        .width('100%')
        .padding(10)
        .borderRadius(12)
        .backgroundColor(COLORS.cardBg)
        .margin({ bottom: 8 })
        .onClick(() => {
          this.selectedTask = t;
          this.showDetailModal = true;
        })
      }, (t: StudyTask) => t.id.toString())
    }
    .width('100%')
    .alignItems(HorizontalAlign.Start)
  }
studyContent()方法是自习Tab的内容路由器,通过if-else链根据currentTopTab的值选择对应的子内容构建器。当currentTopTab === 0时调用todayContent()展示今日页面。
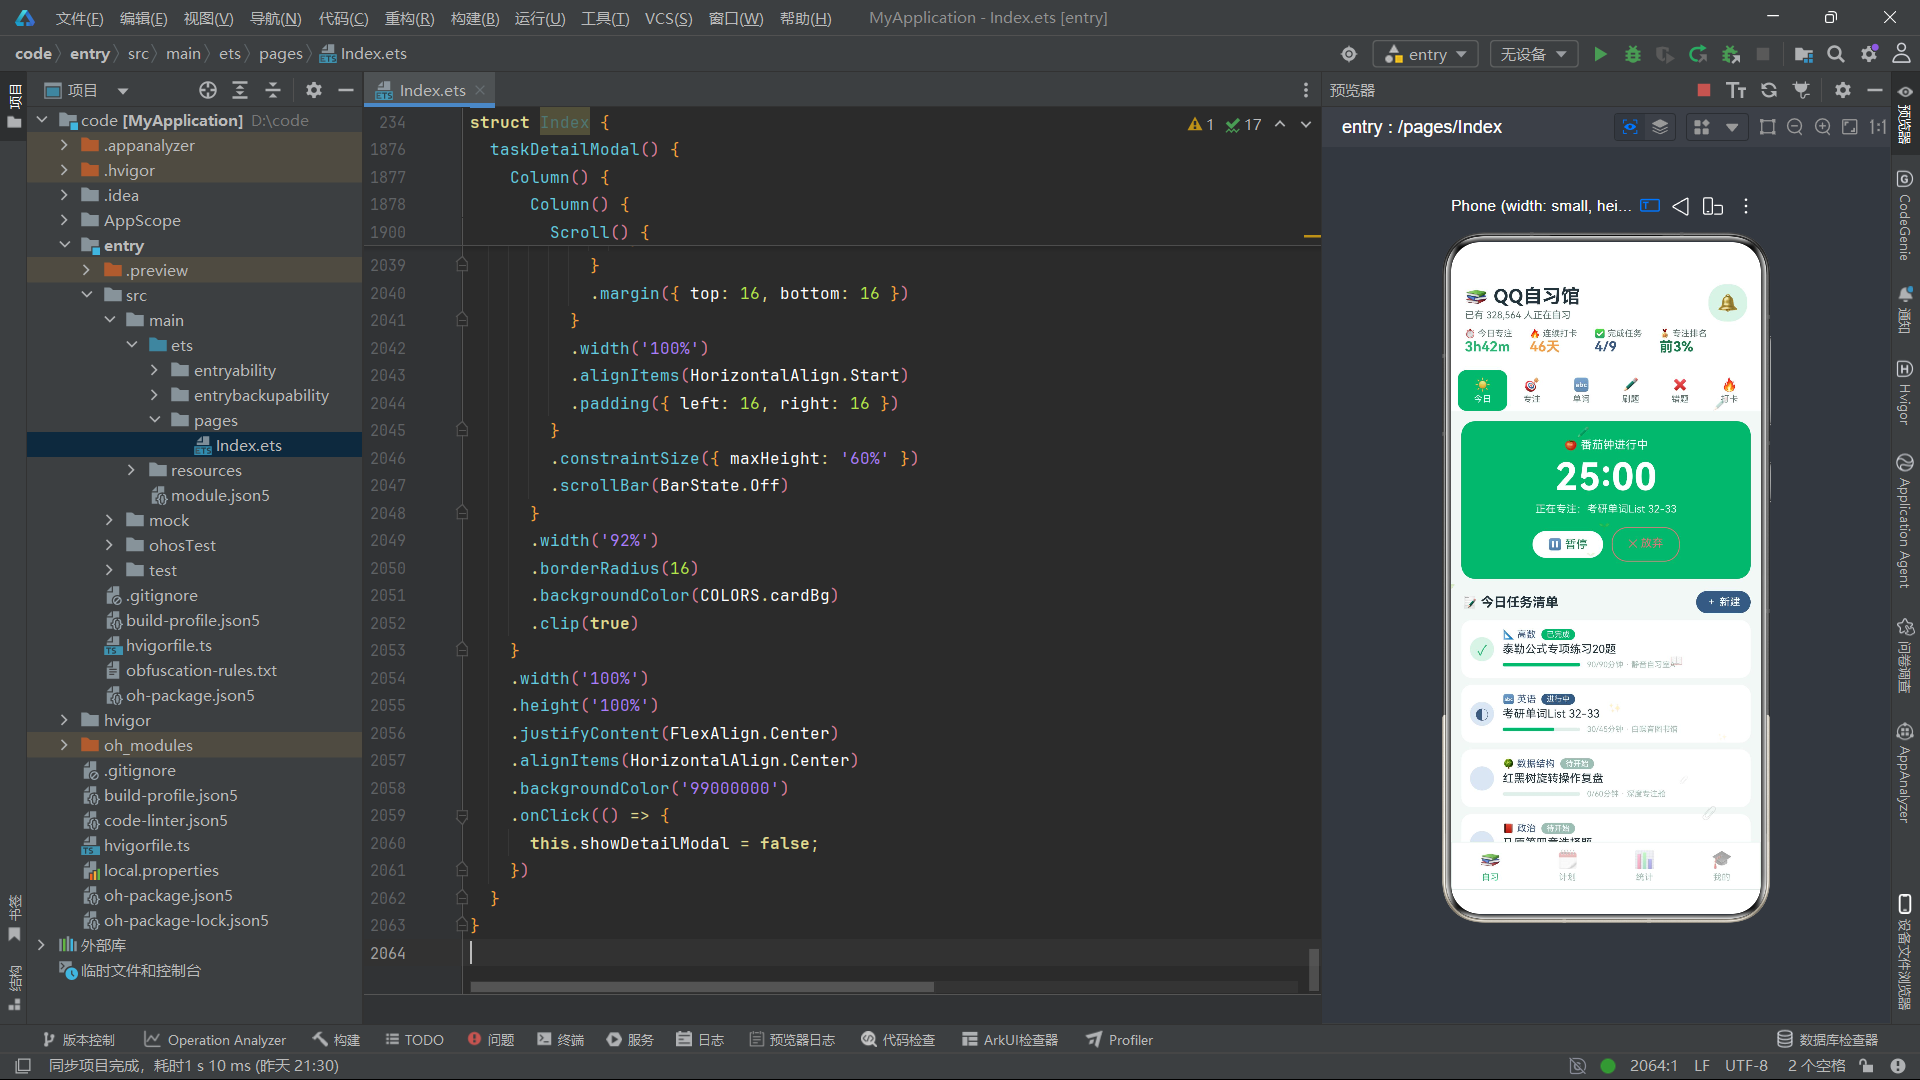
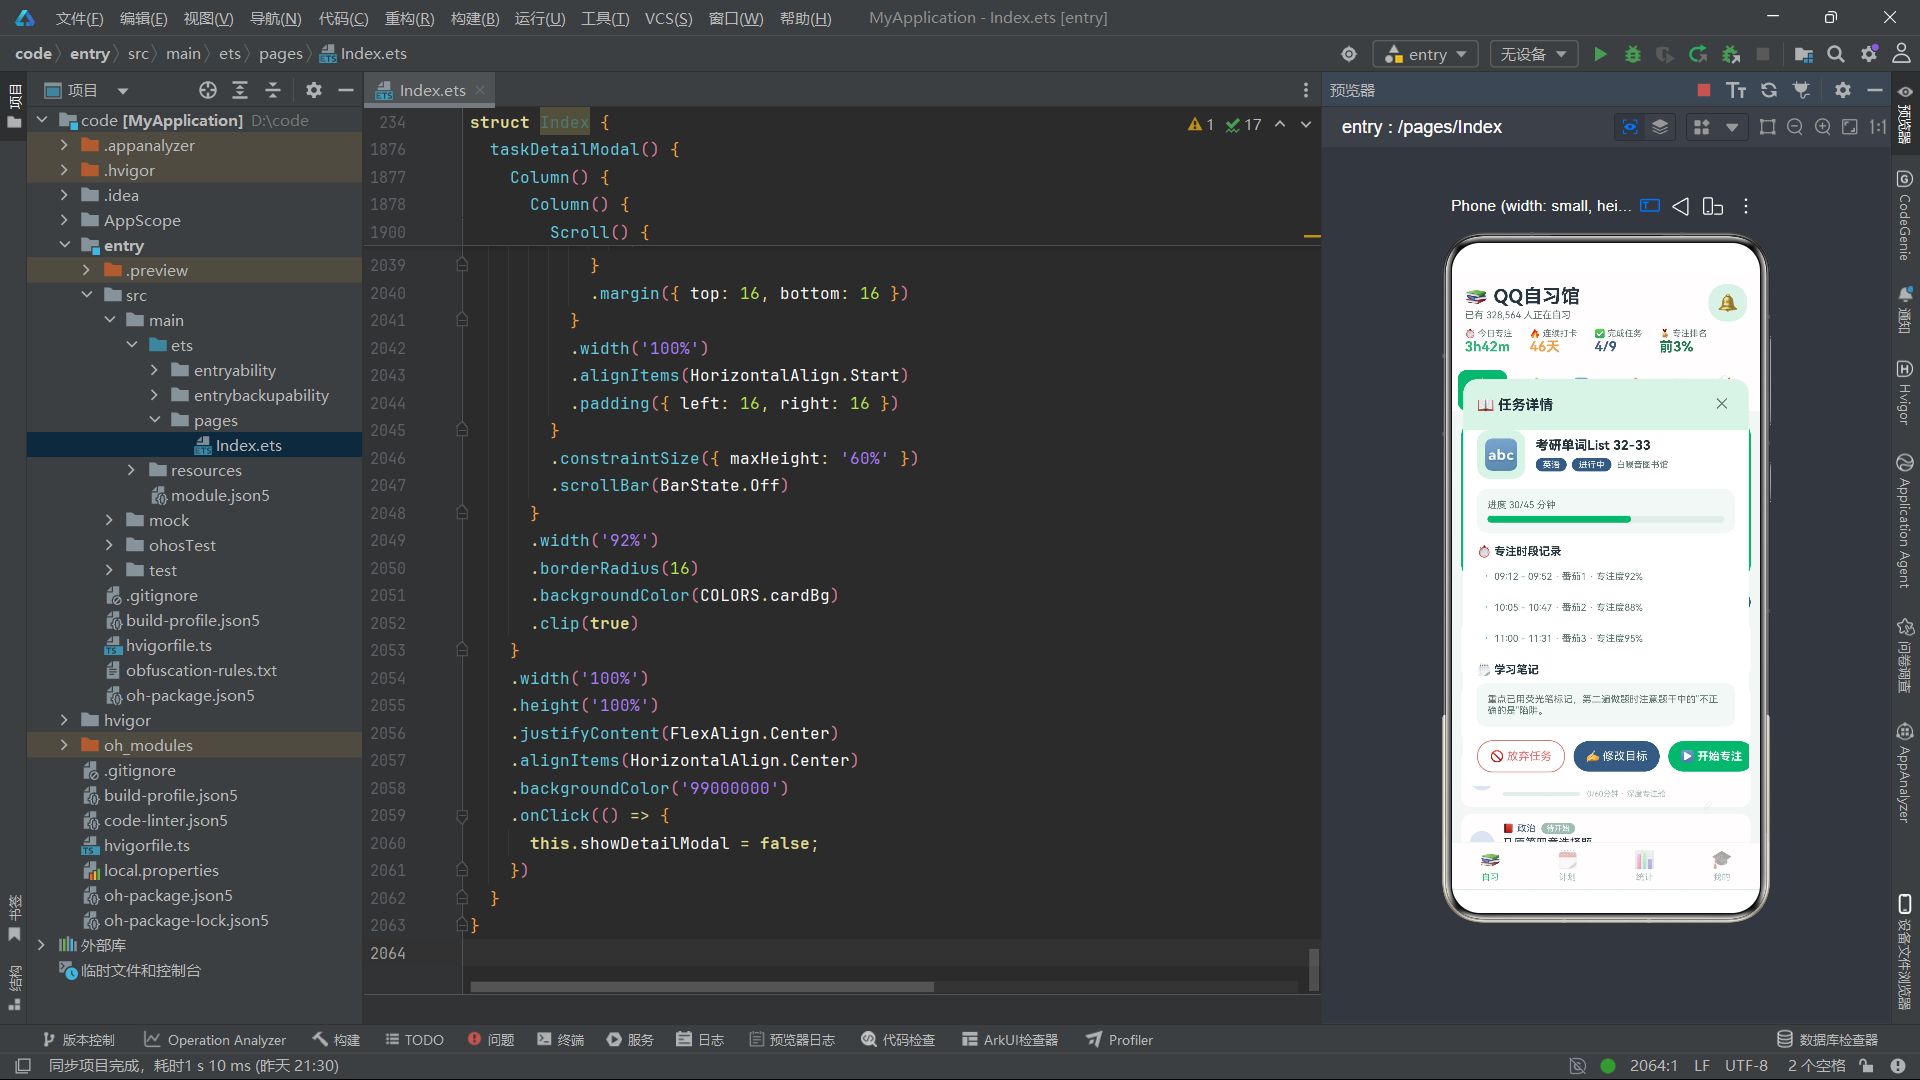
todayContent()是整个应用信息密度最高的页面之一,包含三大模块。首先是番茄钟大卡片——薄荷绿背景的圆角卡片,中央展示44号粗体的倒计时数字"25:00",上方标题"🍅 番茄钟进行中",下方显示当前专注任务描述。卡片底部是暂停和放弃两个操作按钮:暂停按钮为白底薄荷绿字,放弃按钮为透明底带红色描边的红色字,点击放弃按钮会弹出放弃确认弹窗。
其次是任务清单标题栏,使用Row的justifyContent隐式分布——标题占据layoutWeight(1)的弹性宽度,右侧"新建"按钮使用靛蓝背景。点击新建按钮弹出新建任务弹窗。
最后是ForEach渲染的任务列表。每个任务卡片包含:左侧的状态图标圆形(已完成显示对勾、进行中显示半圆、待开始为空),右侧的任务信息区(科目+状态标签、任务内容文本、进度条+时长+自习室名)。进度条通过嵌套Row实现——外层灰色背景Row宽度固定90vp,内层薄荷绿Text宽度通过t.doneMinutes * 90 / t.minutes动态计算,实现了百分比进度的可视化。maxLines(1)和textOverflow({ overflow: TextOverflow.Ellipsis })确保长文本以省略号截断。点击任务卡片会设置selectedTask并弹出任务详情弹窗。
第十六段:自习室座位图——focusRoomContent方法
  @Builder
  focusRoomContent() {
    Column() {
      Column() {
        Text('🏛 静音自习室A · 座位图')
          .fontSize(15)
          .fontWeight(FontWeight.Bold)
          .fontColor(COLORS.textPrimary)
        Text('当前 7/10 人在座 · 平均专注 152 分钟')
          .fontSize(11)
          .fontColor(COLORS.textSecondary)
          .margin({ top: 3 })
      }
      .width('100%')
      .alignItems(HorizontalAlign.Start)
      .margin({ bottom: 10 })

      Grid() {
        ForEach(SEATS, (s: SeatInfo) => {
          GridItem() {
            Column() {
              Text(s.avatar)
                .fontSize(24)
              Text(s.occupant)
                .fontSize(9)
                .fontColor(s.status === '可预约' ? COLORS.textHint : COLORS.textPrimary)
                .maxLines(1)
                .margin({ top: 4 })
              Text(s.status === '专注中' ? s.minutes + '分钟' : s.status)
                .fontSize(8)
                .fontColor(s.status === '专注中' ? COLORS.mint : (s.status === '小憩' ? COLORS.warning : COLORS.indigo))
                .margin({ top: 2 })
            }
            .width('100%')
            .padding({ top: 10, bottom: 8 })
            .borderRadius(10)
            .backgroundColor(s.status === '可预约' ? COLORS.bg : (s.status === '专注中' ? COLORS.mintLight : COLORS.indigoLight))
            .border({ width: 1, color: s.status === '可预约' ? COLORS.border : COLORS.mint })
          }
        }, (s: SeatInfo) => s.seatNo.toString())
      }
      .columnsTemplate('1fr 1fr 1fr 1fr 1fr')
      .rowsGap(8)
      .columnsGap(8)
      .height(320)

      Text('📖 房间公告:请保持静音,进出请轻开关门')
        .fontSize(10)
        .fontColor(COLORS.textHint)
        .margin({ top: 10, bottom: 14 })

      Text('🏆 今日专注排行榜')
        .fontSize(14)
        .fontWeight(FontWeight.Bold)
        .fontColor(COLORS.textPrimary)
        .margin({ bottom: 8 })

      ForEach(SEATS, (s: SeatInfo, idx: number) => {
        if (s.status !== '可预约') {
          Row() {
            Text(idx < 3 ? '🥇🥈🥉'.slice(idx * 2, idx * 2 + 2) : (idx + 1).toString())
              .fontSize(idx < 3 ? 14 : 13)
              .fontColor(idx < 3 ? COLORS.warning : COLORS.textHint)
              .width(24)
            Text(s.avatar)
              .fontSize(20)
            Text(s.occupant)
              .fontSize(12)
              .fontColor(COLORS.textPrimary)
              .layoutWeight(1)
              .margin({ left: 8 })
            Text(s.minutes + ' min')
              .fontSize(11)
              .fontWeight(FontWeight.Bold)
              .fontColor(COLORS.mint)
          }
          .width('100%')
          .padding(10)
          .borderRadius(10)
          .backgroundColor(COLORS.cardBg)
          .margin({ bottom: 6 })
        }
      }, (s: SeatInfo) => s.seatNo.toString())
    }
    .width('100%')
    .alignItems(HorizontalAlign.Start)
  }
focusRoomContent()方法构建了自习室座位图页面。页面顶部展示自习室名称和实时统计信息(7/10人在座,平均专注152分钟)。
核心区域是Grid网格布局,通过columnsTemplate('1fr 1fr 1fr 1fr 1fr')定义了5列等宽的网格模板。10个座位以GridItem为单位填充网格,形成两行五列的座位排列。每个座位卡片的背景色和边框色通过三元条件表达式根据status动态确定——可预约为灰色背景+浅边框,专注中为薄荷浅色背景+薄荷边框,小憩为靛蓝浅色背景+薄荷边框。座位卡片内展示头像(24号字)、昵称(9号字)和专注时长或状态文字(8号字)。
页面下半部分是今日专注排行榜。ForEach遍历SEATS数组,通过if (s.status !== '可预约')过滤掉空位。排行榜前三名使用Emoji奖牌图标(🥇🥈🥉),通过字符串切片'🥇🥈🥉'.slice(idx * 2, idx * 2 + 2)获取对应位置的奖牌Emoji——由于每个Emoji占两个UTF-16编码单元,切片的步长为2。第四名及以后显示数字排名。排行榜右侧显示专注时长(s.minutes + ' min'),使用薄荷绿色和粗体强调。
第十七段:单词背诵页面——wordContent方法
  @Builder
  wordContent() {
    Column() {
      Column() {
        Text('🔤 每日单词 · 已背 2/8')
          .fontSize(14)
          .fontWeight(FontWeight.Bold)
          .fontColor(COLORS.textPrimary)
        Row() {
          Column() {
            Column() {
              Text(WORDS[0].word)
                .fontSize(18)
                .fontWeight(FontWeight.Bold)
                .fontColor(COLORS.indigo)
              Text(WORDS[0].phonetic)
                .fontSize(11)
                .fontColor(COLORS.textSecondary)
                .margin({ top: 4 })
              Text(WORDS[0].meaning)
                .fontSize(12)
                .fontColor(COLORS.textPrimary)
                .margin({ top: 6 })
            }
            .width('100%')
            .padding(16)
            .borderRadius(12)
            .backgroundColor(COLORS.indigoLight)
            .alignItems(HorizontalAlign.Center)
          }
          .layoutWeight(1)

          Column() {
            Text('认识')
              .fontSize(12)
              .fontColor(COLORS.white)
              .padding({ left: 14, right: 14, top: 8, bottom: 8 })
              .borderRadius(16)
              .backgroundColor(COLORS.mint)
            Text('模糊')
              .fontSize(12)
              .fontColor(COLORS.white)
              .padding({ left: 14, right: 14, top: 8, bottom: 8 })
              .borderRadius(16)
              .backgroundColor(COLORS.warning)
              .margin({ top: 8 })
          }
          .margin({ left: 12 })
        }
        .width('100%')
        .margin({ top: 10 })
      }
      .width('100%')
      .padding(14)
      .borderRadius(16)
      .backgroundColor(COLORS.cardBg)
      .alignItems(HorizontalAlign.Start)

      Text('📋 今日词单')
        .fontSize(14)
        .fontWeight(FontWeight.Bold)
        .fontColor(COLORS.textPrimary)
        .margin({ top: 14, bottom: 8 })

      ForEach(WORDS, (w: WordItem) => {
        Row() {
          Column() {
            Text(w.word)
              .fontSize(14)
              .fontWeight(FontWeight.Bold)
              .fontColor(COLORS.textPrimary)
            Text(w.phonetic + '  ' + w.meaning)
              .fontSize(10)
              .fontColor(COLORS.textSecondary)
              .margin({ top: 3 })
          }
          .alignItems(HorizontalAlign.Start)
          .layoutWeight(1)

          Column() {
            Text(w.mastered ? '✓ 已掌握' : '复习' + w.reviewCount + '次')
              .fontSize(10)
              .fontColor(w.mastered ? COLORS.mint : COLORS.warning)
          }
          .alignItems(HorizontalAlign.End)
        }
        .width('100%')
        .padding(12)
        .borderRadius(12)
        .backgroundColor(COLORS.cardBg)
        .border({
          width: 1,
          color: w.mastered ? COLORS.mintLight : COLORS.border
        })
        .margin({ bottom: 6 })
      }, (w: WordItem) => w.id.toString())
    }
    .width('100%')
    .alignItems(HorizontalAlign.Start)
  }
wordContent()方法构建了单词背诵页面。页面上半部分是单词翻卡区域:标题栏显示进度"已背2/8",下方是横向排列的单词卡片和操作按钮。单词卡片取WORDS[0]的数据,以靛蓝浅色为背景,展示单词(18号粗体靛蓝)、音标(11号次要色)和释义(12号主色)三个层级的信息。右侧是"认识"(薄荷绿)和"模糊"(橙色)两个操作按钮,模拟了常见的翻卡学习交互模式。
页面下半部分是完整词单列表。ForEach遍历WORDS数组,为每个单词生成一行卡片。左侧展示单词和音标释义,右侧根据mastered状态显示不同内容——已掌握显示"✓ 已掌握"(薄荷绿),未掌握显示"复习N次"(橙色)。卡片的边框颜色也根据mastered状态变化——已掌握为薄荷浅色边框,未掌握为默认边框色。这种通过数据属性驱动视觉差异的设计,使得用户在浏览词单时能够快速识别已掌握和待复习的单词。
第十八段:刷题记录页面——quizContent方法
  @Builder
  quizContent() {
    Column() {
      Row() {
        Column() {
          Text('✏️ 今日刷题')
            .fontSize(13)
            .fontColor(COLORS.white)
          Text('128题')
            .fontSize(20)
            .fontWeight(FontWeight.Bold)
            .fontColor(COLORS.white)
            .margin({ top: 2 })
        }
        .alignItems(HorizontalAlign.Start)
        .layoutWeight(1)

        Column() {
          Text('正确率')
            .fontSize(13)
            .fontColor(COLORS.white)
          Text('82.4%')
            .fontSize(20)
            .fontWeight(FontWeight.Bold)
            .fontColor(COLORS.white)
            .margin({ top: 2 })
        }
        .alignItems(HorizontalAlign.Start)

        Column() {
          Text('连续答对')
            .fontSize(13)
            .fontColor(COLORS.white)
          Text('15题')
            .fontSize(20)
            .fontWeight(FontWeight.Bold)
            .fontColor(COLORS.white)
            .margin({ top: 2 })
        }
        .alignItems(HorizontalAlign.Start)
        .margin({ left: 16 })
      }
      .width('100%')
      .padding(16)
      .borderRadius(16)
      .backgroundColor(COLORS.indigo)

      Text('📚 题库记录')
        .fontSize(14)
        .fontWeight(FontWeight.Bold)
        .fontColor(COLORS.textPrimary)
        .margin({ top: 14, bottom: 8 })

      ForEach(TASKS, (t: StudyTask, idx: number) => {
        if (idx < 10) {
          Row() {
            Column() {
              Text(t.subjectIcon)
                .fontSize(22)
            }
            .width(40)
            .height(40)
            .borderRadius(10)
            .backgroundColor(COLORS.mintLight)
            .justifyContent(FlexAlign.Center)

            Column() {
              Text(t.subject + ' · ' + (idx + 1) + '月' + (idx * 2 + 3) + '日练习')
                .fontSize(12)
                .fontColor(COLORS.textPrimary)
              Text('共' + (20 + idx * 3) + '题 · 用时' + (15 + idx * 4) + '分钟 · 正确率' + (72 + idx * 2) + '%')
                .fontSize(10)
                .fontColor(COLORS.textSecondary)
                .margin({ top: 3 })
            }
            .alignItems(HorizontalAlign.Start)
            .layoutWeight(1)
            .margin({ left: 10 })

            Text('查看')
              .fontSize(11)
              .fontColor(COLORS.indigo)
              .padding({ left: 10, right: 10, top: 4, bottom: 4 })
              .borderRadius(10)
              .backgroundColor(COLORS.indigoLight)
              .onClick(() => {
                this.selectedTask = t;
                this.showDetailModal = true;
              })
          }
          .width('100%')
          .padding(10)
          .borderRadius(12)
          .backgroundColor(COLORS.cardBg)
          .margin({ bottom: 8 })
        }
      }, (t: StudyTask) => t.id.toString())
    }
    .width('100%')
    .alignItems(HorizontalAlign.Start)
  }
quizContent()方法构建了刷题记录页面。页面顶部是靛蓝色背景的统计卡片,展示三个核心指标——今日刷题数(128题)、正确率(82.4%)、连续答对题数(15题),三个指标均使用白色文字,在深色背景上形成强烈的视觉对比。
页面主体是题库记录列表。ForEach遍历TASKS数组,通过if (idx < 10)限制只显示前10条记录。每条记录卡片包含:左侧的科目图标方块(40x40vp,薄荷浅色背景)、中间的记录信息(科目+日期、题数+用时+正确率)、右侧的"查看"按钮。记录信息中的数值通过索引idx进行动态计算——题数为20 + idx * 3,用时为15 + idx * 4分钟,正确率为72 + idx * 2%,这种基于索引的数值生成方式模拟了时间推移中刷题量的递增和正确率的提升趋势。点击"查看"按钮会弹出任务详情弹窗。
第十九段:错题本页面——wrongContent方法
  @Builder
  wrongContent() {
    Column() {
      Text('❌ 错题本 · 共86题待消灭')
        .fontSize(15)
        .fontWeight(FontWeight.Bold)
        .fontColor(COLORS.textPrimary)
        .margin({ bottom: 10 })

      Row() {
        ForEach(['全部', '高数', '英语', '政治', '专业课'], (t: string, idx: number) => {
          Text(t)
            .fontSize(11)
            .fontColor(idx === 0 ? COLORS.white : COLORS.textSecondary)
            .padding({ left: 12, right: 12, top: 5, bottom: 5 })
            .borderRadius(12)
            .backgroundColor(idx === 0 ? COLORS.indigo : COLORS.cardBg)
            .margin({ right: 8 })
        }, (t: string) => t)
      }
      .width('100%')
      .margin({ bottom: 10 })

      ForEach(TASKS, (t: StudyTask, idx: number) => {
        if (idx < 8) {
          Column() {
            Row() {
              Text(t.subjectIcon + ' ' + t.subject)
                .fontSize(11)
                .fontColor(COLORS.indigo)
              Text('错' + (idx % 4 + 2) + '次')
                .fontSize(9)
                .fontColor(COLORS.white)
                .padding({ left: 6, right: 6, top: 1, bottom: 1 })
                .borderRadius(6)
                .backgroundColor(COLORS.danger)
                .margin({ left: 8 })
              Text('第' + (idx + 1) + '题')
                .fontSize(10)
                .fontColor(COLORS.textHint)
                .margin({ left: 8 })
            }
            .width('100%')

            Text('关于' + t.content + '的辨析题,选项C与D易混淆,需要复盘核心概念。')
              .fontSize(12)
              .fontColor(COLORS.textPrimary)
              .margin({ top: 6 })

            Row() {
              Text('来源:' + t.room)
                .fontSize(9)
                .fontColor(COLORS.textHint)
              Text('标记已掌握')
                .fontSize(10)
                .fontColor(COLORS.mint)
                .padding({ left: 10, right: 10, top: 3, bottom: 3 })
                .borderRadius(10)
                .backgroundColor(COLORS.mintLight)
                .margin({ left: 8 })
            }
            .width('100%')
            .margin({ top: 8 })
          }
          .width('100%')
          .padding(12)
          .borderRadius(12)
          .backgroundColor(COLORS.cardBg)
          .border({
            width: 1,
            color: idx % 3 === 0 ? COLORS.danger : COLORS.border
          })
          .margin({ bottom: 8 })
        }
      }, (t: StudyTask) => t.id.toString())
    }
    .width('100%')
    .alignItems(HorizontalAlign.Start)
  }
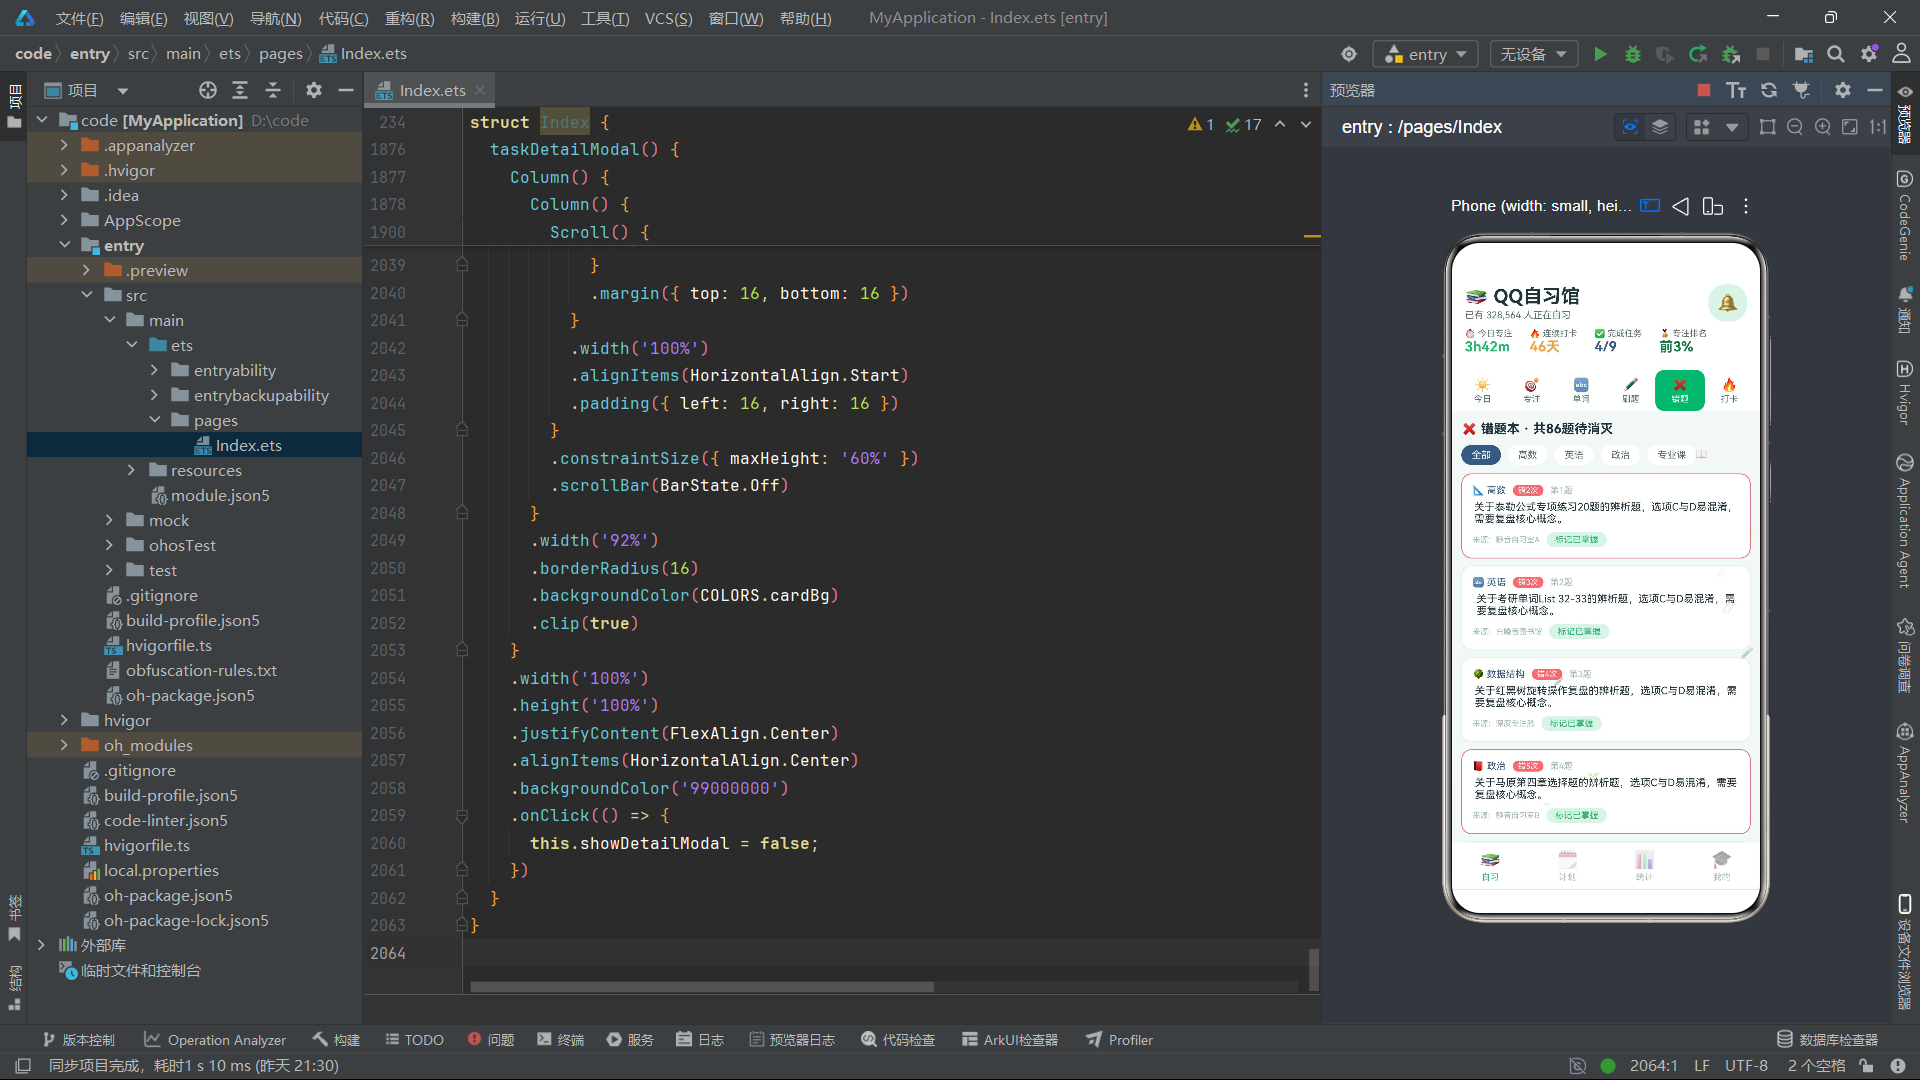
wrongContent()方法构建了错题本页面。页面顶部标题显示错题总数(86题待消灭),下方是科目筛选标签栏——"全部"标签为靛蓝背景白色文字(选中态),其余标签为白底次要色文字(未选中态),通过idx === 0条件判断实现第一个标签的选中效果。
错题列表通过ForEach遍历TASKS数组前8条数据生成。每张错题卡片包含三层信息:顶部是科目名+错误次数标签+题号,中部是错题描述文本,底部是来源信息和"标记已掌握"操作按钮。错误次数通过idx % 4 + 2计算(范围2-5次),模拟了不同题目的错误频率。卡片边框颜色通过idx % 3 === 0条件判断——每三张卡片的第一张使用红色边框(标记重点错题),其余使用默认边框色,这种间隔性的视觉强调引导用户关注高频错题。
第二十段:打卡热力图页面——punchContent方法
  @Builder
  punchContent() {
    Column() {
      Column() {
        Text('🔥 连续打卡 46 天')
          .fontSize(16)
          .fontWeight(FontWeight.Bold)
          .fontColor(COLORS.textPrimary)
        Text('超越馆内 97% 的自习生')
          .fontSize(11)
          .fontColor(COLORS.textSecondary)
          .margin({ top: 3 })
        Row() {
          ForEach(['日', '一', '二', '三', '四', '五', '六'], (d: string) => {
            Text(d)
              .fontSize(10)
              .fontColor(COLORS.textHint)
              .layoutWeight(1)
              .textAlign(TextAlign.Center)
          }, (d: string) => d)
        }
        .width('100%')
        .margin({ top: 12 })

        Flex({ wrap: FlexWrap.Wrap }) {
          ForEach(HEAT_LEVELS, (lv: number, idx: number) => {
            Column() {
              Text('')
                .width('100%')
                .height('100%')
            }
            .width('10.5%')
            .height(22)
            .borderRadius(4)
            .backgroundColor(heatCellColor(lv))
            .margin(2)
          }, (lv: number, idx: number) => idx.toString())
        }
        .width('100%')
        .margin({ top: 6 })

        Row() {
          Text('少')
            .fontSize(9)
            .fontColor(COLORS.textHint)
          Column() { Text('').width('100%').height('100%') }
          .width(14).height(10).borderRadius(3)
          .backgroundColor(heatCellColor(1)).margin({ left: 4 })
          Column() { Text('').width('100%').height('100%') }
          .width(14).height(10).borderRadius(3)
          .backgroundColor(heatCellColor(2)).margin({ left: 3 })
          Column() { Text('').width('100%').height('100%') }
          .width(14).height(10).borderRadius(3)
          .backgroundColor(heatCellColor(3)).margin({ left: 3 })
          Column() { Text('').width('100%').height('100%') }
          .width(14).height(10).borderRadius(3)
          .backgroundColor(heatCellColor(4)).margin({ left: 3 })
          Text('多')
            .fontSize(9)
            .fontColor(COLORS.textHint)
            .margin({ left: 4 })
        }
        .justifyContent(FlexAlign.End)
        .width('100%')
        .margin({ top: 8 })
      }
      .width('100%')
      .padding(14)
      .borderRadius(16)
      .backgroundColor(COLORS.cardBg)
      .alignItems(HorizontalAlign.Start)

      Text('🏅 打卡徽章墙')
        .fontSize(14)
        .fontWeight(FontWeight.Bold)
        .fontColor(COLORS.textPrimary)
        .margin({ top: 14, bottom: 8 })

      Grid() {
        ForEach(['🔥7天', '🌟30天', '💯100天', '🌅晨读', '🌙夜猫', '🍅番茄王', '📈进步奖', '🏆全勤奖'], (b: string) => {
          GridItem() {
            Column() {
              Text(b)
                .fontSize(11)
                .fontColor(COLORS.textPrimary)
                .padding({ top: 10, bottom: 10 })
            }
            .width('100%')
            .borderRadius(10)
            .backgroundColor(COLORS.mintLight)
          }
        }, (b: string) => b)
      }
      .columnsTemplate('1fr 1fr 1fr 1fr')
      .rowsGap(8)
      .columnsGap(8)
      .height(100)

      Text('📅 最近打卡动态')
        .fontSize(14)
        .fontWeight(FontWeight.Bold)
        .fontColor(COLORS.textPrimary)
        .margin({ top: 14, bottom: 8 })

      ForEach(TASKS, (t: StudyTask, idx: number) => {
        if (idx < 6) {
          Row() {
            Text('·')
              .fontSize(14)
              .fontColor(COLORS.mint)
            Column() {
              Text('8月' + (24 - idx) + '日 · 自习' + (90 + idx * 15) + '分钟')
                .fontSize(12)
                .fontColor(COLORS.textPrimary)
              Text(t.room + ' · 完成「' + t.content + '」')
                .fontSize(10)
                .fontColor(COLORS.textSecondary)
                .margin({ top: 2 })
            }
            .alignItems(HorizontalAlign.Start)
            .layoutWeight(1)
            .margin({ left: 8 })
            Text('✓')
              .fontSize(12)
              .fontColor(COLORS.mint)
          }
          .width('100%')
          .padding(10)
          .borderRadius(10)
          .backgroundColor(COLORS.cardBg)
          .margin({ bottom: 6 })
        }
      }, (t: StudyTask) => t.id.toString())
    }
    .width('100%')
    .alignItems(HorizontalAlign.Start)
  }
punchContent()方法构建了打卡日历页面,这是应用中视觉设计最丰富的页面之一。顶部卡片展示连续打卡天数(46天)和排名百分比(超越97%),下方是热力图日历。
热力图由星期表头和日期网格两部分组成。星期表头使用ForEach渲染"日一二三四五六"七个文字,每个占layoutWeight(1)等宽分布。日期网格使用Flex({ wrap: FlexWrap.Wrap })实现自动换行布局,28个热力格子通过ForEach(HEAT_LEVELS, ...)渲染,每个格子宽度为10.5%(一行约9-10个格子),高度22vp,圆角4vp。格子背景色由heatCellColor(lv)根据热力等级返回对应的薄荷色阶。热力图下方是图例——"少"到"多"四个色阶方块,帮助用户理解颜色含义。
页面中部是打卡徽章墙,使用Grid的4列模板展示8个徽章(7天、30天、100天、晨读、夜猫、番茄王、进步奖、全勤奖),每个徽章为薄荷浅色背景的圆角方块。页面底部是最近打卡动态列表,取TASKS前6条数据,每条显示日期、自习时长、自习室和完成任务,日期通过24 - idx动态递减模拟最近的打卡记录。
第二十一段:计划页面——planContent方法
  @Builder
  planContent() {
    Column() {
      Column() {
        Row() {
          Text('🎯 学习目标')
            .fontSize(15)
            .fontWeight(FontWeight.Bold)
            .fontColor(COLORS.textPrimary)
            .layoutWeight(1)
          Text('编辑')
            .fontSize(12)
            .fontColor(COLORS.white)
            .padding({ left: 12, right: 12, top: 5, bottom: 5 })
            .borderRadius(12)
            .backgroundColor(COLORS.mint)
            .onClick(() => {
              this.showGoalModal = true;
            })
        }
        .width('100%')

        Row() {
          Column() {
            Text('每日4小时')
              .fontSize(14)
              .fontWeight(FontWeight.Bold)
              .fontColor(COLORS.indigo)
            Text('目标时长')
              .fontSize(10)
              .fontColor(COLORS.textSecondary)
              .margin({ top: 2 })
          }
          .alignItems(HorizontalAlign.Start)
          .layoutWeight(1)

          Column() {
            Text('每周6天')
              .fontSize(14)
              .fontWeight(FontWeight.Bold)
              .fontColor(COLORS.indigo)
            Text('打卡频率')
              .fontSize(10)
              .fontColor(COLORS.textSecondary)
              .margin({ top: 2 })
          }
          .alignItems(HorizontalAlign.Start)
          .layoutWeight(1)

          Column() {
            Text('一杯奶茶')
              .fontSize(14)
              .fontWeight(FontWeight.Bold)
              .fontColor(COLORS.warning)
            Text('达成奖励')
              .fontSize(10)
              .fontColor(COLORS.textSecondary)
              .margin({ top: 2 })
          }
          .alignItems(HorizontalAlign.Start)
          .layoutWeight(1)
        }
        .width('100%')
        .margin({ top: 12 })
      }
      .width('100%')
      .padding(14)
      .borderRadius(16)
      .backgroundColor(COLORS.cardBg)
      .alignItems(HorizontalAlign.Start)

      Text('🗓 本周任务安排')
        .fontSize(15)
        .fontWeight(FontWeight.Bold)
        .fontColor(COLORS.textPrimary)
        .margin({ top: 14, bottom: 8 })

      ForEach(WEEK_DAYS, (d: string, idx: number) => {
        Row() {
          Column() {
            Text('周' + d)
              .fontSize(12)
              .fontWeight(FontWeight.Bold)
              .fontColor(idx === 5 || idx === 6 ? COLORS.warning : COLORS.indigo)
          }
          .width(44)
          .height(44)
          .borderRadius(12)
          .backgroundColor(idx === 5 || idx === 6 ? '#FBF0E0' : COLORS.indigoLight)
          .justifyContent(FlexAlign.Center)

          Column() {
            Row() {
              Text(FOCUS_HOURS[idx] >= 3 ? '🔥 高强度日' : '📝 常规日')
                .fontSize(11)
                .fontColor(FOCUS_HOURS[idx] >= 3 ? COLORS.warning : COLORS.mint)
              Text('计划' + FOCUS_HOURS[idx].toFixed(1) + 'h')
                .fontSize(10)
                .fontColor(COLORS.textSecondary)
                .margin({ left: 8 })
            }
            Text(idx < TASKS.length ? TASKS[idx].subject + ':' + TASKS[idx].content : '机动复习时间')
              .fontSize(12)
              .fontColor(COLORS.textPrimary)
              .maxLines(1)
              .textOverflow({ overflow: TextOverflow.Ellipsis })
              .margin({ top: 3 })
          }
          .alignItems(HorizontalAlign.Start)
          .layoutWeight(1)
          .margin({ left: 10 })

          Text('详情')
            .fontSize(10)
            .fontColor(COLORS.indigo)
            .padding({ left: 10, right: 10, top: 4, bottom: 4 })
            .borderRadius(10)
            .backgroundColor(COLORS.indigoLight)
            .onClick(() => {
              this.selectedTask = TASKS[idx];
              this.showDetailModal = true;
            })
        }
        .width('100%')
        .padding(10)
        .borderRadius(12)
        .backgroundColor(COLORS.cardBg)
        .margin({ bottom: 8 })
      }, (d: string) => d)
    }
    .width('100%')
    .padding(12)
    .alignItems(HorizontalAlign.Start)
  }
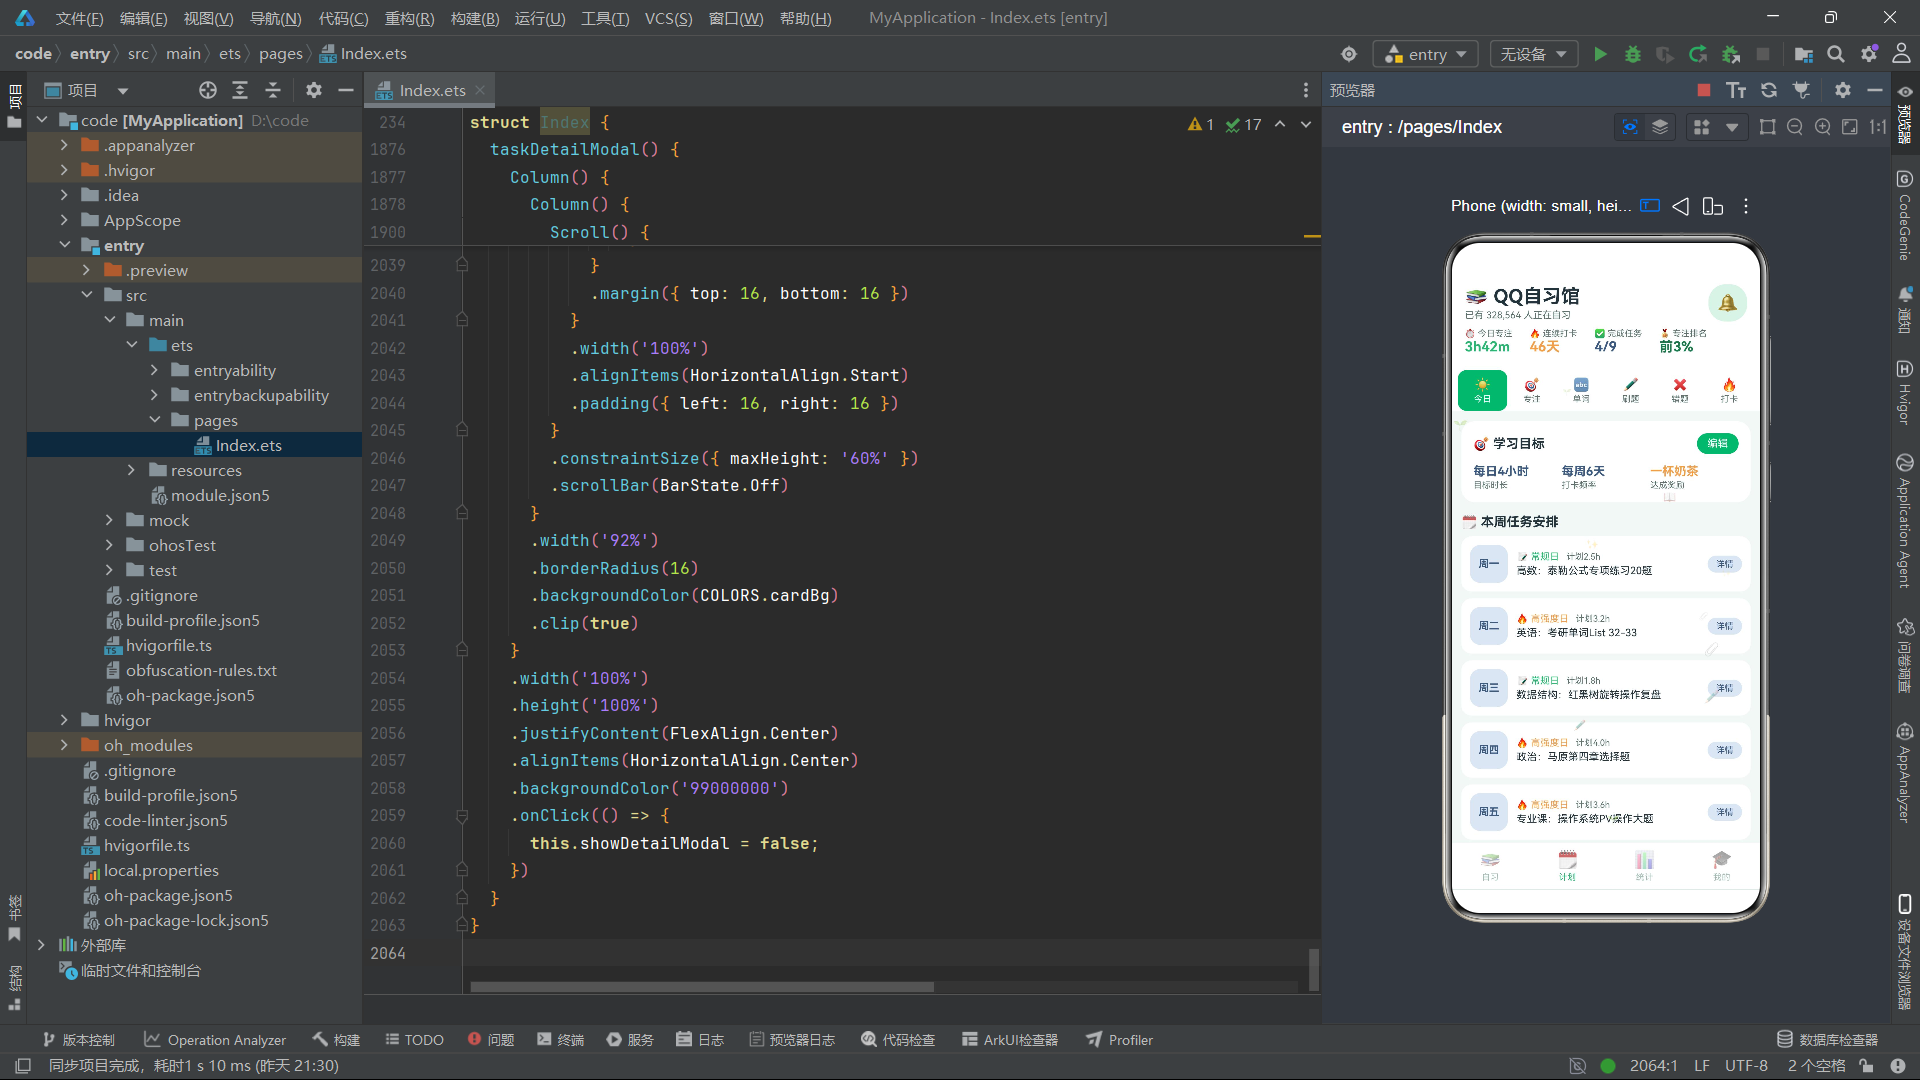
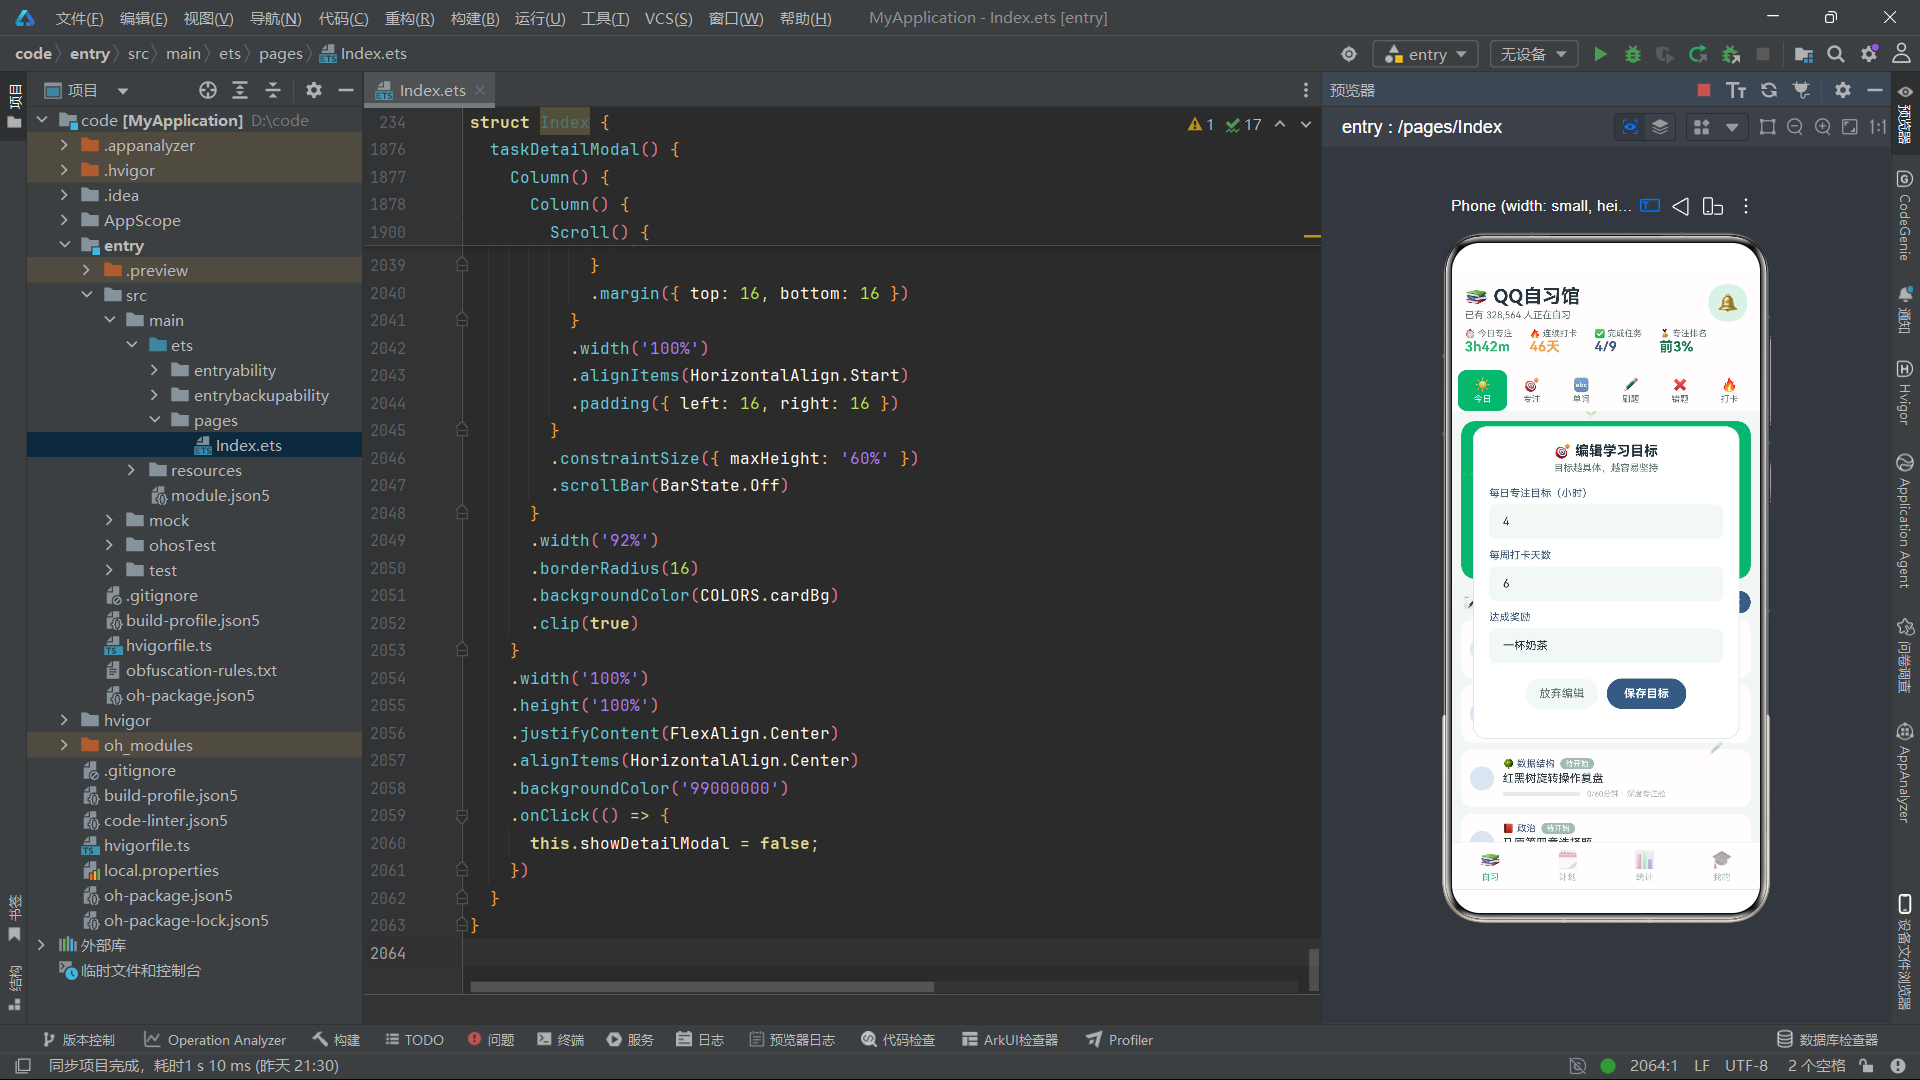
planContent()方法构建了学习计划页面。页面顶部是学习目标卡片,展示三个关键目标参数:每日4小时目标时长、每周6天打卡频率、一杯奶茶达成奖励。卡片右上角有"编辑"按钮,点击后弹出编辑目标弹窗(showGoalModal = true)。
页面主体是本周任务安排列表。ForEach遍历WEEK_DAYS数组(周一到周日),为每天生成一行任务安排卡片。卡片左侧是44x44vp的日期方块,周一至周五使用靛蓝浅色背景和靛蓝文字,周六周日使用橙色浅色背景和橙色文字,通过idx === 5 || idx === 6条件判断实现周末的视觉区分。方块右侧展示当天计划信息——根据FOCUS_HOURS[idx]是否大于3小时显示"高强度日"或"常规日"标签,以及对应的计划时长。下方展示当天对应的任务内容(取TASKS[idx]的数据),如果索引超出任务数组范围则显示"机动复习时间"。点击"详情"按钮弹出任务详情弹窗。
第二十二段:统计页面——statsContent方法
  @Builder
  statsContent() {
    Column() {
      Column() {
        Text('📊 本周专注时长(小时)')
          .fontSize(14)
          .fontWeight(FontWeight.Bold)
          .fontColor(COLORS.textPrimary)
        Row() {
          ForEach(WEEK_DAYS, (d: string, idx: number) => {
            Column() {
              Text(FOCUS_HOURS[idx].toFixed(1))
                .fontSize(9)
                .fontColor(COLORS.textSecondary)
              Column() {
                Text('')
                  .width('100%')
                  .height(1)
              }
              .width(22)
              .height(focusBarHeight(FOCUS_HOURS[idx]))
              .borderRadius({ topLeft: 4, topRight: 4 })
              .backgroundColor(FOCUS_HOURS[idx] >= 4 ? COLORS.indigo : COLORS.mint)
              Text('周' + d)
                .fontSize(9)
                .fontColor(COLORS.textSecondary)
                .margin({ top: 4 })
            }
            .margin({ left: 12, right: 12 })
            .alignItems(HorizontalAlign.Center)
          }, (d: string) => d)
        }
        .width('100%')
        .justifyContent(FlexAlign.Center)
        .alignItems(VerticalAlign.Bottom)
        .padding({ top: 10 })
      }
      .width('100%')
      .padding(14)
      .borderRadius(16)
      .backgroundColor(COLORS.cardBg)
      .alignItems(HorizontalAlign.Start)

      Row() {
        Column() {
          Text('35.7h')
            .fontSize(18)
            .fontWeight(FontWeight.Bold)
            .fontColor(COLORS.mint)
          Text('周总专注')
            .fontSize(10)
            .fontColor(COLORS.textSecondary)
            .margin({ top: 2 })
        }
        .layoutWeight(1)
        .padding(12)
        .borderRadius(12)
        .backgroundColor(COLORS.cardBg)

        Column() {
          Text('5.1h')
            .fontSize(18)
            .fontWeight(FontWeight.Bold)
            .fontColor(COLORS.indigo)
          Text('日均专注')
            .fontSize(10)
            .fontColor(COLORS.textSecondary)
            .margin({ top: 2 })
        }
        .layoutWeight(1)
        .padding(12)
        .borderRadius(12)
        .backgroundColor(COLORS.cardBg)
        .margin({ left: 8 })

        Column() {
          Text('83%')
            .fontSize(18)
            .fontWeight(FontWeight.Bold)
            .fontColor(COLORS.warning)
          Text('目标达成率')
            .fontSize(10)
            .fontColor(COLORS.textSecondary)
            .margin({ top: 2 })
        }
        .layoutWeight(1)
        .padding(12)
        .borderRadius(12)
        .backgroundColor(COLORS.cardBg)
        .margin({ left: 8 })
      }
      .width('100%')
      .margin({ top: 12 })

      Text('📚 学科时长分布')
        .fontSize(14)
        .fontWeight(FontWeight.Bold)
        .fontColor(COLORS.textPrimary)
        .margin({ top: 14, bottom: 8 })

      ForEach(TASKS, (t: StudyTask, idx: number) => {
        if (idx < 6) {
          Row() {
            Text(t.subjectIcon + ' ' + t.subject)
              .fontSize(12)
              .fontColor(COLORS.textPrimary)
              .width(80)
            Column() {
              Row() {
                Text('')
                  .width(t.minutes * 2)
                  .height(8)
                  .borderRadius(4)
                  .backgroundColor(idx % 2 === 0 ? COLORS.mint : COLORS.indigo)
              }
              .width(150)
              .height(8)
              .borderRadius(4)
              .backgroundColor(COLORS.border)
            }
            .layoutWeight(1)
            Text(t.minutes + '分钟')
              .fontSize(10)
              .fontColor(COLORS.textSecondary)
              .margin({ left: 8 })
          }
          .width('100%')
          .padding(10)
          .borderRadius(10)
          .backgroundColor(COLORS.cardBg)
          .margin({ bottom: 6 })
        }
      }, (t: StudyTask) => t.id.toString())
    }
    .width('100%')
    .padding(12)
    .alignItems(HorizontalAlign.Start)
  }
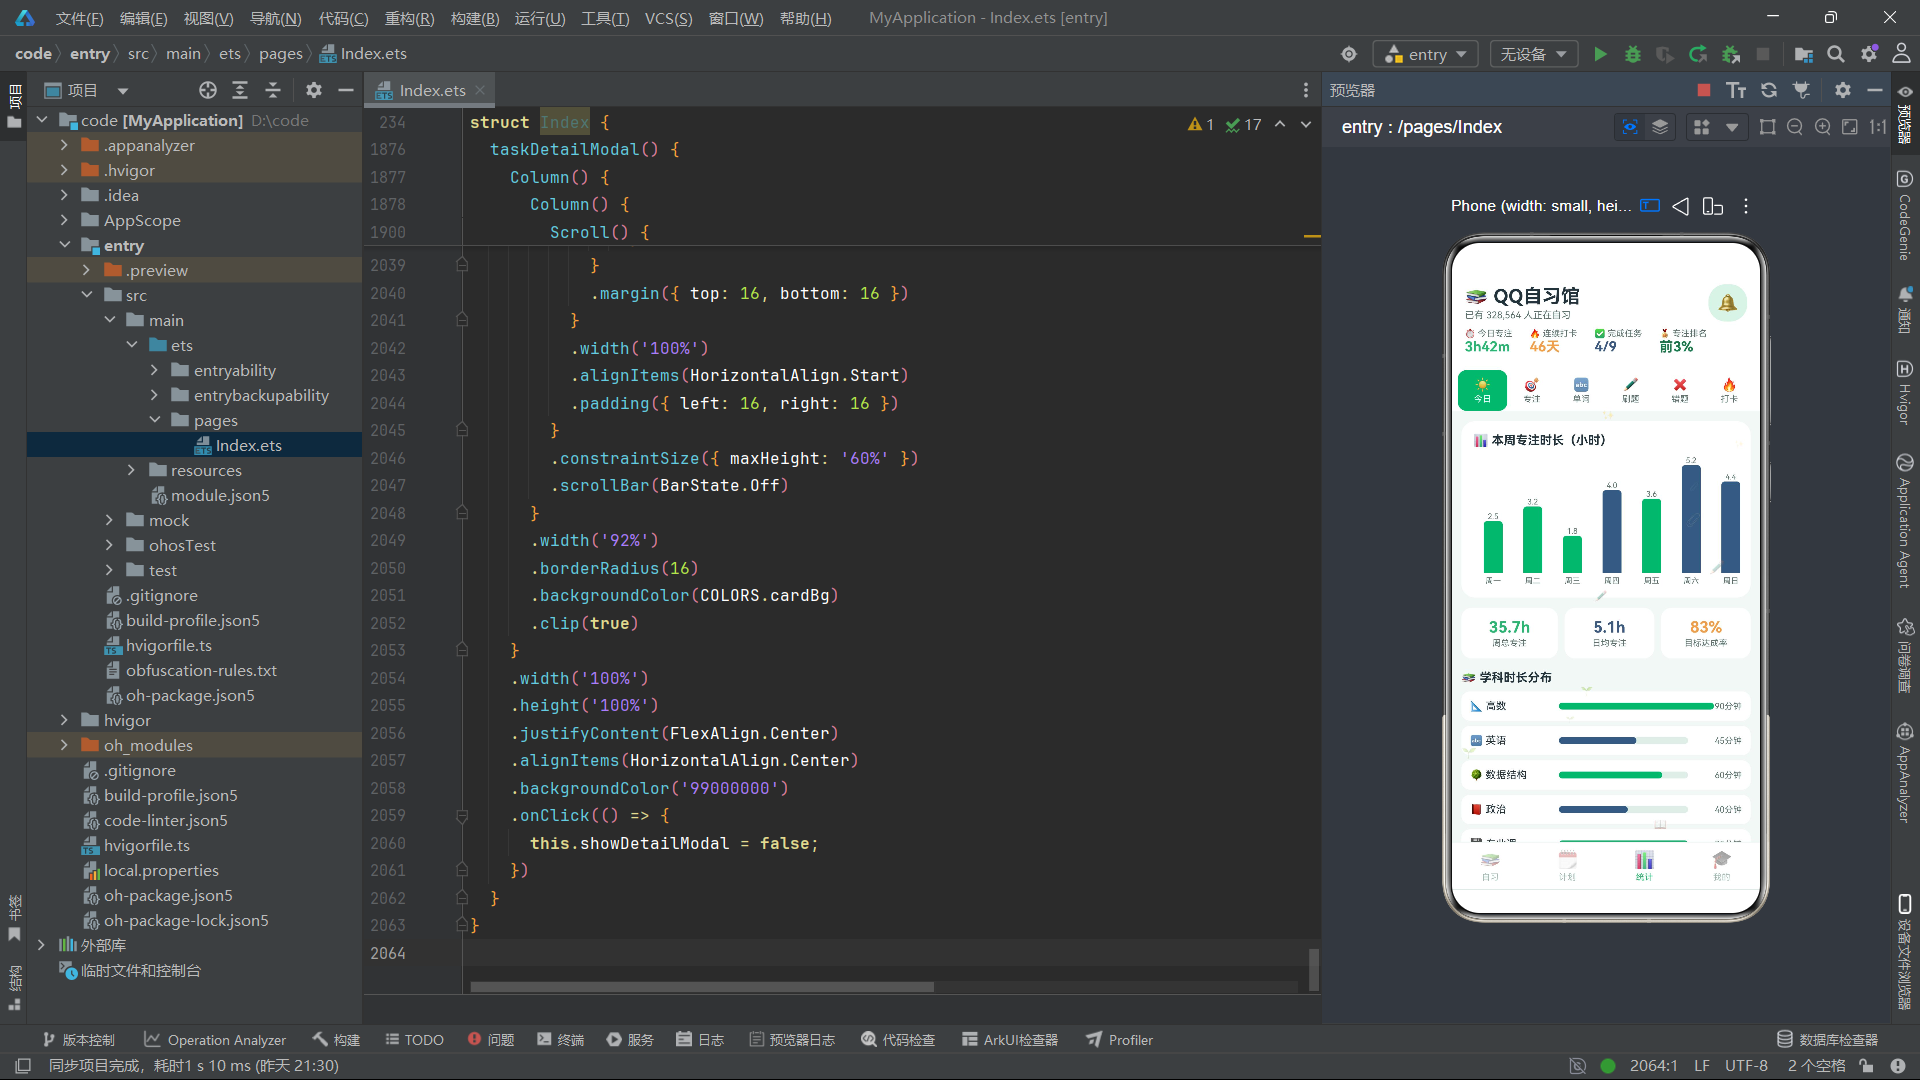
statsContent()方法构建了统计数据页面。页面顶部是本周专注时长柱状图。ForEach遍历WEEK_DAYS数组,为每天生成一个柱子。每个柱子由三部分垂直排列:顶部的数值标签(9号字)、中间的柱状条(宽度22vp,高度由focusBarHeight()函数计算)、底部的星期标签。柱状条颜色根据FOCUS_HOURS[idx] >= 4判断——达到4小时及以上使用靛蓝色,否则使用薄荷绿。Row容器使用justifyContent(FlexAlign.Center)使柱子水平居中,alignItems(VerticalAlign.Bottom)使柱子底部对齐,形成标准柱状图的视觉效果。
柱状图下方是三个统计指标卡片——周总专注(35.7h,薄荷绿)、日均专注(5.1h,靛蓝)、目标达成率(83%,橙色),三个卡片等宽分布,使用layoutWeight(1)和margin({ left: 8 })实现等间距排列。
页面底部是学科时长分布的水平条形图。ForEach取TASKS前6条数据,为每个学科生成一行进度条——左侧是学科名称(固定宽度80vp),中间是进度条(外层灰色背景宽度150vp,内层彩色条宽度为t.minutes * 2),右侧是分钟数文字。进度条颜色通过idx % 2 === 0交替使用薄荷绿和靛蓝,增加了视觉多样性。
第二十三段:个人页面与底部导航——mineContent与bottomTabs方法
  @Builder
  mineContent() {
    Column() {
      Column() {
        Row() {
          Text('🎓')
            .fontSize(38)
            .width(64)
            .height(64)
            .textAlign(TextAlign.Center)
            .borderRadius(32)
            .backgroundColor(COLORS.mintLight)
          Column() {
            Text('上岸锦鲤')
              .fontSize(18)
              .fontWeight(FontWeight.Bold)
              .fontColor(COLORS.textPrimary)
            Text('考研倒计时 118 天 · 目标院校:华中科技大学')
              .fontSize(11)
              .fontColor(COLORS.textSecondary)
              .margin({ top: 3 })
            Text('⏱ 累计专注 1,286 小时')
              .fontSize(10)
              .fontColor(COLORS.mint)
              .margin({ top: 3 })
          }
          .alignItems(HorizontalAlign.Start)
          .layoutWeight(1)
          .margin({ left: 12 })
        }
        .width('100%')
      }
      .width('100%')
      .padding(14)
      .borderRadius(16)
      .backgroundColor(COLORS.cardBg)
      .alignItems(HorizontalAlign.Start)

      Text('🪪 我的自习档案')
        .fontSize(14)
        .fontWeight(FontWeight.Bold)
        .fontColor(COLORS.textPrimary)
        .margin({ top: 14, bottom: 8 })

      ForEach([['常驻房间', '静音自习室A · 328小时'], ['最早打卡', '05:42 · 那天背完了List 40'], ['最长专注', '单次5小时12分钟'], ['学习搭子', '微分骑士、单词收割机']], (pair: string[]) => {
        Row() {
          Text(pair[0])
            .fontSize(12)
            .fontColor(COLORS.textSecondary)
          Text(pair[1])
            .fontSize(12)
            .fontColor(COLORS.textPrimary)
            .layoutWeight(1)
            .textAlign(TextAlign.End)
        }
        .width('100%')
        .padding({ top: 10, bottom: 10 })
        .borderRadius(10)
        .backgroundColor(COLORS.cardBg)
        .padding({ left: 14, right: 14 })
        .margin({ bottom: 6 })
      }, (pair: string[]) => pair[0])

      Text('🎁 我的奖励兑换')
        .fontSize(14)
        .fontWeight(FontWeight.Bold)
        .fontColor(COLORS.textPrimary)
        .margin({ top: 14, bottom: 8 })

      Row() {
        Column() {
          Text('☕')
            .fontSize(26)
          Text('奶茶券')
            .fontSize(10)
            .fontColor(COLORS.textPrimary)
            .margin({ top: 4 })
          Text('500金币')
            .fontSize(9)
            .fontColor(COLORS.warning)
            .margin({ top: 2 })
        }
        .layoutWeight(1)
        .padding(10)
        .borderRadius(12)
        .backgroundColor(COLORS.cardBg)

        Column() {
          Text('🎧')
            .fontSize(26)
          Text('白噪音会员')
            .fontSize(10)
            .fontColor(COLORS.textPrimary)
            .margin({ top: 4 })
          Text('1200金币')
            .fontSize(9)
            .fontColor(COLORS.warning)
            .margin({ top: 2 })
        }
        .layoutWeight(1)
        .padding(10)
        .borderRadius(12)
        .backgroundColor(COLORS.cardBg)
        .margin({ left: 8 })

        Column() {
          Text('📕')
            .fontSize(26)
          Text('真题手册')
            .fontSize(10)
            .fontColor(COLORS.textPrimary)
            .margin({ top: 4 })
          Text('3000金币')
            .fontSize(9)
            .fontColor(COLORS.warning)
            .margin({ top: 2 })
        }
        .layoutWeight(1)
        .padding(10)
        .borderRadius(12)
        .backgroundColor(COLORS.cardBg)
        .margin({ left: 8 })
      }
      .width('100%')
    }
    .width('100%')
    .padding(12)
    .alignItems(HorizontalAlign.Start)
  }

  @Builder
  bottomTabs() {
    Row() {
      ForEach(BOTTOM_TABS, (t: TabItem, idx: number) => {
        Column() {
          Text(t.icon)
            .fontSize(20)
            .opacity(this.currentBottomTab === idx ? 1 : 0.45)
          Text(t.label)
            .fontSize(10)
            .fontColor(this.currentBottomTab === idx ? COLORS.mint : COLORS.textHint)
            .margin({ top: 3 })
        }
        .layoutWeight(1)
        .padding({ top: 8, bottom: 8 })
        .onClick(() => {
          this.currentBottomTab = idx;
          this.currentTopTab = 0;
        })
      }, (t: TabItem) => t.label)
    }
    .width('100%')
    .backgroundColor(COLORS.cardBg)
    .border({ width: 1, color: COLORS.border })
  }
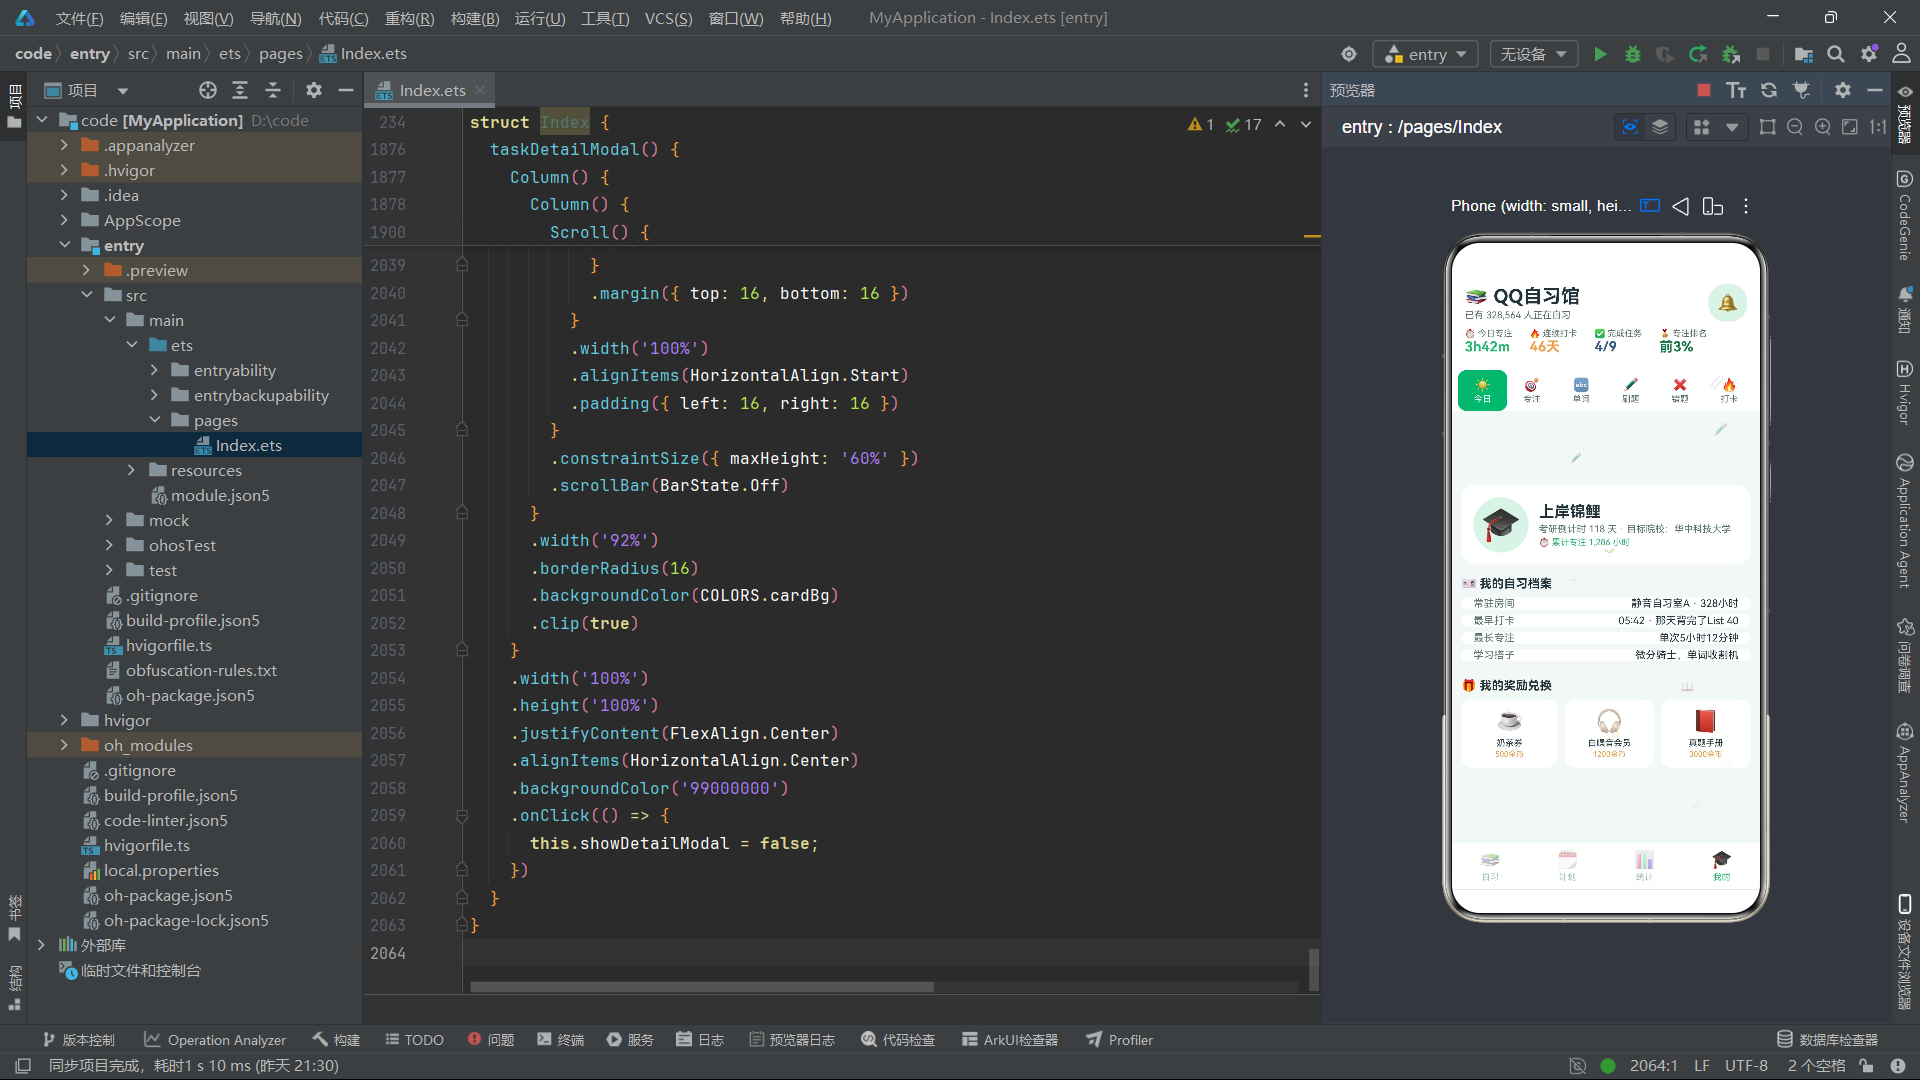
mineContent()方法构建了个人中心页面。页面顶部是用户资料卡片,左侧是64x64vp的圆形头像背景(薄荷浅色),内嵌38号字的毕业帽Emoji;右侧是用户昵称(18号粗体)、考研倒计时和目标院校信息(11号次要色)、累计专注时长(10号薄荷绿)。卡片下方是自习档案列表,使用ForEach遍历一个二维字符串数组——每条记录包含标签和值,以左标签右值的表格式布局展示常驻房间、最早打卡、最长专注和学习搭子四项档案信息。页面底部是奖励兑换区,三个等宽卡片展示奶茶券(500金币)、白噪音会员(1200金币)和真题手册(3000金币),金币价格使用橙色文字强调。
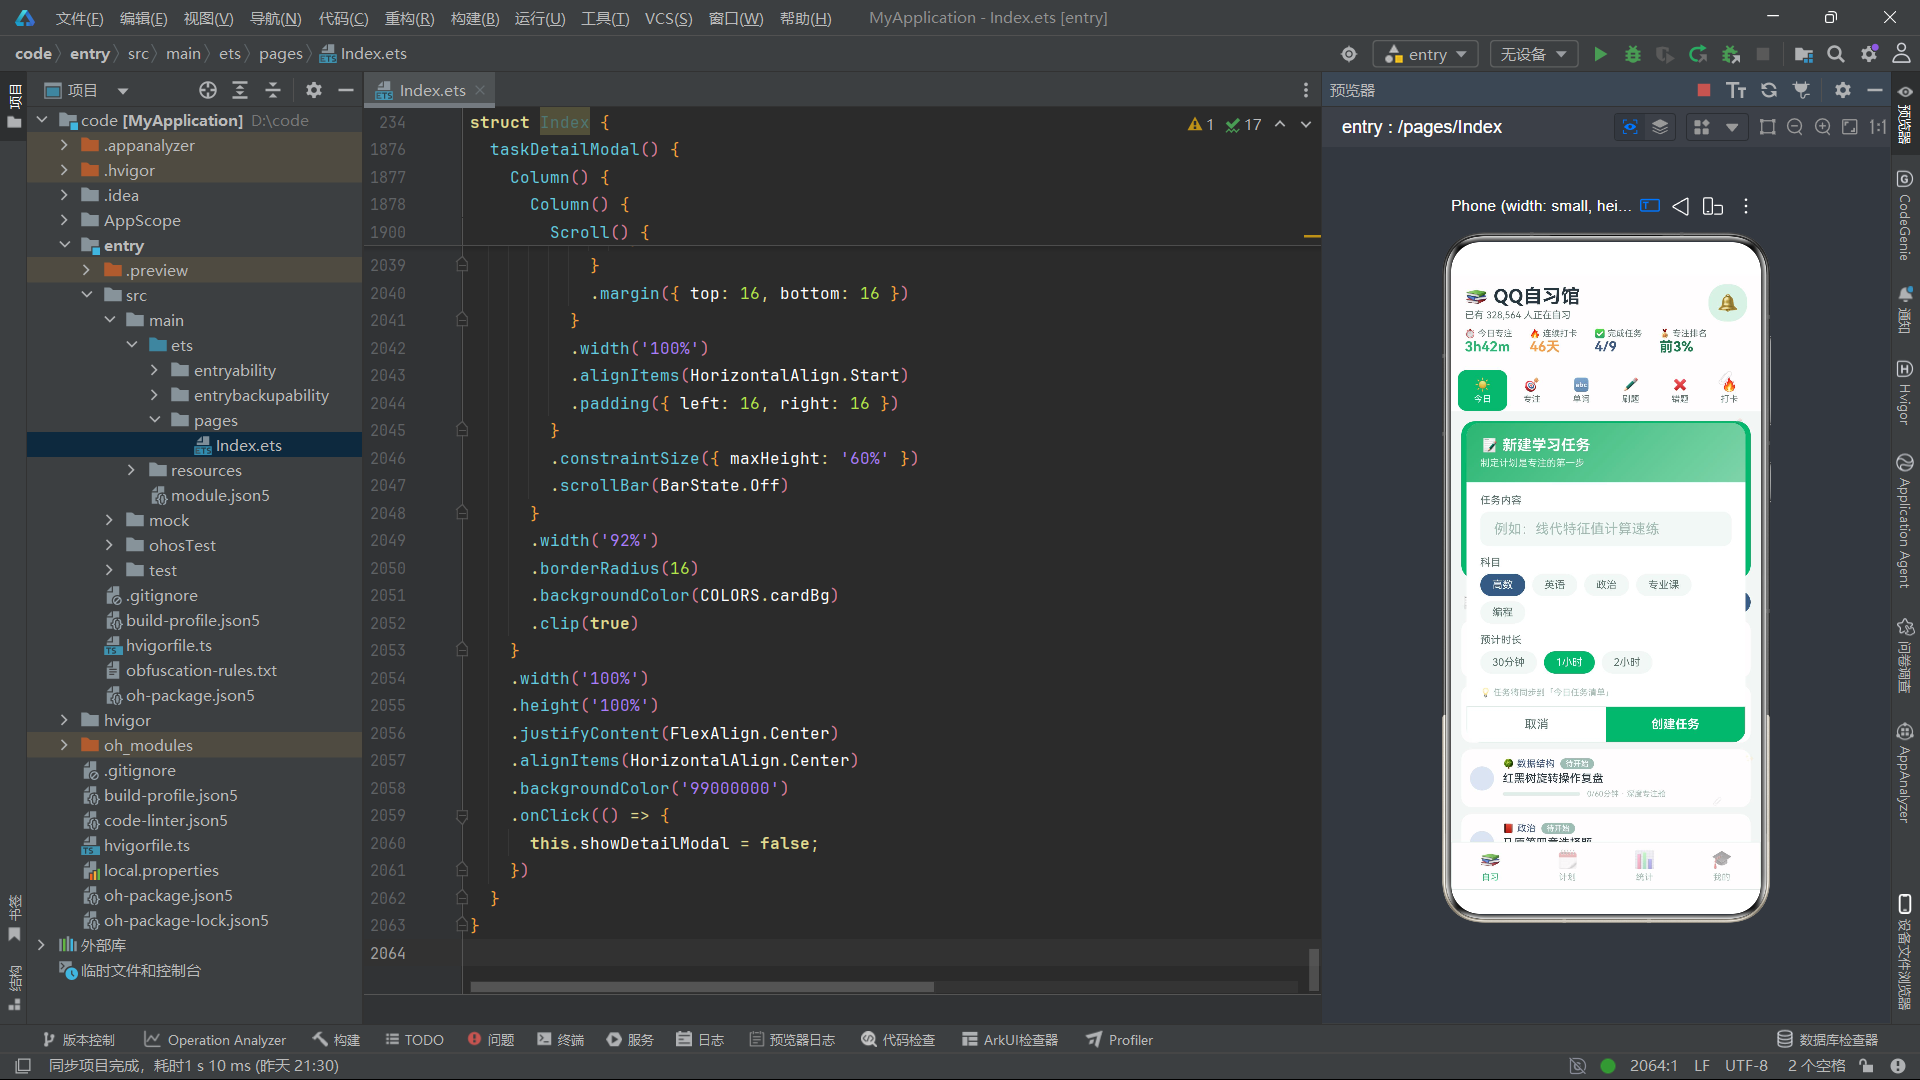
bottomTabs()方法构建了底部导航栏。ForEach遍历BOTTOM_TABS数组,为每个Tab生成图标+文字的垂直排列。选中态通过两个维度的视觉变化来体现:图标透明度从0.45变为1(opacity),文字颜色从textHint变为薄荷绿。onClick回调同时更新两个状态变量——currentBottomTab设为被点击的索引,currentTopTab重置为0,确保切换底部Tab时回到子页面的第一个Tab。底部栏顶部有一条1vp的薄荷浅色边框,与页面背景形成视觉分隔。
第二十四段:新建任务与编辑目标弹窗——newTaskModal与goalEditModal方法
  @Builder
  newTaskModal() {
    Column() {
      Column() {
        Column() {
          Text('📝 新建学习任务')
            .fontSize(17)
            .fontWeight(FontWeight.Bold)
            .fontColor(COLORS.white)
          Text('制定计划是专注的第一步')
            .fontSize(11)
            .fontColor('#E2F6EB')
            .margin({ top: 4 })
        }
        .width('100%')
        .padding(16)
        .alignItems(HorizontalAlign.Start)
        .linearGradient({
          angle: 135,
          colors: [['#2BB673', 0], ['#7ED4A9', 1]]
        })

        Scroll() {
          Column() {
            Column() {
              Text('任务内容')
                .fontSize(12)
                .fontColor(COLORS.textSecondary)
                .alignSelf(ItemAlign.Start)
              TextInput({ placeholder: '例如:线代特征值计算速练', text: this.newTaskContent })
                .fontSize(13)
                .fontColor(COLORS.textPrimary)
                .placeholderColor(COLORS.textHint)
                .backgroundColor(COLORS.bg)
                .borderRadius(10)
                .height(40)
                .margin({ top: 6 })
                .onChange((v: string) => {
                  this.newTaskContent = v;
                })
            }
            .width('100%')
            .alignItems(HorizontalAlign.Start)
            .margin({ top: 14 })

            Text('科目')
              .fontSize(12)
              .fontColor(COLORS.textSecondary)
              .margin({ top: 12 })
            Flex({ wrap: FlexWrap.Wrap }) {
              ForEach(['高数', '英语', '政治', '专业课', '编程'], (t: string, idx: number) => {
                Text(t)
                  .fontSize(12)
                  .fontColor(this.newTaskSubject === idx ? COLORS.white : COLORS.textSecondary)
                  .padding({ left: 14, right: 14, top: 6, bottom: 6 })
                  .borderRadius(14)
                  .backgroundColor(this.newTaskSubject === idx ? COLORS.indigo : COLORS.bg)
                  .margin({ right: 8, top: 6 })
                  .onClick(() => {
                    this.newTaskSubject = idx;
                  })
              }, (t: string) => t)
            }
            .width('100%')

            Text('预计时长')
              .fontSize(12)
              .fontColor(COLORS.textSecondary)
              .margin({ top: 12 })
            Row() {
              ForEach(['30分钟', '1小时', '2小时'], (t: string, idx: number) => {
                Text(t)
                  .fontSize(12)
                  .fontColor(this.newTaskMinutes === idx ? COLORS.white : COLORS.textSecondary)
                  .padding({ left: 14, right: 14, top: 6, bottom: 6 })
                  .borderRadius(14)
                  .backgroundColor(this.newTaskMinutes === idx ? COLORS.mint : COLORS.bg)
                  .margin({ right: 8, top: 6 })
                  .onClick(() => {
                    this.newTaskMinutes = idx;
                  })
              }, (t: string) => t)
            }
            .width('100%')

            Text('💡 任务将同步到「今日任务清单」')
              .fontSize(10)
              .fontColor(COLORS.textHint)
              .margin({ top: 16, bottom: 10 })
          }
          .width('100%')
          .alignItems(HorizontalAlign.Start)
          .padding({ left: 16, right: 16 })
        }
        .constraintSize({ maxHeight: '50%' })
        .scrollBar(BarState.Off)


      }
      .width('92%')
      .borderRadius(16)
      .backgroundColor(COLORS.cardBg)
      .clip(true)
    }
    .width('100%')
    .height('100%')
    .justifyContent(FlexAlign.Center)
    .alignItems(HorizontalAlign.Center)
    .backgroundColor('99000000')
    .onClick(() => {
      this.showDetailModal = false;
    })
  }
}
五、总结
本文以"QQ自习·学习馆"在线自习室打卡应用为完整实战案例,系统性地剖析了基于HarmonyOS 6.1.1 ArkTS API 24的声明式UI开发全流程。从技术层面看,这个应用涵盖了ArkTS框架的六大核心技术领域。
第一是类型安全的数据建模。应用使用了interface和@Observed class两种数据建模方式——ColorPalette、TabItem、SeatInfo、WordItem、ParticleItem等接口用于定义不可变的数据结构体,而StudyTask类通过@Observed装饰器实现了可观察的数据模型。这种双轨制建模策略在保证类型安全的同时,兼顾了性能与灵活性。
第二是响应式状态管理。14个@State状态变量覆盖了导航、弹窗、表单、动画和选中五大状态域,每个状态变量的变化都精确驱动对应UI片段的自动更新。aboutToAppear和aboutToDisappear生命周期回调配合setInterval/clearInterval实现了动画的启动与清理,避免了内存泄漏。
第三是组件化UI构建。@Builder装饰器将页面拆分为头部、Tab栏、四个内容区域、四个弹窗和底部导航等独立构建块,每个构建块通过this.methodName()方式组合调用,实现了高内聚低耦合的组件架构。Stack层叠布局将内容层、粒子特效层和弹窗层有序叠加,构建了丰富的视觉层次。
第四是数据驱动的条件渲染。if-else条件分支根据导航状态动态切换内容区域,ForEach列表渲染配合不同的键值生成策略实现了15种列表视图。三元条件表达式在组件属性层面实现了状态驱动的动态着色和布局。
第五是纯函数式算法设计。buildParticles、driftParticles、statusColor、focusBarHeight、heatCellColor等函数均采用"输入到输出"的纯函数模式,不产生副作用,便于测试和复用。粒子动画的"旧状态到新状态"的不可变更新方式,是响应式编程的最佳实践。
第六是弹窗交互系统。四种弹窗通过独立的@State布尔变量控制显隐,通过selectedTask传递上下文数据,通过"关闭A+打开B"的状态组合实现弹窗间的链式跳转。backgroundColor('99000000')半透明遮罩和onClick遮罩关闭提供了统一的弹窗交互体验。
HarmonyOS 6.1.1 ArkTS API 24的声明式UI范式,使得开发者能够以简洁的类型安全代码构建复杂的交互界面。@Observed/@State/@Builder三大装饰器构成了"数据可观察-状态可响应-UI可组件化"的完整技术闭环,为鸿蒙生态的应用开发提供了强大的基础设施支撑。随着鸿蒙生态的持续发展,ArkTS必将成为构建高性能、高可维护性跨设备应用的首选技术栈。

作为“人工智能6S店”的官方数字引擎,为AI开发者与企业提供一个覆盖软硬件全栈、一站式门户。
更多推荐

 4
4 0
0- 0


 已为社区贡献34条内容

所有评论(0)