
鸿蒙 ArkTS 实战|光的色散演示:Canvas 画三棱镜与七色光谱
·
一、设计思路
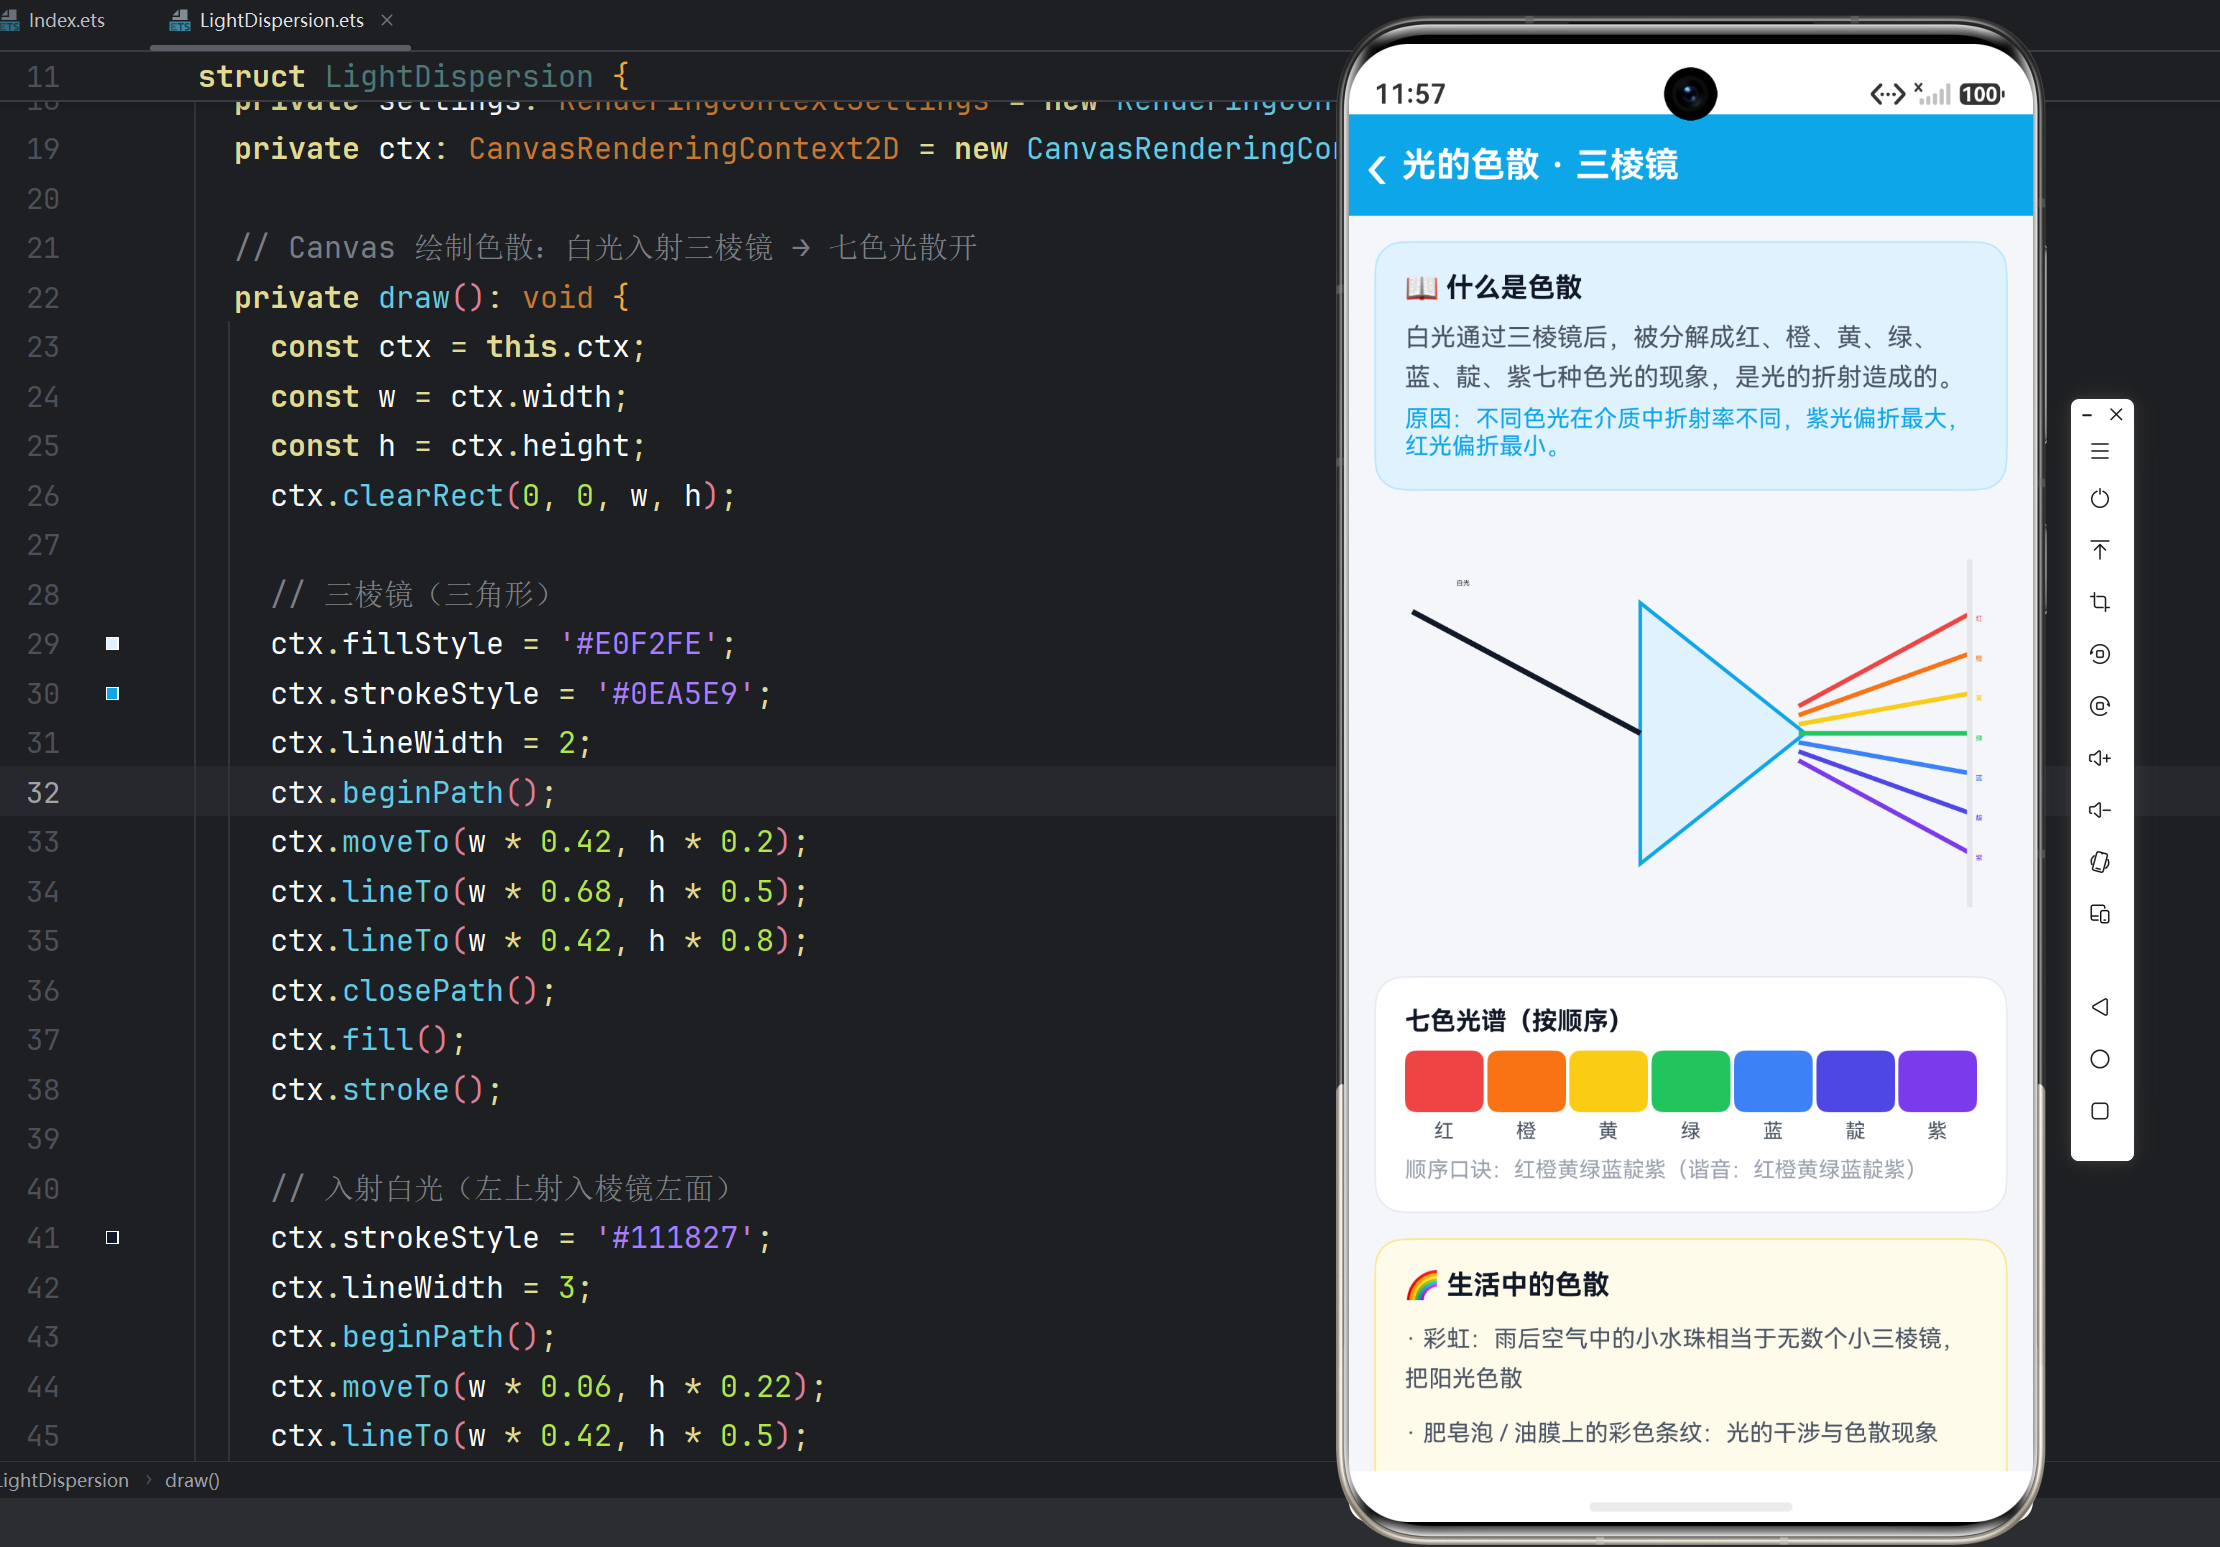
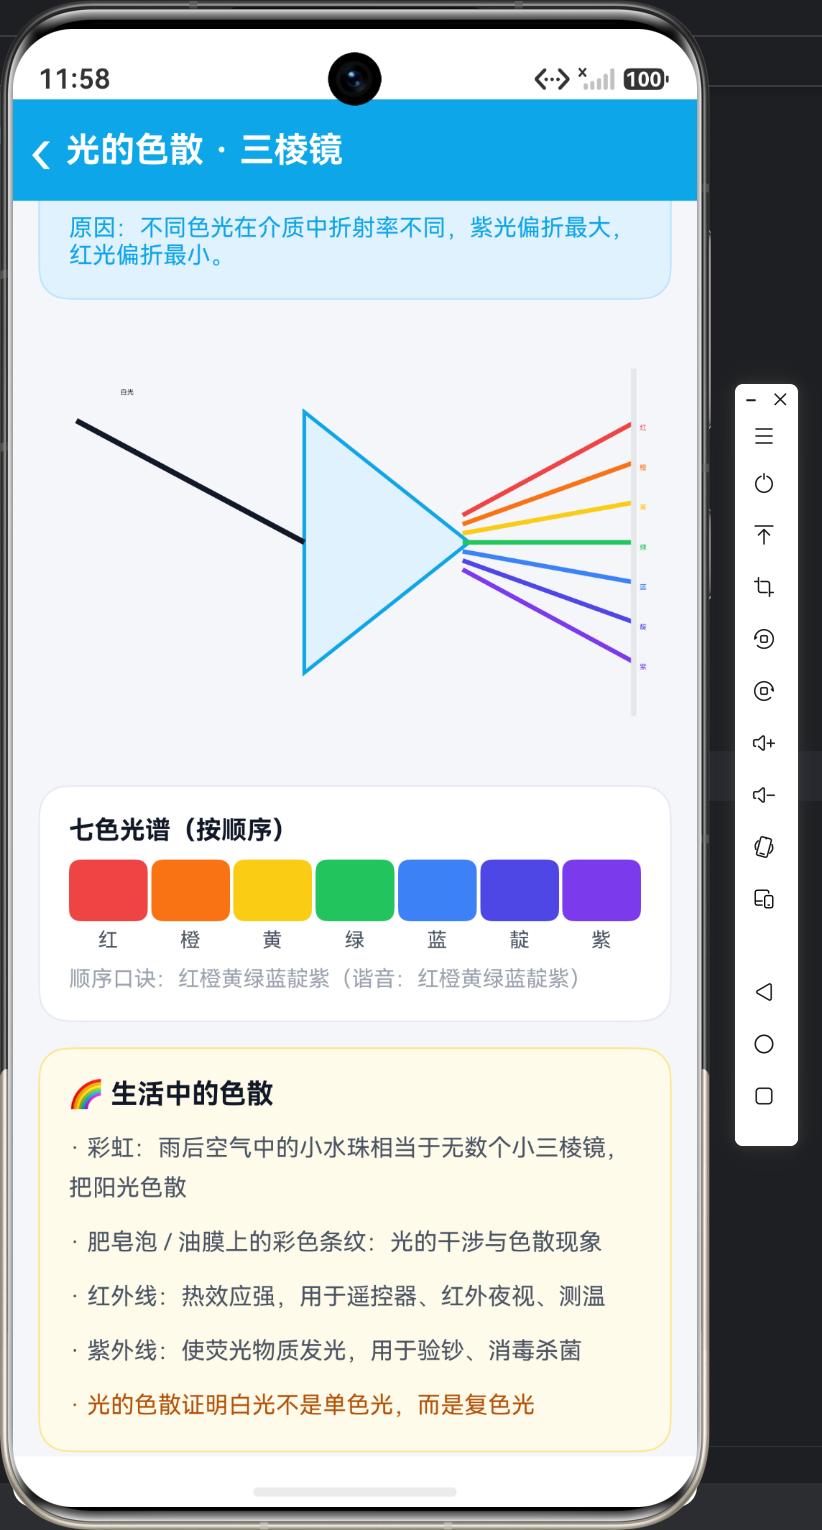
光的色散是光学经典实验:白光经三棱镜折射分解为红橙黄绿蓝靛紫。技术演示做两层:①Canvas 画"白光入射 → 三棱镜 → 七色光散开 → 屏幕承接"的完整光路图,七种色光按不同折射角画出;②用七色块横向排列渲染"光谱条",与口诀对应。数据上把七色做成数组,绘制与渲染共用一份数据。
二、七色光谱数据(单一数据源)
import { router } from '@kit.ArkUI';

@Entry
@Component
struct LightDispersion {
  // 七色光谱数据:颜色值数组(按 红→紫 排列)
  private spectrum: string[] = [
    '#EF4444', '#F97316', '#FACC15', '#22C55E', '#3B82F6', '#4F46E5', '#7C3AED'
  ];
  // 与颜色一一对应的色名
  private spectrumNames: string[] = ['红', '橙', '黄', '绿', '蓝', '靛', '紫'];

  private settings: RenderingContextSettings = new RenderingContextSettings(true);
  private ctx: CanvasRenderingContext2D = new CanvasRenderingContext2D(this.settings);
}
三、Canvas 绘制色散光路(核心代码)
  private draw(): void {
    const ctx = this.ctx;
    const w = ctx.width;
    const h = ctx.height;
    ctx.clearRect(0, 0, w, h);

    // 三棱镜(三角形):Path 三点闭合 + 填充描边
    ctx.fillStyle = '#E0F2FE';
    ctx.strokeStyle = '#0EA5E9';
    ctx.lineWidth = 2;
    ctx.beginPath();
    ctx.moveTo(w * 0.42, h * 0.2);
    ctx.lineTo(w * 0.68, h * 0.5);
    ctx.lineTo(w * 0.42, h * 0.8);
    ctx.closePath();
    ctx.fill();
    ctx.stroke();

    // 入射白光(左上 → 棱镜左面)
    ctx.strokeStyle = '#111827';
    ctx.lineWidth = 3;
    ctx.beginPath();
    ctx.moveTo(w * 0.06, h * 0.22);
    ctx.lineTo(w * 0.42, h * 0.5);
    ctx.stroke();
    ctx.fillStyle = '#111827';
    ctx.font = '13px sans-serif';
    ctx.textAlign = 'center';
    ctx.fillText('白光', w * 0.14, h * 0.16);

    // 出射七色光:从棱镜右面散开,越靠后偏折越大(越向下)
    for (let i = 0; i < this.spectrum.length; i++) {
      ctx.strokeStyle = this.spectrum[i];   // 每条光线用对应颜色
      ctx.lineWidth = 2.5;
      ctx.beginPath();
      const startY = h * 0.5 + (i - 3) * 5;   // 起点在棱镜右棱附近微错开
      const endY = h * 0.5 + (i - 3) * 22;    // 终点逐渐散开
      ctx.moveTo(w * 0.67, startY);
      ctx.lineTo(w * 0.94, endY);
      ctx.stroke();
      // 色名标注(颜色与光线一致)
      ctx.fillStyle = this.spectrum[i];
      ctx.fillText(this.spectrumNames[i], w * 0.955, endY + 4);
    }

    // 承接屏幕(竖线)
    ctx.strokeStyle = '#E5E7EB';
    ctx.lineWidth = 3;
    ctx.beginPath();
    ctx.moveTo(w * 0.94, h * 0.1);
    ctx.lineTo(w * 0.94, h * 0.9);
    ctx.stroke();
  }
四、光谱条 UI(ForEach 渲染七色块)
  build() {
    Column() {
      // 顶部标题栏(略)
      Scroll() {
        Column({ space: 14 }) {
          // 原理卡
          Text('白光通过三棱镜后,被分解成红、橙、黄、绿、蓝、靛、紫七种色光,'
            + '这是光的折射造成的:不同色光折射率不同,紫光偏折最大,红光最小。')
            .fontSize(13).fontColor('#4B5563').lineHeight(22).width('100%')

          // 色散光路示意图
          Canvas(this.ctx)
            .width('100%').height(240)
            .onReady(() => { this.draw(); })

          // 七色光谱条:ForEach 渲染 7 个色块,每个带色名
          Column({ space: 8 }) {
            Text('七色光谱(按顺序)').fontSize(14).fontWeight(FontWeight.Bold)
              .fontColor('#111827').width('100%')
            Row({ space: 2 }) {
              ForEach(this.spectrum, (color: string, index: number) => {
                Column({ space: 4 }) {
                  Column()
                    .width('100%').height(34)
                    .backgroundColor(color)          // 色块颜色取自数组
                    .borderRadius(6)
                  Text(this.spectrumNames[index])     // 色名与颜色同下标对应
                    .fontSize(11).fontColor('#4B5563')
                }.layoutWeight(1)                    // 七列均分宽度
              }, (color: string) => color)           // key = 颜色值
            }.width('100%')
            Text('顺序口诀:红橙黄绿蓝靛紫')
              .fontSize(12).fontColor('#9CA3AF').width('100%')
          }
          .width('100%').padding(16).borderRadius(16)
          .backgroundColor(Color.White).border({ width: 1, color: '#E5EAF2' })
        }
        .padding(14)
      }
      .layoutWeight(1).scrollBar(BarState.Off)
    }
    .height('100%').width('100%').backgroundColor('#F4F6FA')
  }
五、代码要点
- 单数据源:
spectrum数组同时服务 Canvas 绘制与光谱条 UI,改一处颜色全局生效。 - 循环绘制:七条出射光线用
for循环 +(i - 3)偏移量实现等差散开,比手写七遍 draw 优雅。 - 同下标对应:
spectrumNames[index]与颜色数组按下标对齐,ForEach 第二个参数正是 index。 - Canvas 坐标系:三棱镜、入射光、出射光、屏幕的相对位置全部按
w/h比例计算,适配任意屏幕。
六、光的色散核心知识点
| 要点 | 内容 |
|---|---|
| 现象 | 白光经三棱镜分解为红橙黄绿蓝靛紫七色光(色散) |
| 原因 | 不同色光折射率不同:紫光偏折最大,红光偏折最小 |
| 结论 | 白光不是单色光,是复色光;红绿蓝是光的三原色 |
| 彩虹 | 雨后小水珠充当三棱镜,把阳光色散成七色 |
| 红外线 | 热效应强:遥控器、红外夜视、测温枪(在红光外侧) |
| 紫外线 | 荧光效应:验钞、消毒(在紫光外侧);过量有害 |
| 易错 | 色散是折射不是反射;七色顺序红橙黄绿蓝靛紫不可颠倒 |
| 口诀 | 红橙黄绿蓝靛紫,白光分解有规律;红外紫外看不见,各有用途记心间 |

作为“人工智能6S店”的官方数字引擎,为AI开发者与企业提供一个覆盖软硬件全栈、一站式门户。
更多推荐
 0
0 0
0- 0


 已为社区贡献45条内容

所有评论(0)