
鸿蒙实战 - 资料征集分发台:收件卡片与状态保持实现
·
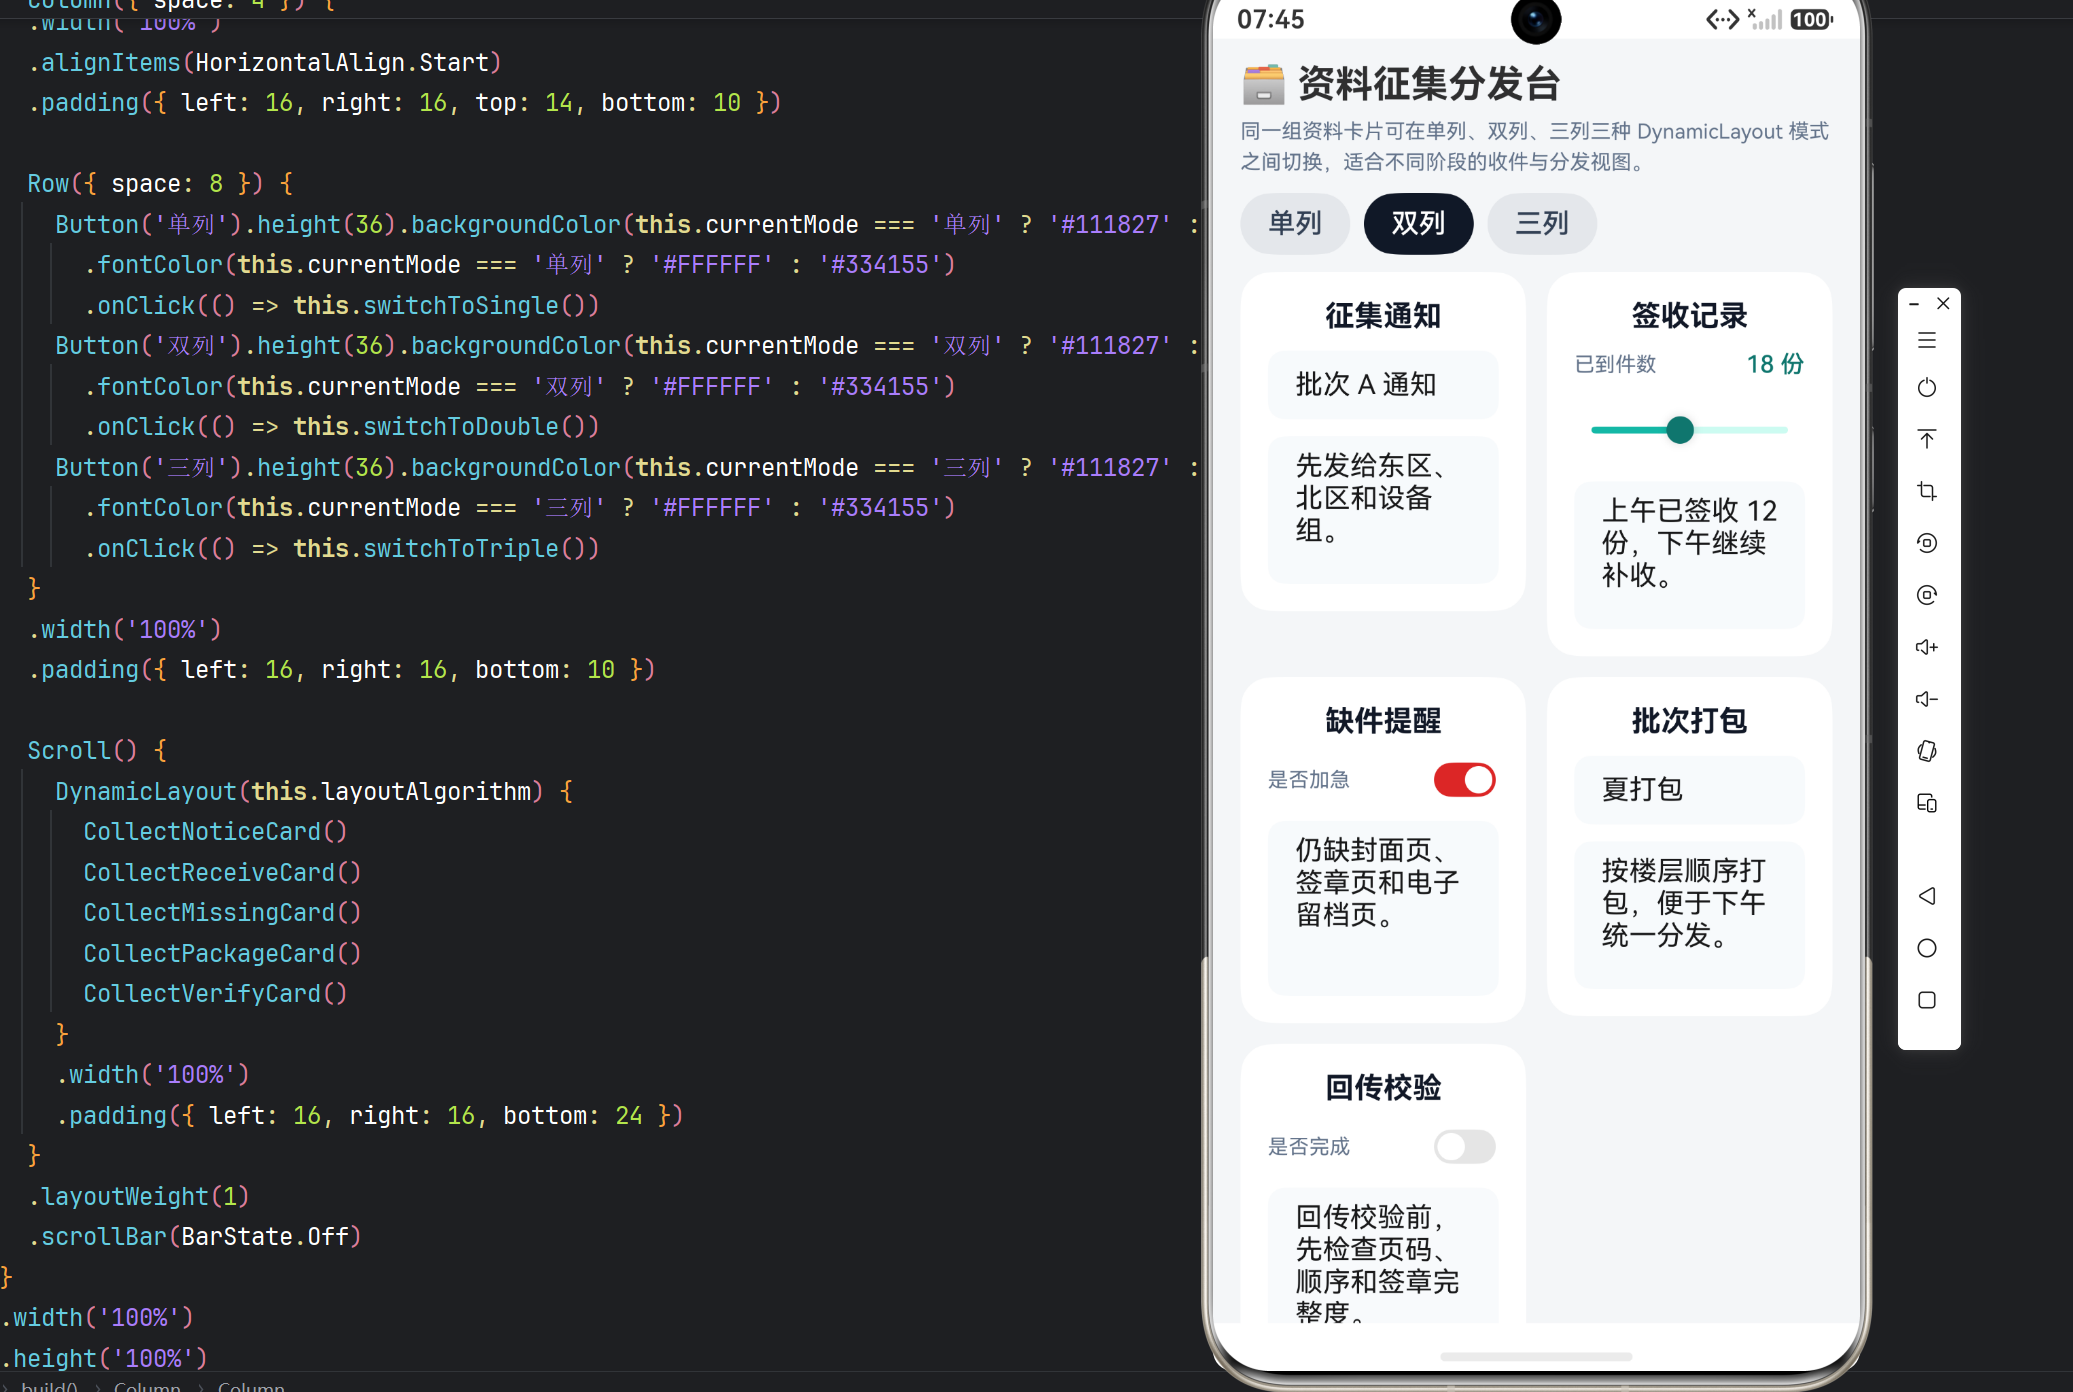
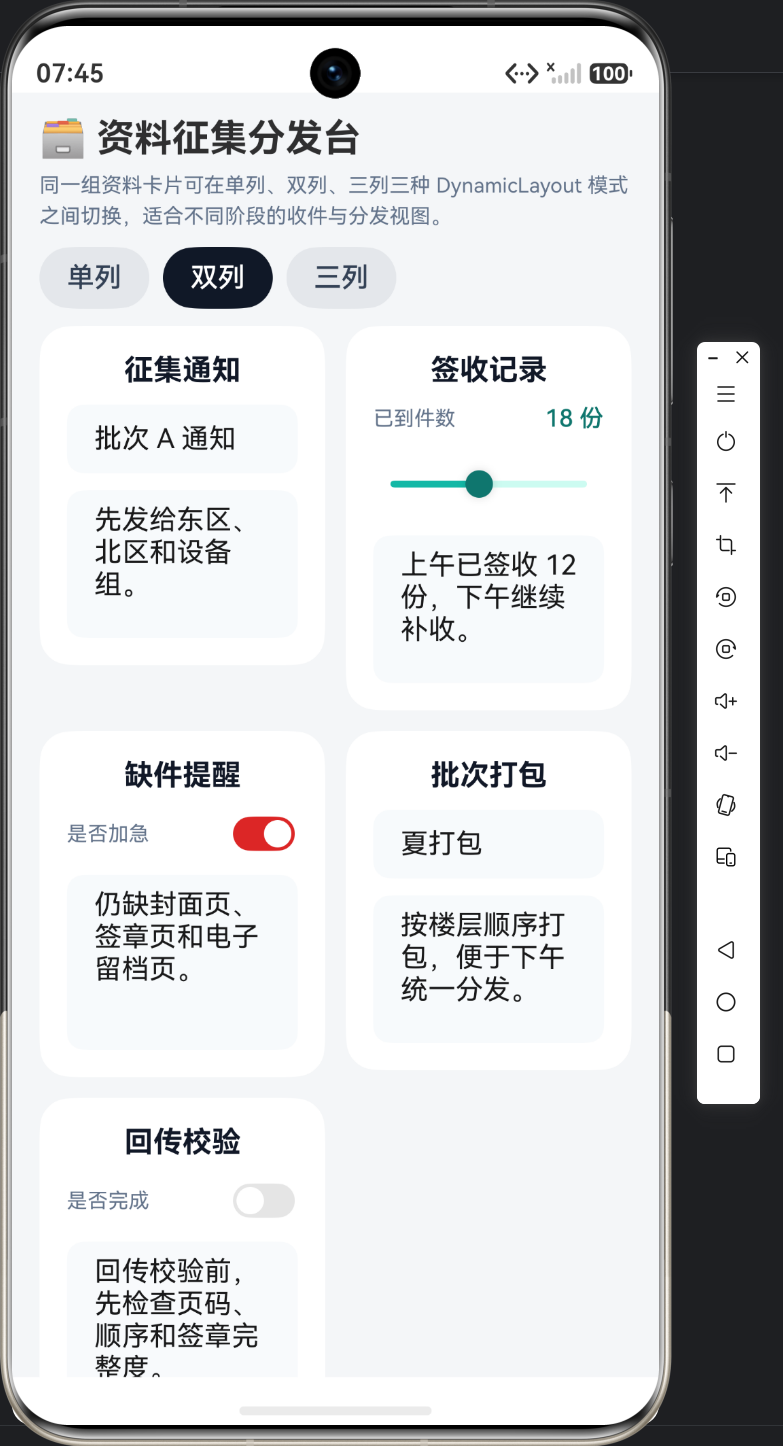
实例:资料征集分发台|技术:ComponentV2、Slider、Toggle、TextInput、TextArea、资料流程卡片
一、本篇范围
本篇只看五张资料卡片。资料征集页的重点不是炫效果,而是让同一组卡片在不同密度视图里保持可编辑,因此卡片代码必须完整呈现出来。
二、卡片组一:征集通知与签收记录
@ComponentV2
struct CollectNoticeCard {
  @Local title: string = '批次 A 通知';
  @Local note: string = '先发给东区、北区和设备组。';

  build() {
    Column({ space: 10 }) {
      Text('征集通知').fontSize(17).fontWeight(FontWeight.Bold).fontColor('#111827')
      TextInput({ text: this.title, placeholder: '通知标题' })
        .backgroundColor('#F8FAFC')
        .borderRadius(10)
        .onChange((value: string) => this.title = value)
      TextArea({ text: this.note, placeholder: '发送范围' })
        .height(86)
        .backgroundColor('#F8FAFC')
        .borderRadius(10)
        .onChange((value: string) => this.note = value)
    }
    .width('100%')
    .padding(16)
    .backgroundColor('#FFFFFF')
    .borderRadius(18)
  }
}

@ComponentV2
struct CollectReceiveCard {
  @Local count: number = 18;
  @Local note: string = '上午已签收 12 份,下午继续补收。';

  build() {
    Column({ space: 10 }) {
      Text('签收记录').fontSize(17).fontWeight(FontWeight.Bold).fontColor('#111827')
      Row() {
        Text('已到件数').fontSize(12).fontColor('#64748B')
        Blank()
        Text(`${Math.round(this.count)} 份`).fontSize(14).fontWeight(FontWeight.Medium).fontColor('#0F766E')
      }.width('100%')
      Slider({ value: this.count, min: 0, max: 40, step: 1 })
        .selectedColor('#14B8A6')
        .trackColor('#CCFBF1')
        .blockColor('#0F766E')
        .onChange((value: number) => this.count = value)
      TextArea({ text: this.note, placeholder: '签收说明' })
        .height(86)
        .backgroundColor('#F8FAFC')
        .borderRadius(10)
        .onChange((value: string) => this.note = value)
    }
    .width('100%')
    .padding(16)
    .backgroundColor('#FFFFFF')
    .borderRadius(18)
  }
}
这组卡片分别展示文本输入和数值录入。资料页的技术重点不在颜色或排版,而在同一组卡片在三种视图里都能继续编辑,因此这些基础控件必须完整保留。
三、卡片组二:缺件提醒与批次打包
@ComponentV2
struct CollectMissingCard {
  @Local urgent: boolean = true;
  @Local note: string = '仍缺封面页、签章页和电子留档页。';

  build() {
    Column({ space: 10 }) {
      Text('缺件提醒').fontSize(17).fontWeight(FontWeight.Bold).fontColor('#111827')
      Row() {
        Text('是否加急').fontSize(12).fontColor('#64748B')
        Blank()
        Toggle({ type: ToggleType.Switch, isOn: this.urgent })
          .selectedColor('#DC2626')
          .onChange((value: boolean) => this.urgent = value)
      }.width('100%')
      TextArea({ text: this.note, placeholder: '缺件项目' })
        .height(102)
        .backgroundColor('#F8FAFC')
        .borderRadius(10)
        .onChange((value: string) => this.note = value)
    }
    .width('100%')
    .padding(16)
    .backgroundColor('#FFFFFF')
    .borderRadius(18)
  }
}

@ComponentV2
struct CollectPackageCard {
  @Local owner: string = '夏打包';
  @Local note: string = '按楼层顺序打包,便于下午统一分发。';

  build() {
    Column({ space: 10 }) {
      Text('批次打包').fontSize(17).fontWeight(FontWeight.Bold).fontColor('#111827')
      TextInput({ text: this.owner, placeholder: '打包负责人' })
        .backgroundColor('#F8FAFC')
        .borderRadius(10)
        .onChange((value: string) => this.owner = value)
      TextArea({ text: this.note, placeholder: '打包说明' })
        .height(86)
        .backgroundColor('#F8FAFC')
        .borderRadius(10)
        .onChange((value: string) => this.note = value)
    }
    .width('100%')
    .padding(16)
    .backgroundColor('#FFFFFF')
    .borderRadius(18)
  }
}
第二组卡片把缺件和打包流程拆开,分别用 Toggle、TextInput 和 TextArea 表达。文章在这里要强调的是:布局模式变化不应该影响字段归属,缺件就应该永远留在缺件卡里。
四、卡片组三:回传校验与三模式按钮
@ComponentV2
struct CollectVerifyCard {
  @Local done: boolean = false;
  @Local note: string = '回传校验前,先检查页码、顺序和签章完整度。';

  build() {
    Column({ space: 10 }) {
      Text('回传校验').fontSize(17).fontWeight(FontWeight.Bold).fontColor('#111827')
      Row() {
        Text('是否完成').fontSize(12).fontColor('#64748B')
        Blank()
        Toggle({ type: ToggleType.Switch, isOn: this.done })
          .selectedColor('#2563EB')
          .onChange((value: boolean) => this.done = value)
      }.width('100%')
      TextArea({ text: this.note, placeholder: '校验说明' })
        .height(102)
        .backgroundColor('#F8FAFC')
        .borderRadius(10)
        .onChange((value: string) => this.note = value)
    }
    .width('100%')
    .padding(16)
    .backgroundColor('#FFFFFF')
    .borderRadius(18)
  }
}

Row({ space: 8 }) {
        Button('单列').height(36).backgroundColor(this.currentMode === '单列' ? '#111827' : '#E5E7EB')
          .fontColor(this.currentMode === '单列' ? '#FFFFFF' : '#334155')
          .onClick(() => this.switchToSingle())
        Button('双列').height(36).backgroundColor(this.currentMode === '双列' ? '#111827' : '#E5E7EB')
          .fontColor(this.currentMode === '双列' ? '#FFFFFF' : '#334155')
          .onClick(() => this.switchToDouble())
        Button('三列').height(36).backgroundColor(this.currentMode === '三列' ? '#111827' : '#E5E7EB')
          .fontColor(this.currentMode === '三列' ? '#FFFFFF' : '#334155')
          .onClick(() => this.switchToTriple())
      }
      .width('100%')
      .padding({ left: 16, right: 16, bottom: 10 })

      Scroll() {
        DynamicLayout(this.layoutAlgorithm) {
          CollectNoticeCard()
          CollectReceiveCard()
          CollectMissingCard()
          CollectPackageCard()
          CollectVerifyCard()
        }
        .width('100%')
        .padding({ left: 16, right: 16, bottom: 24 })
      }
最后一组代码把第五张卡和按钮区放在一起。这样写的原因很直接:资料页的真正交互闭环,就是“切模式 → 看卡片排布 → 继续改卡片内容”,所以按钮区和 DynamicLayout 挂载关系必须一起交代。
五、卡片绑定对照表
| 卡片或区域 | 主要控件 | 状态字段 | 页面作用 |
|---|---|---|---|
| 征集通知 | TextInput / TextArea | title / note | 通知标题与发送范围 |
| 签收记录 | Slider / TextArea | count / note | 件数与签收说明 |
| 缺件提醒 | Toggle / TextArea | urgent / note | 缺件与加急 |
| 批次打包 | TextInput / TextArea | owner / note | 打包负责人和说明 |
| 回传校验 | Toggle / TextArea | done / note | 校验完成状态 |
六、本篇小结
第二篇把五张资料卡完整展开,目的是证明这页不是“切个列数给你看”,而是同一组可编辑卡片在不同信息密度下都能工作。

作为“人工智能6S店”的官方数字引擎,为AI开发者与企业提供一个覆盖软硬件全栈、一站式门户。
更多推荐
 8
8 0
0- 0


 已为社区贡献30条内容

所有评论(0)