
鸿蒙项目实战 - 社区活动编排板:标签云布局算法与自动换行
·
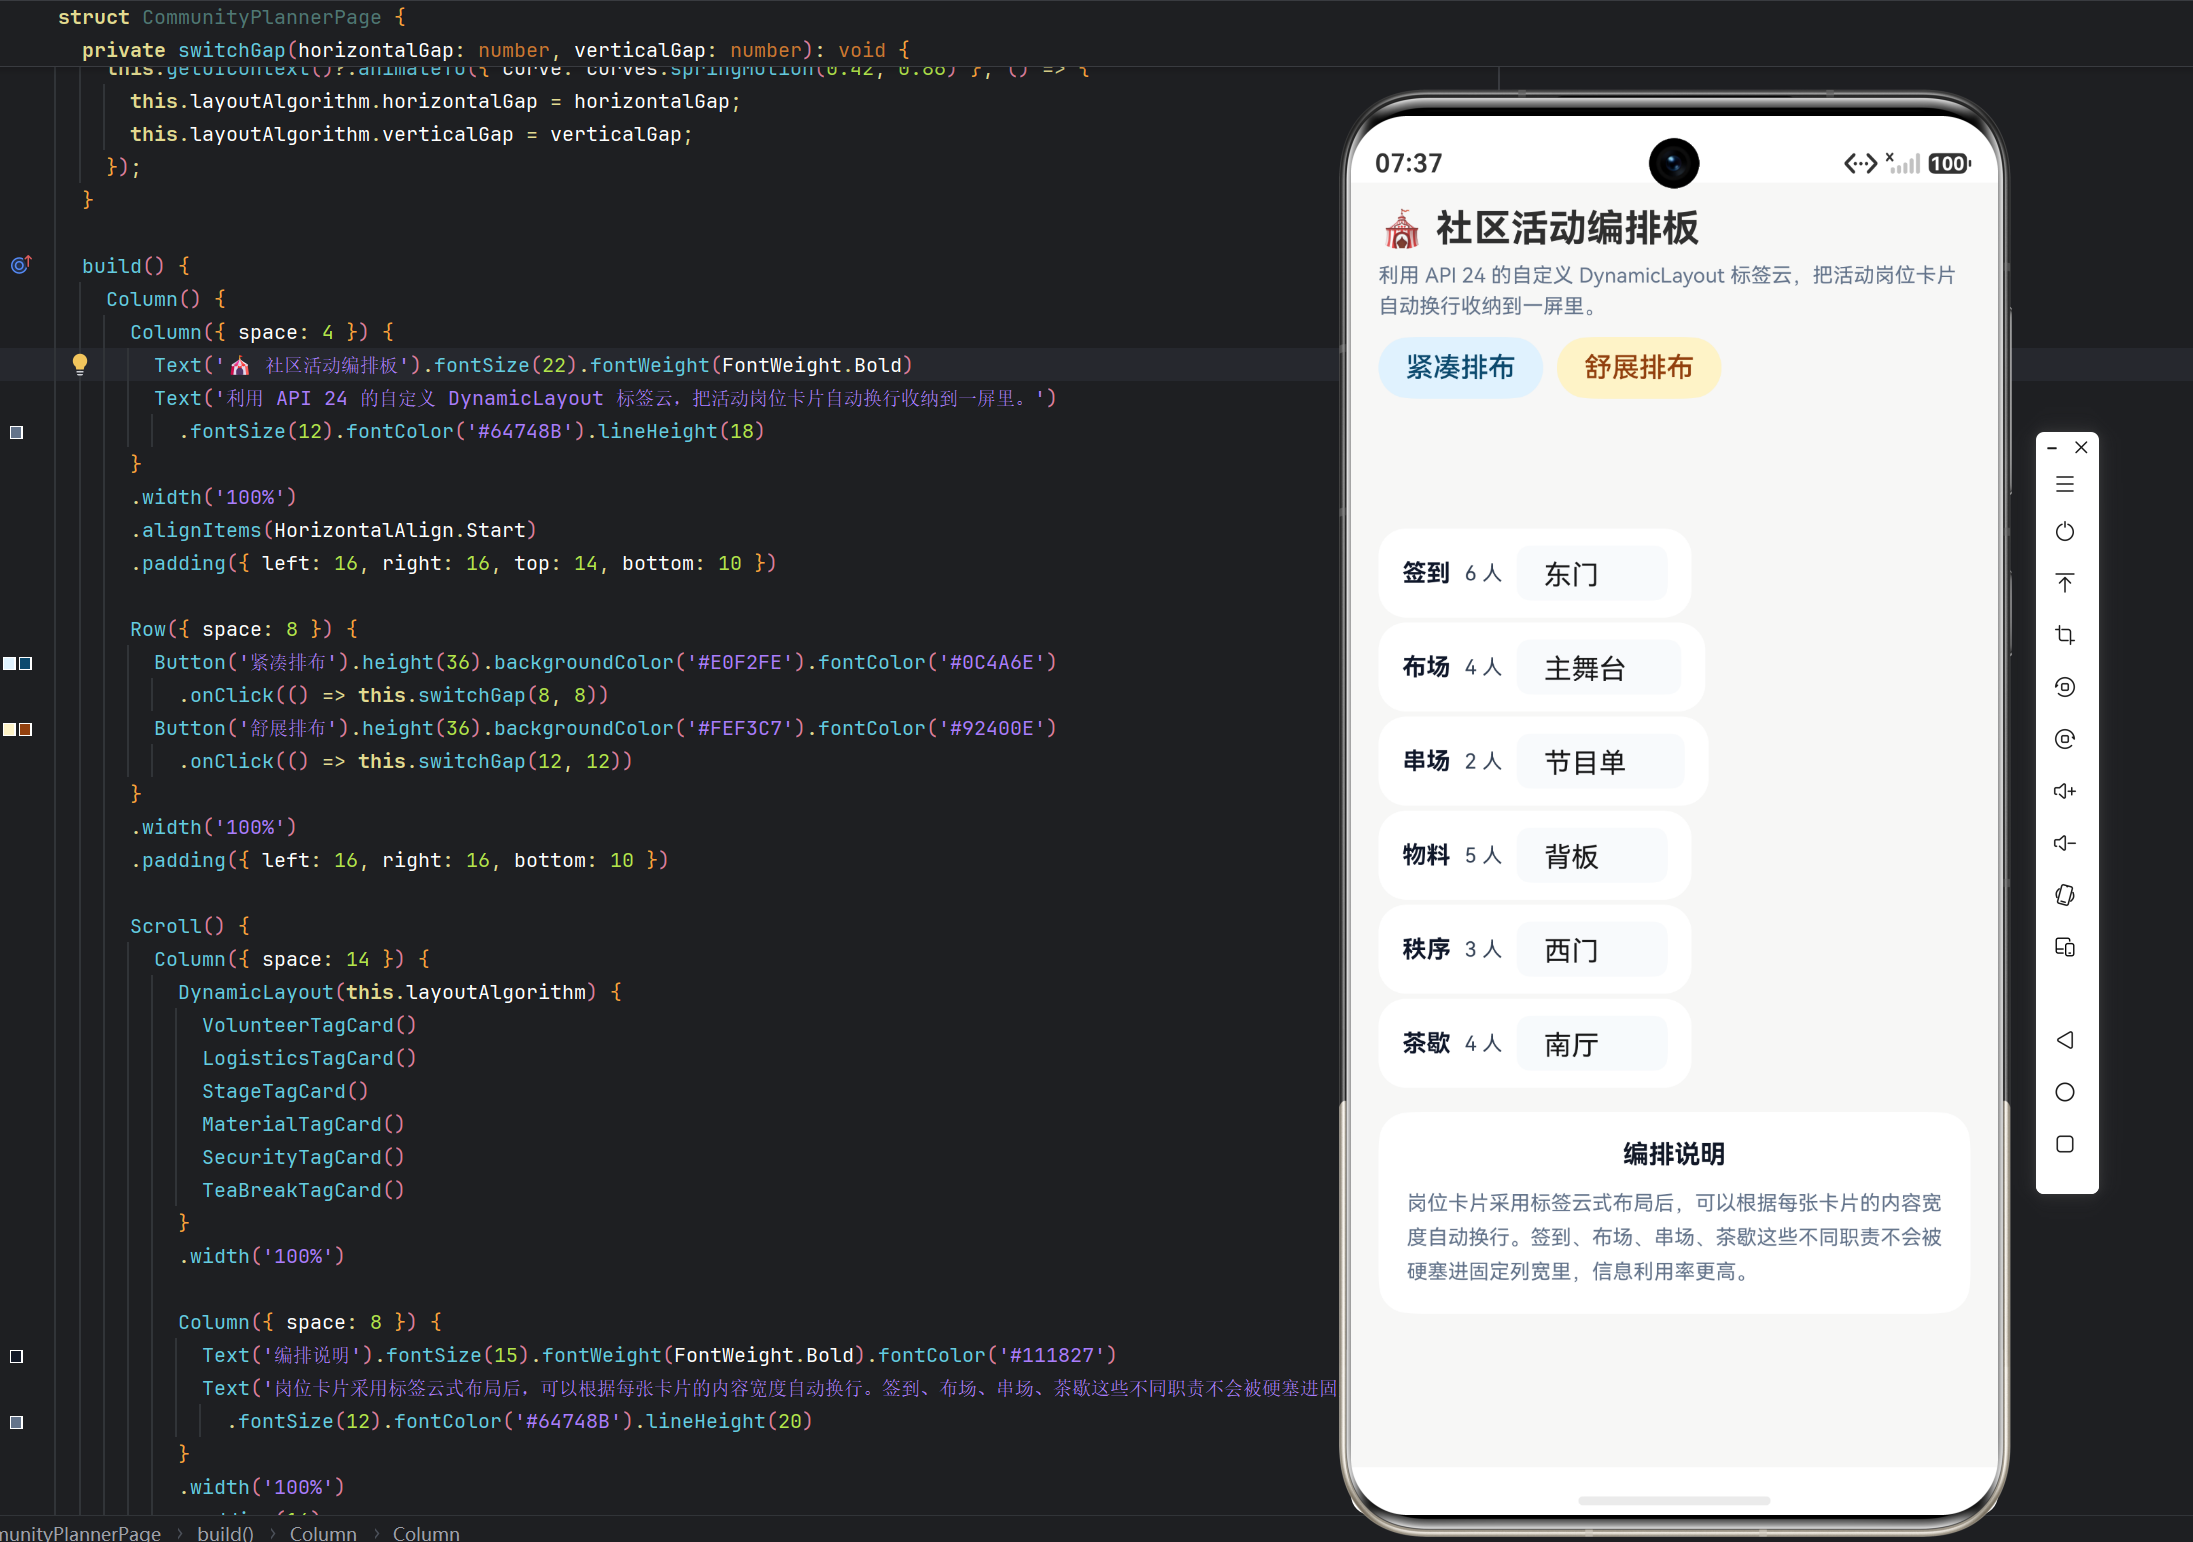
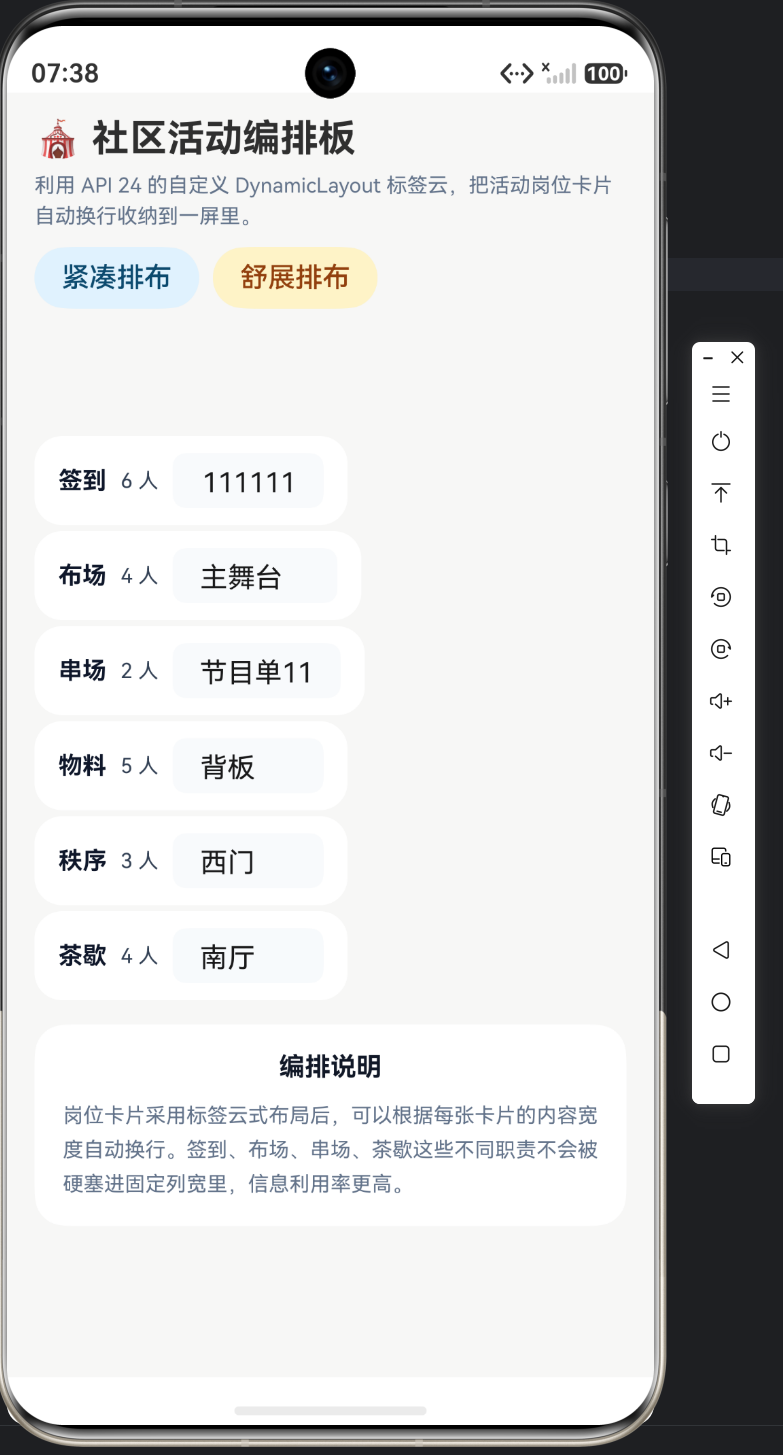
实例:社区活动编排板|技术:CustomLayoutAlgorithm、onMeasure、onLayout、自动换行、DynamicLayout
一、本篇范围
本篇只拆标签云算法和页面入口。真正的核心是“何时换行”和“换行后 y 坐标怎样累计”,因此 onMeasure 与 onLayout 两段必须直接给代码。
二、导入与布局依赖
import {
  CustomLayoutAlgorithm,
  DynamicLayout,
  DynamicLayoutAttribute,
  FrameNode,
  LayoutConstraint,
  Position,
  curves
} from '@kit.ArkUI';
这里依赖的仍然是 CustomLayoutAlgorithm 路线,只不过策略从“找最短列”换成了“超宽换行”。技术文要把这个依赖层写清楚,否则读者只会看到标签排布结果,不知道页面为什么能自动换行。
三、标签云算法:换行测量与坐标布局
@ObservedV2
class TagCloudLayout extends CustomLayoutAlgorithm {
  @Trace horizontalGap: number = 10;
  @Trace verticalGap: number = 10;

  onMeasure(self: FrameNode, constraint: LayoutConstraint): void {
    const maxWidth = constraint.maxSize.width;
    let currentLineWidth = 0;
    let currentLineHeight = 0;
    let totalHeight = 0;
    for (let index = 0; index < self.getChildrenCount(); index++) {
      const child = self.getChild(index);
      if (!child) {
        continue;
      }
      child.measure({
        maxSize: { width: maxWidth, height: constraint.maxSize.height },
        minSize: { width: 0, height: 0 },
        percentReference: constraint.percentReference
      });
      const size = child.getMeasuredSize();
      if (currentLineWidth > 0 && currentLineWidth + size.width > maxWidth) {
        totalHeight += currentLineHeight + this.verticalGap;
        currentLineWidth = 0;
        currentLineHeight = 0;
      }
      currentLineWidth += size.width + this.horizontalGap;
      currentLineHeight = Math.max(currentLineHeight, size.height);
    }
    if (self.getChildrenCount() > 0) {
      totalHeight += currentLineHeight;
    }
    self.setMeasuredSize({ width: maxWidth, height: totalHeight });
  }

  onLayout(self: FrameNode, _: Position): void {
    const maxWidth = self.getMeasuredSize().width;
    let x = 0;
    let y = 0;
    let lineHeight = 0;
    for (let index = 0; index < self.getChildrenCount(); index++) {
      const child = self.getChild(index);
      if (!child) {
        continue;
      }
      const size = child.getMeasuredSize();
      if (x > 0 && x + size.width > maxWidth) {
        x = 0;
        y += lineHeight + this.verticalGap;
        lineHeight = 0;
      }
      child.layout({ x: x, y: y });
      x += size.width + this.horizontalGap;
      lineHeight = Math.max(lineHeight, size.height);
    }
  }
}
onMeasure 负责累计当前行宽度,一旦超出最大宽度就把当前行高度记入 totalHeight;onLayout 负责在真正摆放时同步执行换行。只有这两个阶段遵循同一条换行规则,标签云才不会出现测量正常、布局错位的问题。
四、页面入口与间距切换
@Entry
@ComponentV2
struct CommunityPlannerPage {
  @Local layoutAlgorithm: TagCloudLayout = new TagCloudLayout();

  private switchGap(horizontalGap: number, verticalGap: number): void {
    this.getUIContext()?.animateTo({ curve: curves.springMotion(0.42, 0.86) }, () => {
      this.layoutAlgorithm.horizontalGap = horizontalGap;
      this.layoutAlgorithm.verticalGap = verticalGap;
    });
  }

  build() {
    Column() {
      Column({ space: 4 }) {
        Text('🎪 61 社区活动编排板').fontSize(22).fontWeight(FontWeight.Bold)
        Text('利用 API 24 的自定义 DynamicLayout 标签云,把活动岗位卡片自动换行收纳到一屏里。')
          .fontSize(12).fontColor('#64748B').lineHeight(18)
      }
      .width('100%')
      .alignItems(HorizontalAlign.Start)
      .padding({ left: 16, right: 16, top: 14, bottom: 10 })

      Row({ space: 8 }) {
        Button('紧凑排布').height(36).backgroundColor('#E0F2FE').fontColor('#0C4A6E')
          .onClick(() => this.switchGap(8, 8))
        Button('舒展排布').height(36).backgroundColor('#FEF3C7').fontColor('#92400E')
          .onClick(() => this.switchGap(12, 12))
      }
      .width('100%')
      .padding({ left: 16, right: 16, bottom: 10 })

      Scroll() {
        Column({ space: 14 }) {
          DynamicLayout(this.layoutAlgorithm) {
            VolunteerTagCard()
            LogisticsTagCard()
            StageTagCard()
            MaterialTagCard()
            SecurityTagCard()
            TeaBreakTagCard()
          }
          .width('100%')

          Column({ space: 8 }) {
            Text('编排说明').fontSize(15).fontWeight(FontWeight.Bold).fontColor('#111827')
            Text('岗位卡片采用标签云式布局后,可以根据每张卡片的内容宽度自动换行。签到、布场、串场、茶歇这些不同职责不会被硬塞进固定列宽里,信息利用率更高。')
              .fontSize(12).fontColor('#64748B').lineHeight(20)
          }
          .width('100%')
          .padding(16)
          .backgroundColor('#FFFFFF')
          .borderRadius(18)
        }
        .width('100%')
        .padding({ left: 16, right: 16, bottom: 24 })
      }
      .layoutWeight(1)
      .scrollBar(BarState.Off)
    }
    .width('100%')
    .height('100%')
    .backgroundColor('#F7F7F6')
  }
}
页面入口只持有一个 TagCloudLayout 实例,并通过按钮改 horizontalGap 和 verticalGap。也就是说,这页的模式切换不是“紧凑版组件”和“舒展版组件”两套代码,而是同一套标签卡配不同的布局参数。
五、代表性标签卡:签到
@ComponentV2
struct VolunteerTagCard {
  @Local label: string = '签到';
  @Local count: number = 6;
  @Local note: string = '东门';

  build() {
    Row({ space: 8 }) {
      Text(this.label).fontSize(14).fontWeight(FontWeight.Bold).fontColor('#0F172A')
      Text(`${Math.round(this.count)} 人`).fontSize(12).fontColor('#334155')
      TextInput({ text: this.note, placeholder: '区域' })
        .width(88)
        .height(32)
        .backgroundColor('#F8FAFC')
        .borderRadius(8)
        .onChange((value: string) => this.note = value)
    }
    .padding({ left: 14, right: 14, top: 10, bottom: 10 })
    .backgroundColor('#FFFFFF')
    .borderRadius(16)
  }
}
这张卡保留了 TextInput,目的不是为了表单复杂度,而是为了让卡片宽度和内容长度都保持真实。标签云示例如果没有真实输入,就无法体现自动换行的实际价值。
六、布局层代码定位表
| 代码块 | 关注点 | 改动入口 |
|---|---|---|
| 导入与布局依赖 | 标签云依赖类型 | 调整布局能力先看 import |
| 标签云算法:换行测量与坐标布局 | 自动换行算法主体 | 调换行逻辑和 gap 看这里 |
| 页面入口与间距切换 | 页面如何调布局参数 | 加更多排布模式时改这里 |
| 代表性标签卡:签到 | 可变宽度的标签卡示例 | 要扩区域或人数字段从这张卡入手 |
七、本篇小结
社区活动编排板第一篇的核心是换行算法,不是岗位名称。只要 onMeasure 和 onLayout 讲清楚,这一页的技术价值就立住了。

作为“人工智能6S店”的官方数字引擎,为AI开发者与企业提供一个覆盖软硬件全栈、一站式门户。
更多推荐
 0
0 0
0- 0


 已为社区贡献30条内容

所有评论(0)