
HarmonyOS 用户数据保护实战:从应用沙箱到 HUKS 安全存储的全链路防护方案
文章目录

每日一句正能量
我不能做你,但是我一定支持你做自己!
我承认我是我,你是你,我们不同;我不仅允许你做自己,我还站在你身后,鼓励你成为你自己。这是爱一个人最高级的形式。
摘要
摘要:在移动互联网时代,用户隐私数据泄露事件频发,应用层的数据保护已成为开发者必须直面的核心课题。本文承接《鸿蒙应用锁实现》篇,深入 HarmonyOS 生态,系统讲解从应用沙箱隔离、HUKS 通用密钥库、AES-256-GCM 加密存储,到生物识别认证增强、跨设备安全同步的完整用户数据保护方案。通过大量 ArkTS/TS 实战代码与架构图解,帮助开发者构建企业级的数据安全防护体系。
一、HarmonyOS 用户数据安全架构概览
HarmonyOS 采用"纵深防御"的安全设计理念,从硬件层到应用层构建了五层安全防护体系:
- 硬件层:安全芯片、可信执行环境(TEE)、安全启动(Secure Boot)
- 内核层:OpenHarmony 内核的 FSCrypt 文件系统加密、进程沙箱隔离、SELinux 强制访问控制
- 框架服务层:HUKS 通用密钥库(HarmonyOS Universal Keystore)、安全存储 DataProtection、权限管理 AccessToken、设备认证 DeviceAuth
- 应用层:应用沙箱隔离、权限管控、数据访问控制
- 用户层:生物识别认证(人脸/指纹/密码)
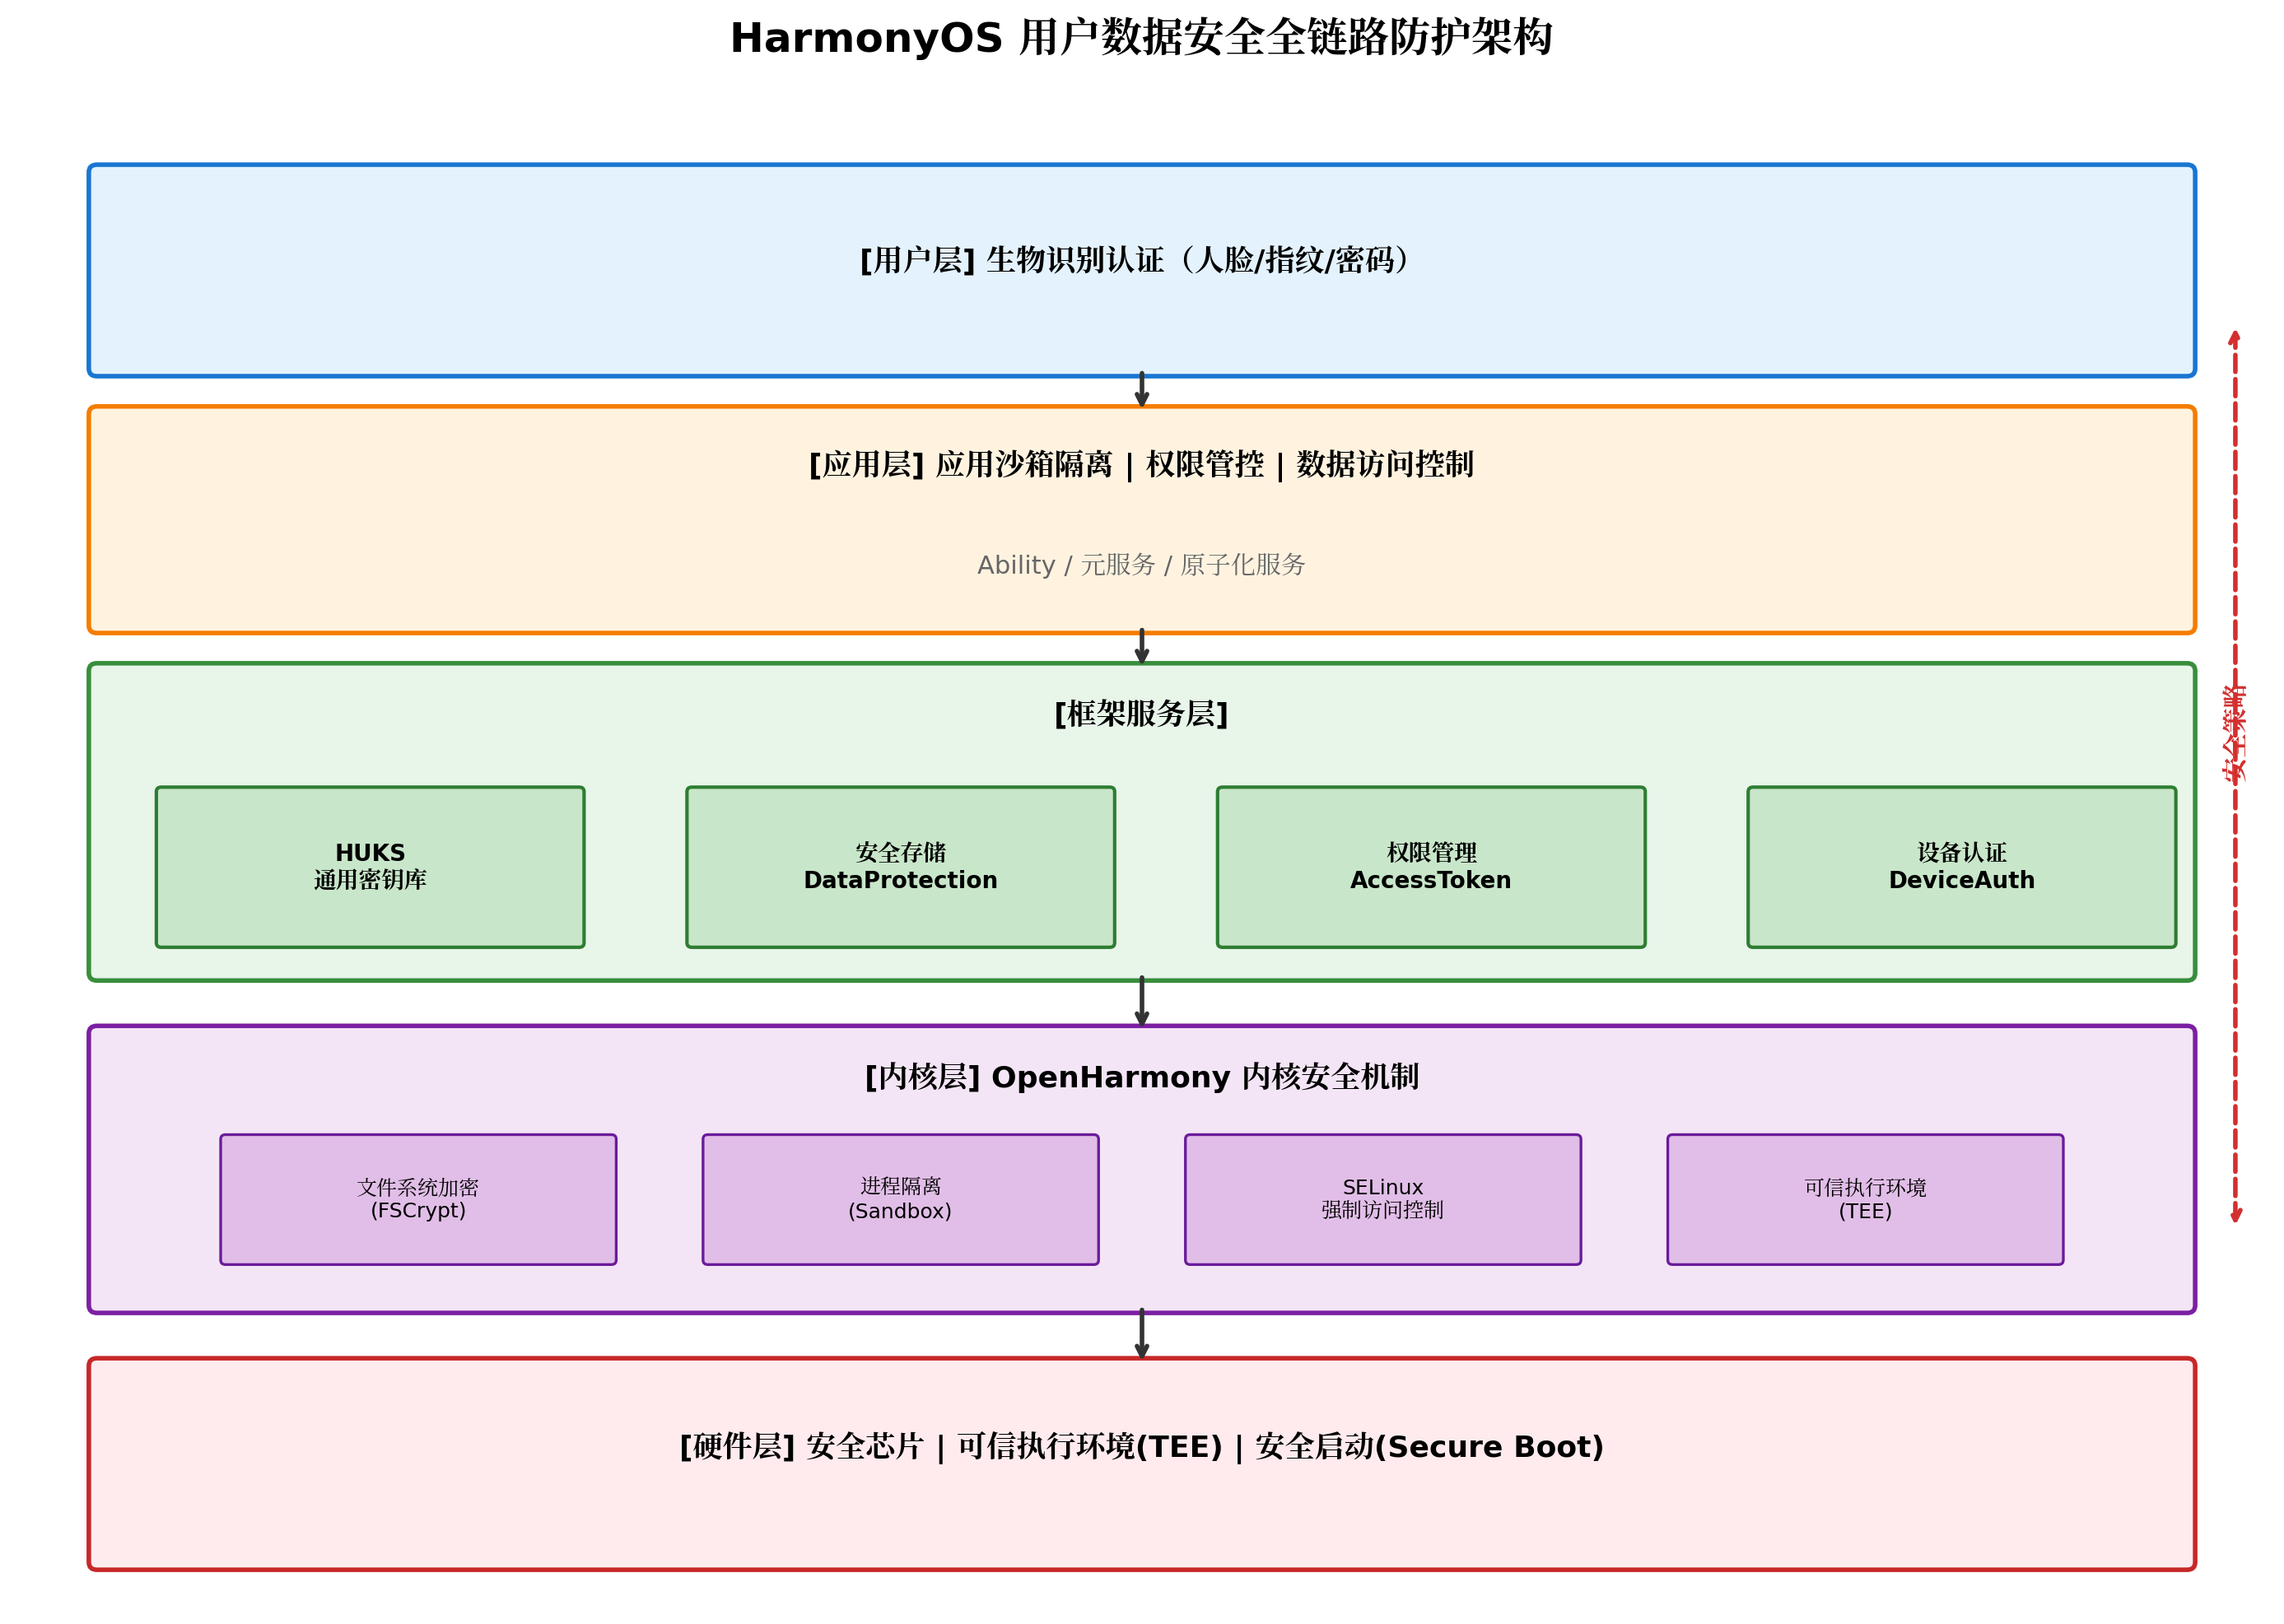
上图展示了 HarmonyOS 用户数据安全的全链路防护架构。应用层的数据保护并非孤立存在,而是依托底层硬件 TEE、内核沙箱以及框架层的 HUKS 服务,形成"硬件可信根 → 内核隔离 → 框架加密 → 应用管控 → 用户认证"的完整信任链。
二、应用沙箱与文件权限隔离
2.1 应用沙箱机制
HarmonyOS 每个应用运行在独立的沙箱环境中,应用只能访问自身的私有目录,无法直接读取其他应用的数据。应用私有目录结构如下:
/data/app/el1/<bundleName>/
├── base/           # 应用基础目录
│   ├── files/      # 应用文件存储
│   ├── database/   # 数据库文件
│   ├── cache/      # 缓存目录
│   └── preferences/# 轻量级偏好设置
└── distributed/    # 分布式数据目录
2.2 文件访问权限控制
HarmonyOS 采用"最小权限原则",应用在 module.json5 中声明所需权限,用户授权后方可访问敏感资源:
{
  "module": {
    "requestPermissions": [
      {
        "name": "ohos.permission.READ_MEDIA",
        "reason": "$string:permission_read_media_reason",
        "usedScene": {
          "abilities": ["EntryAbility"],
          "when": "inUse"
        }
      },
      {
        "name": "ohos.permission.WRITE_MEDIA",
        "reason": "$string:permission_write_media_reason"
      }
    ]
  }
}
2.3 数据分级保护
根据数据敏感程度,建议将用户数据划分为四个等级:
| 等级 | 数据类型 | 保护策略 |
|---|---|---|
| P1(公开) | 应用配置、缓存数据 | 沙箱隔离即可 |
| P2(内部) | 用户偏好设置、浏览记录 | 沙箱 + 文件权限控制 |
| P3(敏感) | 用户账号、个人资料 | 沙箱 + AES 加密存储 |
| P4(机密) | 支付密码、身份凭证 | 沙箱 + HUKS + 生物识别认证 |
三、基于 HUKS 的密钥安全管理
3.1 HUKS 架构原理
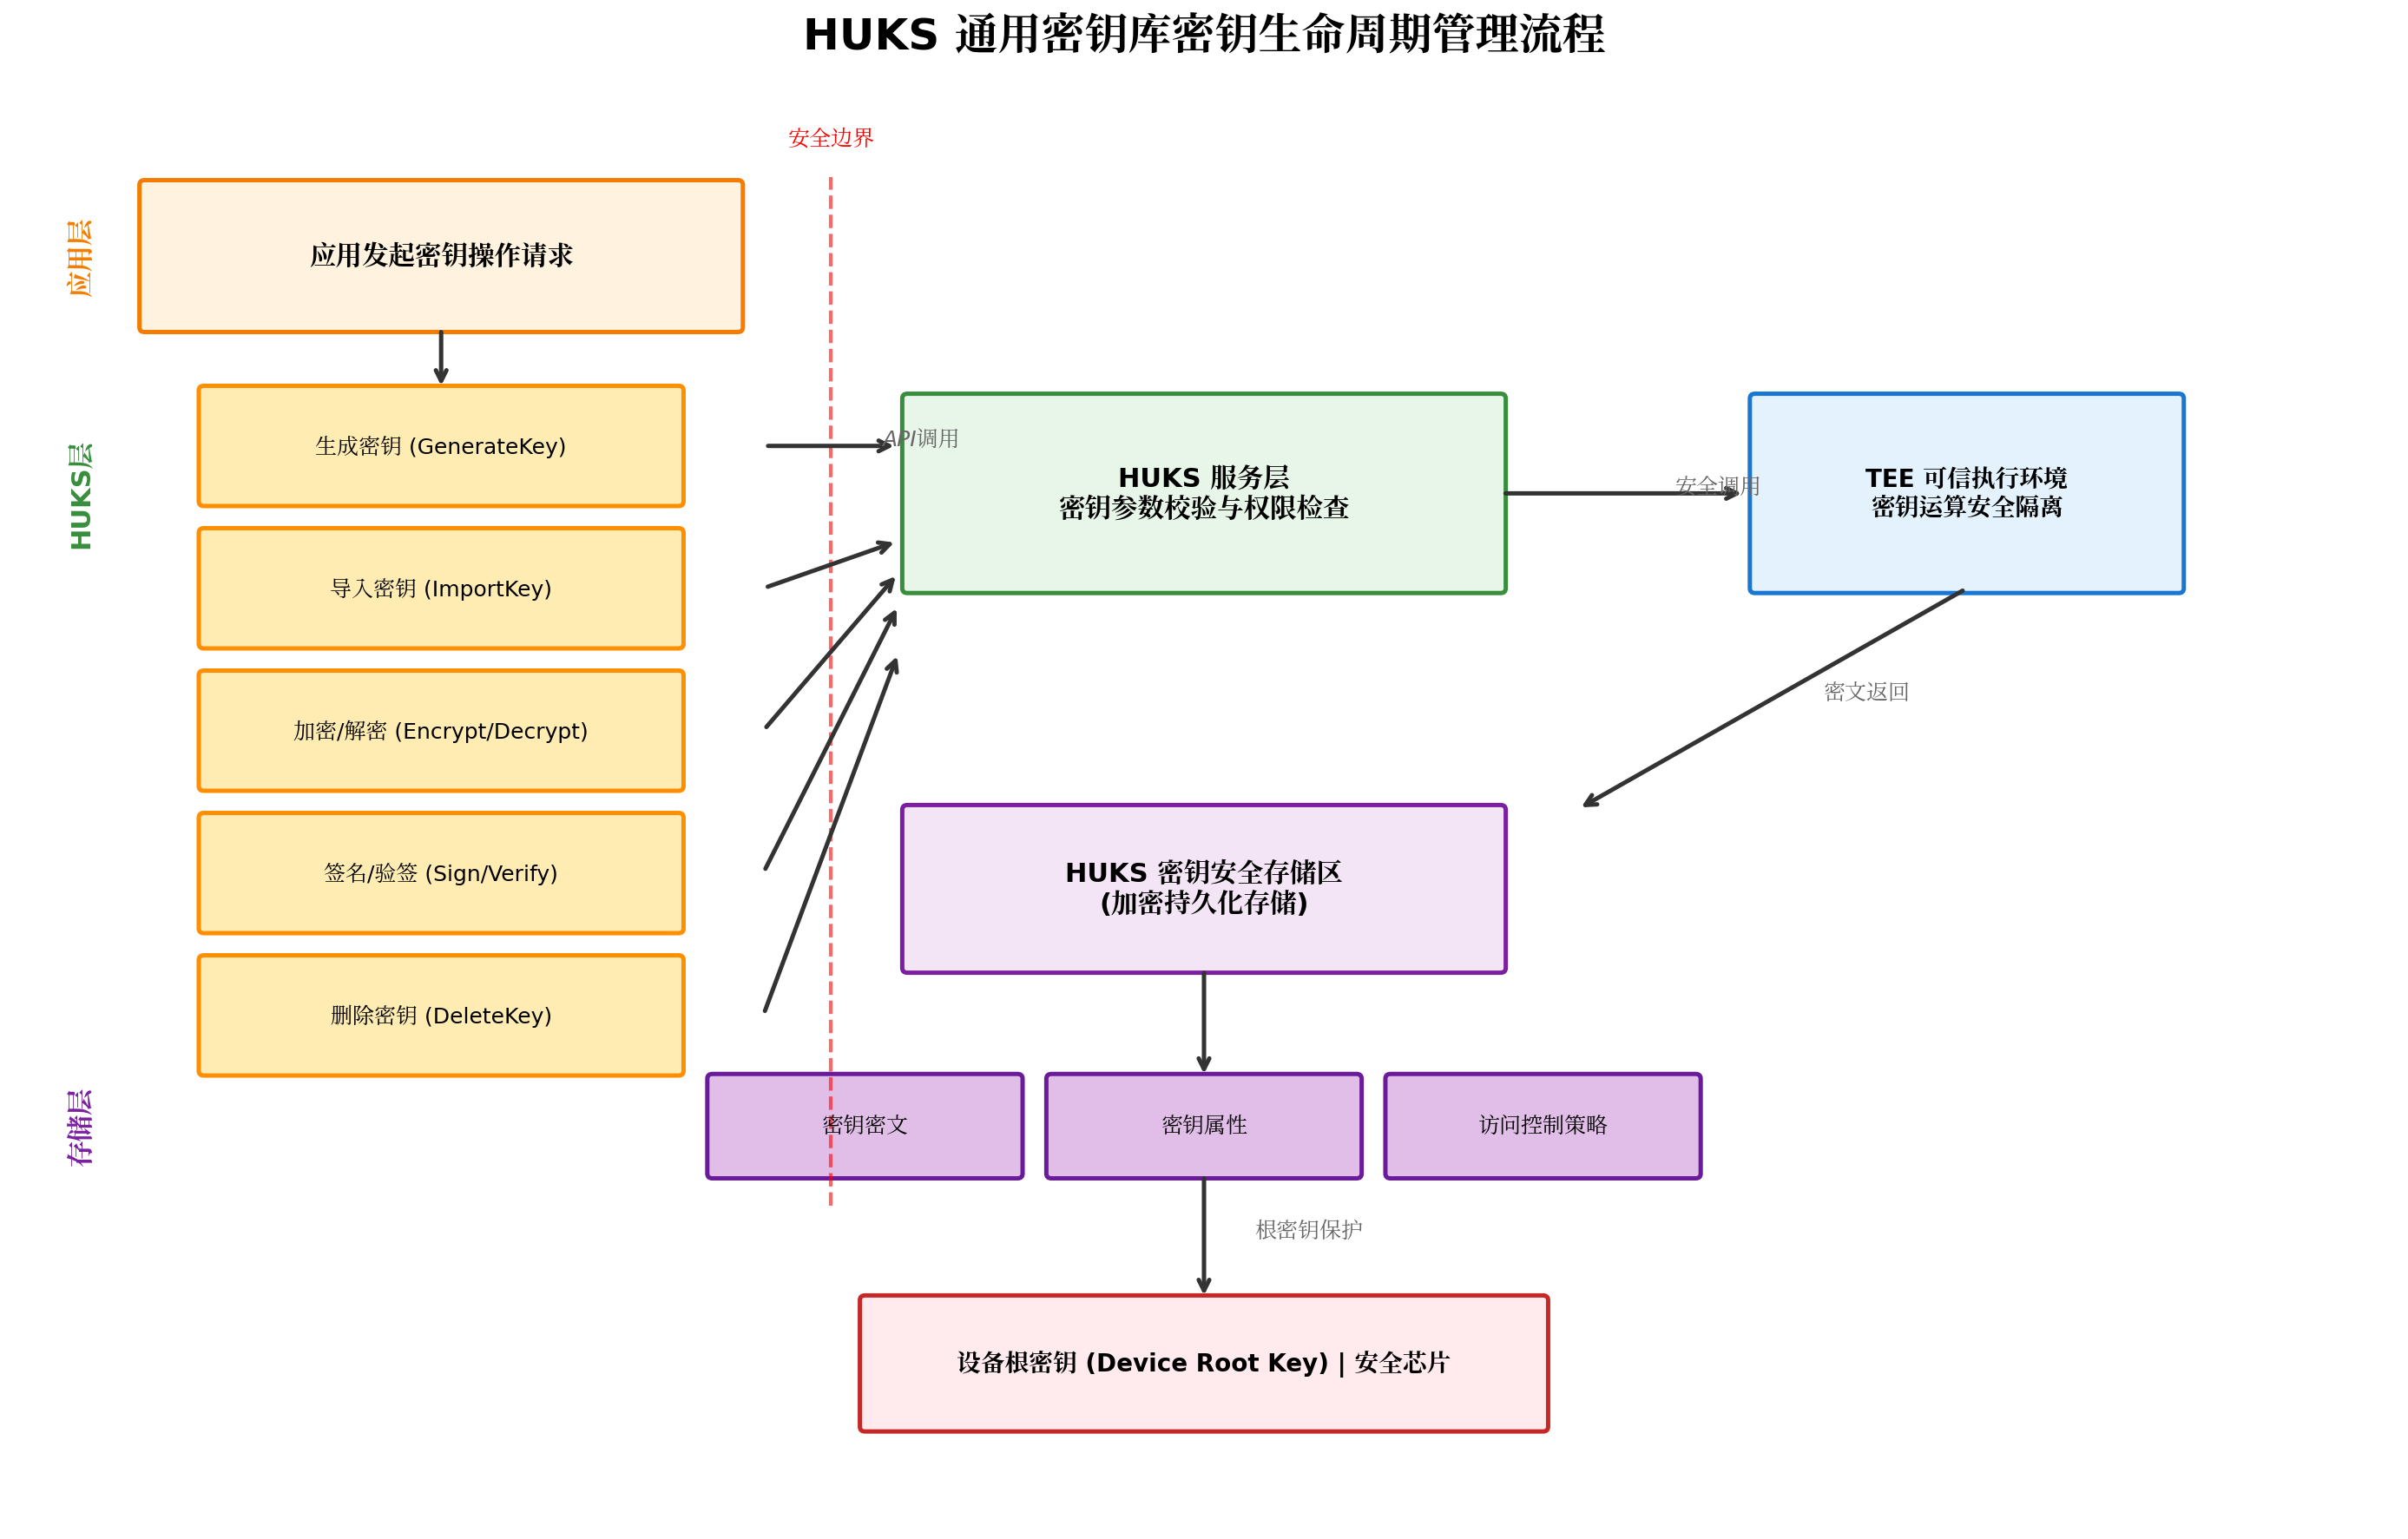
HUKS(HarmonyOS Universal Keystore)是 HarmonyOS 提供的通用密钥管理服务,核心特性包括:
- 密钥不出安全区:密钥的生成、存储、运算均在 TEE(可信执行环境)中完成,应用层无法直接获取明文密钥
- 硬件级保护:密钥由设备根密钥(Device Root Key)保护,即使设备被 Root 也无法提取
- 丰富的算法支持:AES、RSA、ECC、HMAC、SM2/SM3/SM4 等国密算法
- 访问控制策略:支持基于生物识别、设备锁、时间窗口的密钥使用策略
3.2 HUKS 密钥生成实战
以下代码演示如何使用 HUKS 生成 AES-256 密钥,并配置访问控制策略:
import { huks } from '@kit.UniversalKeystoreKit';

class HuksKeyManager {
  private static readonly KEY_ALIAS = 'user_data_master_key';
  private static readonly KEY_SIZE = 256;

  /**
   * 生成 AES-256 密钥,绑定生物识别认证
   */
  async generateAesKey(): Promise<void> {
    const properties: Array<huks.HuksParam> = [
      // 指定算法为 AES
      {
        tag: huks.HuksTag.HUKS_TAG_ALGORITHM,
        value: huks.HuksKeyAlg.HUKS_ALG_AES
      },
      // 密钥用途:加密 + 解密
      {
        tag: huks.HuksTag.HUKS_TAG_PURPOSE,
        value: huks.HuksKeyPurpose.HUKS_KEY_PURPOSE_ENCRYPT |
               huks.HuksKeyPurpose.HUKS_KEY_PURPOSE_DECRYPT
      },
      // 密钥长度 256 位
      {
        tag: huks.HuksTag.HUKS_TAG_KEY_SIZE,
        value: huks.HuksKeySize.HUKS_AES_KEY_SIZE_256
      },
      // 分组模式 GCM
      {
        tag: huks.HuksTag.HUKS_TAG_BLOCK_MODE,
        value: huks.HuksCipherMode.HUKS_MODE_GCM
      },
      // 填充模式 NONE(GCM 不需要填充)
      {
        tag: huks.HuksTag.HUKS_TAG_PADDING,
        value: huks.HuksKeyPadding.HUKS_PADDING_NONE
      },
      // 密钥存储级别:TEE 安全存储
      {
        tag: huks.HuksTag.HUKS_TAG_STORAGE_LEVEL,
        value: huks.HuksAuthStorageLevel.HUKS_AUTH_STORAGE_LEVEL_CE
      },
      // 访问控制:需要生物识别认证(指纹/人脸)
      {
        tag: huks.HuksTag.HUKS_TAG_USER_AUTH_TYPE,
        value: huks.HuksUserAuthType.HUKS_USER_AUTH_TYPE_BIO |
               huks.HuksUserAuthType.HUKS_USER_AUTH_TYPE_PIN
      },
      // 认证有效期:300 秒
      {
        tag: huks.HuksTag.HUKS_TAG_AUTH_TIMEOUT,
        value: 300
      },
      // 设备锁绑定:屏幕解锁后才能使用密钥
      {
        tag: huks.HuksTag.HUKS_TAG_DEVICE_LOCKED,
        value: huks.HuksDeviceLocked.HUKS_DEVICE_LOCKED_TRUE
      }
    ];

    const options: huks.HuksOptions = {
      properties: properties
    };

    try {
      await huks.generateKeyItem(HuksKeyManager.KEY_ALIAS, options);
      console.info('HUKS 密钥生成成功,已绑定生物识别认证');
    } catch (error) {
      console.error('HUKS 密钥生成失败:', error);
      throw error;
    }
  }

  /**
   * 检查密钥是否存在
   */
  async hasKey(): Promise<boolean> {
    try {
      const keyInfo = await huks.getKeyItemProperties(HuksKeyManager.KEY_ALIAS, {});
      return !!keyInfo;
    } catch {
      return false;
    }
  }

  /**
   * 删除密钥
   */
  async deleteKey(): Promise<void> {
    try {
      await huks.deleteKeyItem(HuksKeyManager.KEY_ALIAS, {});
      console.info('HUKS 密钥已安全删除');
    } catch (error) {
      console.error('HUKS 密钥删除失败:', error);
    }
  }
}

export default new HuksKeyManager();
3.3 密钥访问控制策略详解
HUKS 支持多种访问控制策略的组合使用:
| 控制策略 | 说明 | 适用场景 |
|---|---|---|
HUKS_TAG_USER_AUTH_TYPE |
指定认证类型(指纹/人脸/PIN) | 高敏感数据访问 |
HUKS_TAG_AUTH_TIMEOUT |
认证有效期(秒) | 平衡安全与体验 |
HUKS_TAG_DEVICE_LOCKED |
设备锁状态绑定 | 防止设备丢失后数据泄露 |
HUKS_TAG_STORAGE_LEVEL |
存储安全级别(CE/DE/ECE) | 不同启动阶段的密钥可用性 |
四、敏感数据加密存储实战
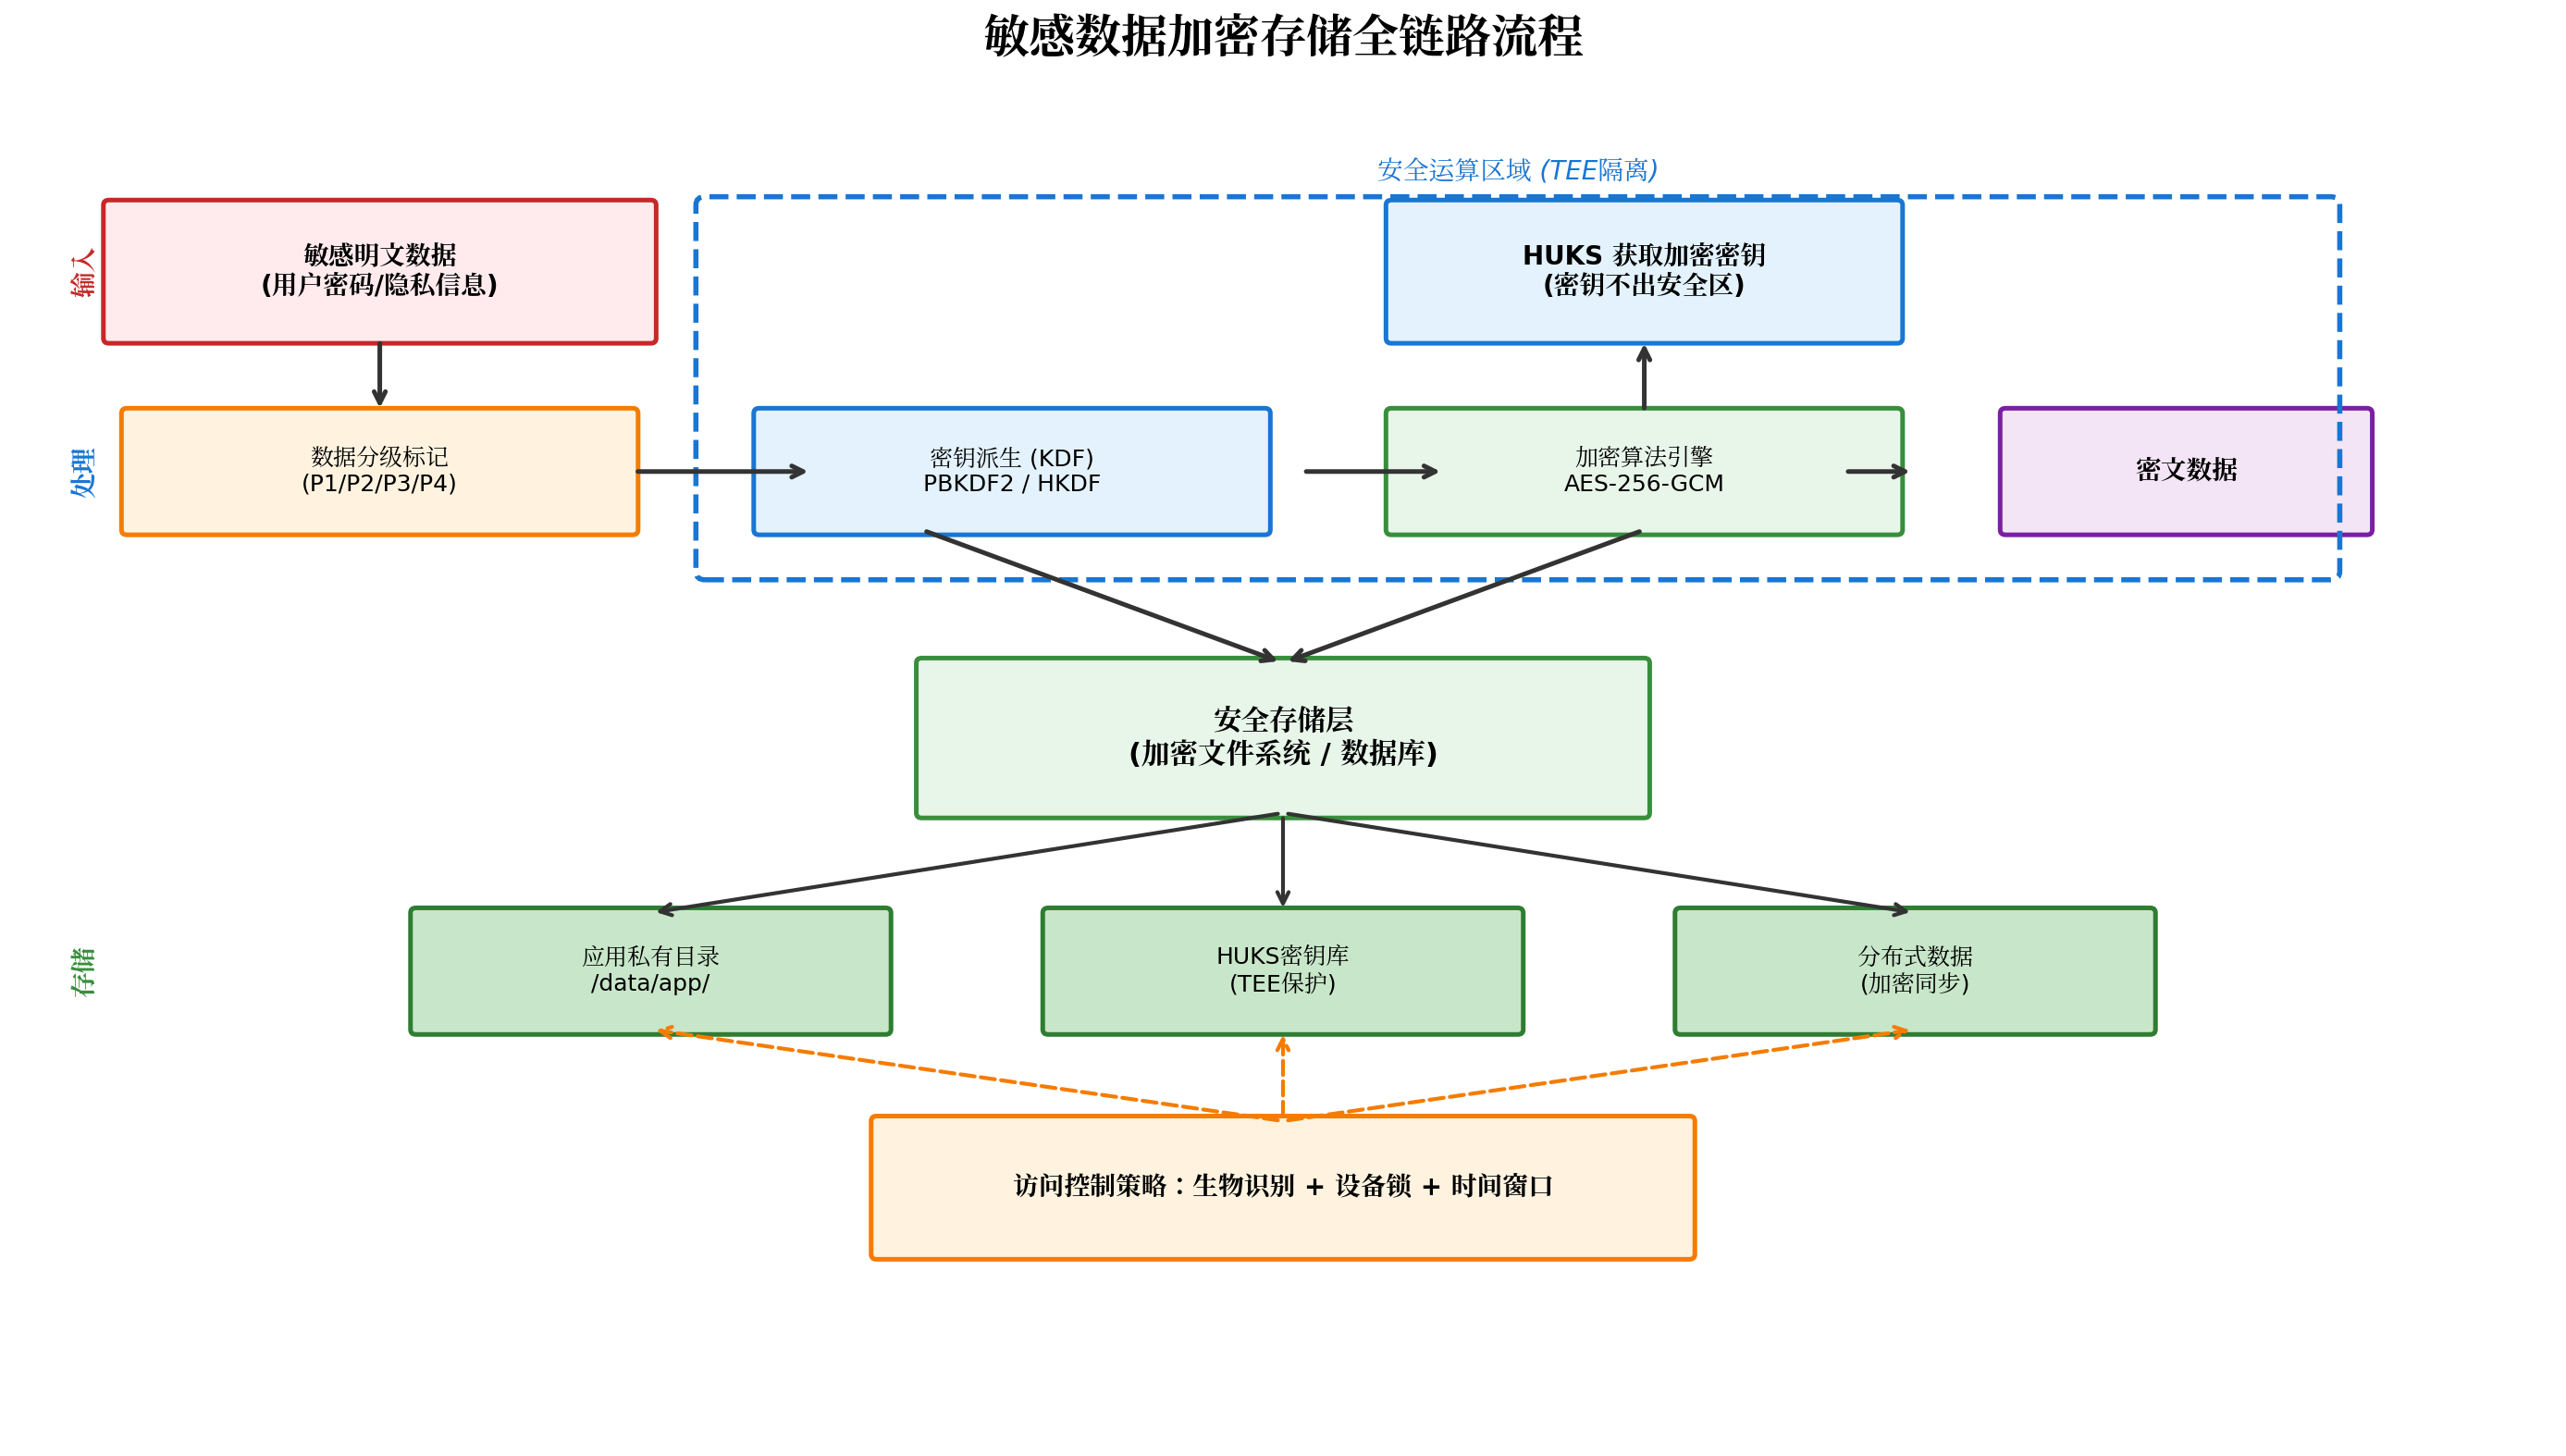
4.1 加密存储架构设计
敏感数据加密存储遵循"数据分级 → 密钥派生 → 安全加密 → 密文存储 → 访问控制"的全链路流程:
4.2 基于 HUKS 的 AES-GCM 加密实现
以下代码实现了完整的敏感数据加密存储方案,包含数据分级、加密、存储、解密全流程:
import { huks } from '@kit.UniversalKeystoreKit';
import { util } from '@kit.ArkTS';

/**
 * 数据安全等级枚举
 */
enum DataSecurityLevel {
  PUBLIC = 1,      // P1: 公开数据
  INTERNAL = 2,    // P2: 内部数据
  SENSITIVE = 3,   // P3: 敏感数据
  CONFIDENTIAL = 4 // P4: 机密数据
}

/**
 * 加密数据封装结构
 */
interface EncryptedData {
  cipherText: string;    // Base64 编码的密文
  iv: string;            // Base64 编码的初始化向量
  authTag: string;       // Base64 编码的 GCM 认证标签
  securityLevel: number; // 数据安全等级
  timestamp: number;     // 加密时间戳
}

class SecureDataManager {
  private static readonly KEY_ALIAS = 'user_data_master_key';
  private static readonly AES_GCM_NONCE_SIZE = 12; // 96 位 IV
  private static readonly AES_GCM_TAG_SIZE = 16;   // 128 位认证标签

  /**
   * 加密敏感数据
   * @param plainText 明文数据
   * @param level 数据安全等级
   */
  async encrypt(plainText: string, level: DataSecurityLevel = DataSecurityLevel.SENSITIVE): Promise<EncryptedData> {
    if (!plainText) {
      throw new Error('明文数据不能为空');
    }

    // P1/P2 级别数据不加密,直接返回(实际项目中可调整策略)
    if (level <= DataSecurityLevel.INTERNAL) {
      return {
        cipherText: plainText,
        iv: '',
        authTag: '',
        securityLevel: level,
        timestamp: Date.now()
      };
    }

    // 生成随机 IV
    const iv = this.generateRandomBytes(SecureDataManager.AES_GCM_NONCE_SIZE);

    // 构造加密参数
    const properties: Array<huks.HuksParam> = [
      {
        tag: huks.HuksTag.HUKS_TAG_ALGORITHM,
        value: huks.HuksKeyAlg.HUKS_ALG_AES
      },
      {
        tag: huks.HuksTag.HUKS_TAG_PURPOSE,
        value: huks.HuksKeyPurpose.HUKS_KEY_PURPOSE_ENCRYPT
      },
      {
        tag: huks.HuksTag.HUKS_TAG_KEY_SIZE,
        value: huks.HuksKeySize.HUKS_AES_KEY_SIZE_256
      },
      {
        tag: huks.HuksTag.HUKS_TAG_BLOCK_MODE,
        value: huks.HuksCipherMode.HUKS_MODE_GCM
      },
      {
        tag: huks.HuksTag.HUKS_TAG_PADDING,
        value: huks.HuksKeyPadding.HUKS_PADDING_NONE
      },
      {
        tag: huks.HuksTag.HUKS_TAG_NONCE,
        value: iv
      },
      {
        tag: huks.HuksTag.HUKS_TAG_ASSOCIATED_DATA,
        value: this.stringToUint8Array(`security_level_${level}`)
      }
    ];

    const options: huks.HuksOptions = {
      properties: properties,
      inData: this.stringToUint8Array(plainText)
    };

    try {
      const result = await huks.initSession(SecureDataManager.KEY_ALIAS, options);
      const finishResult = await huks.finishSession(result.handle, options);

      // GCM 模式下,认证标签附加在密文末尾
      const cipherData = finishResult.outData as Uint8Array;
      const cipherTextLen = cipherData.length - SecureDataManager.AES_GCM_TAG_SIZE;

      const cipherText = cipherData.slice(0, cipherTextLen);
      const authTag = cipherData.slice(cipherTextLen);

      return {
        cipherText: this.arrayBufferToBase64(cipherText.buffer),
        iv: this.arrayBufferToBase64(iv.buffer),
        authTag: this.arrayBufferToBase64(authTag.buffer),
        securityLevel: level,
        timestamp: Date.now()
      };
    } catch (error) {
      console.error('数据加密失败:', error);
      throw new Error(`加密失败: ${error.message}`);
    }
  }

  /**
   * 解密敏感数据
   * @param encryptedData 加密数据对象
   */
  async decrypt(encryptedData: EncryptedData): Promise<string> {
    // P1/P2 级别数据直接返回
    if (encryptedData.securityLevel <= DataSecurityLevel.INTERNAL) {
      return encryptedData.cipherText;
    }

    const cipherText = this.base64ToUint8Array(encryptedData.cipherText);
    const iv = this.base64ToUint8Array(encryptedData.iv);
    const authTag = this.base64ToUint8Array(encryptedData.authTag);

    // 拼接密文 + 认证标签(HUKS GCM 模式要求)
    const combinedData = new Uint8Array(cipherText.length + authTag.length);
    combinedData.set(cipherText, 0);
    combinedData.set(authTag, cipherText.length);

    const properties: Array<huks.HuksParam> = [
      {
        tag: huks.HuksTag.HUKS_TAG_ALGORITHM,
        value: huks.HuksKeyAlg.HUKS_ALG_AES
      },
      {
        tag: huks.HuksTag.HUKS_TAG_PURPOSE,
        value: huks.HuksKeyPurpose.HUKS_KEY_PURPOSE_DECRYPT
      },
      {
        tag: huks.HuksTag.HUKS_TAG_KEY_SIZE,
        value: huks.HuksKeySize.HUKS_AES_KEY_SIZE_256
      },
      {
        tag: huks.HuksTag.HUKS_TAG_BLOCK_MODE,
        value: huks.HuksCipherMode.HUKS_MODE_GCM
      },
      {
        tag: huks.HuksTag.HUKS_TAG_PADDING,
        value: huks.HuksKeyPadding.HUKS_PADDING_NONE
      },
      {
        tag: huks.HuksTag.HUKS_TAG_NONCE,
        value: iv
      },
      {
        tag: huks.HuksTag.HUKS_TAG_ASSOCIATED_DATA,
        value: this.stringToUint8Array(`security_level_${encryptedData.securityLevel}`)
      }
    ];

    const options: huks.HuksOptions = {
      properties: properties,
      inData: combinedData
    };

    try {
      const result = await huks.initSession(SecureDataManager.KEY_ALIAS, options);
      const finishResult = await huks.finishSession(result.handle, options);

      return this.uint8ArrayToString(finishResult.outData as Uint8Array);
    } catch (error) {
      console.error('数据解密失败:', error);
      throw new Error(`解密失败: ${error.message}`);
    }
  }

  /**
   * 生成随机字节数组
   */
  private generateRandomBytes(length: number): Uint8Array {
    const random = new util.Random();
    const bytes = new Uint8Array(length);
    for (let i = 0; i < length; i++) {
      bytes[i] = random.nextInt(0, 256);
    }
    return bytes;
  }

  /**
   * 字符串转 Uint8Array
   */
  private stringToUint8Array(str: string): Uint8Array {
    const encoder = new util.TextEncoder();
    return encoder.encodeInto(str);
  }

  /**
   * Uint8Array 转字符串
   */
  private uint8ArrayToString(data: Uint8Array): string {
    const decoder = new util.TextDecoder('utf-8');
    return decoder.decodeWithStream(data);
  }

  /**
   * ArrayBuffer 转 Base64
   */
  private arrayBufferToBase64(buffer: ArrayBuffer): string {
    const bytes = new Uint8Array(buffer);
    let binary = '';
    for (let i = 0; i < bytes.byteLength; i++) {
      binary += String.fromCharCode(bytes[i]);
    }
    return util.encodeURIComponent(binary);
  }

  /**
   * Base64 转 Uint8Array
   */
  private base64ToUint8Array(base64: string): Uint8Array {
    const binary = util.decodeURIComponent(base64);
    const bytes = new Uint8Array(binary.length);
    for (let i = 0; i < binary.length; i++) {
      bytes[i] = binary.charCodeAt(i);
    }
    return bytes;
  }
}

export { SecureDataManager, DataSecurityLevel, type EncryptedData };
4.3 安全存储封装(Preferences + 加密)
将加密能力封装到 Preferences 存储中,实现透明化的安全存储:
import { preferences } from '@kit.ArkData';
import { SecureDataManager, DataSecurityLevel, type EncryptedData } from './SecureDataManager';

class SecurePreferences {
  private pref: preferences.Preferences;
  private secureManager: SecureDataManager;

  constructor(context: Context, name: string) {
    this.pref = preferences.getPreferencesSync(context, { name });
    this.secureManager = new SecureDataManager();
  }

  /**
   * 安全存储字符串(自动加密)
   */
  async putSecureString(key: string, value: string, level: DataSecurityLevel = DataSecurityLevel.SENSITIVE): Promise<void> {
    const encrypted = await this.secureManager.encrypt(value, level);
    this.pref.putSync(key, JSON.stringify(encrypted));
    await this.pref.flush();
  }

  /**
   * 安全读取字符串(自动解密)
   */
  async getSecureString(key: string, defaultValue: string = ''): Promise<string> {
    try {
      const jsonStr = this.pref.getSync(key, '') as string;
      if (!jsonStr) return defaultValue;

      const encrypted: EncryptedData = JSON.parse(jsonStr);
      return await this.secureManager.decrypt(encrypted);
    } catch (error) {
      console.error(`读取安全数据失败 [${key}]:`, error);
      return defaultValue;
    }
  }

  /**
   * 删除安全数据
   */
  async deleteSecure(key: string): Promise<void> {
    this.pref.deleteSync(key);
    await this.pref.flush();
  }
}

export default SecurePreferences;
五、生物识别认证增强数据访问安全
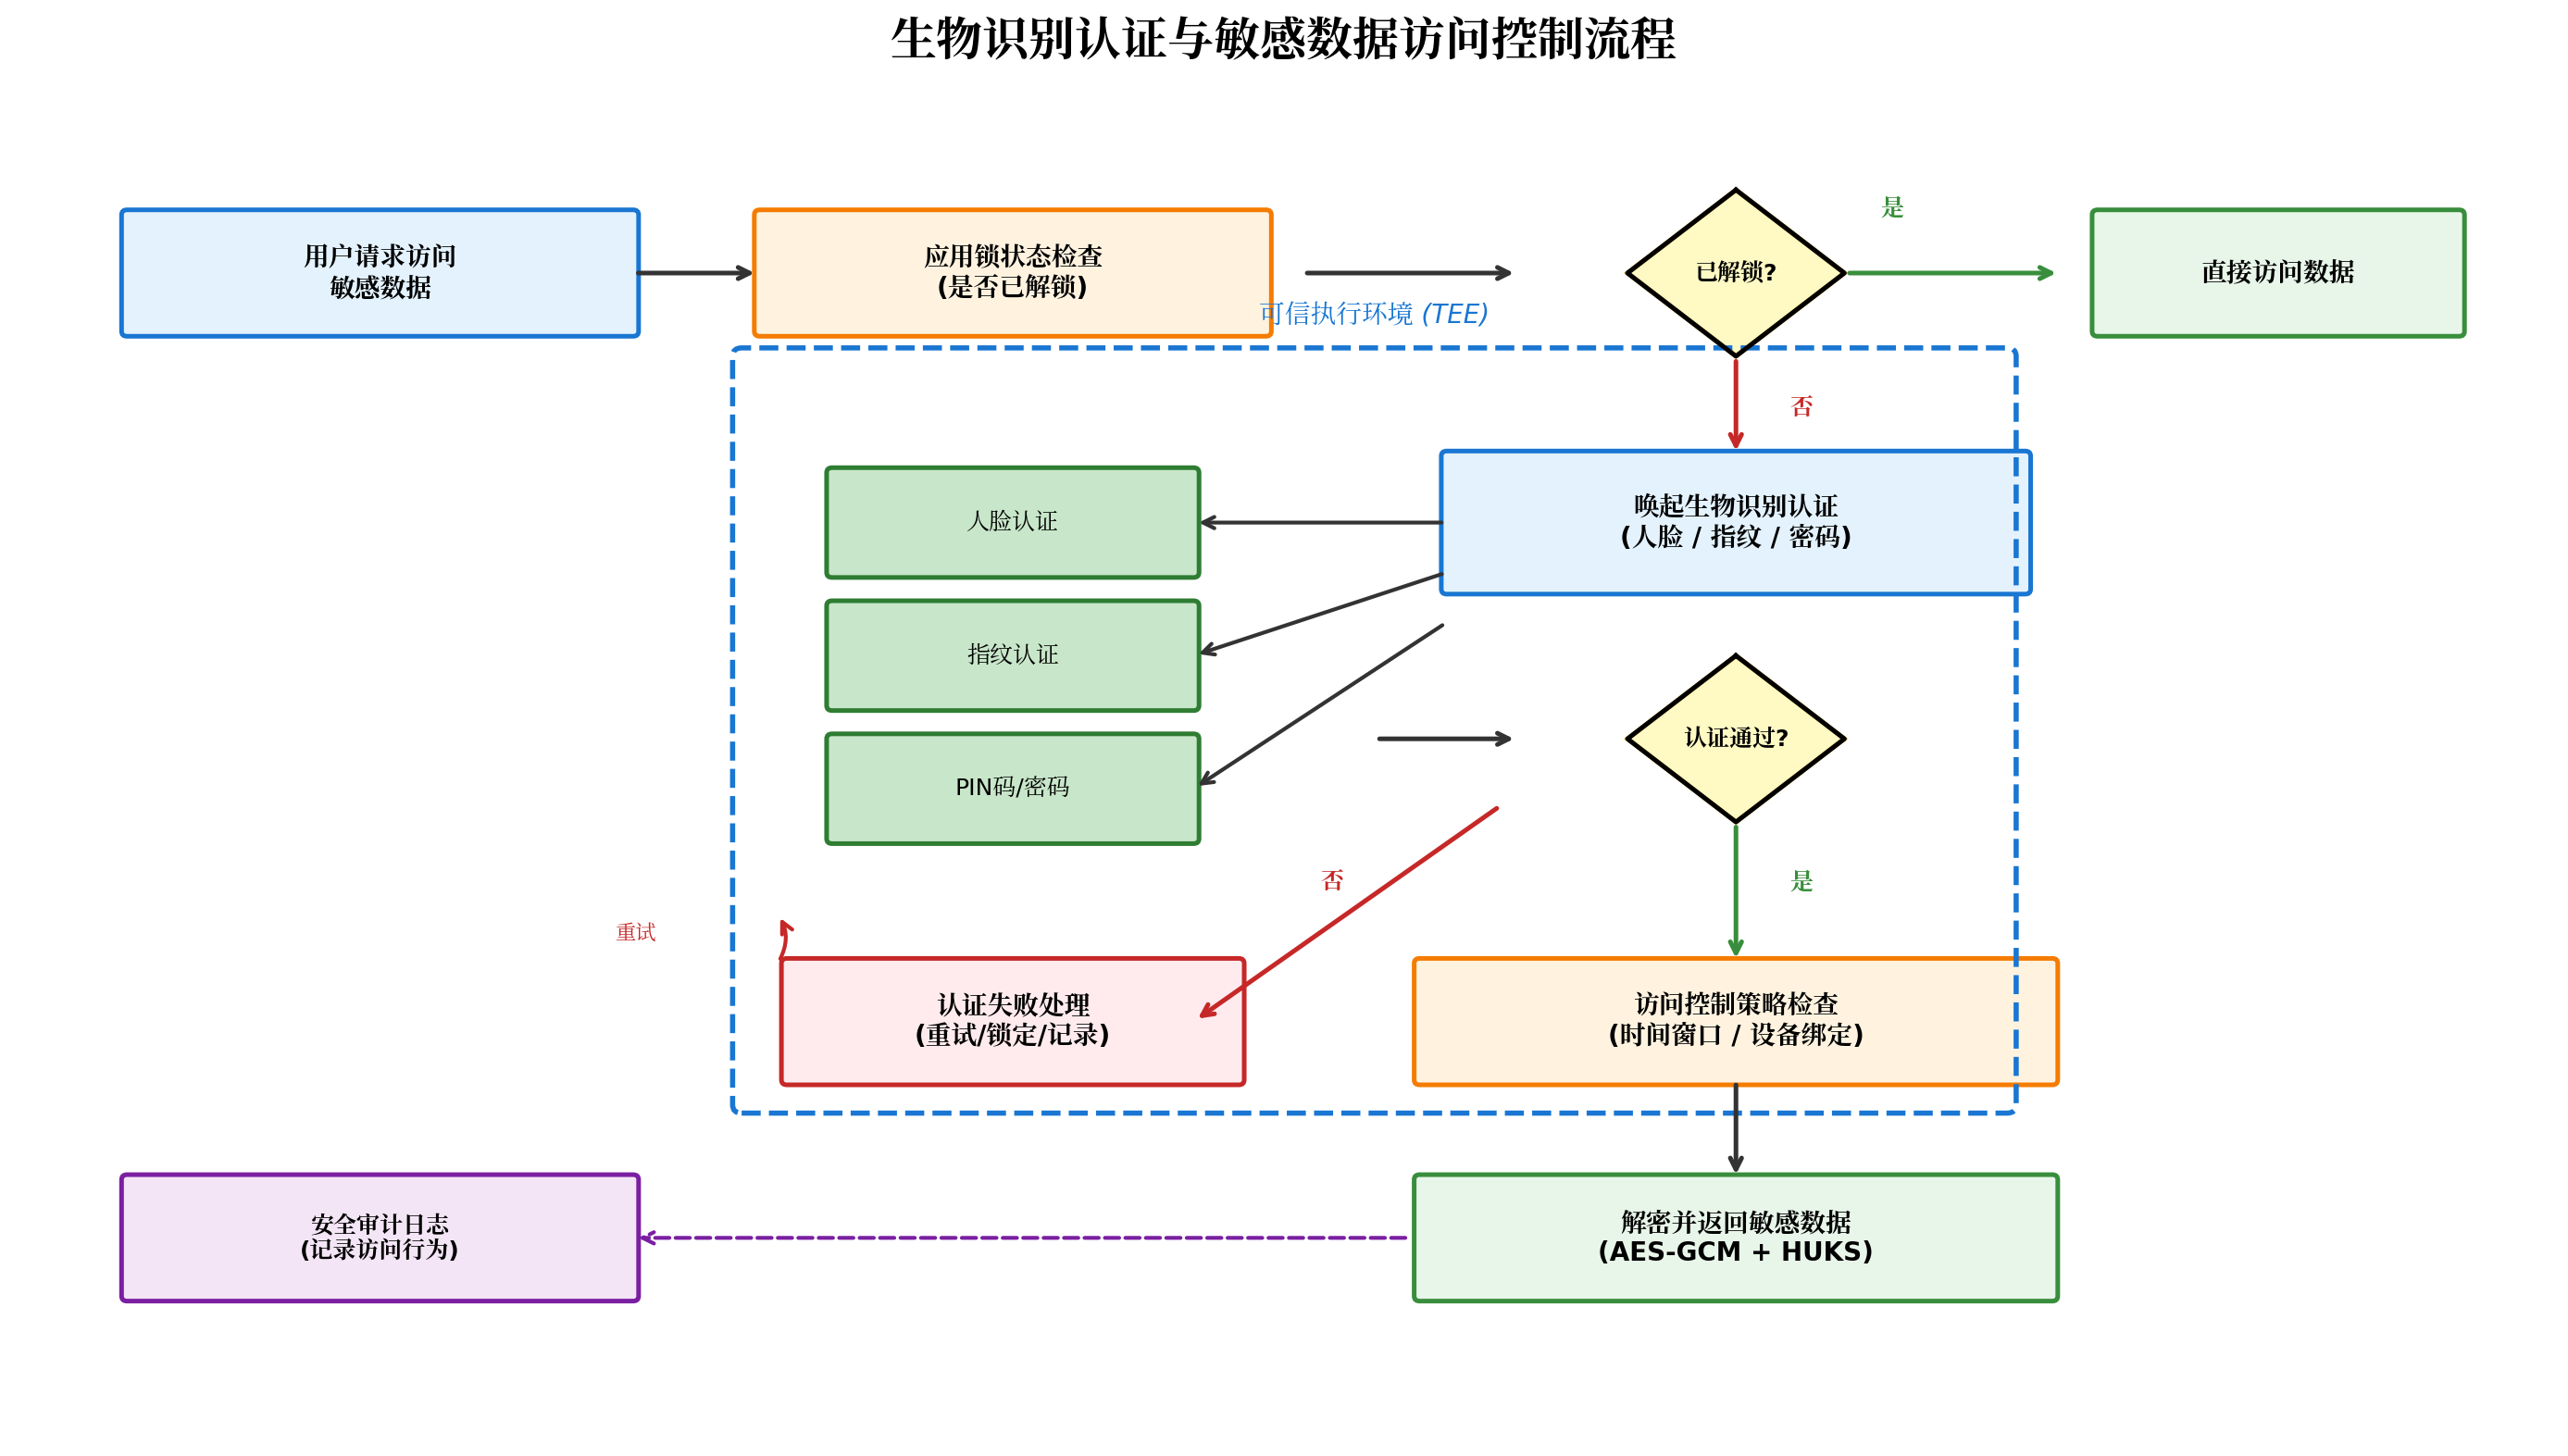
5.1 认证流程设计
在应用锁的基础上,进一步引入生物识别认证机制,形成"应用锁 + 生物识别"的双重防护:
5.2 用户身份认证 API 实战
HarmonyOS 提供 @kit.UserAuthenticationKit 实现生物识别认证:
import { userAuth } from '@kit.UserAuthenticationKit';
import { BusinessError } from '@kit.BasicServicesKit';

class BiometricAuthManager {
  private static readonly AUTH_TIMEOUT = 60 * 1000; // 60 秒超时

  /**
   * 发起生物识别认证
   * @param title 认证标题
   * @param description 认证描述
   */
  async authenticate(title: string = '验证身份', description: string = '请验证以访问敏感数据'): Promise<boolean> {
    const authParam: userAuth.AuthParam = {
      challenge: new Uint8Array([0, 1, 2, 3, 4, 5, 6, 7]),
      authType: [userAuth.UserAuthType.FACE, userAuth.UserAuthType.FINGERPRINT, userAuth.UserAuthType.PIN],
      authTrustLevel: userAuth.AuthTrustLevel.ATL3
    };

    const widgetParam: userAuth.WidgetParam = {
      title: title,
      navigationButtonText: '取消',
      // 可根据需要自定义 UI 样式
    };

    try {
      const userAuthInstance = userAuth.getUserAuthInstance(authParam, widgetParam);

      // 监听认证结果
      const result = await new Promise<userAuth.UserAuthResult>((resolve, reject) => {
        userAuthInstance.on('result', (result: userAuth.UserAuthResult) => {
          resolve(result);
        });

        userAuthInstance.start();

        // 超时处理
        setTimeout(() => {
          userAuthInstance.off('result');
          userAuthInstance.cancel();
          reject(new Error('认证超时'));
        }, BiometricAuthManager.AUTH_TIMEOUT);
      });

      userAuthInstance.off('result');

      if (result.result === userAuth.ResultCode.SUCCESS) {
        console.info('生物识别认证成功');
        // 记录安全审计日志
        this.logAuthEvent('SUCCESS', result.authType);
        return true;
      } else {
        console.warn('生物识别认证失败:', result.result);
        this.logAuthEvent('FAILED', result.authType, result.result);
        return false;
      }
    } catch (error) {
      const err = error as BusinessError;
      console.error('生物识别认证异常:', err.code, err.message);
      this.logAuthEvent('ERROR', undefined, err.code);
      return false;
    }
  }

  /**
   * 检查设备是否支持生物识别
   */
  async checkBiometricSupport(): Promise<{ face: boolean; fingerprint: boolean; pin: boolean }> {
    const status = await userAuth.getAvailableStatus(
      [userAuth.UserAuthType.FACE, userAuth.UserAuthType.FINGERPRINT, userAuth.UserAuthType.PIN],
      userAuth.AuthTrustLevel.ATL3
    );

    // 简化处理:实际应根据 status 详细判断
    return {
      face: status === userAuth.ResultCode.SUCCESS,
      fingerprint: status === userAuth.ResultCode.SUCCESS,
      pin: true // PIN 码通常始终可用
    };
  }

  /**
   * 记录认证审计日志
   */
  private logAuthEvent(result: string, authType?: userAuth.UserAuthType, errorCode?: number): void {
    const event = {
      timestamp: new Date().toISOString(),
      eventType: 'BIOMETRIC_AUTH',
      result: result,
      authType: authType?.toString() || 'UNKNOWN',
      errorCode: errorCode || 0,
      deviceId: 'device_hash_placeholder' // 实际应使用设备唯一标识哈希
    };
    console.info('安全审计日志:', JSON.stringify(event));
    // 实际项目中可写入本地安全日志或上报安全中心
  }
}

export default new BiometricAuthManager();
5.3 应用锁与生物识别的联动
将应用锁状态与生物识别认证联动,实现无缝的安全体验:
import { AppLockManager } from './AppLockManager'; // 前序文章实现
import BiometricAuthManager from './BiometricAuthManager';
import SecurePreferences from './SecurePreferences';

class SecureDataAccessController {
  private securePref: SecurePreferences;
  private readonly AUTH_VALIDITY_PERIOD = 5 * 60 * 1000; // 5 分钟认证有效期

  constructor(context: Context) {
    this.securePref = new SecurePreferences(context, 'secure_access_cache');
  }

  /**
   * 访问敏感数据前的安全检查
   */
  async checkAccessPermission(): Promise<boolean> {
    // 1. 检查应用锁是否已解锁
    if (!AppLockManager.isUnlocked()) {
      console.warn('应用未解锁,拒绝访问敏感数据');
      return false;
    }

    // 2. 检查生物识别认证是否在有效期内
    const lastAuthTime = await this.securePref.getSecureString('last_bio_auth_time', '0');
    const elapsed = Date.now() - parseInt(lastAuthTime);

    if (elapsed < this.AUTH_VALIDITY_PERIOD) {
      console.info('生物识别认证在有效期内,允许访问');
      return true;
    }

    // 3. 唤起生物识别认证
    const authResult = await BiometricAuthManager.authenticate(
      '访问敏感数据',
      '请验证身份以查看加密信息'
    );

    if (authResult) {
      // 更新认证时间戳
      await this.securePref.putSecureString('last_bio_auth_time', Date.now().toString());
      return true;
    }

    return false;
  }

  /**
   * 安全读取用户敏感信息
   */
  async getUserSensitiveData(context: Context, dataKey: string): Promise<string | null> {
    const hasPermission = await this.checkAccessPermission();
    if (!hasPermission) {
      throw new Error('访问被拒绝:未通过安全认证');
    }

    const securePref = new SecurePreferences(context, 'user_sensitive_data');
    return await securePref.getSecureString(dataKey, '');
  }
}

export default SecureDataAccessController;
六、跨设备数据同步安全策略
6.1 分布式数据安全架构
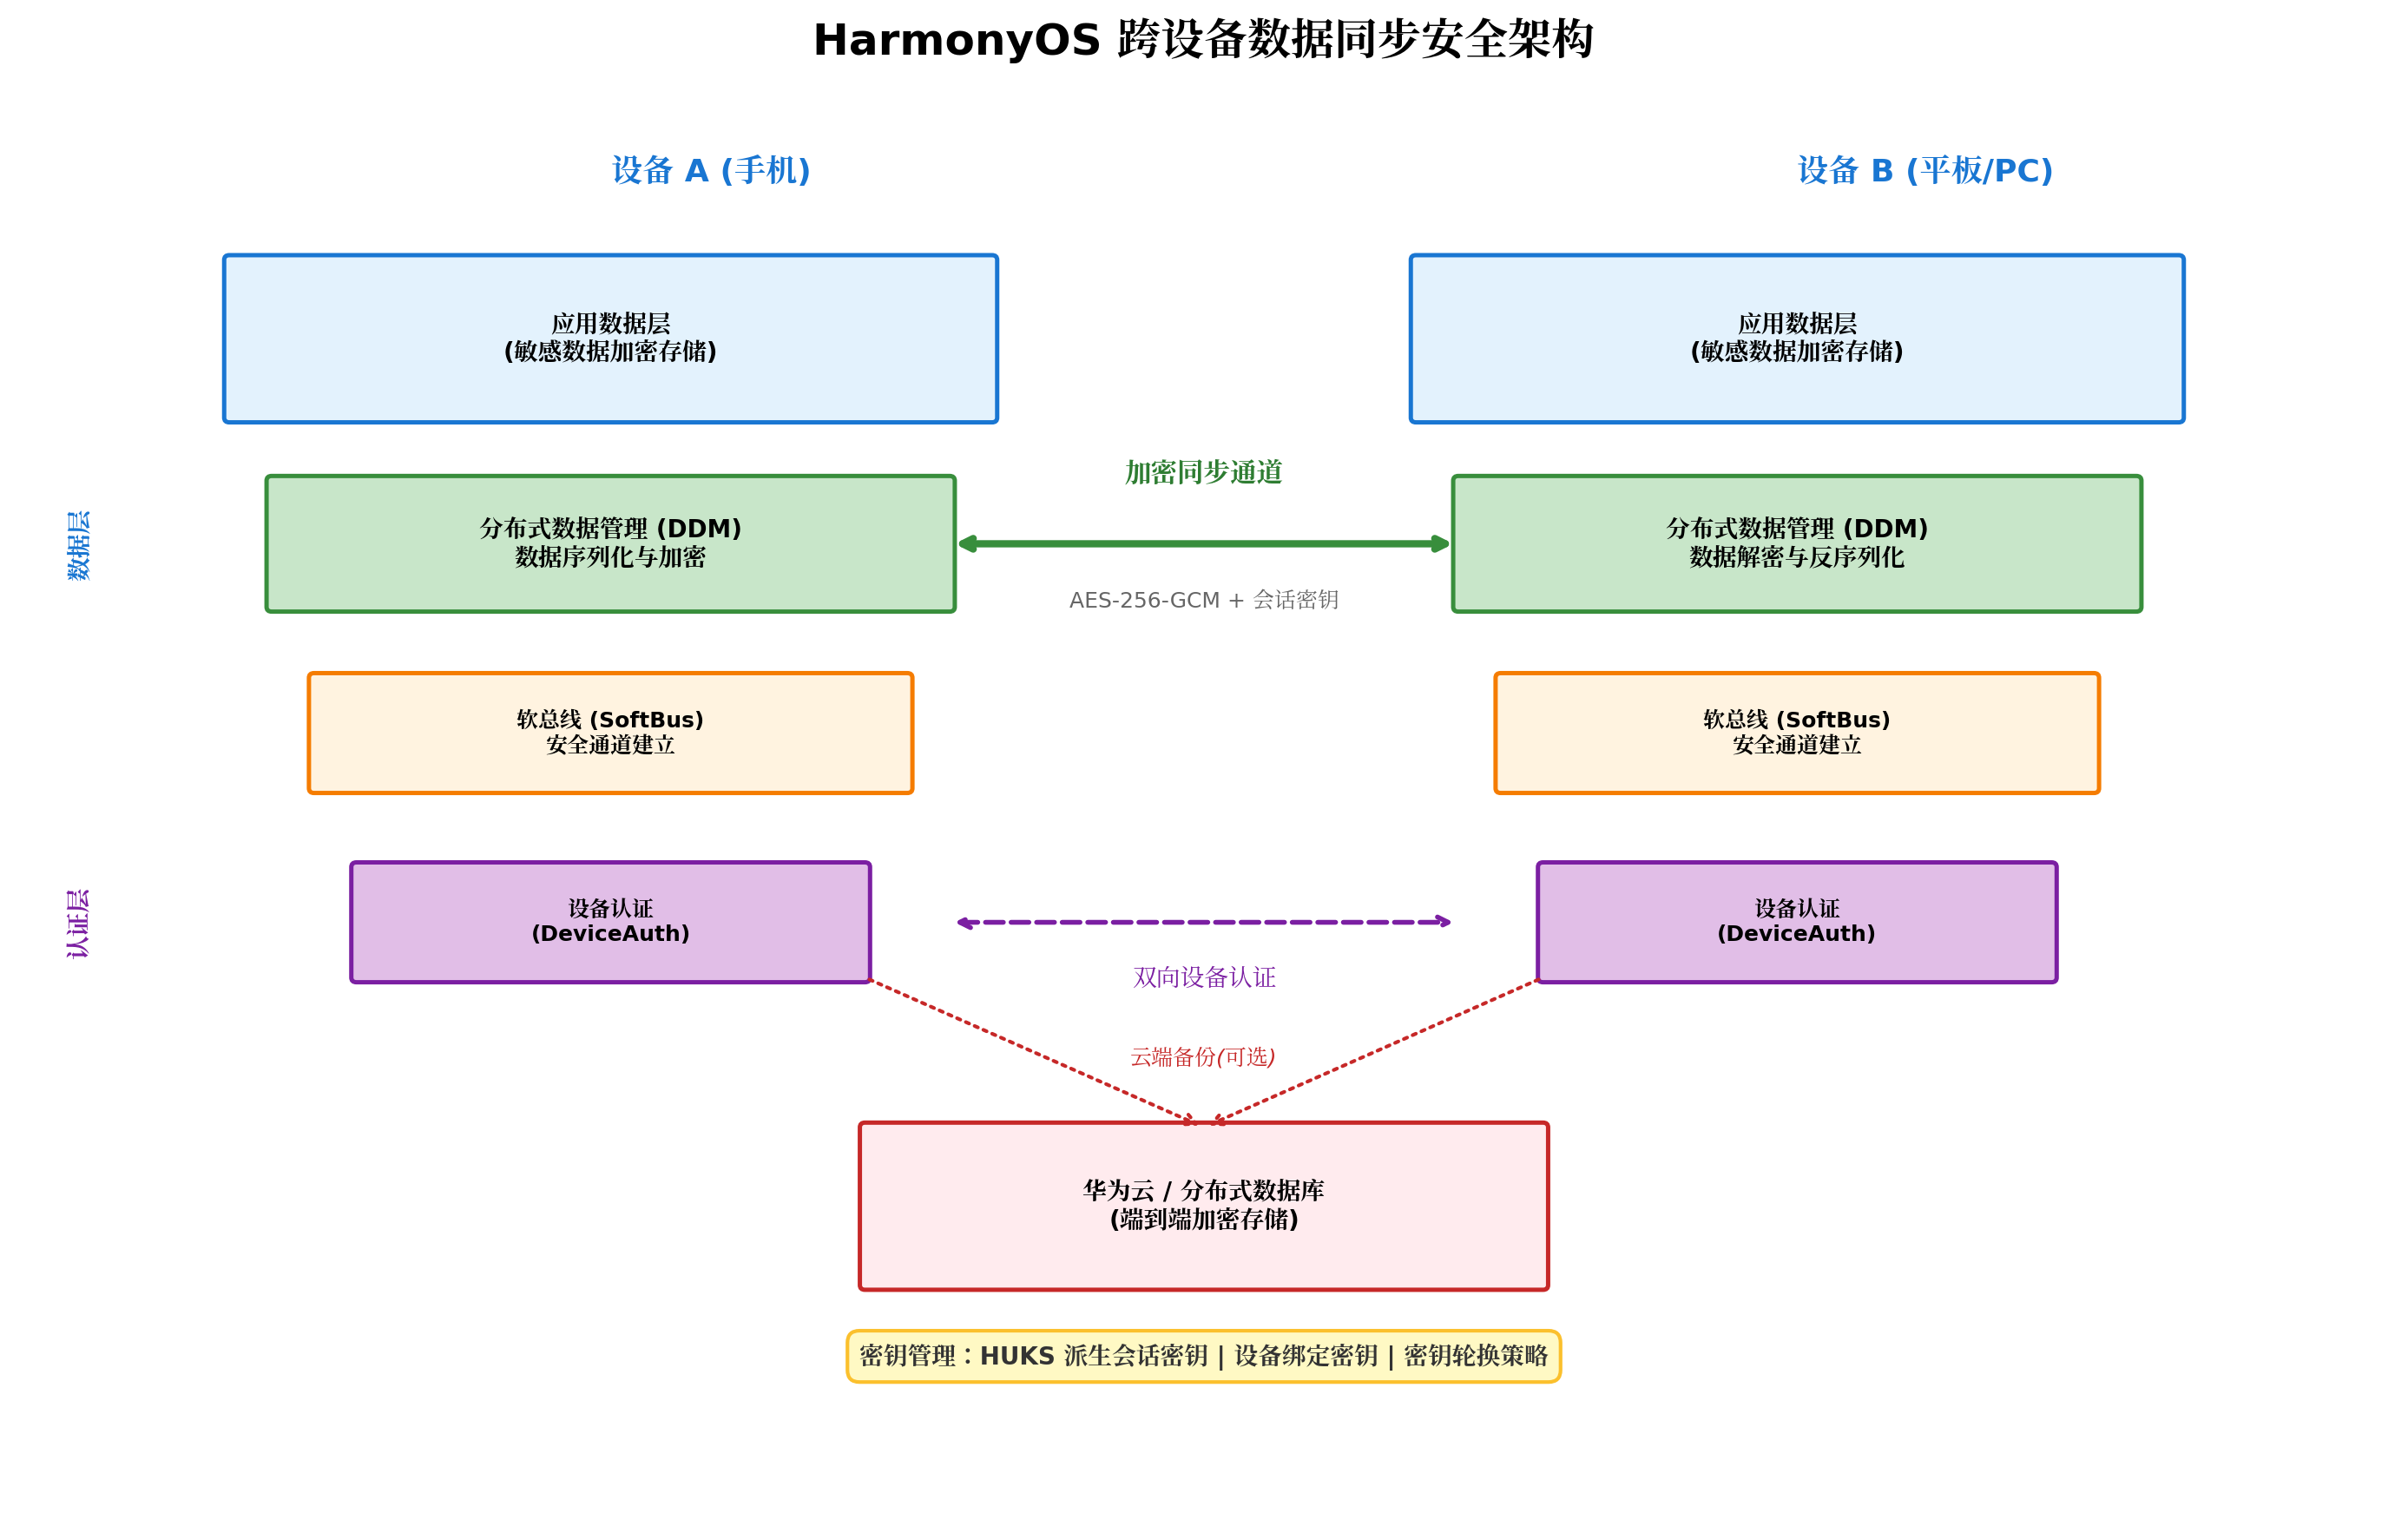
HarmonyOS 的分布式能力让数据可在多设备间无缝流转,但这也带来了额外的安全风险。跨设备同步必须确保:
- 设备双向认证:通过 DeviceAuth 服务验证设备身份
- 通道加密:软总线(SoftBus)建立 AES-256-GCM 加密通道
- 端到端加密:云端备份数据也必须加密存储
6.2 分布式数据库安全配置
使用 @kit.ArkData 的分布式数据库时,开启加密同步:
import { distributedDataObject } from '@kit.ArkData';

class SecureDistributedDataManager {
  private distributedObject: distributedDataObject.DataObject;

  async createSecureDistributedData(context: Context, sessionId: string): Promise<void> {
    // 创建分布式数据对象,启用端到端加密
    this.distributedObject = distributedDataObject.create(context, {
      // 敏感数据字段
      userToken: '',
      encryptedProfile: '',
      lastSyncTime: 0
    });

    // 设置同步策略:仅同步到已认证的可信设备
    this.distributedObject.setSessionId(sessionId);

    // 监听数据变更(仅处理来自可信设备的数据)
    this.distributedObject.on('change', (sessionId: string, fields: Array<string>) => {
      console.info(`收到设备 [${sessionId}] 的数据变更:`, fields);
      // 验证数据来源设备的认证状态
      this.verifyDeviceTrust(sessionId).then(trusted => {
        if (trusted) {
          this.handleSecureDataChange(fields);
        } else {
          console.warn(`拒绝处理未认证设备 [${sessionId}] 的数据`);
        }
      });
    });
  }

  /**
   * 安全同步加密数据
   */
  async syncEncryptedData(encryptedData: string): Promise<void> {
    // 更新分布式对象(数据已经是密文,同步过程由软总线加密保护)
    this.distributedObject.encryptedProfile = encryptedData;
    this.distributedObject.lastSyncTime = Date.now();

    // 触发同步
    await this.distributedObject.save('local');
  }

  /**
   * 验证设备信任状态
   */
  private async verifyDeviceTrust(sessionId: string): Promise<boolean> {
    // 实际项目中调用 DeviceAuth 服务验证
    // 简化示例:检查设备是否在可信列表中
    const trustedDevices = await this.getTrustedDeviceList();
    return trustedDevices.includes(sessionId);
  }

  private async getTrustedDeviceList(): Promise<string[]> {
    // 从安全存储中读取可信设备列表
    return [];
  }

  private handleSecureDataChange(fields: Array<string>): void {
    console.info('处理安全数据变更:', fields);
  }
}

export default SecureDistributedDataManager;
七、数据安全审计与合规检测
7.1 安全审计日志系统
建立完整的安全审计机制,记录所有敏感操作:
interface SecurityAuditLog {
  id: string;
  timestamp: number;
  eventType: 'KEY_ACCESS' | 'DATA_ENCRYPT' | 'DATA_DECRYPT' | 'AUTH_SUCCESS' | 'AUTH_FAILED' | 'KEY_ROTATION';
  resourceId: string;
  userIdentity: string;
  deviceId: string;
  result: 'SUCCESS' | 'FAILED' | 'DENIED';
  details?: string;
}

class SecurityAuditLogger {
  private static readonly MAX_LOG_SIZE = 1000;
  private logs: SecurityAuditLog[] = [];

  async log(event: Omit<SecurityAuditLog, 'id' | 'timestamp'>): Promise<void> {
    const auditLog: SecurityAuditLog = {
      id: this.generateLogId(),
      timestamp: Date.now(),
      ...event
    };

    this.logs.push(auditLog);

    // 日志滚动:超过上限时移除最旧的日志
    if (this.logs.length > SecurityAuditLogger.MAX_LOG_SIZE) {
      this.logs = this.logs.slice(-SecurityAuditLogger.MAX_LOG_SIZE);
    }

    // 敏感操作实时上报
    if (event.result === 'FAILED' || event.result === 'DENIED') {
      await this.reportSecurityAlert(auditLog);
    }

    console.info(`[安全审计] ${event.eventType}: ${event.result}`);
  }

  private generateLogId(): string {
    return `AUDIT_${Date.now()}_${Math.random().toString(36).substr(2, 9)}`;
  }

  private async reportSecurityAlert(log: SecurityAuditLog): Promise<void> {
    // 实际项目中可上报到远程安全监控中心
    console.warn('[安全告警] 检测到异常访问行为:', log);
  }

  /**
   * 导出审计日志(用于合规检查)
   */
  exportLogs(startTime?: number, endTime?: number): SecurityAuditLog[] {
    let filtered = this.logs;
    if (startTime) {
      filtered = filtered.filter(l => l.timestamp >= startTime);
    }
    if (endTime) {
      filtered = filtered.filter(l => l.timestamp <= endTime);
    }
    return filtered;
  }
}

export default new SecurityAuditLogger();
7.2 合规检测清单
| 检测项 | 检测内容 | 合规标准 |
|---|---|---|
| 密钥管理 | 密钥是否由 HUKS 托管 | 密钥明文不得出现在应用代码或普通存储中 |
| 加密算法 | 是否使用 AES-256-GCM | 禁止使用 ECB 模式、DES、RC4 等弱算法 |
| 认证机制 | 敏感操作是否需生物识别 | P4 级数据必须绑定生物识别认证 |
| 访问日志 | 是否记录敏感数据访问 | 所有加密/解密操作必须留痕 |
| 数据清理 | 卸载时是否清除密钥 | 应用卸载必须调用 HUKS 删除密钥 |
八、完整代码示例与工程实践
8.1 完整使用示例
import { HuksKeyManager } from './HuksKeyManager';
import { SecureDataManager, DataSecurityLevel } from './SecureDataManager';
import SecurePreferences from './SecurePreferences';
import BiometricAuthManager from './BiometricAuthManager';
import SecureDataAccessController from './SecureDataAccessController';
import SecurityAuditLogger from './SecurityAuditLogger';

class UserDataProtectionDemo {
  private context: Context;

  constructor(context: Context) {
    this.context = context;
  }

  async initialize(): Promise<void> {
    // 1. 初始化 HUKS 主密钥(首次启动)
    const hasKey = await HuksKeyManager.hasKey();
    if (!hasKey) {
      await HuksKeyManager.generateAesKey();
    }

    console.info('用户数据保护模块初始化完成');
  }

  /**
   * 保存用户敏感信息(完整流程)
   */
  async saveUserSensitiveInfo(key: string, data: string): Promise<void> {
    try {
      const securePref = new SecurePreferences(this.context, 'user_vault');
      await securePref.putSecureString(key, data, DataSecurityLevel.CONFIDENTIAL);

      await SecurityAuditLogger.log({
        eventType: 'DATA_ENCRYPT',
        resourceId: key,
        userIdentity: 'current_user',
        deviceId: 'device_hash',
        result: 'SUCCESS',
        details: '敏感数据已加密存储'
      });
    } catch (error) {
      console.error('保存敏感数据失败:', error);
      throw error;
    }
  }

  /**
   * 读取用户敏感信息(完整流程)
   */
  async readUserSensitiveInfo(key: string): Promise<string | null> {
    try {
      // 1. 生物识别认证
      const authResult = await BiometricAuthManager.authenticate(
        '访问保险柜',
        '请验证身份以查看敏感信息'
      );

      if (!authResult) {
        await SecurityAuditLogger.log({
          eventType: 'AUTH_FAILED',
          resourceId: key,
          userIdentity: 'current_user',
          deviceId: 'device_hash',
          result: 'DENIED'
        });
        return null;
      }

      // 2. 解密并返回数据
      const securePref = new SecurePreferences(this.context, 'user_vault');
      const data = await securePref.getSecureString(key);

      await SecurityAuditLogger.log({
        eventType: 'DATA_DECRYPT',
        resourceId: key,
        userIdentity: 'current_user',
        deviceId: 'device_hash',
        result: 'SUCCESS'
      });

      return data;
    } catch (error) {
      console.error('读取敏感数据失败:', error);
      return null;
    }
  }

  /**
   * 应用卸载清理
   */
  async cleanupOnUninstall(): Promise<void> {
    await HuksKeyManager.deleteKey();
    console.info('应用卸载:HUKS 密钥已安全清除');
  }
}

export default UserDataProtectionDemo;
九、性能优化与最佳实践
9.1 性能优化策略
| 优化点 | 策略 | 收益 |
|---|---|---|
| 密钥缓存 | 认证有效期内缓存 HUKS 会话句柄 | 减少 TEE 通信开销 |
| 批量加密 | 合并小数据块批量加密 | 降低 API 调用频率 |
| 异步处理 | 加密/解密操作放入 Worker 线程 | 避免阻塞 UI 主线程 |
| 懒加载 | 延迟初始化 HUKS 密钥 | 缩短应用冷启动时间 |
9.2 安全最佳实践
- 密钥分离原则:不同业务使用不同别名密钥,避免"一把钥匙开所有锁"
- 定期轮换:高敏感业务建议每 90 天轮换一次密钥
- 防截屏/录屏:在展示敏感数据的页面启用
setWindowPrivacyMode防截屏 - 内存安全:敏感数据使用完毕后立即置零,防止内存残留
- 安全键盘:输入密码时使用系统安全键盘,防止键盘记录
// 防截屏设置示例
import { window } from '@kit.ArkUI';

async function enablePrivacyMode(): Promise<void> {
  const mainWindow = await window.getLastWindow(getContext());
  await mainWindow.setWindowPrivacyMode(true);
}
十、总结
本文从 HarmonyOS 安全架构出发,系统阐述了用户数据保护的全链路实现方案:
- 应用沙箱与权限管控是数据安全的第一道防线,通过最小权限原则限制数据访问范围;
- HUKS 通用密钥库提供了硬件级的密钥保护能力,确保密钥永不离开 TEE 安全区;
- AES-256-GCM 加密存储结合数据分级策略,实现了不同敏感度数据的差异化保护;
- 生物识别认证与应用锁联动,构建"双因素"身份验证体系;
- 跨设备安全同步通过设备认证与通道加密,保障分布式场景下的数据安全;
- 安全审计日志为数据合规与异常检测提供了可追溯的证据链。
开发者应根据业务场景选择合适的安全等级,在安全性与用户体验之间找到最佳平衡点。记住:安全不是功能,而是贯穿整个应用生命周期的基础架构。
转载自:https://blog.csdn.net/u014727709/article/details/163783049
欢迎 👍点赞✍评论⭐收藏,欢迎指正

作为“人工智能6S店”的官方数字引擎,为AI开发者与企业提供一个覆盖软硬件全栈、一站式门户。
更多推荐
 1
1 0
0- 0


 已为社区贡献109条内容

所有评论(0)