
组件渲染控制与条件渲染深度解析与性能优化
文章目录

每日一句正能量
花不开时耐心侍弄,等花开;事不成时默默耕耘,等事成。
花不开时,不是放弃,而是继续浇水施肥(持续积累)。事不成时,不是抱怨,而是继续深耕细作(专注当下)。结果不在掌控之中,但过程完全在自己手中。能享受过程的人,最终往往也能收获结果。
摘要
在 HarmonyOS ArkUI 声明式 UI 框架中,组件渲染控制是决定应用性能与用户体验的核心环节。本文系统梳理条件渲染(if/else)、显隐控制(visibility)、循环渲染(ForEach)及懒加载渲染(LazyForEach)四大渲染控制机制的技术原理与适用边界,深入剖析状态管理服务层如何驱动渲染决策,并结合状态管理 V2 的属性级观察能力,提供一套完整的企业级渲染控制性能优化方案。通过大量实战代码与性能对比数据,帮助开发者精准选择渲染策略,打造 60FPS 丝滑流畅的鸿蒙应用。
一、渲染控制的技术定位与核心价值
1.1 为什么渲染控制至关重要
ArkUI 采用声明式开发范式,开发者只需描述"UI 应该是什么样子",框架负责在状态变化时自动计算差异并更新界面。然而,这种自动化的背后隐藏着性能陷阱:不合理的渲染控制会导致组件频繁创建/销毁、不必要的布局重计算、以及状态订阅范围的过度扩大,最终表现为界面卡顿、内存泄漏和功耗飙升。
在前序文章(第一百七十八篇)中,我们探讨了插槽(Slot)机制如何通过 @BuilderParam 实现组件化内容分发。插槽机制与渲染控制紧密耦合:插槽内容的切换本质上是一种条件渲染,而插槽内嵌套的 ForEach 循环则涉及组件复用与键值管理。掌握渲染控制,是充分发挥插槽机制威力的前提。
1.2 渲染控制的四大核心机制
HarmonyOS ArkUI 提供了四种主要的渲染控制手段,各有其独特的技术特征与适用场景:
| 机制 | 核心能力 | 组件生命周期 | 适用数据规模 | 性能特征 |
|---|---|---|---|---|
| if/else 条件渲染 | 根据状态动态创建/销毁组件 | 触发 aboutToAppear/Disappear | 少量分支 | 低频切换友好 |
| visibility 显隐控制 | 调整组件可见性,保留实例 | 不触发生命周期 | 单组件 | 高频切换友好 |
| ForEach 循环渲染 | 遍历数组批量生成组件 | 依赖 key 值复用 | 中小数据量 (<100) | 需合理设置 key |
| LazyForEach 懒加载 | 仅渲染可视区域 | 缓存+复用机制 | 大数据量 (>100) | 内存占用低 |
二、条件渲染(if/else):精准控制组件生命周期
2.1 技术原理深度解析
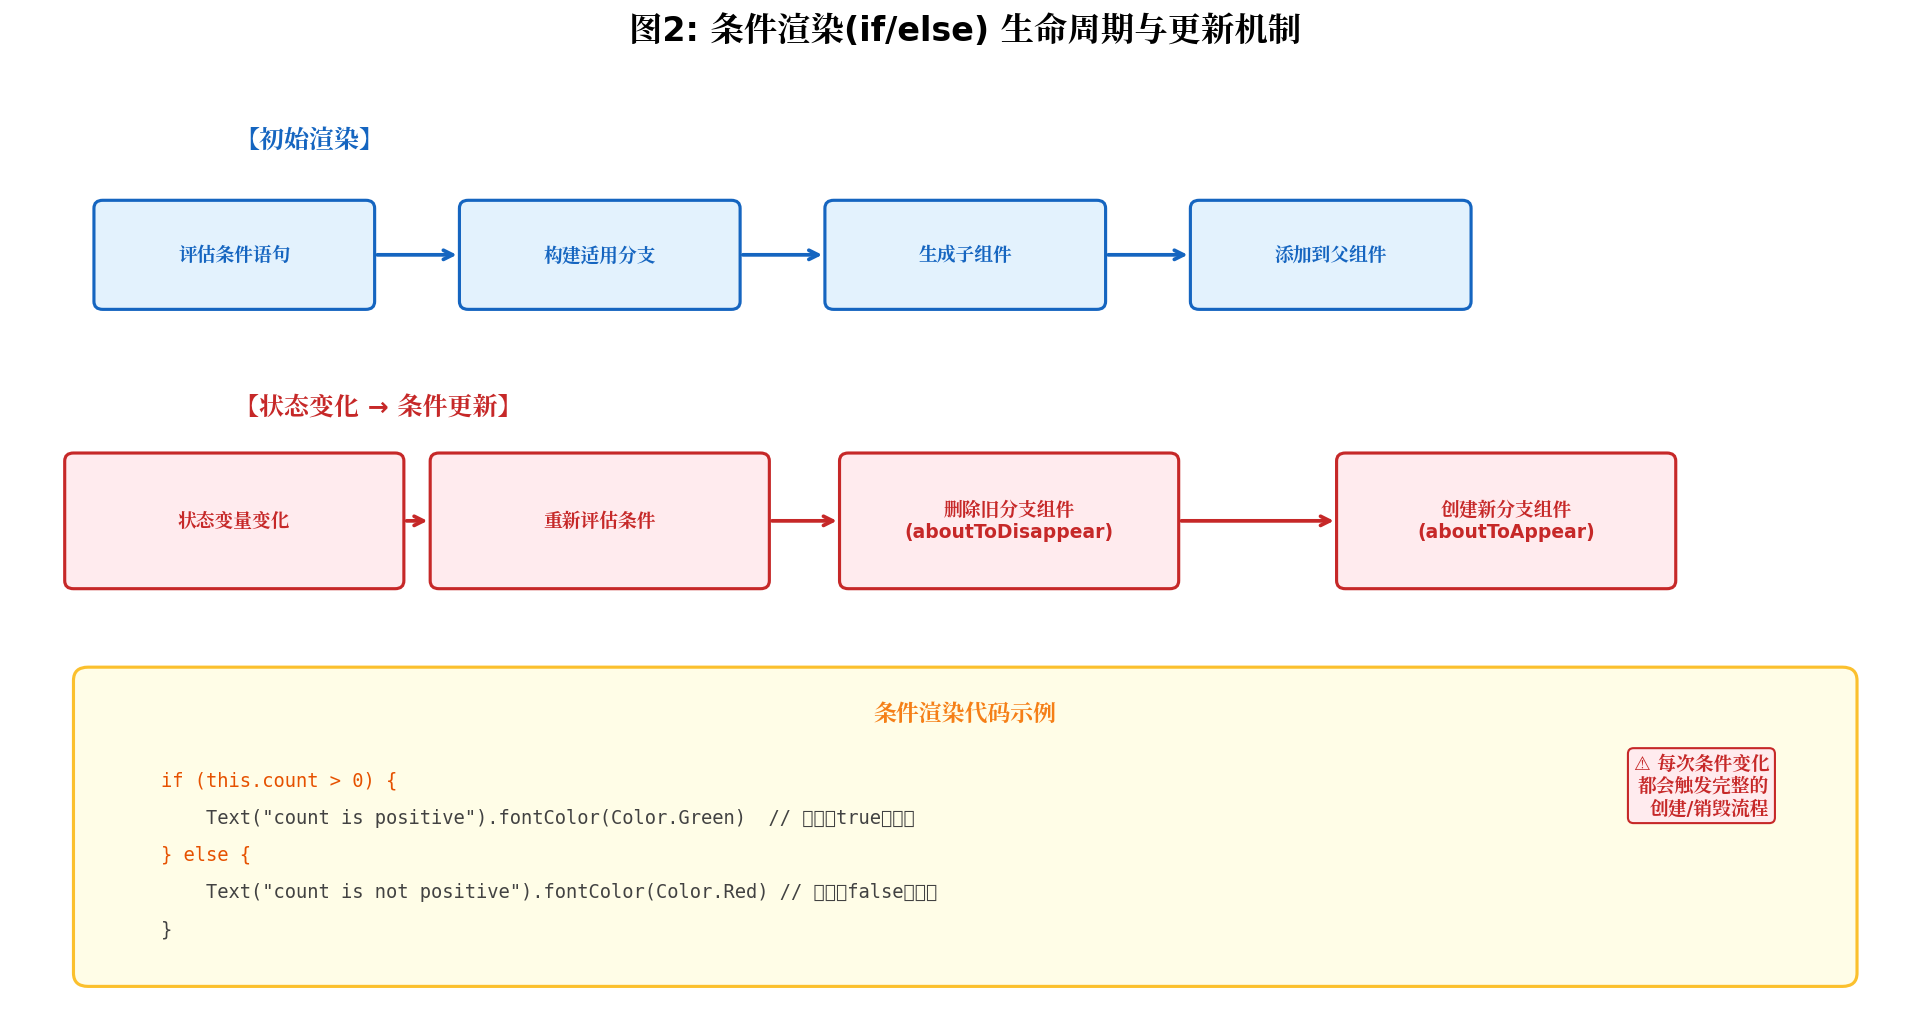
条件渲染是 ArkUI 最基础也是最常用的渲染控制手段。其工作机制可拆解为两个阶段:
初始渲染阶段:框架评估条件语句,仅构建满足条件的分支组件,未满足条件的分支不会被创建,也不会占用任何内存资源。
状态更新阶段:当条件语句中使用的状态变量发生变化时,框架重新评估条件。若评估结果发生变化,则执行"删除旧分支组件 → 创建新分支组件"的完整流程,期间会依次触发旧组件的 aboutToDisappear() 和新组件的 aboutToAppear() 生命周期回调。
2.2 基础条件渲染实战
@Entry
@Component
struct ConditionalRenderDemo {
  @State count: number = 0
  @State userRole: string = 'guest'  // guest | user | admin

  build() {
    Column({ space: 16 }) {
      Text(`当前计数: ${this.count}`)
        .fontSize(18)
        .fontWeight(FontWeight.Bold)

      // 简单条件渲染
      if (this.count > 0) {
        Text('计数为正数')
          .fontSize(16)
          .fontColor('#4CAF50')
          .backgroundColor('#E8F5E9')
          .padding(8)
          .borderRadius(6)
      } else if (this.count < 0) {
        Text('计数为负数')
          .fontSize(16)
          .fontColor('#F44336')
          .backgroundColor('#FFEBEE')
          .padding(8)
          .borderRadius(6)
      } else {
        Text('计数为零')
          .fontSize(16)
          .fontColor('#9E9E9E')
          .padding(8)
      }

      // 多分支条件渲染:基于用户角色
      if (this.userRole === 'admin') {
        AdminPanel()
      } else if (this.userRole === 'user') {
        UserPanel()
      } else {
        GuestPanel()
      }

      Row({ space: 12 }) {
        Button('减少')
          .onClick(() => this.count--)
        Button('增加')
          .onClick(() => this.count++)
      }

      Row({ space: 12 }) {
        Button('访客')
          .onClick(() => this.userRole = 'guest')
        Button('用户')
          .onClick(() => this.userRole = 'user')
        Button('管理员')
          .onClick(() => this.userRole = 'admin')
      }
    }
    .width('100%')
    .height('100%')
    .padding(20)
    .backgroundColor('#F5F5F5')
  }
}

@Component
struct AdminPanel {
  aboutToAppear() {
    console.info('AdminPanel 创建 - 加载管理员数据')
  }

  aboutToDisappear() {
    console.info('AdminPanel 销毁 - 释放管理员资源')
  }

  build() {
    Column() {
      Text('管理员控制台')
        .fontSize(20)
        .fontColor('#1976D2')
      Text('拥有系统全部权限')
        .fontSize(14)
        .fontColor('#757575')
    }
    .padding(16)
    .backgroundColor('#E3F2FD')
    .borderRadius(12)
    .width('100%')
  }
}

@Component
struct UserPanel {
  aboutToAppear() {
    console.info('UserPanel 创建 - 加载用户数据')
  }

  aboutToDisappear() {
    console.info('UserPanel 销毁 - 释放用户资源')
  }

  build() {
    Column() {
      Text('用户中心')
        .fontSize(20)
        .fontColor('#388E3C')
      Text('拥有常规操作权限')
        .fontSize(14)
        .fontColor('#757575')
    }
    .padding(16)
    .backgroundColor('#E8F5E9')
    .borderRadius(12)
    .width('100%')
  }
}

@Component
struct GuestPanel {
  build() {
    Column() {
      Text('访客模式')
        .fontSize(20)
        .fontColor('#F57C00')
      Text('仅支持浏览,无法操作')
        .fontSize(14)
        .fontColor('#757575')
    }
    .padding(16)
    .backgroundColor('#FFF3E0')
    .borderRadius(12)
    .width('100%')
  }
}
2.3 条件渲染的性能陷阱与规避
陷阱一:嵌套过深的条件判断
过深的 if/else 嵌套不仅降低代码可读性,还会增加框架的条件评估开销。建议将复杂逻辑拆分为独立方法或子组件。
陷阱二:在条件分支中直接使用可能为空的数据
当条件分支中的组件直接访问可能为 undefined 的数据时,状态切换过程中可能触发空指针异常或动画崩溃。
// ❌ 错误示范:直接使用可能为空的数据
if (this.data1) {
  Text(this.data1.str)  // 状态切换瞬间 data1 可能为 null
}

// ✅ 正确姿势1:使用安全访问操作符
if (this.data1) {
  Text(this.data1?.str)
}

// ✅ 正确姿势2:禁用默认过渡动画
if (this.data1) {
  Text(this.data1.str)
    .transition(TransitionEffect.IDENTITY)  // 禁用过渡效果,避免动画crash
}
三、显隐控制(visibility):高频切换的性能利器
3.1 三种可见性模式解析
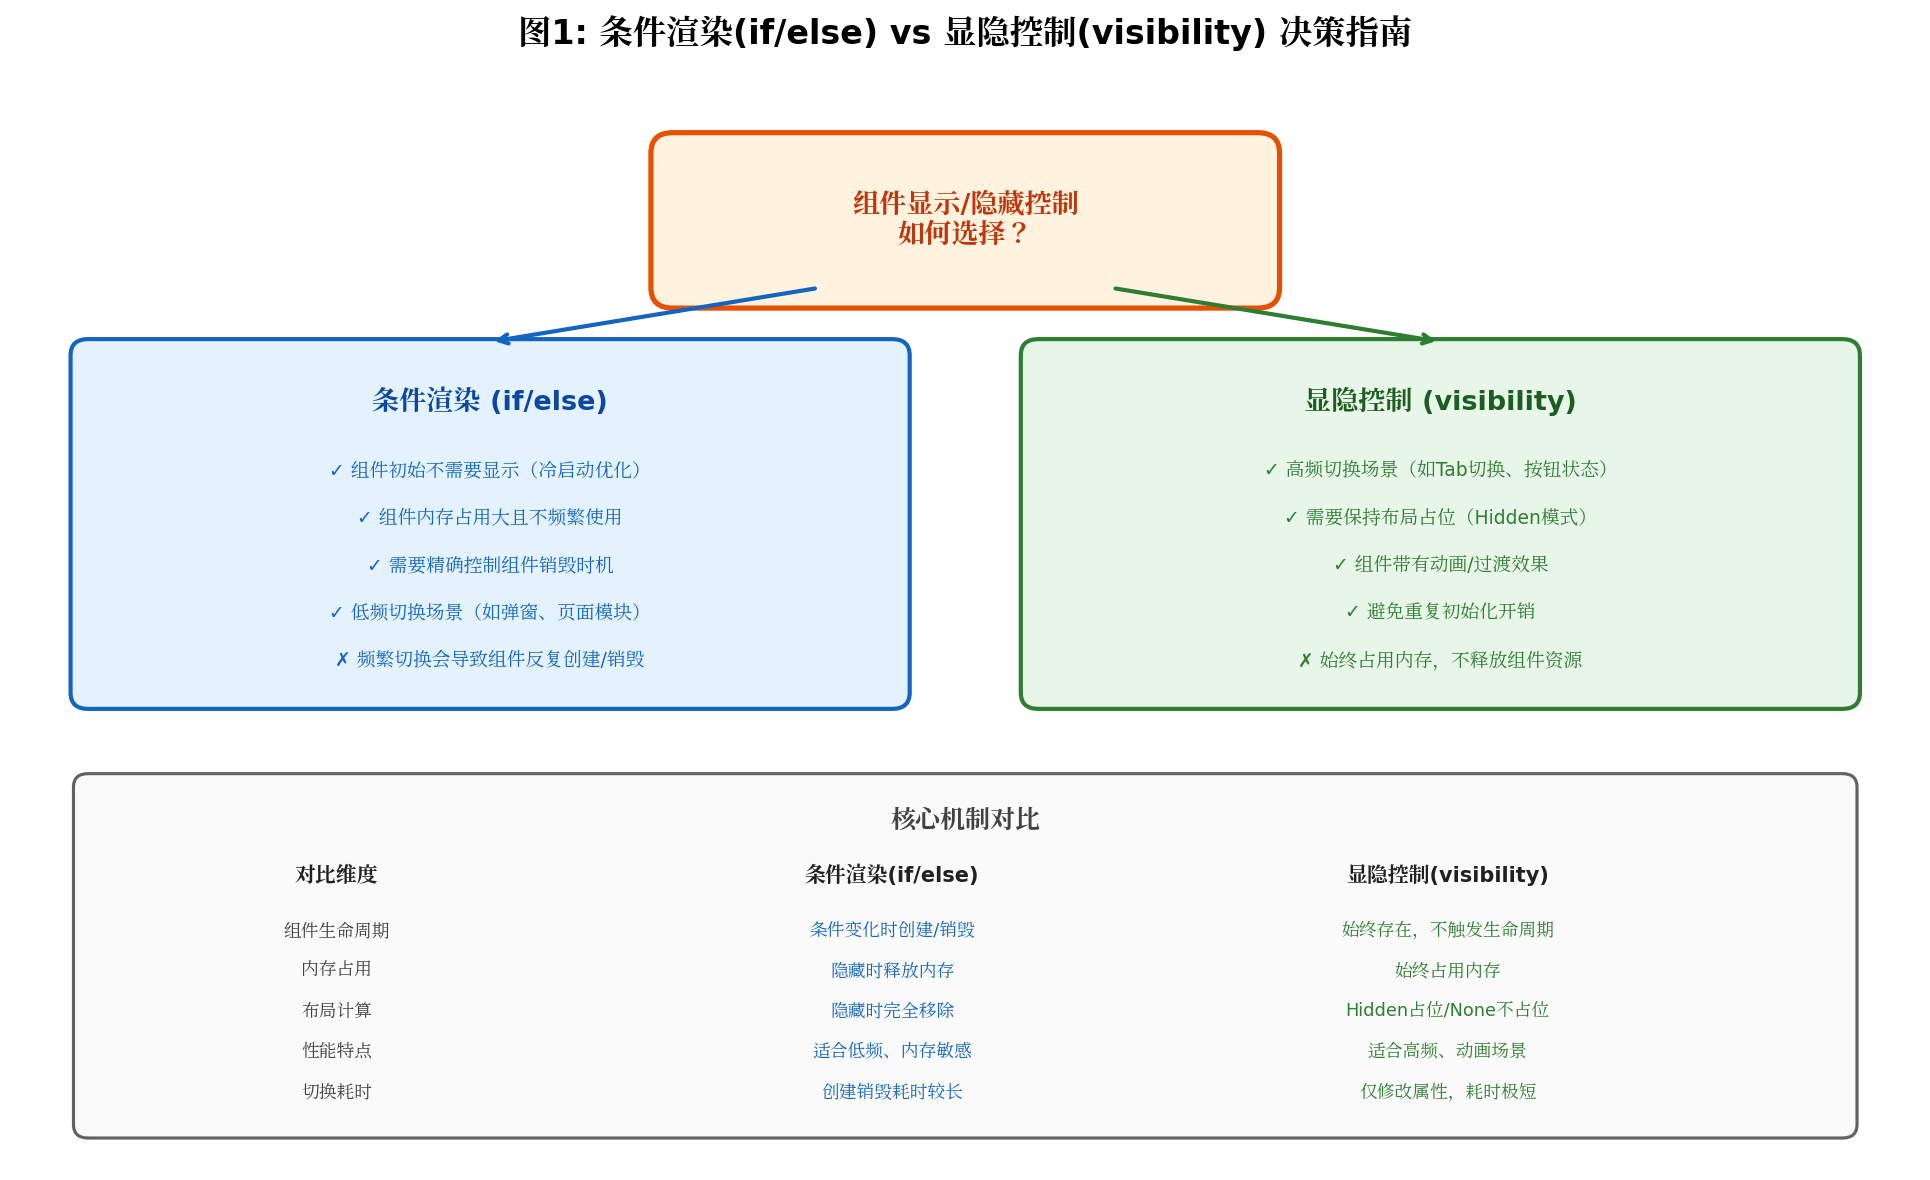
显隐控制通过 visibility 属性调整组件可见性,组件始终存在于组件树中,不会触发创建/销毁生命周期。
| 属性值 | 视觉效果 | 布局参与 | 适用场景 |
|---|---|---|---|
Visibility.Visible | 完全显示 | 参与布局 | 默认状态 |
Visibility.Hidden | 不可见但占位 | 参与布局 | 保持布局稳定,避免页面抖动 |
Visibility.None | 不可见且不占位 | 不参与布局 | 完全移除视觉和布局影响 |
3.2 条件渲染 vs 显隐控制:性能实测对比
在实际开发中,选择条件渲染还是显隐控制,直接影响应用性能。以下是一个基于 1000 张图片切换场景的实测对比:
// ❌ 反例:高频切换使用 if/else(1000张图片反复创建/销毁)
@Entry
@Component
struct WorseUseIf {
  @State isVisible: boolean = true
  private data: number[] = Array.from({ length: 1000 }, (_, i) => i)

  build() {
    Column() {
      Button('切换显示/隐藏')
        .onClick(() => { this.isVisible = !this.isVisible })
        .width('100%')

      if (this.isVisible) {
        Scroll() {
          Column() {
            ForEach(this.data, (item: number) => {
              Image($r('app.media.icon'))
                .width('25%')
                .height('12.5%')
            }, (item: number) => item.toString())
          }
        }
      }
    }
  }
}

// ✅ 正例:高频切换使用 visibility(组件实例始终保留)
@Entry
@Component
struct BetterUseVisibility {
  @State isVisible: boolean = true
  private data: number[] = Array.from({ length: 1000 }, (_, i) => i)

  build() {
    Column() {
      Button('切换显示/隐藏')
        .onClick(() => { this.isVisible = !this.isVisible })
        .width('100%')

      Scroll() {
        Column() {
          ForEach(this.data, (item: number) => {
            Image($r('app.media.icon'))
              .width('25%')
              .height('12.5%')
          }, (item: number) => item.toString())
        }
      }
      .visibility(this.isVisible ? Visibility.Visible : Visibility.None)
    }
  }
}
实测结果对比:
| 指标 | if/else 条件渲染 | visibility 显隐控制 | 性能提升 |
|---|---|---|---|
| 切换耗时 | ~1000ms | ~2ms | 500倍 |
| 内存波动 | 剧烈(反复创建/销毁) | 平稳(实例保留) | 显著优化 |
| 生命周期触发 | aboutToAppear/Disappear | 无 | 减少开销 |
选型原则:高频切换(如 Tab 页签、按钮状态)优先使用
visibility;低频切换或初始不需要显示的组件(如弹窗、复杂图表)优先使用if/else。
四、循环渲染(ForEach):键值管理与组件复用
4.1 ForEach 工作机制深度解析
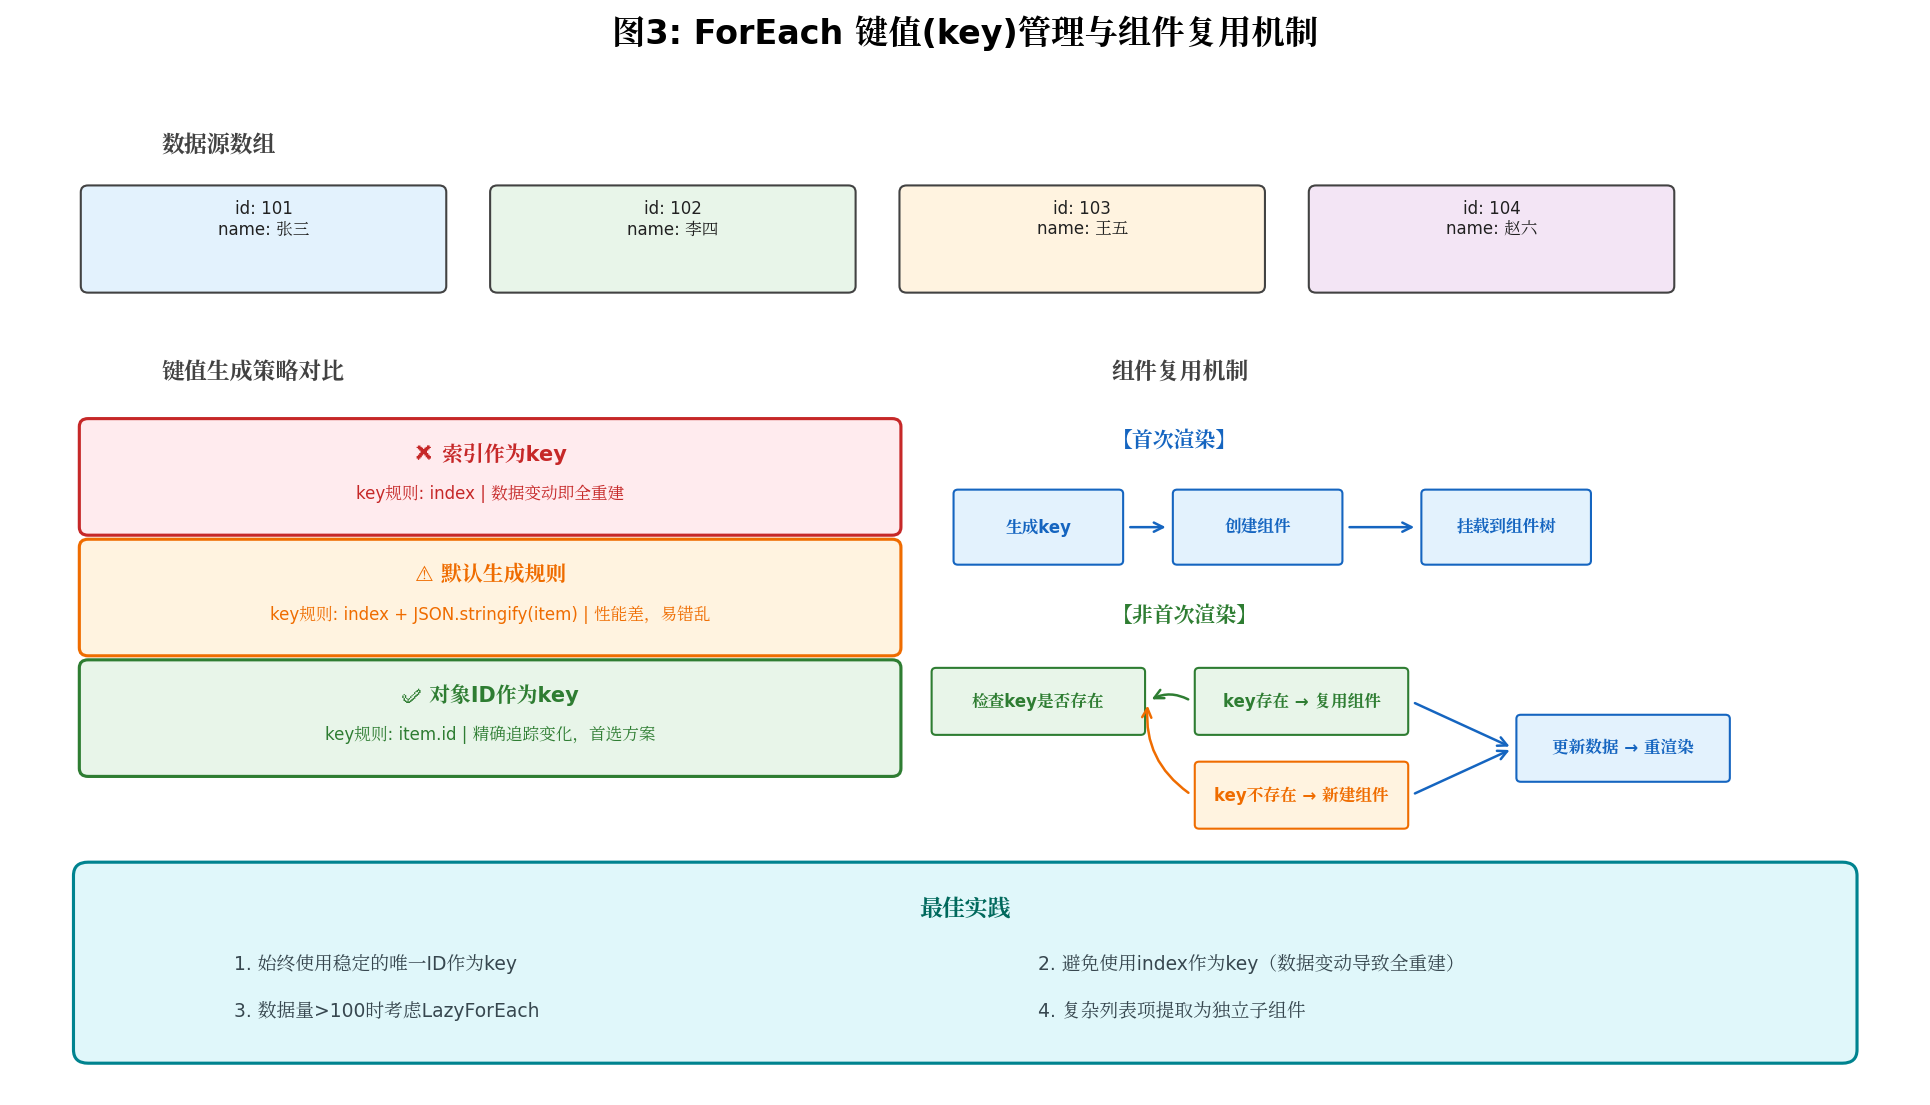
ForEach 是 ArkUI 遍历数据集合动态生成 UI 组件的核心语法。其工作原理是为每个数组元素生成一个唯一键值(key),用于标识和追踪组件变化。
键值生成策略直接决定渲染性能:
| 键值类型 | 生成规则 | 优点 | 缺点 | 推荐度 |
|---|---|---|---|---|
| 索引 index | (item, index) => index | 保证唯一性 | 数据变动即全重建 | ❌ 禁止使用 |
| 默认规则 | index + '__' + JSON.stringify(item) | 无需配置 | 性能差,易错乱 | ⚠️ 不推荐 |
| 数组项 item | (item) => item | 简单数组可用 | 值重复时渲染异常 | ⚠️ 有限适用 |
| 对象 ID | (item) => item.id | 精确追踪变化 | 需数据结构支持 | ✅ 首选方案 |
4.2 键值管理实战:从反例到正例
// ❌ 反例:使用 index 作为 key(数据增删时组件错乱)
@Entry
@Component
struct BadKeyExample {
  @State items: Array<{ id: number; name: string }> = [
    { id: 101, name: '张三' },
    { id: 102, name: '李四' },
    { id: 103, name: '王五' },
  ]

  build() {
    List() {
      ForEach(this.items, (item, index) => {
        ListItem() {
          Text(`${item.name} (ID: ${item.id})`)
            .fontSize(16)
        }
      }, (item, index) => index.toString())  // ❌ 使用 index 作为 key
    }
  }
}

// ✅ 正例:使用对象唯一 ID 作为 key
@Entry
@Component
struct GoodKeyExample {
  @State items: Array<{ id: number; name: string; likes: number }> = [
    { id: 101, name: '张三', likes: 12 },
    { id: 102, name: '李四', likes: 8 },
    { id: 103, name: '王五', likes: 25 },
  ]

  build() {
    List({ space: 8 }) {
      ForEach(this.items, (item) => {
        ListItem() {
          UserCard({ userItem: item })
        }
      }, (item) => item.id.toString())  // ✅ 使用稳定的唯一 ID
    }
    .padding(16)
  }
}

@Component
struct UserCard {
  @ObjectLink userItem: { id: number; name: string; likes: number }

  build() {
    Row() {
      Column({ space: 4 }) {
        Text(this.userItem.name)
          .fontSize(16)
          .fontWeight(FontWeight.Medium)
        Text(`ID: ${this.userItem.id}`)
          .fontSize(12)
          .fontColor('#757575')
      }
      .alignItems(HorizontalAlign.Start)
      .layoutWeight(1)

      Row({ space: 4 }) {
        Image($r('app.media.ic_like'))
          .width(18)
          .height(18)
          .fillColor('#F44336')
        Text(`${this.userItem.likes}`)
          .fontSize(14)
          .fontColor('#F44336')
      }
    }
    .width('100%')
    .padding(12)
    .backgroundColor('#FAFAFA')
    .borderRadius(8)
  }
}
4.3 ForEach 与条件渲染的嵌套使用
ForEach 的 itemGenerator 函数支持包含 if/else 条件渲染逻辑,可根据数据源的不同条件动态生成不同类型的子组件:
@Entry
@Component
struct MixedRenderExample {
  @State dataList: Array<{ type: string; content: string; priority: string }> = [
    { type: 'text', content: '系统通知:今晚维护', priority: 'high' },
    { type: 'image', content: 'app.media.banner', priority: 'normal' },
    { type: 'text', content: '您的订单已发货', priority: 'normal' },
    { type: 'action', content: '立即更新', priority: 'high' },
  ]

  build() {
    List({ space: 10 }) {
      ForEach(this.dataList, (item, index) => {
        ListItem() {
          // 根据数据类型条件渲染不同组件
          if (item.type === 'text') {
            TextMessageItem({ content: item.content, priority: item.priority })
          } else if (item.type === 'image') {
            ImageMessageItem({ imageSrc: item.content })
          } else if (item.type === 'action') {
            ActionMessageItem({ actionText: item.content, priority: item.priority })
          }
        }
      }, (item, index) => `${item.type}_${index}`)
    }
    .padding(16)
  }
}

@Component
struct TextMessageItem {
  @Prop content: string
  @Prop priority: string

  build() {
    Row() {
      Text(this.content)
        .fontSize(14)
        .fontColor(this.priority === 'high' ? '#F44336' : '#424242')
        .layoutWeight(1)

      if (this.priority === 'high') {
        Text('重要')
          .fontSize(10)
          .fontColor(Color.White)
          .backgroundColor('#F44336')
          .padding({ left: 6, right: 6, top: 2, bottom: 2 })
          .borderRadius(4)
      }
    }
    .width('100%')
    .padding(12)
    .backgroundColor('#FAFAFA')
    .borderRadius(8)
  }
}

@Component
struct ImageMessageItem {
  @Prop imageSrc: string

  build() {
    Image($r(this.imageSrc as string))
      .width('100%')
      .height(120)
      .objectFit(ImageFit.Cover)
      .borderRadius(8)
  }
}

@Component
struct ActionMessageItem {
  @Prop actionText: string
  @Prop priority: string

  build() {
    Button(this.actionText)
      .width('100%')
      .height(40)
      .backgroundColor(this.priority === 'high' ? '#F44336' : '#1976D2')
      .fontColor(Color.White)
      .borderRadius(8)
  }
}
五、懒加载渲染(LazyForEach):大数据量的性能保障
5.1 为什么需要 LazyForEach
当数据量超过 100 条时,ForEach 会一次性创建所有组件,导致首屏加载缓慢、内存占用飙升。LazyForEach 采用虚拟滚动机制,仅渲染可视区域内的组件,配合 cachedCount 预加载策略,在流畅度与内存占用之间取得平衡。
5.2 LazyForEach 实战:长列表优化
import { BasicDataSource } from '@kit.ArkUI'

// 自定义数据源
class MessageDataSource extends BasicDataSource {
  private dataArray: Array<{ id: number; title: string; desc: string }> = []

  public totalCount(): number {
    return this.dataArray.length
  }

  public getData(index: number): { id: number; title: string; desc: string } {
    return this.dataArray[index]
  }

  public pushData(data: { id: number; title: string; desc: string }): void {
    this.dataArray.push(data)
    this.notifyDataAdd(this.dataArray.length - 1)
  }

  public initData(count: number): void {
    for (let i = 0; i < count; i++) {
      this.dataArray.push({
        id: 1000 + i,
        title: `消息标题 ${i + 1}`,
        desc: `这是第 ${i + 1} 条消息的详细描述内容,用于展示长列表性能优化效果。`,
      })
    }
    this.notifyDataReload()
  }
}

@Entry
@Component
struct LazyListDemo {
  private dataSource: MessageDataSource = new MessageDataSource()

  aboutToAppear() {
    // 初始化 10000 条数据
    this.dataSource.initData(10000)
  }

  build() {
    Column() {
      Text(`长列表演示 (${this.dataSource.totalCount()} 条数据)`)
        .fontSize(18)
        .fontWeight(FontWeight.Bold)
        .margin(16)

      List({ space: 8 }) {
        LazyForEach(this.dataSource, (item: { id: number; title: string; desc: string }) => {
          ListItem() {
            MessageItem({ message: item })
          }
        }, (item) => item.id.toString())
      }
      .width('100%')
      .layoutWeight(1)
      .cachedCount(5)  // 预加载屏幕外 5 个组件
      .edgeEffect(EdgeEffect.Spring)
    }
    .width('100%')
    .height('100%')
    .backgroundColor('#F5F5F5')
  }
}

@Component
struct MessageItem {
  @Prop message: { id: number; title: string; desc: string }

  build() {
    Column({ space: 6 }) {
      Text(this.message.title)
        .fontSize(15)
        .fontWeight(FontWeight.Medium)
        .fontColor('#212121')
        .maxLines(1)
        .textOverflow({ overflow: TextOverflow.Ellipsis })
        .width('100%')

      Text(this.message.desc)
        .fontSize(13)
        .fontColor('#757575')
        .maxLines(2)
        .textOverflow({ overflow: TextOverflow.Ellipsis })
        .width('100%')
    }
    .width('100%')
    .padding(12)
    .backgroundColor(Color.White)
    .borderRadius(8)
  }
}
5.3 性能优化关键参数
| 参数 | 作用 | 推荐值 | 说明 |
|---|---|---|---|
cachedCount | 预加载屏幕外组件数量 | 1~5 | 平衡内存与流畅度 |
keyGenerator | 组件唯一标识 | 稳定 ID | 确保组件正确复用 |
edgeEffect | 边缘回弹效果 | Spring | 提升交互体验 |
| 组件提取 | 列表项独立组件 | 必做 | 减少父组件重建范围 |
六、状态管理服务层与渲染控制的协同优化
6.1 状态管理 V2 的属性级观察
在状态管理 V1 中,状态更新以对象为单位进行观察,即使只修改对象中的一个属性,也会触发整个对象的依赖组件重渲染。状态管理 V2 优化为属性级观察,仅当具体属性变化时才触发相关组件更新,显著降低渲染开销。
// 状态管理 V2 示例:精细化渲染控制
import { AppStorageV2 } from '@kit.ArkUI'

@ObservedV2
class UserProfile {
  @Trace name: string = ''
  @Trace avatar: string = ''
  @Trace level: number = 1
  @Trace isVip: boolean = false
}

@Entry
@ComponentV2
struct StateV2RenderDemo {
  @Local user: UserProfile = new UserProfile()

  aboutToAppear() {
    this.user.name = '张三'
    this.user.avatar = 'app.media.avatar_01'
    this.user.level = 5
    this.user.isVip = true
  }

  build() {
    Column({ space: 16 }) {
      // 仅当 name 变化时重渲染
      Text(this.user.name)
        .fontSize(24)
        .fontWeight(FontWeight.Bold)

      // 仅当 avatar 变化时重渲染
      Image($r(this.user.avatar))
        .width(80)
        .height(80)
        .borderRadius(40)

      Row({ space: 8 }) {
        // 仅当 level 变化时重渲染
        Text(`Lv.${this.user.level}`)
          .fontSize(14)
          .fontColor('#FF9800')
          .backgroundColor('#FFF3E0')
          .padding({ left: 8, right: 8, top: 2, bottom: 2 })
          .borderRadius(4)

        // 仅当 isVip 变化时重渲染
        if (this.user.isVip) {
          Text('VIP')
            .fontSize(12)
            .fontColor('#FFD700')
            .backgroundColor('#FFFDE7')
            .padding({ left: 6, right: 6, top: 2, bottom: 2 })
            .borderRadius(4)
        }
      }

      Button('升级等级')
        .onClick(() => {
          this.user.level++  // 仅触发 level 相关组件重渲染
        })

      Button('切换VIP状态')
        .onClick(() => {
          this.user.isVip = !this.user.isVip  // 仅触发 isVip 相关组件重渲染
        })
    }
    .width('100%')
    .height('100%')
    .padding(20)
    .backgroundColor('#F5F5F5')
  }
}
6.2 渲染控制综合策略矩阵
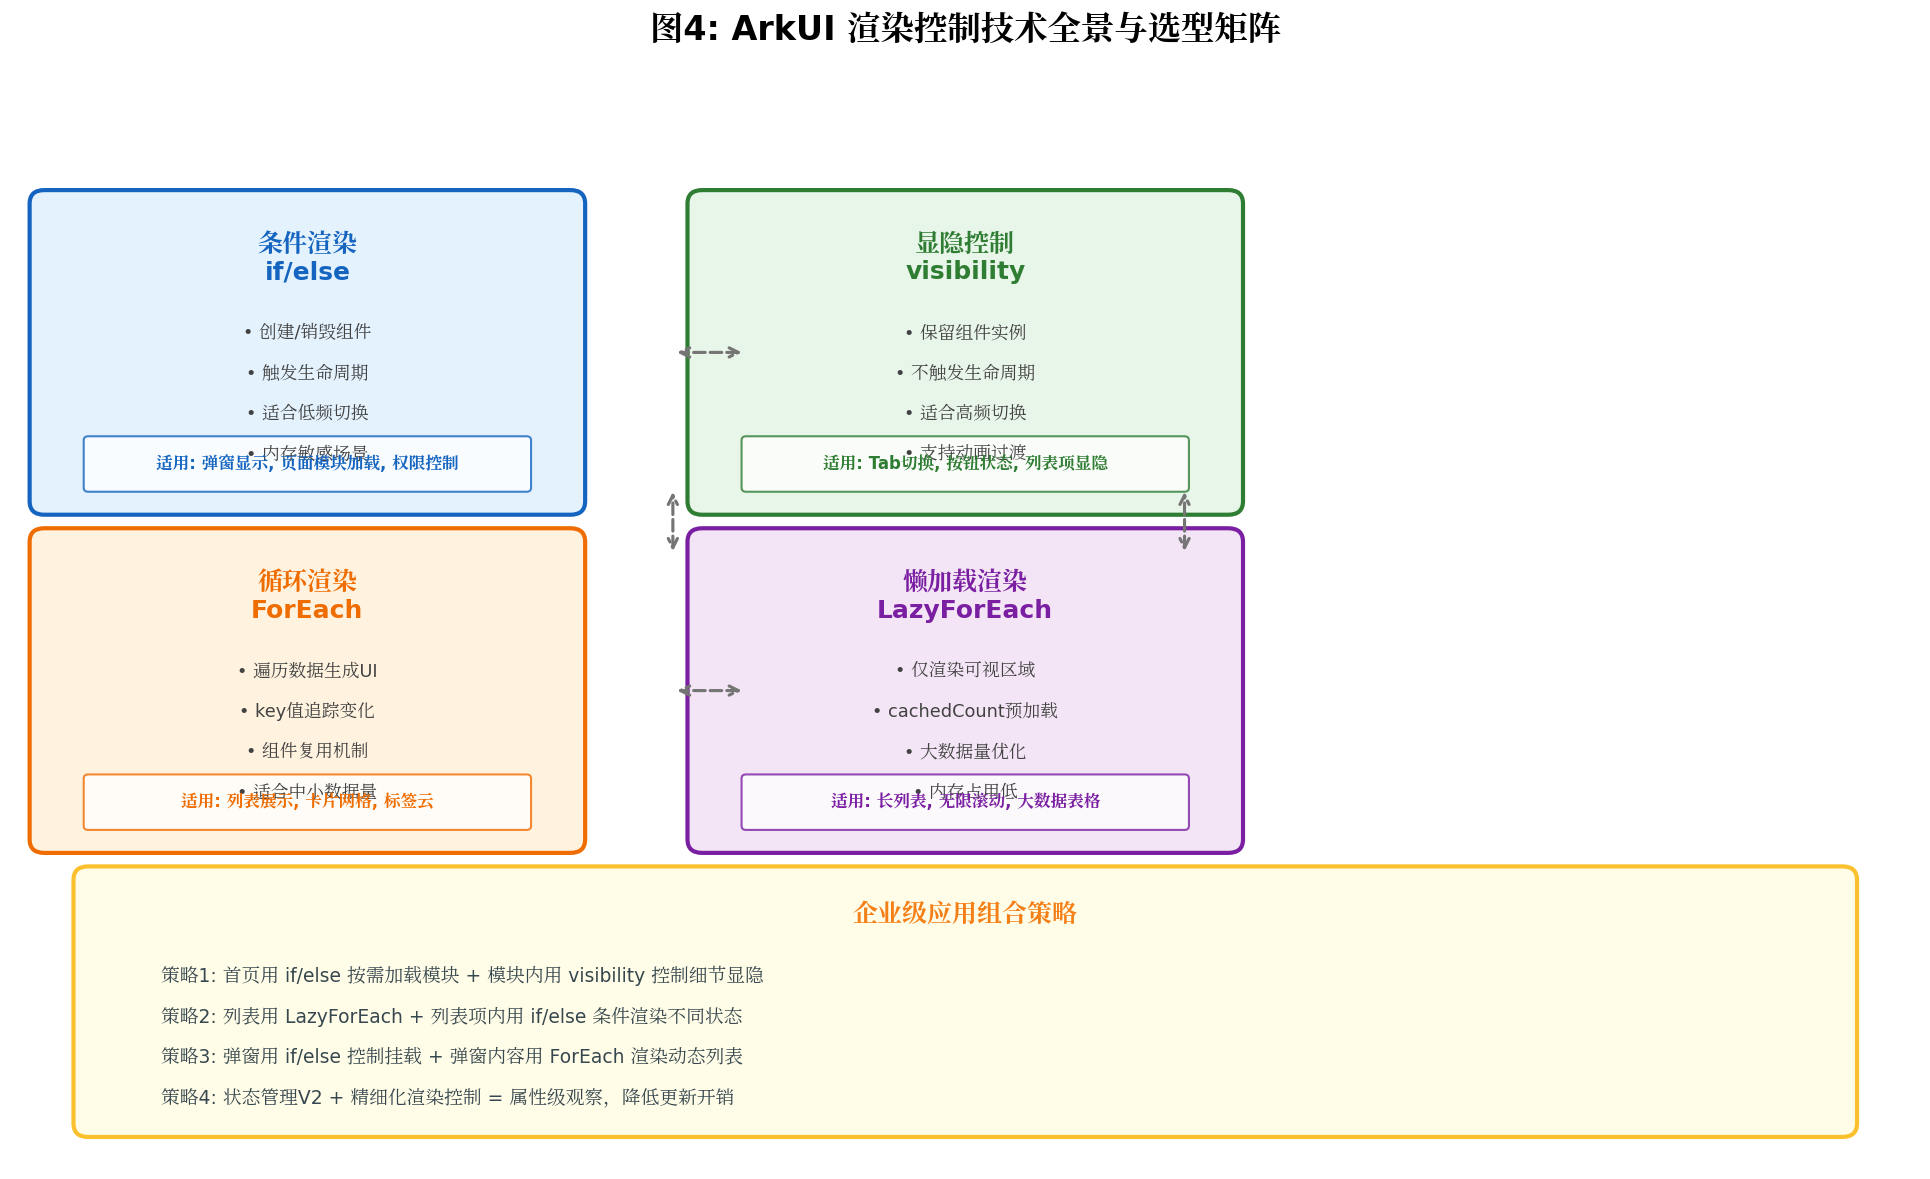
在企业级应用开发中,渲染控制不是单一技术的选择,而是多种机制的组合运用:
策略一:首页模块化加载
使用 if/else 按需加载首页各功能模块,减少冷启动时的组件创建数量。每个模块内部使用 visibility 控制子元素的显隐,避免模块内高频切换带来的重建开销。
策略二:长列表 + 条件渲染组合
列表容器使用 LazyForEach 保障大数据量下的滚动流畅度,列表项内部根据数据状态使用 if/else 条件渲染不同的 UI 形态(如已读/未读、高优先级/普通优先级)。
策略三:插槽内容动态切换
结合前序文章的插槽机制,通过状态变量控制传入插槽的 @Builder 函数,实现组件结构复用与内容动态切换的完美结合。
七、性能优化最佳实践总结
7.1 渲染控制黄金法则
-
高频切换用 visibility,低频切换用 if/else:这是选择渲染控制方式的首要原则。
-
始终为 ForEach 提供稳定的唯一 key:禁止使用
index作为 key,优先使用业务唯一标识(如id、uuid)。 -
大数据量列表必用 LazyForEach:数据量超过 100 条时,
ForEach会导致严重的内存和性能问题。 -
复杂列表项提取为独立子组件:减少父组件的重建范围,提高渲染效率。
-
迁移到状态管理 V2:利用属性级观察能力,避免对象级更新带来的过度渲染。
-
避免在 Builder 函数中创建临时对象:
@Builder在每次状态更新时可能重新执行,内部应避免复杂计算。 -
合理使用 @Reusable 组件复用:在列表滑动场景中,复用组件可显著提升帧率。
7.2 性能监控与调优
// 使用生命周期日志分析渲染频率
@Component
struct MonitoredComponent {
  @State renderCount: number = 0

  aboutToAppear() {
    console.info('[性能监控] MonitoredComponent 创建')
  }

  aboutToDisappear() {
    console.info('[性能监控] MonitoredComponent 销毁')
  }

  aboutToReuse() {
    console.info('[性能监控] MonitoredComponent 复用')
  }

  build() {
    this.renderCount++
    console.info(`[性能监控] MonitoredComponent 第 ${this.renderCount} 次渲染`)

    Column() {
      Text(`渲染次数: ${this.renderCount}`)
        .fontSize(14)
        .fontColor('#757575')
    }
    .padding(12)
  }
}
八、总结
本文从状态管理服务层的视角,系统解析了 HarmonyOS ArkUI 中四大渲染控制机制的技术原理、适用边界与性能特征。条件渲染(if/else)通过精准控制组件生命周期实现内存优化;显隐控制(visibility)通过保留组件实例实现高频切换的性能保障;循环渲染(ForEach)通过键值管理实现组件复用;懒加载渲染(LazyForEach)通过虚拟滚动实现大数据量的流畅展示。
在实际开发中,没有绝对最优的渲染控制方式,只有最适合当前场景的选型组合。掌握"高频用 visibility、低频用 if/else、列表用 ForEach/LazyForEach、状态用 V2"的决策框架,结合性能监控与持续调优,才能构建出真正丝滑流畅的鸿蒙应用。
转载自:https://blog.csdn.net/u014727709/article/details/163540800
欢迎 👍点赞✍评论⭐收藏,欢迎指正

作为“人工智能6S店”的官方数字引擎,为AI开发者与企业提供一个覆盖软硬件全栈、一站式门户。
更多推荐

 3
3 0
0- 0


 已为社区贡献160条内容

所有评论(0)