
鸿蒙新特性:@ohos.notificationManager 通知管理实验室实战 —— 发布通知、插槽管理与角标控制
引言
通知是应用与用户沟通的第一公里。一条及时、清晰、分类正确的通知,能让用户在锁屏上就能获取关键信息,点击即可回到应用完成操作。HarmonyOS NEXT 通过 @ohos.notificationManager 模块将通知发布、管理、插槽分类、角标控制等能力统一暴露给开发者。
@ohos.notificationManager 属于 @kit.NotificationKit,是通知管理的核心入口。它最让人惊喜的设计是:发布通知无需任何权限。这意味着任何应用都可以自由地推送通知——社交通信、服务提醒、内容资讯、实况窗——只需构建好 NotificationRequest 请求对象,调用 publish() 即可。
本文将深入讲解 @ohos.notificationManager 的通知发布流程、插槽分类机制、状态查询接口、角标控制能力,并构建一个"通知管理实验室"Demo,让你在一个页面中完整体验通知的发布、管理、插槽配置和状态追踪。
一、API 架构:以 NotificationRequest 为核心
1.1 核心设计理念
@ohos.notificationManager 的核心能力可以概括为五个字:发、管、查、标、跳。
- 发:通过
publish(request)发布通知,通过cancel(id, label)或cancelAll()取消 - 管:通过
addSlot(type)/getSlots()/removeSlot(type)管理通知插槽(分类) - 查:通过
isNotificationEnabled()/getActiveNotifications()查询通知状态 - 标:通过
setBadgeNumber(num)/getBadgeNumber()控制桌面角标 - 跳:通过
requestEnableNotification()请求通知权限,应用内弹出系统权限对话框
这五个能力构成了完整的通知管理闭环:先检查通知是否被用户关闭,然后添加通知插槽定义分类,接着发布通知,查询活跃通知列表,控制桌面角标。
1.2 NotificationRequest —— 通知构建单元
NotificationRequest 是所有通知发布操作的核心数据结构:
interface NotificationRequest {
  id: number;                              // 通知 ID,同 ID + 同 label 会替换旧通知
  content: NotificationContent;            // 通知内容(标题、正文等)
  notificationSlotType?: SlotType;         // 通知插槽类型(分类)
  label?: string;                          // 通知标签,用于分组管理
  deliveryTime?: number;                   // 定时发送时间戳
  showDeliveryTime?: boolean;              // 是否显示发送时间
  groupName?: string;                      // 通知分组名
  template?: NotificationTemplate;         // 通知模板
  isFloatingIcon?: boolean;               // 是否在状态栏显示浮动图标
  distributedOption?: DistributedOptions;  // 分布式通知选项
  notificationFlags?: NotificationFlags;   // 通知标志位
}
在我们的 Demo 中,最小化的 NotificationRequest 只需要三个字段:
const request: notificationManager.NotificationRequest = {
  id: Date.now(),
  content: {
    notificationContentType: notificationManager.ContentType.NOTIFICATION_CONTENT_BASIC_TEXT,
    normal: {
      title: '通知标题',
      text: '这是通知正文内容'
    }
  },
  notificationSlotType: notificationManager.SlotType.SOCIAL_COMMUNICATION
};
1.3 通知内容类型(ContentType)
ContentType 枚举定义了通知正文的展现形式:
| 枚举值 | 说明 | 对应内容字段 |
|---|---|---|
| NOTIFICATION_CONTENT_BASIC_TEXT | 基本文本 | normal: { title, text } |
| NOTIFICATION_CONTENT_LONG_TEXT | 长文本 | longText: { title, text, longText, ... } |
| NOTIFICATION_CONTENT_MULTILINE | 多行文本 | multiLine: { title, text, lines, ... } |
| NOTIFICATION_CONTENT_PICTURE | 图片通知 | picture: { title, text, picture, ... } |
| NOTIFICATION_CONTENT_SYSTEM_LIVE_VIEW | 系统实况窗 | systemLiveView: { ... } |
Demo 中使用最基本的 NOTIFICATION_CONTENT_BASIC_TEXT,足够展示通知发布的核心流程。对于更丰富的通知样式,只需切换 notificationContentType 和对应的 content 子字段即可。
1.4 通知插槽类型(SlotType)
插槽是 HarmonyOS 通知系统中最重要的概念之一——它决定了通知的分类归属和展示行为:
| 枚举值 | 数值 | 说明 | 默认重要等级 |
|---|---|---|---|
| UNKNOWN_TYPE | 0 | 未知类型 | LOW |
| SOCIAL_COMMUNICATION | 1 | 社交通信(聊天消息等) | HIGH |
| SERVICE_INFORMATION | 2 | 服务信息(订单、物流等) | HIGH |
| CONTENT_INFORMATION | 3 | 内容资讯(新闻、推荐等) | LOW |
| LIVE_VIEW | 4 | 实况窗(外卖、导航等) | DEFAULT |
| CUSTOMER_SERVICE | 5 | 客服消息 | DEFAULT |
| OTHER_TYPES | 0xFFFF | 其他类型 | LOW |
每种插槽类型对应一个 NotificationSlot 对象,其中 level 字段控制通知的展示级别:
- LEVEL_HIGH(3级):顶部弹出横幅 + 状态栏图标 + 锁屏展示
- LEVEL_DEFAULT(2级):状态栏图标 + 锁屏展示,不弹出横幅
- LEVEL_LOW(1级):仅在通知中心可见,不弹出横幅,不显示图标
二、核心 API 详解
2.1 publish() —— 发布通知
function publish(request: NotificationRequest): Promise<void>;
publish() 无需任何权限。如果新通知的 id 和 label 与已有通知相同,新通知会替换旧通知:
const req: notificationManager.NotificationRequest = {
  id: Date.now(),
  content: {
    notificationContentType: notificationManager.ContentType.NOTIFICATION_CONTENT_BASIC_TEXT,
    normal: {
      title: '新消息',
      text: '你有一条来自好友的新消息'
    }
  },
  notificationSlotType: notificationManager.SlotType.SOCIAL_COMMUNICATION
};

notificationManager.publish(req).then(() => {
  console.log('通知已发布');
}).catch((err: Error) => {
  console.error('发布失败:', err.message);
});
发布可能失败的原因包括:通知被用户关闭(错误码 1600004)、通知插槽被禁用(错误码 1600005)、发布频率超限(错误码 1600009)等。
2.2 cancel() / cancelAll() —— 取消通知
function cancel(id: number, label?: string): Promise<void>;
function cancelAll(): Promise<void>;
cancel() 取消指定 ID 和 label 的通知,cancelAll() 取消当前应用发布的所有通知。取消操作同样无需权限:
// 取消特定通知
notificationManager.cancel(12345).then(() => {
  console.log('通知已取消');
});

// 取消全部通知
notificationManager.cancelAll().then(() => {
  console.log('全部通知已清除');
});
2.3 isNotificationEnabled() —— 检查通知开关
function isNotificationEnabled(): Promise<boolean>;
function isNotificationEnabledSync(): boolean;
同步版本 isNotificationEnabledSync() 立即返回,适合在页面初始化时快速检查:
const enabled = notificationManager.isNotificationEnabledSync();
if (!enabled) {
  // 提示用户开启通知权限
  notificationManager.requestEnableNotification().then(() => {
    console.log('已弹出通知权限对话框');
  });
}
2.4 getActiveNotifications() —— 获取活跃通知
function getActiveNotifications(): Promise<Array<NotificationRequest>>;
function getActiveNotificationCount(): Promise<number>;
getActiveNotifications() 返回当前应用仍在通知栏中展示的所有通知。getActiveNotificationCount() 仅返回数量:
notificationManager.getActiveNotificationCount().then((count: number) => {
  this.activeCount = count;
});
2.5 插槽管理
function addSlot(type: SlotType): Promise<void>;
function getSlots(): Promise<Array<NotificationSlot>>;
function removeSlot(type: SlotType): Promise<void>;
插槽必须在发布通知之前创建。如果发布了某个插槽类型的通知但该插槽尚未添加,系统会自动创建默认配置的插槽:
// 添加自定义插槽
notificationManager.addSlot(notificationManager.SlotType.CUSTOMER_SERVICE).then(() => {
  console.log('客服消息插槽已添加');
});

// 查询所有插槽
notificationManager.getSlots().then((slots) => {
  slots.forEach((slot) => {
    console.log('插槽类型:', slot.notificationType, '级别:', slot.notificationLevel);
  });
});
注意 NotificationSlot 返回的字段中,type 和 level 字段来自旧版 @ohos.notification 命名空间(已弃用),新代码应使用 notificationType 和 notificationLevel 字段。
2.6 角标管理
function setBadgeNumber(badgeNumber: number): Promise<void>;
function getBadgeNumber(): Promise<number>;
setBadgeNumber() 设置桌面应用图标上的角标数字。传入 0 可清除角标:
notificationManager.setBadgeNumber(5).then(() => {
  console.log('角标已设为 5');
});

notificationManager.getBadgeNumber().then((num: number) => {
  console.log('当前角标数:', num);
});
三、权限模型
3.1 无需权限的操作
以下操作在 HarmonyOS 中无需任何权限声明:
publish()— 发布通知cancel()/cancelAll()— 取消通知isNotificationEnabled()/isNotificationEnabledSync()— 检查通知开关getActiveNotifications()/getActiveNotificationCount()— 查询活跃通知addSlot()/getSlots()/removeSlot()— 插槽管理setBadgeNumber()/getBadgeNumber()— 角标管理
这与 Android 的设计形成鲜明对比——在 Android 中,从 Android 13(API 33)开始,发布通知需要 POST_NOTIFICATIONS 运行时权限,用户可以选择拒绝。
3.2 请求通知权限
尽管发布通知不需要权限,但如果用户在系统设置中关闭了应用的通知开关,publish() 会返回错误码 1600004。此时可以使用 requestEnableNotification() 弹出系统对话框引导用户开启:
notificationManager.requestEnableNotification().then(() => {
  // 用户已做出选择(开启或保持关闭)
  const enabled = notificationManager.isNotificationEnabledSync();
  if (enabled) {
    // 用户开启了通知
  }
});
四、实战 Demo:通知管理实验室
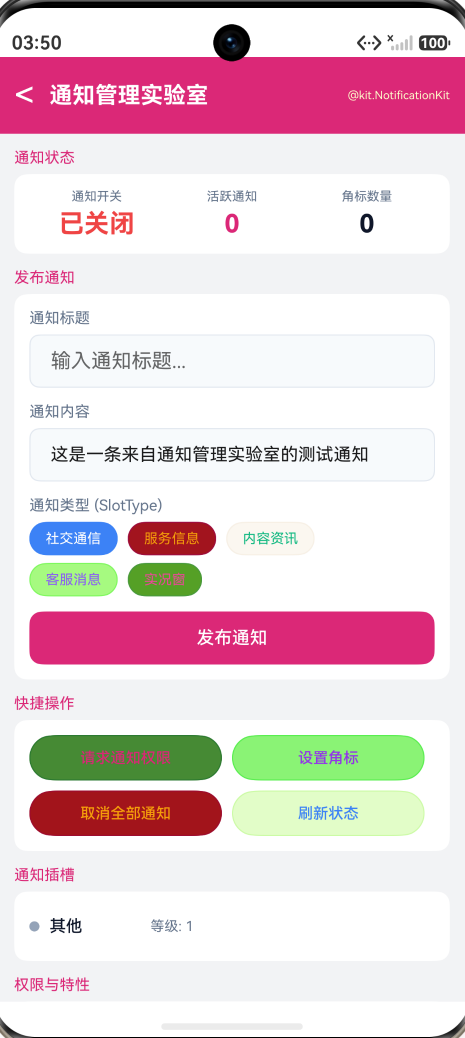
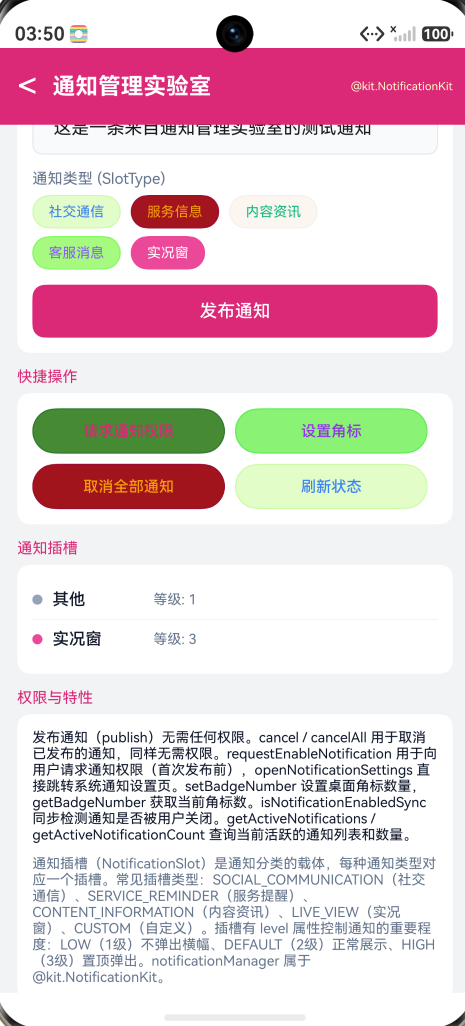
本节构建一个完整的通知管理实验室,在一个页面中覆盖通知发布、状态查询、插槽管理和操作日志。
4.1 页面设计
页面分为六个功能区域:
-
通知状态面板:三栏展示通知开关状态、活跃通知数量、角标数值,颜色编码直观显示状态
-
发布通知表单:通知标题输入框 + 正文输入框 + 5 种 SlotType 可选的插槽选择器 + 发布按钮
-
快捷操作:请求通知权限、设置随机角标、取消全部通知、刷新状态四个按钮
-
通知插槽管理:展示所有已添加的插槽,包括类型标签、重要等级和描述信息
-
操作日志:记录每次操作的完整历史,区分系统信息(灰色)、成功操作(绿色)、错误(红色)
-
权限与特性说明:两个知识卡片,总结 API 能力
4.2 核心实现
发布通知——构建 NotificationRequest 并调用 publish():
private publishNotification(): void {
  const title = this.titleInput.trim() || '通知实验室';
  const body = this.bodyInput.trim() || '测试通知内容';
  const request: notificationManager.NotificationRequest = {
    id: Date.now(),
    content: {
      notificationContentType: notificationManager.ContentType.NOTIFICATION_CONTENT_BASIC_TEXT,
      normal: { title: title, text: body }
    },
    notificationSlotType: this.selectedSlot
  };
  notificationManager.publish(request).then(() => {
    this.addLog('已发布通知: ' + title, 'success');
    this.getActiveCount();
  }).catch((e: Error) => {
    this.addLog('发布失败: ' + e.message, 'error');
  });
}
插槽查询——处理新旧两套字段的兼容性:
private getSlots(): void {
  notificationManager.getSlots().then((slotList) => {
    const result: NotifSlot[] = [];
    for (let i = 0; i < slotList.length; i++) {
      const s = slotList[i];
      // 优先使用新版字段 notificationType/notificationLevel
      const st = s.notificationType !== undefined ? s.notificationType :
        (s.type !== undefined ? s.type : 0);
      const sl = s.notificationLevel !== undefined ? s.notificationLevel :
        (s.level !== undefined ? s.level : 2);
      result.push({
        type: Number(st), label: this.slotTypeLabel(Number(st)),
        level: Number(sl), desc: s.desc || ''
      });
    }
    this.slots = result;
  });
}
这里的关键技巧是优先使用 notificationType 和 notificationLevel 字段(新版 API),并回退到 type 和 level 字段(旧版兼容)。
角标设置——随机生成 1-10 的数字并设置:
private setBadge(): void {
  const num = Math.floor(Math.random() * 10) + 1;
  notificationManager.setBadgeNumber(num).then(() => {
    this.badgeNumber = num.toString();
    this.addLog('角标已设为 ' + num, 'success');
  });
}
4.3 交互方式
Demo 提供四个核心交互点:
-
发布通知:在表单中输入标题和正文,从 5 种插槽类型中选择一种(社交通信、服务信息、内容资讯、客服消息、实况窗),点击"发布通知"按钮。通知会立即出现在系统通知栏中,活跃通知计数同步更新。
-
快捷操作:四个快捷按钮覆盖常见操作——请求通知权限会弹出系统对话框,设置角标会随机设置桌面角标数字,取消全部通知清除所有已发布通知,刷新状态重新查询全部数据。
-
插槽查看:插槽管理区域展示系统中已添加的通知插槽,包括类型标签(带彩色圆形指示器)、重要等级和描述。开发者可以直观地看到通知分类的全貌。
-
状态追踪:顶部的三栏状态面板实时反映通知开关状态(绿色"已开启"或红色"已关闭")、活跃通知数量和角标数值,所有操作历史记录在底部日志中。
五、@ohos.notification 与 @ohos.notificationManager 的关系
HarmonyOS 通知系统中存在两个相关的命名空间,理解它们的关系对避免类型错误至关重要:
| 维度 | @ohos.notification | @ohos.notificationManager |
|---|---|---|
| 定位 | 旧版通知 API(逐步弃用) | 新版通知 API(推荐使用) |
| SlotType | 不含 LIVE_VIEW | 完整 7 种类型 |
| 通知发布 | 部分方法已废弃 | publish() 为主要接口 |
| 推荐使用 | 仅用于类型兼容 | 新项目首选 |
在编写代码时,应统一使用 @ohos.notificationManager 的 SlotType 和 ContentType。但如果遇到从 getSlots() 返回的 NotificationSlot 对象,其 type 字段可能来自旧版命名空间——此时需要做类型转换,优先读取 notificationType 字段。
六、ArkTS 严格模式注意事项
6.1 保留名称
ArkTS 中某些名称是保留的,不能用作 @Component 中的属性名。例如 activeCount 会导致编译错误(“Methods, properties and accessors in structures decorated by ‘@Component’ cannot have name as ‘activeCount’”)。应改用 notifCount 等替代名称。
6.2 跨模块类型不兼容
notification.SlotType 和 notificationManager.SlotType 是两个不同的类型,即使数值相同也不能互相赋值。解决方法是使用 number 类型作为中间表示:
// 正确:使用 number 作为中间类型
const st: number = Number(s.notificationType ?? s.type ?? 0);
this.slotTypeLabel(st);

// 错误:直接使用 notificationManager.SlotType 接收 notification.SlotType
const st: notificationManager.SlotType = s.type; // 类型错误
6.3 NotificationRequest 字段选择
构建通知请求时,应使用 notificationSlotType 而非 slotType:
// 正确:使用新版字段
const req = { notificationSlotType: notificationManager.SlotType.SOCIAL_COMMUNICATION, ... };

// 错误:slotType 接受 notification.SlotType,与 notificationManager.SlotType 不兼容
const req = { slotType: notificationManager.SlotType.SOCIAL_COMMUNICATION, ... };
七、实际应用场景
7.1 聊天消息通知
private sendMessageNotification(sender: string, message: string): void {
  notificationManager.publish({
    id: Date.now(),
    content: {
      notificationContentType: notificationManager.ContentType.NOTIFICATION_CONTENT_BASIC_TEXT,
      normal: { title: sender, text: message }
    },
    notificationSlotType: notificationManager.SlotType.SOCIAL_COMMUNICATION
  }).catch((e: Error) => {
    // 通知被关闭时降级为应用内提示
    this.showInAppToast(sender + ': ' + message);
  });
}
7.2 下载完成通知
private notifyDownloadComplete(fileName: string): void {
  notificationManager.publish({
    id: 1001,
    content: {
      notificationContentType: notificationManager.ContentType.NOTIFICATION_CONTENT_BASIC_TEXT,
      normal: { title: '下载完成', text: fileName + ' 已下载完毕' }
    },
    notificationSlotType: notificationManager.SlotType.SERVICE_INFORMATION
  });
}
7.3 角标同步未读消息
private syncUnreadBadge(unreadCount: number): void {
  if (unreadCount > 0) {
    notificationManager.setBadgeNumber(unreadCount);
  } else {
    notificationManager.setBadgeNumber(0);
  }
}
八、总结
@ohos.notificationManager 是 HarmonyOS NEXT 中通知管理的核心模块。通过本文的学习,你应该已经掌握:
- 通知发布:
publish(request)无需权限,构建NotificationRequest最少只需 id + content + notificationSlotType 三个字段 - 内容类型:
ContentType枚举支持基本文本、长文本、多行、图片等多种通知展现形式 - 插槽分类:
SlotType定义了 7 种通知分类,每种有自己的默认重要等级(LOW/DEFAULT/HIGH),决定通知的展示行为 - 状态查询:
isNotificationEnabledSync()同步检查开关,getActiveNotifications()查询活跃通知列表 - 角标控制:
setBadgeNumber()/getBadgeNumber()管理桌面角标 - 类型兼容:注意
@ohos.notification与@ohos.notificationManager的类型差异,统一使用新版 API
@ohos.notificationManager 的最佳使用模式可以总结为:
先检查开关,再创建插槽,然后发布通知,适时清理,用角标引导用户回归。
通知是应用最直接的触达用户方式,但滥用通知会导致用户关闭通知权限。合理使用通知插槽分类、尊重用户的通知偏好、在合适的时机发送有价值的内容——这些是优秀的通知策略的核心原则。将通知管理作为应用体验的有机组成部分,而非简单的消息推送通道。
@ohos.notificationManager 属于 @kit.NotificationKit,与 Android 的 NotificationManager 和 iOS 的 UNUserNotificationCenter 定位类似,但在权限模型上更加开放——发布通知无需权限的设计大大降低了接入门槛。同时,插槽机制提供了一套系统级的通知分类框架,让用户可以精细地控制每种类型通知的展示行为。

作为“人工智能6S店”的官方数字引擎,为AI开发者与企业提供一个覆盖软硬件全栈、一站式门户。
更多推荐

 1
1 0
0- 0


 已为社区贡献286条内容

所有评论(0)