
Flutter鸿蒙特性展示台:GestureDetector手势交互与设备选择
引言
在移动应用开发中,手势交互是用户与应用之间最直接的沟通方式。一个良好的手势交互设计能够极大提升用户体验,让操作更加直观和自然。在"鸿蒙特性展示台"应用中,我们使用 GestureDetector 组件实现了丰富的手势交互功能,特别是在分布式设备协同页面中的设备选择交互。
本文将深入探讨 GestureDetector 组件的原理、用法、高级特性以及在设备选择中的实际应用。我们将通过源码分析和实战案例,帮助读者全面掌握手势交互的设计与实现技巧,并理解其在鸿蒙特性展示中的设计思想。
一、GestureDetector组件概述
1.1 GestureDetector的定义
GestureDetector 是 Flutter 中的一个手势检测组件,它能够识别多种手势操作,如点击、双击、长按、滑动、缩放等。通过包裹子组件,GestureDetector 可以将手势事件传递给相应的回调函数,实现丰富的交互效果。
1.2 手势类型分类
Flutter 中的手势可以分为以下几类:
| 手势类别 | 手势类型 | 回调函数 |
|---|---|---|
| 点击手势 | 单击 | onTap |
| 双击 | onDoubleTap | |
| 长按 | onLongPress | |
| 长按结束 | onLongPressEnd | |
| 滑动手势 | 水平滑动 | onHorizontalDragStart/Move/End |
| 垂直滑动 | onVerticalDragStart/Move/End | |
| 任意方向滑动 | onPanStart/Move/End | |
| 缩放手势 | 捏合缩放 | onScaleStart/Update/End |
| 拖拽手势 | 拖拽开始/移动/结束 | onDragStart/Move/End |
1.3 GestureDetector核心参数
GestureDetector({
  Key? key,
  this.child,                    // 子组件
  this.onTap,                    // 单击回调
  this.onDoubleTap,              // 双击回调
  this.onLongPress,              // 长按回调
  this.onLongPressUp,            // 长按抬起回调
  this.onLongPressEnd,           // 长按结束回调
  this.onLongPressMoveUpdate,    // 长按移动回调
  this.onHorizontalDragStart,    // 水平滑动开始
  this.onHorizontalDragUpdate,   // 水平滑动更新
  this.onHorizontalDragEnd,      // 水平滑动结束
  this.onVerticalDragStart,      // 垂直滑动开始
  this.onVerticalDragUpdate,     // 垂直滑动更新
  this.onVerticalDragEnd,        // 垂直滑动结束
  this.onPanStart,               // 任意方向滑动开始
  this.onPanUpdate,              // 任意方向滑动更新
  this.onPanEnd,                 // 任意方向滑动结束
  this.onScaleStart,             // 缩放开始
  this.onScaleUpdate,            // 缩放更新
  this.onScaleEnd,               // 缩放结束
  this.behavior = HitTestBehavior.deferToChild,  // 命中测试行为
  this.excludeFromSemantics = false,  // 是否排除语义
})
1.4 HitTestBehavior枚举值
enum HitTestBehavior {
  deferToChild,     // 默认,子组件处理命中测试
  opaque,           // 不透明,整个区域接收点击
  translucent,      // 半透明,父组件和子组件都可以接收点击
}
二、项目中的手势交互应用
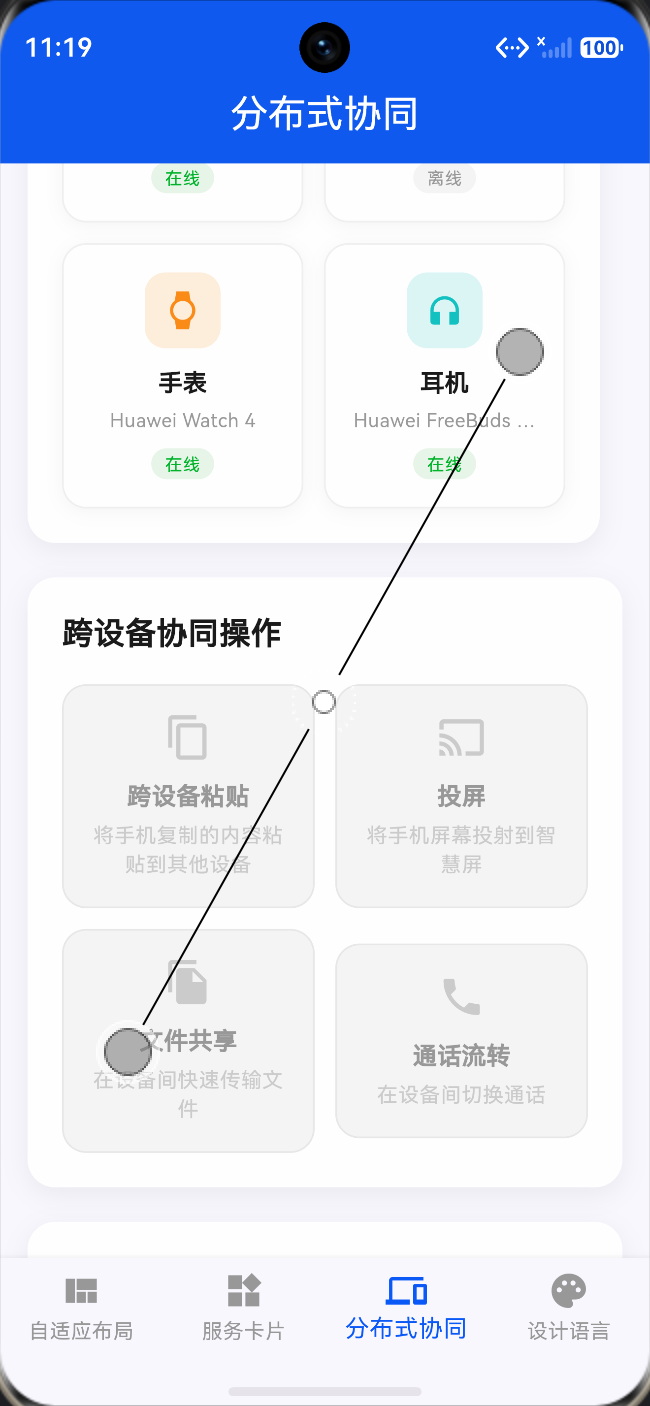
2.1 设备卡片点击选择
在分布式设备协同页面中,我们使用 GestureDetector 实现了设备卡片的点击选择功能:
Widget _buildDeviceCard(DeviceInfo device) {
  final isOnline = device.status == '在线';
  final isSelected = _selectedDevice == device.name;

  return GestureDetector(
    onTap: () {
      if (isOnline) {
        _selectDevice(device.name);
      }
    },
    child: Container(
      width: 140,
      padding: const EdgeInsets.all(16),
      decoration: BoxDecoration(
        color: isSelected ? const Color(0xFF0A59F7).withValues(alpha: 0.06) : Colors.white,
        borderRadius: BorderRadius.circular(14),
        border: Border.all(
          color: isSelected ? const Color(0xFF0A59F7) : const Color(0xFFF0F0F0),
          width: 1,
        ),
        boxShadow: [
          BoxShadow(
            color: Colors.black.withValues(alpha: 0.04),
            blurRadius: 8,
            offset: const Offset(0, 2),
          ),
        ],
      ),
      // ... 省略其他内容
    ),
  );
}
2.2 状态管理实现
class _DistributedDevicePageState extends State<DistributedDevicePage> {
  String _selectedDevice = '手机';
  bool _isConnected = false;

  void _selectDevice(String deviceName) {
    setState(() {
      _selectedDevice = deviceName;
    });
  }

  void _toggleConnection(bool value) {
    setState(() {
      _isConnected = value;
    });
  }
}
2.3 服务卡片点击反馈
在服务卡片页面中,GestureDetector 也用于实现卡片的点击交互:
Widget _buildServiceCard({
  required IconData icon,
  required String title,
  required String subtitle,
  required Color color,
}) {
  return GestureDetector(
    onTap: () {
      // 处理服务卡片点击
    },
    child: Container(
      padding: const EdgeInsets.all(16),
      decoration: BoxDecoration(
        color: color.withValues(alpha: 0.06),
        borderRadius: BorderRadius.circular(16),
      ),
      // ... 省略其他内容
    ),
  );
}
三、手势识别原理
3.1 手势识别流程
Flutter 的手势识别系统采用了责任链模式,手势识别流程如下:
- 指针事件阶段:当用户触摸屏幕时,产生
PointerDownEvent事件 - 手势竞技场阶段:多个手势识别器竞争处理事件
- 手势识别阶段:获胜的手势识别器处理事件并触发回调
- 手势结束阶段:产生
PointerUpEvent或PointerCancelEvent事件
3.2 手势竞技场机制
Flutter 使用手势竞技场(Gesture Arena)来管理多个手势识别器之间的竞争:
┌──────────────────────────────────────────────────────────────┐
│                    Gesture Arena                             │
├──────────────────────────────────────────────────────────────┤
│  PointerDownEvent                                            │
│       │                                                      │
│       ▼                                                      │
│  ┌──────────────┐  ┌──────────────┐  ┌──────────────┐       │
│  │ TapGesture   │  │ LongPress    │  │ DragGesture  │       │
│  │ Recognizer   │  │ Recognizer   │  │ Recognizer   │       │
│  └──────┬───────┘  └──────┬───────┘  └──────┬───────┘       │
│         │                 │                 │                │
│         ▼                 ▼                 ▼                │
│  ┌─────────────────────────────────────────────────────┐     │
│  │              竞争阶段 (Competition)                  │     │
│  │  - Tap: 等待确认是否为单击                           │     │
│  │  - LongPress: 等待长按时间阈值                       │     │
│  │  - Drag: 等待移动距离阈值                           │     │
│  └─────────────────────────────────────────────────────┘     │
│         │                 │                 │                │
│         ▼                 ▼                 ▼                │
│  ┌─────────────────────────────────────────────────────┐     │
│  │              决策阶段 (Decision)                    │     │
│  │  - 第一个达到阈值的识别器获胜                        │     │
│  │  - 其他识别器收到 reject 消息                       │     │
│  └─────────────────────────────────────────────────────┘     │
│                            │                                 │
│                            ▼                                 │
│                  触发回调 (Callback)                          │
└──────────────────────────────────────────────────────────────┘
3.3 手势识别器源码分析
以下是简化的手势识别器实现:
abstract class GestureRecognizer extends Object {
void addPointer(PointerEvent event);
void handleEvent(PointerEvent event);
void acceptGesture(int pointer);
void rejectGesture(int pointer);
}
class TapGestureRecognizer extends GestureRecognizer {
Duration? _downDuration;
bool _wonArena = false;
void handleEvent(PointerEvent event) {
if (event is PointerDownEvent) {
_downDuration = Duration.zero;
} else if (event is PointerUpEvent) {
if (_wonArena) {
onTap?.call();
}
}
}
void acceptGesture(int pointer) {
_wonArena = true;
}
}
class LongPressGestureRecognizer extends GestureRecognizer {
static const Duration _longPressDuration = Duration(milliseconds: 500);
Timer? _timer;
void handleEvent(PointerEvent event) {
if (event is PointerDownEvent) {
_timer = Timer(_longPressDuration, () {
acceptGesture(event.pointer);
onLongPress?.call();
});
} else if (event is PointerUpEvent) {
_timer?.cancel();
}
}
}
四、设备选择交互设计
4.1 交互状态设计
在设备选择功能中,我们设计了三种交互状态:
| 状态 | 视觉表现 | 触发条件 |
|---|---|---|
| 默认状态 | 白色背景、灰色边框 | 设备未被选中 |
| 选中状态 | 蓝色背景、蓝色边框 | 用户点击设备卡片 |
| 禁用状态 | 灰色图标、浅灰背景 | 设备离线 |
4.2 选中状态切换实现
void _selectDevice(String deviceName) {
  setState(() {
    _selectedDevice = deviceName;
  });
}
4.3 选中状态视觉反馈
decoration: BoxDecoration(
  color: isSelected
      ? const Color(0xFF0A59F7).withValues(alpha: 0.06)
      : Colors.white,
  borderRadius: BorderRadius.circular(14),
  border: Border.all(
    color: isSelected
        ? const Color(0xFF0A59F7)
        : const Color(0xFFF0F0F0),
    width: 1,
  ),
),
4.4 禁用状态处理
onTap: () {
  if (isOnline) {
    _selectDevice(device.name);
  }
},
当设备离线时,点击事件不会触发状态切换,同时图标颜色和文字颜色会变为灰色:
child: Icon(
  device.icon,
  color: isOnline ? device.color : const Color(0xFFCCCCCC),
  size: 22,
),
五、高级手势交互
5.1 长按交互
GestureDetector(
  onLongPress: () {
    // 长按开始
  },
  onLongPressUp: () {
    // 长按抬起
  },
  onLongPressEnd: (LongPressEndDetails details) {
    // 长按结束,包含位置信息
    print('长按结束位置: ${details.globalPosition}');
  },
  onLongPressMoveUpdate: (LongPressMoveUpdateDetails details) {
    // 长按移动
    print('长按移动: ${details.localPosition}');
  },
  child: Container(
    width: 100,
    height: 100,
    color: Colors.blue,
  ),
)
5.2 滑动交互
GestureDetector(
  onHorizontalDragStart: (DragStartDetails details) {
    print('滑动开始: ${details.globalPosition}');
  },
  onHorizontalDragUpdate: (DragUpdateDetails details) {
    print('滑动距离: ${details.delta.dx}');
  },
  onHorizontalDragEnd: (DragEndDetails details) {
    print('滑动速度: ${details.velocity}');
  },
  child: Container(
    width: 200,
    height: 100,
    color: Colors.green,
  ),
)
5.3 缩放交互
GestureDetector(
  onScaleStart: (ScaleStartDetails details) {
    print('缩放开始: ${details.focalPoint}');
  },
  onScaleUpdate: (ScaleUpdateDetails details) {
    print('缩放比例: ${details.scale}');
    print('旋转角度: ${details.rotation}');
  },
  onScaleEnd: (ScaleEndDetails details) {
    print('缩放结束');
  },
  child: Container(
    width: 200,
    height: 200,
    color: Colors.yellow,
  ),
)
5.4 组合手势
GestureDetector(
  onTap: () {
    print('单击');
  },
  onDoubleTap: () {
    print('双击');
  },
  onLongPress: () {
    print('长按');
  },
  child: Container(
    width: 150,
    height: 150,
    color: Colors.purple,
  ),
)
六、手势交互与状态管理
6.1 使用StatefulWidget管理状态
class DeviceSelectionPage extends StatefulWidget {
_DeviceSelectionPageState createState() => _DeviceSelectionPageState();
}
class _DeviceSelectionPageState extends State<DeviceSelectionPage> {
String _selectedDevice = '';
bool _isConnecting = false;
void _handleDeviceTap(String deviceName) {
setState(() {
_selectedDevice = deviceName;
_isConnecting = true;
});
// 模拟连接过程
Future.delayed(const Duration(seconds: 2), () {
setState(() {
_isConnecting = false;
});
});
}
Widget build(BuildContext context) {
return ListView(
children: _devices.map((device) {
return GestureDetector(
onTap: () => _handleDeviceTap(device.name),
child: _buildDeviceItem(device),
);
}).toList(),
);
}
}
6.2 使用ValueNotifier管理状态
class DeviceSelectionPage extends StatelessWidget {
final ValueNotifier<String> selectedDevice = ValueNotifier<String>('');
Widget build(BuildContext context) {
return ListView(
children: _devices.map((device) {
return ValueListenableBuilder<String>(
valueListenable: selectedDevice,
builder: (context, value, child) {
final isSelected = value == device.name;
return GestureDetector(
onTap: () {
selectedDevice.value = device.name;
},
child: _buildDeviceItem(device, isSelected),
);
},
);
}).toList(),
);
}
}
6.3 使用Provider管理状态
class DeviceState extends ChangeNotifier {
String _selectedDevice = '';
String get selectedDevice => _selectedDevice;
void selectDevice(String deviceName) {
_selectedDevice = deviceName;
notifyListeners();
}
}
class DeviceSelectionPage extends StatelessWidget {
Widget build(BuildContext context) {
return Consumer<DeviceState>(
builder: (context, state, child) {
return ListView(
children: _devices.map((device) {
return GestureDetector(
onTap: () {
state.selectDevice(device.name);
},
child: _buildDeviceItem(device, state.selectedDevice == device.name),
);
}).toList(),
);
},
);
}
}
七、手势冲突处理
7.1 手势优先级
在 Flutter 中,手势识别器之间存在优先级关系:
长按识别器 > 滑动识别器 > 点击识别器
当多个手势识别器同时存在时,优先级高的识别器会先获得处理权。
7.2 解决手势冲突
方法一:使用 behavior 参数
GestureDetector(
  behavior: HitTestBehavior.opaque,
  onTap: () {},
  child: Container(
    child: AnotherGestureDetector(
      onTap: () {},
    ),
  ),
)
方法二:使用 RawGestureDetector
RawGestureDetector(
  gestures: {
    TapGestureRecognizer: GestureRecognizerFactoryWithHandlers<TapGestureRecognizer>(
      () => TapGestureRecognizer(),
      (recognizer) {
        recognizer.onTap = () {};
      },
    ),
    LongPressGestureRecognizer: GestureRecognizerFactoryWithHandlers<LongPressGestureRecognizer>(
      () => LongPressGestureRecognizer(),
      (recognizer) {
        recognizer.onLongPress = () {};
      },
    ),
  },
  child: Container(),
)
方法三:使用 Listener 组件
Listener(
  onPointerDown: (PointerDownEvent event) {
    // 处理原始指针事件
  },
  child: Container(),
)
八、鸿蒙设计规范中的手势交互
8.1 点击交互规范
| 交互类型 | 响应时间 | 视觉反馈 |
|---|---|---|
| 单击 | ≤ 100ms | 缩放效果或颜色变化 |
| 双击 | 两次点击间隔 ≤ 300ms | 放大效果 |
| 长按 | ≥ 500ms | 震动反馈 + 菜单弹出 |
8.2 滑动交互规范
| 滑动方向 | 手势距离 | 视觉反馈 |
|---|---|---|
| 水平滑动 | ≥ 10px | 内容跟随移动 |
| 垂直滑动 | ≥ 10px | 滚动效果 |
| 边缘滑动 | 距离边缘 ≤ 20px | 返回效果 |
8.3 缩放交互规范
| 缩放类型 | 缩放范围 | 视觉反馈 |
|---|---|---|
| 捏合缩放 | 0.5x - 3x | 内容实时缩放 |
| 双击缩放 | 1x → 2x | 平滑过渡动画 |
九、实战案例:分布式设备协同页面交互
9.1 完整页面结构
class DistributedDevicePage extends StatefulWidget {
const DistributedDevicePage({super.key});
State<DistributedDevicePage> createState() => _DistributedDevicePageState();
}
class _DistributedDevicePageState extends State<DistributedDevicePage> {
String _selectedDevice = '手机';
bool _isConnected = false;
final List<DeviceInfo> _devices = [
DeviceInfo('手机', 'Huawei Mate 60 Pro', '在线', Icons.smartphone, const Color(0xFF0A59F7)),
DeviceInfo('平板', 'Huawei MatePad Pro', '在线', Icons.tablet, const Color(0xFF00B42A)),
DeviceInfo('电脑', 'Huawei MateBook X', '在线', Icons.laptop, const Color(0xFF722ED1)),
DeviceInfo('智慧屏', 'Huawei Vision', '离线', Icons.tv, const Color(0xFF999999)),
DeviceInfo('手表', 'Huawei Watch 4', '在线', Icons.watch, const Color(0xFFFA8C16)),
DeviceInfo('耳机', 'Huawei FreeBuds Pro', '在线', Icons.headphones, const Color(0xFF13C2C2)),
];
void _toggleConnection(bool value) {
setState(() {
_isConnected = value;
});
}
void _selectDevice(String deviceName) {
setState(() {
_selectedDevice = deviceName;
});
}
Widget build(BuildContext context) {
return SingleChildScrollView(
padding: const EdgeInsets.all(16),
child: Column(
crossAxisAlignment: CrossAxisAlignment.start,
children: [
_buildConnectionStatus(),
const SizedBox(height: 20),
_buildDeviceList(),
const SizedBox(height: 20),
_buildDistributedPanel(),
const SizedBox(height: 20),
_buildMultiScreenDemo(),
],
),
);
}
}
9.2 设备卡片完整实现
Widget _buildDeviceCard(DeviceInfo device) {
  final isOnline = device.status == '在线';
  final isSelected = _selectedDevice == device.name;

  return GestureDetector(
    onTap: () {
      if (isOnline) {
        _selectDevice(device.name);
      }
    },
    onLongPress: () {
      if (isOnline) {
        _showDeviceDetail(device);
      }
    },
    child: Container(
      width: 140,
      padding: const EdgeInsets.all(16),
      decoration: BoxDecoration(
        color: isSelected ? const Color(0xFF0A59F7).withValues(alpha: 0.06) : Colors.white,
        borderRadius: BorderRadius.circular(14),
        border: Border.all(
          color: isSelected ? const Color(0xFF0A59F7) : const Color(0xFFF0F0F0),
          width: 1,
        ),
        boxShadow: [
          BoxShadow(
            color: Colors.black.withValues(alpha: 0.04),
            blurRadius: 8,
            offset: const Offset(0, 2),
          ),
        ],
      ),
      child: Column(
        children: [
          Container(
            width: 44,
            height: 44,
            decoration: BoxDecoration(
              color: isOnline ? device.color.withValues(alpha: 0.15) : const Color(0xFFF0F0F0),
              borderRadius: BorderRadius.circular(12),
            ),
            child: Icon(
              device.icon,
              color: isOnline ? device.color : const Color(0xFFCCCCCC),
              size: 22,
            ),
          ),
          const SizedBox(height: 10),
          Text(
            device.name,
            style: TextStyle(
              fontSize: 14,
              fontWeight: FontWeight.w600,
              color: isOnline ? const Color(0xFF1A1A1A) : const Color(0xFFCCCCCC),
            ),
          ),
          const SizedBox(height: 4),
          Text(
            device.model,
            style: TextStyle(
              fontSize: 11,
              color: isOnline ? const Color(0xFF999999) : const Color(0xFFE0E0E0),
            ),
            maxLines: 1,
            overflow: TextOverflow.ellipsis,
          ),
          const SizedBox(height: 8),
          Container(
            padding: const EdgeInsets.symmetric(horizontal: 8, vertical: 2),
            decoration: BoxDecoration(
              color: isOnline ? const Color(0xFFE8F5E9) : const Color(0xFFF5F5F5),
              borderRadius: BorderRadius.circular(10),
            ),
            child: Text(
              device.status,
              style: TextStyle(
                fontSize: 10,
                fontWeight: FontWeight.w500,
                color: isOnline ? const Color(0xFF00B42A) : const Color(0xFF999999),
              ),
            ),
          ),
        ],
      ),
    ),
  );
}
9.3 设备详情弹窗
void _showDeviceDetail(DeviceInfo device) {
  showDialog(
    context: context,
    builder: (context) {
      return AlertDialog(
        title: Text(device.name),
        content: Column(
          mainAxisSize: MainAxisSize.min,
          children: [
            Text('型号: ${device.model}'),
            Text('状态: ${device.status}'),
          ],
        ),
        actions: [
          TextButton(
            onPressed: () {
              Navigator.of(context).pop();
            },
            child: const Text('关闭'),
          ),
        ],
      );
    },
  );
}
9.4 连接状态切换
Widget _buildConnectionStatus() {
  return Container(
    padding: const EdgeInsets.all(20),
    decoration: BoxDecoration(
      color: _isConnected ? const Color(0xFFE8F5E9) : const Color(0xFFFFEBEE),
      borderRadius: BorderRadius.circular(16),
      border: Border.all(
        color: _isConnected ? const Color(0xFF00B42A) : const Color(0xFFFA5151),
        width: 1,
      ),
    ),
    child: Row(
      children: [
        Container(
          width: 48,
          height: 48,
          decoration: BoxDecoration(
            color: _isConnected ? const Color(0xFF00B42A) : const Color(0xFFFA5151),
            borderRadius: BorderRadius.circular(12),
          ),
          child: Icon(
            _isConnected ? Icons.link : Icons.link_off,
            color: Colors.white,
            size: 24,
          ),
        ),
        const SizedBox(width: 16),
        Expanded(
          child: Column(
            crossAxisAlignment: CrossAxisAlignment.start,
            children: [
              Text(
                _isConnected ? '分布式连接已建立' : '分布式连接未建立',
                style: TextStyle(
                  fontSize: 18,
                  fontWeight: FontWeight.w600,
                  color: _isConnected ? const Color(0xFF00B42A) : const Color(0xFFFA5151),
                ),
              ),
              const SizedBox(height: 4),
              Text(
                _isConnected
                    ? '已连接 5 台设备,可进行跨设备协同操作'
                    : '点击开关建立分布式连接,体验多设备协同',
                style: const TextStyle(
                  fontSize: 14,
                  color: Color(0xFF666666),
                ),
              ),
            ],
          ),
        ),
        Switch(
          value: _isConnected,
          onChanged: _toggleConnection,
          activeThumbColor: const Color(0xFF00B42A),
          activeTrackColor: const Color(0xFFA5D6A7),
          inactiveThumbColor: const Color(0xFFFA5151),
          inactiveTrackColor: const Color(0xFFFFCDD2),
        ),
      ],
    ),
  );
}
十、手势交互性能优化
10.1 避免不必要的重建
// 错误示例
GestureDetector(
  onTap: () {
    setState(() {
      // 更新状态
    });
  },
  child: ExpensiveWidget(),  // 每次都会重建
)

// 优化后
GestureDetector(
  onTap: () {
    setState(() {
      // 更新状态
    });
  },
  child: const ExpensiveWidget(),  // 使用const避免重建
)
10.2 使用AnimatedBuilder
AnimatedBuilder(
  animation: _animation,
  builder: (context, child) {
    return Transform.scale(
      scale: _animation.value,
      child: child,
    );
  },
  child: GestureDetector(
    onTap: () {
      // 触发动画
    },
    child: Container(),
  ),
)
10.3 使用RepaintBoundary
RepaintBoundary(
  child: GestureDetector(
    onTap: () {},
    child: ComplexWidget(),
  ),
)
十一、常见问题与解决方案
11.1 点击事件不响应
问题描述:GestureDetector 的点击事件不响应。
解决方案:
- 检查子组件是否设置了
behavior参数 - 确保子组件有实际的尺寸
- 检查是否有其他组件遮挡
// 确保子组件有尺寸
GestureDetector(
  behavior: HitTestBehavior.opaque,
  onTap: () {},
  child: Container(
    width: 100,
    height: 100,
    color: Colors.transparent,
  ),
)
11.2 手势冲突
问题描述:多个手势识别器之间发生冲突。
解决方案:
- 使用
behavior参数控制命中测试行为 - 使用
RawGestureDetector自定义手势识别器 - 使用
Listener处理原始指针事件
11.3 长按与点击冲突
问题描述:长按和点击事件同时触发。
解决方案:
- Flutter 的手势竞技场机制会自动处理这个问题
- 如果长按时间超过阈值,点击事件不会触发
- 如果在长按阈值内抬起手指,只会触发点击事件
十二、总结与扩展
12.1 GestureDetector的适用场景
GestureDetector 适用于以下场景:
- 按钮点击交互
- 列表项点击选择
- 卡片点击跳转
- 长按菜单弹出
- 滑动删除操作
- 缩放查看详情
12.2 手势交互设计原则
- 一致性:相同类型的组件应该有一致的手势交互
- 可发现性:用户应该能够直观地发现可交互的元素
- 反馈明确:每个手势操作都应该有明确的视觉或触觉反馈
- 容错性:允许用户的操作有一定的偏差
- 效率性:常用操作应该能够快速完成
12.3 未来发展方向
随着鸿蒙生态的不断发展,手势交互在鸿蒙平台上的应用会越来越广泛。未来的发展方向包括:
- 更丰富的手势类型支持
- 更好的跨设备手势协同
- 更智能的手势识别算法
- 更个性化的手势交互体验
通过本文的学习,读者应该掌握了 GestureDetector 组件的核心用法和高级技巧,并了解了其在"鸿蒙特性展示台"应用中的实际应用。希望这些知识能够帮助你在实际项目中更好地设计和实现手势交互功能,提升用户体验。

作为“人工智能6S店”的官方数字引擎,为AI开发者与企业提供一个覆盖软硬件全栈、一站式门户。
更多推荐
 0
0 0
0- 0


 已为社区贡献26条内容

所有评论(0)