
Flutter鸿蒙特性展示台_阴影与圆角设计规范与实现
一、项目概述
1.1 应用背景
在鸿蒙设计语言中,阴影和圆角是构建视觉层次和美感的重要元素。合理的阴影可以增强界面的立体感和层次感,而统一的圆角可以提升界面的亲和力和现代感。鸿蒙设计语言定义了一套完整的阴影和圆角规范,帮助开发者创建一致且美观的用户界面。
本文以「鸿蒙特性展示台」应用为例,详细讲解如何使用 Flutter 实现符合鸿蒙设计规范的阴影和圆角效果,包括不同层级的阴影设计、不同大小的圆角应用,以及如何通过 BoxDecoration 实现复杂的视觉效果。
1.2 技术栈
| 技术点 | 说明 |
|---|---|
| BoxDecoration | 容器装饰器,用于设置背景、阴影、圆角等 |
| BoxShadow | 阴影组件,用于设置阴影的颜色、模糊半径、偏移量等 |
| BorderRadius | 圆角组件,用于设置圆角半径 |
| Container | 基础容器组件,用于承载装饰效果 |
| DecorationImage | 装饰图片,用于设置背景图片 |
| Gradient | 渐变效果,用于设置渐变色背景 |
1.3 界面效果
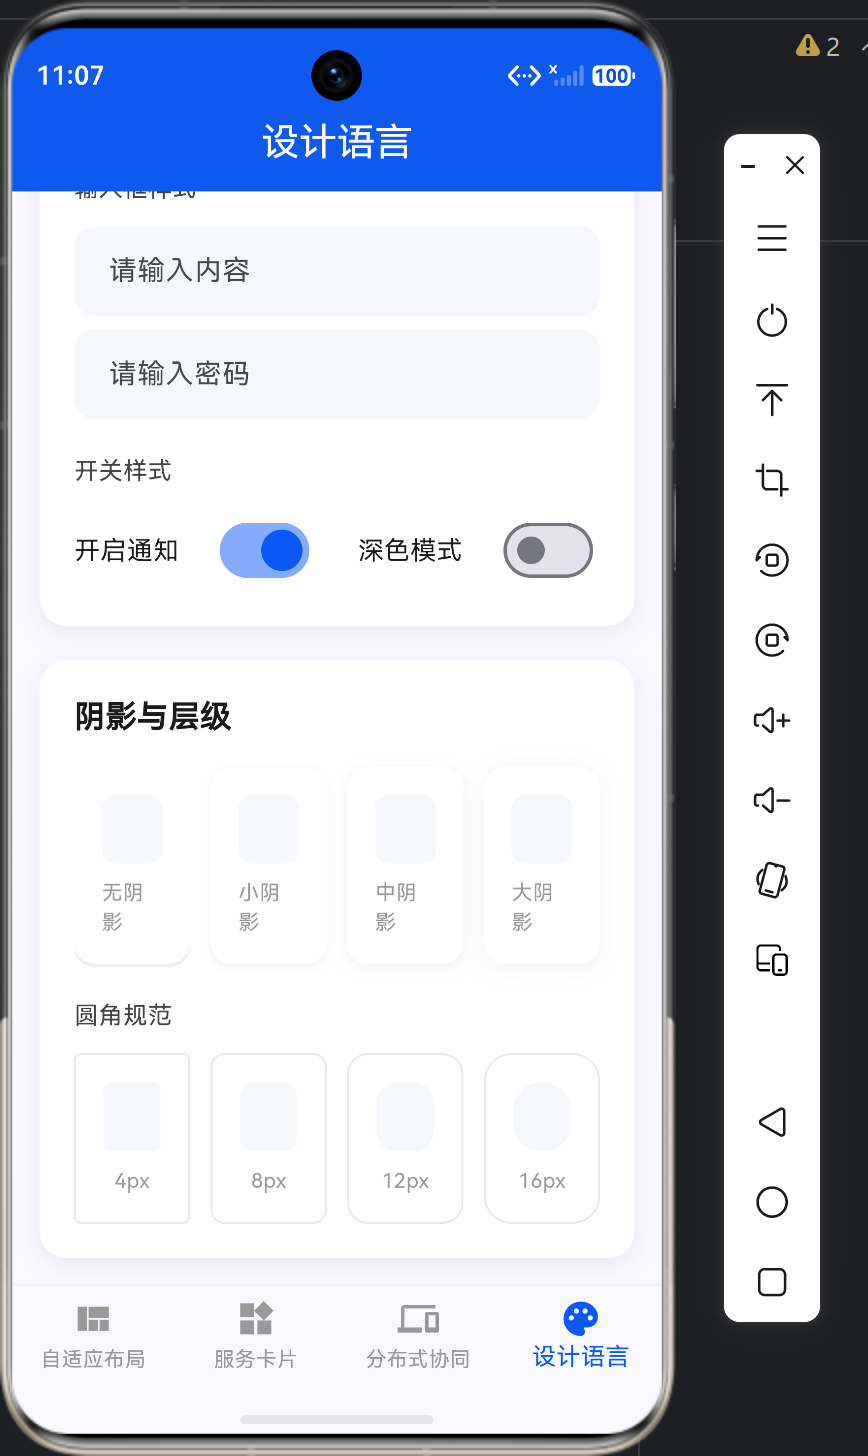
应用的设计语言页面展示了各种阴影和圆角效果:
┌─────────────────────────────────────────────────────────────────┐
│                      阴影与层级展示                              │
│                                                                 │
│  ┌─────────────┐  ┌─────────────┐  ┌─────────────┐  ┌─────────────┐  │
│  │   无阴影    │  │   小阴影    │  │   中阴影    │  │   大阴影    │  │
│  │             │  │             │  │             │  │             │  │
│  │   ┌─────┐   │  │   ┌─────┐   │  │   ┌─────┐   │  │   ┌─────┐   │  │
│  │   │     │   │  │   │     │   │  │   │     │   │  │   │     │   │  │
│  │   └─────┘   │  │   └─────┘   │  │   └─────┘   │  │   └─────┘   │  │
│  └─────────────┘  └─────────────┘  └─────────────┘  └─────────────┘  │
│                                                                      │
│                      圆角规范展示                                    │
│                                                                      │
│  ┌─────────────┐  ┌─────────────┐  ┌─────────────┐  ┌─────────────┐  │
│  │    4px      │  │    8px      │  │   12px      │  │   16px      │  │
│  │             │  │             │  │             │  │             │  │
│  │   ┌─────┐   │  │   ┌─────┐   │  │   ┌─────┐   │  │   ┌─────┐   │  │
│  │   │     │   │  │   │     │   │  │   │     │   │  │   │     │   │  │
│  │   └─────┘   │  │   └─────┘   │  │   └─────┘   │  │   └─────┘   │  │
│  └─────────────┘  └─────────────┘  └─────────────┘  └─────────────┘  │
└─────────────────────────────────────────────────────────────────────┘
二、核心代码解析
2.1 阴影与层级展示组件
_buildShadowAndElevation 组件展示了不同层级的阴影效果和不同大小的圆角效果:
Widget _buildShadowAndElevation() {
  return Container(
    padding: const EdgeInsets.all(20),
    decoration: BoxDecoration(
      color: Colors.white,
      borderRadius: BorderRadius.circular(16),
      boxShadow: [
        BoxShadow(
          color: Colors.black.withValues(alpha: 0.06),
          blurRadius: 12,
          offset: const Offset(0, 4),
        ),
      ],
    ),
    child: Column(
      crossAxisAlignment: CrossAxisAlignment.start,
      children: [
        const Text(
          '阴影与层级',
          style: TextStyle(
            fontSize: 18,
            fontWeight: FontWeight.w600,
            color: Color(0xFF1A1A1A),
          ),
        ),
        const SizedBox(height: 16),
        Row(
          children: [
            Expanded(
              child: _buildShadowCard(0, '无阴影'),
            ),
            const SizedBox(width: 12),
            Expanded(
              child: _buildShadowCard(4, '小阴影'),
            ),
            const SizedBox(width: 12),
            Expanded(
              child: _buildShadowCard(8, '中阴影'),
            ),
            const SizedBox(width: 12),
            Expanded(
              child: _buildShadowCard(12, '大阴影'),
            ),
          ],
        ),
        const SizedBox(height: 20),
        const Text(
          '圆角规范',
          style: TextStyle(
            fontSize: 14,
            fontWeight: FontWeight.w500,
            color: Color(0xFF434343),
          ),
        ),
        const SizedBox(height: 12),
        Row(
          children: [
            Expanded(
              child: _buildRadiusCard(4, '4px'),
            ),
            const SizedBox(width: 12),
            Expanded(
              child: _buildRadiusCard(8, '8px'),
            ),
            const SizedBox(width: 12),
            Expanded(
              child: _buildRadiusCard(12, '12px'),
            ),
            const SizedBox(width: 12),
            Expanded(
              child: _buildRadiusCard(16, '16px'),
            ),
          ],
        ),
      ],
    ),
  );
}
代码要点:
- 容器设计:使用
Container作为卡片容器,设置白色背景、16px 圆角和大阴影效果 - 标题样式:标题使用 18px 字号、600 字重,颜色为深灰色 (#1A1A1A)
- 阴影展示:使用
Row横向排列四种不同阴影效果的卡片 - 圆角展示:使用
Row横向排列四种不同圆角大小的卡片 - 间距设置:使用
SizedBox(width: 12)和SizedBox(height: 16/20)设置组件间距
2.2 阴影卡片组件
_buildShadowCard 组件用于展示不同层级的阴影效果:
Widget _buildShadowCard(double blurRadius, String label) {
  return Container(
    padding: const EdgeInsets.all(16),
    decoration: BoxDecoration(
      color: Colors.white,
      borderRadius: BorderRadius.circular(12),
      boxShadow: [
        BoxShadow(
          color: Colors.black.withValues(alpha: 0.06),
          blurRadius: blurRadius,
          offset: const Offset(0, 2),
        ),
      ],
    ),
    child: Column(
      children: [
        Container(
          width: 40,
          height: 40,
          decoration: BoxDecoration(
            color: const Color(0xFFF5F7FA),
            borderRadius: BorderRadius.circular(8),
          ),
        ),
        const SizedBox(height: 8),
        Text(
          label,
          style: const TextStyle(
            fontSize: 12,
            color: Color(0xFF999999),
          ),
        ),
      ],
    ),
  );
}
2.3 圆角卡片组件
_buildRadiusCard 组件用于展示不同大小的圆角效果:
Widget _buildRadiusCard(double radius, String label) {
  return Container(
    padding: const EdgeInsets.all(16),
    decoration: BoxDecoration(
      color: Colors.white,
      borderRadius: BorderRadius.circular(radius),
      border: Border.all(
        color: const Color(0xFFE8E8E8),
        width: 1,
      ),
    ),
    child: Column(
      children: [
        Container(
          width: 40,
          height: 40,
          decoration: BoxDecoration(
            color: const Color(0xFFF5F7FA),
            borderRadius: BorderRadius.circular(radius),
          ),
        ),
        const SizedBox(height: 8),
        Text(
          label,
          style: const TextStyle(
            fontSize: 12,
            color: Color(0xFF999999),
          ),
        ),
      ],
    ),
  );
}
三、阴影设计规范
3.1 阴影参数详解
BoxShadow 组件有以下关键参数:
| 参数 | 类型 | 说明 | 默认值 |
|---|---|---|---|
| color | Color | 阴影颜色 | Colors.black |
| blurRadius | double | 模糊半径,越大阴影越模糊 | 0.0 |
| spreadRadius | double | 扩散半径,正值扩大阴影,负值缩小 | 0.0 |
| offset | Offset | 阴影偏移量,(dx, dy) | Offset(0, 0) |
| blurStyle | BlurStyle | 模糊样式 | BlurStyle.normal |
3.2 鸿蒙阴影规范
鸿蒙设计语言定义了四种标准阴影层级:
| 层级 | blurRadius | offset | 适用场景 |
|---|---|---|---|
| 无阴影 | 0 | (0, 0) | 底层元素、背景 |
| 小阴影 | 4 | (0, 2) | 小卡片、标签、按钮 |
| 中阴影 | 8 | (0, 4) | 中等卡片、弹窗 |
| 大阴影 | 12 | (0, 4) | 大卡片、对话框、浮层 |
3.3 阴影实现示例
无阴影:
Container(
  decoration: BoxDecoration(
    color: Colors.white,
    borderRadius: BorderRadius.circular(12),
    boxShadow: [],
  ),
)
小阴影:
Container(
  decoration: BoxDecoration(
    color: Colors.white,
    borderRadius: BorderRadius.circular(12),
    boxShadow: [
      BoxShadow(
        color: Colors.black.withValues(alpha: 0.06),
        blurRadius: 4,
        offset: const Offset(0, 2),
      ),
    ],
  ),
)
中阴影:
Container(
  decoration: BoxDecoration(
    color: Colors.white,
    borderRadius: BorderRadius.circular(12),
    boxShadow: [
      BoxShadow(
        color: Colors.black.withValues(alpha: 0.06),
        blurRadius: 8,
        offset: const Offset(0, 4),
      ),
    ],
  ),
)
大阴影:
Container(
  decoration: BoxDecoration(
    color: Colors.white,
    borderRadius: BorderRadius.circular(12),
    boxShadow: [
      BoxShadow(
        color: Colors.black.withValues(alpha: 0.06),
        blurRadius: 12,
        offset: const Offset(0, 4),
      ),
    ],
  ),
)
3.4 阴影设计原则
- 层级分明:不同层级的元素使用不同强度的阴影,形成清晰的视觉层次
- 方向一致:阴影偏移量统一向下,符合光照规律
- 颜色统一:阴影颜色统一使用黑色半透明 (
rgba(0, 0, 0, 0.06)) - 适度使用:避免过度使用阴影,保持界面简洁
四、圆角设计规范
4.1 圆角参数详解
BorderRadius 组件有以下常用构造函数:
| 构造函数 | 说明 |
|---|---|
| BorderRadius.circular(double radius) | 四个角统一圆角 |
| BorderRadius.only(topLeft, topRight, bottomLeft, bottomRight) | 单独设置每个角的圆角 |
| BorderRadius.vertical(top, bottom) | 分别设置顶部和底部的圆角 |
| BorderRadius.horizontal(left, right) | 分别设置左侧和右侧的圆角 |
4.2 鸿蒙圆角规范
鸿蒙设计语言定义了四种标准圆角大小:
| 圆角值 | 适用场景 |
|---|---|
| 4px | 小按钮、标签、徽章 |
| 8px | 卡片内部元素、小容器 |
| 12px | 按钮、输入框、卡片 |
| 16px | 对话框、弹窗、大卡片 |
4.3 圆角实现示例
统一圆角:
Container(
  decoration: BoxDecoration(
    color: Colors.white,
    borderRadius: BorderRadius.circular(12),
  ),
)
单独设置圆角:
Container(
  decoration: BoxDecoration(
    color: Colors.white,
    borderRadius: BorderRadius.only(
      topLeft: Radius.circular(16),
      topRight: Radius.circular(16),
      bottomLeft: Radius.circular(0),
      bottomRight: Radius.circular(0),
    ),
  ),
)
垂直方向圆角:
Container(
  decoration: BoxDecoration(
    color: Colors.white,
    borderRadius: BorderRadius.vertical(
      top: Radius.circular(12),
      bottom: Radius.circular(0),
    ),
  ),
)
水平方向圆角:
Container(
  decoration: BoxDecoration(
    color: Colors.white,
    borderRadius: BorderRadius.horizontal(
      left: Radius.circular(12),
      right: Radius.circular(0),
    ),
  ),
)
4.4 圆角设计原则
- 统一规范:相同类型的组件使用相同大小的圆角,保持视觉一致性
- 适度圆角:圆角不宜过大或过小,12px 是最常用的标准圆角
- 场景适配:根据组件的大小和用途选择合适的圆角大小
- 特殊处理:对于连续的卡片列表,中间卡片可以只保留顶部或底部圆角
五、BoxDecoration 高级用法
5.1 渐变背景
BoxDecoration 支持线性渐变、径向渐变和 Sweep 渐变:
线性渐变:
Container(
  decoration: BoxDecoration(
    gradient: LinearGradient(
      colors: [Color(0xFF0A59F7), Color(0xFF4080FF)],
      begin: Alignment.topLeft,
      end: Alignment.bottomRight,
    ),
    borderRadius: BorderRadius.circular(16),
  ),
)
径向渐变:
Container(
  decoration: BoxDecoration(
    gradient: RadialGradient(
      colors: [Color(0xFF0A59F7), Color(0xFF4080FF)],
      center: Alignment.center,
      radius: 0.8,
    ),
    borderRadius: BorderRadius.circular(16),
  ),
)
5.2 边框设置
BoxDecoration 支持设置边框样式:
Container(
  decoration: BoxDecoration(
    color: Colors.white,
    borderRadius: BorderRadius.circular(12),
    border: Border.all(
      color: Color(0xFFE8E8E8),
      width: 1,
    ),
  ),
)
不同边的边框:
Container(
  decoration: BoxDecoration(
    color: Colors.white,
    borderRadius: BorderRadius.circular(12),
    border: Border(
      top: BorderSide(color: Color(0xFF0A59F7), width: 2),
      bottom: BorderSide(color: Color(0xFFE8E8E8), width: 1),
      left: BorderSide.none,
      right: BorderSide.none,
    ),
  ),
)
5.3 背景图片
BoxDecoration 支持设置背景图片:
Container(
  decoration: BoxDecoration(
    image: DecorationImage(
      image: NetworkImage('https://example.com/image.jpg'),
      fit: BoxFit.cover,
      alignment: Alignment.center,
    ),
    borderRadius: BorderRadius.circular(16),
  ),
)
5.4 混合装饰
BoxDecoration 支持同时设置多种装饰效果:
Container(
  decoration: BoxDecoration(
    color: Colors.white,
    gradient: LinearGradient(
      colors: [Color(0xFF0A59F7).withValues(alpha: 0.1), Colors.transparent],
      begin: Alignment.topLeft,
      end: Alignment.bottomRight,
    ),
    borderRadius: BorderRadius.circular(12),
    border: Border.all(
      color: Color(0xFF0A59F7),
      width: 1,
    ),
    boxShadow: [
      BoxShadow(
        color: Colors.black.withValues(alpha: 0.06),
        blurRadius: 8,
        offset: Offset(0, 4),
      ),
    ],
  ),
)
六、阴影与圆角组合实战
6.1 卡片组件
卡片组件通常需要阴影和圆角的组合:
Widget _buildCard({
  required Widget child,
  double shadowRadius = 8,
  double borderRadius = 12,
}) {
  return Container(
    decoration: BoxDecoration(
      color: Colors.white,
      borderRadius: BorderRadius.circular(borderRadius),
      boxShadow: [
        BoxShadow(
          color: Colors.black.withValues(alpha: 0.06),
          blurRadius: shadowRadius,
          offset: const Offset(0, shadowRadius > 4 ? 4 : 2),
        ),
      ],
    ),
    child: child,
  );
}
6.2 按钮组件
按钮组件需要适当的圆角和阴影:
Widget _buildButton({
  required String text,
  required VoidCallback onPressed,
  bool primary = true,
}) {
  return Container(
    height: 44,
    decoration: BoxDecoration(
      color: primary ? Color(0xFF0A59F7) : Color(0xFFF5F7FA),
      borderRadius: BorderRadius.circular(12),
      boxShadow: primary
          ? [
              BoxShadow(
                color: Color(0xFF0A59F7).withValues(alpha: 0.3),
                blurRadius: 8,
                offset: Offset(0, 4),
              ),
            ]
          : [],
    ),
    child: Material(
      color: Colors.transparent,
      child: InkWell(
        borderRadius: BorderRadius.circular(12),
        onTap: onPressed,
        child: Center(
          child: Text(
            text,
            style: TextStyle(
              fontSize: 16,
              fontWeight: FontWeight.w500,
              color: primary ? Colors.white : Color(0xFF1A1A1A),
            ),
          ),
        ),
      ),
    ),
  );
}
6.3 输入框组件
输入框组件需要圆角和边框的组合:
Widget _buildInputField({
  required String hintText,
  bool obscureText = false,
}) {
  return Container(
    decoration: BoxDecoration(
      color: Color(0xFFF5F7FA),
      borderRadius: BorderRadius.circular(12),
      border: Border.all(
        color: Color(0xFFE8E8E8),
        width: 1,
      ),
    ),
    child: TextField(
      obscureText: obscureText,
      decoration: InputDecoration(
        hintText: hintText,
        border: InputBorder.none,
        contentPadding: EdgeInsets.symmetric(horizontal: 16, vertical: 14),
      ),
    ),
  );
}
七、性能优化技巧
7.1 避免过度绘制
过多的阴影会导致过度绘制,影响性能。可以使用以下方法优化:
// 使用 RepaintBoundary 隔离绘制区域
RepaintBoundary(
  child: Container(
    decoration: BoxDecoration(
      boxShadow: [
        BoxShadow(
          color: Colors.black.withValues(alpha: 0.06),
          blurRadius: 12,
          offset: Offset(0, 4),
        ),
      ],
    ),
  ),
)
7.2 缓存阴影效果
对于复杂的阴影效果,可以使用 ClipPath 配合 CustomPaint 缓存:
class ShadowCache extends StatelessWidget {
final Widget child;
final double blurRadius;
const ShadowCache({
super.key,
required this.child,
this.blurRadius = 8,
});
Widget build(BuildContext context) {
return CustomPaint(
painter: ShadowPainter(blurRadius: blurRadius),
child: child,
);
}
}
class ShadowPainter extends CustomPainter {
final double blurRadius;
ShadowPainter({required this.blurRadius});
void paint(Canvas canvas, Size size) {
final paint = Paint()
..color = Colors.black.withValues(alpha: 0.06)
..maskFilter = MaskFilter.blur(BlurStyle.normal, blurRadius);
canvas.drawRRect(
RRect.fromRectAndRadius(
Rect.fromLTWH(0, blurRadius, size.width, size.height),
Radius.circular(12),
),
paint,
);
}
bool shouldRepaint(covariant CustomPainter oldDelegate) {
return (oldDelegate as ShadowPainter).blurRadius != blurRadius;
}
}
7.3 使用 const 构造函数
对于不变的装饰效果,使用 const 构造函数避免不必要的重建:
const BoxDecoration(
  color: Colors.white,
  borderRadius: BorderRadius.all(Radius.circular(12)),
  boxShadow: [
    BoxShadow(
      color: Color(0x0F000000),
      blurRadius: 8,
      offset: Offset(0, 4),
    ),
  ],
)
八、鸿蒙设计规范综合应用
8.1 卡片层级体系
鸿蒙设计语言定义了完整的卡片层级体系:
| 层级 | 阴影 | 圆角 | 适用场景 |
|---|---|---|---|
| 一级卡片 | 大阴影 (blurRadius: 12) | 16px | 主内容区、大卡片 |
| 二级卡片 | 中阴影 (blurRadius: 8) | 12px | 次级内容区、中等卡片 |
| 三级卡片 | 小阴影 (blurRadius: 4) | 8px | 小卡片、标签 |
| 四级卡片 | 无阴影 | 4px | 底层元素、背景 |
8.2 组件样式规范
鸿蒙设计语言定义了常用组件的样式规范:
| 组件 | 阴影 | 圆角 | 其他 |
|---|---|---|---|
| 按钮 | 主按钮有阴影,其他无 | 12px | 高度 44px |
| 输入框 | 无 | 12px | 浅灰色背景 |
| 开关 | 无 | 圆形 | 主题色滑块 |
| 卡片 | 根据层级 | 12px/16px | 白色背景 |
8.3 视觉层次设计
合理的视觉层次设计可以提升用户体验:
┌──────────────────────────────────────────────────────────┐
│  一级卡片 (大阴影, 16px圆角)                              │
│                                                          │
│  ┌────────────────────────────────────────────────────┐  │
│  │  二级卡片 (中阴影, 12px圆角)                        │  │
│  │                                                    │  │
│  │  ┌──────────────────────────────────────────────┐  │  │
│  │  │  三级卡片 (小阴影, 8px圆角)                   │  │  │
│  │  │                                              │  │  │
│  │  │  ┌────────────────────────────────────────┐  │  │  │
│  │  │  │  四级卡片 (无阴影, 4px圆角)             │  │  │  │
│  │  │  └────────────────────────────────────────┘  │  │  │
│  │  └──────────────────────────────────────────────┘  │  │
│  └────────────────────────────────────────────────────┘  │
└──────────────────────────────────────────────────────────┘
九、常见问题与解决方案
9.1 阴影不显示
问题描述: 设置了 boxShadow 但阴影不显示。
解决方案:
- 检查
color是否设置了透明度,纯黑色阴影可能被背景覆盖 - 检查
blurRadius是否大于 0,值为 0 时阴影不可见 - 检查
offset是否合适,偏移量过小可能被容器遮挡 - 确保父容器没有设置
clipBehavior: Clip.hardEdge,这会裁剪阴影
// 正确做法
Container(
  clipBehavior: Clip.none, // 允许阴影溢出
  decoration: BoxDecoration(
    boxShadow: [
      BoxShadow(
        color: Colors.black.withValues(alpha: 0.06),
        blurRadius: 8,
        offset: Offset(0, 4),
      ),
    ],
  ),
)
9.2 圆角与阴影不一致
问题描述: 圆角和阴影的圆角不一致。
解决方案:
确保 borderRadius 和 boxShadow 的圆角一致:
Container(
  decoration: BoxDecoration(
    borderRadius: BorderRadius.circular(12),
    boxShadow: [
      BoxShadow(
        color: Colors.black.withValues(alpha: 0.06),
        blurRadius: 8,
        offset: Offset(0, 4),
      ),
    ],
  ),
)
9.3 性能问题
问题描述: 大量使用阴影导致性能下降。
解决方案:
- 减少阴影的使用,只在关键组件上使用阴影
- 使用较小的
blurRadius值 - 使用
RepaintBoundary隔离绘制区域 - 考虑使用图片代替复杂的阴影效果
十、总结
本文详细讲解了「鸿蒙特性展示台」应用中阴影与圆角设计规范的实现方法,包括:
- 阴影设计规范:四种标准阴影层级的实现,包括无阴影、小阴影、中阴影和大阴影
- 圆角设计规范:四种标准圆角大小的实现,包括 4px、8px、12px 和 16px
- BoxDecoration 高级用法:渐变背景、边框设置、背景图片和混合装饰
- 组合实战:卡片组件、按钮组件和输入框组件的阴影与圆角组合实现
- 性能优化技巧:避免过度绘制、缓存阴影效果和使用 const 构造函数
- 鸿蒙设计规范综合应用:卡片层级体系、组件样式规范和视觉层次设计
通过学习本文,开发者可以掌握如何使用 Flutter 实现符合鸿蒙设计规范的阴影和圆角效果,提升应用的视觉质量和用户体验。
参考资料:

作为“人工智能6S店”的官方数字引擎,为AI开发者与企业提供一个覆盖软硬件全栈、一站式门户。
更多推荐



 34
34 0
0- 0


 已为社区贡献96条内容

所有评论(0)