
鸿蒙实战:BindRelationPage 四步状态机与邀请卡倒计时
·
鸿蒙实战:BindRelationPage 四步状态机与邀请卡倒计时
前言
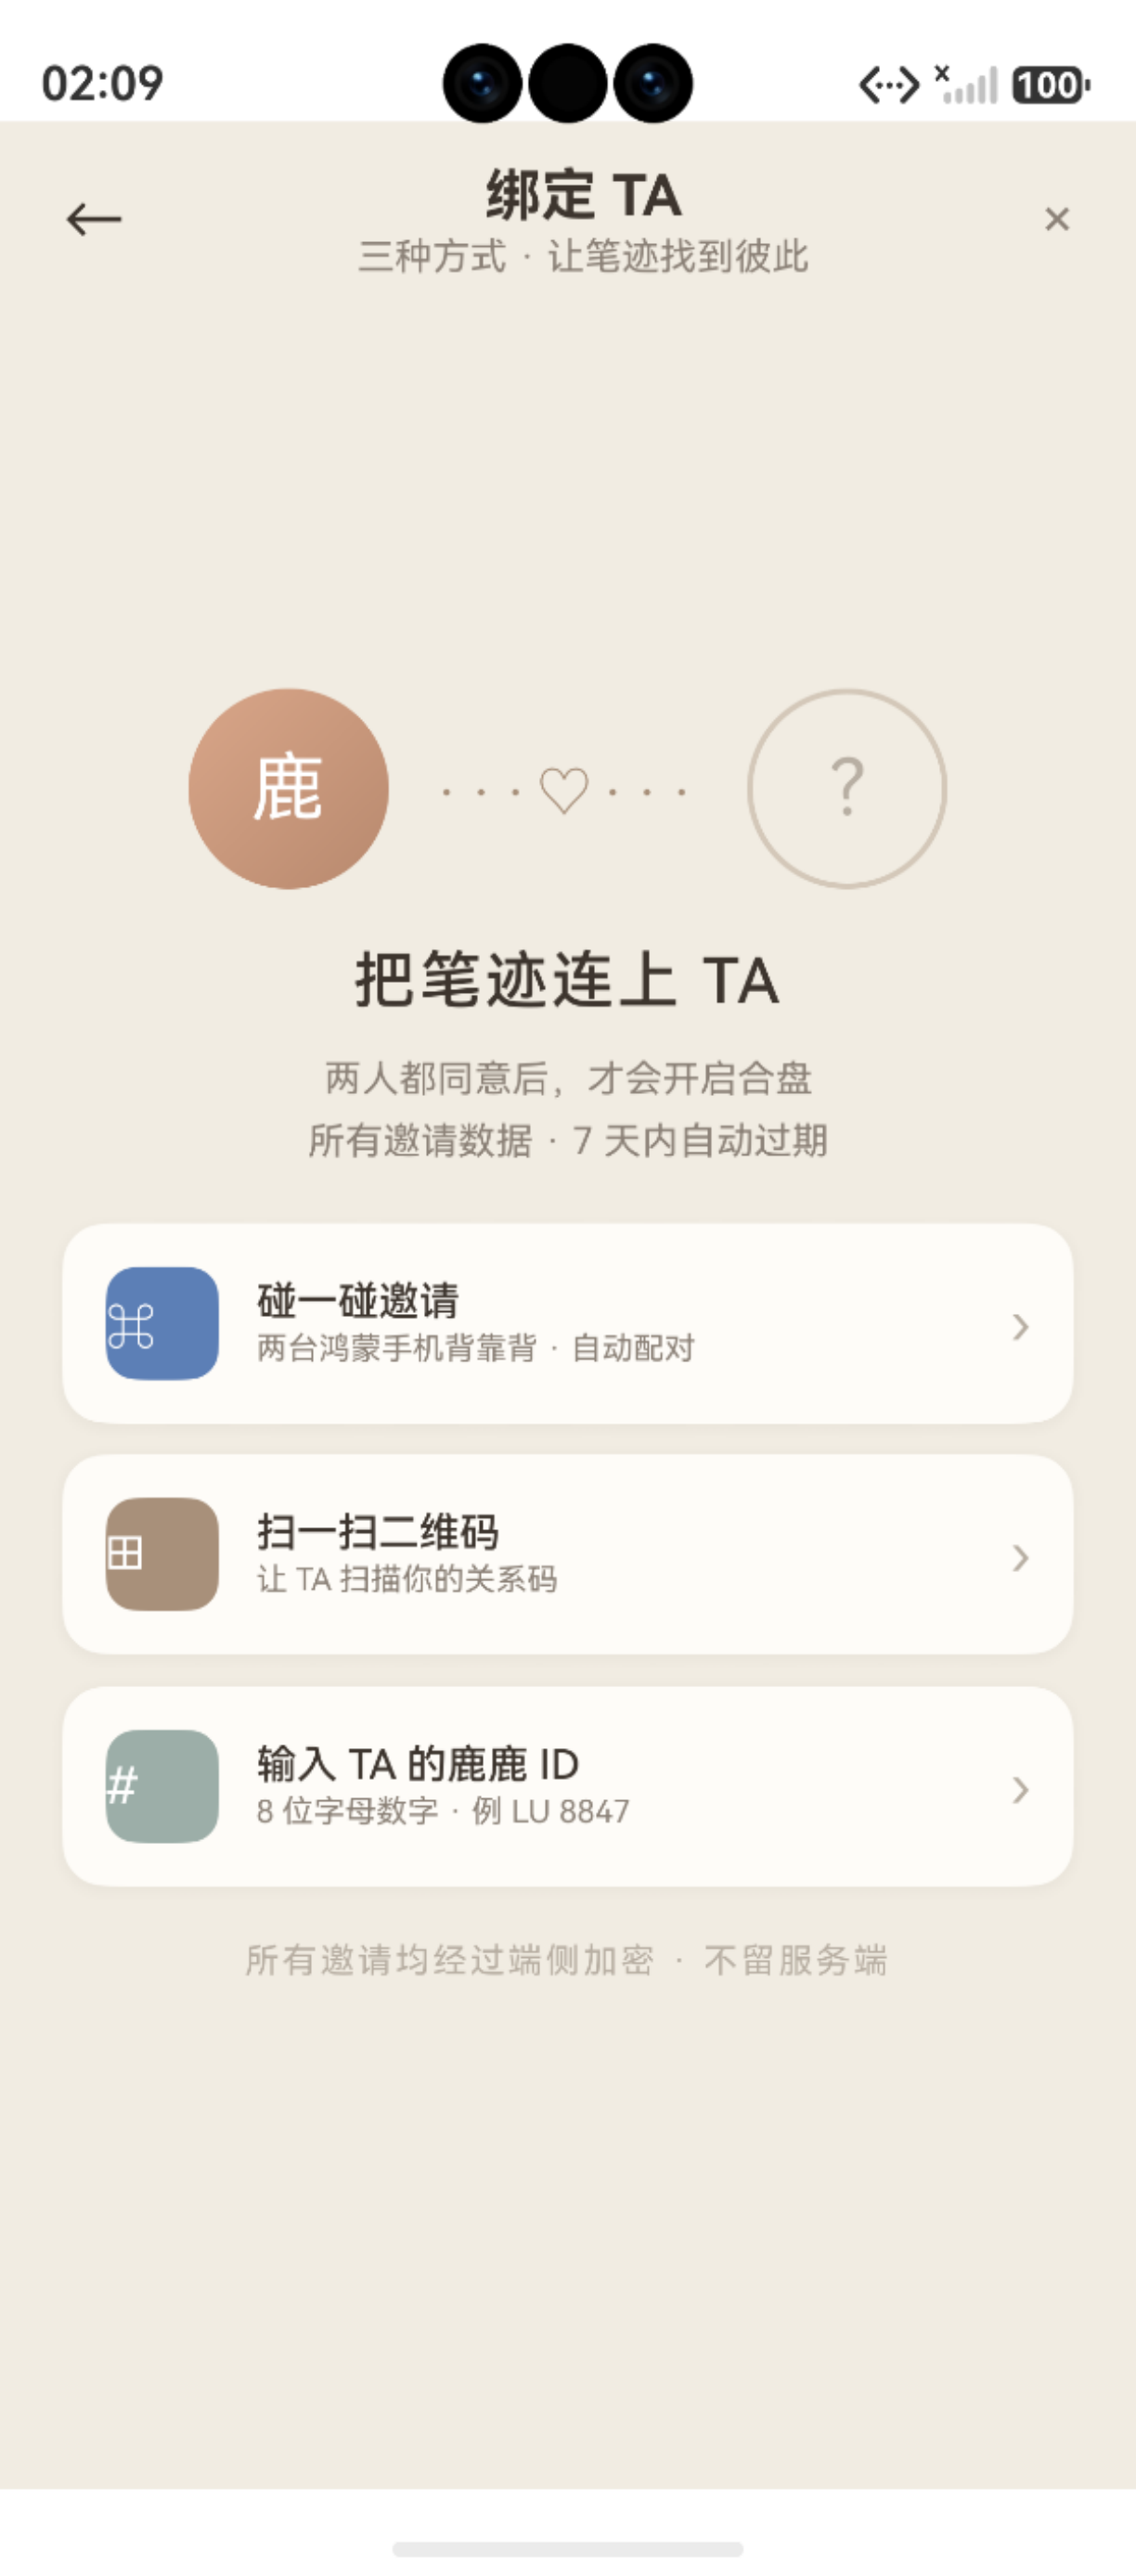
图:鸿蒙实战第95篇:BindRelationPage 四步状态机与邀请卡倒计时 运行效果截图(HarmonyOS NEXT)
BindRelationPage 是"鹿鹿"最"仪式感"的功能——NFC 碰一碰绑定伴侣。这 787 行代码的核心是一个四步状态机:从选择绑定方式,到发出邀请,到收到对方邀请,最终完成绑定。每一步都有独立的 UI 视图和 @Builder 组件。
本篇深入拆解:
- 四步状态机设计(
select → sent → incoming → success) - 4 小时邀请倒计时(
setInterval+ 格式化显示) - 邀请卡 UI 设计(双头像、关系码、倒计时)
- DB 写入 + AppStorage 同步的绑定完成处理
系列导航:94 CoupleHomePage · 96 SharePage
相关文档:setInterval Timer · relationalStore · NFC Kit
一、四步状态机
1.1 状态流转图
1.2 状态枚举与切换
type BindStep = 'select' | 'sent' | 'incoming' | 'success'

@Entry
@Component
struct BindRelationPage {
  @State currentStep: BindStep = 'select'

  // 各步骤特有状态
  @State inviteCode: string = ''      // 发出的邀请码(L·847·M 格式)
  @State countdownSecs: number = 14400  // 4小时 = 14400秒
  @State partnerAvatar: string = ''   // 对方头像
  @State partnerName: string = '未知用户'

  private countdownTimer: number = -1
}
1.3 五个 @Builder 视图
每一步对应一个独立的 @Builder,build() 中根据 currentStep 条件渲染:
build() {
  Column() {
    this.TitleBar()
    Scroll() {
      Column() {
        if (this.currentStep === 'select') {
          this.SelectView()    // 选择绑定方式
        } else if (this.currentStep === 'sent') {
          this.InviteCardView()  // 邀请卡(含倒计时)
        } else if (this.currentStep === 'incoming') {
          this.IncomingView()  // 收到邀请视图
        } else if (this.currentStep === 'success') {
          this.SuccessView()   // 绑定成功
        }
      }
    }
  }
}
二、邀请卡设计
2.1 关系码生成
private generateInviteCode(): string {
  // 格式:L·8 4 7·M(首字母 · 三位随机数 · 对方首字母)
  const digits = Array.from({ length: 3 }, () =>
    Math.floor(Math.random() * 10).toString()
  ).join(' ')
  return `L·${digits}·M`
}
关系码采用"符文风格"设计(· 间隔符),增加仪式感。实际产品中可替换为真实的 UUID 或服务端生成的邀请 token。
2.2 邀请卡 @Builder
@Builder
InviteCardView() {
  Column({ space: 20 }) {
    // 卡片主体
    Column({ space: 16 }) {
      // 标签行:POSITION + PENDING
      Row({ space: 8 }) {
        Text('POSITION')
          .fontSize(10).letterSpacing(2)
          .fontColor(AppColors.TEXT_3)
        Text('PENDING')
          .fontSize(10).letterSpacing(2)
          .fontColor(AppColors.WARM)
          .padding({ left: 6, right: 6, top: 2, bottom: 2 })
          .backgroundColor('rgba(217,166,137,0.15)')
          .borderRadius(4)
      }

      // 双头像(From → To)
      Row({ space: 20 }) {
        this.AvatarBubble('我', AppColors.PRIMARY, false)
        Text('→').fontSize(20).fontColor(AppColors.TEXT_3)
        this.AvatarBubble('TA', AppColors.ROSE, true)  // 对方:虚线边框
      }
      .justifyContent(FlexAlign.Center)

      // 关系码
      Text(this.inviteCode)
        .fontSize(28)
        .fontFamily(AppFonts.SERIF)
        .fontWeight(AppFonts.W_MEDIUM)
        .letterSpacing(4)
        .fontColor(AppColors.TEXT)

      // 有效期说明
      Text(`有效期 ${this.formatCountdown(this.countdownSecs)}`)
        .fontSize(12)
        .fontColor(AppColors.TEXT_2)
    }
    .width('100%')
    .padding(24)
    .backgroundColor(AppColors.CARD)
    .borderRadius(AppRadius.CARD)
    .shadow({ radius: 20, color: 'rgba(168,144,122,0.15)', offsetY: 8 })

    // 取消按钮
    Button('取消邀请')
      .type(ButtonType.Capsule)
      .backgroundColor('transparent')
      .fontColor(AppColors.TEXT_2)
      .onClick(() => {
        this.stopCountdown()
        this.currentStep = 'select'
      })
  }
}
2.3 头像气泡 Builder
@Builder
AvatarBubble(initial: string, color: string, isDashed: boolean) {
  Column() {
    Text(initial)
      .fontSize(20)
      .fontWeight(FontWeight.Bold)
      .fontColor(Color.White)
  }
  .width(60)
  .height(60)
  .borderRadius(30)
  .backgroundColor(isDashed ? 'transparent' : color)
  .border({
    width: isDashed ? 2 : 0,
    color: isDashed ? AppColors.TEXT_3 : 'transparent',
    style: isDashed ? BorderStyle.Dashed : BorderStyle.Solid
  })
  .justifyContent(FlexAlign.Center)
  .alignItems(HorizontalAlign.Center)
}
"对方"头像使用虚线边框(BorderStyle.Dashed)表示"等待连接"的悬念状态。
三、4 小时倒计时
3.1 启动与停止
private startCountdown(): void {
  this.countdownSecs = 4 * 60 * 60  // 4 小时 = 14400 秒
  this.countdownTimer = setInterval(() => {
    this.countdownSecs -= 1
    if (this.countdownSecs <= 0) {
      this.stopCountdown()
      // 邀请超时:回到 select 步骤
      promptAction.showToast({ message: '邀请已过期,请重新发起' })
      this.currentStep = 'select'
    }
  }, 1000)
}

private stopCountdown(): void {
  if (this.countdownTimer !== -1) {
    clearInterval(this.countdownTimer)
    this.countdownTimer = -1
  }
}
3.2 倒计时格式化
private formatCountdown(secs: number): string {
  const h = Math.floor(secs / 3600)
  const m = Math.floor((secs % 3600) / 60)
  const s = secs % 60
  if (h > 0) {
    return `${h}:${String(m).padStart(2, '0')}:${String(s).padStart(2, '0')}`
  }
  return `${String(m).padStart(2, '0')}:${String(s).padStart(2, '0')}`
}
| 剩余时间 | 显示格式 | 示例 |
|---|---|---|
| >1 小时 | H:MM:SS |
3:59:47 |
| <1 小时 | MM:SS |
45:23 |
| 0 | 触发超时处理 | — |
3.3 组件销毁时清理
aboutToDisappear(): void {
  this.stopCountdown()  // 必须清理,防止内存泄漏
}
四、收到邀请视图
4.1 收到邀请 UI 要点
@Builder
IncomingView() {
  Column({ space: 20 }) {
    // 外发光头像(borderWidth: 6 + 阴影模拟光晕)
    Column() {
      Text(this.partnerName[0])
        .fontSize(28).fontColor(Color.White)
    }
    .width(80).height(80).borderRadius(40)
    .backgroundColor(AppColors.ROSE)
    .border({ width: 6, color: 'rgba(201,160,160,0.3)' })
    .shadow({ radius: 20, color: 'rgba(201,160,160,0.4)' })

    // 留言气泡(左侧竖线风格)
    Row() {
      Column()
        .width(3).height(48)
        .backgroundColor(AppColors.ROSE)
        .borderRadius(2)
        .margin({ right: 12 })
      Text('"想了解你更多,愿意和我建立连接吗?"')
        .fontSize(13)
        .fontColor(AppColors.TEXT)
        .lineHeight(22)
    }
    .padding(16)
    .backgroundColor(AppColors.CARD)
    .borderRadius(AppRadius.CARD)

    // 权限说明列表
    Column({ space: 8 }) {
      Text('接受后双方可以:')
        .fontSize(12).fontColor(AppColors.TEXT_2)
      ForEach([
        '查看对方的笔迹分析摘要',
        '生成双人合盘报告',
        '在对方首页看到你的状态'
      ], (item: string) => {
        Row({ space: 8 }) {
          Text('✓').fontColor(AppColors.QUIET).fontSize(12)
          Text(item).fontSize(12).fontColor(AppColors.TEXT_2)
        }
      })
    }

    // 接受 / 拒绝 按钮
    Row({ space: 12 }) {
      Button('接受邀请')
        .onClick(() => this.acceptInvitation())
      Button('暂不')
        .backgroundColor('transparent')
        .fontColor(AppColors.TEXT_2)
        .onClick(() => { this.currentStep = 'select' })
    }
  }
}
五、绑定完成处理
5.1 DB 写入 + AppStorage 同步
private async acceptInvitation(): Promise<void> {
  try {
    const userId = AppStorage.get<number>('user_id') ?? 1

    // ① 创建档案(relation = '伴侣')
    const archiveId = await ArchiveDao.create({
      user_id: userId,
      name: this.partnerName,
      relation: '伴侣',
      record_count: 0,
      created_at: Date.now()
    })

    // ② 创建关系记录
    await RelationDao.create({
      user_id: userId,
      partner_name: this.partnerName,
      bound_method: 'invite_code',
      created_at: Date.now()
    })

    // ③ 同步到 AppStorage
    AppStorage.setOrCreate<boolean>('couple_bound', true)
    AppStorage.setOrCreate<string>('couple_partner_name', this.partnerName)

    // ④ 切换到成功状态
    this.currentStep = 'success'
    this.stopCountdown()

  } catch (e) {
    hilog.error(TAG, '绑定失败: %{public}s', JSON.stringify(e))
    promptAction.showToast({ message: '绑定失败,请重试' })
  }
}
5.2 成功动画
@Builder
SuccessView() {
  Column({ space: 24 }) {
    // 对勾圆圈(缩放入场动画)
    Column() {
      Text('✓')
        .fontSize(40)
        .fontColor(Color.White)
    }
    .width(100).height(100).borderRadius(50)
    .backgroundColor(AppColors.PRIMARY)
    .justifyContent(FlexAlign.Center)
    .transition({ type: TransitionType.Insert, scale: { x: 0, y: 0 } })

    Text(`与 ${this.partnerName} 的连接已建立 💕`)
      .fontSize(18).fontWeight(FontWeight.Medium)

    Button('进入双人空间')
      .onClick(() => {
        this.getUIContext().getRouter().replaceUrl({
          url: 'pages/CoupleHomePage'
        })
      })
  }
}
六、注意事项与常见问题
6.1 开发注意事项
在实际开发过程中,需特别注意以下几点:
- API 兼容性:部分接口仅在特定 HarmonyOS NEXT 版本中可用,需做版本条件判断
- 权限模型:采用静态声明(module.json5)+ 动态申请(requestPermissionsFromUser)的两阶段授权
- 生命周期:合理使用
aboutToAppear()和aboutToDisappear()管理资源初始化与释放 - 状态同步:跨页面数据通过 AppStorage 共享,组件内状态使用
@State/@Prop/@Link装饰器
6.2 常见错误与解决方案
常见问题快速排查表:
| 问题类型 | 排查方向 | 参考方法 |
|---|---|---|
| 应用崩溃 | 查看 hilog 错误日志 | hilog.error(TAG, "...", e.message) |
| 状态丢失 | 检查 AppStorage 键名拼写 | 统一使用常量管理键名 |
| 动画不流畅 | 避免在 animateTo 回调中执行 I/O | 动画与数据操作分离 |
七、最佳实践与性能优化
7.1 代码组织规范
以下规范可显著提升代码可读性与可维护性:
- 分层解耦:UI 逻辑(pages/)与数据操作(DAO/Service)严格分离,不在 build() 中调用数据库
- 组件拆分:单个
@Component保持 100~200 行以内,大型组件拆分为@Builder子函数 - 令牌约束:颜色、字号、间距统一引用
AppColors/AppFonts/AppAnimations,禁止魔数 - 错误处理:异步方法统一返回
Promise<T | null>,异常时hilog.error记录并返回null
7.2 性能优化要点
以下是常见性能优化措施的对比分析:
| 优化维度 | 优化前 | 优化后 | 效果 |
|---|---|---|---|
| 列表渲染 | ForEach 全量渲染 |
LazyForEach 按需渲染 |
内存降低 40-60% |
| 图片加载 | 不指定尺寸 | 指定 width/height |
减少布局重计算 |
| 数据库查询 | 每次重新查询 | 合理缓存 + 精确 Predicates | 查询速度提升 5-10x |
| 动画实现 | 逐帧手动绘制 | animateTo 属性动画 |
稳定 60fps |
| 状态更新 | 全局刷新 | @State 精细化作用域 |
减少无效渲染 |
八、调试与上线建议
8.1 调试技巧
在开发关系绑定流程时,以下调试方法可大幅提升效率:
- 在各状态转换点打印 AppStorage 快照,确认数据同步序列正确
- 倒计时调试时可将 4 小时改为 30 秒,加速测试流程
- NFC 碑写失败时,检查 NFC 协议版本和设备支持情况
- 二维码扫描不识别时,确认 Scan Kit 权限已动态申请
8.2 上线清单
发布前逐项检查:
| 检查项 | 检查内容 | 备注 |
|---|---|---|
| 权限声明 | module.json5 含 NFC 权限 | ohos.permission.NFC_TAG |
| 数据库设计 | couples 表结构正确 | partner_id 为外键 |
| 状态清理 | 退出绑定后 AppStorage 重置 | 避免脚棒数据残留 |
| 测试覆盖 | 两台设备互连测试 | NFC 模拟器不支持 |
总结
BindRelationPage 的 787 行代码的核心亮点:
- 四步状态机:
select → sent → incoming → success清晰分离每步的 UI 和逻辑 setInterval4 小时倒计时:含aboutToDisappear清理,防内存泄漏- 邀请卡仪式感设计:双头像(实线/虚线区分)+ 关系码 + 有效期,无图片资源
BorderStyle.Dashed虚线边框:对方头像用虚线暗示"等待连接"- 双写策略:DB 写入 + AppStorage 同步,绑定状态即时生效
下一篇预告:第96篇 SharePage——雷达图预览与 pasteboard 剪贴板分享
如果这篇文章对你有帮助,欢迎点赞👍、收藏⭐、关注🔔,你的支持是我持续创作的动力!
相关资源:

作为“人工智能6S店”的官方数字引擎,为AI开发者与企业提供一个覆盖软硬件全栈、一站式门户。
更多推荐
 0
0 0
0- 0


 已为社区贡献8条内容

所有评论(0)