
【鸿蒙】HarmonyOS 蓝牙/NFC 短距通信完全指南:从扫描到数据交换的全流程实战
HarmonyOS 蓝牙/NFC 短距通信完全指南:从扫描到数据交换的全流程实战
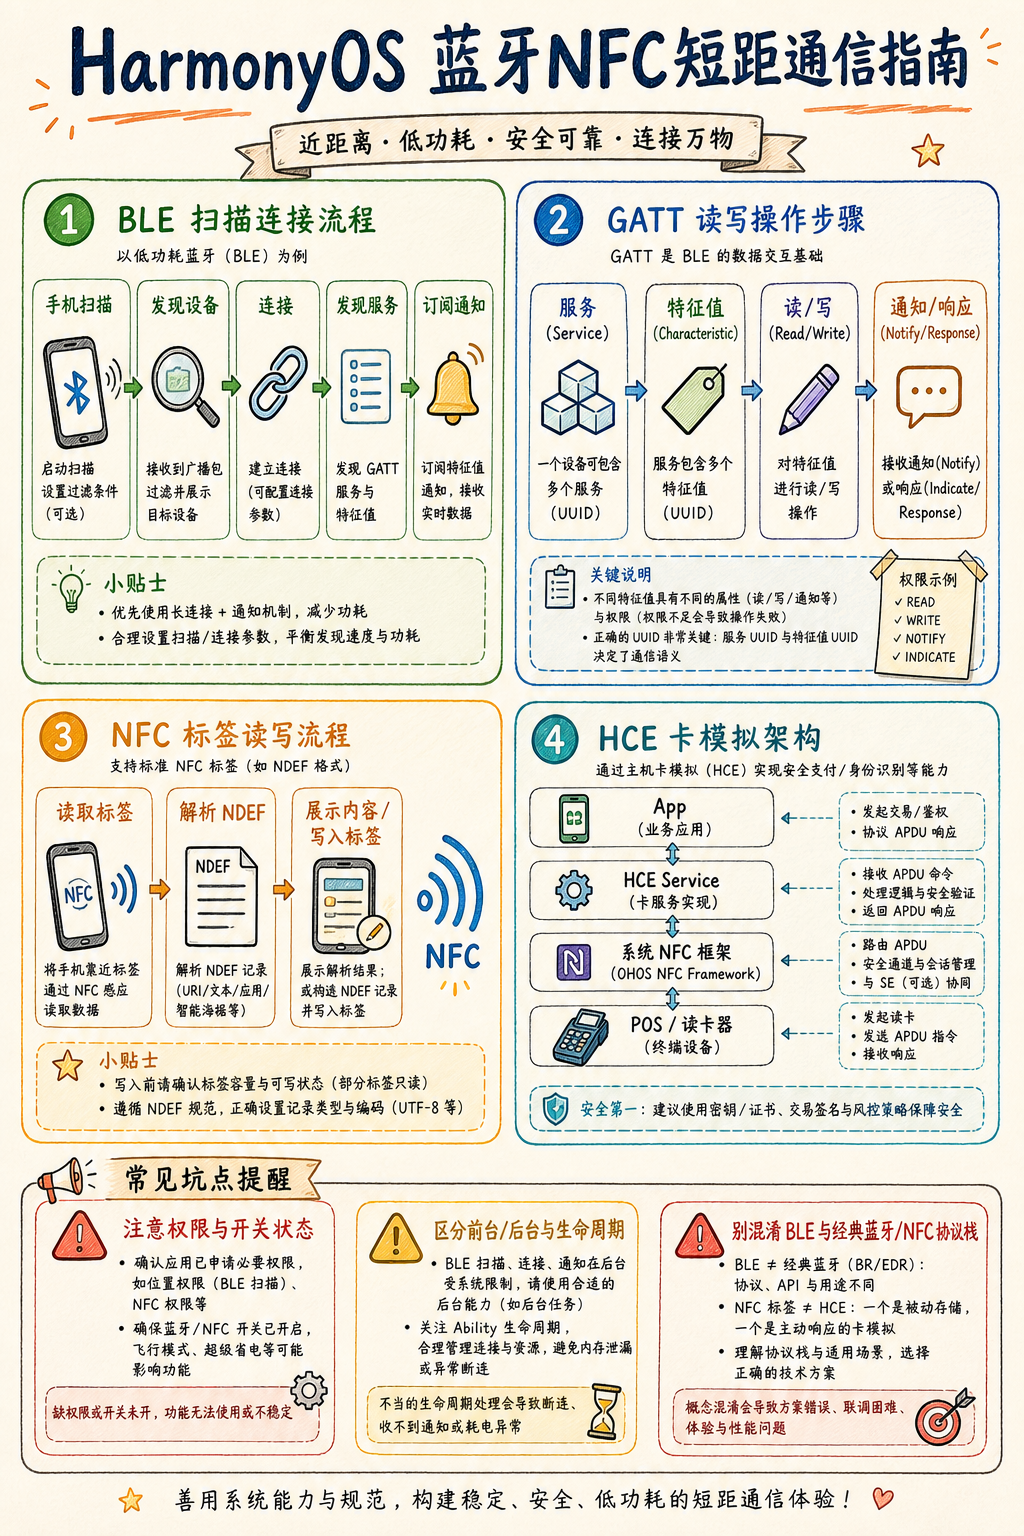
掌握 HarmonyOS NEXT 蓝牙(BLE/经典蓝牙)与 NFC(NDEF/卡模拟)核心 API,彻底解决设备发现、配对、数据收发、权限申请等高频开发痛点。
> 适用版本:HarmonyOS NEXT / API 12+
> 预计阅读时长:18 分钟
---
一、短距通信能力全景
短距通信在物联网、支付、设备协同场景中不可或缺。HarmonyOS NEXT 提供两条独立技术栈:
┌────────────────────────────────────────────────────────┐
│                 HarmonyOS 短距通信栈                    │
├─────────────────────┬──────────────────────────────────┤
│      蓝牙子系统      │           NFC 子系统              │
│  ┌───────────────┐  │  ┌─────────────────────────────┐ │
│  │ 经典蓝牙(BR/EDR)│  │  │ NDEF 标签读写              │ │
│  │ - A2DP/AVRCP  │  │  │ - NdefMessage/NdefRecord   │ │
│  │ - SPP 串口     │  │  ├─────────────────────────────┤ │
│  ├───────────────┤  │  │ HCE 卡模拟                  │ │
│  │ BLE 低功耗     │  │  │ - CardEmulation             │ │
│  │ - GATT Server │  │  │ - AID 路由                  │ │
│  │ - GATT Client │  │  └─────────────────────────────┘ │
│  │ - 广播/扫描   │  │                                   │
│  └───────────────┘  │                                   │
└─────────────────────┴──────────────────────────────────┘
核心模块路径:
- @ohos.bluetooth.ble — BLE 广播/扫描/GATT
- @ohos.bluetooth.connection — 经典蓝牙连接管理
- @ohos.nfc.tag — NFC 标签读写
- @ohos.nfc.cardEmulation — HCE 卡模拟
---
二、权限申请:必须先搞定,否则一切白搭
2.1 所需权限清单
// module.json5
"requestPermissions": [
{ "name": "ohos.permission.USE_BLUETOOTH" },
{ "name": "ohos.permission.DISCOVER_BLUETOOTH" },
{ "name": "ohos.permission.MANAGE_BLUETOOTH" },
{ "name": "ohos.permission.LOCATION" },
{ "name": "ohos.permission.APPROXIMATELY_LOCATION" },
{ "name": "ohos.permission.NFC_TAG" },
{ "name": "ohos.permission.NFC_CARD_EMULATION" }
]
2.2 动态申请(BLE 扫描场景)
import { abilityAccessCtrl } from '@kit.AbilityKit';

async function requestBlePermissions(context: Context): Promise

     {

const atManager = abilityAccessCtrl.createAtManager();
const permissions = [
'ohos.permission.LOCATION',
'ohos.permission.APPROXIMATELY_LOCATION',
'ohos.permission.USE_BLUETOOTH',
];
const result = await atManager.requestPermissionsFromUser(context, permissions);
// result.authResults[i] === 0 表示已授权
return result.authResults.every(r => r === 0);
}
LOCATION 或 APPROXIMATELY_LOCATION),缺少任意一个将导致 startBLEScan 静默失败,扫描结果永远为空,且不抛异常。
---
三、BLE 开发实战
3.1 BLE 扫描流程
调用 startBLEScan()
│
▼
on('BLEDeviceFind') 持续回调
│
├─ 过滤 ServiceUUID / 设备名 / RSSI
│
▼
stopBLEScan()  ← 找到目标设备后立即停止,节省电量
│
▼
createGattClientDevice(deviceId)
import ble from '@ohos.bluetooth.ble';
import { BusinessError } from '@ohos.base';

const TARGET_SERVICE_UUID = '0000FFF0-0000-1000-8000-00805F9B34FB';
let gattClient: ble.GattClientDevice | null = null;

function startScan(): void {
// 注册发现回调(必须在 startBLEScan 之前注册)
ble.on('BLEDeviceFind', (devices: Array

    ) => {

for (const device of devices) {
const hasTargetService = device.serviceUuids?.includes(TARGET_SERVICE_UUID);
if (hasTargetService) {
ble.stopBLEScan();          // 立即停止,避免持续扫描耗电
connectDevice(device.deviceId);
break;
}
}
});

const scanFilters: Array

     = [{ serviceUuid: TARGET_SERVICE_UUID }];

const scanOptions: ble.ScanOptions = {
interval: 0,
dutyMode: ble.ScanDuty.SCAN_MODE_LOW_LATENCY,
matchMode: ble.MatchMode.MATCH_MODE_AGGRESSIVE,
};

try {
ble.startBLEScan(scanFilters, scanOptions);
} catch (e) {
const err = e as BusinessError;
console.error(startBLEScan failed: ${err.code} ${err.message});
}
}
3.2 GATT 连接与特征读写
function connectDevice(deviceId: string): void {
gattClient = ble.createGattClientDevice(deviceId);

gattClient.on('BLEConnectionStateChange', (state: ble.BLEConnectionChangeState) => {
if (state.state === ble.ProfileConnectionState.STATE_CONNECTED) {
// 连接成功后先发现服务,否则直接读写会报错
gattClient!.getServices().then((services: Array

    ) => {

const targetService = services.find(s => s.serviceUuid === TARGET_SERVICE_UUID);
const targetChar = targetService?.characteristics?.find(
c => c.characteristicUuid === '0000FFF1-0000-1000-8000-00805F9B34FB'
);
if (targetChar) {
gattClient!.readCharacteristicValue(targetChar).then(result => {
const value = new Uint8Array(result.characteristicValue);
console.info(Read: ${Array.from(value).map(b => b.toString(16)).join(' ')});
});
}
});
}
});

gattClient.connect();
}
3.3 开启 BLE 通知(Notify)
async function enableNotify(char: ble.BLECharacteristic): Promise

    {

   // 步骤1:告知系统订阅通知

   await gattClient!.setNotifyCharacteristicChanged(char, true);


   // 步骤2:向 CCCD 描述符写入 0x0100,外围设备才会真正推送

   const cccd: ble.BLEDescriptor = {

   serviceUuid: TARGET_SERVICE_UUID,

   characteristicUuid: char.characteristicUuid,

   descriptorUuid: '00002902-0000-1000-8000-00805F9B34FB',

   descriptorValue: new Uint8Array([0x01, 0x00]).buffer,

   };

   await gattClient!.writeDescriptorValue(cccd);


   // 步骤3:注册数据变化回调

   gattClient!.on('BLECharacteristicChange', (charChange: ble.BLECharacteristic) => {

   const data = new Uint8Array(charChange.characteristicValue);

   console.info(Notify data: ${Array.from(data).map(b => b.toString(16)).join(' ')});

   });

   }
3.4 GATT Server(外围设备模式)
let gattServer: ble.GattServer;

function startGattServer(): void {
gattServer = ble.createGattServer();

const service: ble.GattService = {
serviceUuid: TARGET_SERVICE_UUID,
isPrimary: true,
characteristics: [{
serviceUuid: TARGET_SERVICE_UUID,
characteristicUuid: '0000FFF1-0000-1000-8000-00805F9B34FB',
characteristicValue: new ArrayBuffer(0),
descriptors: [],
properties: 0x0A,  // READ | WRITE
}],
includeServices: [],
};

gattServer.addService(service);

gattServer.on('characteristicWrite', (req: ble.CharacteristicWriteRequest) => {
const data = new Uint8Array(req.value);
console.info(Received: ${Array.from(data).map(b => b.toString(16)).join(' ')});
gattServer.sendResponse({
deviceId: req.deviceId,
transId: req.transId,
status: 0,
offset: 0,
value: new ArrayBuffer(0),
});
});

// 开始广播
ble.startAdvertising(
{ interval: 160, txPower: 0, connectable: true },
{ serviceUuids: [TARGET_SERVICE_UUID], manufactureData: [], serviceData: [] }
);
}
---
四、NFC 标签读写实战
4.1 NFC 标签分发机制
设备靠近 NFC 标签
│
▼
NFC 服务识别标签类型
│
├─ NDEF 标签 → action: "ohos.nfc.action.TAG_DISCOVERED"
└─ ISO-DEP   → action: "ohos.nfc.action.TAG_DISCOVERED"
│
▼
匹配 module.json5 中的 skills.actions 配置
│
▼
冷启动 → onCreate(want)  /  热启动 → onNewWant(want)
"skills": [{ "actions": ["ohos.nfc.action.TAG_DISCOVERED"], "uris": [] }]
// UIAbility 中同时处理冷启动和热启动
onCreate(want: Want): void { handleNfcWant(want); }
onNewWant(want: Want): void { handleNfcWant(want); }

function handleNfcWant(want: Want): void {
const tagInfo = tag.getTagInfo(want);
if (tagInfo.technology.includes(tag.NfcTechnology.NDEF)) {
readNdefTag(tagInfo);
}
}
4.2 读取 NDEF 标签
import tag from '@ohos.nfc.tag';

async function readNdefTag(tagInfo: tag.TagInfo): Promise

     {

const ndefTag = tag.getNdef(tagInfo);
await ndefTag.connect();   // 必须先 connect

try {
const ndefMessage = await ndefTag.readNdef();
for (const record of ndefMessage.ndefRecords) {
if (record.tnf === tag.NfcTnfType.TNF_WELL_KNOWN) {
const payload = new Uint8Array(record.payload);
// Text Record: 第一字节为状态字节,后面是语言代码+文本
const langLen = payload[0] & 0x3F;
const text = new TextDecoder().decode(payload.slice(1 + langLen));
console.info(NDEF text: ${text});
}
}
} finally {
await ndefTag.close();   // 必须 close,否则标签持续占用
}
}
4.3 写入 NDEF 标签
async function writeNdefTag(tagInfo: tag.TagInfo, message: string): Promise

    {

   const ndefTag = tag.getNdef(tagInfo);

   await ndefTag.connect();


   try {

   const encoder = new TextEncoder();

   const langCode = 'zh';

   const langBytes = encoder.encode(langCode);

   const textBytes = encoder.encode(message);

   const statusByte = langCode.length & 0x3F;


   const payload = new Uint8Array(1 + langBytes.length + textBytes.length);

   payload[0] = statusByte;

   payload.set(langBytes, 1);

   payload.set(textBytes, 1 + langBytes.length);


   const ndefMessage: tag.NdefMessage = {

   ndefRecords: [{

   tnf: tag.NfcTnfType.TNF_WELL_KNOWN,

   rtdType: new Uint8Array([0x54]).buffer,  // 'T' = Text RTD

   id: new ArrayBuffer(0),

   payload: payload.buffer,

   }]

   };

   await ndefTag.writeNdef(ndefMessage);

   } finally {

   await ndefTag.close();

   }

   }
---
五、HCE 卡模拟实战
HCE(Host Card Emulation)让手机模拟为 NFC 卡片,典型场景为门禁卡/交通卡。
import cardEmulation from '@ohos.nfc.cardEmulation';

class MyHceService extends cardEmulation.HceService {
onCommand(apduData: number[]): void {
console.info(APDU: ${apduData.map(b => b.toString(16)).join(' ')});
if (apduData[1] === 0xA4) {
this.sendResponse([0x90, 0x00]);  // SELECT AID 成功
} else {
this.sendResponse([0x6D, 0x00]);  // 不支持的指令
}
}
}
{ "aids": ["A000000003000000"] }
---
六、错误写法 → 问题 → 正确写法
案例 1:BLE 扫描无结果
// ❌ 错误:先 startBLEScan,再注册回调
ble.startBLEScan([], {});
ble.on('BLEDeviceFind', (devices) => { ... });
// 问题:回调注册晚于扫描启动,早期扫描结果丢失

// ✅ 正确:先注册回调,再启动扫描
ble.on('BLEDeviceFind', (devices) => { ... });
ble.startBLEScan([], {});
案例 2:未发现服务直接读特征
// ❌ 错误:连接后直接读特征(报错:services not discovered)
gattClient.on('BLEConnectionStateChange', (state) => {
if (state.state === ProfileConnectionState.STATE_CONNECTED) {
gattClient.readCharacteristicValue(char);
}
});

// ✅ 正确:连接后先 getServices,从返回的 services 中取特征对象
gattClient.on('BLEConnectionStateChange', (state) => {
if (state.state === ProfileConnectionState.STATE_CONNECTED) {
gattClient.getServices().then(services => {
const char = services[0].characteristics[0];
gattClient.readCharacteristicValue(char);
});
}
});
案例 3:NFC 标签未关闭连接
// ❌ 错误:用完不 close → 标签持续被占用
const ndefTag = tag.getNdef(tagInfo);
await ndefTag.connect();
await ndefTag.readNdef();

// ✅ 正确:try/finally 确保 close
await ndefTag.connect();
try {
await ndefTag.readNdef();
} finally {
await ndefTag.close();
}
---
七、最佳实践
7.1 BLE 扫描找到目标立即停止
做法:找到目标设备后立即调用ble.stopBLEScan()。 原因: SCAN_MODE_LOW_LATENCY 模式下持续扫描功耗约是 idle 的 5~10 倍。 不这样做会怎样:耗电明显增加,部分系统还会在后台强制降级扫描频率。
7.2 GATT 连接复用,按指数退避重连
做法:缓存GattClientDevice 实例,监听连接状态,断开后以 1s → 2s → 4s 间隔重连。 原因:每次 createGattClientDevice + connect 需要完整 BLE 握手,通常耗时 500ms~2s。 不这样做会怎样:用户每次打开页面都经历秒级等待;高频重连可能触发对端设备防抖,被拒绝连接。
7.3 NFC 操作异步执行,勿阻塞主线程
做法:将connect/read/write/close 通过 async/await + TaskPool 与 UI 线程隔离。 原因:NFC I/O 存在不确定延迟(10~200ms),主线程阻塞导致帧率抖动甚至 ANR。 不这样做会怎样:UI 卡顿,严重时系统弹出"应用未响应"对话框。
7.4 监听蓝牙状态,就绪后再初始化
做法:通过bluetooth.on('stateChange', ...) 监听开关,在 STATE_ON 后再启动扫描/广播。 原因:蓝牙开关切换是异步过程,立即调用 API 会抛 2900099(BT_ERR_INTERNAL_ERROR)。 不这样做会怎样:应用启动时若蓝牙未就绪,初始化必然失败,错误信息不直观,排查困难。
---
八、核心坑点
坑点 1:BLE 扫描需要位置权限但静默失败
现象:startBLEScan 调用后 BLEDeviceFind 回调始终为空,无任何报错日志。 原因:API 12 中 BLE 扫描依赖位置能力,缺少 LOCATION 或 APPROXIMATELY_LOCATION 时系统静默忽略扫描结果。 复现:移除 module.json5 中位置权限后运行扫描,观察 BLEDeviceFind 从不触发。 解决:在 startBLEScan 前先申请位置权限,确认授权后再启动扫描。
---
坑点 2:GATT 通知未写 CCCD 描述符
现象:readCharacteristicValue 正常,但 on('BLECharacteristicChange') 回调永远不触发。 原因:BLE Notify 要求客户端向 CCCD(UUID: 00002902-...)写入 0x0100 开启通知,缺少此步骤外围设备不会主动推送数据。 复现:只调用 setNotifyCharacteristicChanged(char, true),不写 CCCD 描述符,监听无效。 解决: setNotifyCharacteristicChanged + writeDescriptorValue(CCCD, [0x01, 0x00]) 必须同时执行(见第三节示例)。
---
坑点 3:NFC onNewWant 中 tagInfo 为 undefined
现象:应用被 NFC 拉起后tag.getTagInfo(want) 返回 undefined 或抛异常。 原因:冷启动时标签信息在 onCreate 的 want 中,热启动时在 onNewWant 中——只处理其中一个导致特定场景 tagInfo 为空。 复现:只在 onNewWant 处理,冷启动靠近标签时 tagInfo 为空。 解决: onCreate 和 onNewWant 共用同一处理函数,两处都调用 tag.getTagInfo(want)。
---
九、总结
1. 权限是基础:BLE 扫描需位置权限,NFC 需 NFC_TAG/NFC_CARD_EMULATION,缺一且静默失败。
2. BLE 流程有序:先注册回调 → 再启动扫描;连接后先 getServices → 再操作特征。
3. NFC 资源必须释放:connect 后必须 close,try/finally 是标准写法。
4. GATT 通知需双写:setNotifyCharacteristicChanged + CCCD 描述符写入缺一不可。
5. 核心结论:BLE 和 NFC 开发最大陷阱在于"静默失败"——无报错无日志,必须通过 hilog 过滤 nfc/bluetooth tag 定位根因。
---
参考资料
- HarmonyOS 官方文档 · 蓝牙 BLE 开发指南
- OpenHarmony 蓝牙源码:foundation/communication/bluetooth/frameworks/inner/src/bluetooth_ble_central_manager.cpp
- OpenHarmony NFC 源码:foundation/communication/nfc/services/src/nfc_service.cpp

作为“人工智能6S店”的官方数字引擎,为AI开发者与企业提供一个覆盖软硬件全栈、一站式门户。
更多推荐
 0
0 0
0- 0


 已为社区贡献13条内容

所有评论(0)