
鸿蒙6.0应用开发——实现简单聊天列表
鸿蒙6.0应用开发——实现简单聊天列表
场景描述
常见聊天界面主要包含联系人消息界面以及聊天窗口界面。其中,联系人列表界面主要支持以下交互场景:
- 左滑操作,用于删除或置顶联系人
- 滚动后点击“回到顶部”按钮快速跳转
- 拖拽调整联系人排序
聊天窗口界面则包含以下功能:
- 初始化时自动定位到底部消息
- 支持下拉加载历史聊天记录
- 实时新增并展示最新聊天内容

消息气泡
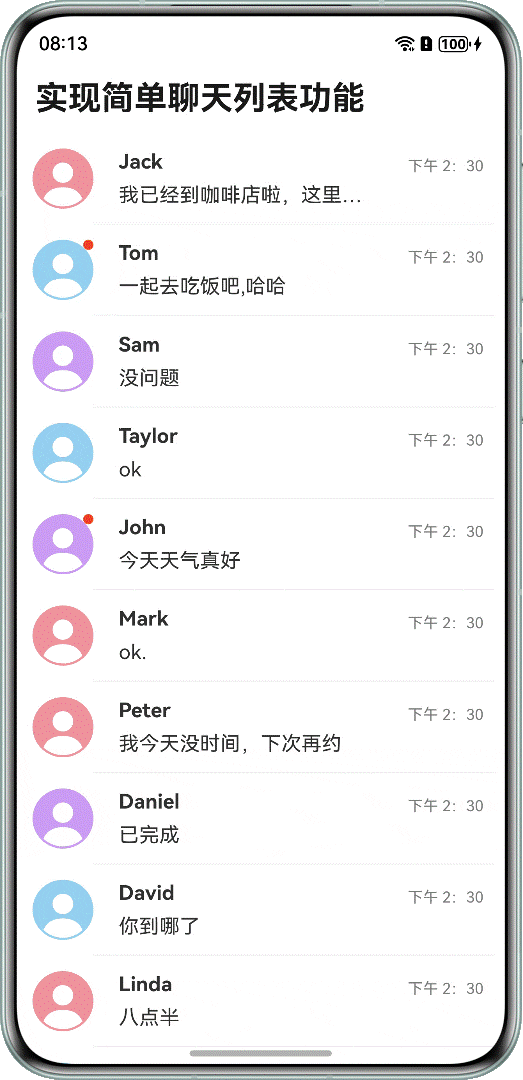
在ListItem中使用Badge组件可实现给列表项添加标记功能。Badge是可以附加在单个组件上用于信息标记的容器组件。例如,在消息列表中,若希望在联系人头像右上角添加标记,可在实现消息列表项ListItem的联系人头像时,将头像Image组件作为Badge的子组件。在Badge组件中,count和position参数用于设置需要展示的消息数量和提示点显示位置,还可以通过style参数灵活设置标记的样式。

实现方案
定义一个变量isNewMessage来标识是否需要给列表项添加标记功能,然后使用Badge组件给列表项添加标记功能。
示例代码
if (item.isNewMessage) {
  // The Badge component can be used to add tags to list items.
  Badge({
    value: '',
    position: BadgePosition.RightTop,
    style: { badgeSize: 8, badgeColor: '#FA2A2D' }
  }) {
    Image(item.image)
      .width(48)
      .height(48)
  }
} else {
  Image(item.image)
    .width(48)
    .height(48)
}
左滑删除/置顶
实现方案
使用组件swipeAction实现ListItem左滑划出组件,然后实现一个左滑区域内容显示的组件itemEnd,将其绑定到swipeAction上。
- 实现ListItem置顶,为每个ListItem定义一个变量isTop用于标记是否置顶,然后设置一个排序方式实现置顶项优先显示。
- 实现ListItem删除,利用Item数组自带的splice方法删除指定index的ListItem。
示例代码
@Builder
itemEnd(item: Item, index: number) {
  Row() {
    Image($r(item.isTop ? 'app.media.up_off' : 'app.media.up_on'))
      .width(24)
      .height(24)
      .margin({ right: 8 })
      .onClick(() => {
        this.toggleTop(item);
      })
    Image($r('app.media.delete'))
      .width(24)
      .height(24)
      .onClick(() => {
        this.sortedList.splice(index, 1);
      })
  }
  .padding(4)
  .height('100%')
  .backgroundColor('#F1F3F5')
  .justifyContent(FlexAlign.SpaceEvenly)
}
.swipeAction({
  end: {
    builder: () => {
      this.itemEnd(item, index);
    },
    actionAreaDistance: 56,
    onAction: () => {
      this.getUIContext().animateTo({ duration: 1000 }, () => {
        this.sortedList.splice(index, 1);
      })
    }
  },
  edgeEffect: SwipeEdgeEffect.Spring
})
滚动后跳转到指定位置

实现方案
以滚动后跳转到顶部为例,在回调.onWillScroll()中通过scroll组件自带的接口currentOffset()获取当前滚动偏移量,将偏移量与临界值进行对比,当超过临界值时显示按钮,点击后调用scrolltoindex(0)即可跳转到顶部。
示例代码
.onWillScroll(() => {
  if (this.scroller.currentOffset().yOffset > 100) {
    this.isFlag = true;
  } else {
    this.isFlag = false;
  }
})
if (this.isFlag) {
  Image($r('app.media.arrow_up_circle_fill'))
    .width(36)
    .height(36)
    .margin({ right: 10, bottom: 10 })
    .onClick(() => {
      this.scroller.scrollToIndex(0, true);
      this.isFlag = false;
    })
}
消息列表拖拽排序

实现方案
通过List组件的拖拽方法onItemDragStart()和onItemDragMove()方法,主要步骤如下:
-
开始拖拽列表元素时,onItemDragStart()方法被触发,在回调里记录当前拖拽的ListItem并赋值给自定义对象dragItem,返回并展示拖拽时的UI函数dragFloatView()。
.onItemDragStart((event: ItemDragInfo, itemIndex: number) => { // Triggered when starting to drag and drop list elements. this.dragItem = this.sortedList[itemIndex]; return this.dragFloatView(this.sortedList[itemIndex]); }) -
拖拽列表元素在列表范围内移动时触发onItemDragMove()方法,在回调里分别记录被拖拽ListItem的索引deleteIndex和拖拽插入位置索引insertIndex,然后通过Item数组的splice方法删除被拖拽的ListItem,同时将被删除的ListItem添加至insertIndex所在的位置。
.onItemDragMove((event: ItemDragInfo, itemIndex: number, insertIndex: number) => { // Triggered when dragging and moving within the range of a list element. this.getUIContext().animateTo({ duration: 200, curve: Curve.Linear }, () => { let deleteIndex = this.sortedList.indexOf(this.dragItem); this.sortedList.splice(deleteIndex, 1); this.sortedList.splice(insertIndex, 0, this.dragItem); }) }) -
定义一个dragFloatView自定义构建函数作为拖拽时临时展示的UI元素,直至拖拽结束。
@Builder dragFloatView(item: Item) { Row() { if (item.isNewMessage) { Badge({ value: '', position: BadgePosition.RightTop, style: { badgeSize: 8, badgeColor: '#FA2A2D' } }) { Image(item.image) .width(48) .height(48) } } else { Image(item.image) .width(48) .height(48) } Row() { Column() { Text(item.name) .fontSize(16) .fontWeight(FontWeight.Bold) .margin({ bottom: 8 }) .textAlign(TextAlign.Start) Text(item.message[item.message.length - 1].msg) .fontSize(16) .maxLines(1) .constraintSize({ maxWidth: '70%' }) .textOverflow({ overflow: TextOverflow.Ellipsis }) } .height('100%') .justifyContent(FlexAlign.Center) .alignItems(HorizontalAlign.Start) Text(item.time) .fontSize(12) .margin({ bottom: 20 }) .fontColor(item.isTop ? Color.Black : Color.Gray) } .width('80%') .justifyContent(FlexAlign.SpaceBetween) } .width('100%') .height(72) .backgroundColor(item.isTop ? '#4497FF' : 'rgba(240,240,240,1)') .justifyContent(FlexAlign.SpaceAround) } -
在拖拽时,被拖拽的ListItem若与记录的dragItem相同,则对其隐藏,避免页面中同时出现相同的ListItem。
.visibility(item == this.dragItem ? Visibility.Hidden : Visibility.Visible)
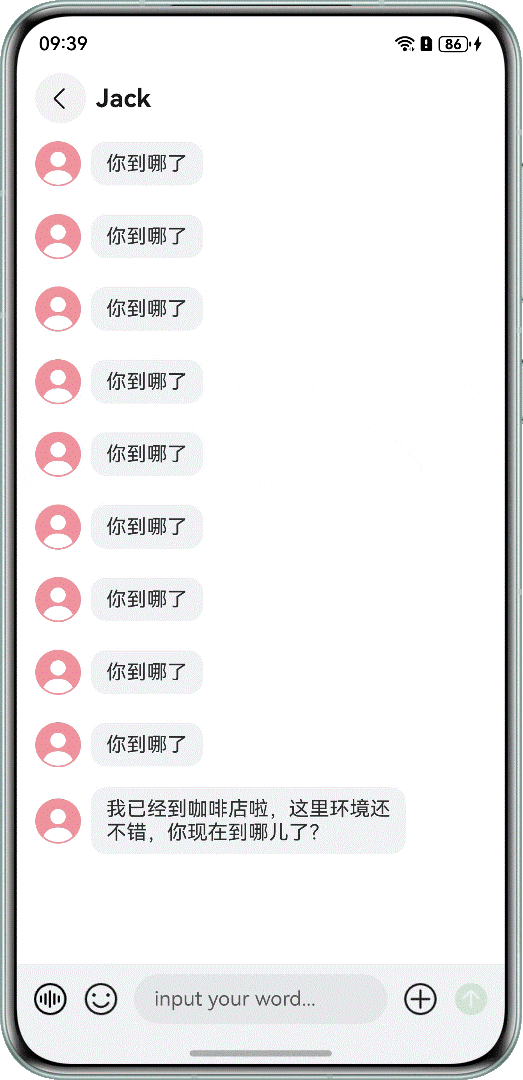
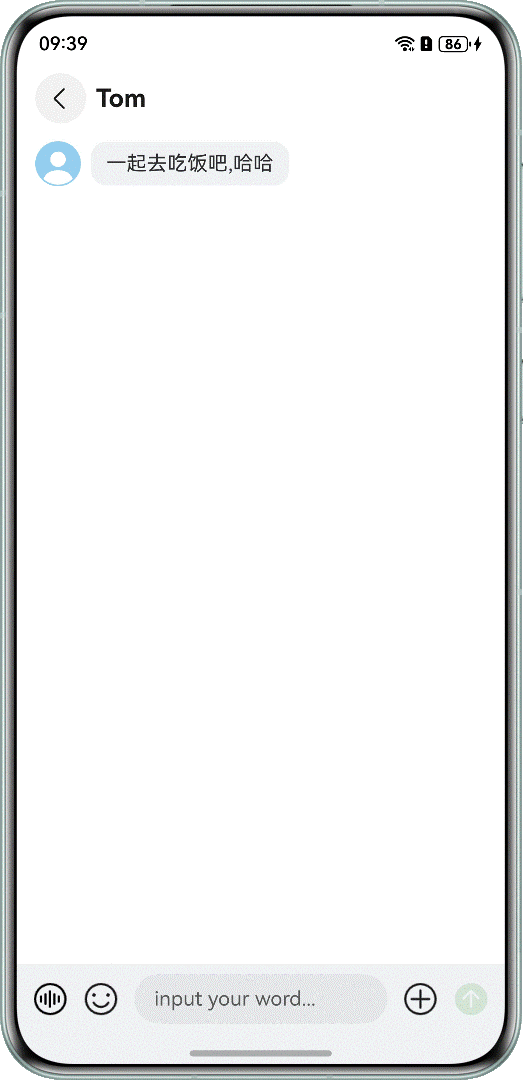
初始化显示到底部

实现方案
通过设置参数initialIndex为消息列表的最大长度,此时只是实现了显示到最后一条,还不能达到预期效果。当遇到超长item时,会从最后一条的顶部开始显示,并不能直接显示到底部。还需要在List组件挂载显示后触发的onAppear()回调中通过ScrollEdge(Edge.Bottom)跳转至最底部。
示例代码
List({ space: 10, scroller: this.scroller, initialIndex: this.itemInfo.message.length - 1 }) {
  ForEach(this.showItemMessage, (item: messageObj, index: number) => {
    ListItem() {
      if (item.sender === 'others') {
        Row() {
          Image(this.itemInfo.image)
            .width(36)
            .height(36)
            .margin({ right: 8 })

          Text(item.msg)
            .fontSize(16)
            .constraintSize({ maxWidth: '70%' })
            .backgroundColor('#F1F3F5')
            .borderRadius(12)
            .padding({
              top: 8,
              bottom: 8,
              left: 12,
              right: 12
            })
        }
        .width('100%')
        .constraintSize({ minHeight: 48 })
        .justifyContent(FlexAlign.Start)
      } else {
        Row() {
          Text(item.msg)
            .fontSize(16)
            .backgroundColor('#F1F3F5')
            .borderRadius(12)
            .padding({
              top: 8,
              bottom: 8,
              left: 12,
              right: 12
            })
          Image($r('app.media.Public_avatar'))
            .width(36)
            .height(36)
            .margin({ left: 8 })
        }
        .width('100%')
        .height(48)
        .justifyContent(FlexAlign.End)
      }
    }
  })
}
.onAppear(() => {
  // Initialize display to the bottom.
  this.scroller.scrollEdge(Edge.Bottom);
})
下拉加载更多聊天记录
实现方案
可以使用Refresh容器组件包裹List组件进行页面下拉操作,进入刷新状态时触发onRefreshing()回调,并在其中添加数据更新的操作,实现下拉刷新页面的功能。
示例代码
Refresh({ refreshing: $$this.isRefreshing }) {
  List({ space: 10, scroller: this.scroller, initialIndex: this.itemInfo.message.length - 1 }) {
    ForEach(this.showItemMessage, (item: messageObj, index: number) => {
      ListItem() {
        if (item.sender === 'others') {
          Row() {
            Image(this.itemInfo.image)
              .width(36)
              .height(36)
              .margin({ right: 8 })

            Text(item.msg)
              .fontSize(16)
              .constraintSize({ maxWidth: '70%' })
              .backgroundColor('#F1F3F5')
              .borderRadius(12)
              .padding({
                top: 8,
                bottom: 8,
                left: 12,
                right: 12
              })
          }
          .width('100%')
          .constraintSize({ minHeight: 48 })
          .justifyContent(FlexAlign.Start)
        } else {
          Row() {
            Text(item.msg)
              .fontSize(16)
              .backgroundColor('#F1F3F5')
              .borderRadius(12)
              .padding({
                top: 8,
                bottom: 8,
                left: 12,
                right: 12
              })
            Image($r('app.media.Public_avatar'))
              .width(36)
              .height(36)
              .margin({ left: 8 })
          }
          .width('100%')
          .height(48)
          .justifyContent(FlexAlign.End)
        }
      }
    })
  }
  .onAppear(() => {
    // Initialize display to the bottom.
    this.scroller.scrollEdge(Edge.Bottom);
  })
  .scrollBar(BarState.Off)
  .contentEndOffset(8)
  .width('100%')
  .height('100%')
}
.width('100%')
.height('100%')
.refreshOffset(64)
.pullToRefresh(true)
.onRefreshing(() => {
  setTimeout(() => {
    this.getLastTenElements(this.itemMessage);
    this.isRefreshing = false;
  }, 1500)
})
新增聊天记录
实现方案
通过TextInput组件获取聊天键盘内容,使用新增列表项push()接口将消息添加到聊天记录中。
示例代码
TextInput({ placeholder: 'input your word...', text: this.inputMessage })
  .height(40)
  .width(200)
  .margin({
    left: 12,
    right: 12
  })
  .onBlur(() => {
    this.scroller.scrollEdge(Edge.Bottom);
  })
  .onChange((value) => {
    this.inputMessage = value;
  })
点击图标发送消息,通过数组的push()方法将输入的内容添加至List数据源itemMessage数组中,然后调用scrollEdge(Edge.Bottom)使List滚动到底部,同时清空输入框的内容。
Image(this.inputMessage === '' ? $r('app.media.send_off') : $r('app.media.send_on'))
  .width(28)
  .height(28)
  .onClick(() => {
    if (this.inputMessage.trim() === '') {
      return;
    }
    this.itemMessage.push({
      sender: 'myself',
      msg: this.inputMessage
    });
    this.showItemMessage = this.itemMessage.slice(-10);
    this.scroller.scrollEdge(Edge.Bottom);
    this.inputMessage = '';
  })

作为“人工智能6S店”的官方数字引擎,为AI开发者与企业提供一个覆盖软硬件全栈、一站式门户。
更多推荐


 10
10 0
0- 0


 已为社区贡献61条内容

所有评论(0)