
鸿蒙6.0应用开发——弹窗组件封装
·
鸿蒙6.0应用开发——弹窗组件封装
文章目录
概述
在应用开发中,通常会遇到自定义弹窗的场景,这些业务场景可能需要实现自定义弹窗的结构和样式。这时提供方可以封装一个传入自定义构建函数的工具类,将类对外导出。使用方可以引入该类,将自定义弹窗结构的@Builder函数作为参数传给封装好的静态类函数中,实现自定义弹窗。
实现原理
通过使用UIContext中获取到的PromptAction对象来实现自定义弹窗工具类的封装。首先通过UIContext实例中的getPromptAction函数获取到promptAction对象,然后通过创建ComponentContent定义自定义弹窗的内容,将自定义弹窗内容作为参数传入promptAction对象的openCustomDialog函数中。使用方通过PromptAction对象封装的工具类接口打开弹窗就会显示自定义弹窗的内容,从而实现自定义的弹窗结构与样式。
开发步骤
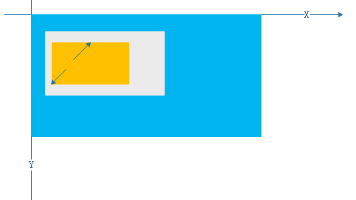
以使用方点击按钮后展示自定义弹窗场景为例,若需实现下图效果,基于promptAction封装弹窗工具类和使用步骤如下:

-
使用方通过全局@Builder封装弹窗结构。
@Builder export function buildText(_obj: Object) { Column({ space: 16 }) { Text($r('app.string.tips')) .fontSize($r('app.float.font_size_l')) .fontWeight(FontWeight.Bold) Text($r('app.string.content')) .fontSize($r('app.float.font_size_l')) Row() { Button($r('app.string.cancel')) .fontColor($r('app.color.blue')) .backgroundColor(Color.White) .margin({ right: $r('app.float.margin_right') }) .width('42%') .onClick(() => { PopViewUtils.closePopView(); }) Button($r('app.string.confirm')) .width('42%') .onClick(() => { PopViewUtils.closePopView(); }) } .justifyContent(FlexAlign.Center) .width($r('app.float.dialog_width')) } .width($r('app.float.dialog_width')) .padding($r('app.float.padding_l')) .justifyContent(FlexAlign.Center) .alignItems(HorizontalAlign.Center) .backgroundColor(Color.White) .borderRadius($r('app.float.border_radius')) } -
提供方通过promptAction对象封装弹窗工具类的步骤如下:
-
在EntryAbility的onWindowStageCreate()方法中,通过AppStorage.setOrCreate()设置全局UIContext对象。
onWindowStageCreate(windowStage: window.WindowStage): void { // ... windowStage.loadContent('pages/Index', (err) => { // ... try { AppStorage.setOrCreate('uiContext', windowStage.getMainWindowSync().getUIContext()); } catch (err) { let error = err as BusinessError; hilog.error(0x0000, 'testTag', `aboutToAppear err, code: ${error.code}, message: ${error.message}`); } }); } -
通过openCustomDialog创建打开弹窗的showDialog函数。
import { ComponentContent, promptAction } from '@kit.ArkUI'; import { hilog } from '@kit.PerformanceAnalysisKit'; import { BusinessError } from '@kit.BasicServicesKit'; export enum PopViewShowType { OPEN } interface PopViewModel { com: ComponentContent<object>; popType: PopViewShowType; } export class PopViewUtils { private static popShare: PopViewUtils; private infoList: PopViewModel[] = new Array<PopViewModel>(); static shareInstance(): PopViewUtils { if (!PopViewUtils.popShare) { PopViewUtils.popShare = new PopViewUtils(); } return PopViewUtils.popShare; } static showDialog<T extends object>(type: PopViewShowType, contentView: WrappedBuilder<[T]>, args: T, options?: promptAction.BaseDialogOptions):void { let uiContext = AppStorage.get<UIContext>('uiContext'); if (uiContext) { // The promptAction object was obtained. let prompt = uiContext.getPromptAction(); let componentContent = new ComponentContent(uiContext, contentView, args); let customOptions: promptAction.BaseDialogOptions = { alignment: options?.alignment || DialogAlignment.Bottom }; // Open pop-ups using openCustomDialog prompt.openCustomDialog(componentContent, customOptions).catch((err: BusinessError) => { hilog.error(0x0000, 'PopViewUtils', `openCustomDialog failed. code=${err.code}, message=${err.message}`); }); let infoList = PopViewUtils.shareInstance().infoList; let info: PopViewModel = { com: componentContent, popType: type }; infoList[0] = info; } } // ... } -
通过closeCustomDialog创建关闭弹窗的closeDialog函数。
static closeDialog(type: PopViewShowType): void { let uiContext = AppStorage.get<UIContext>('uiContext'); if (uiContext) { // The promptAction object was obtained. let prompt = uiContext.getPromptAction(); let sameTypeList = PopViewUtils.shareInstance().infoList.filter((model) => { return model.popType === type; }) let info = sameTypeList[sameTypeList.length - 1]; if (info && info.com) { PopViewUtils.shareInstance().infoList = PopViewUtils.shareInstance().infoList.filter((model) => { return model.com !== info.com; }) // Close pop-ups using closeCustomDialog. prompt.closeCustomDialog(info.com).catch((err: BusinessError) => { hilog.error(0x0000, 'PopViewUtils', `closeCustomDialog failed. code=${err.code}, message=${err.message}`); }); } } } -
封装对外的打开和关闭弹窗接口函数。
static showPopView<T extends object>(contentView: WrappedBuilder<[T]>, args: T,
  options?: promptAction.BaseDialogOptions):void {
  PopViewUtils.showDialog(PopViewShowType.OPEN, contentView, args, options);
}

static closePopView():void {
  PopViewUtils.closeDialog(PopViewShowType.OPEN);
}
-
-
使用方调用弹窗工具类传入封装好的弹窗结构实现自定义弹窗。
import { PopViewUtils } from '../model/PopViewUtils';
// ...
@Entry
@Component
struct DialogComponent {
  build() {
    NavDestination() {
      Column() {
        Button('Click me')
          .width('100%')
          .onClick(() => {
            PopViewUtils.showPopView<Object>(wrapBuilder(buildText), new Object(), { alignment: DialogAlignment.Center });
          })
      }
      .justifyContent(FlexAlign.End)
      .padding({
        left: $r('app.float.padding'),
        right: $r('app.float.padding'),
        bottom: $r('app.float.padding')
      })
      .width('100%')
      .height('100%')
    }
    .title(getResourceString($r('app.string.dialog'), this))
  }
}

作为“人工智能6S店”的官方数字引擎,为AI开发者与企业提供一个覆盖软硬件全栈、一站式门户。
更多推荐
 4
4 0
0- 0


 已为社区贡献60条内容

所有评论(0)