
蓝香蕉代码 |【 PixelTune - 鸿蒙ArkUI+Python运行时开发一个图像处理应用】
PixelTune 技术实现教程
如何在 HarmonyOS Next 上构建一个集成 Python 图像处理引擎的本地应用
目录
- 项目概述
- 工程结构详解
- 技术架构与数据流
- 第一步:创建 HarmonyOS 工程
- 第二步:C++ NAPI Shell 执行器
- 第三步:Python 处理脚本
- 第四步:ArkTS 前端界面
- 第五步:HNP 打包 Python 运行环境
- 第六步:权限声明与签名
- 第七步:构建与调试
- ArkTS 常见编译问题速查
- 扩展思路
1. 项目概述
PixelTune 是一个运行在 HarmonyOS Next 设备上的图像处理应用。它的核心特点是:
- 不依赖云服务 – Python + Pillow 直接在设备端运行
- ArkTS 前端 + C++ NAPI 桥接 + Python 处理引擎 的三层架构
- Pipeline 模式支持多步操作自由组合
- 全部通过
forkpty+ PTY 执行命令,获得完整终端环境
最终效果
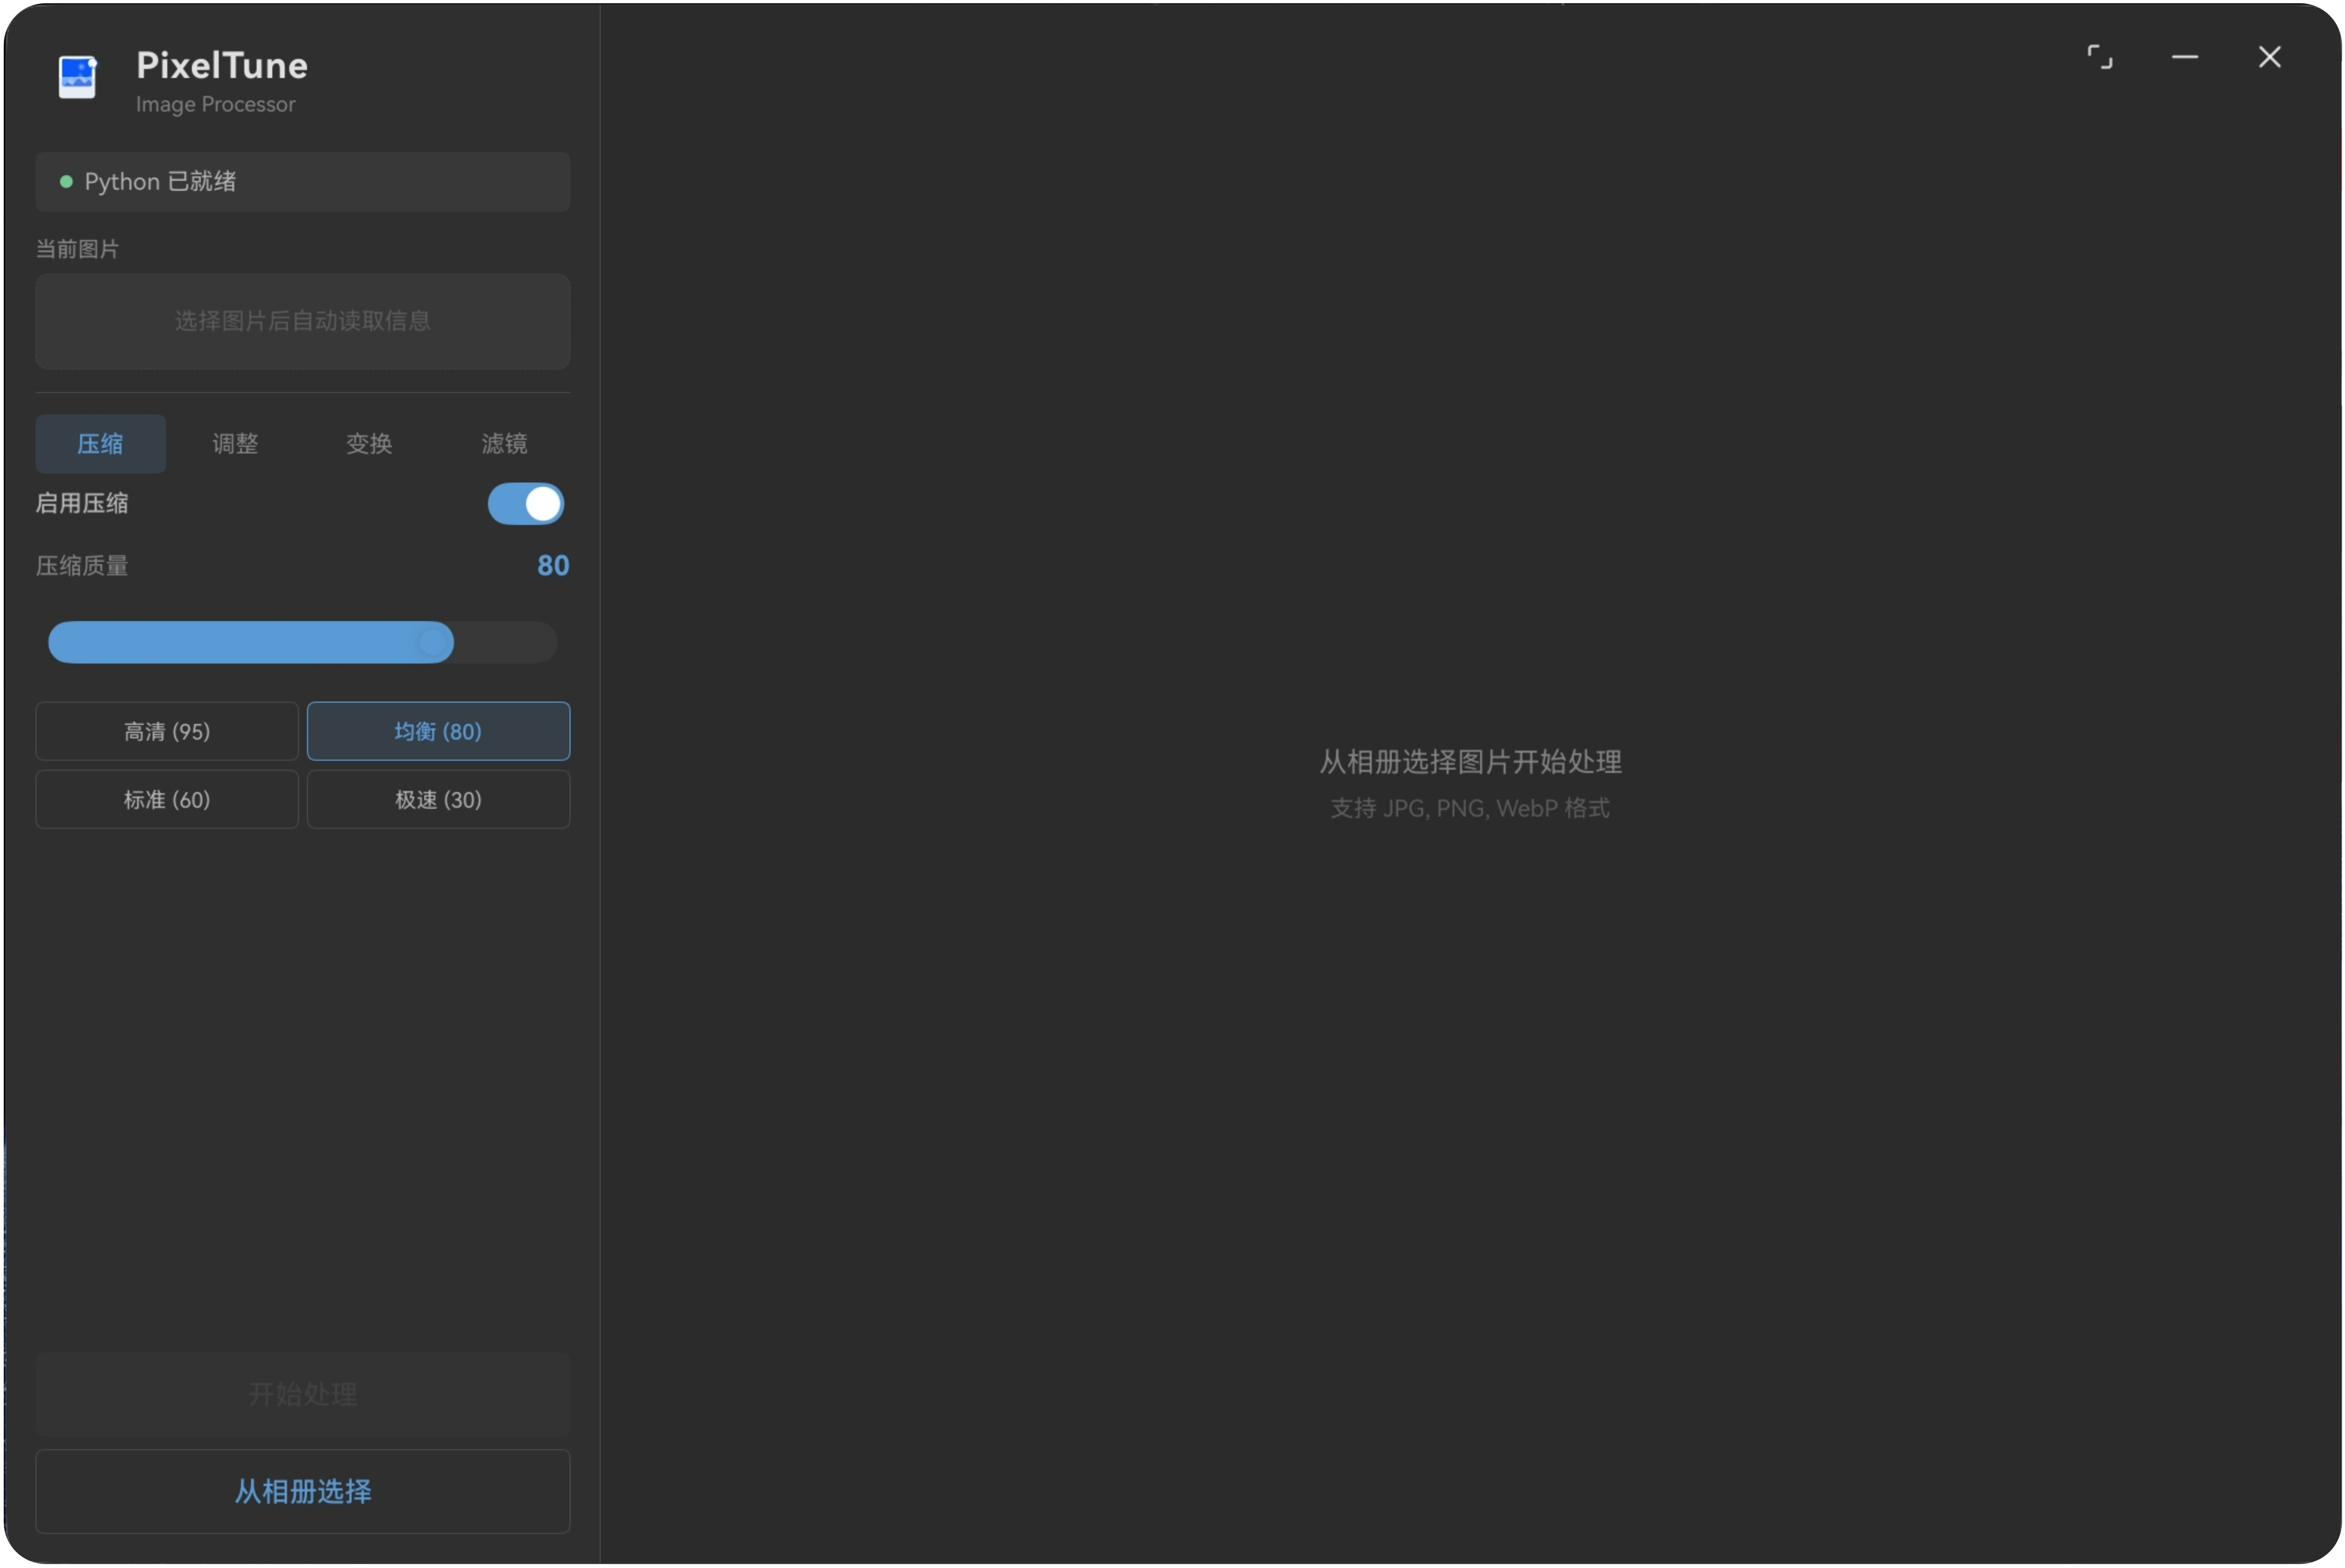
三栏布局:左侧操作面板 (280px) + 中央图片预览 + 右侧属性面板 (300px,可收起)
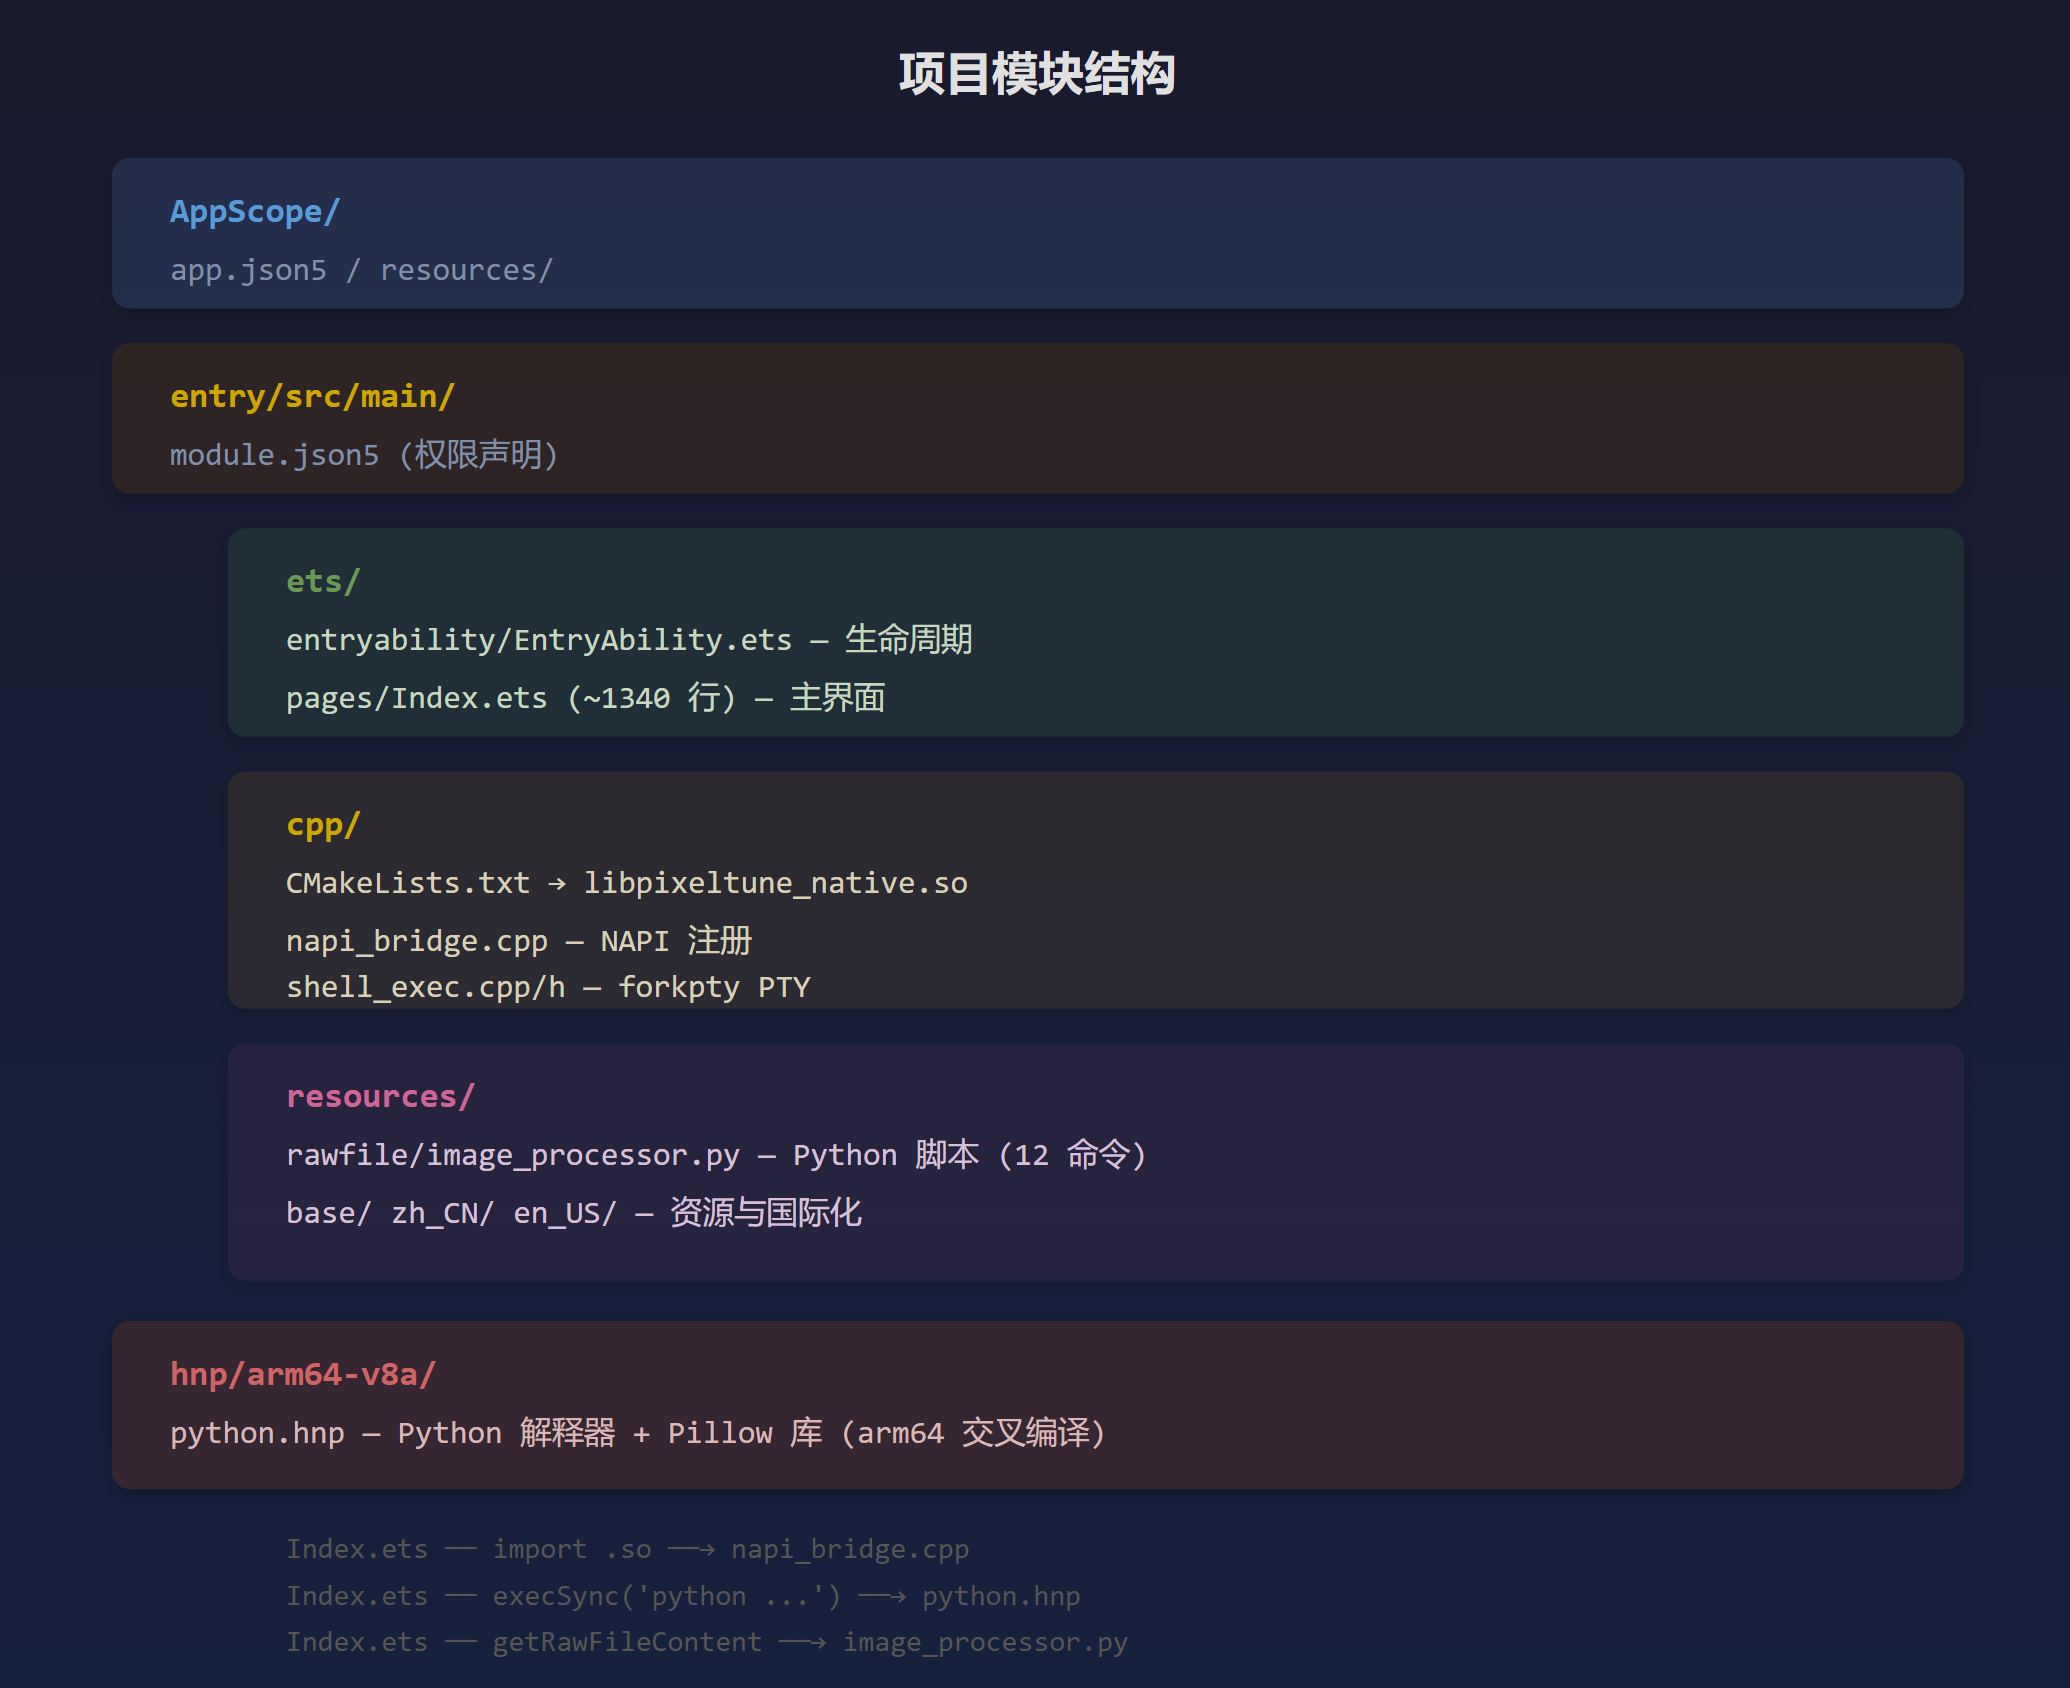
2. 工程结构详解
PixelTune/
├── AppScope/                          # 应用级配置
│   ├── app.json5                      #   bundleName、版本号、图标
│   └── resources/base/
│       ├── media/                     #   应用图标 (foreground.svg + background.svg)
│       └── element/string.json        #   应用名称
│
├── entry/                             # 主模块
│   ├── src/main/
│   │   ├── module.json5              #   模块配置、权限声明
│   │   ├── ets/                       #   ArkTS 前端代码
│   │   │   ├── entryability/
│   │   │   │   └── EntryAbility.ets   #     应用生命周期 (隐藏标题栏)
│   │   │   ├── pages/
│   │   │   │   └── Index.ets          #     主界面 (约1300行)
│   │   │   └── utils/
│   │   │       └── Logger.ets         #     日志封装
│   │   ├── cpp/                       #   C++ Native 代码
│   │   │   ├── CMakeLists.txt         #     CMake 构建 (产出 libpixeltune_native.so)
│   │   │   ├── napi_bridge.cpp        #     NAPI 注册 (暴露 execSync 等到 ArkTS)
│   │   │   ├── shell_exec.h           #     Shell 执行器接口
│   │   │   └── shell_exec.cpp         #     forkpty 实现 (~370行)
│   │   └── resources/
│   │       ├── rawfile/
│   │       │   └── image_processor.py #     Python 处理脚本 (12个命令)
│   │       ├── base/                  #   图标、字符串、页面路由
│   │       ├── en_US/                 #   英文本地化
│   │       └── zh_CN/                 #   中文本地化
│   ├── build-profile.json5            #   模块构建配置
│   └── oh-package.json5               #   模块依赖
│
├── hnp/                               # Python HNP 包
│   └── arm64-v8a/
│       └── python.hnp                 #   Python解释器 + Pillow (预编译)
│
├── build-profile.json5                # 全局构建配置
├── oh-package.json5                   # 全局依赖
└── hvigor/                            # 构建工具配置
3. 技术架构与数据流
本节采用 4+1 视图模型 描述系统架构,覆盖逻辑、过程、开发、物理四个维度。
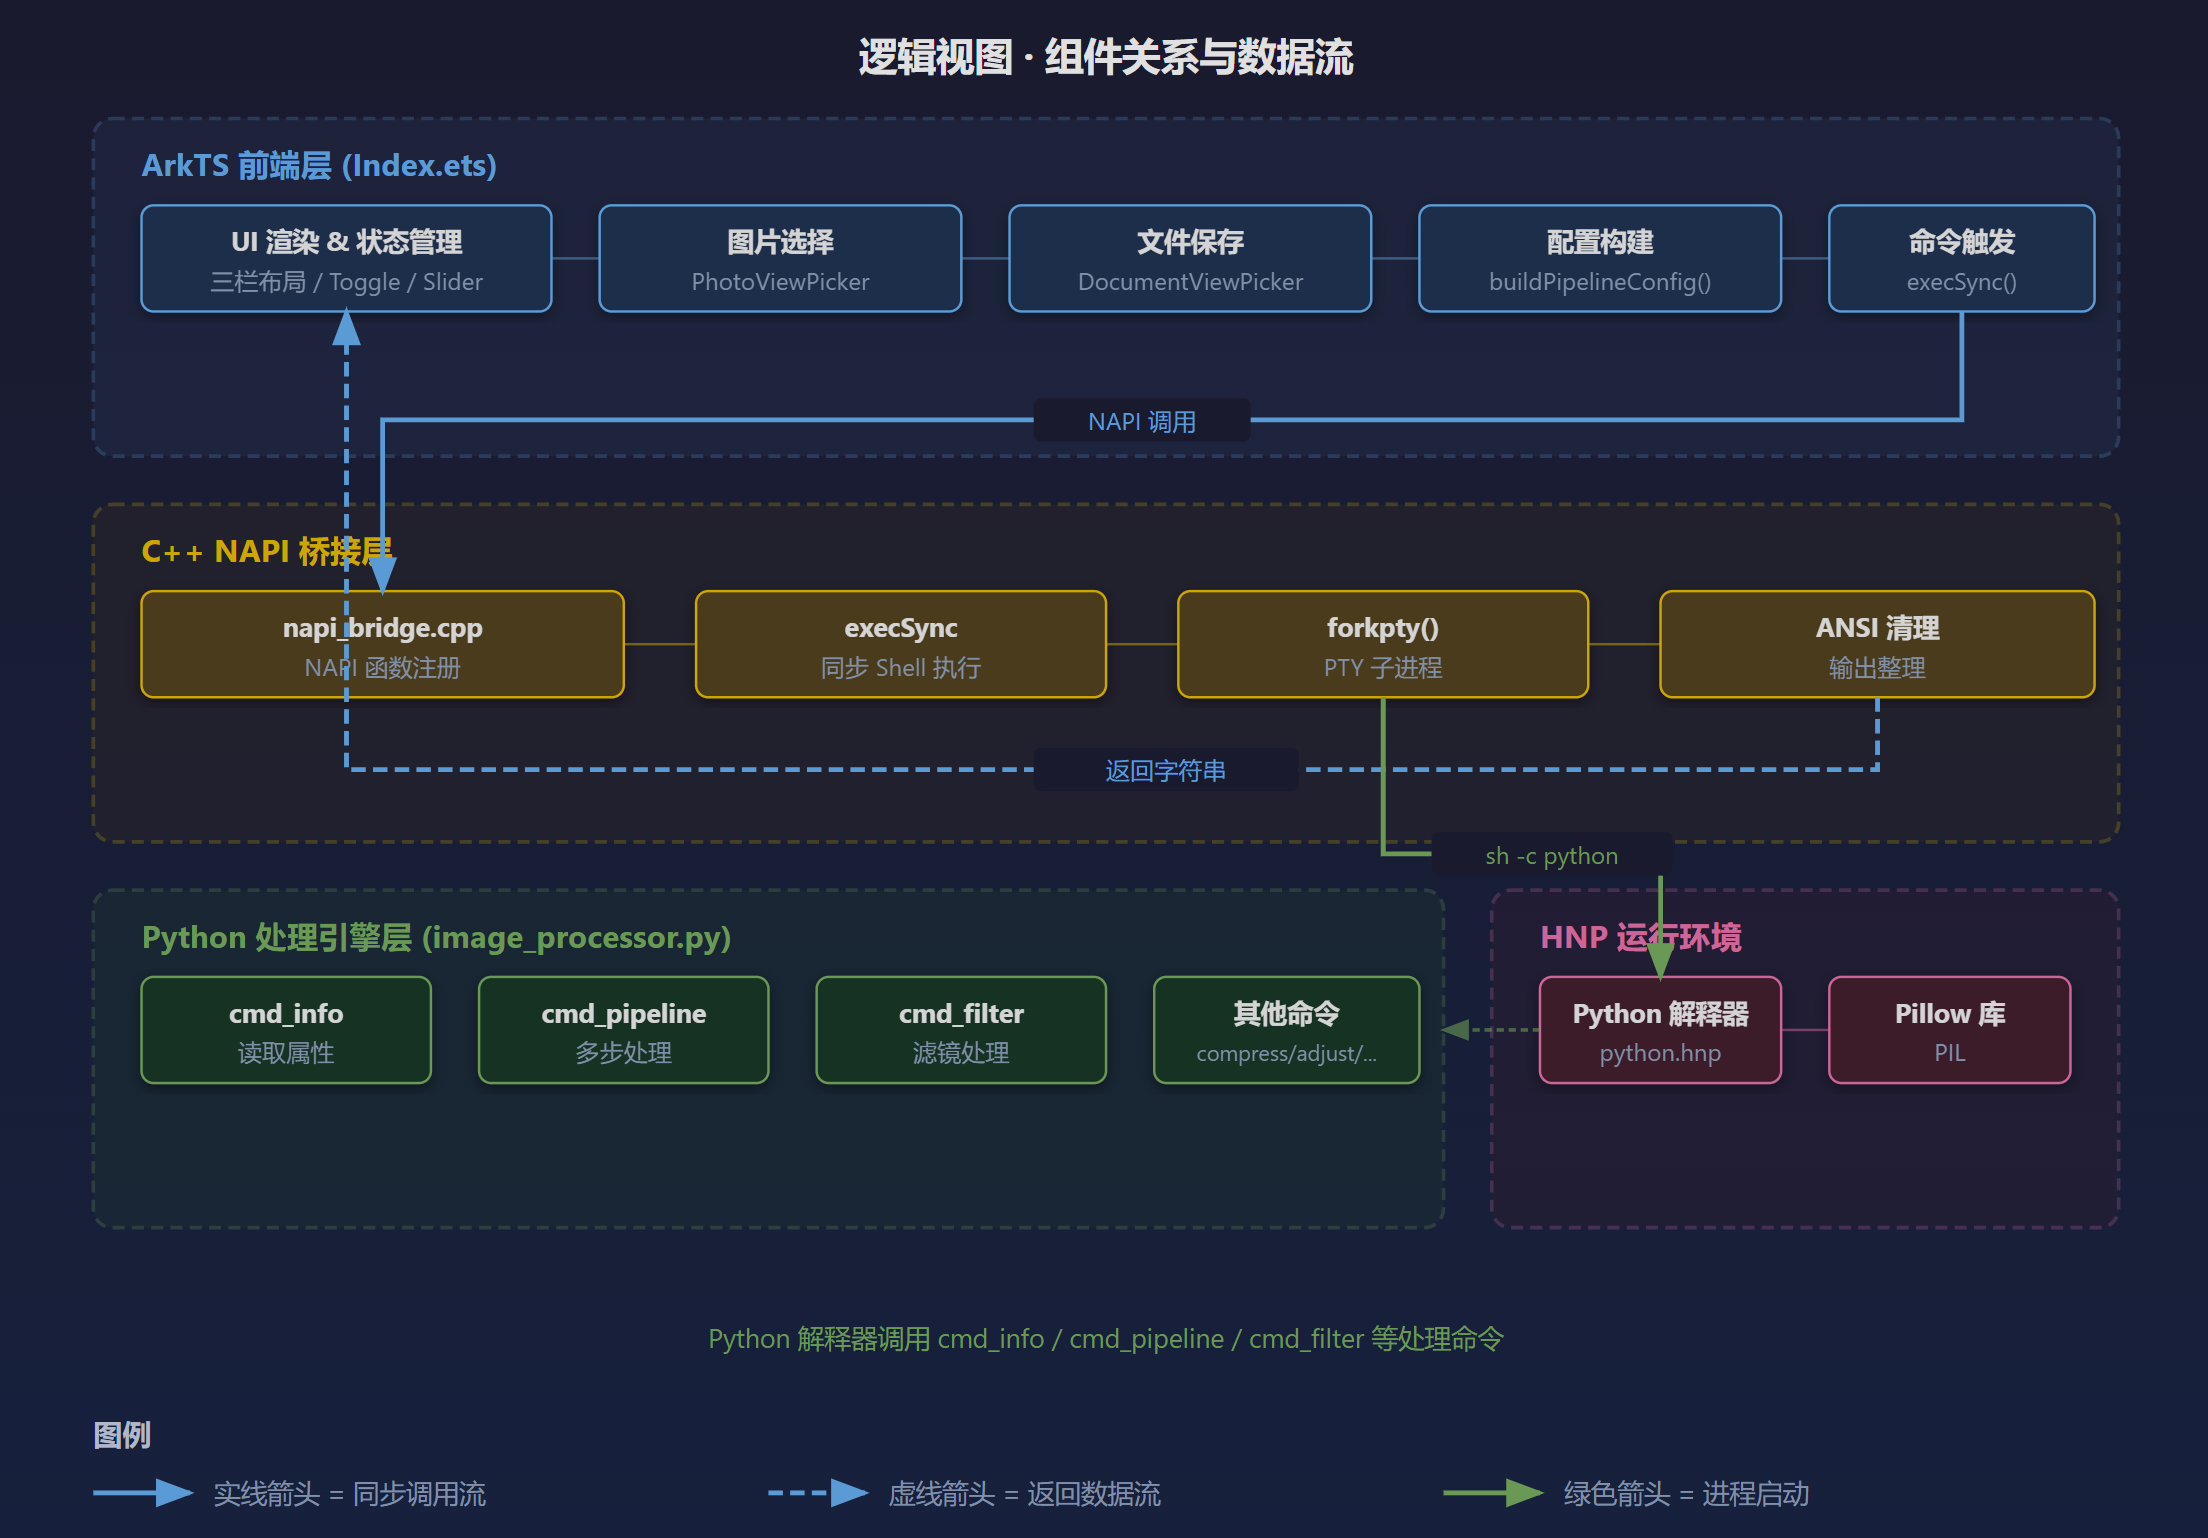
3.1 逻辑视图 – 三层架构
系统分为三层:ArkTS 前端层负责 UI 和用户交互,C++ NAPI 桥接层负责 Shell 命令执行,Python 引擎层负责图像处理。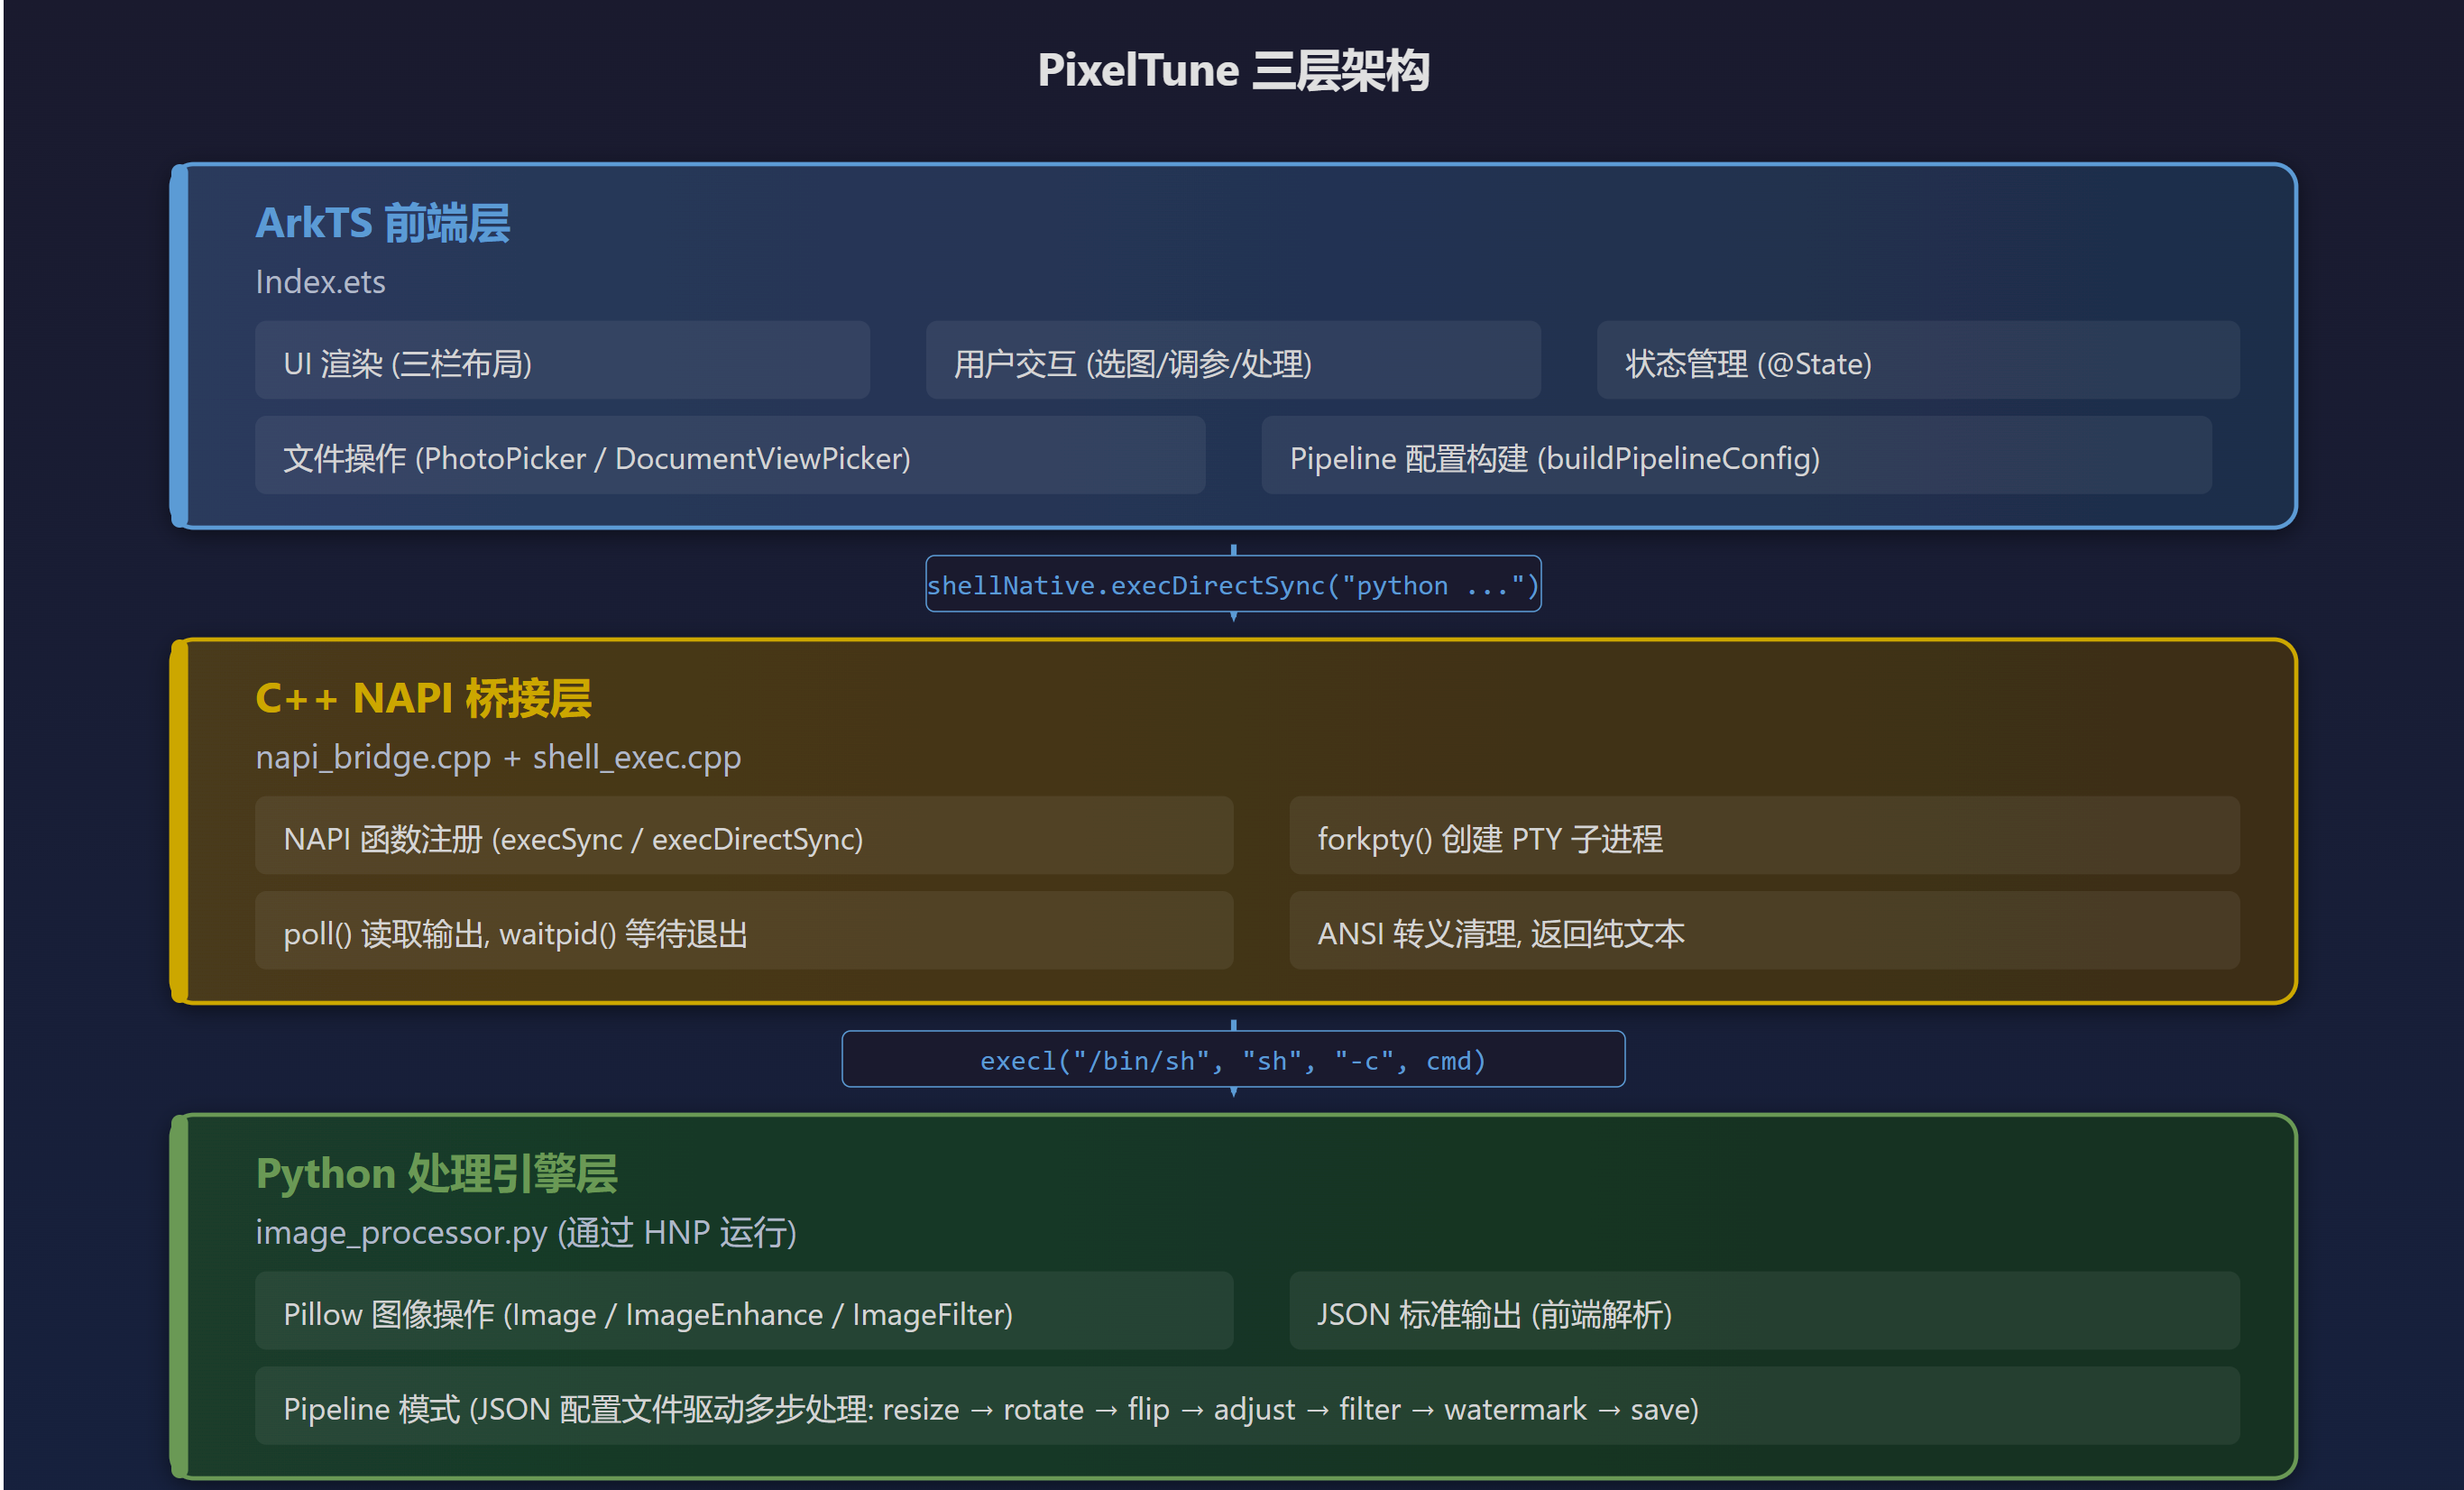
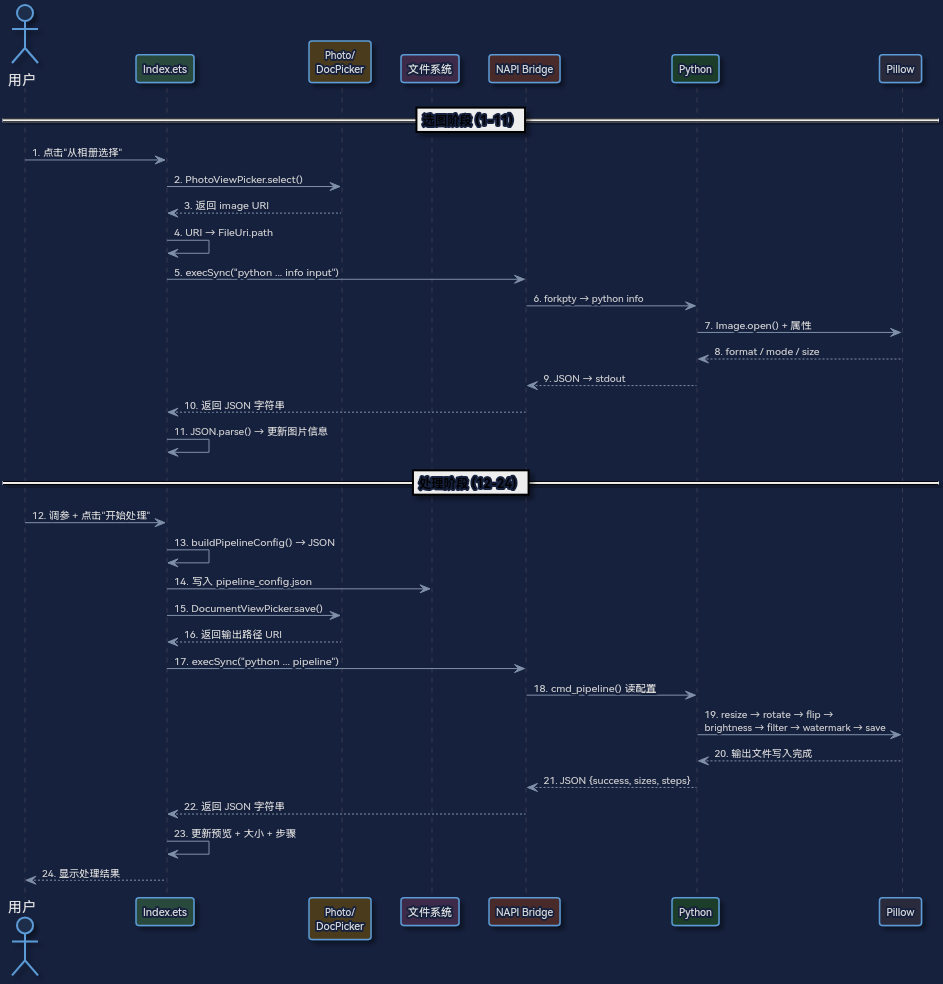
3.2 过程视图 – Pipeline 数据流
一次完整的 Pipeline 处理涉及 29 个步骤,跨三层架构流转:
选图阶段:
  1. 用户点击"从相册选择"
  2. PhotoViewPicker.select() → 返回 image URI
  3. URI → FileUri.path → 文件系统路径
  4. execSync("python script.py info path") → 获取图片属性
  5. JSON.parse() → 更新 UI 显示

处理阶段:
  6. 用户调参 + 点击"开始处理"
  7. buildPipelineConfig() → JSON 配置
  8. 写入 pipeline_config.json 临时文件
  9. DocumentViewPicker.save() → 用户选择输出位置
 10. execSync("python script.py pipeline input output config")
 11. forkpty → sh -c → Python cmd_pipeline()
 12. 按 JSON 配置顺序执行 Pillow 操作
 13. JSON 结果返回 → 更新预览图 + 文件大小 + 步骤列表
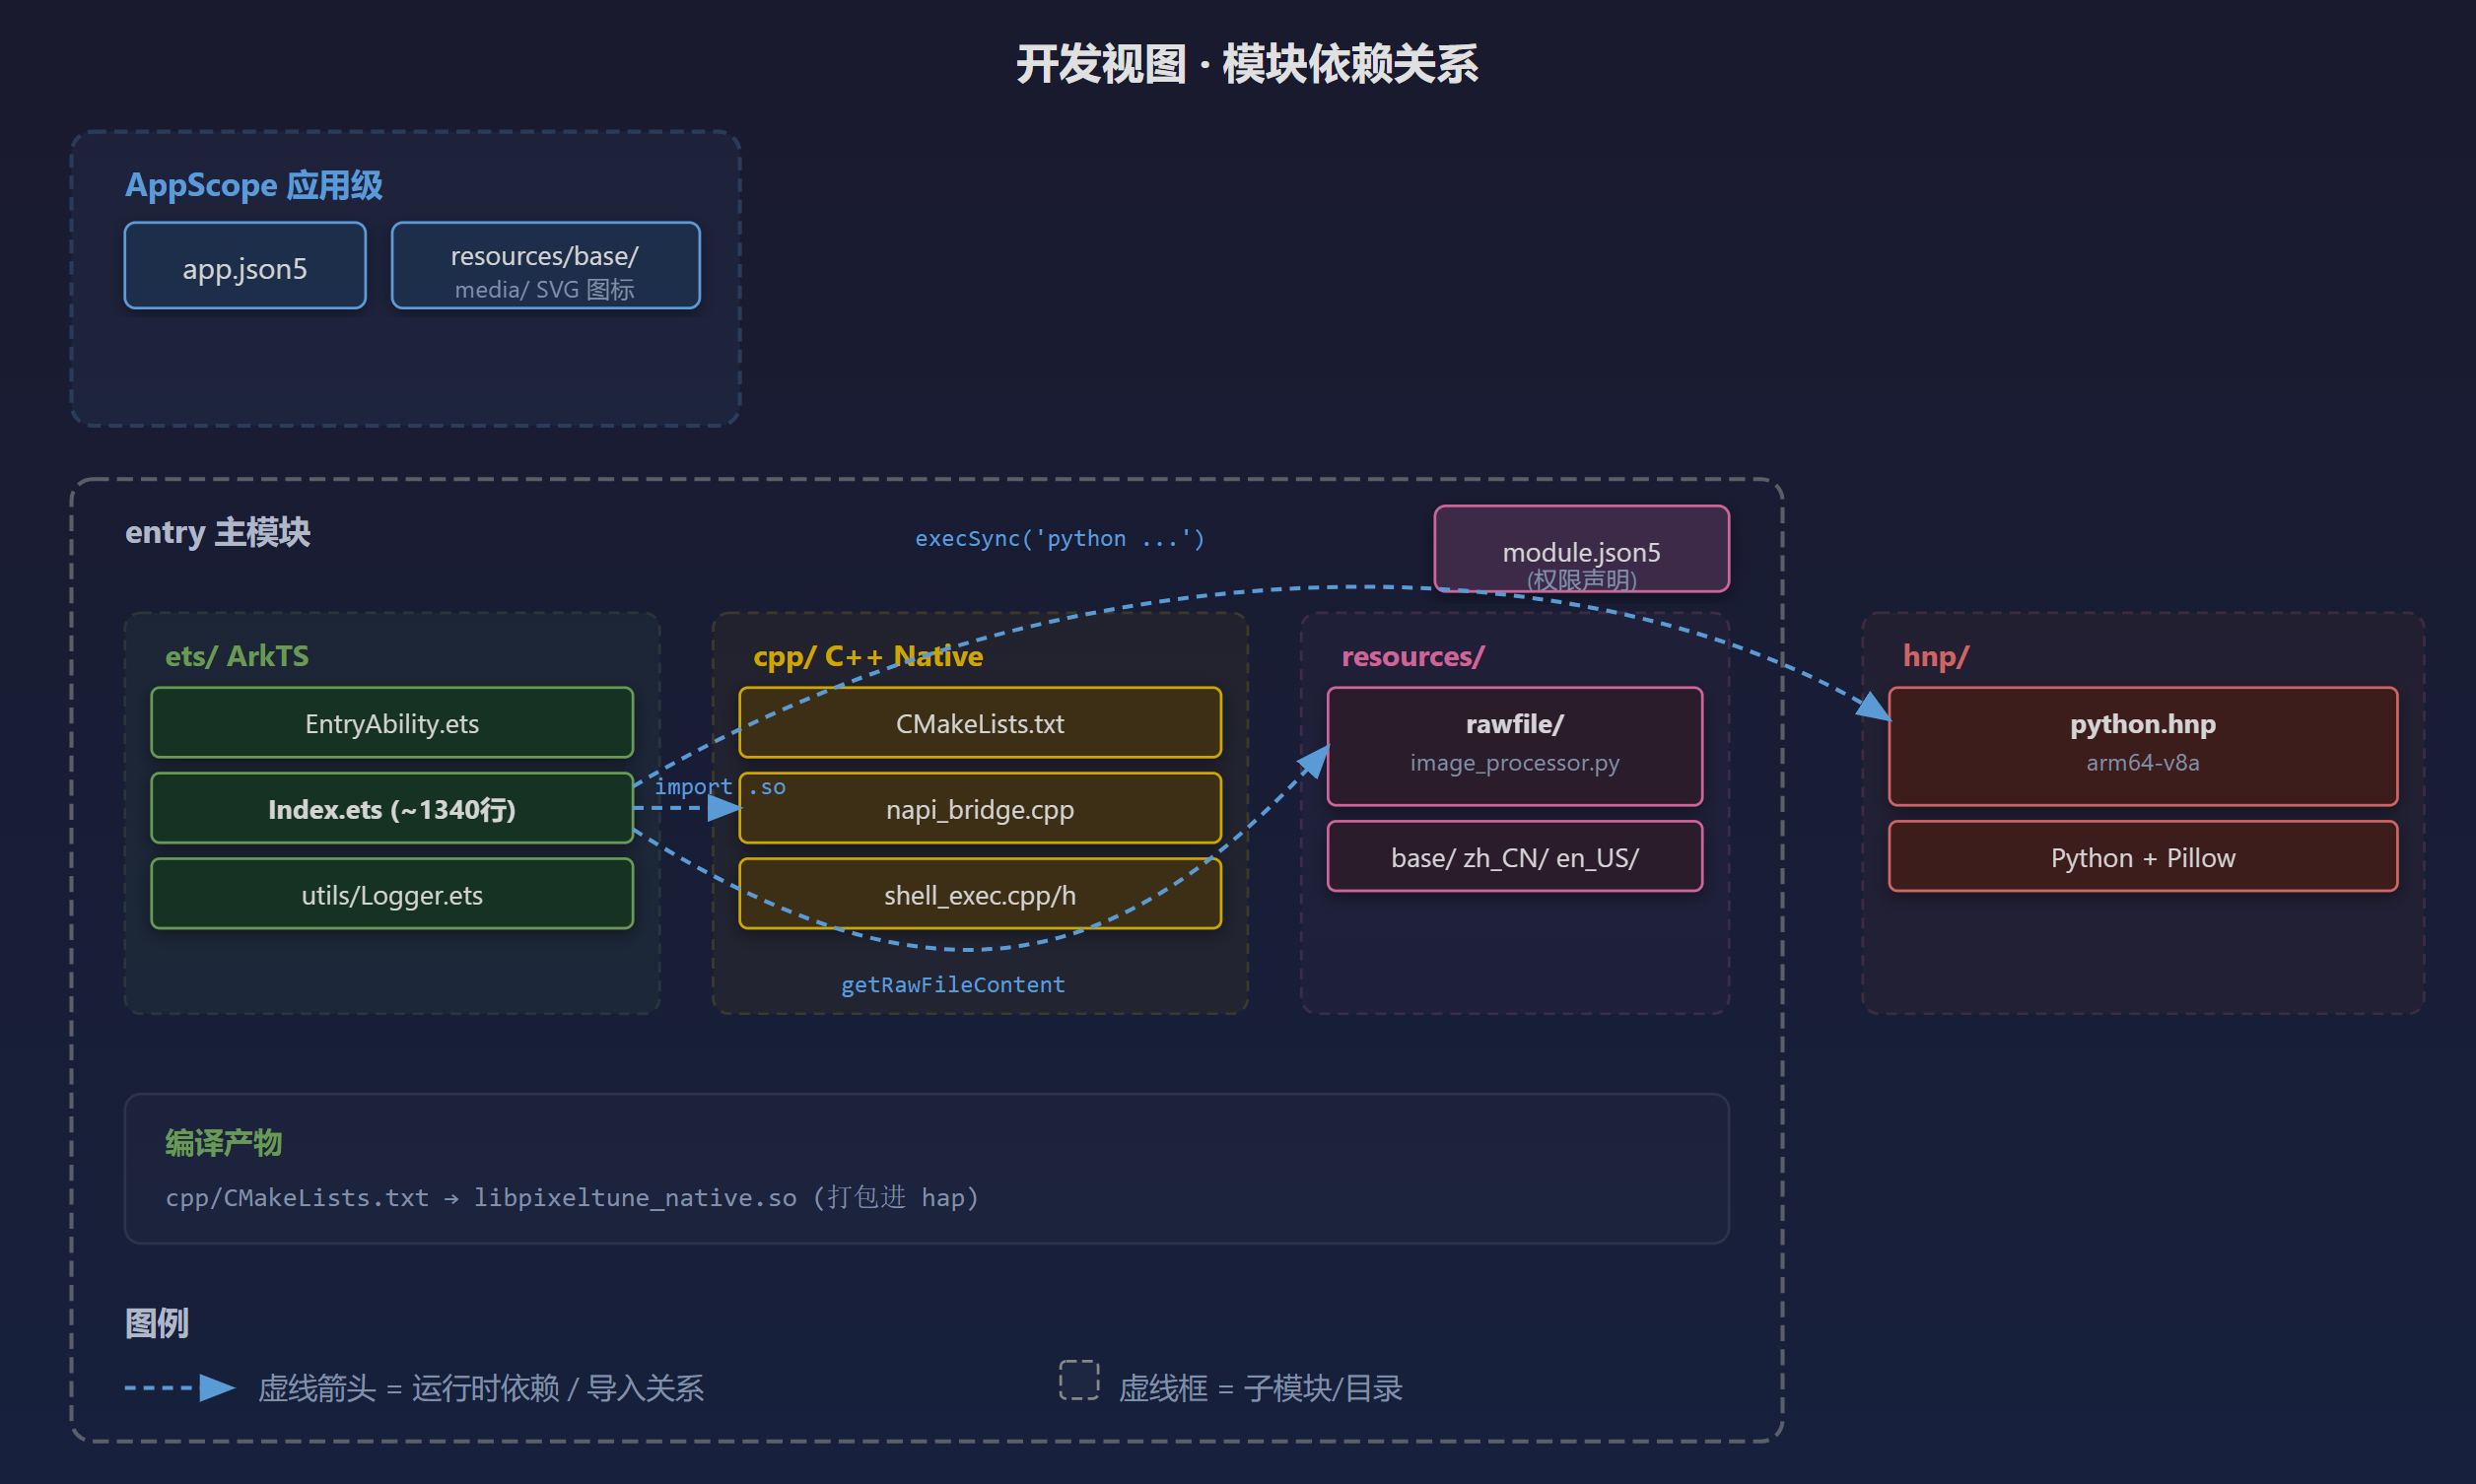
3.3 开发视图 – 模块结构
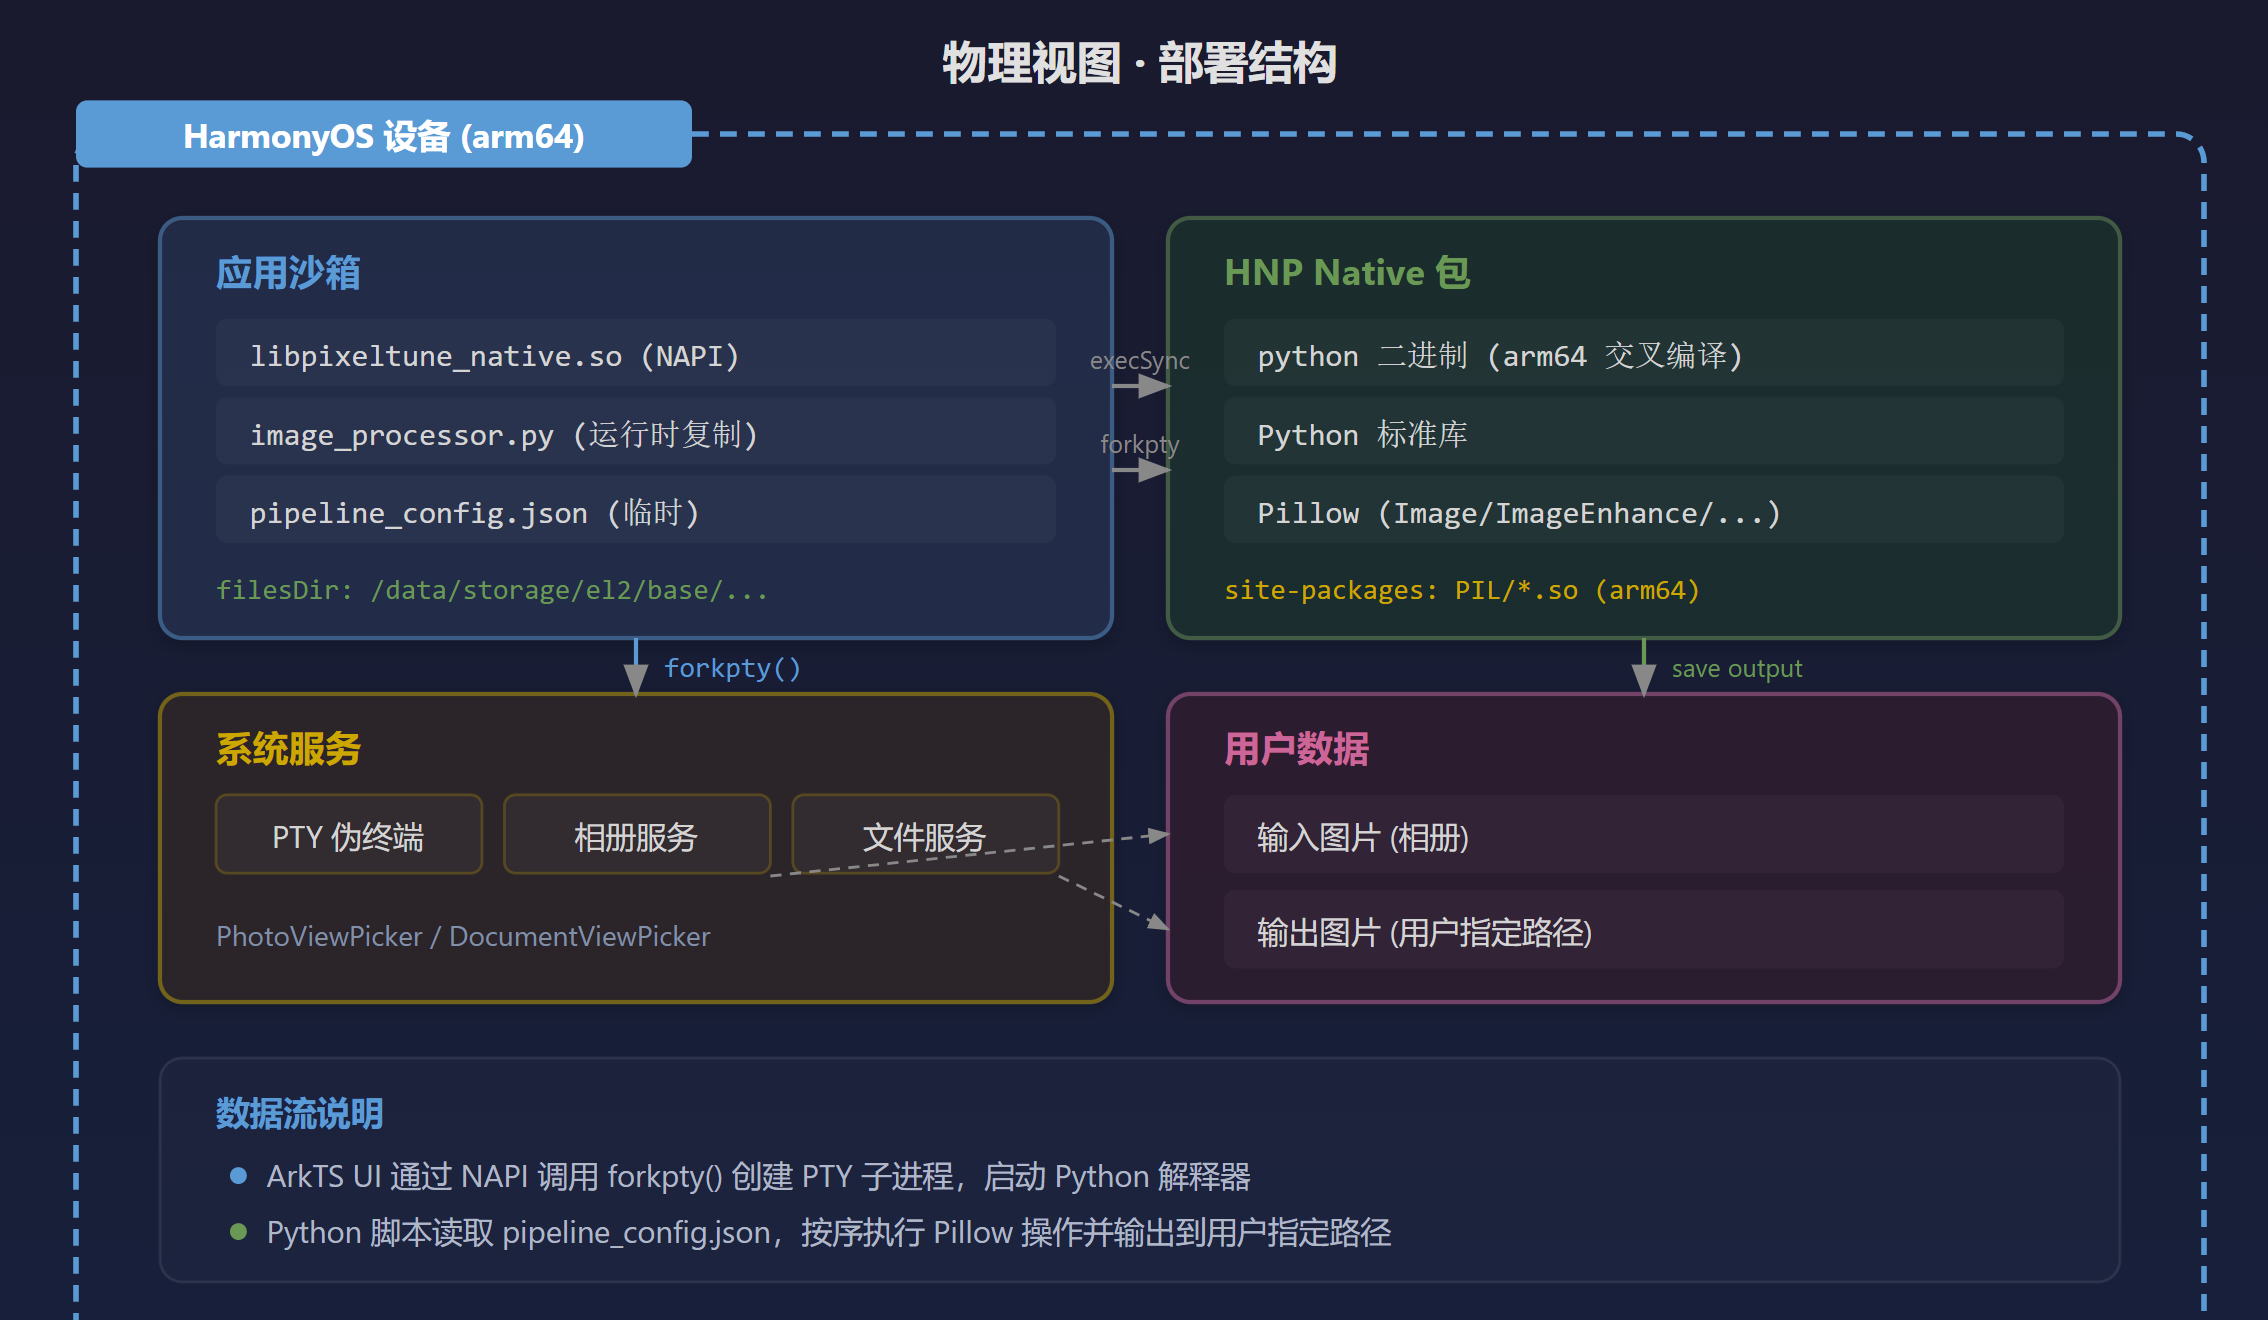
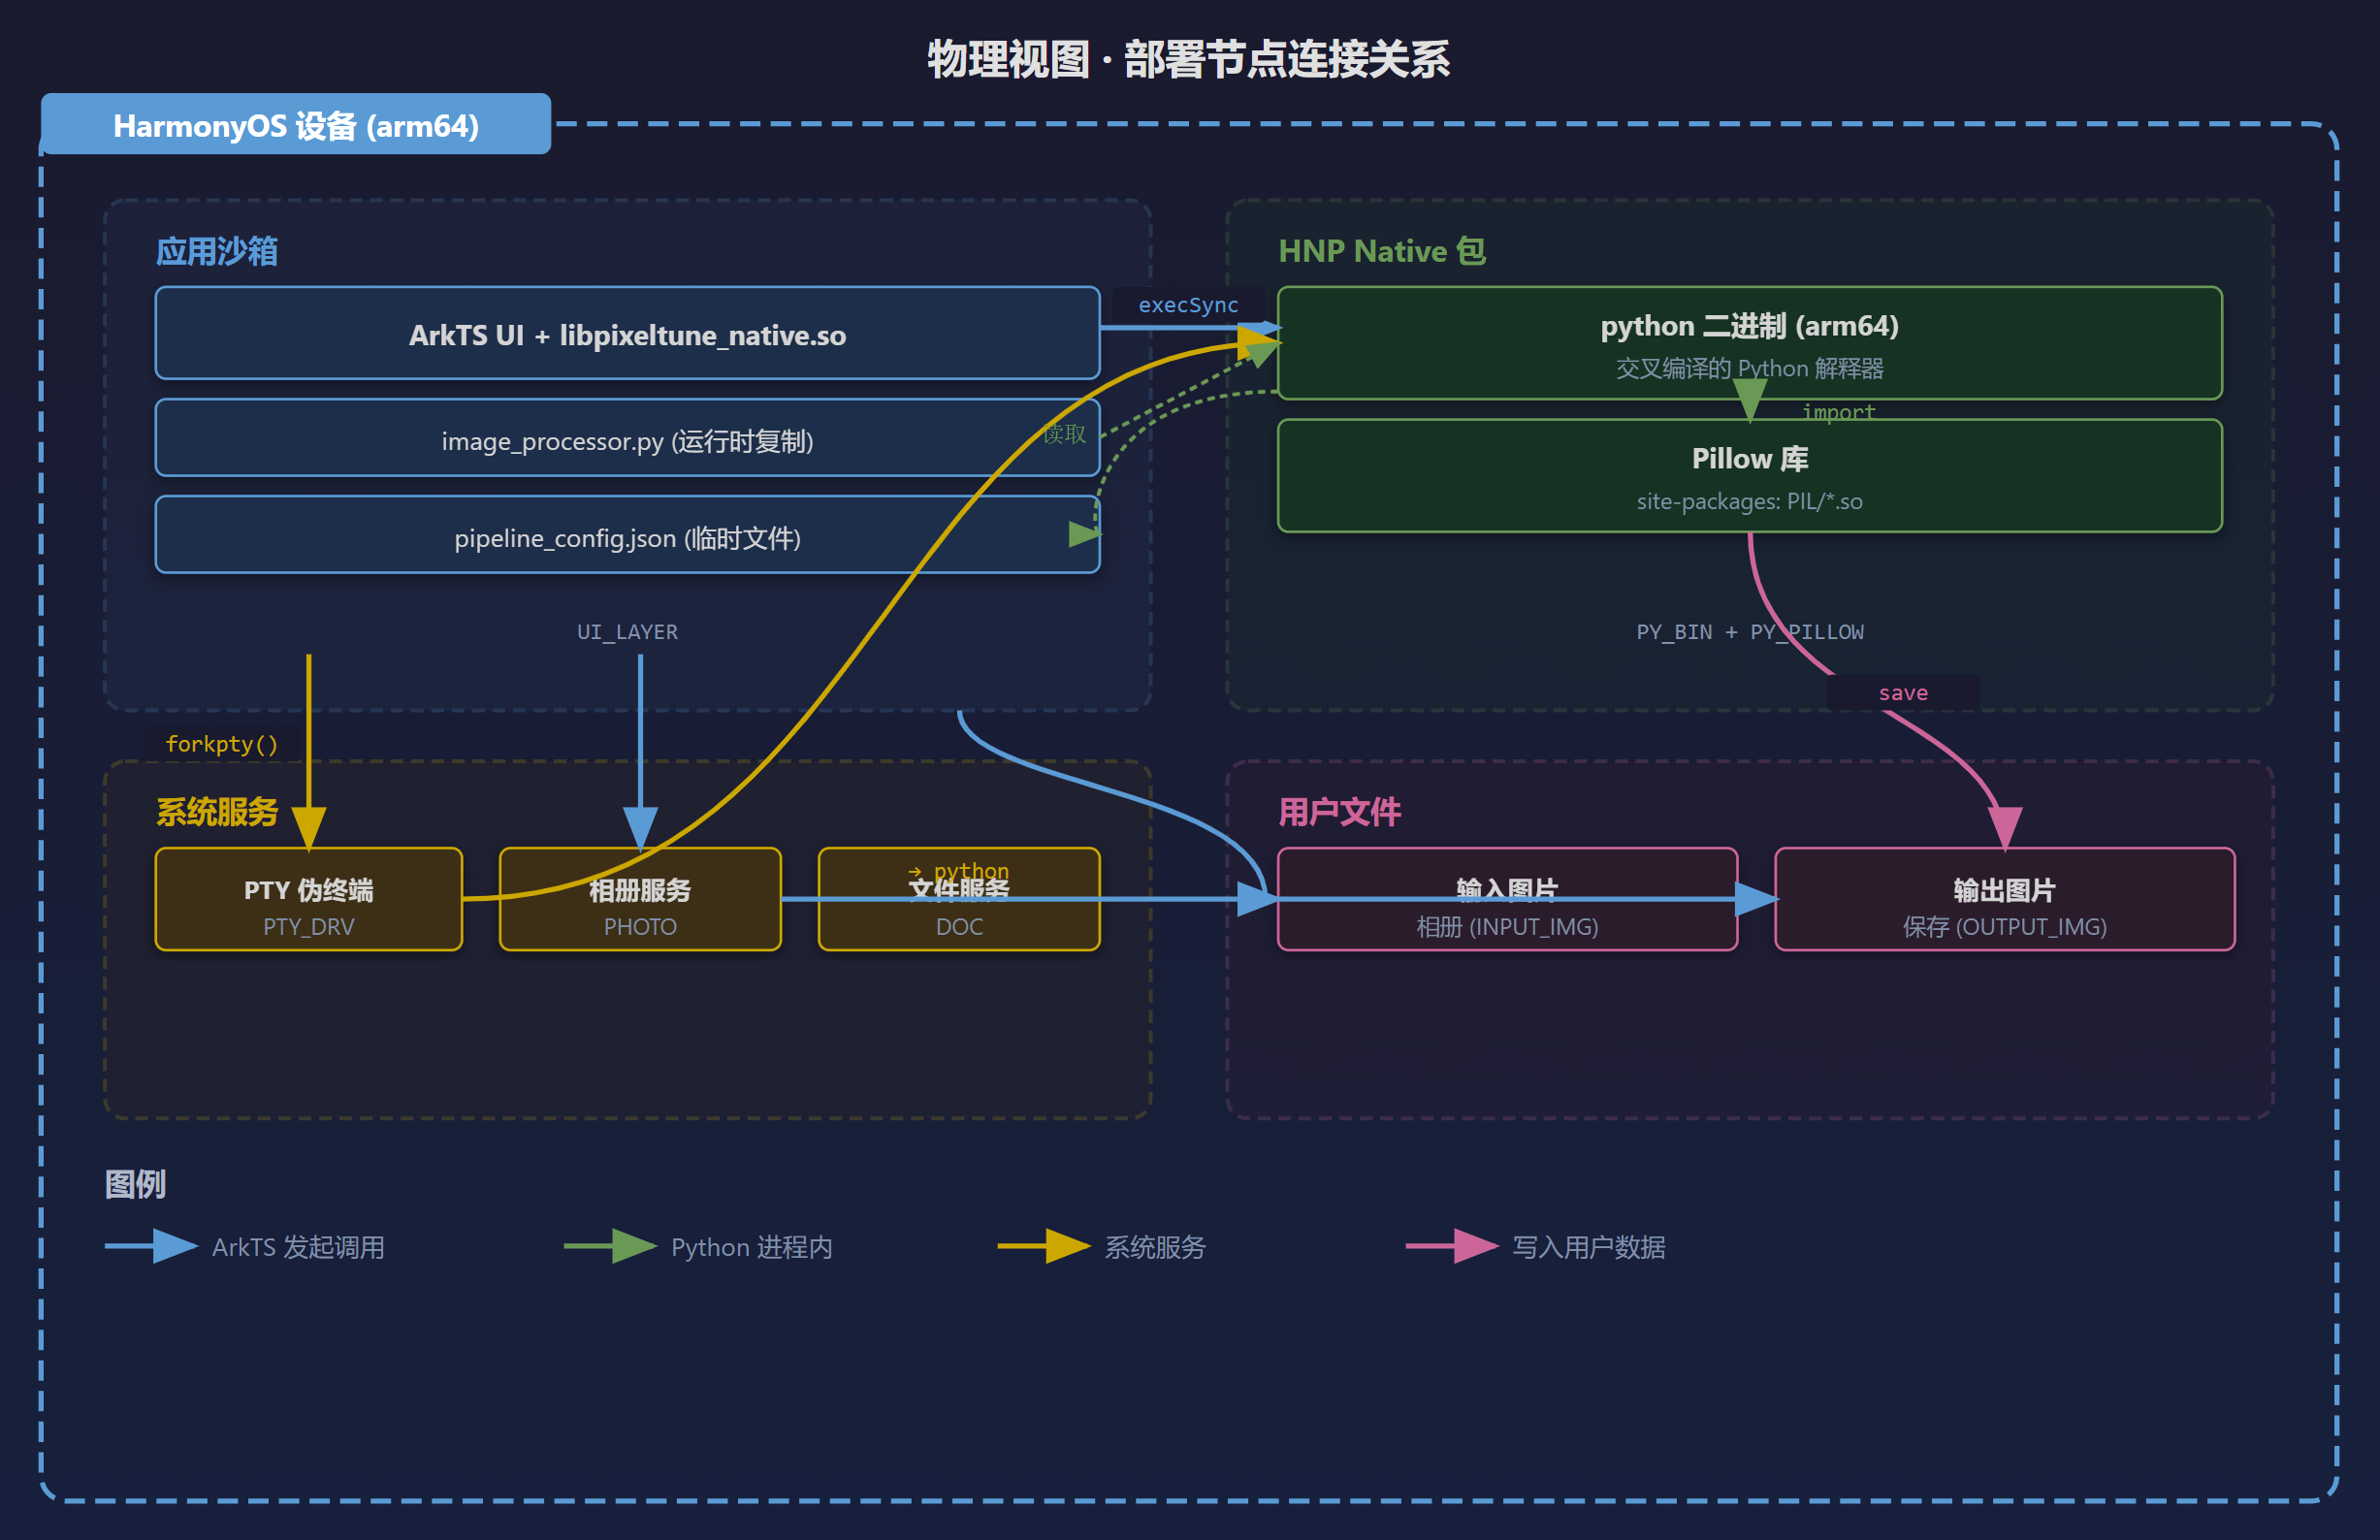
3.4 物理视图 – 部署结构
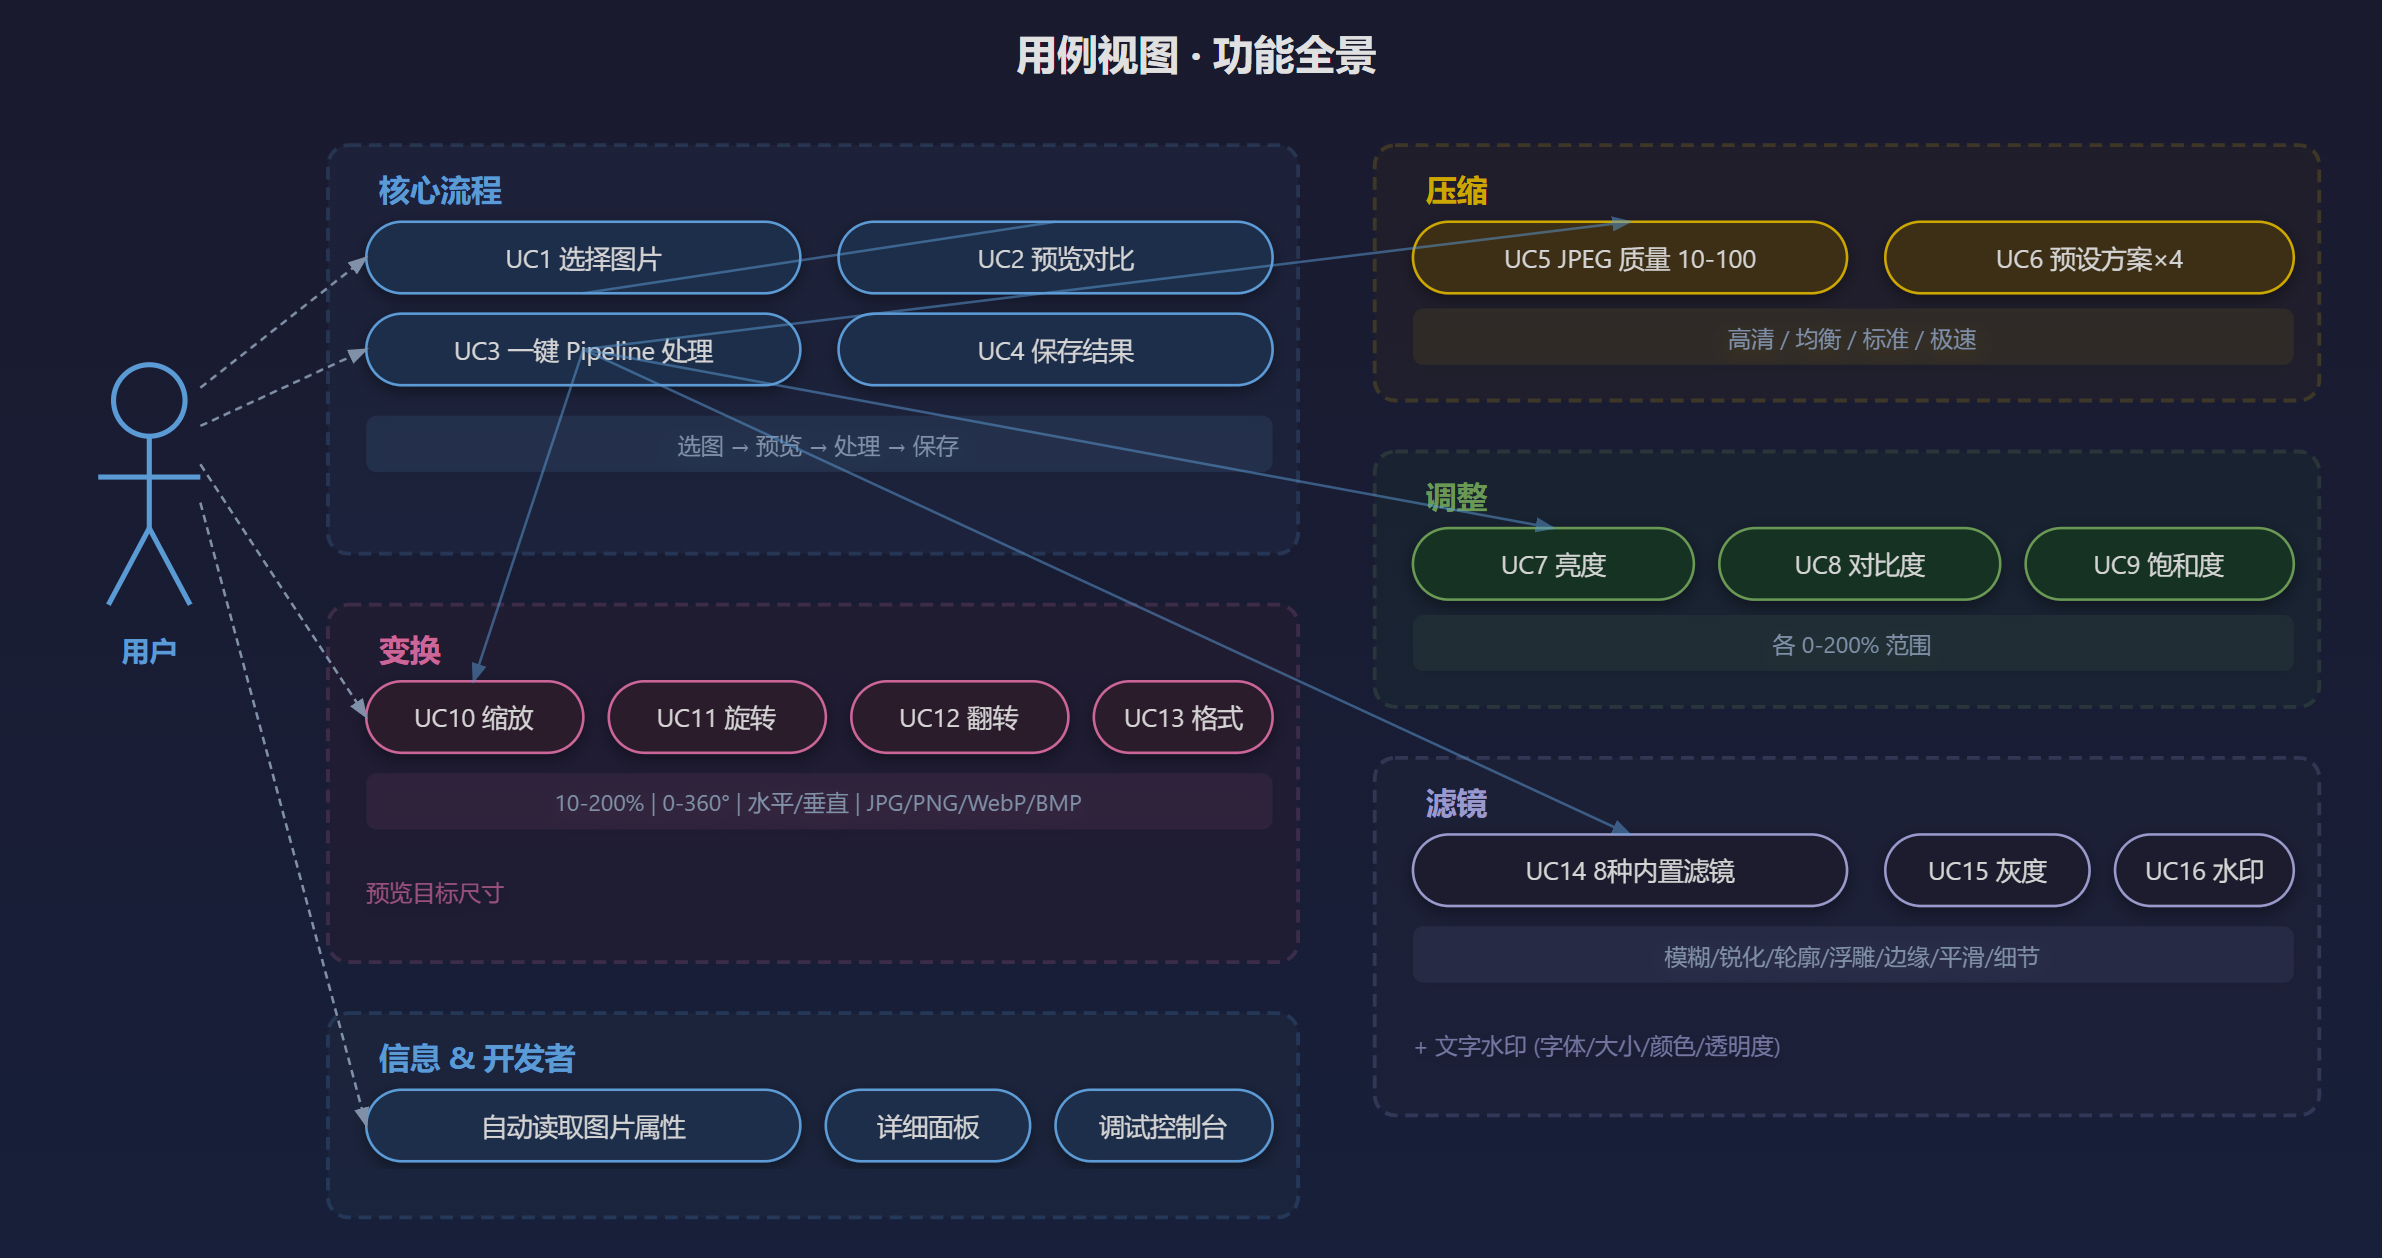
3.5 用例视图 – 功能全景
| 功能组 | 能力 | 说明 |
|---|---|---|
| 核心流程 | 选图 → 预览 → 处理 → 保存 | Pipeline 多步组合 |
| 压缩 | JPEG 质量调节 10-100 | 4种预设方案 |
| 调整 | 亮度/对比度/饱和度 | 各 0-200% 范围 |
| 变换 | 缩放/旋转/翻转/格式转换 | 预览目标尺寸 |
| 滤镜 | 8种 Pillow 内置滤镜 | + 灰度化 + 文字水印 |
| 信息 | 自动读取属性/详细面板 | 处理前后对比 |
| 开发者 | 调试控制台/Python 检测 | ENABLE_CONSOLE 开关 |
3.6 为什么用 forkpty 而不是 popen/system?
| 方案 | 问题 |
|---|---|
system() |
HarmonyOS 沙箱限制,/bin/sh 执行受限 |
popen() |
单向管道,无法获得完整 PTY 环境 |
forkpty() |
我们的选择 – 创建完整 PTY 伪终端,子进程拥有完整终端环境,Python 解释器可正常运行,输出无污染 |
4. 第一步:创建 HarmonyOS 工程
4.1 在 DevEco Studio 中创建项目
选择 Empty Ability 模板,配置:
- Project Name:
PixelTune - Bundle Name:
com.pixeltune.app - Compatible SDK: API 23+
- Language: ArkTS
4.2 app.json5 配置
{
  "app": {
    "bundleName": "com.pixeltune.app",
    "vendor": "PixelTune",
    "versionCode": 1000000,
    "versionName": "1.0.0",
    "icon": "$media:layered_image",
    "label": "$string:app_name"
  }
}
4.3 隐藏系统标题栏
在 EntryAbility.ets 的 onWindowStageCreate 回调中:
windowStage.getMainWindow().then((myWindow: window.Window) => {
  myWindow.setWindowDecorVisible(false);
})
隐藏后需要自己在 UI 顶部留出状态栏的避让空间。
5. 第二步:C++ NAPI Shell 执行器
这是整个项目的关键桥接层,让 ArkTS 能够在设备上执行任意 Shell 命令。
5.1 接口设计 (shell_exec.h)
struct ExecResult {
    int exitCode;       // 进程退出码, -1 表示异常
    std::string output; // 标准输出 + 标准错误的合并文本
};

// 通过 sh -c 执行命令 (适用于 shell 命令、管道等)
ExecResult shellExecSync(const std::string& command);

// 直接执行二进制, 不经过 sh (绕过沙箱限制)
ExecResult shellExecDirectSync(const std::string& binary,
                               const std::vector<std::string>& argv);

// 异步执行, 逐行回调
std::thread shellExecAsync(const std::string& command,
                           OutputCallback onOutput,
                           std::function<void(int)> onExit,
                           std::shared_ptr<std::atomic<bool>> cancel);
5.2 核心实现原理 (shell_exec.cpp)
同步执行的核心流程:
ExecResult shellExecSync(const std::string& command) {
    int masterFd;
    struct winsize ws = { .ws_col = 120, .ws_row = 40 };

    // 1. forkpty 创建 PTY 子进程
    pid_t pid = forkpty(&masterFd, nullptr, nullptr, &ws);

    if (!pid) {
        // 2. 子进程: 设置 HOME 环境变量, 执行命令
        setenv("HOME", "/storage/Users/currentUser", 1);
        execl("/bin/sh", "sh", "-c", command.c_str(), nullptr);
        _exit(127);
    }

    // 3. 父进程: poll() 循环读取输出
    while (true) {
        // 先 waitpid(WNOHANG) 检查子进程是否退出
        // 再 poll(500ms) 等待输出
        // 子进程退出后再 poll(100ms) 读取剩余输出
    }

    // 4. 关闭 masterFd, 清理 ANSI 转义序列
    close(masterFd);
    result.output = cleanPtyOutput(rawOutput);
    return result;
}
关键细节:
- PTY 窗口大小设为 120x40,避免行被截断
- 子进程 HOME 设为
/storage/Users/currentUser,确保 Python 可写缓存 cleanAnsi()清理 ANSI 转义序列(PTY 会产生颜色码等)cleanPtyOutput()去除\r、空行,只保留有内容的行
5.3 NAPI 注册 (napi_bridge.cpp)
将 C++ 函数暴露为 ArkTS 可调用的接口:
static napi_value ExecSync(napi_env env, napi_callback_info info) {
    // 从参数获取 command 字符串
    size_t argc = 1;
    napi_value args[1];
    napi_get_cb_info(env, info, &argc, args, nullptr, nullptr);

    char buf[4096];
    size_t len;
    napi_get_value_string_utf8(env, args[0], buf, sizeof(buf), &len);

    // 调用 shell 执行器
    ExecResult result = shellExecSync(std::string(buf, len));

    // 返回输出字符串
    napi_value ret;
    napi_create_string_utf8(env, result.output.c_str(),
                            result.output.size(), &ret);
    return ret;
}

// 模块注册
static napi_module pixeltuneModule = {
    .nm_version = 1,
    .nm_register_func = Init,
    .nm_modname = "pixeltune_native",  // 对应 libpixeltune_native.so
};
5.4 CMakeLists.txt
cmake_minimum_required(VERSION 3.4.1)
project(pixeltune_native)

add_library(pixeltune_native SHARED
    napi_bridge.cpp
    shell_exec.cpp
)

target_include_directories(pixeltune_native PRIVATE
    ${CMAKE_CURRENT_SOURCE_DIR}
)

target_link_libraries(pixeltune_native PUBLIC
    ace_napi.z.so
)
产出物:libpixeltune_native.so
5.5 ArkTS 端调用
import shellNative from 'libpixeltune_native.so';

const output: string = shellNative.execSync('python --version 2>&1');
6. 第三步:Python 处理脚本
6.1 脚本部署方式
脚本放在 entry/src/main/resources/rawfile/image_processor.py,运行时复制到应用沙箱:
private prepareScript(): string {
    const scriptName: string = 'image_processor.py';
    const destPath: string = this.context.filesDir + '/' + scriptName;

    const resMgr = this.context.resourceManager;
    const content: Uint8Array = resMgr.getRawFileContentSync(scriptName);
    const file: fs.File = fs.openSync(destPath,
        fs.OpenMode.READ_WRITE | fs.OpenMode.CREATE);
    fs.writeSync(file.fd, content.buffer);
    fs.closeSync(file);

    return destPath; // 返回脚本在文件系统中的实际路径
}
6.2 命令设计
脚本使用命令分派模式,所有输出均为 JSON:
if __name__ == '__main__':
    cmd = sys.argv[1]
    if cmd == 'info':
        cmd_info(sys.argv[2])
    elif cmd == 'compress':
        cmd_compress(sys.argv[2], sys.argv[3], sys.argv[4])
    elif cmd == 'pipeline':
        cmd_pipeline(sys.argv[2], sys.argv[3], sys.argv[4])
    # ...
12 个命令:
| 命令 | 参数 | 用途 |
|---|---|---|
info |
input | 获取图片格式/尺寸/色彩模式 |
compress |
input, output, quality | JPEG 质量压缩 |
adjust |
input, output, brightness, contrast, saturation | 亮度/对比度/饱和度 |
resize_percent |
input, output, percent | 百分比缩放 |
rotate |
input, output, angle | 旋转 |
flip |
input, output, direction | 翻转 |
convert |
input, output | 格式转换 |
filter |
input, output, filter_name | Pillow 内置滤镜 |
grayscale |
input, output | 灰度化 |
watermark |
input, output, text | 文字水印 |
exif |
input | EXIF 信息读取 |
pipeline |
input, output, config_path | 组合处理 (JSON 配置驱动) |
6.3 Pipeline 命令详解
这是最核心的命令,支持将多个操作组合执行:
def cmd_pipeline(input_path, output_path, config_path):
    with open(config_path, 'r') as f:
        cfg = json.load(f)  # 读取 JSON 配置

    img = Image.open(input_path)
    steps = []

    # 按固定顺序执行:
    # 1. Resize (resize_percent)
    # 2. Rotate (rotate_angle)
    # 3. Flip (horizontal/vertical)
    # 4. Brightness / Contrast / Saturation (ImageEnhance)
    # 5. Filter (8种 Pillow 滤镜)
    # 6. Grayscale
    # 7. Watermark (半透明文字)
    # 8. Save (quality + optimize)

    print(json.dumps({
        "success": True,
        "input_size": input_size,
        "output_size": output_size,
        "steps": steps,  # 记录实际执行了哪些步骤
        "output": output_path
    }))
前端构造配置:
private buildPipelineConfig(): string {
    const cfg: Record<string, Object> = {};
    if (this.enableCompress) cfg['quality'] = this.quality;
    if (this.enableAdjust) {
        cfg['brightness'] = this.adjustBrightness / 100;
        cfg['contrast'] = this.adjustContrast / 100;
        cfg['saturation'] = this.adjustSaturation / 100;
    }
    // ...
    return JSON.stringify(cfg);
}
配置写入临时文件 pipeline_config.json,作为命令行参数传递,避免 Shell 转义问题。
6.4 JSON 输出格式约定
{
    "success": true,
    "input_size": 1234567,
    "output_size": 680000,
    "steps": ["resize 50%", "sharpen", "compress Q80"],
    "output": "/data/storage/el2/base/files/output.jpg"
}
前端通过 JSON.parse() 解析并更新 UI。
7. 第四步:ArkTS 前端界面
7.1 颜色方案管理
ArkTS 不允许无类型的对象字面量(arkts-no-untyped-obj-literals),颜色必须定义为顶层 const string:
// 正确
const ACCENT: string = '#5b9bd5';
const BG_PANEL: string = '#2f2f2f';

// 错误 - 编译不通过
const C = {
    accent: '#5b9bd5',
    bgPanel: '#2f2f2f',
};
7.2 三栏布局
@Entry
@Component
struct Index {
  build() {
    Column() {
      Row() {
        this.LeftSidebar()       // 固定宽度 280
        this.CenterPreview()     // layoutWeight(1)
        if (this.rightPanel !== 'none') {
          this.RightPanel()      // 固定宽度 300, 按需显示
        }
      }
      .layoutWeight(1)
    }
    .width('100%')
    .height('100%')
  }
}
7.3 图片选择与保存
选择图片 – 使用 PhotoViewPicker:
private pickImage() {
    const photoSelectPicker = new picker.PhotoViewPicker();
    const options: picker.PhotoSelectOptions = {
        MIMEType: picker.PhotoViewMIMETypes.IMAGE_TYPE,
        maxSelectNumber: 1
    };
    photoSelectPicker.select(options).then((result) => {
        const uri: string = result.photoUris[0];
        // URI 转为文件系统路径
        this.selectedImagePath =
            new fileUri.FileUri(uri).path;
    });
}
保存文件 – 使用 DocumentViewPicker:
const documentPicker = new picker.DocumentViewPicker();
const saveOptions: picker.DocumentSaveOptions = {
    newFileNames: ['output.jpg']
};
const result = await documentPicker.save(saveOptions);
const outputPath = new fileUri.FileUri(result[0]).path;
7.4 URI 与路径互转
import { fileUri } from '@kit.CoreFileKit';

// URI -> Path
const path = new fileUri.FileUri(uri).path;

// Path -> URI (用于 Image 组件显示)
const uri = fileUri.getUriFromPath(path);
7.5 Pipeline 执行流程
private executePipeline() {
    // 1. 构建配置 JSON
    const configJson = this.buildPipelineConfig();

    // 2. 写入临时配置文件
    const configPath = this.context.filesDir + '/pipeline_config.json';
    fs.writeSync(fs.openSync(configPath, ...), configJson);

    // 3. 用户选择输出位置
    const documentPicker = new picker.DocumentViewPicker();
    documentPicker.save(saveOptions).then((result) => {
        const outputPath = this.uriToRealPath(result[0]);

        // 4. 执行 Python 命令
        const cmd = `python "${scriptPath}" pipeline "${inputPath}" "${outputPath}" "${configPath}"`;
        const output: string = shellNative.execSync(cmd);

        // 5. 解析 JSON 结果
        const parsed = JSON.parse(output.trim());
        if (parsed['success']) {
            this.processedImageUri = this.pathToUri(parsed['output']);
            this.resultInputSize = parsed['input_size'];
            this.resultOutputSize = parsed['output_size'];
        }
    });
}
8. 第五步:HNP 打包 Python 运行环境
8.1 什么是 HNP
HNP(HarmonyOS Native Package)是 HarmonyOS 的原生包格式。在本项目中,我们将 Python 解释器和 Pillow 库打包为 HNP,使应用可以脱离服务端独立运行 Python 脚本。
8.2 HNP 在项目中的位置
hnp/
└── arm64-v8a/
    └── python.hnp    # Python 3.x + Pillow, arm64 架构
8.3 HNP 集成要点
- HNP 包随应用安装到设备
- Python 解释器二进制位于 HNP 包内部
shellExecSync('python ...')实际调用的是 HNP 中的 Python- Pillow 需要预编译为 arm64 的
.so文件,放入 HNP 的site-packages中
8.4 如何制作 HNP 包
python3.12.9是我们适配的一个python版本(也可以在Python_Package_For_HarmonyOS跟踪更多版本)
-
首先获取这个版本,在鸿蒙PC上解压,如示例中我将获取的包放到~/test 目录下并解压
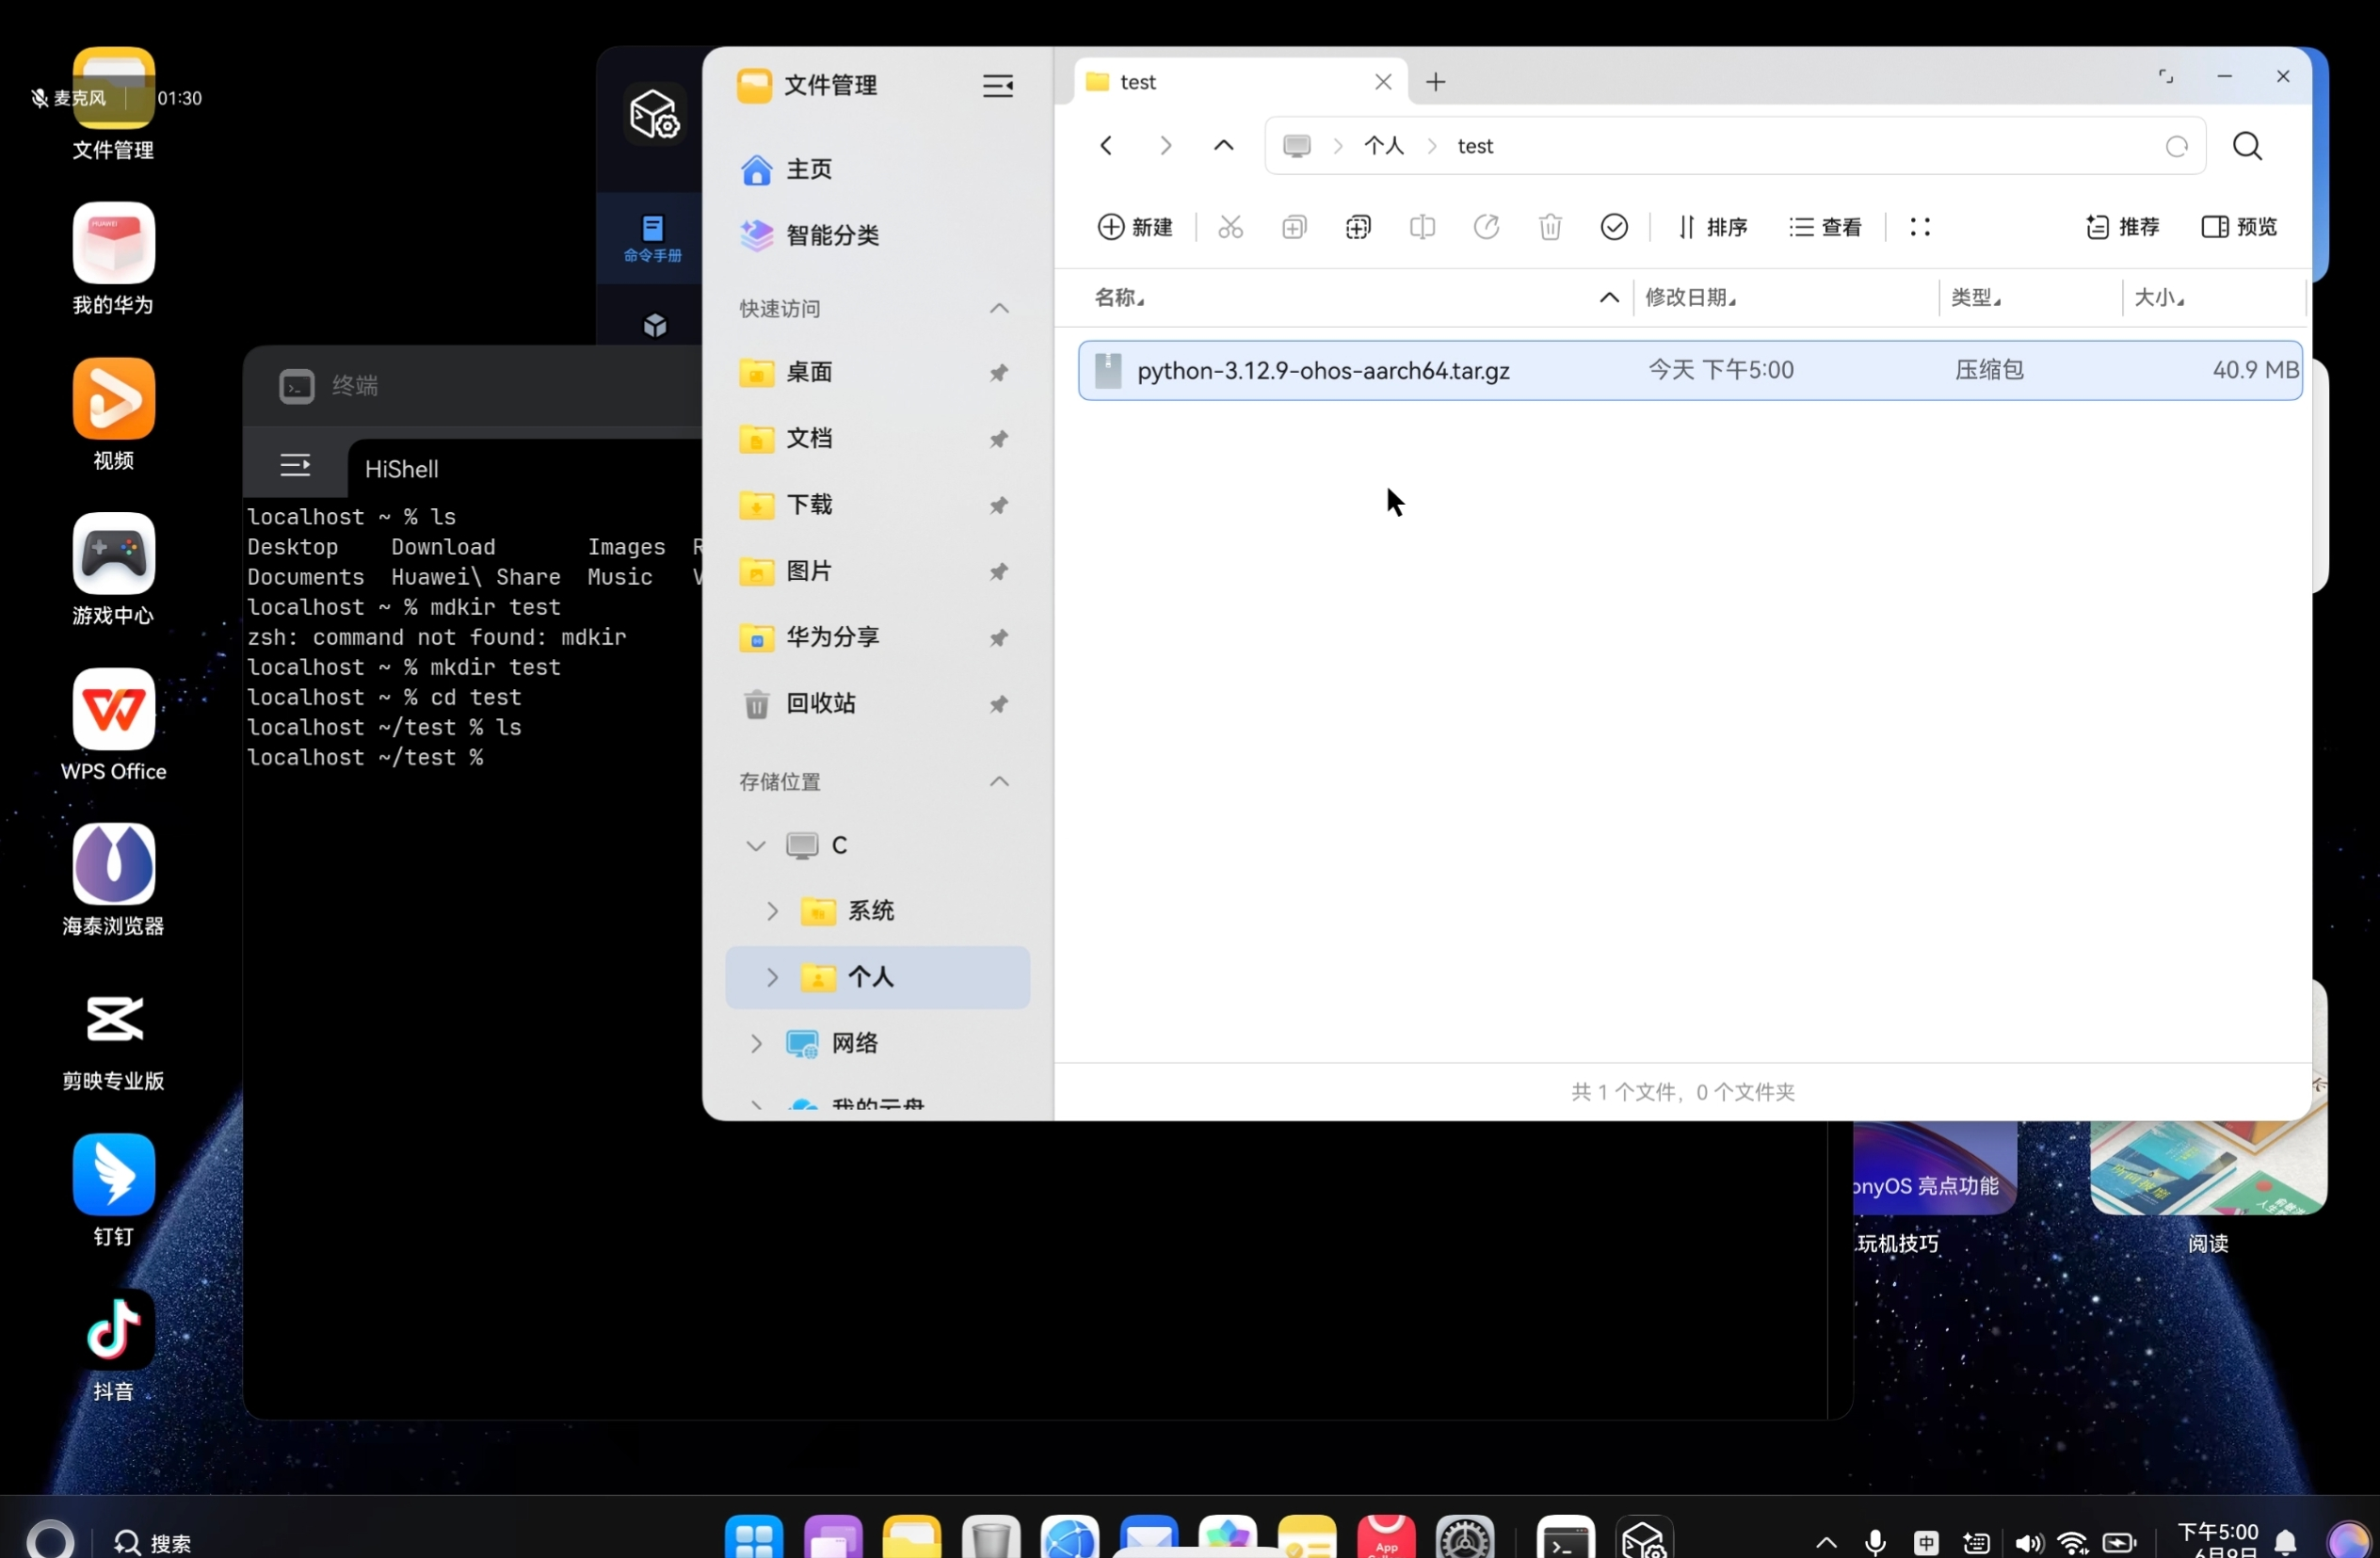

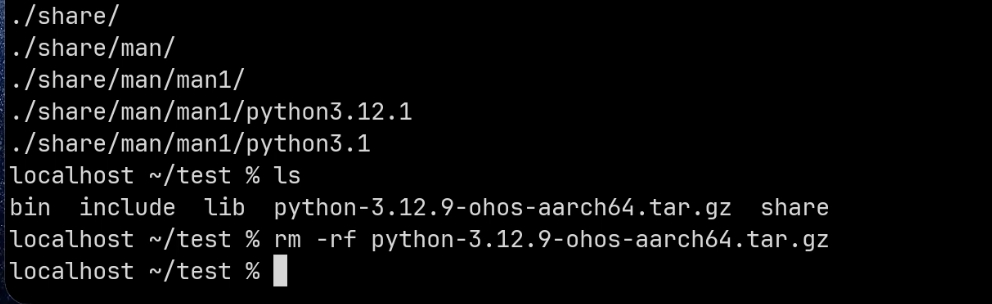
-
注意解压完成后,压缩包不要污染环境,可以删除或挪到其他目录
-
安装pip和pillow
pip和pillow需要通过以下方式安装,其中pillow是我们在社区完成适配,需要使用社区的pip源
./python3.12 im ensurepip
./python3.12 -m pip install Pillow --index-url https://pypi.cnb.cool/OpenHarmonyPCDeveloper/pypi/-/packages/simple
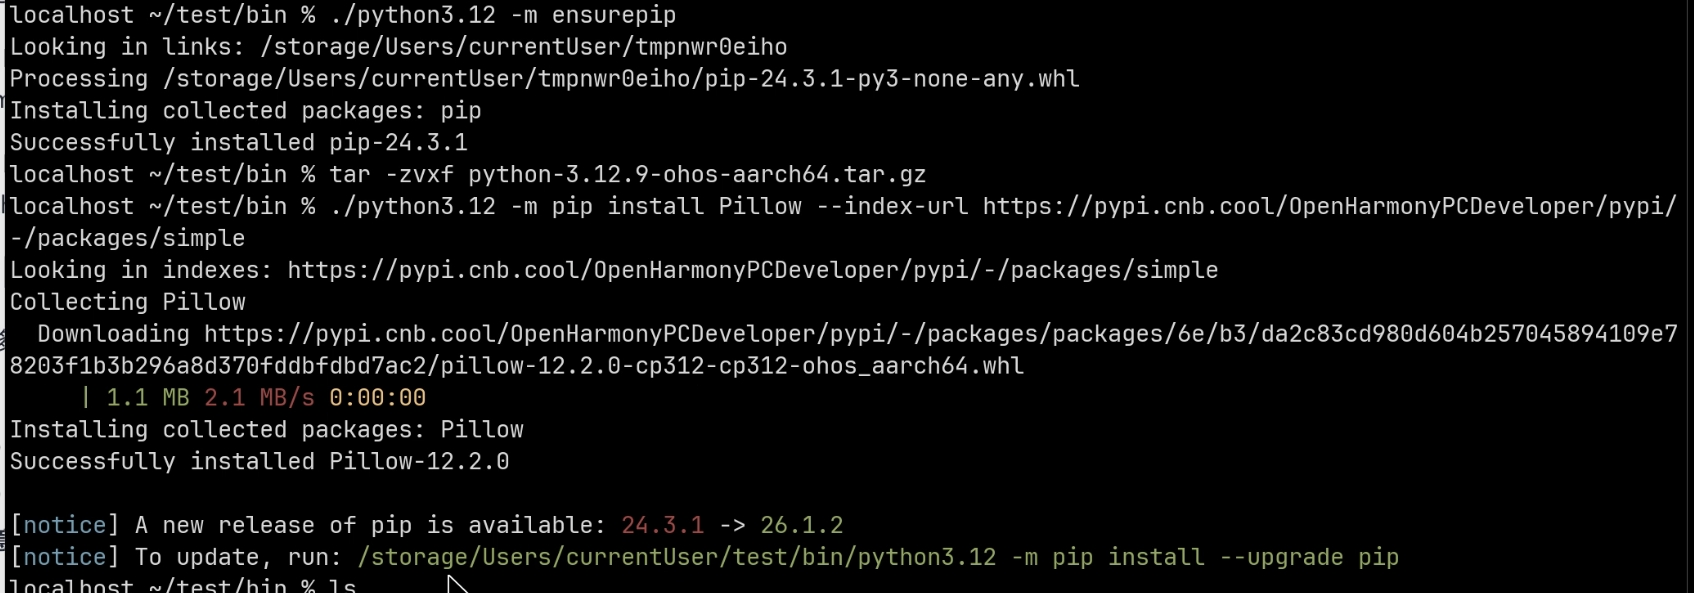
- 安装后可以看到安装pillow到我们纯净python环境下的site-package中

然后在python根目录下创建hnp.json,按照以下方式填写,其中target就是
{
  "type":"hnp-config",
  "name":"python",
  "version":"3.12.9",
  "install":{
      "links":[
          {
            "source":"/bin/python3",
            "target":"python"
          }
      ]
  }
}
- 最后执行hnpcli打包
hnpcli可以在社区获取,或者在鸿蒙PC下载DevBox后执行,也可以把整个路径压缩后在linux或windows上执行,这里要注意下,把所有的文件都修改为777,hnpcli命令会按照上述hnp.json制作出python.hnp归档包,将其放到项目目录hnp/arm64-v8a/下即可,可参见本工程
chmod -R 777 ~/test
hnpcli pack -i ~/test -o ~/
9. 第六步:权限声明与签名
9.1 module.json5 权限
在设备端运行 Python 解释器需要以下内核级权限:
{
  "module": {
    "requestPermissions": {
      "acl": {
        "ALLOW_EXTERNAL_NATIVE_CODE": true,
        "LOAD_INDEPENDENT_LIBRARY": true,
        "ALLOW_WRITABLE_CODE_MEMORY": true,
        "DISABLE_CODE_MEMORY_PROTECTION": true
      }
    }
  }
}
| 权限 | 用途 |
|---|---|
ALLOW_EXTERNAL_NATIVE_CODE |
加载 HNP 包中的 Python 解释器 |
LOAD_INDEPENDENT_LIBRARY |
独立加载 Native 库 (Python 扩展模块) |
ALLOW_WRITABLE_CODE_MEMORY |
Python JIT 运行时需要可写代码段 |
DISABLE_CODE_MEMORY_PROTECTION |
禁用代码段内存保护以支持 Python 动态加载 |
9.2 签名配置
- 在 DevEco Studio 中:File → Project Structure → Signing Configs
- 选择或创建与
com.pixeltune.app匹配的签名证书 - 真机调试需要华为开发者账号和调试证书
10. 第七步:构建与调试
10.1 构建步骤
- 确保
hnp/arm64-v8a/python.hnp已放置 - DevEco Studio:Build → Clean Project
- Build → Build Hap(s)/APP(s)
- 连接设备,点击运行
10.2 调试技巧
开启调试控制台:
在 Index.ets 中:
const ENABLE_CONSOLE: boolean = true; // 开发时设为 true
这会在右侧面板显示终端风格的调试控制台,展示所有 Python 命令和输出。
查看 HiLog:
C++ 层使用 HiLog 输出:
#define LOG_TAG "PixelTune-Shell"
LOGI("sync: %{public}s", command.c_str());
通过 hdc 命令查看:
hdc hilog | grep PixelTune
11. ArkTS 常见编译问题速查
arkts-no-untyped-obj-literals
Object literal must correspond to some explicitly declared class or interface
原因: ArkTS 禁止无类型对象字面量
解决: 使用 Record<string, Object> 或拆成单独的 const:
// 错误
const C = { accent: '#5b9bd5' };

// 正确
const ACCENT: string = '#5b9bd5';
// 或者
const cfg: Record<string, Object> = { quality: 80 };
Cannot find name 'xxx'
原因: 变量拼写错误或作用域问题
常见场景: brightness / contrast 是 CustomComponent 的保留属性名
解决: 加前缀,如 adjustBrightness / adjustContrast
TextCase.UPPER_CASE 不存在
原因: ArkTS 枚举使用 PascalCase
解决: TextCase.UpperCase
NAPI 模块找不到
Cannot find module 'libpixeltune_native.so'
原因: CMakeLists.txt 中的 target 名称与 napi_bridge.cpp 中的 nm_modname 不一致
检查:
- CMakeLists.txt:
add_library(pixeltune_native SHARED ...) - napi_bridge.cpp:
.nm_modname = "pixeltune_native" - ArkTS:
import shellNative from 'libpixeltune_native.so'
三者必须一致。
PackageHap 错误
--json-path must be the config.json file or module.json file
原因: 签名配置与 bundleName 不匹配,或构建缓存损坏
解决:
- Build → Clean Project
- File → Invalidate Caches / Restart
- 重新配置签名证书
12. 扩展思路
更多 Python 库
HNP 方案的扩展性极强,理论上可以打包任何 Python 库:
- OpenCV (
cv2) – 更强大的图像处理、人脸检测、物体识别 - NumPy – 矩阵运算,批量图像处理
- scikit-image – 科学级图像处理
- onnxruntime – 端侧 AI 推理
批量处理
当前为单图处理,可扩展为:
- 目录扫描
- 批量 Pipeline
- 进度条显示
实时预览
- 缩略图快速预览
- 调参时实时更新(用低分辨率缩略图提速)
预设模板
- 保存常用 Pipeline 配置为预设
- 一键应用「社交媒体优化」「证件照处理」等模板
许可证
本文档基于 木兰宽松许可证 v2.0 发布。
Copyright (c) 2026 OpenHarmonyPCDeveloper
Licensed under the Mulan PSL v2.

作为“人工智能6S店”的官方数字引擎,为AI开发者与企业提供一个覆盖软硬件全栈、一站式门户。
更多推荐
 7
7 0
0- 0


 已为社区贡献2条内容

所有评论(0)