
【共创季稿事节】鸿蒙ArkTS颜色滤镜实战
鸿蒙 ArkTS 实战:ColorFilter 颜色矩阵滤镜——从原理到 7 种经典效果完整实现
一、为什么需要 ColorFilter?
图像滤镜是移动应用的常见需求——从社交 App 的美化功能、电商的商品展示,到工具 App 的禁用灰度状态,都需要动态改变图像的色彩表现。
传统做法是编写 GPU 着色器,这对 ArkTS 开发者过于底层。HarmonyOS NEXT 的 Image 组件直接提供了 colorFilter 属性,允许传入一个 4×5 的颜色变换矩阵,在 GPU 层面并行计算每个像素的 RGBA 变换。一行 .colorFilter(matrix) 即可生效,零额外依赖。
二、颜色矩阵原理 | 4×5 矩阵的数学本质
2.1 矩阵结构(行主序)
索引  0  1  2  3  4   →  R 通道变换系数
      5  6  7  8  9   →  G 通道变换系数
     10 11 12 13 14   →  B 通道变换系数
     15 16 17 18 19   →  A 通道变换系数
2.2 数学公式
新 R = m[0]×R + m[1]×G + m[2]×B + m[3]×A + m[4]
新 G = m[5]×R + m[6]×G + m[7]×B + m[8]×A + m[9]
新 B = m[10]×R + m[11]×G + m[12]×B + m[13]×A + m[14]
新 A = m[15]×R + m[16]×G + m[17]×B + m[18]×A + m[19]
前 4 列是缩放系数,决定当前输出通道受 R、G、B、A 输入的影响权重;第 5 列是偏移量,与输入像素值无关。例如反色中偏移设为 +1,结合 -1 系数,实现 新值 = 1 - 原值。
2.3 单位矩阵(原图效果)
[1, 0, 0, 0, 0,   // 新 R = R
 0, 1, 0, 0, 0,   // 新 G = G
 0, 0, 1, 0, 0,   // 新 B = B
 0, 0, 0, 1, 0]   // 新 A = A
对角为 1、其余为 0、偏移为 0,就是"原图"。
三、API 24 下的 colorFilter 属性
3.1 属性签名
// 方式一:直接传入 20 个 number 的数组(推荐,0 依赖,兼容性最好)
Image(src).colorFilter([r0, r1, r2, r3, r4, g0, g1, g2, g3, g4, b0, b1, b2, b3, b4, a0, a1, a2, a3, a4])

// 方式二:使用 ColorFilter 对象(API 24 从 @kit.ArkGraphics2D 导入)
import { ColorFilter } from '@kit.ArkGraphics2D';
Image(src).colorFilter(new ColorFilter(matrix))
⚠️ API 24 中
ColorFilter/ColorMatrix不在@kit.ArkUI中,推荐直接用数组传参,省去 import 烦恼。
3.2 与简化属性对比
| 属性 | 等价效果 | 示例 |
|---|---|---|
.grayscale(v) |
灰度,v∈[0,1] | .grayscale(0.8) |
.sepia(v) |
怀旧,v∈[0,1] | .sepia(0.6) |
.invert(v) |
反色,v∈[0,1] | .invert(0.5) |
.saturate(v) |
饱和度,v≥0 | .saturate(2.0) |
.hueRotate(deg) |
色相旋转 | .hueRotate(90) |
.brightness(v) |
亮度 | .brightness(1.2) |
.contrast(v) |
对比度 | .contrast(1.5) |
.colorFilter(matrix) |
通用矩阵 | 核心 API |
简化属性适合单一效果,colorFilter 适合多通道混合变换。
四、7 种滤镜矩阵逐行解读
4.1 原图
对角全 1,不做变换,作为对比基准。
4.2 灰度(Grayscale)
[0.2126, 0.7152, 0.0722, 0, 0,
 0.2126, 0.7152, 0.0722, 0, 0,
 0.2126, 0.7152, 0.0722, 0, 0,
 0,      0,      0,      1, 0]
三行系数相同,输出 R=G=B = 0.2126R + 0.7152G + 0.0722B。权重来自 ITU-R BT.709 亮度标准:人眼对绿色最敏感(0.7152),对蓝色最不敏感(0.0722)。若均分 0.333,灰度图会偏暗。
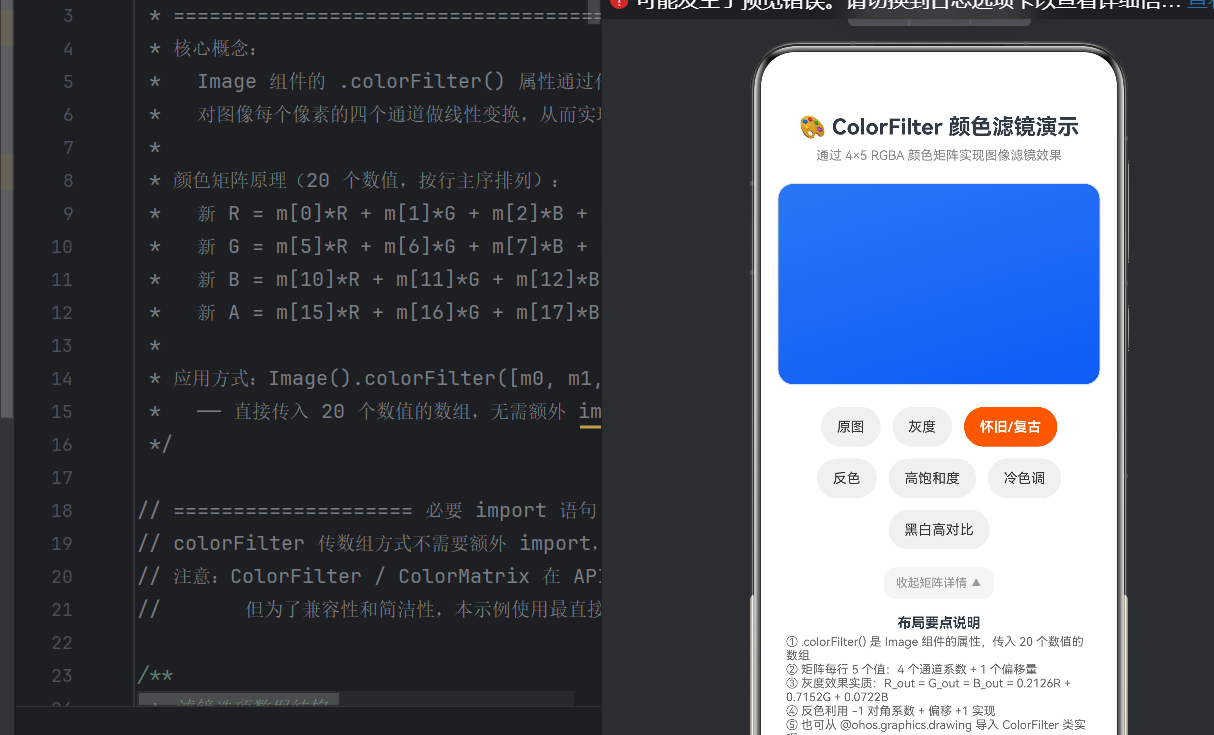
4.3 怀旧/复古(Sepia)
[0.393, 0.769, 0.189, 0, 0,
 0.349, 0.686, 0.168, 0, 0,
 0.272, 0.534, 0.131, 0, 0,
 0,     0,     0,     1, 0]
R 行和 G 行从其他通道"借"来大量能量,B 通道被大幅削弱,产生暖黄褐色的老照片效果。三行系数相加均大于 1,整体亮度提升约 35%。
4.4 反色(Invert)
[-1, 0,  0,  0, 1,
 0,  -1, 0,  0, 1,
 0,  0,  -1, 0, 1,
 0,  0,  0,  1, 0]
对角线 -1 + 偏移 +1 = 新值 = 1 - 原值。黑变白、白变黑,完美反转。
4.5 高饱和度
[1.438, -0.122, -0.016, 0, -0.03,
 -0.062, 1.378, -0.016, 0, -0.05,
 -0.062, -0.122, 1.483, 0, -0.02,
 0,      0,      0,      1, 0]
对角系数 > 1 增强本色,负的非对角系数削弱串扰。红更红、绿更绿、蓝更蓝。
4.6 冷色调
[1,   0,   0,   0, 0,
 0,   0.9, 0,   0, 0,
 0,   0,   1.2, 0, 0,
 0,   0,   0,   1, 0]
R 不变、G 略降(0.9)、B 提升(1.2),模拟色温降低时蓝光增多的效果。适合科技感 UI。
4.7 黑白高对比
[1.5, 1.5, 1.5, 0, -1,
 1.5, 1.5, 1.5, 0, -1,
 1.5, 1.5, 1.5, 0, -1,
 0,   0,   0,   1, 0]
放大灰度增益至 1.5 倍,引入 -1 偏移,将中间色调"撕裂"成近乎二值化的黑白分明的效果。RGB 均值低于 0.67 的像素压至 0,高于的被裁剪到 1。
五、完整代码实现
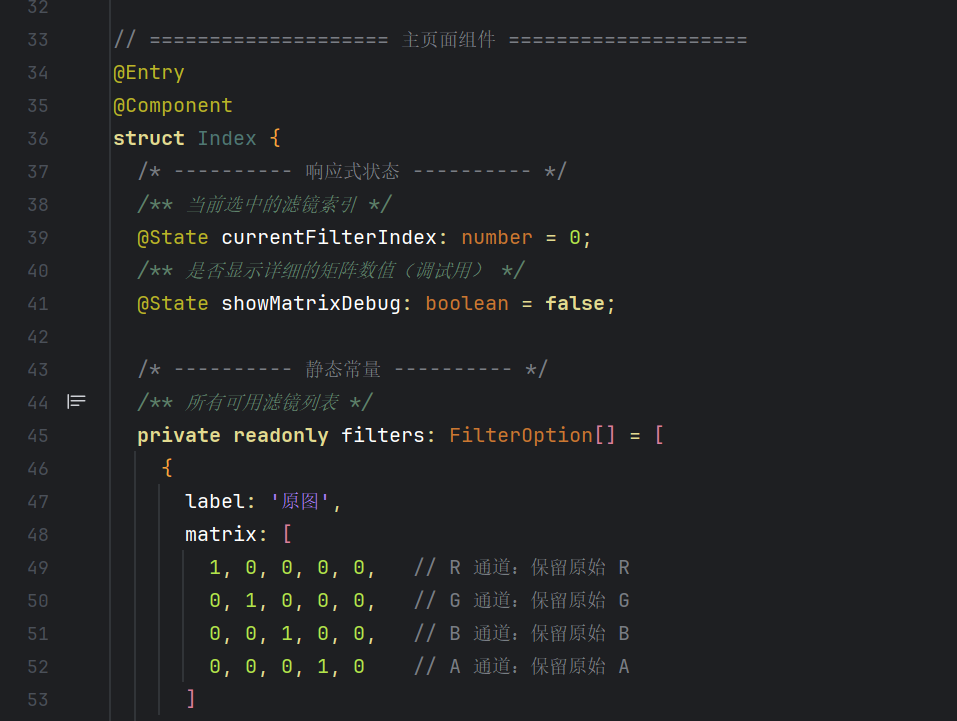
5.1 接口定义与状态声明
interface FilterOption {
  label: string;
  matrix: number[];
}

@Entry
@Component
struct Index {
  @State currentFilterIndex: number = 0;
  @State showMatrixDebug: boolean = false;

  private readonly filters: FilterOption[] = [
    { label: '原图',      matrix: [1,0,0,0,0, 0,1,0,0,0, 0,0,1,0,0, 0,0,0,1,0] },
    { label: '灰度',      matrix: [0.2126,0.7152,0.0722,0,0, 0.2126,0.7152,0.0722,0,0, 0.2126,0.7152,0.0722,0,0, 0,0,0,1,0] },
    { label: '怀旧/复古', matrix: [0.393,0.769,0.189,0,0, 0.349,0.686,0.168,0,0, 0.272,0.534,0.131,0,0, 0,0,0,1,0] },
    { label: '反色',      matrix: [-1,0,0,0,1, 0,-1,0,0,1, 0,0,-1,0,1, 0,0,0,1,0] },
    { label: '高饱和度',  matrix: [1.438,-0.122,-0.016,0,-0.03, -0.062,1.378,-0.016,0,-0.05, -0.062,-0.122,1.483,0,-0.02, 0,0,0,1,0] },
    { label: '冷色调',    matrix: [1,0,0,0,0, 0,0.9,0,0,0, 0,0,1.2,0,0, 0,0,0,1,0] },
    { label: '黑白高对比', matrix: [1.5,1.5,1.5,0,-1, 1.5,1.5,1.5,0,-1, 1.5,1.5,1.5,0,-1, 0,0,0,1,0] }
  ];

  get currentMatrix(): number[] {
    return this.filters[this.currentFilterIndex].matrix;
  }

  get currentLabel(): string {
    return this.filters[this.currentFilterIndex].label;
  }
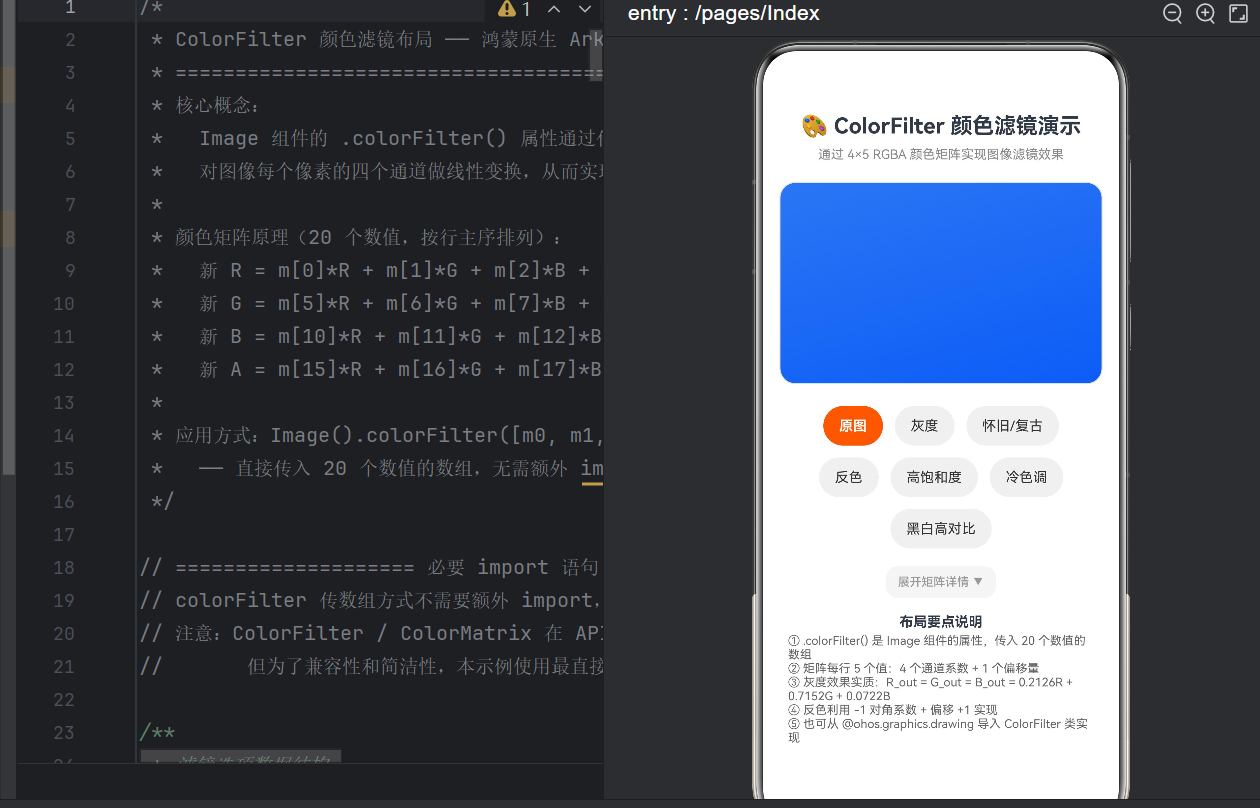
5.2 build() 布局
  build() {
    Scroll() {                         // ★ Scroll 实现页面滚动
      Column() {
        // ---- 标题 ----
        Text('🎨 ColorFilter 颜色滤镜演示')
          .fontSize(22).fontWeight(FontWeight.Bold)
          .width('100%').padding({ top: 16, bottom: 8 })

        Text('通过 4×5 RGBA 颜色矩阵实现图像滤镜效果')
          .fontSize(13).fontColor('#888888')
          .width('100%').padding({ bottom: 12 })

        // ---- 当前滤镜名 ----
        Text(this.currentLabel)
          .fontSize(18).fontWeight(FontWeight.Medium)
          .fontColor('#ff6600').width('100%').padding({ bottom: 8 })

        // ---- 图片展示区(核心) ----
        Stack() {
          Image($r('app.media.background'))
            .width('95%').aspectRatio(1.6)
            .objectFit(ImageFit.Cover).borderRadius(16)
            // ★★★ 核心:colorFilter ★★★
            .colorFilter(this.currentMatrix)
            .animation({ duration: 400, curve: Curve.EaseInOut })
        }
        .width('100%').padding({ bottom: 16 })

        // ---- 滤镜按钮(Flex + wrap 流式布局) ----
        Flex({ direction: FlexDirection.Row, wrap: FlexWrap.Wrap,
               justifyContent: FlexAlign.Center }) {
          ForEach(this.filters, (item, index) => {
            Button(item.label)
              .height(40).fontSize(14).borderRadius(20).margin(6)
              .backgroundColor(this.currentFilterIndex === index ?
                '#ff6600' : '#f0f0f0')
              .fontColor(this.currentFilterIndex === index ?
                '#ffffff' : '#333333')
              .onClick(() => { this.currentFilterIndex = index; })
          }, (_, i) => i.toString())
        }.width('100%').padding({ left: 12, right: 12, bottom: 12 })

        // ---- 矩阵调试面板 ----
        Button(this.showMatrixDebug ? '收起 ▲' : '展开 ▼')
          .fontSize(12).height(32).borderRadius(12)
          .onClick(() => { this.showMatrixDebug = !this.showMatrixDebug; })

        if (this.showMatrixDebug) {
          Scroll() {
            Column() {
              Text('🎯 4×5 颜色矩阵').fontSize(13).fontColor('#666')
              this.MatrixRow('R 通道', 0)
              this.MatrixRow('G 通道', 5)
              this.MatrixRow('B 通道', 10)
              this.MatrixRow('A 通道', 15)
            }.padding(16)
          }.height(160).backgroundColor('#fafafa').borderRadius(12).padding(8)
        }

        // ---- 底部说明 ----
        Text('布局要点说明').fontSize(14).fontWeight(FontWeight.Bold).padding({ top: 16, bottom: 4 })
        Column() {
          Text('① .colorFilter() 传入 20 个数值的数组,无需 import').fontSize(12).fontColor('#666')
          Text('② 每行 5 值:4 个通道系数 + 1 个偏移量').fontSize(12).fontColor('#666')
          Text('③ 灰度:R_out = G_out = B_out = 0.2126R + 0.7152G + 0.0722B').fontSize(12).fontColor('#666')
          Text('④ 反色利用 -1 对角系数 + 偏移 +1 实现').fontSize(12).fontColor('#666')
          Text('⑤ 也可从 @kit.ArkGraphics2D 导入 ColorFilter 类').fontSize(12).fontColor('#666')
        }.alignItems(HorizontalAlign.Start).width('90%').padding({ bottom: 20 })
      }.width('100%').padding(8)
    }.scrollable(ScrollDirection.Vertical)
  }
5.3 @Builder 矩阵行
  @Builder
  MatrixRow(label: string, offset: number) {
    Row() {
      Text(label).fontSize(12).width(55).textAlign(TextAlign.End)
      Text(this.currentMatrix[offset].toFixed(3)).fontSize(12).width(50)
      Text(this.currentMatrix[offset+1].toFixed(3)).fontSize(12).width(50)
      Text(this.currentMatrix[offset+2].toFixed(3)).fontSize(12).width(50)
      Text(this.currentMatrix[offset+3].toFixed(3)).fontSize(12).width(50)
      Text(this.currentMatrix[offset+4].toFixed(3)).fontSize(12).width(50)
        .fontColor('#cc5500')  // 偏移量橙色高亮
    }
    .justifyContent(FlexAlign.Center).padding({ top: 4, bottom: 4 })
  }
}
六、避坑指南:API 24 常见编译错误
6.1 ColorFilter/ColorMatrix 未导出
Module '"@kit.ArkUI"' has no exported member 'ColorFilter'
修复: 用数组传参代替类实例。或从 @kit.ArkGraphics2D 导入。
6.2 Curve.FadeIn 不存在
Curve 枚举没有 FadeIn。用 Curve.EaseIn / Curve.EaseOut / Curve.EaseInOut。
6.3 自定义组件 6 个参数
ArkTS @Component 不支持位置参数传值。改用 @Builder 函数传参:
// ✅ 用 @Builder
@Builder MatrixRow(label: string, offset: number) { ... }
this.MatrixRow('R 通道', 0)

// ❌ 不行
MatrixRow('R 通道', 0.1, 0.2, 0.3, 0.4, 0.5)
6.4 Column 没有 scrollable()
用 Scroll 包裹 Column,scrollable() 设置方向。
6.5 build() 内不能声明变量
build() 中不允许 let / const。变量提取为 get 计算属性:
get currentMatrix(): number[] { return this.filters[idx].matrix; }
七、性能优化
- GPU 管线:
colorFilter在片段着色器阶段完成,1920×1080 图片处理 < 1ms - 矩阵复用:将矩阵定义为
private readonly常量,避免每次 re-render 重建 - 动画开销:
.animation({ duration: 400 })会触发属性插值,列表场景建议减少动画组件数 - 列表场景:配合
LazyForEach+.syncLoad(true)获得流畅滚动体验
八、总结
本文从颜色矩阵的数学原理出发,用 7 个具体滤镜(原图、灰度、怀旧、反色、高饱和、冷色调、黑白高对比)展示了 HarmonyOS NEXT API 24 中 Image.colorFilter() 的完整用法,并附带了可运行的 ArkTS 代码和常见编译错误的解决方案。
颜色矩阵的核心规律可概括为:
- 对角 > 1 → 增强该通道
- 对角 < 1 → 减弱该通道
- 对角为负 → 反相
- 非对角非零 → 颜色串扰 / 混合
- 第 5 列 → 整体偏移
掌握了这五条规律,任何色彩变换需求你都能写出对应的矩阵。下一步可以尝试滑块实时调节矩阵参数、多层滤镜叠加、AI 自动推荐滤镜等进阶功能。
API 参考:


作为“人工智能6S店”的官方数字引擎,为AI开发者与企业提供一个覆盖软硬件全栈、一站式门户。
更多推荐

 2
2 0
0- 0


 已为社区贡献21条内容

所有评论(0)