
鸿蒙 ArkTS 实战:从零搭建一个带 SQLite 持久化的「目标规划器」App
鸿蒙 ArkTS 实战:从零搭建一个带 SQLite 持久化的「目标规划器」App
一份基于 HarmonyOS 5.0 + ArkTS + relationalStore 的完整实战项目,涵盖数据建模、关系型数据库 CRUD、状态管理、组件化 UI、自定义弹窗、统计可视化等核心知识点,适合作为 ArkTS 入门到进阶的练手项目。
运行截图:
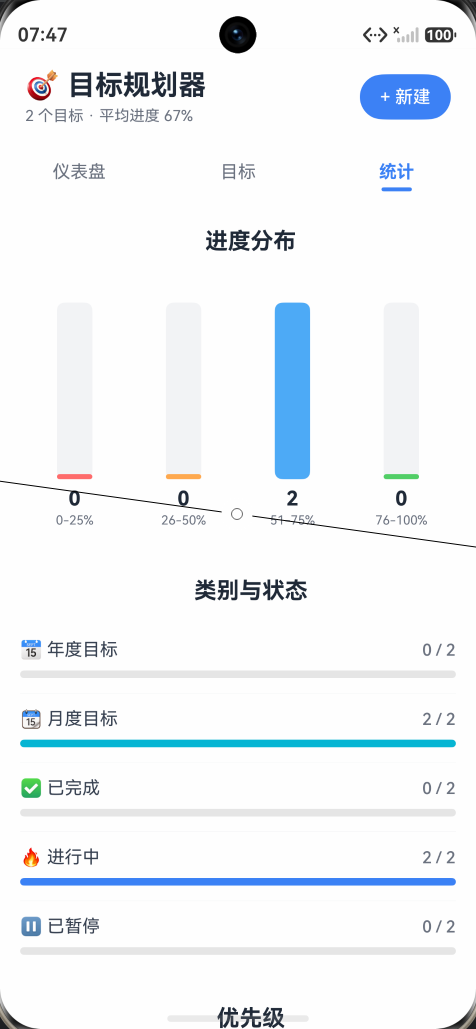
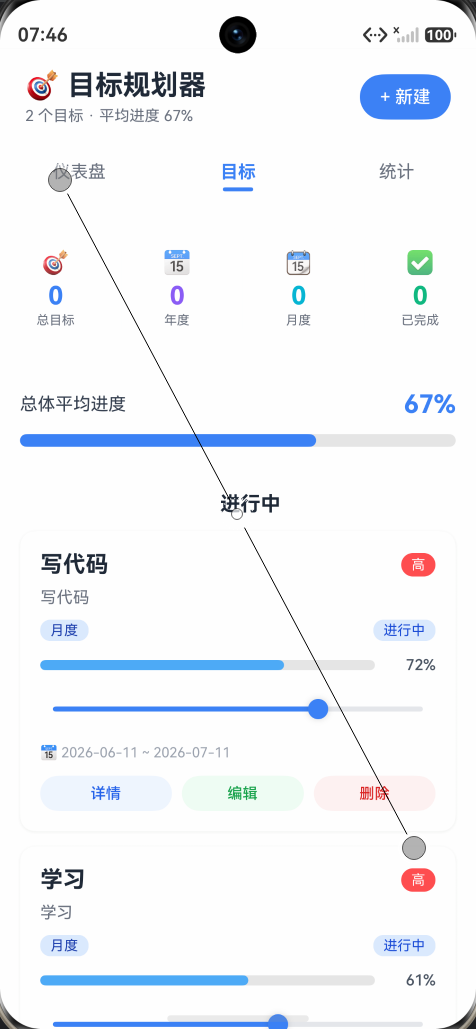
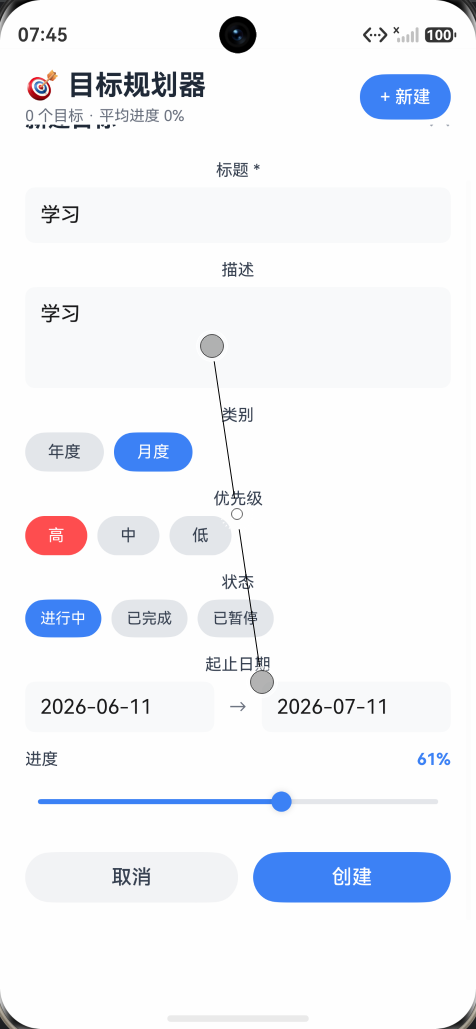
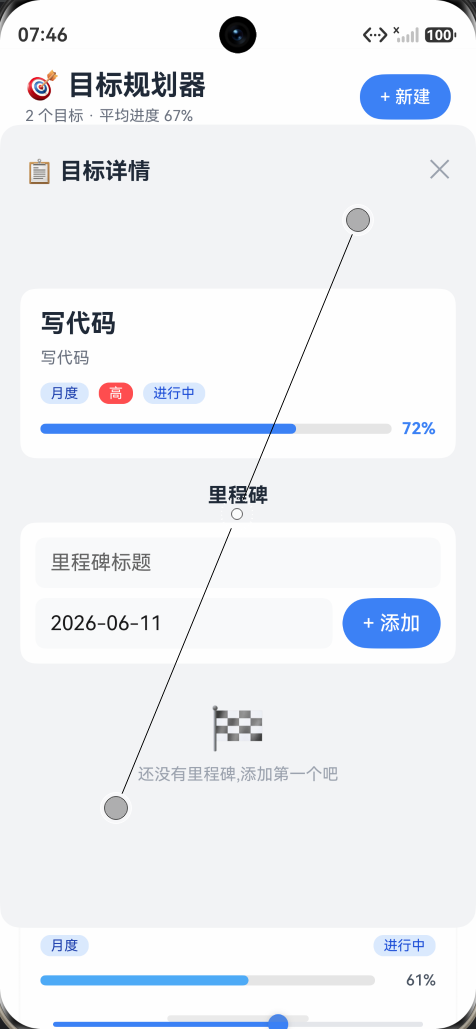
一、项目背景与动机
在学习 HarmonyOS 应用开发时,大多数教程只讲 Text、Button、List 这些基础组件,真正落到"数据怎么存、状态怎么管、复杂弹窗怎么写"的时候,资料就少了很多。本项目 ArkTsSQLiteplan(目标规划器) 就是为了把这些工程化问题串起来,完整演示一个真实可用的鸿蒙 App 是怎么从 0 到 1 写出来的。
项目最终实现的能力:
- 🎯 目标的增删改查(CRUD)
- 📅 年度 / 月度目标分类
- 🔥 高 / 中 / 低 三档优先级
- 📊 仪表盘 + 进度统计 + 柱状图可视化
- 🏁 目标下的里程碑(Milestone)管理
- 💾 基于
@ohos.data.relationalStore的本地持久化 - 🔍 关键字搜索 + 类别筛选
二、技术栈一览
| 类别 | 技术 / 框架 | 版本 |
|---|---|---|
| 应用框架 | HarmonyOS ArkTS | API 12+ |
| UI 框架 | ArkUI(声明式) | Stage 模型 |
| 数据持久化 | relationalStore(SQLite) | @ohos.data.relationalStore |
| 状态管理 | @State / @Prop / @Link / @Observed / @ObjectLink | 内置 |
| 构建工具 | Hvigor | 6.1.1 |
| 调试工具 | DevEco Studio | 5.0+ |
整个项目 0 三方依赖,所有能力全部使用鸿蒙原生 API,跟着敲一遍就能把 ArkTS 的工程套路摸熟。
三、项目目录结构
ArkTsSQLiteplan/
├── AppScope/                        # 应用级资源
│   ├── app.json5
│   └── resources/
├── entry/                           # 主模块
│   ├── src/main/
│   │   ├── ets/
│   │   │   ├── entryability/
│   │   │   │   └── EntryAbility.ets        # UIAbility 入口
│   │   │   ├── components/                 # 可复用 UI 组件
│   │   │   │   ├── GoalCard.ets            # 目标卡片
│   │   │   │   ├── EditDialog.ets          # 新建/编辑弹窗
│   │   │   │   ├── DetailPage.ets          # 目标详情页(含里程碑)
│   │   │   │   └── BarChart.ets            # 自定义柱状图
│   │   │   ├── model/
│   │   │   │   └── GoalModel.ets           # 数据模型 + 数据库管理
│   │   │   └── pages/
│   │   │       └── Index.ets               # 主页(三 Tab 布局)
│   │   ├── resources/                      # 颜色/字符串/图标
│   │   └── module.json5
│   ├── build-profile.json5
│   └── oh-package.json5
└── oh-package.json5                # 工程级配置
四、核心实现拆解
4.1 数据模型(@Observed 装饰)
为了让数据修改能被 UI 自动感知,所有数据类都用 @Observed 装饰,这样在配合 @ObjectLink 使用时能做到深层次的响应式更新。
@Observed
export class Goal {
  id: number = 0;
  title: string = '';
  description: string = '';
  category: string = '月度';   // 年度 / 月度
  priority: string = '中';     // 高 / 中 / 低
  startDate: string = '';
  endDate: string = '';
  progress: number = 0;
  status: string = '进行中';   // 进行中 / 已完成 / 已暂停
  createdAt: number = 0;
  updatedAt: number = 0;
}

@Observed
export class Milestone {
  id: number = 0;
  goalId: number = 0;
  title: string = '';
  targetDate: string = '';
  isCompleted: number = 0;
  createdAt: number = 0;
}

@Observed
export class ProgressBucket {
  range: string = '';
  count: number = 0;
  color: string = '#4DABF7';
}
💡 小贴士:
@Observed必须配合@ObjectLink使用才能发挥深观察能力,纯@State用@Observed类也能正常工作,但字段变化不会被自动追踪——本项目里数据从数据库加载后整体替换this.goals = list,所以采用的是"整体替换"模式,不需要@ObjectLink。
4.2 数据库层(单例 + relationalStore)
GoalDatabase 采用了经典 单例模式 + 延迟初始化,整个 App 共享一个 RdbStore 实例。
export class GoalDatabase {
  private store: relationalStore.RdbStore | null = null;
  private static instance: GoalDatabase | null = null;

  private constructor() {}

  static getInstance(): GoalDatabase {
    if (GoalDatabase.instance === null) {
      GoalDatabase.instance = new GoalDatabase();
    }
    return GoalDatabase.instance;
  }

  async initStore(context: Context): Promise<void> {
    if (this.store !== null) return;
    this.store = await relationalStore.getRdbStore(context, STORE_CONFIG);
    await this.createTables();
  }
}
表结构设计
CREATE TABLE IF NOT EXISTS goals (
  id INTEGER PRIMARY KEY AUTOINCREMENT,
  title TEXT NOT NULL,
  description TEXT,
  category TEXT NOT NULL DEFAULT '月度',
  priority TEXT NOT NULL DEFAULT '中',
  start_date TEXT,
  end_date TEXT,
  progress INTEGER NOT NULL DEFAULT 0,
  status TEXT NOT NULL DEFAULT '进行中',
  created_at INTEGER NOT NULL,
  updated_at INTEGER NOT NULL
);

CREATE TABLE IF NOT EXISTS milestones (
  id INTEGER PRIMARY KEY AUTOINCREMENT,
  goal_id INTEGER NOT NULL,
  title TEXT NOT NULL,
  target_date TEXT,
  is_completed INTEGER NOT NULL DEFAULT 0,
  created_at INTEGER NOT NULL,
  FOREIGN KEY (goal_id) REFERENCES goals(id) ON DELETE CASCADE
);
🎯 设计亮点:
created_at/updated_at用 毫秒时间戳(数字),比 ISO 字符串排序更快- 里程碑通过
goal_id外键关联目标,删除目标时手动级联删里程碑progress用INTEGER,未来扩展可以直接换百分比以外的单位
CRUD 实现(以 insertGoal 为例)
async insertGoal(goal: Goal): Promise<number> {
  if (this.store === null) throw new Error('数据库未初始化');
  const now = Date.now();
  const valueBucket: relationalStore.ValuesBucket = {
    'title': goal.title,
    'description': goal.description,
    'category': goal.category,
    'priority': goal.priority,
    'start_date': goal.startDate,
    'end_date': goal.endDate,
    'progress': goal.progress,
    'status': goal.status,
    'created_at': now,
    'updated_at': now
  };
  try {
    return await this.store.insert('goals', valueBucket);
  } catch (err) {
    hilog.error(DOMAIN, TAG, '插入目标失败: %{public}s', JSON.stringify(err));
    throw new Error('插入目标失败');
  }
}
区间统计(predicates.between 高级用法)
统计页要展示"各进度段的目标数量",可以用一条 SQL 搞定,也可以像下面这样用 RdbPredicates 的 between 拆 4 次查询(在 SQLite 里性能差异可忽略,代码更易读):
const ranges = [
  { name: '0-25%',  min: 0,  max: 25,  color: '#FF6B6B' },
  { name: '26-50%', min: 26, max: 50,  color: '#FFA94D' },
  { name: '51-75%', min: 51, max: 75,  color: '#4DABF7' },
  { name: '76-100%',min: 76, max: 100, color: '#51CF66' }
];

for (const r of ranges) {
  const predicates = new relationalStore.RdbPredicates('goals');
  predicates.between('progress', r.min, r.max);
  const rs = await this.store.query(predicates);
  result.push({ range: r.name, count: rs.rowCount, color: r.color });
}
4.3 主页布局(Stack + Tabs 三段式)
主页采用了外层 Stack + 内层 Tabs的经典结构:
build() {
  Stack() {
    // 1) 底层:主内容(标题栏 + Tabs)
    Column() {
      this.buildHeader();
      Tabs({ barPosition: BarPosition.Start, index: this.currentTabIndex }) {
        TabContent() { this.buildDashboard(); }.tabBar(this.buildTabBar('仪表盘', 0));
        TabContent() { this.buildGoalsTab(); }.tabBar(this.buildTabBar('目标', 1));
        TabContent() { this.buildStatsTab(); }.tabBar(this.buildTabBar('统计', 2));
      }
    }
    .width('100%').height('100%').backgroundColor('#F3F4F6');

    // 2) 中层:编辑弹窗(条件渲染)
    if (this.showEditDialog) {
      EditDialog({
        isEditMode: $isEditMode,
        showDialog: $showEditDialog,
        goal: this.editingGoal,
        onSave: (g: Goal) => this.handleSave(g)
      });
    }

    // 3) 顶层:详情页(条件渲染)
    if (this.showDetail) {
      DetailPage({...});
    }
  }
}
把弹窗/详情页放在 Stack 里、用 if 条件渲染,比 bindContentCover / fullScreenCover 更灵活,能保留主页面状态。
4.4 编辑弹窗(自定义 Dialog 的正确姿势)
这是项目里最容易踩坑的部分,也是网上资料最少的地方。
build() {
  Column() {
    // 1) 遮罩层(全屏半透明)
    Column()
      .width('100%').height('100%')
      .backgroundColor('#00000080')
      .onClick(() => { this.showDialog = false; });

    // 2) 内容层(用 position 浮在外层,不和遮罩争空间)
    Scroll() {
      Column() { /* 表单字段 */ }
        .width('100%').padding(20);
    }
    .width('100%')
    .height('85%')
    .backgroundColor(Color.White)
    .borderRadius(16)
    .position({ x: 0, y: 60 });   // ← 关键:position 让它脱离文档流
  }
  .width('100%').height('100%')
  .position({ x: 0, y: 0 });
}
⚠️ 避坑指南:
- ❌ 错误写法:用
.layoutWeight(1)让内容区自适应。结果遮罩height('100%')已经把父容器占满,layoutWeight(1)拿到 0 高度,表单渲染成"贴边的一条线"。- ✅ 正确写法:内容区用
.position({ x: 0, y: 60 })浮在外层之上,既不和遮罩争布局,又能在屏幕中央偏上的位置弹出。- 这点和 Android Compose / Flutter 的
Box思维是一致的——position相当于 Compose 里的Modifier.offset。
表单双向绑定
@Component
export struct EditDialog {
  @Link isEditMode: boolean;        // 两向绑定父组件
  @Link showDialog: boolean;        // 两向绑定父组件
  @Prop  goal: Goal = new Goal();   // 单向接收(用于初始化表单)
  onSave: (goal: Goal) => void = () => {};

  @State editTitle: string = '';
  @State editDesc: string = '';
  // ...其它字段

  aboutToAppear(): void {
    this.initFromGoal();   // 每次出现都从 goal 重新初始化
  }

  aboutToUpdate(): void {
    this.initFromGoal();   // 父组件 goal 变了也跟着更新
  }
}
aboutToAppear + aboutToUpdate 两个生命周期一起用,保证"新建"和"编辑"两种场景下表单都能正确初始化。
4.5 卡片 + 滑块联动
GoalCard 里的进度调节滑块,松手时才回写数据库,避免每滑动一格都触发 IO:
Slider({
  value: this.goal.progress,
  min: 0, max: 100, step: 1,
  style: SliderStyle.OutSet
})
.onChange((value: number, mode: SliderChangeMode) => {
  if (mode === SliderChangeMode.End) {   // ← 只在 End 时才触发
    this.onProgressChange(this.goal, Math.round(value));
  }
});
SliderChangeMode 有 Begin / Moving / End / Click 几种,这是 ArkTS 里很容易被忽略但极其有用的一个枚举。
4.6 自定义柱状图(纯 ArkUI 实现)
没引图表库,直接用 Stack + 高度比例 + 动画实现:
Stack({ alignContent: Alignment.Bottom }) {
  // 背景槽
  Column().width(28).height(140)
    .backgroundColor('#F3F4F6').borderRadius(6);

  // 实际柱子
  Column()
    .width(28)
    .height(this.getBarHeight())   // 根据比例计算
    .backgroundColor(this.data.color)
    .borderRadius(6)
    .animation({ duration: 600, curve: Curve.EaseOut });
}
柱高比例算法:
private getBarHeight(): number {
  if (this.maxValue <= 0) return 4;
  const ratio = this.data.count / this.maxValue;
  return Math.max(4, Math.round(140 * ratio));
}
Math.max(4, ...) 保证即使 count=0 也能看到一个 4px 的小底座,视觉上不会"消失"。
五、运行效果
5.1 仪表盘
- 顶部 4 张统计卡(总目标 / 年度 / 月度 / 已完成)
- 总体平均进度条
- "进行中"目标列表(最多展示 5 个)
5.2 目标 Tab
- 搜索框(支持标题 + 描述模糊匹配)
- 类别过滤(全部 / 年度 / 月度)
- 卡片支持详情、编辑、删除、拖动滑块改进度
5.3 统计 Tab
- 4 段进度分布柱状图
- 类别与状态占比(线性进度条)
- 优先级分布(高/中/低)
5.4 编辑弹窗
- 标题(必填)、描述、类别、优先级、状态、起止日期、进度
- 表单校验:标题不能为空、不超过 50 字符;结束日期不能早于开始日期
5.5 详情页
- 目标基础信息 + 进度
- 里程碑增删改 + 完成勾选
六、踩坑 & 经验总结
| 序号 | 问题 | 解决方案 |
|---|---|---|
| 1 | 自定义 Dialog 内容被遮罩挤成 0 高度 | 内容用 position 浮在外层之上,不要用 layoutWeight |
| 2 | 弹窗"新建"和"编辑"共用组件,字段初始化混乱 | 拆 aboutToAppear(新建)+ aboutToUpdate(编辑)双生命周期 |
| 3 | Slider 每移动一格都写库导致卡顿 | 只在 SliderChangeMode.End 时回调 |
| 4 | relationalStore 字段名是下划线,JS 是驼峰 | 在 ValuesBucket 里做一层映射,数据库/对象解耦 |
| 5 | @Observed 配合 @State 整体替换最省事 | 不要尝试字段级 @ObjectLink,数据源变了就整体 this.list = newList |
| 6 | 单例数据库多页面共享 | 静态 getInstance() + 私有构造,首次 initStore 注入 context |
七、如何运行
- 安装 DevEco Studio 5.0+
File → Open选中项目根目录- 等待 Hvigor 同步完成
- 顶部工具栏选择
entry模块 + 你的真机/模拟器 - 点击 ▶️ Run,首次启动会自动创建
goal_planner.db
数据库文件路径:
/data/data/<bundleName>/databases/goal_planner.db,可在AppScope/app.json5里改包名。
八、未来规划
- 数据导出(JSON / CSV)
- 目标提醒(Notification + 定时任务)
- 主题切换(深色模式适配)
- 拖拽排序(SwipeAction / 长按拖拽)
- 多端适配(平板 / PC 2in1)
- 云同步(AGC Cloud DB / AppGallery Connect)
九、写在最后
这个项目麻雀虽小,五脏俱全——数据建模、数据库、状态管理、组件化、动画、自定义弹窗、统计可视化全都有涉及,代码量也只有 1000 多行,非常适合作为 ArkTS 的"期末作业"或面试作品。
如果这篇文章帮到了你,欢迎点赞 👍 收藏 ⭐ 关注 🔔,后续会出更多鸿蒙实战教程。
📦 仓库地址:https://github.com/yourname/ArkTsSQLiteplan
📮 联系作者:your.email@example.com

作为“人工智能6S店”的官方数字引擎,为AI开发者与企业提供一个覆盖软硬件全栈、一站式门户。
更多推荐

 7
7 0
0- 0


 已为社区贡献7条内容

所有评论(0)