
鸿蒙原生应用实战(三):笔记详情与编辑页面的路由与CRUD
鸿蒙原生应用实战(三):笔记详情与编辑页面的路由与CRUD
系列目录:
- 第一篇:项目搭建与页面架构设计
- 第二篇:首页开发与全局数据流设计
- 第三篇:笔记详情与编辑页面的路由与CRUD ← 当前
- 第四篇:分类浏览与个人中心的多维数据展示
- 第五篇:构建调试、异常处理与HAP发布
一、前言
上一篇我们完成了首页开发,实现了笔记列表展示、搜索筛选和数据流设计。本篇将开发两个核心交互页面——笔记详情页(NotePage) 和 编辑页(EditPage),涵盖:
- 页面间路由参数传递
- 笔记 CRUD(增删改查)
- 编辑态/新建态的双模式切换
- 删除确认弹窗(bindContentCover)
- API 23 下 router 的正确使用方法
二、鸿蒙路由机制详解
2.1 router 的正确导入
在 API 23 中,路由模块必须从 @ohos.router 导入:
import router from '@ohos.router';
⚠️ 不要从 @kit.AbilityKit 导入——API 23 版本中该路径不导出 router。
2.2 页面跳转与传参
// 跳转并传参
router.pushUrl({
  url: 'pages/NotePage',
  params: { noteId: note.id }
});

// 无参数跳转
router.pushUrl({ url: 'pages/EditPage' });
2.3 接收参数(含空值保护)
接收参数时使用 router.getParams(),必须处理 null 情况:
aboutToAppear(): void {
  // 关键:类型声明为 | null,加 if 保护
  let params: Record<string, Object> | null =
    router.getParams() as Record<string, Object> | null;
  if (params) {
    let noteId: number | undefined = params['noteId'] as number | undefined;
    // ... 处理逻辑
  }
}
这是最容易出错的点! 如果不加 | null 判断,当从无参数跳转进入页面时,router.getParams() 返回 null,访问 params['noteId'] 会直接崩溃。
2.4 页面返回
router.back(); // 返回上一页
关于弃用警告:在 API 23 SDK 中,pushUrl、getParams、back 都会显示 deprecation warning,但功能正常可用。这些 API 要到更高版本才移除,目前无需处理。
三、笔记详情页 (NotePage)
3.1 页面结构
Column
├── 顶部导航栏 (Row)
│   ├── 返回按钮 (带点击)
│   ├── 标题 "笔记详情"
│   └── "编辑" 文字按钮
├── Scroll
│   └── Column (内容区)
│       ├── 分类标签 (带颜色边框)
│       ├── 标题 (大字体粗体)
│       ├── 日期
│       ├── Divider 分隔线
│       └── 正文 (lineHeight 26)
└── 底部删除按钮 (Row → Button)
    └── bindContentCover 删除确认弹窗
3.2 加载笔记数据
通过路由参数 noteId 从全局 AppStorage 中查找对应笔记:
@State note: Note = { id: 0, title: '', content: '', category: '', date: '' };

aboutToAppear(): void {
  let params: Record<string, Object> = router.getParams() as Record<string, Object>;
  let noteId: number = params['noteId'] as number;
  this.loadNote(noteId);
}

loadNote(noteId: number): void {
  let stored: string | undefined = AppStorage.get<string>('notes');
  if (stored) {
    let allNotes: Note[] = JSON.parse(stored) as Note[];
    let found: Note | undefined = allNotes.find((n: Note) => n.id === noteId);
    if (found) {
      this.note = found;
    }
  }
}
这里 find 方法返回 Note | undefined,如果数据被删除或不存在,页面会显示空内容。实际生产环境可以加上错误提示。
3.3 分类颜色标签
每个分类有不同的颜色标识:
getCategoryColor(category: string): ResourceColor {
  let colorMap: Record<string, ResourceColor> = {
    '工作': '#007AFF',   // 蓝色
    '学习': '#34C759',   // 绿色
    '生活': '#FF9500',   // 橙色
    '灵感': '#AF52DE'    // 紫色
  };
  return colorMap[category] || '#999999';
}
应用在 UI 上:
Text(this.note.category)
  .fontColor(this.getCategoryColor(this.note.category))
  .border({ width: 1, color: this.getCategoryColor(this.note.category) })
  .borderRadius(6)
  .alignSelf(ItemAlign.Start)
3.4 删除确认弹窗
使用 bindContentCover 实现底部弹出确认对话框:
@State showDeleteDialog: boolean = false;

// 在 Column 上绑定
.bindContentCover($$this.showDeleteDialog, this.DeleteDialogBuilder())

// Builder 定义弹窗内容
@Builder
DeleteDialogBuilder() {
  Column() {
    Text('确认删除')
      .fontSize($r('app.float.subtitle_font_size'))
      .fontWeight(FontWeight.Bold)
      .margin({ bottom: 12 })

    Text('确定要删除这条笔记吗?')
      .fontColor($r('app.color.text_secondary'))
      .margin({ bottom: 24 })

    Row() {
      Button('取消')
        .onClick(() => { this.showDeleteDialog = false; })
      Blank().width(12)
      Button('确定')
        .backgroundColor($r('app.color.delete_red'))
        .onClick(() => {
          this.showDeleteDialog = false;
          this.deleteNote();
        })
    }
    .width('100%')
  }
  .padding(24)
  .backgroundColor($r('app.color.card_bg'))
  .borderRadius(16)
  .width('80%')
}
⚠️ 注意 $$this.showDeleteDialog 的双向绑定语法——$$ 前缀实现状态变量和弹窗显示状态的同步。
四、编辑页面 (EditPage)
4.1 双模式设计
编辑页面同时处理新建笔记和编辑已有笔记两种场景:
| 场景 | 路由参数 | 页面标题 | 保存行为 |
|---|---|---|---|
| 新建 | 无(或 noteId=0) | “新建笔记” | 生成新 id,插入列表头部 |
| 编辑 | noteId=目标ID | “编辑笔记” | 覆盖原数据 |
@State isEditing: boolean = false;
@State editNoteId: number = 0;

aboutToAppear(): void {
  let params: Record<string, Object> | null = router.getParams() as Record<string, Object> | null;
  if (params) {
    let noteId: number | undefined = params['noteId'] as number | undefined;
    if (noteId !== undefined && noteId > 0) {
      this.isEditing = true;
      this.editNoteId = noteId;
      // 从 AppStorage 加载已有数据
      let stored: string | undefined = AppStorage.get<string>('notes');
      if (stored) {
        let allNotes: Note[] = JSON.parse(stored) as Note[];
        let found: Note | undefined = allNotes.find((n: Note) => n.id === noteId);
        if (found) {
          this.title = found.title;
          this.content = found.content;
          this.selectedCategory = found.category;
        }
      }
    }
  }
}
4.2 页面结构
Column
├── 顶部导航栏
│   ├── "取消" 文字按钮 → router.back()
│   ├── "新建笔记" 或 "编辑笔记" 标题
│   └── "保存" 文字按钮 → saveNote()
├── 标题输入框 (TextInput)
├── 分类选择器 (Row)
│   ├── "分类" 标签
│   └── [工作] [学习] [生活] [灵感] 按钮组
├── Divider
└── 正文输入 (TextArea) ← layoutWeight(1) 撑满剩余空间
4.3 分类选择器实现
分类采用按钮组样式,单选的交互模式:
private categoryOptions: CategoryOption[] = [
  { label: '工作', value: '工作' },
  { label: '学习', value: '学习' },
  { label: '生活', value: '生活' },
  { label: '灵感', value: '灵感' }
];

Row() {
  Text('分类')
    .fontColor($r('app.color.text_secondary'))
  Blank()
  ForEach(this.categoryOptions, (option: CategoryOption) => {
    Text(option.label)
      .fontColor(this.selectedCategory === option.value
        ? Color.White
        : $r('app.color.text_secondary'))
      .backgroundColor(this.selectedCategory === option.value
        ? $r('app.color.primary')
        : $r('app.color.card_bg'))
      .borderRadius(14)
      .onClick(() => { this.selectedCategory = option.value; })
  }, (option: CategoryOption) => option.value)
}
4.4 保存逻辑 (CRUD)
saveNote(): void {
  // 标题为空时不保存
  if (this.title.trim().length === 0) {
    return;
  }

  let stored: string | undefined = AppStorage.get<string>('notes');
  let allNotes: Note[] = stored ? JSON.parse(stored) as Note[] : [];

  // 生成当前日期字符串
  let now: Date = new Date();
  let dateStr: string = now.getFullYear() + '-' +
    String(now.getMonth() + 1).padStart(2, '0') + '-' +
    String(now.getDate()).padStart(2, '0');

  if (this.isEditing) {
    // UPDATE: 查找并替换
    let index: number = allNotes.findIndex((n: Note) => n.id === this.editNoteId);
    if (index !== -1) {
      allNotes[index] = {
        id: this.editNoteId,
        title: this.title.trim(),
        content: this.content.trim(),
        category: this.selectedCategory,
        date: allNotes[index].date  // 保留原日期
      };
    }
  } else {
    // CREATE: 生成新ID,插入列表头部
    let maxId: number = 0;
    for (let note of allNotes) {
      if (note.id > maxId) { maxId = note.id; }
    }
    let newNote: Note = {
      id: maxId + 1,
      title: this.title.trim(),
      content: this.content.trim(),
      category: this.selectedCategory,
      date: dateStr
    };
    allNotes = [newNote, ...allNotes];  // 新笔记在顶部
  }

  // 持久化到 AppStorage
  AppStorage.setOrCreate<string>('notes', JSON.stringify(allNotes));
  router.back();  // 返回上一页
}
4.5 删除逻辑
deleteNote(): void {
  let stored: string | undefined = AppStorage.get<string>('notes');
  if (stored) {
    let allNotes: Note[] = JSON.parse(stored) as Note[];
    // DELETE: 过滤掉目标ID
    allNotes = allNotes.filter((n: Note) => n.id !== this.note.id);
    AppStorage.setOrCreate<string>('notes', JSON.stringify(allNotes));
  }
  router.back();  // 返回上一页
}
五、ArkTS 对象字面量陷阱
这是本项目遇到的一个典型编译错误:
Object literal must correspond to some explicitly declared class or interface
(arkts-no-untyped-obj-literals)
以下写法不允许:
// ❌ 编译错误:@Builder 参数类型不能是对象字面量
@Builder
StatBadge(params: { label: string; value: string; color: string; }) { }

// ❌ 编译错误:调用 @Builder 时不能直接传对象字面量
this.StatBadge({ label: '工作', value: '3', color: '#007AFF' });
正确写法:
// ✅ 方案1:定义接口
interface StatBadgeParams { label: string; value: string; color: string; }

@Builder
StatBadge(params: StatBadgeParams) { }

// ✅ 方案2:使用独立参数
@Builder
StatBadge(label: string, value: string, color: string) { }

this.StatBadge('工作', '3', '#007AFF');  // 直接传值
六、本篇总结
本篇我们完成了:
- ✅ 鸿蒙路由机制:pushUrl传参、getParams接收(含空值保护)、back返回
- ✅ 笔记详情页:数据加载、分类颜色标签、删除确认弹窗
- ✅ 编辑页:新建/编辑双模式、分类选择器、标题+正文输入
- ✅ 完整 CRUD:创建(id递增+头部插入)、读取、更新、删除
- ✅ @Builder 参数类型的 ArkTS 严格模式避坑
下一篇将开发分类浏览页和个人中心页,展示更丰富的数据可视化内容。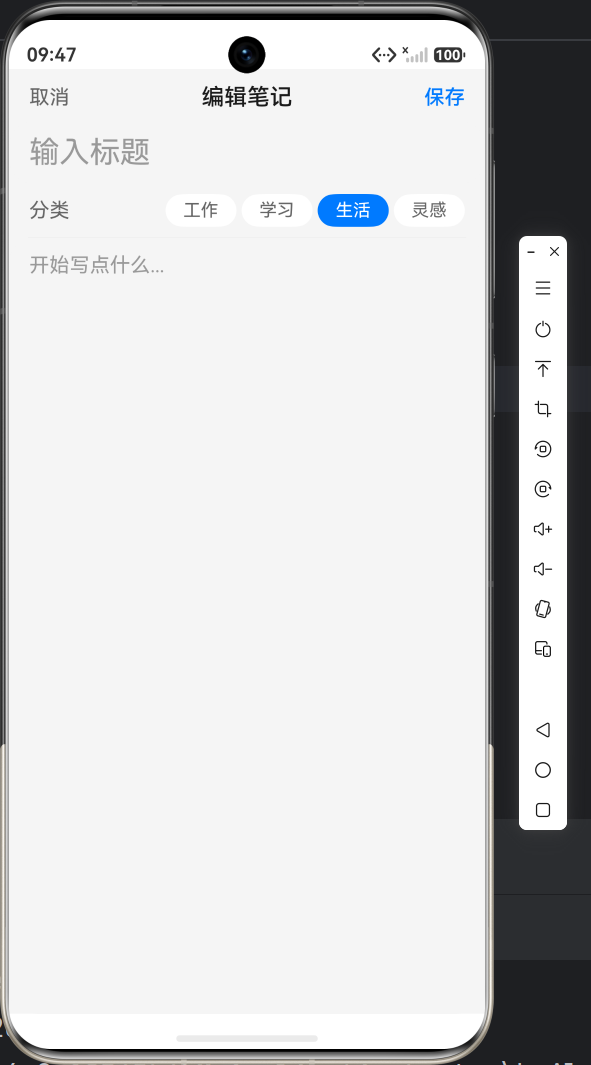

作为“人工智能6S店”的官方数字引擎,为AI开发者与企业提供一个覆盖软硬件全栈、一站式门户。
更多推荐

 9
9 0
0- 0


 已为社区贡献42条内容

所有评论(0)