
Tauri 应用移植到 OpenHarmony/鸿蒙PC完整指南
本文介绍了如何将Tauri v2桌面应用移植到OpenHarmony(鸿蒙)设备上运行的详细步骤。Tauri是一个使用Web前端技术构建桌面应用的框架,相比Electron更轻量、性能更好。移植到OpenHarmony可以复用现有代码,覆盖Windows/macOS/Linux/OHOS多平台,并获得鸿蒙原生体验。 移植核心思路是通过napi-ohos桥接层连接Rust与OHOS原生代码,使用Ar
手把手教你将一个 Tauri v2 桌面应用移植到 OpenHarmony(鸿蒙)设备上运行 。
更多交流学习,欢迎加入开源鸿蒙PC社区:https://harmonypc.csdn.net/
- 适用目标:OHOS ARM64(平板/开发板)/ x86_64(鸿蒙 PC)
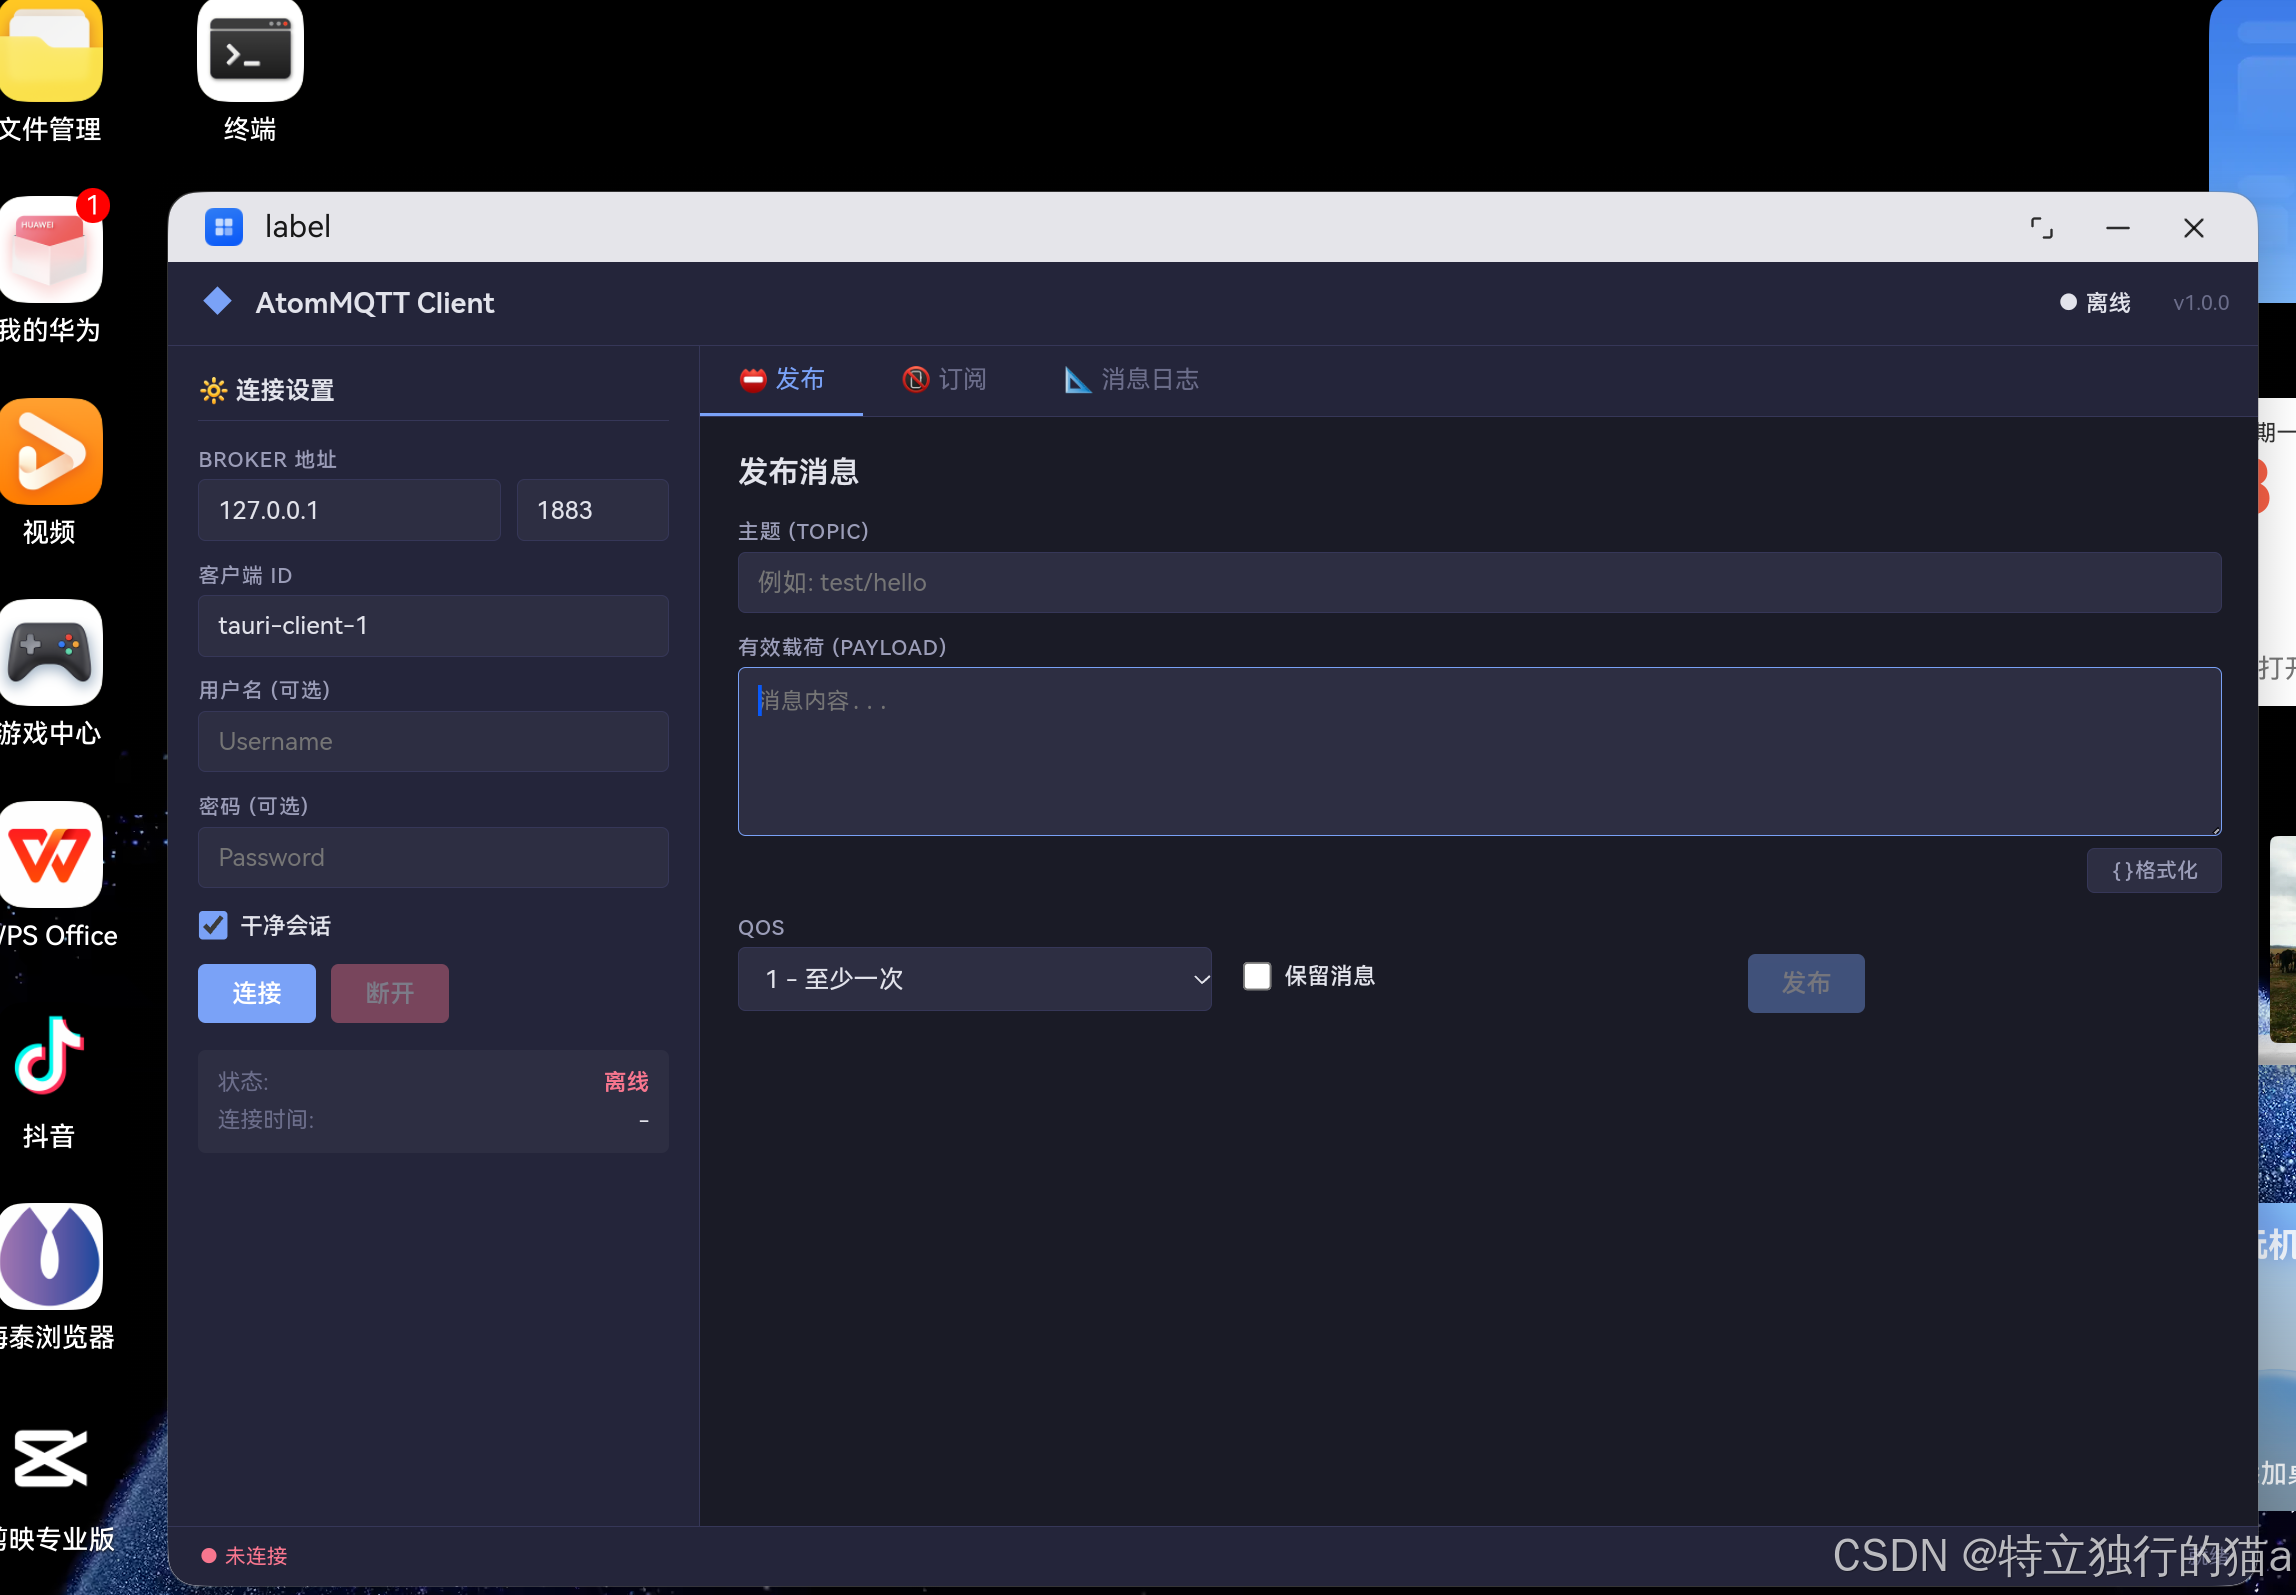
- 本文基于 AtomMQTT Client 的真实移植经验沉淀
文章目录
1. 背景介绍
什么是 Tauri?
Tauri 是一个使用 Web 前端技术(HTML/CSS/JS/React/Vue 等)构建桌面应用的框架,后端使用 Rust。相比 Electron,Tauri 更轻量、更安全、性能更好。
为什么要移植到 OpenHarmony?
OpenHarmony(开源鸿蒙)正在快速发展,鸿蒙 PC 版也逐渐成熟。将 Tauri 应用移植到 OHOS 可以:
- 复用现有的 Tauri 代码 — 不需要用 ArkUI 重写 UI
- 跨平台覆盖 — 一套代码同时支持 Windows/macOS/Linux/OHOS
- 鸿蒙原生体验 — 运行在 OHOS 设备上,通过 hdc 部署
移植原理
Tauri OHOS 移植的核心思路是:
Tauri App (Rust + WebView)
       │
       ▼
   napi-ohos 桥接层     ← Rust 与 OHOS 原生代码的桥梁
       │
       ▼
   OHOS ArkWeb WebView  ← 渲染前端页面
       │
       ▼
   HAP 打包              ← DevEco Studio 打包为鸿蒙应用
社区已有先锋 richerfu 完成了 Tauri v2 的 OHOS fork,本指南在此基础之上。
移植案例参考:MQTT Client的Tauri应用移植到 OpenHarmony 鸿蒙 PC/ARM64 实践记录
2. 前置准备
硬件要求
| 项目 | 要求 |
|---|---|
| 开发机 | Windows 10/11 x86_64(本文以 Win10 为例) |
| 目标设备 | OpenHarmony 平板/开发板(ARM64)或 鸿蒙 PC(x86_64) |
| 磁盘空间 | 至少 10GB(含 OHOS SDK、Rust 工具链) |
软件要求
| 软件 | 版本 | 下载 |
|---|---|---|
| Rust | 1.75+ | rustup.rs |
| Node.js | 18+ | nodejs.org |
| OHOS SDK | 6.x | HarmonyOS 开发者网站 |
| DevEco Studio | 5.0+ | HarmonyOS 开发者网站 |
| Git | 任意 | git-scm.com |
网络配置(中国大陆)
# GitHub 代理加速
git config --global url."https://ghfast.top/https://github.com".insteadOf "https://github.com"

# crates.io 镜像(.cargo/config.toml)
[source.crates-io]
replace-with = "ustc-sparse"
[source.ustc-sparse]
registry = "sparse+https://mirrors.ustc.edu.cn/crates.io-index/"
[net]
git-fetch-with-cli = true
3. 环境搭建(关键!)
3.1 安装 OHOS Rust 目标
rustup target add aarch64-unknown-linux-ohos
rustup target add x86_64-unknown-linux-ohos
3.2 安装 tauri-cli(OHOS fork)
这是最关键的一步。需要从 richerfu/tauri 的 feat/open-harmony 分支安装。
# 克隆 OHOS 分支
git clone --branch feat/open-harmony https://ghfast.top/https://github.com/richerfu/tauri.git tauri-ohos

# ⚠️ 必须修复 cargo-mobile2 版本!
# 编辑 tauri-ohos/crates/tauri-cli/Cargo.toml
# 找到这一行:
#   cargo-mobile2 = { version = "0.20.6", ... }
# 改为:
#   cargo-mobile2 = { version = "0.22", ... }

# 安装 tauri-cli
cargo install --path tauri-ohos/crates/tauri-cli

# 验证安装
cargo tauri --version
# 应输出类似: cargo-tauri-cli 2.8.4

# 安装 ohrs(OHOS 运行时支持)
cargo install ohrs
为什么必须改 cargo-mobile2 版本?
原仓库锁定在旧版0.20.6,但新版的cargo-mobile2已经包含了open_harmony平台支持。如果跳过此步骤,会报错:cannot find open_harmony in cargo_mobile2
3.3 配置 OHOS SDK 路径
从 HarmonyOS 开发者网站下载 OHOS SDK 后,目录结构类似:
D:\software\sdk\default\openharmony\
├── native\                    # NDK 核心
│   ├── llvm\bin\              # clang, lld, llvm-ar
│   ├── sysroot\               # 系统头文件和库
│   └── build\cmake\           # CMake 工具链
├── ...
设置环境变量(注意:指向 SDK 根目录,不是 native/):
$env:OHOS_HOME = "D:\software\sdk\default\openharmony"
3.4 配置链接器(Windows 特有)
OHOS NDK 自带的 aarch64-unknown-linux-ohos-clang 是 Unix shell 脚本,Windows 无法直接使用。需要创建一个 .cmd 包装器:
@echo off
REM ohos-clang.cmd - aarch64 OHOS linker wrapper for Rust
"D:\software\sdk\default\openharmony\native\llvm\bin\clang.exe" ^
  -target aarch64-linux-ohos ^
  --sysroot="D:\software\sdk\default\openharmony\native\sysroot" ^
  -D__MUSL__ -fuse-ld=lld %*
放置在项目 src-tauri/ 目录下,然后在 .cargo/config.toml 中引用:
[target.aarch64-unknown-linux-ohos]
linker = "..\\ohos-clang.cmd"
ar = "D:\\software\\sdk\\default\\openharmony\\native\\llvm\\bin\\llvm-ar.exe"
rustflags = [
    "-C", "link-arg=-fuse-ld=lld",
    "-C", "link-arg=--rtlib=compiler-rt",
]
4. 创建 Tauri 项目
用标准方式创建一个 Tauri v2 项目:
# 使用 create-tauri-app(非交互式)
npm create tauri-app@latest my-tauri-app -- --template vanilla --manager npm

cd my-tauri-app
npm install
项目结构初始如下:
my-tauri-app/
├── public/             # 前端静态文件
│   └── index.html
├── src/                # 前端源码(如果用框架的话)
├── src-tauri/          # Rust 后端
│   ├── src/
│   │   ├── lib.rs
│   │   └── main.rs
│   ├── Cargo.toml
│   ├── build.rs
│   ├── tauri.conf.json
│   └── icons/
├── package.json
└── ...
5. 改造为 OHOS 兼容结构
5.1 修改 lib.rs
这是最重要的改动。Tauri v2 标准 main.rs 中直接调用 .run(),但 OHOS 需要 mobile_entry_point 宏。
src-tauri/src/lib.rs:
// 将应用逻辑提取到 lib.rs
// 注意 cfg_attr 宏 —— 这是 OHOS 正常运行的关键!

#[cfg_attr(mobile, tauri::mobile_entry_point)]
pub fn run() {
    tauri::Builder::default()
        .invoke_handler(tauri::generate_handler![
            greet,  // 你的命令
        ])
        .run(tauri::generate_context!())
        .expect("error while running tauri application");
}

#[tauri::command]
fn greet(name: &str) -> String {
    format!("Hello, {}!", name)
}
src-tauri/src/main.rs:
// #![cfg_attr 用于 Windows 隐藏控制台窗口
#![cfg_attr(
    all(not(debug_assertions), target_os = "windows"),
    windows_subsystem = "windows"
)]

fn main() {
    // 调用 lib.rs 中的 run 函数
    my_tauri_app_lib::run();
}
注意:
lib.rs中的 crate 名称(my_tauri_app_lib)需要与Cargo.toml中[lib] name一致。
5.2 修改 Cargo.toml
[package]
name = "my-tauri-app"
version = "0.1.0"
edition = "2021"

[lib]
name = "my_tauri_app_lib"
crate-type = ["staticlib", "cdylib", "rlib"]  # ← 必须!

[build-dependencies]
# 使用本地 tauri-ohos 仓库的 tauri-build
tauri-build = { path = "../tauri-ohos/crates/tauri-build", default-features = false, features = ["codegen"] }

[dependencies]
# 使用本地 tauri-ohos 仓库的 tauri
tauri = { path = "../tauri-ohos/crates/tauri" }
serde = { version = "1", features = ["derive"] }
serde_json = "1"

# OHOS 目标需要 napi 支持
[target.'cfg(target_env = "ohos")'.dependencies]
napi-derive-ohos = "1.1"
napi-ohos = { version = "1.1", features = ["napi8"] }
5.3 创建图标
OHOS 需要 RGBA PNG 图标:
# 用 Node.js 生成 RGBA PNG
node -e "
const fs = require('fs');
const { createCanvas } = require('canvas'); // 或用纯 PNG 库
// 最简单:找一个 1024x1024 的 RGBA PNG 放到 src-tauri/icons/
"
或者用在线工具生成一个 1024x1024 的 RGBA PNG,命名为 icon.png,放入 src-tauri/icons/。
5.4 配置 tauri.conf.json
{
  "productName": "My Tauri App",
  "version": "0.1.0",
  "identifier": "com.example.myapp",
  "build": {
    "frontendDist": "../public",
    "devUrl": "http://localhost:1420",
    "beforeBuildCommand": "",
    "beforeDevCommand": ""
  },
  "app": {
    "windows": [
      {
        "title": "My Tauri App",
        "width": 1080,
        "height": 800,
        "resizable": true,
        "center": true
      }
    ],
    "security": { "csp": null }
  },
  "bundle": {
    "active": true,
    "targets": "all",
    "icon": ["icons/icon.png"]
  }
}
如果需要在 WebView 中通过
window.__TAURI__访问 Tauri API,添加:"app": { "withGlobalTauri": true, ... }
5.5 配置 .cargo/config.toml
# src-tauri/.cargo/config.toml
[source.crates-io]
replace-with = "ustc-sparse"
[source.ustc-sparse]
registry = "sparse+https://mirrors.ustc.edu.cn/crates.io-index/"
[net]
git-fetch-with-cli = true

[target.aarch64-unknown-linux-ohos]
linker = "..\\ohos-clang.cmd"
ar = "D:\\software\\sdk\\default\\openharmony\\native\\llvm\\bin\\llvm-ar.exe"
rustflags = [
    "-C", "link-arg=-fuse-ld=lld",
    "-C", "link-arg=--rtlib=compiler-rt",
]
6. 交叉编译
6.1 初始化 OHOS 工程
$env:OHOS_HOME = "D:\software\sdk\default\openharmony"

cd src-tauri
cargo tauri ohos init --skip-targets-install
这会生成 src-tauri/gen/ohos/ 目录,包含完整的 DevEco Studio 工程。
6.2 编译 Rust 代码
cd src-tauri

# 编译 ARM64(平板/手机/鸿蒙pc)
cargo tauri ohos build -t aarch64

# 或者编译 x86_64
cargo tauri ohos build -t x86_64
编译成功后,产物在:
src-tauri/target/aarch64-unknown-linux-ohos/release/libmy_tauri_app_lib.so
6.3 同步产物到 OHOS 工程
# 复制 .so 到正确位置
Copy-Item -Path "target/aarch64-unknown-linux-ohos/release/libmy_tauri_app_lib.so" `
          -Destination "gen/ohos/entry/libs/arm64-v8a/" -Force

# 同步前端文件
Copy-Item -Path "..\public\*" `
          -Destination "gen\ohos\entry\src\main\resources\rawfile" -Recurse -Force
7. DevEco Studio 打包 HAP
7.1 导入工程
- 打开 DevEco Studio
- File → Open → 选择
src-tauri/gen/ohos/目录 - 等待工程加载完成
7.2 修改必要文件
hvigorfile.ts
DevEco Studio 打开项目时会尝试执行 cargo tauri ohos dev-eco-studio-script,这会失败(因为 Rust 编译已经在命令行完成)。注释掉这个调用:
// src-tauri/gen/ohos/entry/hvigorfile.ts
function tauriPlugin(): HvigorPlugin {
  return {
    pluginId: 'tauri',
    apply(node: HvigorNode) {
      const buildRustCode = () => {
        // 注释掉:Rust 编译已在命令行完成
        // const target = properties.target || "aarch64";
        // execFileSync("cargo",
        //   ["tauri", "ohos", "dev-eco-studio-script", "--target", target.toString()], {
        //     cwd: resolve(__dirname, "../../../"),
        //     stdio: "inherit",
        //   });
      }
      node.getTaskByName('default@ConfigureCmake')!.afterRun(buildRustCode);
    }
  }
}
build-profile.json5
某些 DevEco Studio 版本对 build-profile.json5 的 schema 验证很严格,只允许以下字段:
{
  "apiType": "stageMode",
  "buildOption": {
    "externalNativeOptions": {
      "path": "./src/main/cpp/CMakeLists.txt",
      "arguments": "",
      "cppFlags": ""
    }
  },
  "buildOptionSet": [
    {
      "name": "release",
      "nativeLib": {
        "debugSymbol": { "strip": true, "exclude": [] }
      }
    }
  ],
  "targets": [
    { "name": "default", "runtimeOS": "HarmonyOS" },
    { "name": "ohosTest" }
  ]
}
❌ 不要包含
runtimeOSVersion、runtimeOSBranch、enableParallel等字段
❌ 不要在buildOption.arkOptions中加libList(.so放在libs/下会被自动发现)
7.3 构建 HAP
- DevEco Studio 菜单栏: Build → Build HAP(s)
- 等待构建完成
- 产物在
entry/build/outputs/default/entry-default-signed.hap
8. 部署到设备
8.1 连接设备
# 查看已连接的设备
hdc list targets

# 如果没看到设备,检查 USB 连接和驱动
8.2 安装 HAP
hdc install -r entry-default-signed.hap
8.3 启动应用
hdc shell aa start -a EntryAbility -b com.example.myapp
com.example.myapp是tauri.conf.json中的identifier字段。
9. 常见问题与解决方案
9.1 编译错误
| 错误信息 | 原因 | 解决 |
|---|---|---|
cannot find open_harmony in cargo_mobile2 |
cargo-mobile2 版本过旧 | 改为 "0.22" |
toolchain file not found |
OHOS_HOME 路径错误 | 设为 SDK 根目录,不是 native/ |
icon ... is not RGBA |
图标格式不对 | 用 RGBA PNG(color type=6) |
cannot find module napi_derive_ohos |
缺少 napi 依赖 | 在 Cargo.toml 添加 OHOS target deps |
ohpm not found |
缺少 ohpm | 安装 DevEco Studio,它会自带 ohpm |
9.2 运行时问题
| 现象 | 原因 | 解决 |
|---|---|---|
| 界面加载了但按钮无响应 | JS 语法错误 | node --check public/script.js 检查 |
| 中文显示为乱码 | Mojibake 编码问题 | 以 UTF-8 无 BOM 保存文件 |
window.__TAURI__ 为 undefined |
IPC bridge 未注入 | 设置 withGlobalTauri: true |
| WebView 白屏 | 前端文件未正确同步 | 检查 rawfile/ 目录是否有文件 |
9.3 OHOS 调试面板
如果前端交互有问题,可以在 public/script.js 顶部注入 Debug 面板:
window.__dbg = (function() {
  var p = document.createElement('div');
  p.id = '__dbgpnl';
  p.style.cssText = 'position:fixed;bottom:0;left:0;right:0;max-height:200px;' +
    'overflow:auto;background:#1a1b26;color:#9ece6a;font:12px monospace;z-index:99999';
  // ... 创建 toggle header + log body ...
  var body = document.createElement('div'); body.id = '__dbgB';
  p.appendChild(body); document.body.appendChild(p);
  return {
    info: function(m) {
      var e = document.createElement('div');
      e.textContent = m; body.appendChild(e);
    },
    error: function(m) {
      var e = document.createElement('div');
      e.style.color = '#f7768e';
      e.textContent = '[ERR] ' + m; body.appendChild(e);
    }
  };
})();

// 探测 Tauri IPC
__dbg.info('__TAURI__: ' + typeof window.__TAURI__);
部署后屏幕底部会显示调试信息,帮助定位 IPC 和 JS 问题。
9.4 完整 Debug Checklist
-
rustup target list确认 OHOS 目标已安装 -
cargo tauri --version确认是 OHOS fork 版本 -
$env:OHOS_HOME指向 SDK 根目录 - 链接器
.cmd文件存在且路径正确 -
node --check public/script.js语法通过 -
tauri.conf.json中withGlobalTauri: true -
build-profile.json5通过 schema 验证 -
hvigorfile.ts中的 cargo 调用已注释 -
.so已复制到libs/arm64-v8a/
10. 总结
移植流程回顾
1. 环境搭建 ──→ 2. 创建项目 ──→ 3. 改造结构 ──→ 4. 编译 ──→ 5. 打包 ──→ 6. 部署
  Rust目标        npm create      修改lib.rs       cargo tauri    DevEco       hdc install
  tauri-cli       tauri-app       修改Cargo.toml   ohos build     Studio
  OHOS SDK                         链接器配置                      Build HAP
  链接器包装
关键经验
- cargo-mobile2 版本 — 安装 tauri-cli 前必须先修复这个依赖,否则无法识别 OHOS 平台
- OHOS_HOME 指向 SDK 根目录 — CLI 会自动拼接
native/,不要多拼一层 - Windows 链接器 — 必须创建
.cmd包装,Unix shell 脚本在 Windows 不可用 - JS 语法错误是最大坑 — OHOS WebView 没有 DevTools,错误会被静默吞掉,务必
node --check - 编码问题 — 中文文本在重新保存时可能被错误编码,注意 UTF-8 无 BOM
- DevEco Studio 版本差异 — 不同版本对
build-profile.json5的 schema 校验不同,按提示调整
参考项目
- AtomMQTT Client for OpenHarmony — 本文的实践案例,完整的 MQTT 客户端移植
- tauri-demo — OHOS 移植的参考示例
- Tauri OHOS Fork — 社区移植分支
- atomMqtt — 配套 MQTT Broker 服务端
展望
随着 OpenHarmony 生态的发展,Tauri 应用的跨平台能力将覆盖到更多设备形态。这套移植方案不仅适用于 MQTT 客户端,也适用于任何 Tauri v2 应用 —— 包括但不限于:
- 工具类应用(JSON 格式化、正则测试、编码转换)
- 数据可视化仪表盘
- 轻量级的 IoT 管理工具
- 个人知识管理应用
跨平台不在于一次写出在所有平台运行的代码,
而在于一套架构、一种模式,能在不同平台间高效迁移。
更多交流学习,欢迎加入开源鸿蒙PC社区:https://harmonypc.csdn.net/

作为“人工智能6S店”的官方数字引擎,为AI开发者与企业提供一个覆盖软硬件全栈、一站式门户。
更多推荐
 1
1 0
0- 0


 已为社区贡献30条内容

所有评论(0)