
鸿蒙PC问题解决-关闭主窗口后子窗口不自动销毁问题详解
/ ✅ 推荐做法return win;});if (index!== -1) {});要点说明问题本质子窗口是独立实例,不会随主窗口自动销毁解决方案在中主动调用destroy()关键代码保存子窗口引用并在生命周期中销毁权限问题悬浮窗权限需要企业签名或使用模拟方案。
·
欢迎加入开源鸿蒙PC社区:
https://harmonypc.csdn.net/
atomgit仓库地址: https://atomgit.com/gcw_7DJ1SfsY/chuangtishengmingzhouqi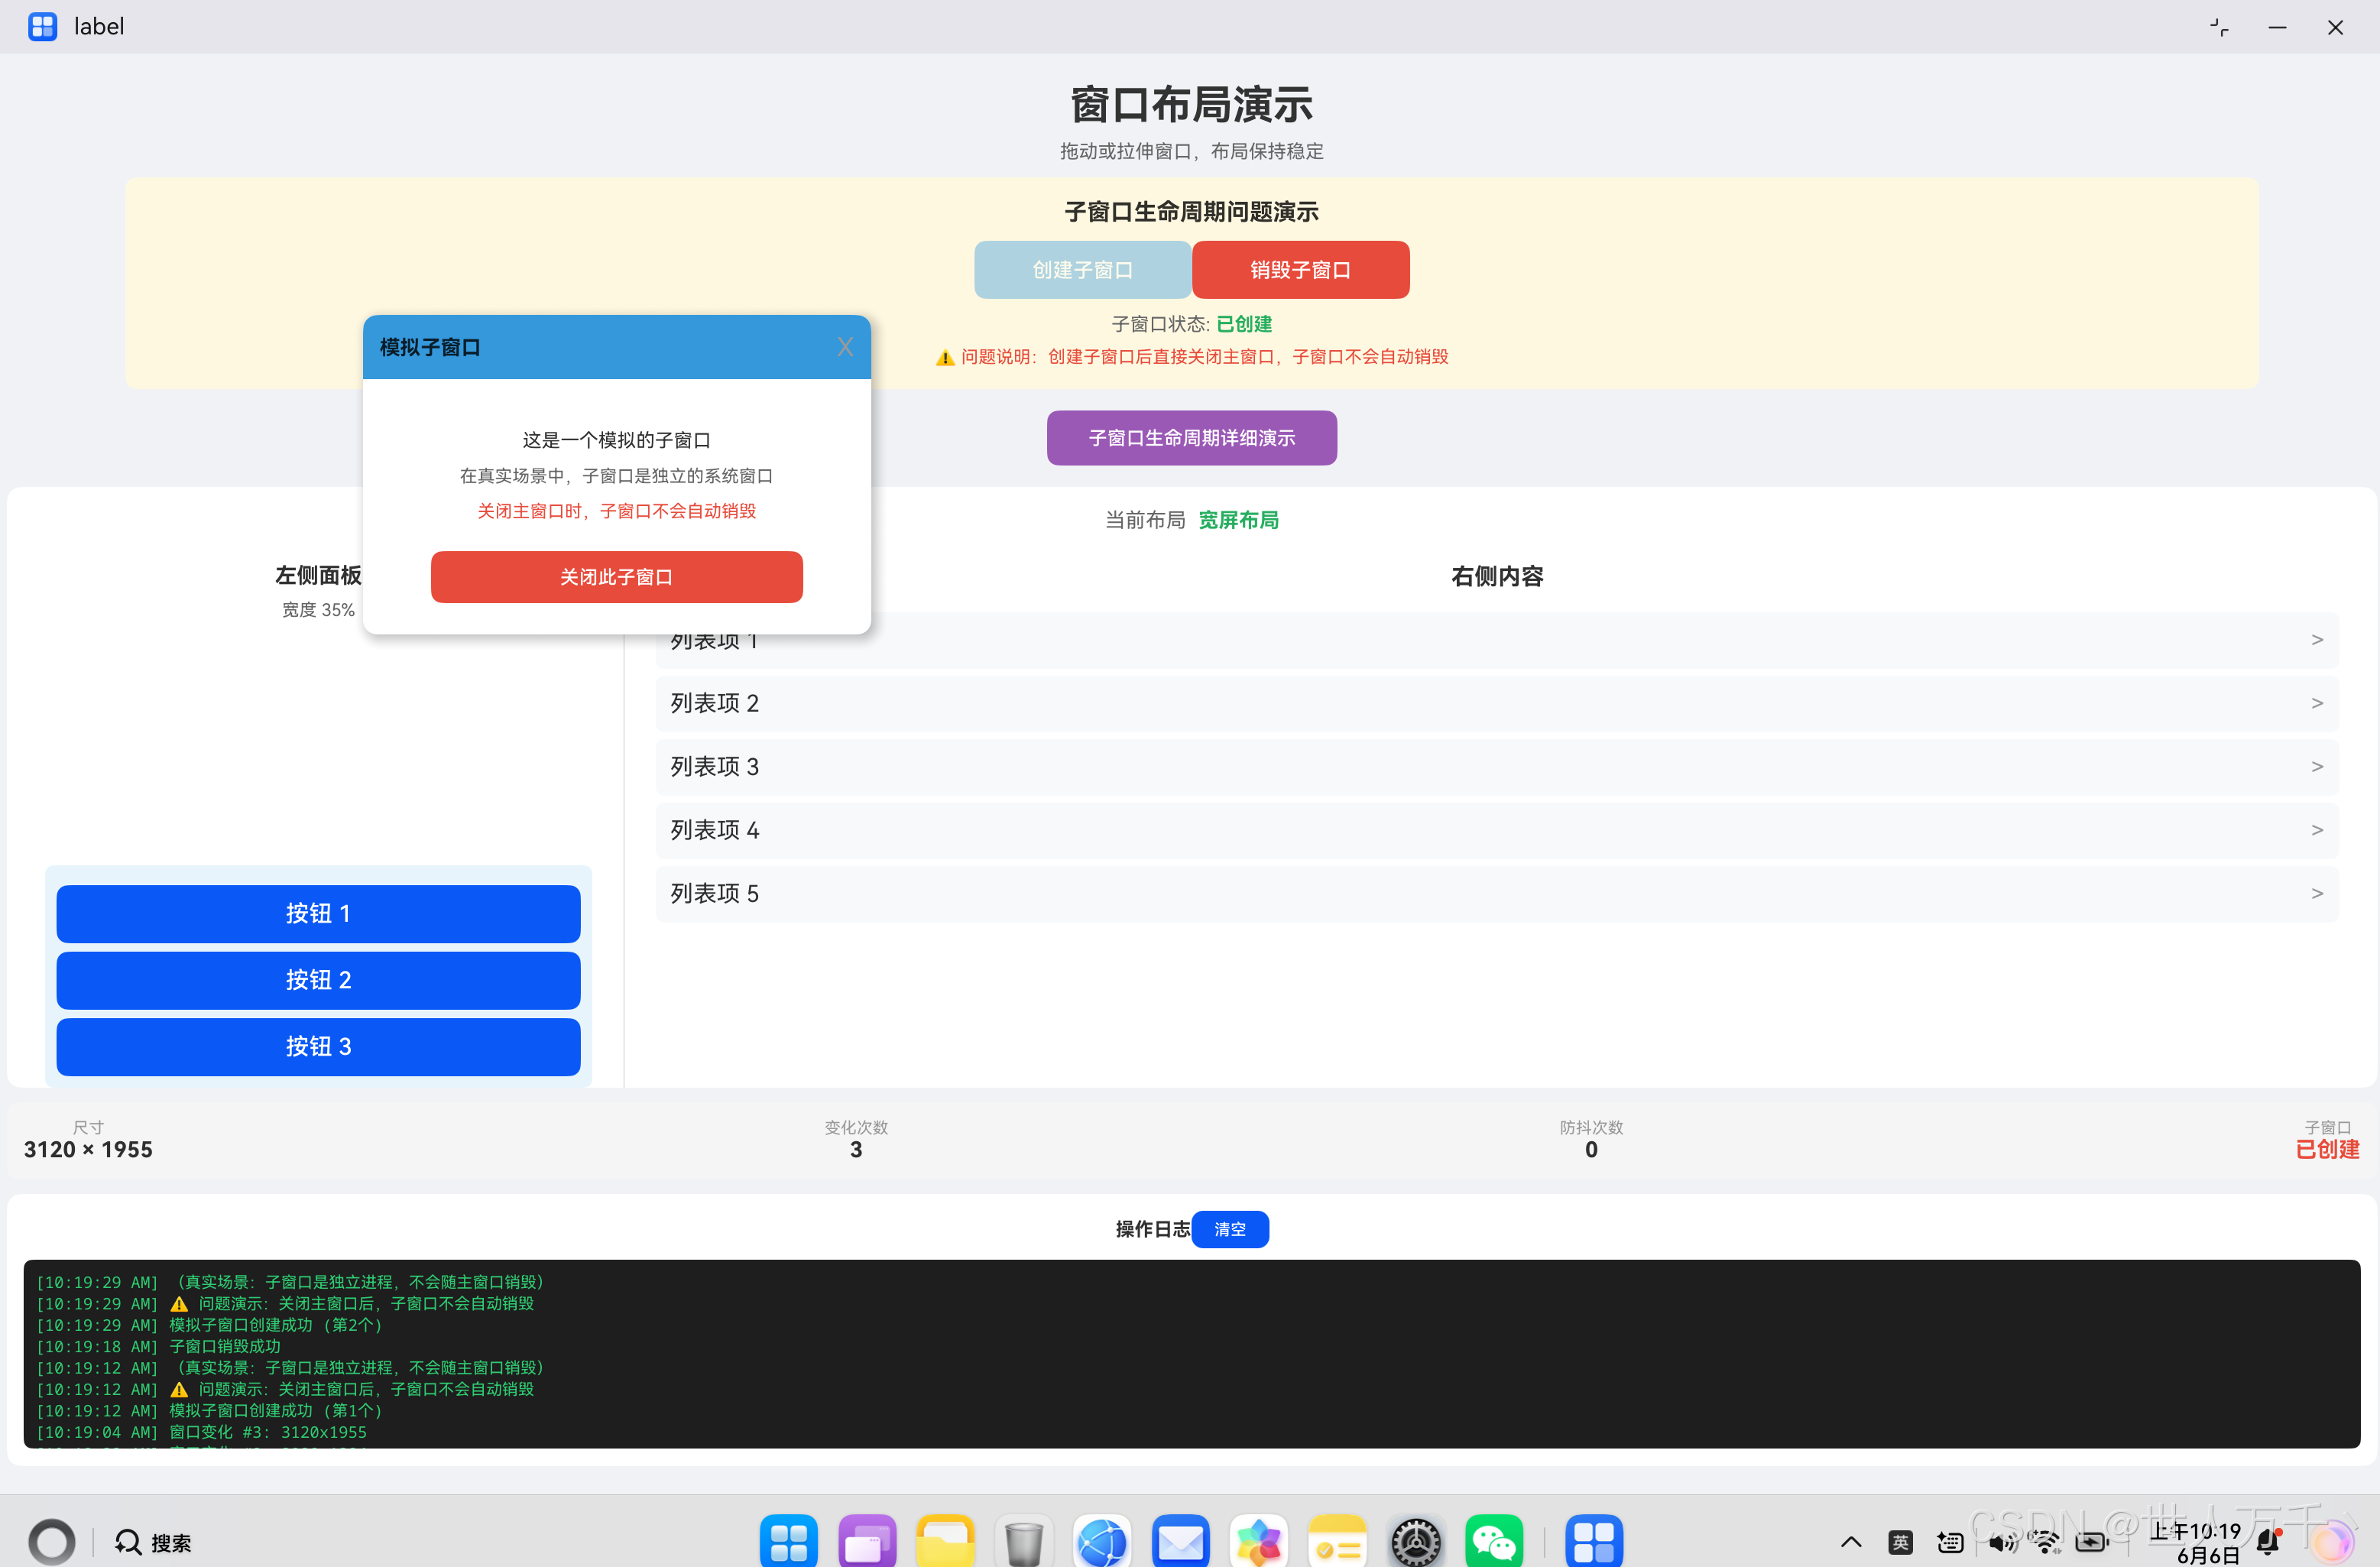
可以正常关闭了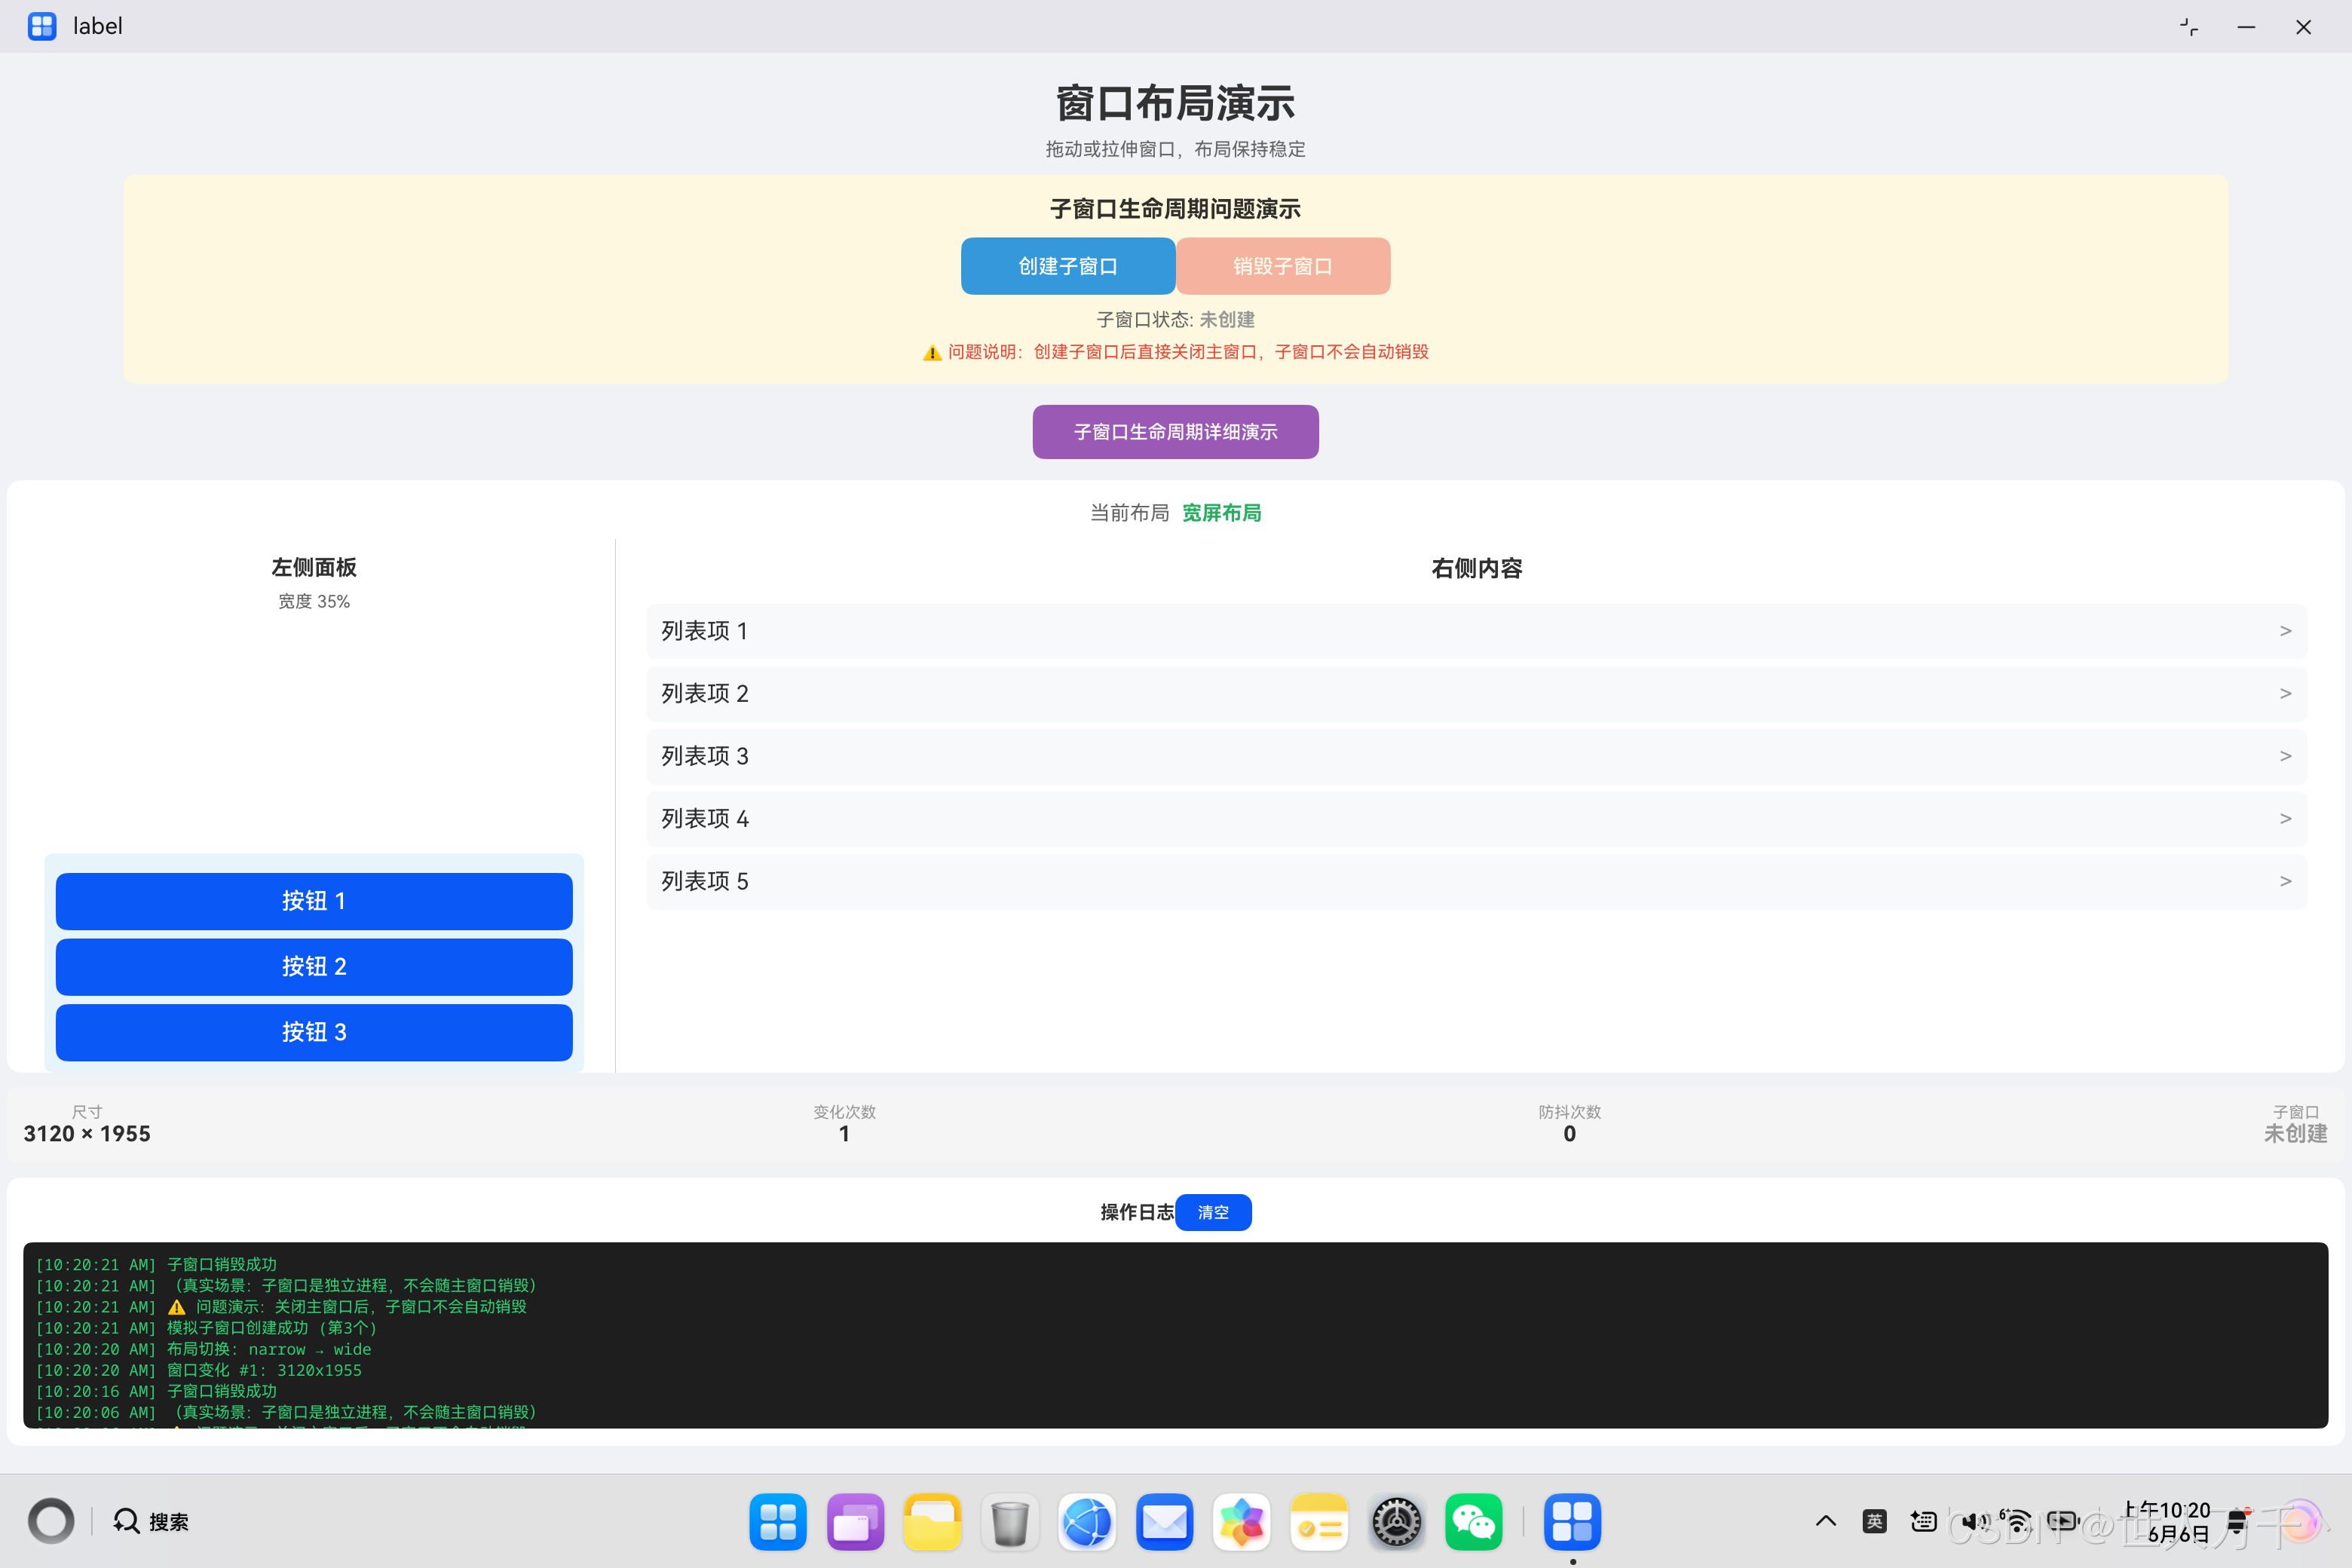
一、问题背景
在鸿蒙PC应用开发中,多窗口管理是一个常见的需求场景。开发者可能需要创建独立于主窗口的子窗口(SubWindow),用于展示辅助功能面板、工具窗口、设置对话框等。
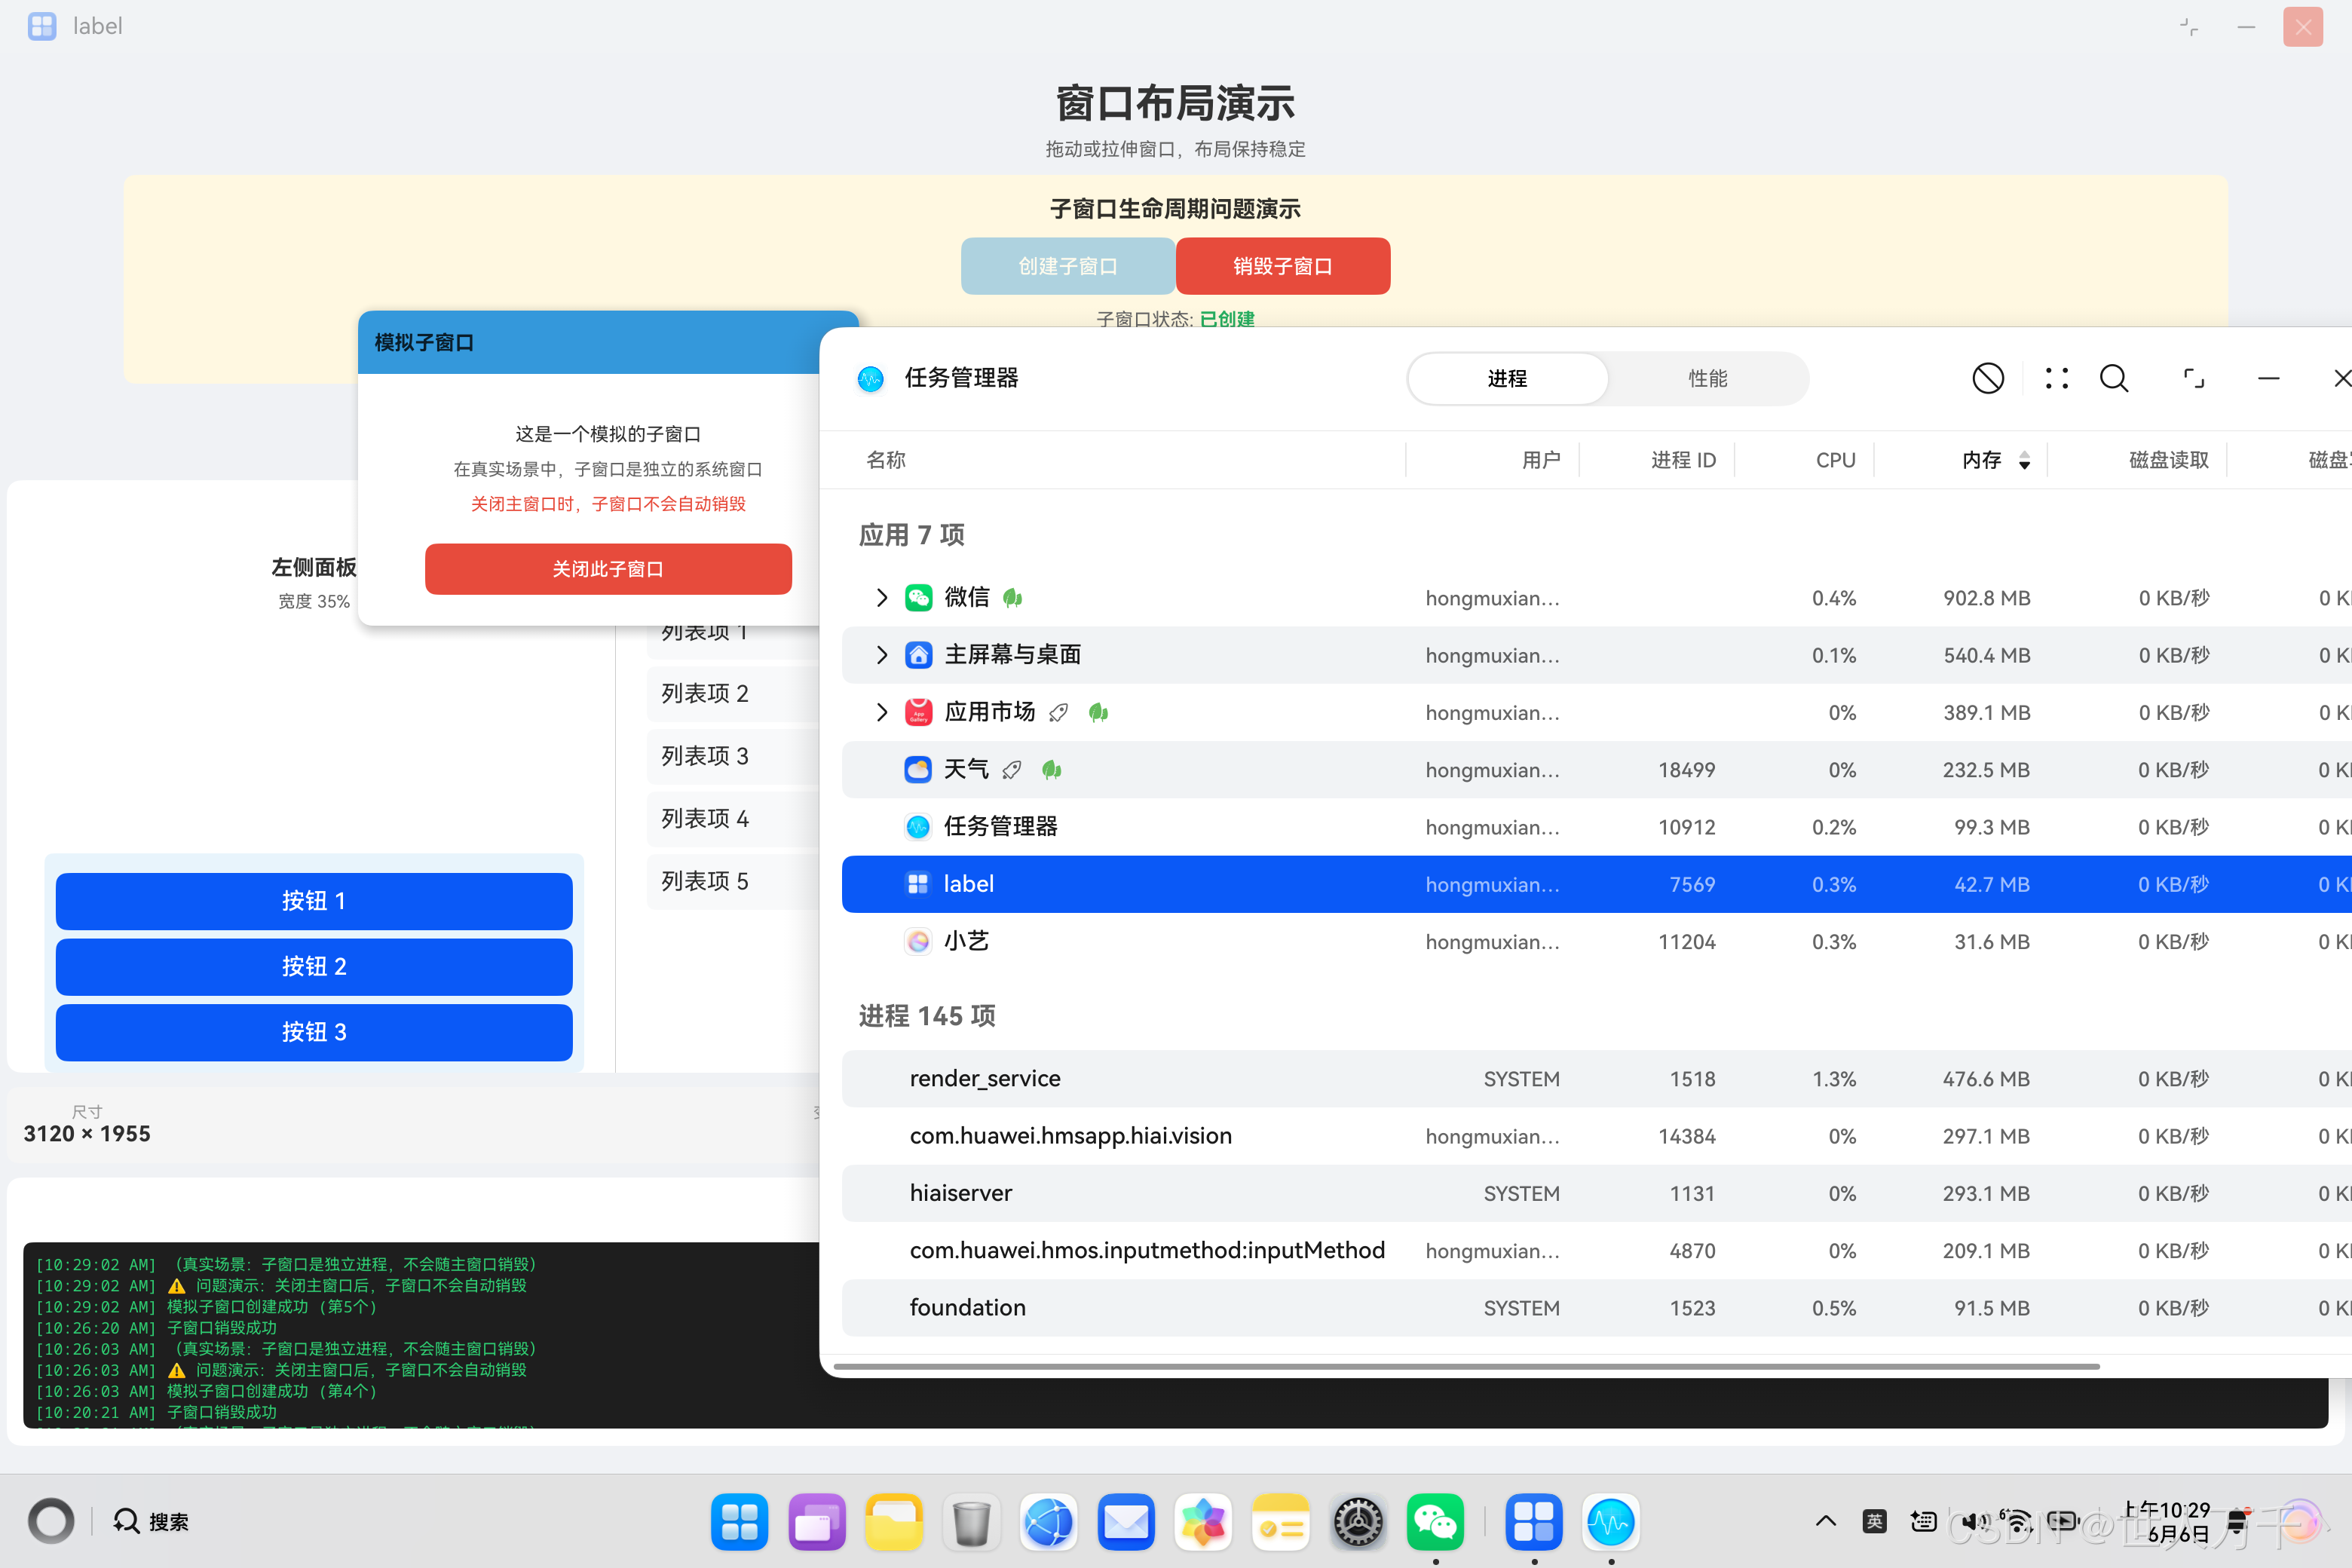
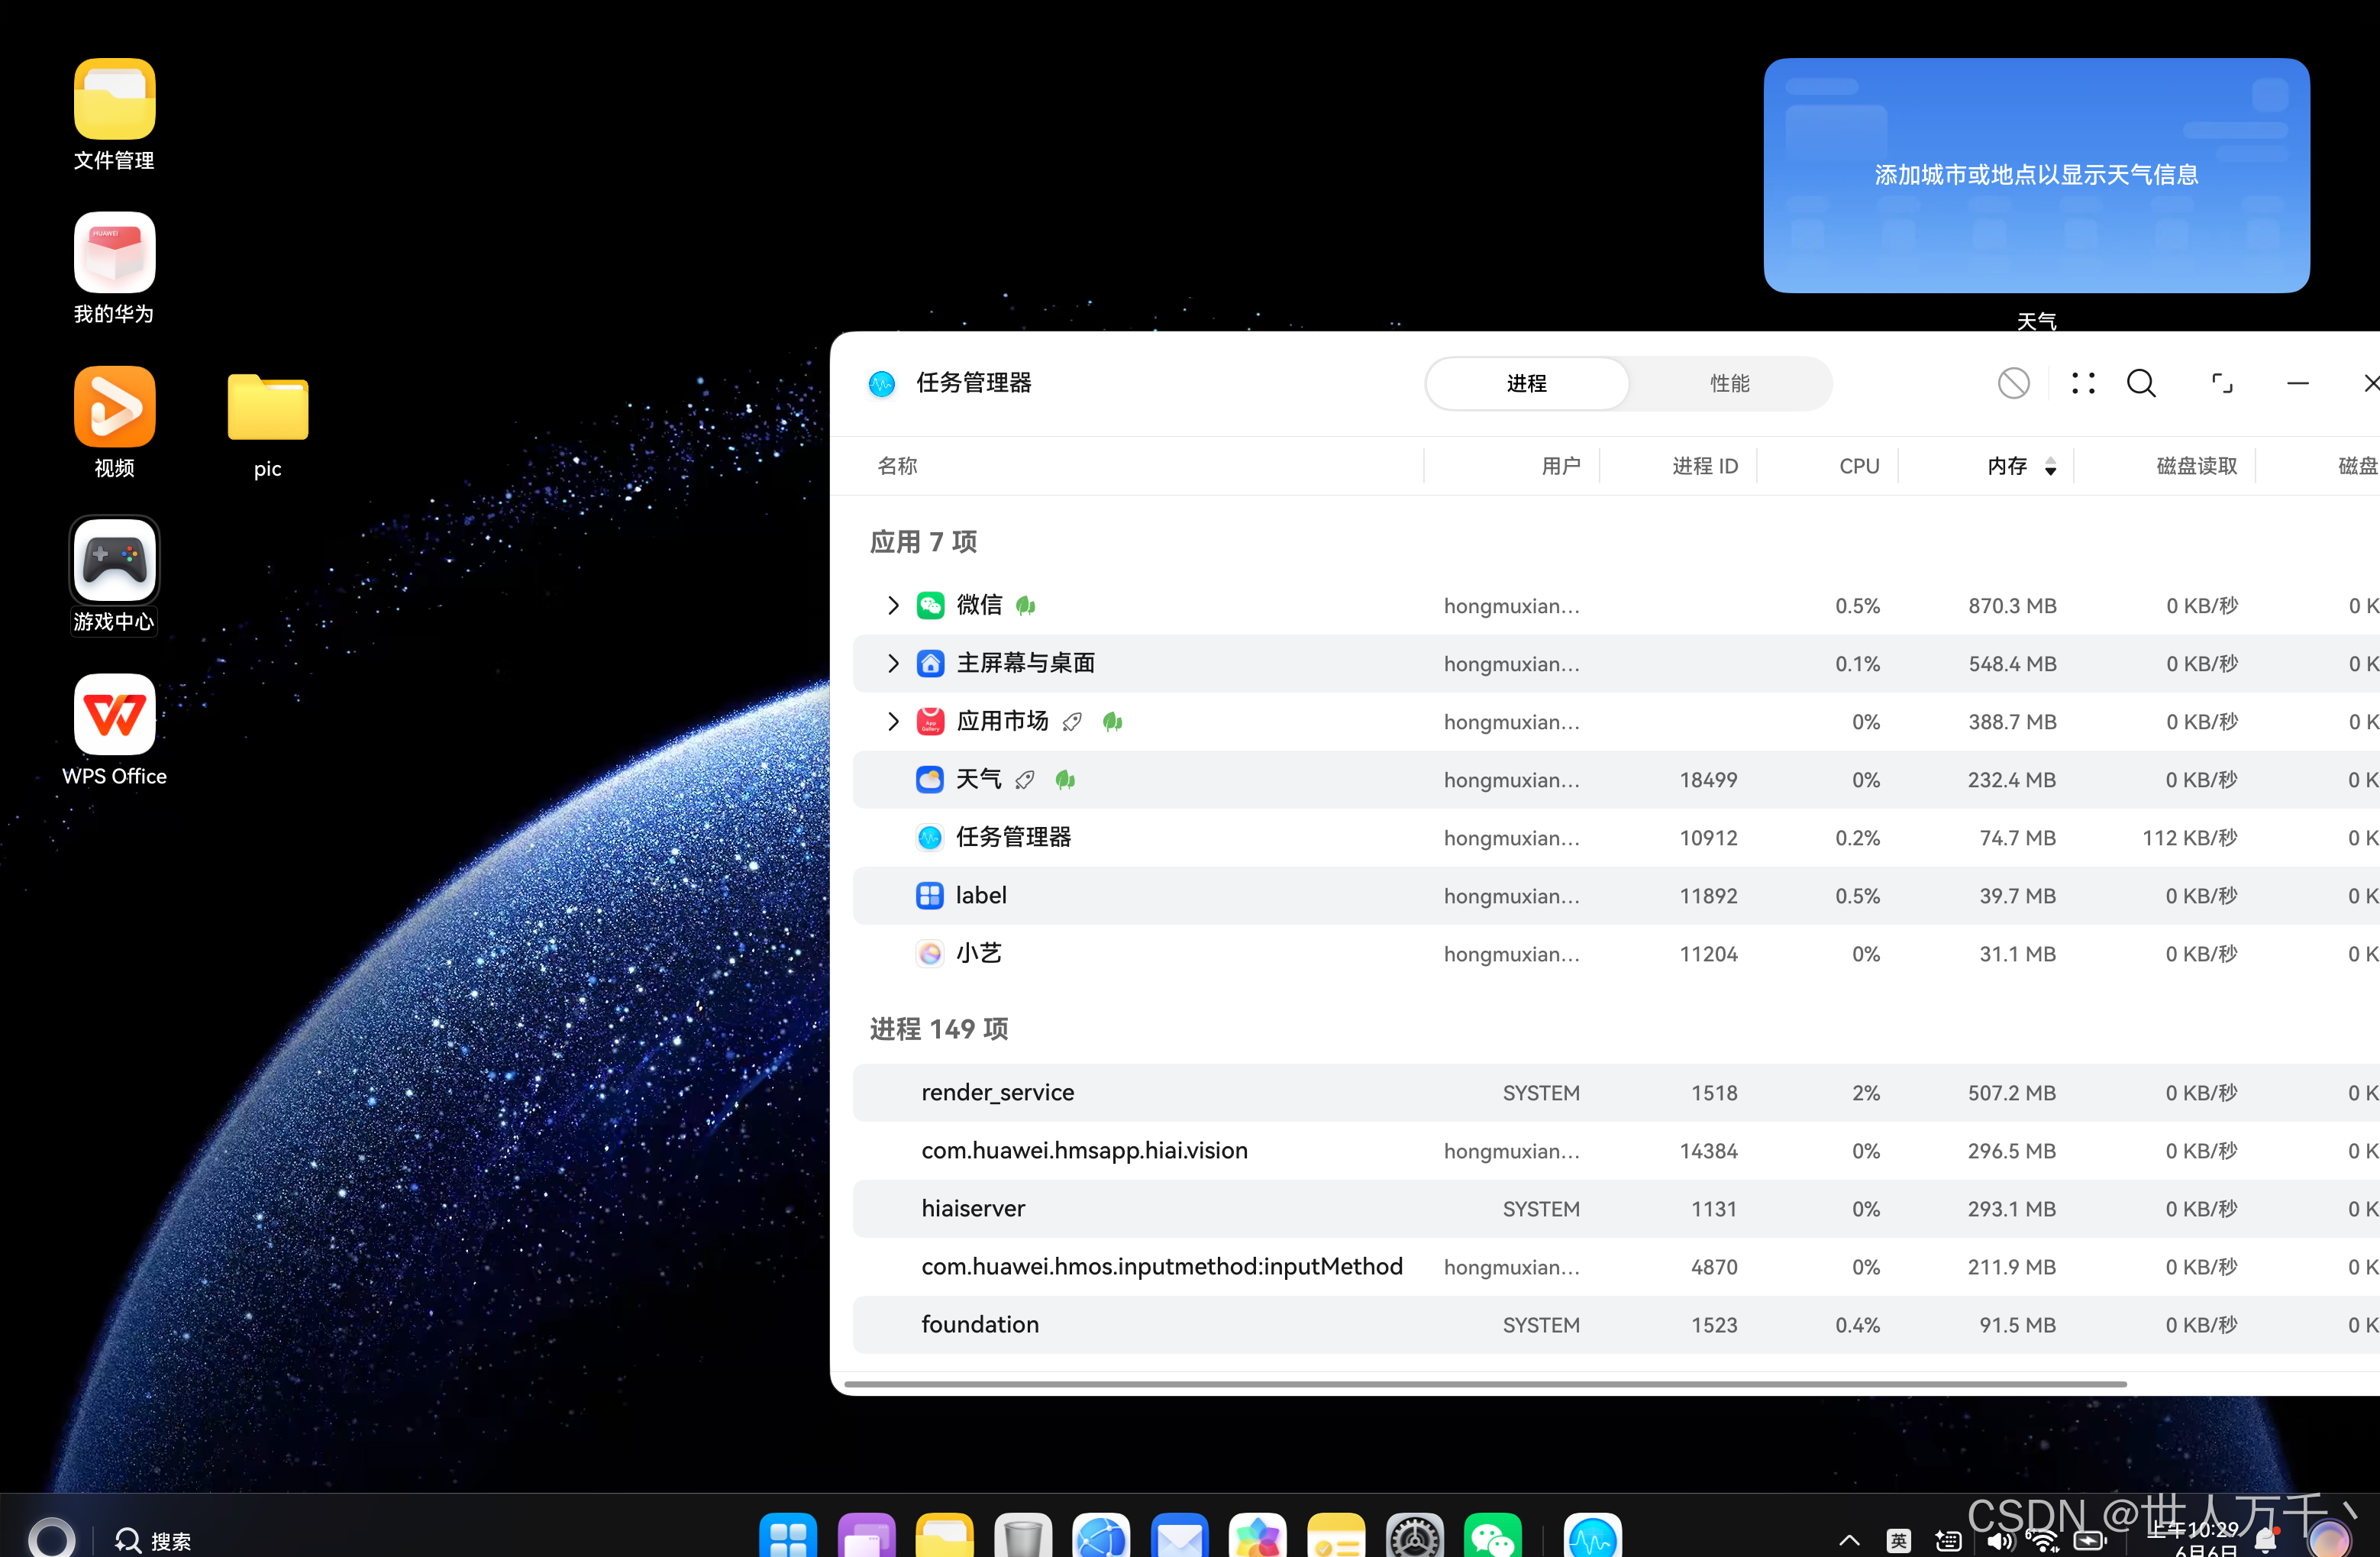
然而,许多开发者在实现子窗口功能时会遇到一个严重的问题:关闭主窗口后,子窗口不会自动销毁,导致:
- 应用进程残留后台
- 内存泄漏
- 资源无法释放
- 下次启动异常
二、问题现象分析
2.1 典型场景
┌─────────────────────────────────────────────────────┐
│                    问题场景                          │
├─────────────────────────────────────────────────────┤
│                                                     │
│  1. 用户打开主窗口                                   │
│  2. 用户点击按钮创建子窗口                            │
│  3. 用户直接关闭主窗口(不关闭子窗口)                  │
│  4. 子窗口仍然存在于桌面(真实场景)                   │
│  5. 应用进程无法正常退出                             │
│                                                     │
└─────────────────────────────────────────────────────┘
2.2 问题演示
为了演示这个问题,我们创建了一个模拟子窗口的示例应用:
// 模拟子窗口状态管理
@State subWindowCreated: boolean = false;

// 创建子窗口
createSubWindow(): void {
  this.subWindowCreated = true;
  console.log('子窗口创建成功');
}

// 销毁子窗口
destroySubWindow(): void {
  this.subWindowCreated = false;
  console.log('子窗口销毁成功');
}
2.3 问题代码对比
| 场景 | 代码 | 结果 |
|---|---|---|
| ❌ 错误 | 不在生命周期中销毁 | 子窗口残留 |
| ✅ 正确 | 在 aboutToDisappear() 中销毁 |
正常退出 |
三、根本原因分析
3.1 窗口生命周期机制
在鸿蒙系统中,每个窗口都是独立的对象实例,拥有自己的生命周期:
┌─────────────────────────────────────────────────────┐
│              窗口生命周期架构                        │
├─────────────────────────────────────────────────────┤
│                                                     │
│   Main Window                Sub Window             │
│   ┌─────────────┐           ┌─────────────┐        │
│   │ 创建        │           │ 创建        │        │
│   │ 显示        │           │ 显示        │        │
│   │ 交互        │           │ 交互        │        │
│   │ 关闭        │           │ ???         │        │
│   └─────────────┘           └─────────────┘        │
│                                                     │
│  主窗口关闭时,子窗口不会自动关闭!                    │
│                                                     │
└─────────────────────────────────────────────────────┘
3.2 内存泄漏路径
当主窗口关闭但子窗口未销毁时,会形成以下内存泄漏链:
主窗口关闭 → 子窗口引用未释放 → 相关资源占用 → 进程无法退出
3.3 资源泄漏示例
// ❌ 错误示例:创建后不保存引用,无法销毁
createSubWindow(): void {
  window.createWindow({
    name: 'SubWindow',
    windowType: 101,
    ctx: context
  }).then((subWin) => {
    // 没有保存引用!
    subWin.resize(400, 300);
    subWin.loadContent('pages/SubWindowContent');
  });
}
四、核心代码详解
4.1 代码一:模拟子窗口实现
@Entry
@Component
struct SubWindowDemo {
  // 子窗口状态
  @State subWindowCreated: boolean = false;
  @State subWindowCount: number = 0;

  // 创建模拟子窗口
  createSubWindow(): void {
    if (this.subWindowCreated) {
      this.destroySubWindow();
      return;
    }

    try {
      this.subWindowCreated = true;
      this.subWindowCount++;
      this.addLog(`模拟子窗口创建成功 (第${this.subWindowCount}个)`);
      this.addLog('⚠️ 问题演示:关闭主窗口后,子窗口不会自动销毁');
    } catch (e) {
      this.addLog('创建子窗口异常: ' + JSON.stringify(e));
    }
  }

  // 销毁子窗口
  destroySubWindow(): void {
    if (this.subWindowCreated) {
      this.subWindowCreated = false;
      this.addLog('子窗口销毁成功');
    }
  }

  // 生命周期:页面即将销毁
  aboutToDisappear(): void {
    this.addLog('页面即将销毁');
    // ⚠️ 故意不销毁子窗口,演示问题
    // this.destroySubWindow();
  }

  build() {
    Stack() {
      // 主内容区域
      Column() {
        // ... 主界面内容
      }

      // 模拟子窗口(浮动层)
      if (this.subWindowCreated) {
        Column() {
          Text('模拟子窗口')
          Button('关闭')
            .onClick(() => {
              this.destroySubWindow();
            })
        }
        .width(350)
        .height(220)
        .position({ x: 250, y: 180 })
        .shadow({
          radius: 20,
          color: 'rgba(0,0,0,0.3)'
        })
      }
    }
  }
}
代码说明:
- 使用
Stack组件实现浮动层效果 @State装饰器管理子窗口状态aboutToDisappear()生命周期中故意不销毁子窗口,用于演示问题
4.2 代码二:真实子窗口创建(需要权限)
import abilityAccessCtrl from '@ohos.abilityAccessCtrl';
import { Permissions } from '@ohos.abilityAccessCtrl';
import { common } from '@kit.AbilityKit';

@Entry
@Component
struct RealSubWindowDemo {
  private subWindow: window.Window | null = null;

  createRealSubWindow(): void {
    const context = getContext(this) as common.UIAbilityContext;
    const atManager = abilityAccessCtrl.createAtManager();

    // 请求悬浮窗权限
    const permissions: Array<Permissions> = ['ohos.permission.SYSTEM_FLOAT_WINDOW'];
    atManager.requestPermissionsFromUser(context, permissions)
      .then((result) => {
        if (result.authResults[0] === 0) {
          // 权限获取成功,创建真实子窗口
          this.doCreateSubWindow(context);
        } else {
          console.log('悬浮窗权限被拒绝');
        }
      });
  }

  doCreateSubWindow(context: common.UIAbilityContext): void {
    window.createWindow({
      name: 'RealSubWindow',
      windowType: 101,  // APP_SUB_WINDOW
      ctx: context
    }).then((subWin) => {
      this.subWindow = subWin;  // 保存引用
      subWin.resize(400, 300);
      subWin.moveTo(200, 150);
      subWin.loadContent('pages/SubWindowContent');
      subWin.show();
    });
  }

  aboutToDisappear(): void {
    // ✅ 正确:主动销毁子窗口
    if (this.subWindow) {
      this.subWindow.destroy().then(() => {
        console.log('子窗口销毁成功');
        this.subWindow = null;
      });
    }
  }
}
代码说明:
- 使用
abilityAccessCtrl请求悬浮窗权限 - 创建子窗口后保存引用到实例变量
- 在
aboutToDisappear()中主动销毁
4.3 代码三:多子窗口管理
@Entry
@Component
struct MultiSubWindowDemo {
  private subWindows: Array<window.Window> = [];
  private windowIdCounter: number = 0;

  createSubWindow(): void {
    const context = getContext(this) as common.UIAbilityContext;

    window.createWindow({
      name: `SubWindow_${this.windowIdCounter++}`,
      windowType: 101,
      ctx: context
    }).then((subWin) => {
      this.subWindows.push(subWin);
      subWin.resize(300 + Math.random() * 100, 200 + Math.random() * 100);
      subWin.moveTo(100 + Math.random() * 300, 100 + Math.random() * 200);
    });
  }

  destroySubWindow(index: number): void {
    if (this.subWindows[index]) {
      this.subWindows[index].destroy().then(() => {
        this.subWindows.splice(index, 1);
      });
    }
  }

  destroyAllSubWindows(): void {
    const destroyPromises = this.subWindows.map((win) => {
      return win.destroy().catch(() => {});
    });

    Promise.all(destroyPromises).then(() => {
      this.subWindows = [];
    });
  }

  aboutToDisappear(): void {
    this.destroyAllSubWindows();
  }
}
代码说明:
- 使用数组管理多个子窗口
- 批量销毁时使用
Promise.all()并行处理 - 确保所有子窗口都被正确销毁
4.4 代码四:权限申请与降级处理
@Entry
@Component
struct PermissionDemo {
  @State hasPermission: boolean = false;
  @State useMockWindow: boolean = false;

  checkPermission(): void {
    const context = getContext(this) as common.UIAbilityContext;
    const atManager = abilityAccessCtrl.createAtManager();

    atManager.checkAccessToken('ohos.permission.SYSTEM_FLOAT_WINDOW')
      .then((result) => {
        this.hasPermission = result === abilityAccessCtrl.GrantStatus.PERMISSION_GRANTED;
        if (!this.hasPermission) {
          // 没有权限,提示用户或使用模拟方案
          this.showPermissionDialog();
        }
      });
  }

  showPermissionDialog(): void {
    // 显示权限申请提示
    AlertDialog.show({
      message: '需要悬浮窗权限以创建子窗口',
      primaryButton: {
        value: '申请权限',
        action: () => {
          this.requestPermission();
        }
      },
      secondaryButton: {
        value: '使用模拟窗口',
        action: () => {
          this.useMockWindow = true;
        }
      }
    });
  }

  requestPermission(): void {
    const context = getContext(this) as common.UIAbilityContext;
    const atManager = abilityAccessCtrl.createAtManager();

    atManager.requestPermissionsFromUser(context, ['ohos.permission.SYSTEM_FLOAT_WINDOW'])
      .then((result) => {
        this.hasPermission = result.authResults[0] === 0;
      });
  }

  build() {
    Column() {
      if (this.hasPermission) {
        // 使用真实子窗口
        RealSubWindow();
      } else if (this.useMockWindow) {
        // 使用模拟子窗口
        MockSubWindow();
      } else {
        // 提示用户选择
        Text('请先获取悬浮窗权限或使用模拟窗口');
      }
    }
  }
}
代码说明:
- 先检查权限状态
- 根据权限状态决定使用真实还是模拟子窗口
- 提供优雅降级方案
五、完整解决方案
5.1 方案一:模拟子窗口(推荐用于开发)
实现步骤:
1. 使用 Stack 组件作为容器
2. 使用 @State 管理子窗口显示状态
3. 使用 position() 设置子窗口位置
4. 使用 shadow() 添加浮动效果
优点:
- 无需申请权限
- 开发调试方便
- 兼容性好
缺点:
- 不是真正的系统窗口
- 无法超出应用边界
5.2 方案二:真实子窗口(正式发布)
实现步骤:
1. 在 module.json5 中声明权限
2. 运行时请求权限
3. 创建子窗口并保存引用
4. 在生命周期中销毁
注意事项:
- 需要企业签名才能正常运行
- 需要处理权限被拒绝的情况
- 需要妥善管理窗口引用
5.3 方案三:混合方案(推荐)
// 根据权限状态选择方案
if (hasPermission) {
  // 使用真实子窗口
  this.createRealSubWindow();
} else {
  // 使用模拟子窗口
  this.createMockSubWindow();
}
六、最佳实践总结
6.1 子窗口管理规范
// ✅ 推荐做法
class WindowManager {
  private windows: Array<window.Window> = [];

  createWindow(options): Promise<window.Window> {
    return window.createWindow(options)
      .then((win) => {
        this.windows.push(win);
        return win;
      });
  }

  destroyWindow(win: window.Window): void {
    const index = this.windows.indexOf(win);
    if (index !== -1) {
      this.windows.splice(index, 1);
    }
    win.destroy();
  }

  destroyAll(): void {
    this.windows.forEach((win) => {
      win.destroy().catch(() => {});
    });
    this.windows = [];
  }
}
6.2 问题排查流程
┌─────────────────────────────────────────────────────┐
│              子窗口问题排查流程                      │
├─────────────────────────────────────────────────────┤
│                                                     │
│  问题:子窗口不销毁                                 │
│       │                                            │
│       ▼                                            │
│  1. 检查是否保存了子窗口引用                         │
│       │                                            │
│       ▼                                            │
│  2. 检查 aboutToDisappear() 中是否调用 destroy()    │
│       │                                            │
│       ▼                                            │
│  3. 检查是否有异常捕获导致销毁失败                    │
│       │                                            │
│       ▼                                            │
│  4. 添加日志确认销毁流程是否执行                      │
│                                                     │
└─────────────────────────────────────────────────────┘
6.3 性能优化建议
| 优化项 | 说明 |
|---|---|
| 批量销毁 | 使用 Promise.all() 并行销毁多个窗口 |
| 引用管理 | 及时清空已销毁窗口的引用 |
| 内存监控 | 使用 DevEco Studio 内存分析工具 |
| 延迟销毁 | 如果频繁创建销毁,考虑对象池复用 |
七、总结
核心要点
| 要点 | 说明 |
|---|---|
| 问题本质 | 子窗口是独立实例,不会随主窗口自动销毁 |
| 解决方案 | 在 aboutToDisappear() 中主动调用 destroy() |
| 关键代码 | 保存子窗口引用并在生命周期中销毁 |
| 权限问题 | 悬浮窗权限需要企业签名或使用模拟方案 |
代码检查清单
- 子窗口创建后保存了引用
- 在
aboutToDisappear()中销毁子窗口 - 处理了销毁失败的异常情况
- 清空了销毁后的引用
- 考虑了权限被拒绝的降级方案
完整流程图
┌─────────────┐     ┌─────────────┐     ┌─────────────┐
│   启动应用  │ ──> │ 创建子窗口  │ ──> │ 保存引用    │
└─────────────┘     └─────────────┘     └─────────────┘
                                              │
                                              ▼
                                    ┌─────────────┐
                                    │  用户操作   │
                                    └─────────────┘
                                              │
                              ┌───────────────┴───────────────┐
                              │                               │
                              ▼                               ▼
                       ┌─────────────┐                 ┌─────────────┐
                       │ 手动关闭    │                 │ 关闭主窗口  │
                       │ 子窗口      │                 │             │
                       └─────────────┘                 └─────────────┘
                              │                               │
                              │                               ▼
                              │                      ┌─────────────┐
                              │                      │aboutToDisappear│
                              │                      └─────────────┘
                              │                               │
                              └───────────┬───────────────────┘
                                          ▼
                                    ┌─────────────┐
                                    │ destroy()   │
                                    │ 销毁子窗口  │
                                    └─────────────┘
                                          │
                                          ▼
                                    ┌─────────────┐
                                    │ 清空引用    │
                                    │ 释放资源    │
                                    └─────────────┘
通过本文的讲解,你应该已经全面理解了鸿蒙PC子窗口生命周期管理的问题和解决方案。核心要点是:子窗口不会随主窗口自动销毁,必须在 aboutToDisappear() 生命周期中主动调用 destroy() 方法。
在实际开发中,建议使用模拟子窗口进行开发调试,正式发布时根据权限状态选择真实子窗口或继续使用模拟方案,确保用户体验的一致性。

作为“人工智能6S店”的官方数字引擎,为AI开发者与企业提供一个覆盖软硬件全栈、一站式门户。
更多推荐


 1
1 0
0- 0


 已为社区贡献6条内容

所有评论(0)