
鸿蒙ArkUI实战:通讯录与字母索引
通讯录是移动端最常见的页面类型之一。本文用 ArkUI 构建一个完整通讯录——分组联系人列表、AlphabetIndexer 字母索引快速跳转、实时搜索筛选、以及联系人详情弹窗。AlphabetIndexer 是 ArkUI 内置的字母索引导航组件,本文将详细拆解其用法。
一、我们要做什么
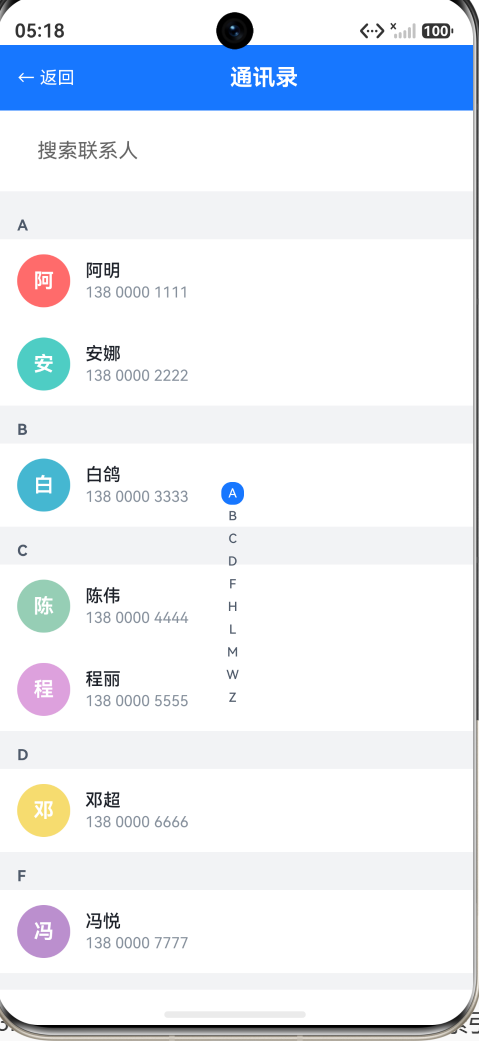
一个"通讯录"页面,包含四个核心功能:
- 分组联系人列表 — 按姓名首字母 A-Z 分组,每组有灰色 section header,每个联系人显示圆形头像(首字母色块)+ 姓名 + 电话
- AlphabetIndexer 字母索引 — 右侧纵向字母栏,点击/滑动字母时列表跳转到对应分组,伴随蓝色弹出式字母提示
- 实时搜索 — 顶部搜索框输入关键字,实时筛选匹配的联系人,搜索时隐藏字母索引
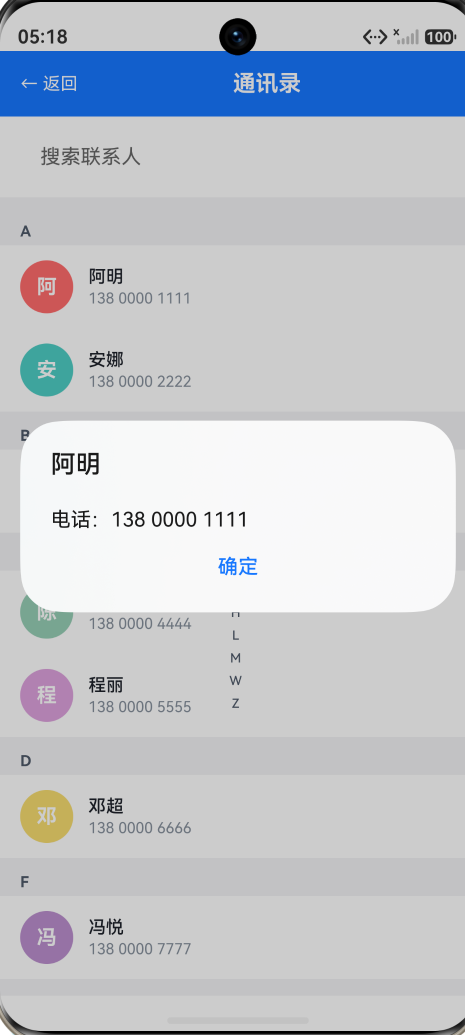
- 联系人详情 — 点击联系人行 → 弹窗显示姓名和电话
交互点:
- 滚动浏览 — 分组列表,每组有 sticky 感的 section header(灰色背景 + 粗体字母)
- 字母索引跳转 — 点击/滑动右侧字母栏,列表自动滚动到对应分组
- 搜索筛选 — 输入关键字实时过滤,字母索引自动隐藏
- 查看详情 — 点击联系人弹窗展示完整信息
二、数据结构:分组模型
class Contact {
  name: string;
  phone: string;
  color: string;  // 头像背景色(预分配,保证同一人颜色不变)
}

class ContactGroup {
  letter: string;       // 分组字母 "A", "B", "C" ...
  contacts: Contact[];  // 该分组下的联系人
}
两层嵌套的数据结构天然映射到 UI 的两层嵌套:
ContactGroup→ 一个 section(header + items)Contact→ 一个联系人行
模拟数据覆盖了 10 个字母分组、共 19 个联系人:
const CONTACT_GROUPS: ContactGroup[] = [
  new ContactGroup('A', [
    new Contact('阿明', '138 0000 1111', AVATAR_COLORS[0]),
    new Contact('安娜', '138 0000 2222', AVATAR_COLORS[1]),
  ]),
  new ContactGroup('B', [
    new Contact('白鸽', '138 0000 3333', AVATAR_COLORS[2]),
  ]),
  // ... C, D, F, H, L, M, W, Z
];
为什么颜色预先分配而不是随机生成? 每次重新渲染时随机颜色会变化——用户搜索后清除关键字,联系人的头像颜色会变,视觉上会产生"闪变"感。预分配颜色保证了数据不变 → 颜色不变。
三、头像设计:首字母色块
Text(contact.name.charAt(0))
  .fontSize(FontSize.MEDIUM)
  .fontColor(Color.White)
  .fontWeight(FontWeight.Bold)
  .width(42)
  .height(42)
  .borderRadius(21)          // 圆形 = 宽度的一半
  .backgroundColor(contact.color)
  .textAlign(TextAlign.Center)
42×42 的圆形色块,文字居中,白色粗体首字母。这是在没有真实头像图片时最常用的头像替代方案——Google Contacts、微信、Telegram 等应用的默认头像都是这个模式。
10 种颜色循环使用:
const AVATAR_COLORS: string[] = [
  '#FF6B6B', '#4ECDC4', '#45B7D1', '#96CEB4', '#DDA0DD',
  '#F7DC6F', '#BB8FCE', '#85C1E9', '#F0B27A', '#82E0AA'
];
19 个联系人平分 10 种颜色,相邻联系人颜色不同,视觉上有足够的区分度。颜色选择策略:明亮 + 饱和度适中 + 白色文字对比度足够(避免了黄色太浅、深蓝太暗等问题)。
四、交互点1:分组列表的嵌套 ForEach
List({ scroller: this.scroller }) {
  ForEach(this.getDisplayGroups(), (group: ContactGroup, groupIndex: number) => {
    // Section header
    ListItem() {
      Text(group.letter)
        .fontSize(FontSize.CAPTION)
        .fontColor(AppColors.TEXT_SECONDARY)
        .fontWeight(FontWeight.Bold)
        .width('100%')
        .padding({ left: Spacing.LG, top: Spacing.MD, bottom: Spacing.XS })
        .backgroundColor(AppColors.BACKGROUND)
    }

    // Contact items
    ForEach(group.contacts, (contact: Contact) => {
      ListItem() {
        Row() {
          Text(contact.name.charAt(0))   // 头像
            .fontSize(FontSize.MEDIUM)
            .fontColor(Color.White)
            .fontWeight(FontWeight.Bold)
            .width(42).height(42)
            .borderRadius(21)
            .backgroundColor(contact.color)
            .textAlign(TextAlign.Center)

          Column() {
            Text(contact.name)            // 姓名
              .fontSize(FontSize.BODY)
              .fontColor(AppColors.TEXT_PRIMARY)
              .fontWeight(FontWeight.Medium)
            Text(contact.phone)           // 电话
              .fontSize(FontSize.CAPTION)
              .fontColor(AppColors.TEXT_TERTIARY)
              .margin({ top: 2 })
          }
          .alignItems(HorizontalAlign.Start)
          .margin({ left: Spacing.MD })
          .layoutWeight(1)
        }
        .width('100%')
        .padding({ left: Spacing.LG, right: Spacing.LG, top: Spacing.MD, bottom: Spacing.MD })
        .onClick(() => { this.showContactDetail(contact); })
      }
    })
  }, (group: ContactGroup) => group.letter)
}
嵌套 ForEach 的 key 函数
外层 ForEach 使用 (group: ContactGroup) => group.letter 作为 key。这意味着当数据变化时(如搜索过滤),ArkUI 会根据 group.letter 判断哪些分组是新增/删除/保留的,从而精确地复用 ListItem,而不是全部重建。
内层 ForEach 的 contacts 没有显式指定 key——ArkUI 会使用默认的索引 key。在搜索场景中,过滤后的 contacts 数组引用变了,所以内层 ListItem 会重建,这是正确的行为。
List vs Scroll 的选择
通讯录用 List 而不是 Scroll,因为:
- List 支持
scrollToIndex()—— 这是字母索引跳转的关键 API - List 有虚拟滚动,大量联系人时性能更好
- ListItem 是 List 的专用子组件,提供更好的复用机制
五、交互点2:AlphabetIndexer 字母索引跳转
AlphabetIndexer 基础用法
AlphabetIndexer({
  arrayValue: this.getAlphabet(),  // ['A','B','C','D','F','H','L','M','W','Z']
  selected: this.selectedIndex     // 当前选中字母的索引
})
  .itemSize(18)                                    // 每个字母的触控区域大小
  .color(AppColors.TEXT_SECONDARY)                 // 未选中字母颜色
  .selectedColor(Color.White)                      // 选中字母颜色(白字)
  .popupColor(AppColors.PRIMARY)                   // 弹出气泡背景色(蓝底)
  .selectedBackgroundColor(AppColors.PRIMARY)      // 选中项背景色(蓝圈)
  .margin({ right: 4 })
  .onSelected((index: number) => {
    this.selectedIndex = index;
    this.scrollToLetter(index);
  })
arrayValue 动态生成
private getAlphabet(): string[] {
  const letters: string[] = [];
  for (let i = 0; i < CONTACT_GROUPS.length; i++) {
    letters.push(CONTACT_GROUPS[i].letter);
  }
  return letters;
}
只显示有联系人的字母,而不是 A-Z 全部 26 个。这避免了用户点击"K"却跳转到空白分组的尴尬。
滚动跳转的核心:scrollToIndex
private groupStartIndices: number[] = [];

private computeGroupIndices(): void {
  this.groupStartIndices = [];
  let count = 0;
  for (let i = 0; i < CONTACT_GROUPS.length; i++) {
    this.groupStartIndices.push(count);
    count += 1 + CONTACT_GROUPS[i].contacts.length;
  }
}

private scrollToLetter(index: number): void {
  if (index >= 0 && index < this.groupStartIndices.length) {
    this.scroller.scrollToIndex(this.groupStartIndices[index]);
  }
}
关键点:groupStartIndices 数组存储了每个分组的 section header 在 List 中的扁平索引。
计算逻辑:
- 分组 A 有 2 个联系人 → 占 3 个 ListItem(1 header + 2 items)→ 起始索引 0
- 分组 B 有 1 个联系人 → 占 2 个 ListItem → 起始索引 3
- 分组 C 有 2 个联系人 → 占 3 个 ListItem → 起始索引 5
- …
scrollToIndex(n) 会将 List 滚动到第 n 个 ListItem 的位置,让对应分组的 section header 出现在列表顶部。
为什么在 aboutToAppear 中计算?
computeGroupIndices() 在 aboutToAppear 生命周期中调用一次。因为 CONTACT_GROUPS 是常量,索引只需要计算一次。不需要在每个 onSelected 回调中动态计算。
六、交互点3:实时搜索筛选
private getDisplayGroups(): ContactGroup[] {
  const keyword = this.searchText.trim();
  if (keyword.length === 0) {
    return CONTACT_GROUPS;  // 无搜索词 → 显示全部
  }
  const result: ContactGroup[] = [];
  for (let i = 0; i < CONTACT_GROUPS.length; i++) {
    const group = CONTACT_GROUPS[i];
    const matched: Contact[] = [];
    for (let j = 0; j < group.contacts.length; j++) {
      if (group.contacts[j].name.indexOf(keyword) >= 0) {
        matched.push(group.contacts[j]);
      }
    }
    if (matched.length > 0) {
      result.push(new ContactGroup(group.letter, matched));
    }
  }
  return result;
}
搜索逻辑
- 输入为空 → 返回原始数据引用(不是拷贝),保留 AlphabetIndexer 和分组结构
- 输入非空 → 遍历所有分组,用
indexOf做子串匹配(“明” 能匹配 “阿明”) - 匹配到的联系人收集到新的 ContactGroup 中,保留原字母分组
- 分组内没有匹配项 → 该分组不出现在结果中
搜索时隐藏 AlphabetIndexer
if (this.searchText.trim().length === 0) {
  AlphabetIndexer({ ... })
}
搜索状态下字母索引自动隐藏——搜索结果是一个被过滤过的分组列表,原来的字母索引不再准确(比如搜索"伟"只显示 C 组的陈伟,此时点击字母栏的 A 没有意义)。
为什么用 indexOf 而不是 includes?
两者的语义相同(都是子串匹配),但 indexOf 兼容性更广。在 ArkTS 的严格模式下,String.prototype.includes 在某些 API 版本中可能不可用。indexOf 是 ES5 API,兼容性最好。
七、交互点4:联系人详情弹窗
private showContactDetail(contact: Contact): void {
  promptAction.showDialog({
    title: contact.name,
    message: `电话:${contact.phone}`,
    buttons: [
      { text: '确定', color: AppColors.PRIMARY }
    ]
  });
}
点击联系人弹出系统对话框,展示姓名(标题)+ 电话(正文)。真实应用中可以扩展为:拨打/发短信/复制号码/查看头像大图。
八、搜索框的设计
Row() {
  TextInput({ placeholder: '搜索联系人', text: $$this.searchText })
    .fontSize(FontSize.BODY)
    .layoutWeight(1)
    .backgroundColor(Color.Transparent)
}
.width('100%')
.padding({ left: Spacing.LG, right: Spacing.LG, top: Spacing.MD, bottom: Spacing.MD })
.backgroundColor(Color.White)
.margin({ bottom: Spacing.SM })
搜索框放在白色 Row 中,位于蓝色 Header 和联系人列表之间。$$this.searchText 双向绑定——用户输入时 searchText 自动更新,触发 getDisplayGroups() 重新计算,列表即时刷新。
backgroundColor(Color.Transparent) 让 TextInput 的背景融入白色 Row,视觉上看起来像是一个整体搜索栏而不是独立的输入框。
九、Scroll 布局:Stack 叠加 AlphabetIndexer
Stack() {
  List({ scroller: this.scroller }) { ... }
    .width('100%')
    .height('100%')
    .backgroundColor(Color.White)
    .scrollBar(BarState.Off)          // 隐藏默认滚动条,避免和字母索引重叠
    .edgeEffect(EdgeEffect.Spring)    // 弹性回弹效果

  if (this.searchText.trim().length === 0) {
    AlphabetIndexer({ ... })
      .margin({ right: 4 })          // 右侧留 4vp 呼吸空间
  }
}
.layoutWeight(1)
Stack 的作用
Stack 将两个子组件叠放在同一空间内:
- 底层:List(全宽全高)
- 顶层:AlphabetIndexer(自动靠右对齐,垂直居中)
AlphabetIndexer 默认在 Stack 中靠右对齐(Alignment.End 的默认行
为)。无需手动设置 position 或 offset。
隐藏滚动条
scrollBar(BarState.Off) 关闭 List 的默认滚动条——字母索引本身就是一个"可视化滚动条",两者共存会产生视觉冲突。用户通过 AlphabetIndexer 的字母位置就能直观感知当前在列表中的位置(选中字母的蓝底高亮 = 当前位置指示器)。
edgeEffect(EdgeEffect.Spring) 弹性效果
列表滚动到顶部/底部时产生弹性回弹动画,和 iOS 通讯录的体验一致。
十、完整代码结构
ContactsPage (~230行)
├── 数据层
│   ├── class Contact                    — 联系人模型
│   ├── class ContactGroup               — 分组模型
│   ├── AVATAR_COLORS[10]                — 头像色板
│   └── CONTACT_GROUPS                   — 模拟数据(10组19人)
├── 状态层
│   ├── @State searchText                — 搜索关键字
│   └── @State selectedIndex             — 字母索引选中位
├── 工具方法
│   ├── computeGroupIndices()            — 计算分组起始索引
│   ├── scrollToLetter(index)            — 滚动到指定字母
│   └── getAlphabet()                    — 获取可用字母列表
├── 业务方法
│   ├── getDisplayGroups()               — 获取展示数据(含搜索过滤)
│   └── showContactDetail(contact)       — 弹窗展示联系人
└── UI 层
    ├── Header(返回 + 标题)
    ├── SearchBar(TextInput)
    └── Stack
        ├── List(嵌套 ForEach)
        │   ├── ListItem — section header
        │   └── ListItem — contact row(头像 + 姓名 + 电话)
        └── AlphabetIndexer(条件渲染)
十一、完整代码
import { AppColors, BorderRadius, FontSize, Spacing } from '../common/Constants';
import { promptAction, router } from '@kit.ArkUI';

class Contact {
  name: string;
  phone: string;
  color: string;

  constructor(name: string, phone: string, color: string) {
    this.name = name;
    this.phone = phone;
    this.color = color;
  }
}

class ContactGroup {
  letter: string;
  contacts: Contact[];

  constructor(letter: string, contacts: Contact[]) {
    this.letter = letter;
    this.contacts = contacts;
  }
}

const AVATAR_COLORS: string[] = ['#FF6B6B', '#4ECDC4', '#45B7D1', '#96CEB4', '#DDA0DD',
  '#F7DC6F', '#BB8FCE', '#85C1E9', '#F0B27A', '#82E0AA'];

const CONTACT_GROUPS: ContactGroup[] = [
  new ContactGroup('A', [
    new Contact('阿明', '138 0000 1111', AVATAR_COLORS[0]),
    new Contact('安娜', '138 0000 2222', AVATAR_COLORS[1]),
  ]),
  new ContactGroup('B', [
    new Contact('白鸽', '138 0000 3333', AVATAR_COLORS[2]),
  ]),
  new ContactGroup('C', [
    new Contact('陈伟', '138 0000 4444', AVATAR_COLORS[3]),
    new Contact('程丽', '138 0000 5555', AVATAR_COLORS[4]),
  ]),
  new ContactGroup('D', [
    new Contact('邓超', '138 0000 6666', AVATAR_COLORS[5]),
  ]),
  new ContactGroup('F', [
    new Contact('冯悦', '138 0000 7777', AVATAR_COLORS[6]),
  ]),
  new ContactGroup('H', [
    new Contact('黄磊', '138 0000 8888', AVATAR_COLORS[7]),
    new Contact('韩雪', '138 0000 9999', AVATAR_COLORS[8]),
  ]),
  new ContactGroup('L', [
    new Contact('李华', '138 0001 0000', AVATAR_COLORS[9]),
    new Contact('刘洋', '138 0001 1000', AVATAR_COLORS[0]),
    new Contact('林芳', '138 0001 2000', AVATAR_COLORS[1]),
  ]),
  new ContactGroup('M', [
    new Contact('马丽', '138 0001 3000', AVATAR_COLORS[2]),
  ]),
  new ContactGroup('W', [
    new Contact('王芳', '138 0001 4000', AVATAR_COLORS[3]),
    new Contact('吴鑫', '138 0001 5000', AVATAR_COLORS[4]),
  ]),
  new ContactGroup('Z', [
    new Contact('张伟', '138 0001 6000', AVATAR_COLORS[5]),
    new Contact('赵敏', '138 0001 7000', AVATAR_COLORS[6]),
    new Contact('周杰', '138 0001 8000', AVATAR_COLORS[7]),
  ]),
];

@Entry
@Component
struct ContactsPage {
  @State searchText: string = '';
  @State selectedIndex: number = 0;
  private scroller: Scroller = new Scroller();

  aboutToAppear(): void {
    this.computeGroupIndices();
  }

  private groupStartIndices: number[] = [];

  private computeGroupIndices(): void {
    this.groupStartIndices = [];
    let count = 0;
    for (let i = 0; i < CONTACT_GROUPS.length; i++) {
      this.groupStartIndices.push(count);
      count += 1 + CONTACT_GROUPS[i].contacts.length;
    }
  }

  private scrollToLetter(index: number): void {
    if (index >= 0 && index < this.groupStartIndices.length) {
      this.scroller.scrollToIndex(this.groupStartIndices[index]);
    }
  }

  private getDisplayGroups(): ContactGroup[] {
    const keyword = this.searchText.trim();
    if (keyword.length === 0) {
      return CONTACT_GROUPS;
    }
    const result: ContactGroup[] = [];
    for (let i = 0; i < CONTACT_GROUPS.length; i++) {
      const group = CONTACT_GROUPS[i];
      const matched: Contact[] = [];
      for (let j = 0; j < group.contacts.length; j++) {
        if (group.contacts[j].name.indexOf(keyword) >= 0) {
          matched.push(group.contacts[j]);
        }
      }
      if (matched.length > 0) {
        result.push(new ContactGroup(group.letter, matched));
      }
    }
    return result;
  }

  private getAlphabet(): string[] {
    const letters: string[] = [];
    for (let i = 0; i < CONTACT_GROUPS.length; i++) {
      letters.push(CONTACT_GROUPS[i].letter);
    }
    return letters;
  }

  private showContactDetail(contact: Contact): void {
    promptAction.showDialog({
      title: contact.name,
      message: `电话:${contact.phone}`,
      buttons: [
        { text: '确定', color: AppColors.PRIMARY }
      ]
    });
  }

  build() {
    Column() {
      Row() {
        Text('← 返回')
          .fontSize(FontSize.BODY)
          .fontColor(Color.White)
          .onClick(() => { router.back(); })
        Text('通讯录')
          .fontSize(FontSize.TITLE)
          .fontWeight(FontWeight.Bold)
          .fontColor(Color.White)
          .layoutWeight(1)
          .textAlign(TextAlign.Center)
      }
      .width('100%')
      .height(52)
      .backgroundColor(AppColors.PRIMARY)
      .padding({ left: Spacing.LG, right: Spacing.LG })

      Row() {
        TextInput({ placeholder: '搜索联系人', text: $$this.searchText })
          .fontSize(FontSize.BODY)
          .layoutWeight(1)
          .backgroundColor(Color.Transparent)
      }
      .width('100%')
      .padding({ left: Spacing.LG, right: Spacing.LG, top: Spacing.MD, bottom: Spacing.MD })
      .backgroundColor(Color.White)
      .margin({ bottom: Spacing.SM })

      Stack() {
        List({ scroller: this.scroller }) {
          ForEach(this.getDisplayGroups(), (group: ContactGroup, groupIndex: number) => {
            ListItem() {
              Text(group.letter)
                .fontSize(FontSize.CAPTION)
                .fontColor(AppColors.TEXT_SECONDARY)
                .fontWeight(FontWeight.Bold)
                .width('100%')
                .padding({ left: Spacing.LG, top: Spacing.MD, bottom: Spacing.XS })
                .backgroundColor(AppColors.BACKGROUND)
            }

            ForEach(group.contacts, (contact: Contact) => {
              ListItem() {
                Row() {
                  Text(contact.name.charAt(0))
                    .fontSize(FontSize.MEDIUM)
                    .fontColor(Color.White)
                    .fontWeight(FontWeight.Bold)
                    .width(42).height(42)
                    .borderRadius(21)
                    .backgroundColor(contact.color)
                    .textAlign(TextAlign.Center)

                  Column() {
                    Text(contact.name)
                      .fontSize(FontSize.BODY)
                      .fontColor(AppColors.TEXT_PRIMARY)
                      .fontWeight(FontWeight.Medium)
                    Text(contact.phone)
                      .fontSize(FontSize.CAPTION)
                      .fontColor(AppColors.TEXT_TERTIARY)
                      .margin({ top: 2 })
                  }
                  .alignItems(HorizontalAlign.Start)
                  .margin({ left: Spacing.MD })
                  .layoutWeight(1)
                }
                .width('100%')
                .padding({ left: Spacing.LG, right: Spacing.LG, top: Spacing.MD, bottom: Spacing.MD })
                .onClick(() => { this.showContactDetail(contact); })
              }
            })
          }, (group: ContactGroup) => group.letter)
        }
        .width('100%')
        .height('100%')
        .backgroundColor(Color.White)
        .scrollBar(BarState.Off)
        .edgeEffect(EdgeEffect.Spring)

        if (this.searchText.trim().length === 0) {
          AlphabetIndexer({
            arrayValue: this.getAlphabet(),
            selected: this.selectedIndex
          })
            .itemSize(18)
            .color(AppColors.TEXT_SECONDARY)
            .selectedColor(Color.White)
            .popupColor(AppColors.PRIMARY)
            .selectedBackgroundColor(AppColors.PRIMARY)
            .margin({ right: 4 })
            .onSelected((index: number) => {
              this.selectedIndex = index;
              this.scrollToLetter(index);
            })
        }
      }
      .layoutWeight(1)
      .width('100%')
    }
    .width('100%')
    .height('100%')
    .backgroundColor(AppColors.BACKGROUND)
  }
}
十二、常见面试题 / 踩坑点
12.1 AlphabetIndexer 的 arrayValue 应该放什么?
只放当前数据中实际存在的字母,而不是固定的 [‘A’, ‘B’, ‘C’, … ‘Z’]。如果放了没有对应数据的字母,用户点击后会跳转到空白区域,体验很差。
可以在 getAlphabet() 中动态从 CONTACT_GROUPS 提取字母列表。数据变化时(如搜索过滤),AlphabetIndexer 也会自动更新。
12.2 scrollToIndex 的参数是什么?
是 ListItem 在扁平列表中的索引,不是分组编号。需要预先计算每个分组的 section header 在 List 中的位置。计算公式:
groupStartIndices[0] = 0
groupStartIndices[i] = groupStartIndices[i-1] + 1 + contacts[i-1].length
12.3 为什么搜索时隐藏 AlphabetIndexer 而不是更新它?
搜索结果是数据子集。如果更新 AlphabetIndexer 的字母列表,用户点击"Z"时可能只找到一个联系人——这和字母索引"快速导航到大量数据中某个位置"的定位不符。
搜索状态下的交互模式应该是"输入 → 过滤 → 点击结果",不需要字母索引辅助。隐藏索引让用户感知到"当前是搜索模式"。
12.4 Stack 中的 AlphabetIndexer 为什么不需要手动定位?
AlphabetIndexer 自带右对齐行为。在 Stack 中,子组件默认居中对齐,但 AlphabetIndexer 内部有自动定位逻辑,会吸附到 Stack 的右侧边缘。唯一需要的手动样式是 .margin({ right: 4 }) 给右侧留一点呼吸空间。
12.5 $$this.searchText 和 this.searchText.trim() 的配合
TextInput 的 $$ 双向绑定会自动更新 searchText,但搜索逻辑使用 this.searchText.trim()。用户输入空格时,trim() 后为空字符串,getDisplayGroups() 返回全部数据——这意味着输入纯空格等于"没搜索"。
这是期望的行为。如果用户输入"张 “(末尾有空格),indexOf('张') 仍然能匹配到"张伟”。
十三、扩展方向
- 字母索引导航弹出气泡 — 开启
.popupEnabled(true)并使用.onRequestPopup()自定义弹出文本样式 - 长按字母索引连续滚动 — AlphabetIndexer 本身就支持滑动选择,无需额外实现
- 联系人收藏/置顶 — 在数据中加
pinned: boolean字段,置顶联系人排在最前面(#分组) - 拼音搜索 — 引入拼音库,支持输入拼音首字母搜索中文姓名(如输入 “zw” 匹配 “张伟”)
- 拨号/发短信快捷操作 — 点击联系人弹窗中增加"呼叫"和"发短信"按钮,调用系统电话和短信 API
- Sticky Header — 用 List 的
sticky属性让 section header 在滚动时吸顶,不随列表滚出屏幕 - 加入 AlphabetIndexer 的
onRequestPopup— 在滑动字母索引时显示大号字母浮层,类似 iOS 通讯录的体验 - 从系统通讯录读取 — 使用
@kit.Contacts读取系统通讯录数据,替换模拟数据
十四、运行方式
代码位于 dev/entry/src/main/ets/pages/ContactsPage.ets。
用 DevEco Studio 打开 dev/ 项目,首页点击"通讯录 — 字母索引与分组列表"即可体验:
- 进入页面 → 看到蓝色顶栏"通讯录" + 搜索框 + 联系人列表
- 滚动列表 → 看到 A-Z 分组的 section header 和彩色头像联系人
- 点击右侧字母"L" → 列表自动滚动到 L 分组(李华、刘洋、林芳)
- 点击右侧字母"Z" → 列表跳转到 Z 分组(张伟、赵敏、周杰)
- 在搜索框输入"伟" → 字母索引消失,只显示 C 组陈伟和 Z 组张伟
- 清空搜索框 → 字母索引重新出现,列表恢复
- 点击"安娜" → 弹窗显示"安娜 电话:138 0000 2222"

作为“人工智能6S店”的官方数字引擎,为AI开发者与企业提供一个覆盖软硬件全栈、一站式门户。
更多推荐


 0
0 0
0- 0


 已为社区贡献286条内容

所有评论(0)