
基于HarmonyOs的英语学习应用技术实现与价值分析
本文基于HarmonyOS系统与ArkTS声明式开发语言,完成轻量化单词学习APP项目开发。项目实现单词展示、音标查看、词义弹窗、切换生词等核心功能,采用@State状态管理完成页面数据联动,依托ArkUI组件化搭建交互界面。文章从技术选型、代码实现、开发踩坑、项目优化四个维度,完整阐述鸿蒙端英语学习应用落地流程,可为入门鸿蒙ArkTS开发的开发者提供实战参考。
基于HarmonyOs的英语学习应用技术实现与价值分析
#项目演示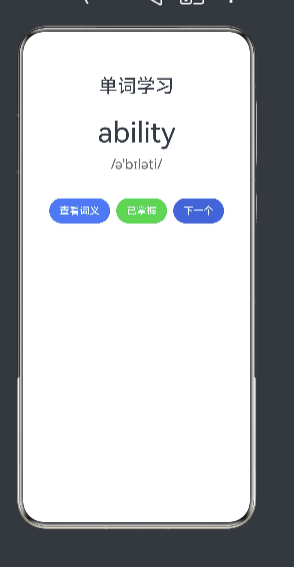
从零构建现代化英语学习APP:React + TypeScript 全栈实战指南
引言
在数字化学习浪潮席卷全球的今天,语言学习类应用成为互联网产品中的热门领域。本文将详细介绍如何使用 React 18 + TypeScript + Vite 技术栈构建一个功能完整、交互体验优秀的英语学习平台。
项目概述
本项目是一个综合性的英语学习应用,包含以下核心功能模块:
- 词汇学习:单词卡片记忆 + 词汇测验
- 语法学习:语法课程 + 填空练习
- 阅读练习:文章阅读 + 阅读理解测试
- 听力练习:音频播放 + 听力测试
- 学习统计:数据可视化展示学习进度
技术架构
技术栈选择
| 分类 | 技术 | 版本 | 选择理由 |
|---|---|---|---|
| 框架 | React | 18.2.0 | 成熟稳定的前端框架,生态完善 |
| 语言 | TypeScript | 5.9.3 | 类型安全,提升代码质量和开发效率 |
| 构建工具 | Vite | 5.0.8 | 极速开发体验,热更新快 |
| 状态管理 | Zustand | 4.5.0 | 轻量级状态管理,API简洁 |
| 路由 | React Router | 6.22.0 | 官方路由方案,支持React 18 |
| 样式 | Tailwind CSS | 3.4.1 | 原子化CSS,快速构建UI |
| 图标 | Lucide React | 0.312.0 | 精美的图标库 |
| 图表 | Recharts | 2.10.0 | 强大的数据可视化组件 |
架构设计
src/
├── components/          # UI组件层
│   ├── Grammar/         # 语法相关组件
│   ├── Home/            # 首页组件
│   ├── Layout/          # 布局组件
│   ├── Listening/       # 听力相关组件
│   ├── Reading/         # 阅读相关组件
│   ├── Stats/           # 统计相关组件
│   └── Vocabulary/      # 词汇相关组件
├── pages/               # 页面层
├── store/               # 状态管理层
├── types/               # 类型定义层
├── App.tsx              # 应用入口
└── main.tsx             # 渲染入口
核心技术实现
1. 类型系统设计
类型安全是大型项目的基石。本项目在 src/types/index.ts 中定义了完整的类型系统:
export type Level = 1 | 2 | 3;

export interface Word {
  id: string;
  word: string;
  meaning: string;
  example: string;
  level: Level;
  lastReviewed?: Date;
  reviewCount: number;
}

export interface UserProgress {
  date: string;
  wordsLearned: number;
  grammarPoints: number;
  readingTime: number;
  listeningTime: number;
}

export interface GrammarTopic {
  id: string;
  title: string;
  description: string;
  content: string;
  level: Level;
}

export interface ReadingArticle {
  id: string;
  title: string;
  content: string;
  level: Level;
  author?: string;
}

export interface ListeningAudio {
  id: string;
  title: string;
  audioUrl: string;
  transcript: string;
  level: Level;
}

export interface QuizQuestion {
  id: string;
  question: string;
  options: string[];
  correctAnswer: number;
}

export interface DailyTask {
  id: string;
  title: string;
  description: string;
  completed: boolean;
  type: 'vocabulary' | 'grammar' | 'reading' | 'listening';
}
设计亮点:
- 使用联合类型
Level限制难度等级只能是 1、2、3 - 使用可选属性
lastReviewed和author增加灵活性 - 使用字面量类型
type限制任务类型的取值范围
2. 状态管理方案
采用 Zustand 实现轻量级状态管理,在 src/store/learningStore.ts 中定义:
import { create } from 'zustand'
import { Word, UserProgress, GrammarTopic, ReadingArticle, ListeningAudio, DailyTask } from '@/types'

interface LearningStore {
  words: Word[];
  progress: UserProgress[];
  grammarTopics: GrammarTopic[];
  readingArticles: ReadingArticle[];
  listeningAudios: ListeningAudio[];
  dailyTasks: DailyTask[];
  currentUser: { name: string; email: string } | null;
  addWord: (word: Omit<Word, 'id'>) => void;
  updateWord: (id: string, updates: Partial<Word>) => void;
  updateProgress: (date: string, updates: Partial<UserProgress>) => void;
  toggleTask: (id: string) => void;
  setUser: (user: { name: string; email: string } | null) => void;
}

export const useLearningStore = create<LearningStore>((set) => ({
  // 初始状态...

  addWord: (word) => set((state) => ({
    words: [...state.words, { ...word, id: Date.now().toString() }],
  })),

  updateWord: (id, updates) => set((state) => ({
    words: state.words.map((word) =>
      word.id === id ? { ...word, ...updates } : word
    ),
  })),

  updateProgress: (date, updates) => set((state) => {
    const existingIndex = state.progress.findIndex((p) => p.date === date)
    if (existingIndex >= 0) {
      const newProgress = [...state.progress]
      newProgress[existingIndex] = { ...newProgress[existingIndex], ...updates }
      return { progress: newProgress }
    }
    return { progress: [...state.progress, { date, ...updates } as UserProgress] }
  }),

  toggleTask: (id) => set((state) => ({
    dailyTasks: state.dailyTasks.map((task) =>
      task.id === id ? { ...task, completed: !task.completed } : task
    ),
  })),

  setUser: (user) => set({ currentUser: user }),
}))
核心特点:
- 使用
Omit<Word, 'id'>确保新增单词时不需要手动生成ID - 使用
Partial<Word>支持部分更新 - 使用
Date.now().toString()生成唯一ID - 采用函数式更新模式,确保状态更新的原子性
3. 页面路由设计
在 src/App.tsx 中配置路由:
import { Routes, Route } from 'react-router-dom'
import { Header } from '@/components/Layout/Header'
import { Sidebar } from '@/components/Layout/Sidebar'
import { Home } from '@/pages/Home'
import { Vocabulary } from '@/pages/Vocabulary'
import { Grammar } from '@/pages/Grammar'
import { Reading } from '@/pages/Reading'
import { Listening } from '@/pages/Listening'
import { Stats } from '@/pages/Stats'

function App() {
  return (
    <div className="min-h-screen bg-gray-50">
      <Header />
      <div className="max-w-7xl mx-auto px-4 sm:px-6 lg:px-8 py-8">
        <div className="flex gap-8">
          <aside className="hidden lg:block w-64 flex-shrink-0">
            <Sidebar />
          </aside>
          <main className="flex-1 min-w-0">
            <Routes>
              <Route path="/" element={<Home />} />
              <Route path="/vocabulary" element={<Vocabulary />} />
              <Route path="/grammar" element={<Grammar />} />
              <Route path="/reading" element={<Reading />} />
              <Route path="/listening" element={<Listening />} />
              <Route path="/stats" element={<Stats />} />
            </Routes>
          </main>
        </div>
      </div>
    </div>
  )
}

export default App
布局特点:
- 使用响应式设计,侧边栏在移动端隐藏
- 使用 Tailwind CSS 的响应式断点
lg:block控制显示 - 主内容区使用
flex-1占据剩余空间
核心功能模块详解
模块一:词汇学习
词汇学习模块包含两个核心功能:单词卡片记忆 和 词汇测验。
1.1 单词卡片组件
src/components/Vocabulary/FlashCard.tsx 实现了翻转动画效果:
import { useState } from 'react'
import { Volume2, ArrowRight, RotateCcw } from 'lucide-react'
import { Word } from '@/types'

interface FlashCardProps {
  word: Word
  onNext: () => void
  onPrev: () => void
  isLast: boolean
  isFirst: boolean
}

export function FlashCard({ word, onNext, onPrev, isLast, isFirst }: FlashCardProps) {
  const [isFlipped, setIsFlipped] = useState(false)

  const handleSpeak = () => {
    const utterance = new SpeechSynthesisUtterance(word.word)
    utterance.lang = 'en-US'
    speechSynthesis.speak(utterance)
  }

  return (
    <div className="flex flex-col items-center">
      <div
        className={`card-flip w-full max-w-md h-80 cursor-pointer ${
          isFlipped ? 'flipped' : ''
        }`}
        onClick={() => setIsFlipped(!isFlipped)}
      >
        <div className="card-flip-inner w-full h-full relative">
          <div className="card-front absolute inset-0 bg-gradient-to-br from-primary to-indigo-600 rounded-2xl shadow-xl p-8 flex flex-col items-center justify-center text-white">
            <div className="text-4xl font-bold mb-4">{word.word}</div>
            <div className="text-lg opacity-80">点击卡片查看释义</div>
            <button
              onClick={(e) => {
                e.stopPropagation()
                handleSpeak()
              }}
              className="mt-4 w-12 h-12 rounded-full bg-white/20 flex items-center justify-center hover:bg-white/30 transition-colors"
            >
              <Volume2 className="w-6 h-6" />
            </button>
          </div>
          <div className="card-back absolute inset-0 bg-white rounded-2xl shadow-xl p-8 flex flex-col items-center justify-center">
            <div className="text-3xl font-bold text-gray-800 mb-4">{word.word}</div>
            <div className="text-xl text-primary mb-4">{word.meaning}</div>
            <div className="text-gray-600 text-center italic">"{word.example}"</div>
          </div>
        </div>
      </div>
      {/* 导航按钮 */}
    </div>
  )
}
实现亮点:
- 使用 Web Speech API 实现单词发音功能
- 通过
isFlipped状态控制卡片翻转 - 使用 CSS 动画实现流畅的翻转效果
- 使用
e.stopPropagation()防止点击按钮时触发卡片翻转
1.2 词汇测验组件
src/components/Vocabulary/Quiz.tsx 实现了四选一测验:
const currentWord = words[currentIndex]
const otherWords = words.filter((_, i) => i !== currentIndex)
const shuffledOptions = [...otherWords]
  .sort(() => Math.random() - 0.5)
  .slice(0, 3)
  .map((w) => w.meaning)
const correctIndex = Math.floor(Math.random() * 4)
const options = [...shuffledOptions]
options.splice(correctIndex, 0, currentWord.meaning)
算法说明:
- 从其他单词中随机选取3个错误选项
- 在4个位置中随机选择一个作为正确答案位置
- 将正确答案插入到随机位置
模块二:语法学习
语法学习模块包含语法课程展示和填空练习。
2.1 课程卡片组件
src/components/Grammar/LessonCard.tsx 使用手风琴式展开效果:
import { useState } from 'react'
import { ChevronDown, ChevronUp, BookOpen } from 'lucide-react'
import { GrammarTopic, Level } from '@/types'

export function LessonCard({ topic }: LessonCardProps) {
  const [isExpanded, setIsExpanded] = useState(false)

  const levelLabels: Record<Level, string> = {
    1: '初级',
    2: '中级',
    3: '高级',
  }

  const levelColors: Record<Level, string> = {
    1: 'bg-green-100 text-green-600',
    2: 'bg-yellow-100 text-yellow-600',
    3: 'bg-red-100 text-red-600',
  }

  return (
    <div className="bg-white rounded-2xl shadow-sm overflow-hidden">
      <button
        onClick={() => setIsExpanded(!isExpanded)}
        className="w-full p-6 flex items-center justify-between text-left hover:bg-gray-50 transition-colors"
      >
        {/* 标题区域 */}
        {isExpanded ? (
          <ChevronUp className="w-5 h-5 text-gray-400" />
        ) : (
          <ChevronDown className="w-5 h-5 text-gray-400" />
        )}
      </button>
      {isExpanded && (
        <div className="px-6 pb-6 animate-fadeIn">
          <div className="bg-gray-50 rounded-xl p-6 whitespace-pre-line text-gray-700 leading-relaxed">
            {topic.content}
          </div>
        </div>
      )}
    </div>
  )
}
设计特点:
- 使用
Record类型定义难度等级的标签和颜色映射 - 使用
whitespace-pre-line保留内容中的换行符 - 使用条件渲染控制课程内容的展开/折叠
模块三:阅读练习
阅读练习模块包含文章阅读和阅读理解测试。
3.1 文章视图组件
src/components/Reading/ArticleView.tsx 展示文章内容:
export function ArticleView({ article }: ArticleViewProps) {
  const levelLabels: Record<Level, string> = {
    1: '初级',
    2: '中级',
    3: '高级',
  }

  const levelColors: Record<Level, string> = {
    1: 'bg-green-100 text-green-600',
    2: 'bg-yellow-100 text-yellow-600',
    3: 'bg-red-100 text-red-600',
  }

  return (
    <div className="bg-white rounded-2xl shadow-sm overflow-hidden">
      <div className="p-6 border-b border-gray-100">
        <div className="flex items-center gap-3 mb-4">
          <div className="w-12 h-12 bg-gradient-to-br from-green-500 to-green-600 rounded-xl flex items-center justify-center">
            <FileText className="w-6 h-6 text-white" />
          </div>
          <div>
            <h2 className="text-xl font-bold text-gray-800">{article.title}</h2>
            <div className="flex items-center gap-2 mt-1">
              {article.author && (
                <span className="flex items-center gap-1 text-sm text-gray-500">
                  <User className="w-4 h-4" />
                  {article.author}
                </span>
              )}
              <span className={`px-2 py-0.5 rounded-full text-xs font-medium ${levelColors[article.level]}`}>
                {levelLabels[article.level]}
              </span>
            </div>
          </div>
        </div>
      </div>
      <div className="p-6">
        <div className="text-gray-700 leading-relaxed whitespace-pre-line text-lg">
          {article.content}
        </div>
      </div>
    </div>
  )
}
模块四:听力练习
听力练习模块包含音频播放器和听力测试。
4.1 音频播放器组件
src/components/Listening/AudioPlayer.tsx 实现了完整的音频控制功能:
import { useState, useRef, useEffect } from 'react'
import { Play, Pause, Volume2, VolumeX } from 'lucide-react'
import { ListeningAudio } from '@/types'

export function AudioPlayer({ audio }: AudioPlayerProps) {
  const [isPlaying, setIsPlaying] = useState(false)
  const [currentTime, setCurrentTime] = useState(0)
  const [duration, setDuration] = useState(0)
  const [isMuted, setIsMuted] = useState(false)
  const audioRef = useRef<HTMLAudioElement>(null)

  useEffect(() => {
    const audioElement = audioRef.current
    if (!audioElement) return

    const updateTime = () => setCurrentTime(audioElement.currentTime)
    const updateDuration = () => setDuration(audioElement.duration)
    const handleEnded = () => setIsPlaying(false)

    audioElement.addEventListener('timeupdate', updateTime)
    audioElement.addEventListener('loadedmetadata', updateDuration)
    audioElement.addEventListener('ended', handleEnded)

    return () => {
      audioElement.removeEventListener('timeupdate', updateTime)
      audioElement.removeEventListener('loadedmetadata', updateDuration)
      audioElement.removeEventListener('ended', handleEnded)
    }
  }, [])

  const togglePlay = () => {
    if (audioRef.current) {
      if (isPlaying) {
        audioRef.current.pause()
      } else {
        audioRef.current.play()
      }
      setIsPlaying(!isPlaying)
    }
  }

  const formatTime = (time: number) => {
    const minutes = Math.floor(time / 60)
    const seconds = Math.floor(time % 60)
    return `${minutes}:${seconds.toString().padStart(2, '0')}`
  }

  return (
    <div className="bg-white rounded-2xl shadow-sm p-6">
      <h3 className="text-lg font-semibold text-gray-800 mb-4">{audio.title}</h3>

      <audio ref={audioRef} src={audio.audioUrl} />

      <div className="flex items-center gap-4">
        <button
          onClick={togglePlay}
          className="w-14 h-14 rounded-full bg-gradient-to-br from-orange-500 to-orange-600 flex items-center justify-center text-white hover:shadow-lg transition-all duration-200"
        >
          {isPlaying ? <Pause className="w-7 h-7" /> : <Play className="w-7 h-7" />}
        </button>

        <div className="flex-1">
          <input
            type="range"
            min="0"
            max={duration || 100}
            value={currentTime}
            onChange={handleSeek}
            className="w-full h-2 bg-gray-200 rounded-full appearance-none cursor-pointer accent-orange-500"
          />
          <div className="flex justify-between text-sm text-gray-500 mt-1">
            <span>{formatTime(currentTime)}</span>
            <span>{formatTime(duration)}</span>
          </div>
        </div>

        <button
          onClick={toggleMute}
          className="w-10 h-10 rounded-full bg-gray-100 flex items-center justify-center text-gray-600 hover:bg-gray-200 transition-colors"
        >
          {isMuted ? <VolumeX className="w-5 h-5" /> : <Volume2 className="w-5 h-5" />}
        </button>
      </div>

      <div className="mt-6 p-4 bg-gray-50 rounded-xl">
        <h4 className="text-sm font-medium text-gray-600 mb-2">Transcript</h4>
        <p className="text-gray-700 whitespace-pre-line">{audio.transcript}</p>
      </div>
    </div>
  )
}
技术要点:
- 使用
useRef引用 audio DOM 元素 - 使用
useEffect监听音频事件 - 实现播放/暂停、进度条拖动、静音控制功能
- 使用
formatTime函数格式化时间显示
模块五:学习统计
学习统计模块使用 Recharts 展示学习数据可视化图表。
5.1 进度图表组件
src/components/Stats/ProgressChart.tsx:
import { LineChart, Line, XAxis, YAxis, CartesianGrid, Tooltip, ResponsiveContainer, BarChart, Bar } from 'recharts'
import { UserProgress } from '@/types'

export function ProgressChart({ progress }: ProgressChartProps) {
  return (
    <div className="bg-white rounded-2xl shadow-sm p-6">
      <h3 className="text-lg font-semibold text-gray-800 mb-6">学习趋势</h3>

      <div className="h-64">
        <ResponsiveContainer width="100%" height="100%">
          <LineChart data={progress}>
            <CartesianGrid strokeDasharray="3 3" />
            <XAxis dataKey="date" />
            <YAxis />
            <Tooltip />
            <Line type="monotone" dataKey="wordsLearned" name="学习单词数" stroke="#4F46E5" strokeWidth={2} />
            <Line type="monotone" dataKey="grammarPoints" name="语法知识点" stroke="#10B981" strokeWidth={2} />
          </LineChart>
        </ResponsiveContainer>
      </div>
    </div>
  )
}

export function TimeSpentChart({ progress }: ProgressChartProps) {
  return (
    <div className="bg-white rounded-2xl shadow-sm p-6">
      <h3 className="text-lg font-semibold text-gray-800 mb-6">学习时长分布</h3>

      <div className="h-64">
        <ResponsiveContainer width="100%" height="100%">
          <BarChart data={progress}>
            <CartesianGrid strokeDasharray="3 3" />
            <XAxis dataKey="date" />
            <YAxis />
            <Tooltip />
            <Bar dataKey="readingTime" name="阅读时间(分钟)" fill="#10B981" />
            <Bar dataKey="listeningTime" name="听力时间(分钟)" fill="#F97316" />
          </BarChart>
        </ResponsiveContainer>
      </div>
    </div>
  )
}
布局组件设计
Header 组件
src/components/Layout/Header.tsx:
import { BookOpen, User } from 'lucide-react'
import { useLearningStore } from '@/store/learningStore'

export function Header() {
  const currentUser = useLearningStore((state) => state.currentUser)

  return (
    <header className="bg-white shadow-sm sticky top-0 z-50">
      <div className="max-w-7xl mx-auto px-4 sm:px-6 lg:px-8">
        <div className="flex items-center justify-between h-16">
          <div className="flex items-center gap-3">
            <div className="w-10 h-10 bg-gradient-to-br from-primary to-secondary rounded-xl flex items-center justify-center">
              <BookOpen className="w-6 h-6 text-white" />
            </div>
            <h1 className="text-xl font-bold text-gray-800">英语学习</h1>
          </div>
          <div className="flex items-center gap-4">
            {currentUser && (
              <div className="flex items-center gap-2">
                <div className="w-8 h-8 bg-primary/10 rounded-full flex items-center justify-center">
                  <User className="w-4 h-4 text-primary" />
                </div>
                <span className="text-sm font-medium text-gray-600">{currentUser.name}</span>
              </div>
            )}
          </div>
        </div>
      </div>
    </header>
  )
}
Sidebar 组件
src/components/Layout/Sidebar.tsx:
import { Home, BookText, PenTool, FileText, Headphones, BarChart3 } from 'lucide-react'
import { useLocation, useNavigate } from 'react-router-dom'

const navItems = [
  { path: '/', icon: Home, label: '首页' },
  { path: '/vocabulary', icon: BookText, label: '词汇学习' },
  { path: '/grammar', icon: PenTool, label: '语法学习' },
  { path: '/reading', icon: FileText, label: '阅读练习' },
  { path: '/listening', icon: Headphones, label: '听力练习' },
  { path: '/stats', icon: BarChart3, label: '学习统计' },
]

export function Sidebar() {
  const location = useLocation()
  const navigate = useNavigate()

  return (
    <nav className="bg-white rounded-2xl shadow-sm p-4">
      <ul className="space-y-2">
        {navItems.map((item) => {
          const Icon = item.icon
          const isActive = location.pathname === item.path
          return (
            <li key={item.path}>
              <button
                onClick={() => navigate(item.path)}
                className={`w-full flex items-center gap-3 px-4 py-3 rounded-xl transition-all duration-200 ${
                  isActive
                    ? 'bg-gradient-to-r from-primary/10 to-secondary/10 text-primary font-medium'
                    : 'text-gray-600 hover:bg-gray-50 hover:text-gray-900'
                }`}
              >
                <Icon className="w-5 h-5" />
                <span className="text-sm">{item.label}</span>
              </button>
            </li>
          )
        })}
      </ul>
    </nav>
  )
}
首页设计
src/pages/Home.tsx 整合了多个组件:
import { ProgressRing } from '@/components/Home/ProgressRing'
import { DailyTaskList } from '@/components/Home/DailyTask'
import { QuickAccess } from '@/components/Home/QuickAccess'
import { useLearningStore } from '@/store/learningStore'

export function Home() {
  const progress = useLearningStore((state) => state.progress)
  const dailyTasks = useLearningStore((state) => state.dailyTasks)
  const words = useLearningStore((state) => state.words)

  const latestProgress = progress[progress.length - 1] || {
    wordsLearned: 0,
    grammarPoints: 0,
    readingTime: 0,
    listeningTime: 0,
  }

  const completedTasks = dailyTasks.filter((t) => t.completed).length
  const taskProgress = Math.round((completedTasks / dailyTasks.length) * 100)

  return (
    <div className="space-y-8">
      <div className="bg-gradient-to-r from-primary to-indigo-600 rounded-2xl shadow-lg p-8 text-white">
        <h2 className="text-2xl font-bold mb-2">今日学习</h2>
        <p className="text-white/80 mb-6">坚持学习,每天进步一点点!</p>
        <div className="grid grid-cols-3 gap-8">
          <ProgressRing
            progress={(words.length / 100) * 100}
            label="已学单词"
            value={words.length.toString()}
            color="#ffffff"
          />
          <ProgressRing
            progress={(latestProgress.grammarPoints / 50) * 100}
            label="语法知识点"
            value={latestProgress.grammarPoints.toString()}
            color="#ffffff"
          />
          <ProgressRing
            progress={taskProgress}
            label="今日任务"
            value={`${completedTasks}/${dailyTasks.length}`}
            color="#ffffff"
          />
        </div>
      </div>

      <QuickAccess />

      <DailyTaskList />
    </div>
  )
}
进度环组件 ProgressRing.tsx 使用 SVG 绘制:
interface ProgressRingProps {
  progress: number
  size?: number
  strokeWidth?: number
  color?: string
  label: string
  value: string
}

export function ProgressRing({
  progress,
  size = 120,
  strokeWidth = 8,
  color = '#4F46E5',
  label,
  value,
}: ProgressRingProps) {
  const radius = (size - strokeWidth) / 2
  const circumference = radius * 2 * Math.PI
  const offset = circumference - (progress / 100) * circumference

  return (
    <div className="flex flex-col items-center">
      <div className="relative" style={{ width: size, height: size }}>
        <svg className="transform -rotate-90" width={size} height={size}>
          <circle
            className="text-gray-200"
            strokeWidth={strokeWidth}
            stroke="currentColor"
            fill="transparent"
            r={radius}
            cx={size / 2}
            cy={size / 2}
          />
          <circle
            className="progress-ring-circle"
            strokeWidth={strokeWidth}
            stroke={color}
            fill="transparent"
            strokeLinecap="round"
            r={radius}
            cx={size / 2}
            cy={size / 2}
            style={{ strokeDasharray: circumference, strokeDashoffset: offset }}
          />
        </svg>
        <div className="absolute inset-0 flex flex-col items-center justify-center">
          <span className="text-2xl font-bold text-gray-800">{value}</span>
        </div>
      </div>
      <span className="mt-3 text-sm text-gray-500">{label}</span>
    </div>
  )
}
样式系统
Tailwind CSS 配置
tailwind.config.js:
/** @type {import('tailwindcss').Config} */
export default {
  content: [
    "./index.html",
    "./src/**/*.{js,ts,jsx,tsx}",
  ],
  theme: {
    extend: {
      colors: {
        primary: '#4F46E5',
        secondary: '#10B981',
      },
      animation: {
        'flip': 'flip 0.6s ease-in-out',
        'fadeIn': 'fadeIn 0.3s ease-out',
      },
      keyframes: {
        flip: {
          '0%': { transform: 'rotateY(0deg)' },
          '100%': { transform: 'rotateY(180deg)' },
        },
        fadeIn: {
          '0%': { opacity: '0', transform: 'translateY(-10px)' },
          '100%': { opacity: '1', transform: 'translateY(0)' },
        },
      },
    },
  },
  plugins: [],
}
自定义 CSS 动画
在 src/index.css 中添加卡片翻转效果:
.card-flip {
  perspective: 1000px;
}

.card-flip-inner {
  position: relative;
  width: 100%;
  height: 100%;
  transition: transform 0.6s;
  transform-style: preserve-3d;
}

.card-flip.flipped .card-flip-inner {
  transform: rotateY(180deg);
}

.card-front,
.card-back {
  position: absolute;
  width: 100%;
  height: 100%;
  backface-visibility: hidden;
}

.card-back {
  transform: rotateY(180deg);
}

.progress-ring-circle {
  transition: stroke-dashoffset 0.5s ease-out;
}
构建与部署
项目脚本
package.json 中定义了以下脚本:
{
  "scripts": {
    "dev": "vite",
    "build": "tsc && vite build",
    "lint": "eslint . --ext ts,tsx --report-unused-disable-directives --max-warnings 0",
    "preview": "vite preview"
  }
}
运行项目
# 安装依赖
npm install

# 开发模式
npm run dev

# 构建生产版本
npm run build

# 预览生产版本
npm run preview
性能优化策略
1. React 性能优化
- 使用
useMemo和useCallback缓存计算结果和回调函数 - 使用 React.memo 优化组件渲染
- 使用 React.lazy 和 Suspense 实现代码分割
2. 状态管理优化
- 使用 Zustand 的 selector 功能只订阅需要的状态
- 避免不必要的状态更新
- 使用 immer 简化复杂状态更新
3. 样式优化
- 使用 Tailwind CSS 的 JIT 模式减少 CSS 体积
- 提取公共样式为组件或工具类
- 使用 CSS 动画替代 JavaScript 动画
未来扩展计划
1. 功能扩展
- 添加用户认证系统
- 实现单词收藏功能
- 添加学习计划制定功能
- 实现数据持久化(localStorage/IndexedDB)
- 添加社交分享功能
2. 技术升级
- 集成 PWA 支持
- 添加服务端渲染(SSR)
- 实现国际化(i18n)
- 添加单元测试和 E2E 测试
总结
本文详细介绍了使用 React 18 + TypeScript + Vite 构建英语学习 APP 的完整过程。从技术选型、架构设计到具体实现,涵盖了状态管理、路由配置、组件开发、样式设计等多个方面。
项目的核心价值在于:
- 技术栈现代化:采用最新的前端技术栈,保证代码质量和开发效率
- 架构清晰:模块化设计,职责分明
- 用户体验优秀:流畅的动画效果和直观的交互设计
- 扩展性强:良好的代码结构便于后续功能扩展
希望本文能为您在构建类似项目时提供参考和启发。如果您有任何问题或建议,欢迎在评论区留言讨论!
项目地址:GitHub Repository
作者:[您的名字]
联系方式:[您的邮箱]
本文同步发布于 CSDN,转载请注明出处。
欢迎使用Markdown编辑器
你好! 这是你第一次使用 Markdown编辑器 所展示的欢迎页。如果你想学习如何使用Markdown编辑器, 可以仔细阅读这篇文章,了解一下Markdown的基本语法知识。
新的改变
我们对Markdown编辑器进行了一些功能拓展与语法支持,除了标准的Markdown编辑器功能,我们增加了如下几点新功能,帮助你用它写博客:
- 全新的界面设计 ,将会带来全新的写作体验;
- 在创作中心设置你喜爱的代码高亮样式,Markdown 将代码片显示选择的高亮样式 进行展示;
- 增加了 图片拖拽 功能,你可以将本地的图片直接拖拽到编辑区域直接展示;
- 全新的 KaTeX数学公式 语法;
- 增加了支持甘特图的mermaid语法1 功能;
- 增加了 多屏幕编辑 Markdown文章功能;
- 增加了 焦点写作模式、预览模式、简洁写作模式、左右区域同步滚轮设置 等功能,功能按钮位于编辑区域与预览区域中间;
- 增加了 检查列表 功能。
功能快捷键
撤销:Ctrl/Command + Z
重做:Ctrl/Command + Y
加粗:Ctrl/Command + B
斜体:Ctrl/Command + I
标题:Ctrl/Command + Shift + H
无序列表:Ctrl/Command + Shift + U
有序列表:Ctrl/Command + Shift + O
检查列表:Ctrl/Command + Shift + C
插入代码:Ctrl/Command + Shift + K
插入链接:Ctrl/Command + Shift + L
插入图片:Ctrl/Command + Shift + G
查找:Ctrl/Command + F
替换:Ctrl/Command + G
合理的创建标题,有助于目录的生成
直接输入1次#,并按下space后,将生成1级标题。
输入2次#,并按下space后,将生成2级标题。
以此类推,我们支持6级标题。有助于使用TOC语法后生成一个完美的目录。
如何改变文本的样式
强调文本 强调文本
加粗文本 加粗文本
标记文本
删除文本
引用文本
H2O is是液体。
210 运算结果是 1024.
插入链接与图片
链接: link.
图片:
带尺寸的图片:
居中的图片:
居中并且带尺寸的图片:
当然,我们为了让用户更加便捷,我们增加了图片拖拽功能。
如何插入一段漂亮的代码片
去博客设置页面,选择一款你喜欢的代码片高亮样式,下面展示同样高亮的 代码片.
// An highlighted block
var foo = 'bar';
生成一个适合你的列表
- 项目
- 项目
- 项目
- 项目
- 项目1
- 项目2
- 项目3
- 计划任务
- 完成任务
创建一个表格
一个简单的表格是这么创建的:
| 项目 | Value |
|---|---|
| 电脑 | $1600 |
| 手机 | $12 |
| 导管 | $1 |
设定内容居中、居左、居右
使用:---------:居中
使用:----------居左
使用----------:居右
| 第一列 | 第二列 | 第三列 |
|---|---|---|
| 第一列文本居中 | 第二列文本居右 | 第三列文本居左 |
SmartyPants
SmartyPants 是一个文本转换工具,主要功能是将普通的 ASCII 标点符号自动转换为更美观的印刷体标点符号。例如:
| 原始符号 | 转换后 | 说明 |
|---|---|---|
"引号" |
“引号” | 直引号变弯引号 |
'单引号' |
‘单引号’ | 直单引号变弯单引号 |
-- |
– | 两个连字符变短破折号 |
--- |
— | 三个连字符变长破折号 |
... |
… | 三个点变省略号 |
创建一个自定义列表
-
Markdown
- Text-to- HTML conversion tool Authors
- John
- Luke
如何创建一个注脚
一个具有注脚的文本。2
注释也是必不可少的
Markdown将文本转换为 HTML。
KaTeX数学公式
您可以使用渲染LaTeX数学表达式 KaTeX:
Gamma公式展示 Γ ( n ) = ( n − 1 ) ! ∀ n ∈ N \Gamma(n) = (n-1)!\quad\forall n\in\mathbb N Γ(n)=(n−1)!∀n∈N 是通过欧拉积分
Γ ( z ) = ∫ 0 ∞ t z − 1 e − t d t . \Gamma(z) = \int_0^\infty t^{z-1}e^{-t}dt\,. Γ(z)=∫0∞tz−1e−tdt.
你可以找到更多关于的信息 LaTeX 数学表达式here.
新的甘特图功能,丰富你的文章
- 关于 甘特图 语法,参考 这儿,
UML图表
可以使用UML图表进行渲染,例如下面产生的一个序列图:
- 关于 UML图表 语法,参考 这儿,
流程图
- 关于 Mermaid 语法,参考 这儿,
FLowchart流程图
我们依旧会支持flowchart.js的流程图语法:
- 关于 Flowchart流程图 语法,参考 这儿.
导出与导入
导出
如果你想尝试使用此编辑器, 你可以在此篇文章任意编辑。当你完成了一篇文章的写作, 在上方工具栏找到 文章导出 ,生成一个.md文件或者.html文件进行本地保存。
导入
如果你想加载一篇你写过的.md文件,在上方工具栏可以选择导入功能进行对应扩展名的文件导入,
继续你的创作。
-
注脚的解释 ↩︎

作为“人工智能6S店”的官方数字引擎,为AI开发者与企业提供一个覆盖软硬件全栈、一站式门户。
更多推荐


 2
2 0
0- 0


 已为社区贡献1条内容

所有评论(0)