
鸿蒙 ArkTS 倒计时器:项目复盘
本文详细介绍了如何使用HarmonyOS ArkTS开发一个功能完整的倒计时器应用。主要内容包括: 项目结构说明,包含入口Ability和主页面Index的代码实现 倒计时器核心功能: 环形进度条显示剩余时间 支持预设时间(1/3/5/10分钟)和自定义输入 完整的控制流程(开始/暂停/重置) 结束提示和最后10秒警示色变化 关键技术点: 使用setInterval实现计时功能 状态管理(@Sta
🎯 从 0 到 1:用 HarmonyOS ArkTS 打造一个高颜值倒计时器
从环境搭建到代码实现,详细记录我用 ArkTS 写倒计时器的完整过程。代码完整可直接运行,建议收藏。
📌 先看看效果
这是一个功能完整的倒计时器应用:
- ⏱ 环形进度条:直观展示剩余时间
- ⚡ 快捷预设:1 / 3 / 5 / 10 分钟一键切换
- ⌨️ 自定义输入:任意分钟 + 秒数组合
- ▶️ 开始 / 暂停 / 重置:完整控制流程
- 🔔 结束提示:倒计时完成后醒目提醒
- ⚠️ 警示色:最后 10 秒自动变橙色警示
🗂️ 项目结构
muban23/
├── entry/
│   └── src/main/
│       ├── ets/
│       │   ├── entryability/
│       │   │   └── EntryAbility.ets          ← 应用的入口 Ability
│       │   └── pages/
│       │       └── Index.ets                 ← 倒计时器主页面
│       ├── module.json5                      ← 模块配置
│       └── resources/                        ← 图片、颜色、字符串资源
├── AppScope/
│   └── app.json5                             ← 应用全局配置
├── oh-package.json5                          ← 依赖管理
├── build-profile.json5                       ← 构建配置
└── hvigorfile.ts                             ← Hvigor 构建脚本
1️⃣ 应用入口:EntryAbility.ets
EntryAbility.ets 是 HarmonyOS 应用的入口类,负责管理应用的生命周期和窗口创建。下面是完整代码:
import { AbilityConstant, ConfigurationConstant, UIAbility, Want } from '@kit.AbilityKit';
import { hilog } from '@kit.PerformanceAnalysisKit';
import { window } from '@kit.ArkUI';

const DOMAIN = 0x0000;

export default class EntryAbility extends UIAbility {

  // 应用创建时调用,可在此进行全局初始化
  onCreate(want: Want, launchParam: AbilityConstant.LaunchParam): void {
    try {
      // 设置颜色模式为跟随系统
      this.context.getApplicationContext().setColorMode(
        ConfigurationConstant.ColorMode.COLOR_MODE_NOT_SET
      );
    } catch (err) {
      hilog.error(DOMAIN, 'testTag', 'Failed to set colorMode. Cause: %{public}s', JSON.stringify(err));
    }
    hilog.info(DOMAIN, 'testTag', '%{public}s', 'Ability onCreate');
  }

  // 应用销毁时调用
  onDestroy(): void {
    hilog.info(DOMAIN, 'testTag', '%{public}s', 'Ability onDestroy');
  }

  // 窗口创建时调用,加载主页面
  onWindowStageCreate(windowStage: window.WindowStage): void {
    hilog.info(DOMAIN, 'testTag', '%{public}s', 'Ability onWindowStageCreate');

    windowStage.loadContent('pages/Index', (err) => {
      if (err.code) {
        hilog.error(DOMAIN, 'testTag', 'Failed to load the content. Cause: %{public}s', JSON.stringify(err));
        return;
      }
      hilog.info(DOMAIN, 'testTag', 'Succeeded in loading the content.');
    });
  }

  // 窗口销毁时调用,释放 UI 相关资源
  onWindowStageDestroy(): void {
    hilog.info(DOMAIN, 'testTag', '%{public}s', 'Ability onWindowStageDestroy');
  }

  // 应用进入前台时调用
  onForeground(): void {
    hilog.info(DOMAIN, 'testTag', '%{public}s', 'Ability onForeground');
  }

  // 应用进入后台时调用
  onBackground(): void {
    hilog.info(DOMAIN, 'testTag', '%{public}s', 'Ability onBackground');
  }
}
代码解读:
onWindowStageCreate是最重要的生命周期钩子,在这里通过loadContent加载主页面- 使用
hilog模块打印日志,方便调试时在 DevEco Studio 的 Log 面板查看 DOMAIN = 0x0000是日志域标识,可以用来过滤日志
2️⃣ 主页面:Index.ets(完整代码)
这是倒计时器的核心页面,包含了所有的 UI 和计时逻辑。
@Entry
@Component
struct CountdownTimer {

  // ── 状态变量 ──
  @State totalSeconds: number = 300;       // 总倒计时秒数(默认5分钟)
  @State remainingSeconds: number = 300;   // 剩余秒数
  @State isRunning: boolean = false;        // 是否正在倒计时
  @State isFinished: boolean = false;       // 是否已完成
  @State customMinutes: string = '';        // 自定义输入-分钟
  @State customSeconds: string = '';         // 自定义输入-秒数

  private timerId: number = -1;             // 定时器 ID,用于清除定时器

  // ── 生命周期:组件即将显示 ──
  aboutToAppear(): void {
    this.resetTimer(300);
  }

  // ── 生命周期:组件即将销毁 ──
  aboutToDisappear(): void {
    this.clearTimer();
  }

  // ── 清除定时器 ──
  clearTimer(): void {
    if (this.timerId !== -1) {
      clearInterval(this.timerId);
      this.timerId = -1;
    }
  }

  // ── 重置计时器到指定秒数 ──
  resetTimer(seconds: number): void {
    this.clearTimer();                       // 先清除旧的定时器
    this.totalSeconds = seconds;
    this.remainingSeconds = seconds;
    this.isRunning = false;
    this.isFinished = false;
  }

  // ── 开始倒计时 ──
  startTimer(): void {
    // 如果已完成或时间为0,不允许开始
    if (this.isFinished || this.remainingSeconds <= 0) {
      return;
    }
    this.isRunning = true;
    this.isFinished = false;
    this.timerId = setInterval(() => {
      this.remainingSeconds--;
      if (this.remainingSeconds <= 0) {
        this.remainingSeconds = 0;
        this.clearTimer();
        this.isRunning = false;
        this.isFinished = true;
      }
    }, 1000);
  }

  // ── 暂停倒计时 ──
  pauseTimer(): void {
    this.clearTimer();
    this.isRunning = false;
  }

  // ── 重置到当前设定的总时间 ──
  resetToCurrentTotal(): void {
    this.clearTimer();
    this.remainingSeconds = this.totalSeconds;
    this.isRunning = false;
    this.isFinished = false;
  }

  // ── 应用自定义时间 ──
  applyCustomTime(): void {
    const min = parseInt(this.customMinutes) || 0;
    const sec = parseInt(this.customSeconds) || 0;
    const total = min * 60 + sec;
    // 限制最大值为24小时(86400秒)
    if (total > 0 && total <= 86400) {
      this.resetTimer(total);
    }
  }

  // ── 计算属性:格式化时间字符串 MM:SS ──
  get formattedTime(): string {
    const min = Math.floor(this.remainingSeconds / 60);
    const sec = this.remainingSeconds % 60;
    return `${min.toString().padStart(2, '0')}:${sec.toString().padStart(2, '0')}`;
  }

  // ── 计算属性:环形进度条的百分比值 ──
  get progressValue(): number {
    if (this.totalSeconds <= 0) {
      return 0;
    }
    return ((this.totalSeconds - this.remainingSeconds) / this.totalSeconds) * 100;
  }

  // ── 计算属性:状态文字 ──
  get statusText(): string {
    if (this.isFinished) {
      return '⏰ 时间到!';
    }
    if (this.isRunning) {
      return '倒计时中…';
    }
    if (this.remainingSeconds < this.totalSeconds) {
      return '已暂停';
    }
    return '准备就绪';
  }

  // ── 计算属性:状态文字颜色 ──
  get statusColor(): ResourceColor {
    if (this.isFinished) {
      return '#FF4444';  // 红色警示
    }
    return '#999999';    // 灰色
  }

  // ── 计算属性:环形进度条颜色 ──
  get ringColor(): ResourceColor {
    if (this.isFinished) {
      return '#FF4444';  // 红色
    }
    // 最后10秒且正在运行时,变橙色警示
    if (this.remainingSeconds <= 10 && this.isRunning) {
      return '#FF6B35';
    }
    return '#FF6B35';     // 主题橙色
  }

  // ── 页面构建 ──
  build() {
    Column() {
      // ── 标题区域 ──
      Text('⏱ 倒计时器')
        .fontSize(28)
        .fontWeight(FontWeight.Bold)
        .fontColor('#1a1a2e')
        .margin({ top: 48, bottom: 32 })

      // ── 环形进度 + 时间显示区域 ──
      Stack() {
        // 环形进度条
        Progress({
          value: this.progressValue,
          total: 100,
          type: ProgressType.Ring
        })
          .width(240)
          .height(240)
          .style({ strokeWidth: 14 })
          .color(this.ringColor)
          .backgroundColor('#E8E8E8')

        // 中间的时间 + 状态文字
        Column({ space: 4 }) {
          Text(this.formattedTime)
            .fontSize(56)
            .fontWeight(FontWeight.Bold)
            .fontColor('#1a1a2e')

          Text(this.statusText)
            .fontSize(15)
            .fontColor(this.statusColor)
        }
        .alignItems(HorizontalAlign.Center)
      }
      .margin({ bottom: 36 })

      // ── 快捷预设按钮行 ──
      Row({ space: 12 }) {
        Button('1 分')
          .fontSize(14)
          .fontColor('#FF6B35')
          .backgroundColor('#FFF0E6')
          .borderRadius(20)
          .height(40)
          .onClick(() => this.resetTimer(60))

        Button('3 分')
          .fontSize(14)
          .fontColor('#FF6B35')
          .backgroundColor('#FFF0E6')
          .borderRadius(20)
          .height(40)
          .onClick(() => this.resetTimer(180))

        Button('5 分')
          .fontSize(14)
          .fontColor('#FF6B35')
          .backgroundColor('#FFF0E6')
          .borderRadius(20)
          .height(40)
          .onClick(() => this.resetTimer(300))

        Button('10 分')
          .fontSize(14)
          .fontColor('#FF6B35')
          .backgroundColor('#FFF0E6')
          .borderRadius(20)
          .height(40)
          .onClick(() => this.resetTimer(600))
      }
      .margin({ bottom: 28 })

      // ── 自定义时间输入行 ──
      Row({ space: 8 }) {
        TextInput({ text: this.customMinutes, placeholder: '分' })
          .width(72)
          .height(44)
          .type(InputType.Number)
          .backgroundColor('#F5F5F5')
          .borderRadius(10)
          .textAlign(TextAlign.Center)
          .onChange((value: string) => {
            this.customMinutes = value;
          })

        Text('分').fontSize(16).fontColor('#666')

        TextInput({ text: this.customSeconds, placeholder: '秒' })
          .width(72)
          .height(44)
          .type(InputType.Number)
          .backgroundColor('#F5F5F5')
          .borderRadius(10)
          .textAlign(TextAlign.Center)
          .onChange((value: string) => {
            this.customSeconds = value;
          })

        Text('秒').fontSize(16).fontColor('#666')

        Button('设定')
          .fontSize(14)
          .fontColor('#FFFFFF')
          .backgroundColor('#FF6B35')
          .borderRadius(20)
          .height(44)
          .onClick(() => this.applyCustomTime())
      }
      .margin({ bottom: 36 })

      // ── 控制按钮:开始/暂停 + 重置 ──
      Row({ space: 20 }) {
        if (!this.isRunning) {
          Button('▶ 开始')
            .width(130)
            .height(52)
            .fontSize(17)
            .fontWeight(FontWeight.Medium)
            .fontColor('#FFFFFF')
            .backgroundColor('#FF6B35')
            .borderRadius(26)
            .onClick(() => this.startTimer())
        } else {
          Button('⏸ 暂停')
            .width(130)
            .height(52)
            .fontSize(17)
            .fontWeight(FontWeight.Medium)
            .fontColor('#FFFFFF')
            .backgroundColor('#FFA500')
            .borderRadius(26)
            .onClick(() => this.pauseTimer())
        }

        Button('↺ 重置')
          .width(130)
          .height(52)
          .fontSize(17)
          .fontWeight(FontWeight.Medium)
          .fontColor('#FFFFFF')
          .backgroundColor('#666666')
          .borderRadius(26)
          .onClick(() => this.resetToCurrentTotal())
      }
    }
    .width('100%')
    .height('100%')
    .padding({ left: 24, right: 24 })
    .alignItems(HorizontalAlign.Center)
    .backgroundColor('#FAFAFA')
  }
}
3️⃣ 关键技术点解析
3.1 响应式状态管理 @State
@State 是 ArkTS 中最基础的状态装饰器,被它装饰的变量一旦改变,UI 会自动重新渲染:
@State isRunning: boolean = false;
@State remainingSeconds: number = 300;
在我们的代码中,remainingSeconds 每秒减 1,环形进度条和中间的时间显示都会自动更新,不需要手动调用任何刷新方法。
3.2 定时器的正确管理
使用 setInterval 创建定时器,用 clearInterval 销毁定时器,两者必须配对:
aboutToAppear(): void {
  this.resetTimer(300);  // 初始化
}

aboutToDisappear(): void {
  this.clearTimer();    // 清理,防止内存泄漏
}
如果不清理,用户退出页面再重新进入,会发现计时器速度翻倍了——因为旧的定时器还在跑。
3.3 条件渲染:开始 / 暂停按钮的切换
ArkUI 支持在 build() 方法中使用 if/else 进行条件渲染:
if (!this.isRunning) {
  Button('▶ 开始')
    .onClick(() => this.startTimer())
} else {
  Button('⏸ 暂停')
    .onClick(() => this.pauseTimer())
}
这比 Vue 的 v-if 写法更简洁,直接写在 build() 方法里即可。
3.4 环形进度条
鸿蒙的 Progress 组件支持多种类型:
| 类型 | 效果 | 本项目使用 |
|---|---|---|
ProgressType.Ring |
环形进度条 | ✅ |
ProgressType.Linear |
线性进度条 | |
ProgressType.Eclipse |
圆形进度(填满) |
核心参数:
Progress({
  value: this.progressValue,  // 当前进度值(0-100)
  total: 100,                  // 总值
  type: ProgressType.Ring     // 环形类型
})
  .style({ strokeWidth: 14 }) // 圆环粗细
  .color(this.ringColor)       // 进度条颜色
3.5 时间格式化技巧
get formattedTime(): string {
  const min = Math.floor(this.remainingSeconds / 60);
  const sec = this.remainingSeconds % 60;
  return `${min.toString().padStart(2, '0')}:${sec.toString().padStart(2, '0')}`;
}
padStart(2, '0') 的作用是:不足2位时在前面补0。比如 5 秒会显示为 05,确保时间格式始终整齐,不会出现数字跳动导致的视觉抖动。
⚙️ 如何运行这个项目
环境准备
- DevEco Studio 4.0 或更高版本
- HarmonyOS SDK(API 10+)
- Node.js 18+
- 一台鸿蒙设备或模拟器
运行步骤
第一步:用 DevEco Studio 打开项目
File → Open → 选择 D:\harmonyos\deepseekv4\project3\muban23 → OK
第二步:等待依赖同步
右下角会出现同步进度,等待出现 ✅ 即可。
第三步:配置运行目标
顶部工具栏选择目标设备:
- 真机:需要用 USB 连接并开启开发者模式
- 模拟器:在 DevEco Studio 中创建并启动模拟器
第四步:运行
点击工具栏的 ▶️ Run 按钮,或按 Shift + F10。
第五步:查看日志
底部 Log 面板选择 hidumper 或 hilog 过滤,可以看到:
Ability onWindowStageCreate
Succeeded in loading the content.
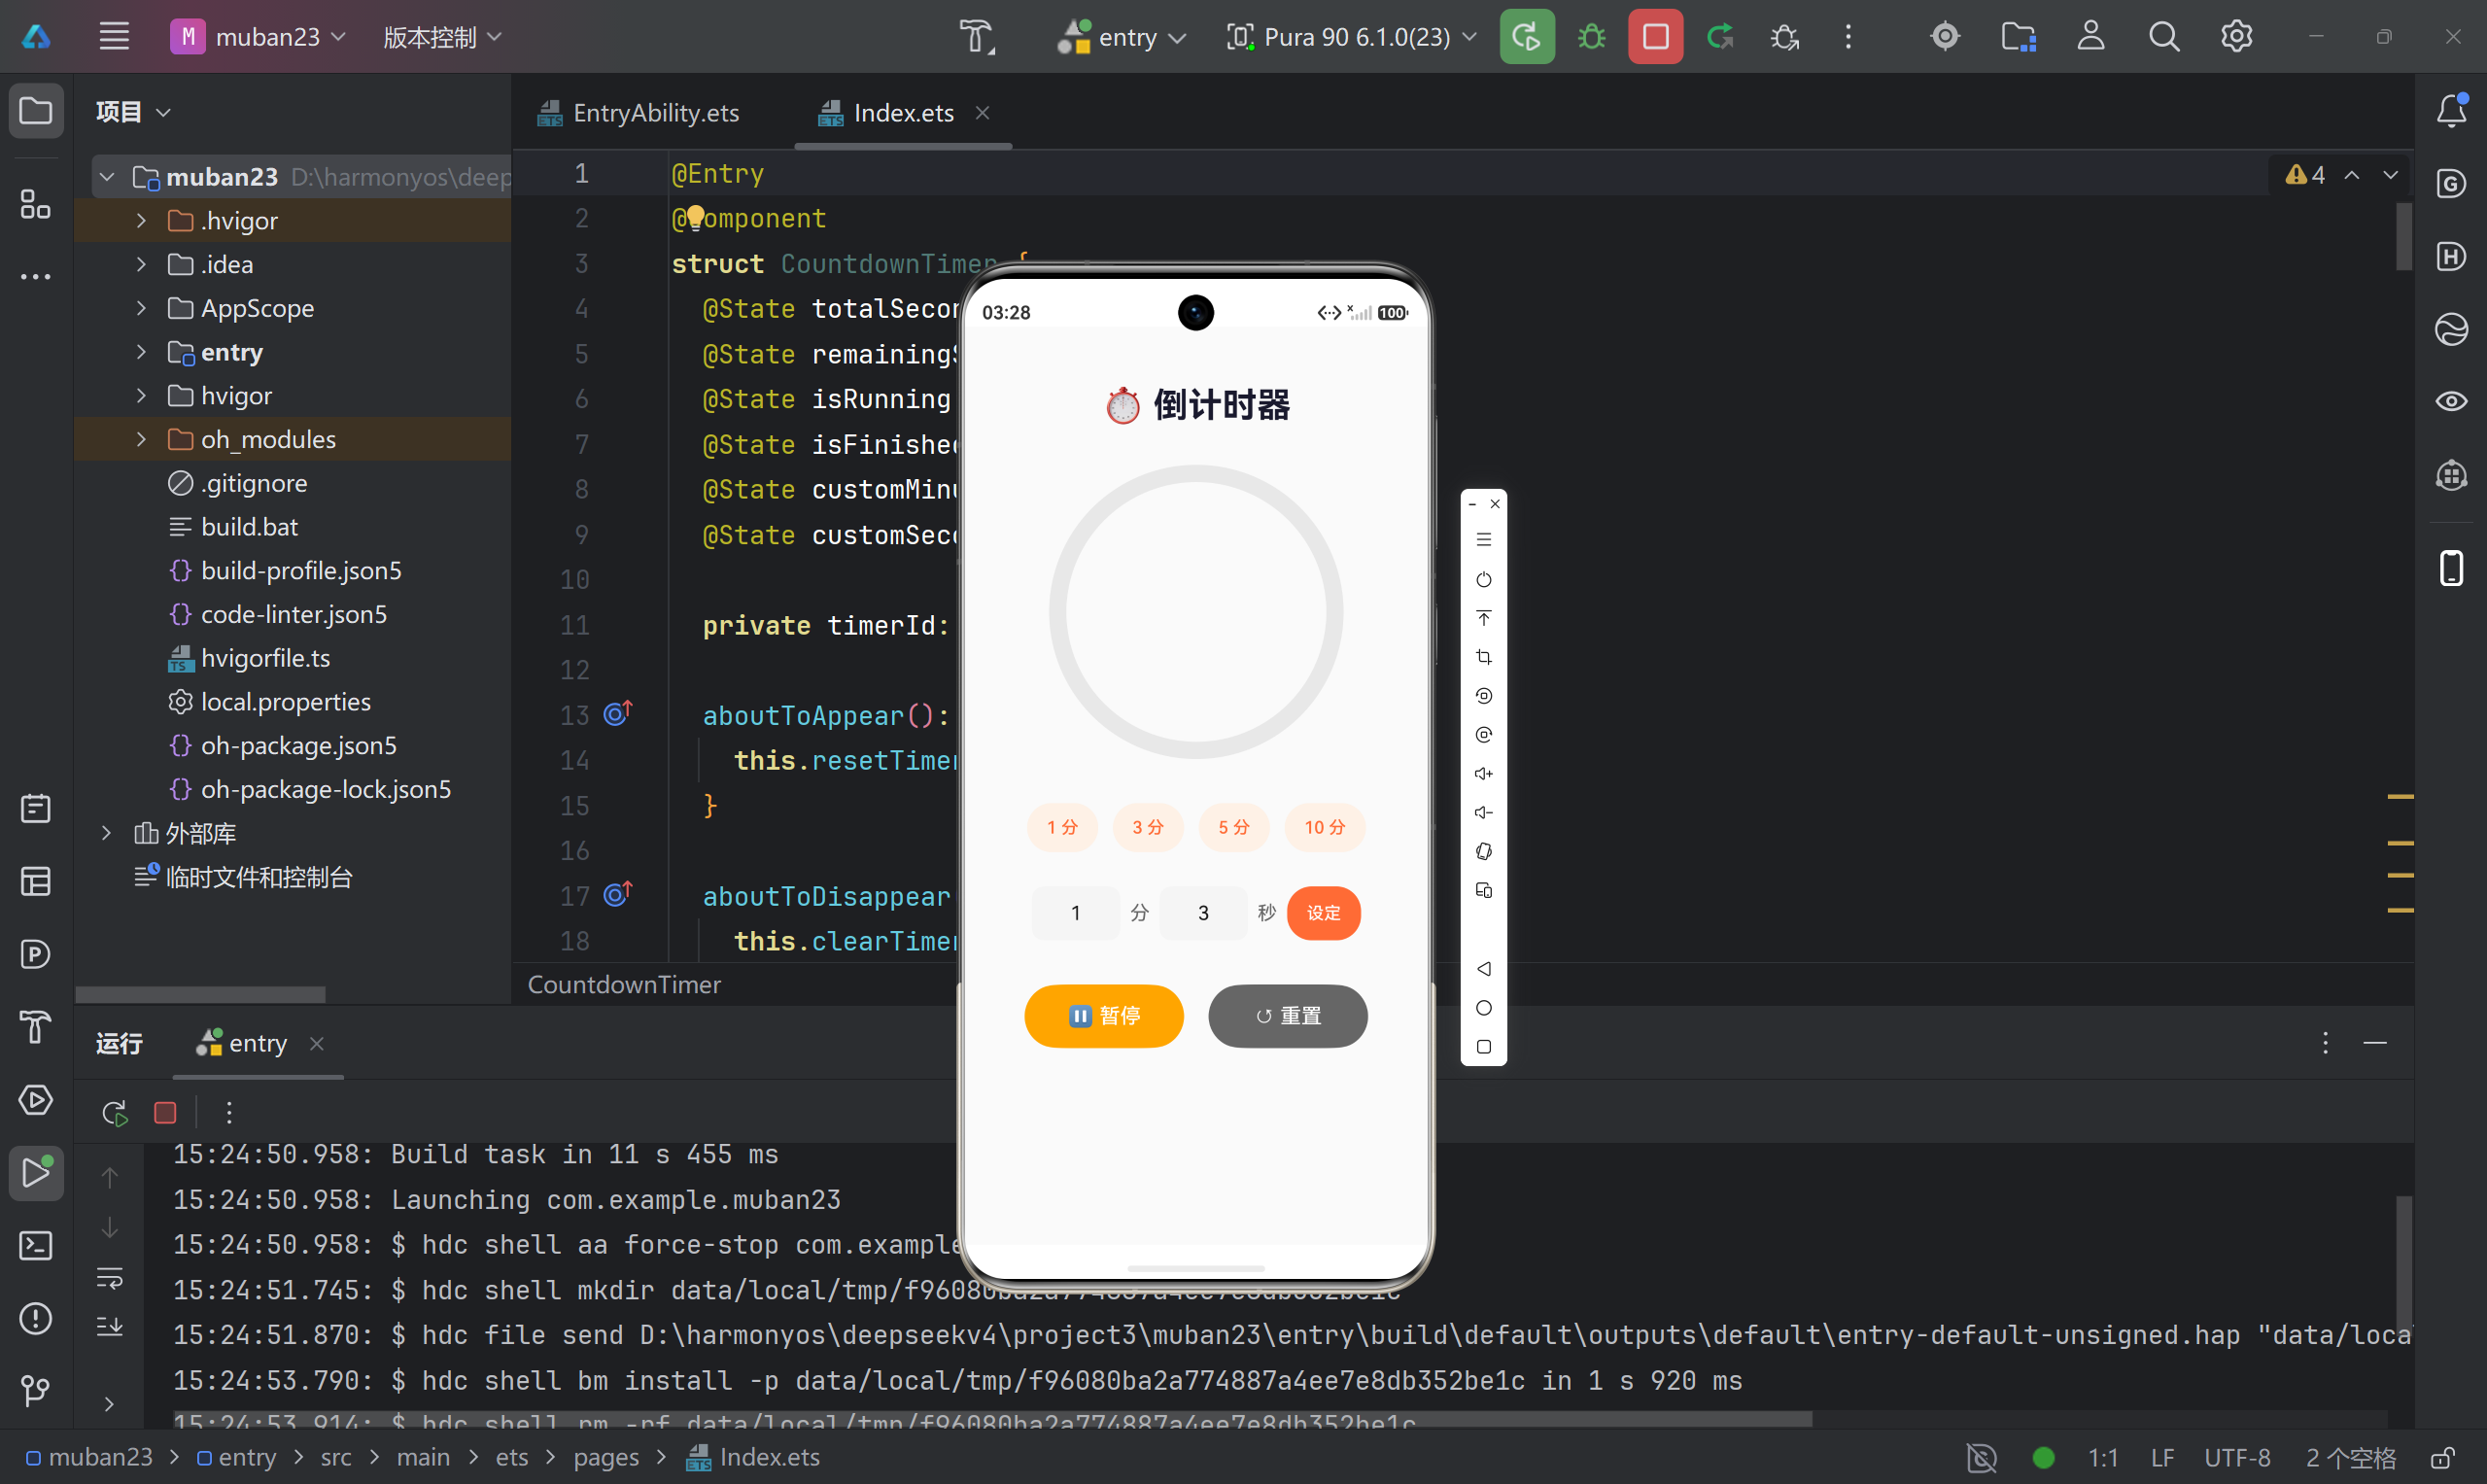
说明页面加载成功。
💡 开发过程中的踩坑与总结
踩坑 1:定时器泄漏
问题:退出页面后再回来,发现计时器速度变快了。
原因:aboutToDisappear() 里没有调用 clearInterval(),旧的定时器没有被清理。
解决:在 aboutToDisappear() 中调用 clearTimer(),确保每次进入页面都是全新的状态。
踩坑 2:时间格式不对齐
问题:显示 0:5 而不是 00:05。
原因:直接用数字拼接字符串。
解决:使用 padStart(2, '0') 补零对齐。
踩坑 3:输入校验
问题:用户输入超大数字(如 999999 分)会导致应用异常。
解决:在 applyCustomTime() 中加了上限判断 total <= 86400(24小时),超出范围不响应。
🎨 配色参考
| 元素 | 颜色代码 | 说明 |
|---|---|---|
| 主题色 | #FF6B35 |
橙色,用于进度条、按钮、快捷预设 |
| 警示色 | #FFA500 |
橙色变体,用于暂停按钮 |
| 完成色 | #FF4444 |
红色,用于时间到提示 |
| 背景色 | #FAFAFA |
浅灰白,页面整体背景 |
| 文字色 | #1a1a2e |
深色,时间数字显示 |
| 副文字色 | #666666 |
灰色,输入标签 |
🚀 可扩展的方向
以下功能在当前代码基础上可以很方便地扩展:
1. 🔔 添加震动反馈
// 倒计时结束时调用
vibrator.startVibrate({ duration: 1000 });
2. 🔊 添加提示音
// 使用 audio 播放系统提示音
const audioPlayer = await audio.createAudioPlayer();
audioPlayer.src = 'assets/sounds/ding.mp3';
3. 🌙 添加深色模式
在 EntryAbility.onCreate() 中根据系统颜色模式动态设置主题色。
4. 📊 添加历史记录
使用 @ohos.data.preferences 轻量存储,记录用户常用的时间设置。
5. ⏰ 多个计时器
改用 ForEach 渲染多个 CountdownTimer 组件实例,实现同时运行多个倒计时。
📚 学习资源推荐

作为“人工智能6S店”的官方数字引擎,为AI开发者与企业提供一个覆盖软硬件全栈、一站式门户。
更多推荐

 1
1 0
0- 0


 已为社区贡献3条内容

所有评论(0)