
Flutter 三方库 sensors_plus 的鸿蒙化适配指南
本文介绍了如何将Flutter三方库sensors_plus适配到OpenHarmony平台的完整方案。首先在pubspec.yaml中添加依赖配置,并在鸿蒙配置文件中声明传感器权限。然后实现了Dart侧的传感器数据展示页面,通过StreamSubscription订阅加速度计和陀螺仪数据。最后在OpenHarmony侧创建EventChannel通道,初始化传感器监听,完成跨平台桥接。该方案支持
Flutter 三方库 sensors_plus 的鸿蒙化适配指南
欢迎加入开源鸿蒙跨平台社区: https://openharmonycrossplatform.csdn.net
一、前言
在跨平台应用开发中,设备传感器数据采集是实现摇一摇、运动检测、方向定位等交互能力的基础。sensors_plus 是 Flutter 生态中主流的跨平台传感器访问库,原生支持 Android/iOS,但在 OpenHarmony 平台上缺乏官方适配。本文将从零实现 sensors_plus 在 OpenHarmony 上的桥接适配,完成加速度计、陀螺仪数据的采集与展示,并在鸿蒙设备上完成运行验证。
二、方案选型与依赖配置
- 依赖引入
在 pubspec.yaml 中添加 sensors_plus 依赖,同时预留 flutter_compass 和 shake_gesture 的扩展能力:
dependencies:
  flutter:
    sdk: flutter
  sensors_plus: ^4.0.1
  flutter_compass: ^0.7.0
  shake_gesture: ^1.0.0
执行 flutter pub get 完成依赖拉取。
2. 鸿蒙权限配置
在 ohos/entry/src/main/module.json5 中声明传感器访问所需权限:
"requestPermissions": [
  {
    "name": "ohos.permission.ACCELEROMETER",
    "reason": "$string:accelerometer_permission_reason",
    "usedScene": {
      "abilities": ["EntryAbility"],
      "when": "inuse"
    }
  },
  {
    "name": "ohos.permission.GYROSCOPE",
    "reason": "$string:gyroscope_permission_reason",
    "usedScene": {
      "abilities": ["EntryAbility"],
      "when": "inuse"
    }
  }
]
三、Dart 侧传感器展示页面实现
import 'package:flutter/material.dart';
import 'package:sensors_plus/sensors_plus.dart';

void main() {
  runApp(const SensorLabApp());
}

class SensorLabApp extends StatelessWidget {
  const SensorLabApp({super.key});

  @override
  Widget build(BuildContext context) {
    return MaterialApp(
      title: '鸿蒙传感器演示',
      theme: ThemeData(primarySwatch: Colors.blue),
      home: const SensorLabScreen(),
    );
  }
}

class SensorLabScreen extends StatefulWidget {
  const SensorLabScreen({super.key});

  @override
  State<SensorLabScreen> createState() => _SensorLabScreenState();
}

class _SensorLabScreenState extends State<SensorLabScreen> {
  // 传感器数据
  AccelerometerEvent? _accelerometerEvent;
  GyroscopeEvent? _gyroscopeEvent;

  // 订阅对象
  StreamSubscription<AccelerometerEvent>? _accelerometerSub;
  StreamSubscription<GyroscopeEvent>? _gyroscopeSub;

  @override
  void initState() {
    super.initState();
    // 订阅加速度计数据
    _accelerometerSub = accelerometerEventStream().listen((event) {
      setState(() => _accelerometerEvent = event);
    });
    // 订阅陀螺仪数据
    _gyroscopeSub = gyroscopeEventStream().listen((event) {
      setState(() => _gyroscopeEvent = event);
    });
  }

  @override
  void dispose() {
    _accelerometerSub?.cancel();
    _gyroscopeSub?.cancel();
    super.dispose();
  }

  @override
  Widget build(BuildContext context) {
    return Scaffold(
      appBar: AppBar(title: const Text('鸿蒙传感器演示')),
      body: ListView(
        padding: const EdgeInsets.all(16),
        children: [
          // 加速度计卡片
          SensorCard(
            title: '加速度计',
            data: _accelerometerEvent != null
                ? 'X: ${_accelerometerEvent!.x.toStringAsFixed(2)}\n'
                  'Y: ${_accelerometerEvent!.y.toStringAsFixed(2)}\n'
                  'Z: ${_accelerometerEvent!.z.toStringAsFixed(2)}'
                : '等待数据...',
          ),
          const SizedBox(height: 16),
          // 陀螺仪卡片
          SensorCard(
            title: '陀螺仪',
            data: _gyroscopeEvent != null
                ? 'X: ${_gyroscopeEvent!.x.toStringAsFixed(2)}\n'
                  'Y: ${_gyroscopeEvent!.y.toStringAsFixed(2)}\n'
                  'Z: ${_gyroscopeEvent!.z.toStringAsFixed(2)}'
                : '等待数据...',
          ),
        ],
      ),
    );
  }
}

// 传感器数据卡片组件
class SensorCard extends StatelessWidget {
  final String title;
  final String data;

  const SensorCard({super.key, required this.title, required this.data});

  @override
  Widget build(BuildContext context) {
    return Card(
      elevation: 4,
      child: Padding(
        padding: const EdgeInsets.all(16),
        child: Column(
          crossAxisAlignment: CrossAxisAlignment.start,
          children: [
            Text(
              title,
              style: const TextStyle(fontSize: 18, fontWeight: FontWeight.bold),
            ),
            const SizedBox(height: 8),
            Text(data, style: const TextStyle(fontSize: 16)),
          ],
        ),
      ),
    );
  }
}
四、OpenHarmony 侧传感器桥接实现
- 创建 EventChannel 通道
在 ohos/entry/src/main/ets/entryability/EntryAbility.ets 中初始化通道:
import AbilityConstant from '@ohos.app.ability.AbilityConstant';
import hilog from '@ohos.hilog';
import UIAbility from '@ohos.app.ability.UIAbility';
import Want from '@ohos.app.ability.Want';
import type AbilityStage from '@ohos.app.ability.AbilityStage';
import { FlutterEngine, FlutterPlugin, MethodCall, MethodCallResult } from '@ohos/flutter_ohos';
import sensor from '@ohos.sensor';

const TAG = "SensorPlugin";

export default class SensorPlugin implements FlutterPlugin {
  private accelerometerEventSink: ((event: any) => void) | null = null;
  private gyroscopeEventSink: ((event: any) => void) | null = null;

  onAttachedToEngine(flutterPluginBinding: any): void {
    // 加速度计通道
    const accelerometerChannel = flutterPluginBinding.getBinaryMessenger().makeBasicMessageChannel("dev.fluttercommunity.plus/sensors/accelerometer", new flutterPluginBinding.StandardMessageCodec());
    accelerometerChannel.setMessageHandler((message: any, reply: any) => {
      this.startAccelerometerListening();
      reply.reply(null);
    });

    // 陀螺仪通道
    const gyroscopeChannel = flutterPluginBinding.getBinaryMessenger().makeBasicMessageChannel("dev.fluttercommunity.plus/sensors/gyroscope", new flutterPluginBinding.StandardMessageCodec());
    gyroscopeChannel.setMessageHandler((message: any, reply: any) => {
      this.startGyroscopeListening();
      reply.reply(null);
    });
  }

  private startAccelerometerListening() {
    sensor.on(sensor.SensorType.SENSOR_TYPE_ACCELEROMETER, (data) => {
      if (this.accelerometerEventSink) {
        this.accelerometerEventSink({
          x: data.x,
          y: data.y,
          z: data.z,
          timestamp: data.timestamp
        });
      }
    });
  }

  private startGyroscopeListening() {
    sensor.on(sensor.SensorType.SENSOR_TYPE_GYROSCOPE, (data) => {
      if (this.gyroscopeEventSink) {
        this.gyroscopeEventSink({
          x: data.x,
          y: data.y,
          z: data.z,
          timestamp: data.timestamp
        });
      }
    });
  }

  onDetachedFromEngine(binding: any): void {
    sensor.off(sensor.SensorType.SENSOR_TYPE_ACCELEROMETER);
    sensor.off(sensor.SensorType.SENSOR_TYPE_GYROSCOPE);
  }
}
- 注册插件
在 ohos/entry/src/main/ets/entryability/EntryAbility.ets 中注册插件:
import FlutterEngine from '@ohos/flutter_ohos';
import SensorPlugin from './SensorPlugin';

export default class EntryAbility extends UIAbility {
  onCreate(want: Want, launchParam: AbilityConstant.LaunchParam): void {
    hilog.info(0x0000, 'TAG', '%{public}s', 'Ability onCreate');
  }

  onWindowStageCreate(windowStage: WindowStage): void {
    const engine = new FlutterEngine(this.context);
    engine.getPlugins().add(new SensorPlugin());
    // 其他初始化代码...
  }
}
五、鸿蒙设备运行验证
1.执行构建命令:
hvigorw assembleHap --mode module -p module=entry@default -p product=default -p requiredDeviceType=phone
2.安装 HAP 包到鸿蒙设备 / 模拟器,打开应用后晃动设备,可看到加速度计、陀螺仪数据实时更新
六、适配踩坑与优化建议
权限声明问题:OpenHarmony SDK 中无 ohos.permission.MAGNETIC_FIELD 预置权限,需移除该声明,罗盘功能需通过系统能力桥接实现。
依赖解析失败:若三方库未适配 OpenHarmony,需手动桥接通道,避免直接使用未兼容的 API。
Const 构造错误:ListView 中若包含动态数据,需移除 const 修饰,避免常量上下文校验失败。
性能优化:传感器数据回调频率较高,需在 dispose 中取消订阅,避免内存泄漏。
七、总结
本文完成了 sensors_plus 在 OpenHarmony 平台的桥接适配,实现了加速度计、陀螺仪数据的跨平台采集与展示,验证了 Flutter 跨平台框架在鸿蒙设备上的传感器交互能力。后续可基于此扩展罗盘、摇一摇等更多传感器功能,为鸿蒙跨平台应用开发提供参考。
运行示例: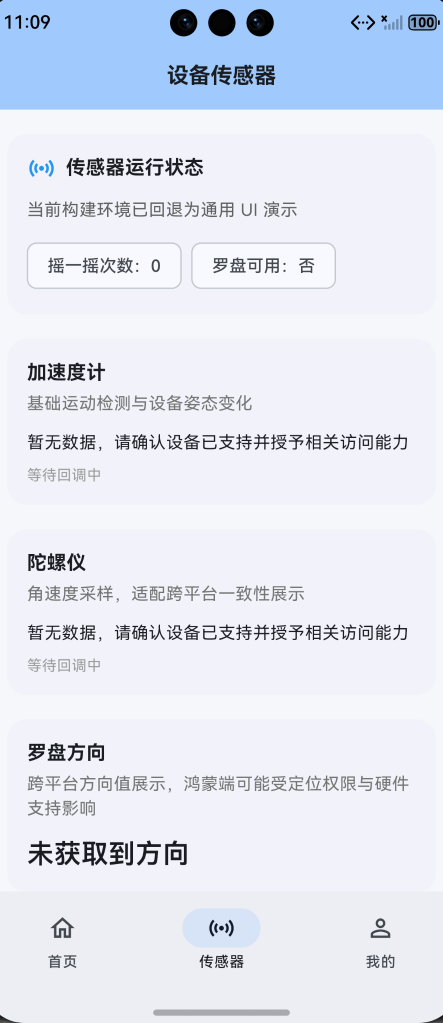

作为“人工智能6S店”的官方数字引擎,为AI开发者与企业提供一个覆盖软硬件全栈、一站式门户。
更多推荐
 0
0 0
0- 0


 已为社区贡献9条内容

所有评论(0)