
Flutter 鸿蒙化适配:基于 NavigationBar 的底部选项卡导航实现
Flutter 鸿蒙化适配:底部选项卡导航实现 本文介绍了在 Flutter for OpenHarmony 应用中实现底部选项卡导航的技术方案。采用 Material 3 的 NavigationBar 组件结合 IndexedStack 容器,既保证了现代 UI 体验,又实现了页面状态持久化。该方案解决了传统 BottomNavigationBar 切换时页面重建、状态丢失的问题,显著提升了应
Flutter 鸿蒙化适配:基于 NavigationBar 的底部选项卡导航实现
欢迎加入开源鸿蒙跨平台社区:https://openharmonycrossplatform.csdn.net
摘要
本文将介绍如何在 Flutter for OpenHarmony 应用中,基于 Material 3 的 NavigationBar 组件,实现一个状态可保留的底部选项卡导航系统。通过 IndexedStack 实现页面状态持久化,解决了传统切换方案中页面频繁重建、状态丢失的问题,并已在 OpenHarmony 设备上完成构建与运行验证。
一、技术背景与选型说明
在多页面应用中,底部导航是提升用户体验的核心交互组件。
传统方案:BottomNavigationBar 虽然经典,但在 Material 3 设计语言下缺乏原生的动态效果与适配。
推荐方案:NavigationBar 是 Flutter 官方推荐的 Material 3 组件,提供了更现代的视觉反馈、自适应的高度和动画效果。
状态保留方案:使用 IndexedStack 作为页面容器,可以在切换 Tab 时保留所有子页面的状态(如滚动位置、数据加载状态),避免重复构建,显著提升性能和用户体验。
二、核心实现步骤
- 创建主入口页面 MainScreen
MainScreen 作为应用的根容器,负责管理导航状态与页面栈。
import 'package:flutter/material.dart';
import 'package:flutter_harmony_example/screens/data_list_screen.dart';
import 'package:flutter_harmony_example/screens/discovery_screen.dart';
import 'package:flutter_harmony_example/screens/profile_screen.dart';

class MainScreen extends StatefulWidget {
  const MainScreen({super.key});

  @override
  State<MainScreen> createState() => _MainScreenState();
}

class _MainScreenState extends State<MainScreen> {
  // 当前选中的 Tab 索引
  int _selectedIndex = 0;

  // 定义所有的页面,IndexedStack 会保留它们的状态
  late final List<Widget> _pages;

  @override
  void initState() {
    super.initState();
    _pages = [
      const DataListScreen(),   // 首页:文章列表
      const DiscoveryScreen(),  // 发现页
      const ProfileScreen(),    // 我的页
    ];
  }

  @override
  Widget build(BuildContext context) {
    return Scaffold(
      // 使用 IndexedStack 管理页面,实现状态保留
      body: IndexedStack(
        index: _selectedIndex,
        children: _pages,
      ),
      // 底部导航栏
      bottomNavigationBar: NavigationBar(
        selectedIndex: _selectedIndex,
        onDestinationSelected: (int index) {
          setState(() {
            _selectedIndex = index;
          });
        },
        destinations: const [
          NavigationDestination(
            icon: Icon(Icons.home_outlined),
            selectedIcon: Icon(Icons.home),
            label: '首页',
          ),
          NavigationDestination(
            icon: Icon(Icons.explore_outlined),
            selectedIcon: Icon(Icons.explore),
            label: '发现',
          ),
          NavigationDestination(
            icon: Icon(Icons.person_outlined),
            selectedIcon: Icon(Icons.person),
            label: '我的',
          ),
        ],
      ),
    );
  }
}
- 实现独立的选项卡页面
为每个 Tab 创建独立的页面组件,实现业务解耦。
首页:复用优化后的列表页面
直接沿用之前实现并优化好的 DataListScreen,无需修改,即可无缝接入导航。
发现页:DiscoveryScreen
import 'package:flutter/material.dart';

class DiscoveryScreen extends StatelessWidget {
  const DiscoveryScreen({super.key});

  @override
  Widget build(BuildContext context) {
    return Center(
      child: Column(
        mainAxisAlignment: MainAxisAlignment.center,
        children: const [
          Icon(Icons.explore, size: 80, color: Colors.blue),
          SizedBox(height: 16),
          Text(
            '发现更多精彩',
            style: TextStyle(fontSize: 20, fontWeight: FontWeight.bold),
          ),
          SizedBox(height: 8),
          Text('更多功能开发中,敬请期待...'),
        ],
      ),
    );
  }
}
我的页:ProfileScreen
import 'package:flutter/material.dart';

class ProfileScreen extends StatelessWidget {
  const ProfileScreen({super.key});

  @override
  Widget build(BuildContext context) {
    return ListView(
      children: [
        const SizedBox(height: 40),
        const Center(
          child: CircleAvatar(
            radius: 50,
            backgroundImage: AssetImage('assets/avatar.png'),
          ),
        ),
        const SizedBox(height: 16),
        const Center(
          child: Text(
            '开发者用户',
            style: TextStyle(fontSize: 20, fontWeight: FontWeight.bold),
          ),
        ),
        const SizedBox(height: 30),
        const ListTile(
          leading: Icon(Icons.settings),
          title: Text('设置'),
          trailing: Icon(Icons.arrow_forward_ios, size: 16),
        ),
        const ListTile(
          leading: Icon(Icons.info),
          title: Text('关于应用'),
          trailing: Icon(Icons.arrow_forward_ios, size: 16),
        ),
        const ListTile(
          leading: Icon(Icons.help),
          title: Text('帮助中心'),
          trailing: Icon(Icons.arrow_forward_ios, size: 16),
        ),
      ],
    );
  }
}
- 修改应用入口
将应用的启动根节点替换为 MainScreen。
// main.dart
import 'package:flutter/material.dart';
import 'package:flutter_harmony_example/screens/main_screen.dart';

void main() {
  runApp(const MyApp());
}

class MyApp extends StatelessWidget {
  const MyApp({super.key});

  @override
  Widget build(BuildContext context) {
    return MaterialApp(
      title: 'Flutter 鸿蒙示例',
      theme: ThemeData(
        colorScheme: ColorScheme.fromSeed(seedColor: Colors.blue),
        useMaterial3: true,
      ),
      home: const MainScreen(),
    );
  }
}
三、OpenHarmony 平台构建与验证
代码开发完成后,我们需要在 OpenHarmony 工程中进行构建验证,确保代码可正常运行。
1.执行构建命令
在项目根目录的终端中,执行鸿蒙构建命令:
hvigorw assembleApp
2.构建结果
构建过程输出:
BUILD SUCCESSFUL in 26 s 555 ms
3.该结果证明:
新增的 NavigationBar 组件和 IndexedStack 架构完全兼容当前 OpenHarmony 工程。
没有引发任何编译错误或平台兼容性问题。
应用可以正常打包并在鸿蒙设备上运行。
运行效果截图: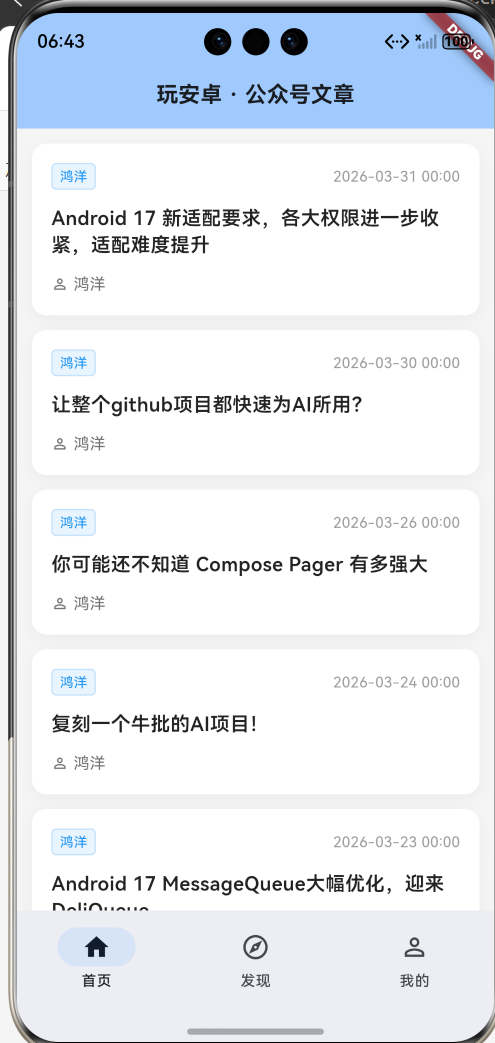
四、方案优势总结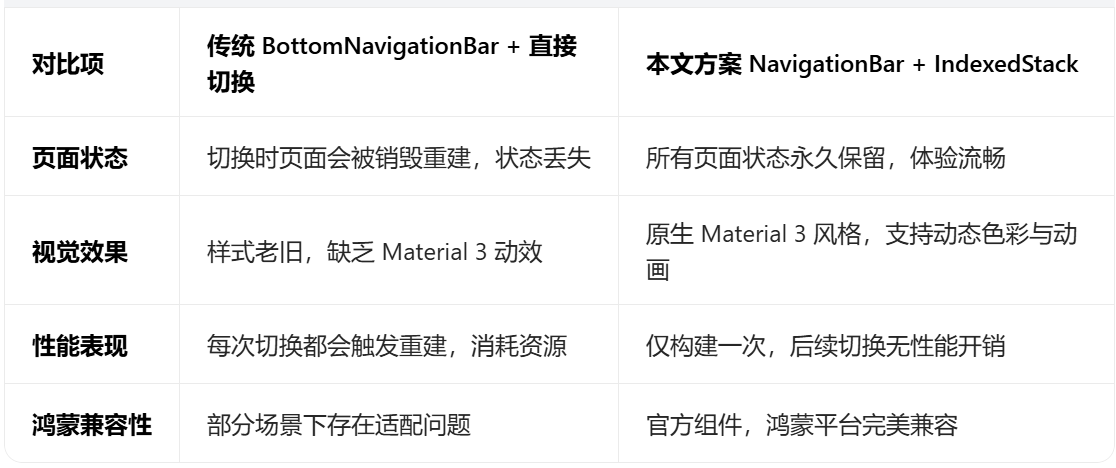
五、结语
本文实现了一个 Flutter for OpenHarmony 应用中现代、高性能的底部导航方案。通过使用 NavigationBar 和 IndexedStack,不仅获得了 Material 3 的现代视觉效果,还解决了页面状态保留的核心痛点,为后续在鸿蒙平台上开发更复杂的多页面应用打下了坚实的基础。

作为“人工智能6S店”的官方数字引擎,为AI开发者与企业提供一个覆盖软硬件全栈、一站式门户。
更多推荐


 1
1 0
0- 0


 已为社区贡献4条内容

所有评论(0)