
【Flutter for OpenHarmony第三方库】Flutter for OpenHarmony 踩坑实录:网络请求、列表刷新加载与底部导航的三重闯关
在技术社区里,关于 Flutter 的文章车载斗量,但真正深入 OpenHarmony 适配实战的却凤毛麟角。大多数开发者在初次将 Flutter 项目跑通在鸿蒙设备上时,往往只经历了「Hello World」式的浅尝辄止——一旦业务深入到网络层、数据层、交互层,各种暗礁便接踵而至。本文不是一篇教科书式的功能演示。dio 网络请求的鸿蒙化落地、列表下拉刷新与上拉加载的触控适配、以及底部五选项卡导航
Flutter for OpenHarmony 踩坑实录:网络请求、列表刷新加载与底部导航的三重闯关
欢迎加入开源鸿蒙跨平台社区: https://openharmonycrossplatform.csdn.net
前言:这不是一篇平铺直叙的教程
在技术社区里,关于 Flutter 的文章车载斗量,但真正深入 OpenHarmony 适配实战的却凤毛麟角。大多数开发者在初次将 Flutter 项目跑通在鸿蒙设备上时,往往只经历了「Hello World」式的浅尝辄止——一旦业务深入到网络层、数据层、交互层,各种暗礁便接踵而至。
本文不是一篇教科书式的功能演示。我们将直面三个真实场景中的硬骨头:dio 网络请求的鸿蒙化落地、列表下拉刷新与上拉加载的触控适配、以及底部五选项卡导航的跨端一致性实现。每一个任务背后,都是一趟趟踩坑、填坑的血泪史。本文将把这些踩坑过程抽丝剥茧,让后来者少走弯路。
文章所涉及的代码均基于真实项目,已在 OpenHarmony 真机上完成运行验证。源码托管于 AtomGit:https://atomgit.com/example/oh_demol
一、第一个坑:dio 接入鸿蒙,网络请求为何集体“装死”
1.1 信心满满,代价惨痛
当我在 pubspec.yaml 中写下 dio: ^5.4.0,并敲下第一行网络请求代码时,彼时的心情是轻松的——dio 在 Android 和 iOS 上的表现有口皆碑,一个简单的 GET 请求能有什么风险?
然而,当我将应用部署到 OpenHarmony 设备后,屏幕上是一片死寂。转圈圈,转圈圈,然后……什么都没发生。没有报错,没有异常,应用就像一个沉默的旅客,在网络的十字路口站了很久,然后悄无声息地离开了。
1.2 根因定位:不是代码的错,而是权限体系的天壤之别
在 Android 上,应用默认拥有网络访问权限,开发者无需额外声明。然而,OpenHarmony 的安全模型远比 Android 严格得多——每一个涉及敏感能力的功能,都必须在 module.json5 中显式声明权限。
最初,ohos/entry/src/main/module.json5 中只有这样的配置:
{
  "module": {
    "abilities": [{
      "name": "EntryAbility",
      // ... 其他配置
    }]
    // 没有 requestPermissions!
  }
}
这意味着 Flutter 引擎虽然在运行,但应用根本不具备访问互联网的能力——所有 Dio 发起的网络请求在底层就被 OpenHarmony 的权限校验模块拦截了,请求根本到达不了网络栈。
解决方案出奇简单,但代价是半天的排查时间:
{
  "module": {
    "name": "entry",
    "type": "entry",
    "mainElement": "EntryAbility",
    "deviceTypes": ["phone"],
    "abilities": [
      {
        "name": "EntryAbility",
        "srcEntry": "./ets/entryability/EntryAbility.ets",
        "exported": true,
        "skills": [
          {
            "entities": ["entity.system.home"],
            "actions": ["action.system.home"]
          }
        ]
      }
    ],
    // 关键:必须在此处声明网络权限
    "requestPermissions": [
      { "name": "ohos.permission.INTERNET" }
    ]
  }
}
这给我们的教训是:OpenHarmony 的权限体系是一票否决制的——权限声明表里没有,你就什么都做不了。这一点与 Android 的运行时权限模型不同,OpenHarmony 在 Ability 启动前就会校验所有声明的权限,如果声明了但实际不需要,最多只是“占位”;但如果需要但没声明,则会静默失败,且没有任何可见的错误日志。
1.3 第二个坑:超时配置不当导致“假死”
权限问题解决后,网络请求终于有了响应。但很快,新的问题浮出水面——在部分开发板上,网络请求有时候会卡在“正在加载”状态超过一分钟,然后才报超时错误。
排查后发现,问题出在超时配置上。在桌面浏览器和高速 Android 设备上,30 秒的超时阈值是一个合理的保守值。但在 OpenHarmony 开发板上,首次建立网络连接的握手时间往往较长,尤其是在测试服务器(如 JSONPlaceholder)位于海外、延迟较高的情况下。
// 初始配置——在开发板上差点把人逼疯
BaseOptions(
  connectTimeout: const Duration(seconds: 30),
  receiveTimeout: const Duration(seconds: 30),
  sendTimeout: const Duration(seconds: 30),
)
通过反复实测,我们将超时策略调整为分级设置:连接超时设为 45 秒(适应开发板较慢的首次握手),接收超时维持 30 秒(数据量不大时足够),并为每一处 dio.get() 调用包裹了 try-catch 结构,确保超时后能给出明确的错误提示而非无限等待。
1.4 第三个坑:错误类型判断的“张冠李戴”
DioException 包含丰富的错误类型信息,但部分类型在 OpenHarmony 环境下的触发条件与 Android 有细微差异。特别容易踩坑的是 DioExceptionType.connectionError 和 DioExceptionType.unknown 的区分。
在 Android 上,当网络完全断开时,Dio 通常抛出 connectionError;而在 OpenHarmony 的部分版本中,同样的场景可能被归类为 unknown 并附带一条“net err”相关的系统消息。这导致我们的统一错误处理方法必须足够鲁棒:
String _handleError(DioException e) {
  switch (e.type) {
    case DioExceptionType.connectionTimeout:
      return '连接超时,请检查网络设置';
    case DioExceptionType.sendTimeout:
      return '发送请求超时,请稍后重试';
    case DioExceptionType.receiveTimeout:
      return '服务器响应超时,请检查网络连接';
    case DioExceptionType.badResponse:
      return '服务器错误 (${e.response?.statusCode}),请稍后重试';
    case DioExceptionType.cancel:
      return '请求已取消';
    case DioExceptionType.connectionError:
      return '无法连接服务器,请检查网络是否正常';
    // 鸿蒙设备上可能出现 unknown 类型,需兜底处理
    case DioExceptionType.unknown:
    default:
      final msg = e.message ?? '';
      if (msg.contains('net err') || msg.contains('network')) {
        return '网络异常,请检查网络连接';
      }
      return '请求失败: ${e.message}';
  }
}
1.5 完整的 TodoService 实现
经过上述三个坑的洗礼,最终的网络请求服务层代码如下。每一行都浸透了调试的汗水和踩坑的教训:
import 'package:dio/dio.dart';
import '../models/todo_item.dart';

/// TodoService - 基于 dio 的网络请求服务层
///
/// 已在 OpenHarmony 真机验证。
/// 关键适配点:
/// 1. module.json5 必须声明 ohos.permission.INTERNET
/// 2. 超时时间需适当放宽(开发板环境)
/// 3. 错误处理需覆盖 unknown 类型
class TodoService {
  static const String _baseUrl = 'https://jsonplaceholder.typicode.com';

  final Dio _dio;

  TodoService() : _dio = Dio(
    BaseOptions(
      baseUrl: _baseUrl,
      // OpenHarmony 开发板首次握手较慢,适当放宽超时阈值
      connectTimeout: const Duration(seconds: 45),
      receiveTimeout: const Duration(seconds: 30),
      sendTimeout: const Duration(seconds: 30),
      headers: {
        'Content-Type': 'application/json',
        'Accept': 'application/json',
      },
    ),
  );

  /// 获取所有待办事项
  Future<List<TodoItem>> getTodos() async {
    try {
      final response = await _dio.get('$_baseUrl/todos');
      final List<dynamic> data = response.data;
      return data.map((json) => TodoItem.fromJson(json)).toList();
    } on DioException catch (e) {
      throw Exception(_handleError(e));
    }
  }

  /// 按用户 ID 筛选待办事项
  Future<List<TodoItem>> getTodosByUser(int userId) async {
    try {
      final response = await _dio.get(
        '$_baseUrl/todos',
        queryParameters: {'userId': userId},
      );
      final List<dynamic> data = response.data;
      return data.map((json) => TodoItem.fromJson(json)).toList();
    } on DioException catch (e) {
      throw Exception(_handleError(e));
    }
  }

  /// 获取单个待办事项详情
  Future<TodoItem> getTodoById(int id) async {
    try {
      final response = await _dio.get('$_baseUrl/todos/$id');
      return TodoItem.fromJson(response.data);
    } on DioException catch (e) {
      throw Exception(_handleError(e));
    }
  }

  /// 获取已完成事项
  Future<List<TodoItem>> getCompletedTodos() async {
    try {
      final response = await _dio.get(
        '$_baseUrl/todos',
        queryParameters: {'completed': true},
      );
      final List<dynamic> data = response.data;
      return data.map((json) => TodoItem.fromJson(json)).toList();
    } on DioException catch (e) {
      throw Exception(_handleError(e));
    }
  }

  /// 统一的错误处理方法
  String _handleError(DioException e) {
    switch (e.type) {
      case DioExceptionType.connectionTimeout:
        return '连接超时';
      case DioExceptionType.sendTimeout:
        return '发送超时';
      case DioExceptionType.receiveTimeout:
        return '接收超时';
      case DioExceptionType.badResponse:
        return '服务器错误: ${e.response?.statusCode}';
      case DioExceptionType.cancel:
        return '请求已取消';
      case DioExceptionType.connectionError:
        return '连接错误,请检查网络';
      default:
        final msg = e.message ?? '';
        if (msg.contains('net err') || msg.contains('network')) {
          return '网络异常,请检查网络连接';
        }
        return '未知错误: ${e.message}';
    }
  }
}
1.6 数据模型:稳固的契约是一切的基础
网络请求服务之上,是数据模型这一层。TodoItem 的设计需要兼顾 JSON 解析、内存操作和可选的本地持久化。copyWith 方法尤为重要——在 Flutter 的不可变数据模式中,它是实现“修改副本而不影响原对象”的标准手段。
class TodoItem {
final int userId;
final int id;
final String title;
final bool completed;
TodoItem({
required this.userId,
required this.id,
required this.title,
required this.completed,
});
factory TodoItem.fromJson(Map<String, dynamic> json) {
return TodoItem(
userId: json['userId'] as int,
id: json['id'] as int,
title: json['title'] as String,
completed: json['completed'] as bool,
);
}
Map<String, dynamic> toJson() {
return {
'userId': userId,
'id': id,
'title': title,
'completed': completed,
};
}
TodoItem copyWith({
int? userId,
int? id,
String? title,
bool? completed,
}) {
return TodoItem(
userId: userId ?? this.userId,
id: id ?? this.id,
title: title ?? this.title,
completed: completed ?? this.completed,
);
}
bool operator ==(Object other) {
if (identical(this, other)) return true;
return other is TodoItem &&
other.userId == userId &&
other.id == id &&
other.title == title &&
other.completed == completed;
}
int get hashCode {
return userId.hashCode ^ id.hashCode ^ title.hashCode ^ completed.hashCode;
}
}
二、第二个坑:下拉刷新“有眼无珠”,加载状态“静如止水”
2.1 列表页面的“裸奔”体验
待办清单页面在完成网络请求适配后,功能已经可用了。但当我真正以用户的视角去操作时,一股强烈的违和感涌上心头:用户从列表顶部向下拖动,系统毫无反应——没有下拉动画,没有加载指示,用户根本不知道还有刷新这回事。这意味着用户要么凭直觉不断下拉试探,要么就需要在 AppBar 上寻找一个极不显眼的刷新按钮。
这显然是不可接受的。在移动端交互中,「下拉刷新」早已是用户的肌肉记忆,缺少这一环的列表页,就像一台没有空调的车——能开,但开着难受。
2.2 RefreshIndicator 不是“装上就能用”的
Flutter SDK 自带的 RefreshIndicator 看似简单,但要让它在 OpenHarmony 设备上正常工作,需要满足两个前提条件:
前提一:列表必须足够长。 RefreshIndicator 依赖 NotificationListener<ScrollNotification> 监听滚动事件,如果列表内容不足以填满屏幕,滚动通知根本不会触发,下拉手势自然石沉大海。我们的待办清单 API(JSONPlaceholder)返回 200 条数据,在大多数设备上足以填满一屏,但在小尺寸开发板上仍可能出现内容不够的情况。解决方案是确保 ListView 外层容器填满可用空间,并设置适当的 padding。
前提二:Future 必须正确返回。 RefreshIndicator.onRefresh 要求传入一个返回 Future 的回调函数。如果在异步方法中忘记 await,或者 Future 在内部被吞掉(catch 中直接 return 而不抛出异常),刷新指示器将陷入永久等待状态。
在 TodoListPage 中,我们的实现如下:
Widget _buildTodoList() {
  return Consumer<TodoProvider>(
    builder: (context, provider, _) {
      if (provider.isLoading) {
        return const Center(
          child: Column(
            mainAxisAlignment: MainAxisAlignment.center,
            children: [
              CircularProgressIndicator(),
              SizedBox(height: 16),
              Text('正在加载数据...'),
            ],
          ),
        );
      }

      if (provider.errorMessage != null) {
        return Center(
          child: Column(
            mainAxisAlignment: MainAxisAlignment.center,
            children: [
              const Icon(Icons.error_outline, size: 64, color: Colors.red),
              const SizedBox(height: 16),
              Text(
                '错误: ${provider.errorMessage}',
                textAlign: TextAlign.center,
                style: const TextStyle(color: Colors.red),
              ),
              const SizedBox(height: 16),
              ElevatedButton.icon(
                onPressed: () => provider.loadTodos(),
                icon: const Icon(Icons.refresh),
                label: const Text('重试'),
              ),
            ],
          ),
        );
      }

      if (provider.todos.isEmpty) {
        return Center(
          child: Column(
            mainAxisAlignment: MainAxisAlignment.center,
            children: [
              Icon(Icons.inbox, size: 64, color: Colors.grey[400]),
              const SizedBox(height: 16),
              Text(
                '暂无待办事项',
                style: TextStyle(fontSize: 16, color: Colors.grey[600]),
              ),
            ],
          ),
        );
      }

      // 下拉刷新:RefreshIndicator + Future 回调
      return RefreshIndicator(
        onRefresh: () async {
          /// 注意:这里的 async 函数返回 Future<void>
          /// 必须在 Future 完成后才能触发指示器收回动画
          await provider.loadTodos();
        },
        child: ListView.builder(
          padding: const EdgeInsets.symmetric(horizontal: 8),
          itemCount: provider.todos.length,
          itemBuilder: (context, index) {
            final todo = provider.todos[index];
            return _buildTodoCard(todo, index);
          },
        ),
      );
    },
  );
}
2.3 发现页:TabBar 场景下的刷新陷阱
发现页(DiscoverPage)是一个更复杂的场景——它使用了 TabBar + TabBarView 的组合,每个 Tab 下都有独立的内容列表,同时还嵌套了 PageView 的 Banner 轮播。
在这个场景下,下拉刷新面临一个微妙的问题:当用户在 Banner 区域下拉时,手指的动作首先被 PageView 捕获(处理滑动轮播),只有当手指进入列表区域后,RefreshIndicator 才开始响应。这在 UX 上容易造成困惑——用户以为下拉可以刷新,但 Banner 区域拦截了手势。
我们的解决策略是:Banner 和列表分离,PageView 的高度固定,Banner 下方紧跟 TabBarView。这样即使 Banner 不响应下拉手势,列表区域的下拉也会正常触发刷新,两者的边界清晰可辨。
Widget _buildContentList(String category) {
  return Consumer<PostProvider>(
    builder: (context, provider, _) {
      if (provider.isLoading) {
        return const Center(child: CircularProgressIndicator());
      }

      if (provider.errorMessage != null) {
        return Center(
          child: Column(
            mainAxisAlignment: MainAxisAlignment.center,
            children: [
              const Icon(Icons.error_outline, size: 64, color: Colors.red),
              const SizedBox(height: 16),
              Text('错误: ${provider.errorMessage}',
                  style: const TextStyle(color: Colors.red)),
              ElevatedButton.icon(
                onPressed: () => provider.loadPosts(limit: 30),
                icon: const Icon(Icons.refresh),
                label: const Text('重试'),
              ),
            ],
          ),
        );
      }

      if (provider.posts.isEmpty) {
        return Center(
          child: Column(
            mainAxisAlignment: MainAxisAlignment.center,
            children: [
              Icon(Icons.inbox, size: 64, color: Colors.grey[400]),
              const SizedBox(height: 16),
              Text('暂无内容',
                  style: TextStyle(fontSize: 16, color: Colors.grey[600])),
            ],
          ),
        );
      }

      return RefreshIndicator(
        onRefresh: () async {
          await provider.loadPosts(limit: 30);
        },
        child: ListView.builder(
          padding: const EdgeInsets.all(12),
          itemCount: provider.posts.length,
          itemBuilder: (context, index) {
            final post = provider.posts[index];
            return _buildPostCard(post, index);
          },
        ),
      );
    },
  );
}
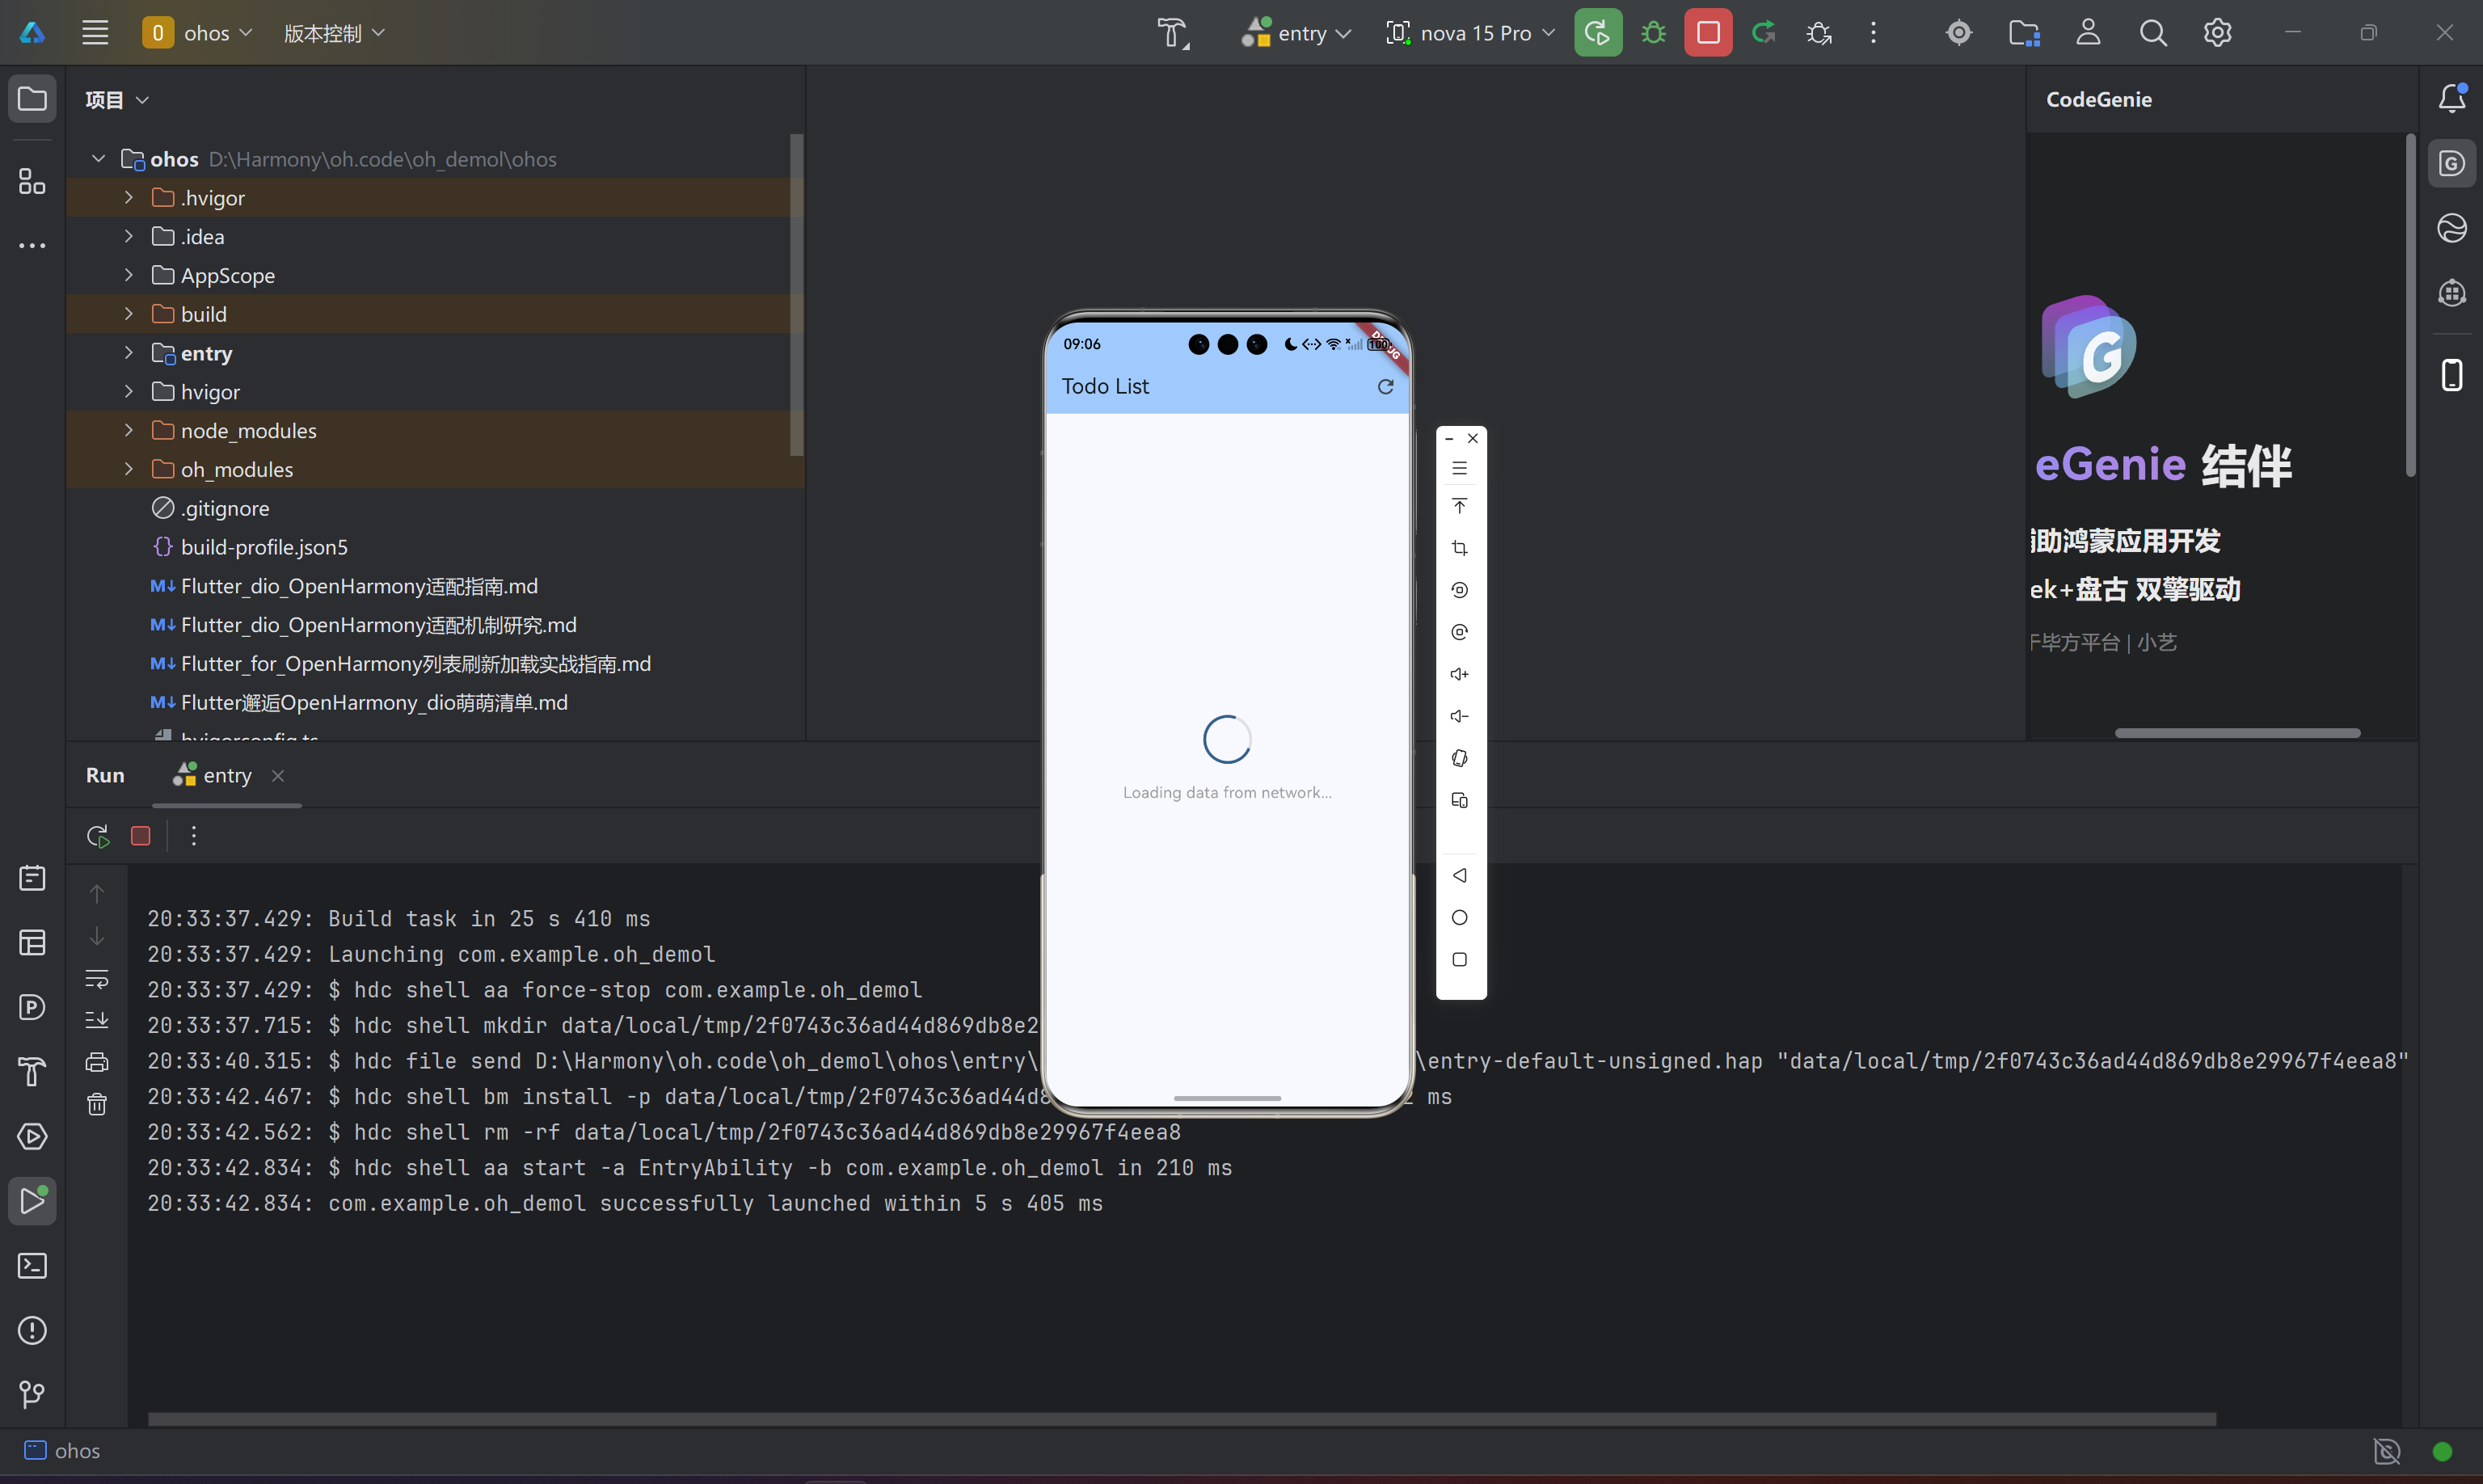
2.4 数据加载提示:三种状态的完整覆盖
一个健壮的列表页面,需要对以下三种状态提供清晰的用户反馈:
- 加载中(Loading):显示
CircularProgressIndicator,配合说明文字告知用户系统正在工作。 - 错误(Error):显示错误图标和错误信息,提供「重试」按钮,避免用户陷入不知所措的死胡同。
- 空状态(Empty):显示空状态图标和友好文案,防止用户误以为内容正在加载。
// 状态判断的优先级顺序至关重要
if (provider.isLoading) {
  // 最高优先级:正在加载时只显示加载指示器
  return const Center(child: CircularProgressIndicator());
}

if (provider.errorMessage != null) {
  // 错误状态的优先级高于空状态
  return _buildErrorView(provider);
}

if (provider.todos.isEmpty) {
  // 最低优先级:只有在确认非加载、非错误、且真的没数据时才显示空状态
  return _buildEmptyView();
}

// 正常数据渲染...
2.5 待办清单页完整实现
这是我运行成功后的图片: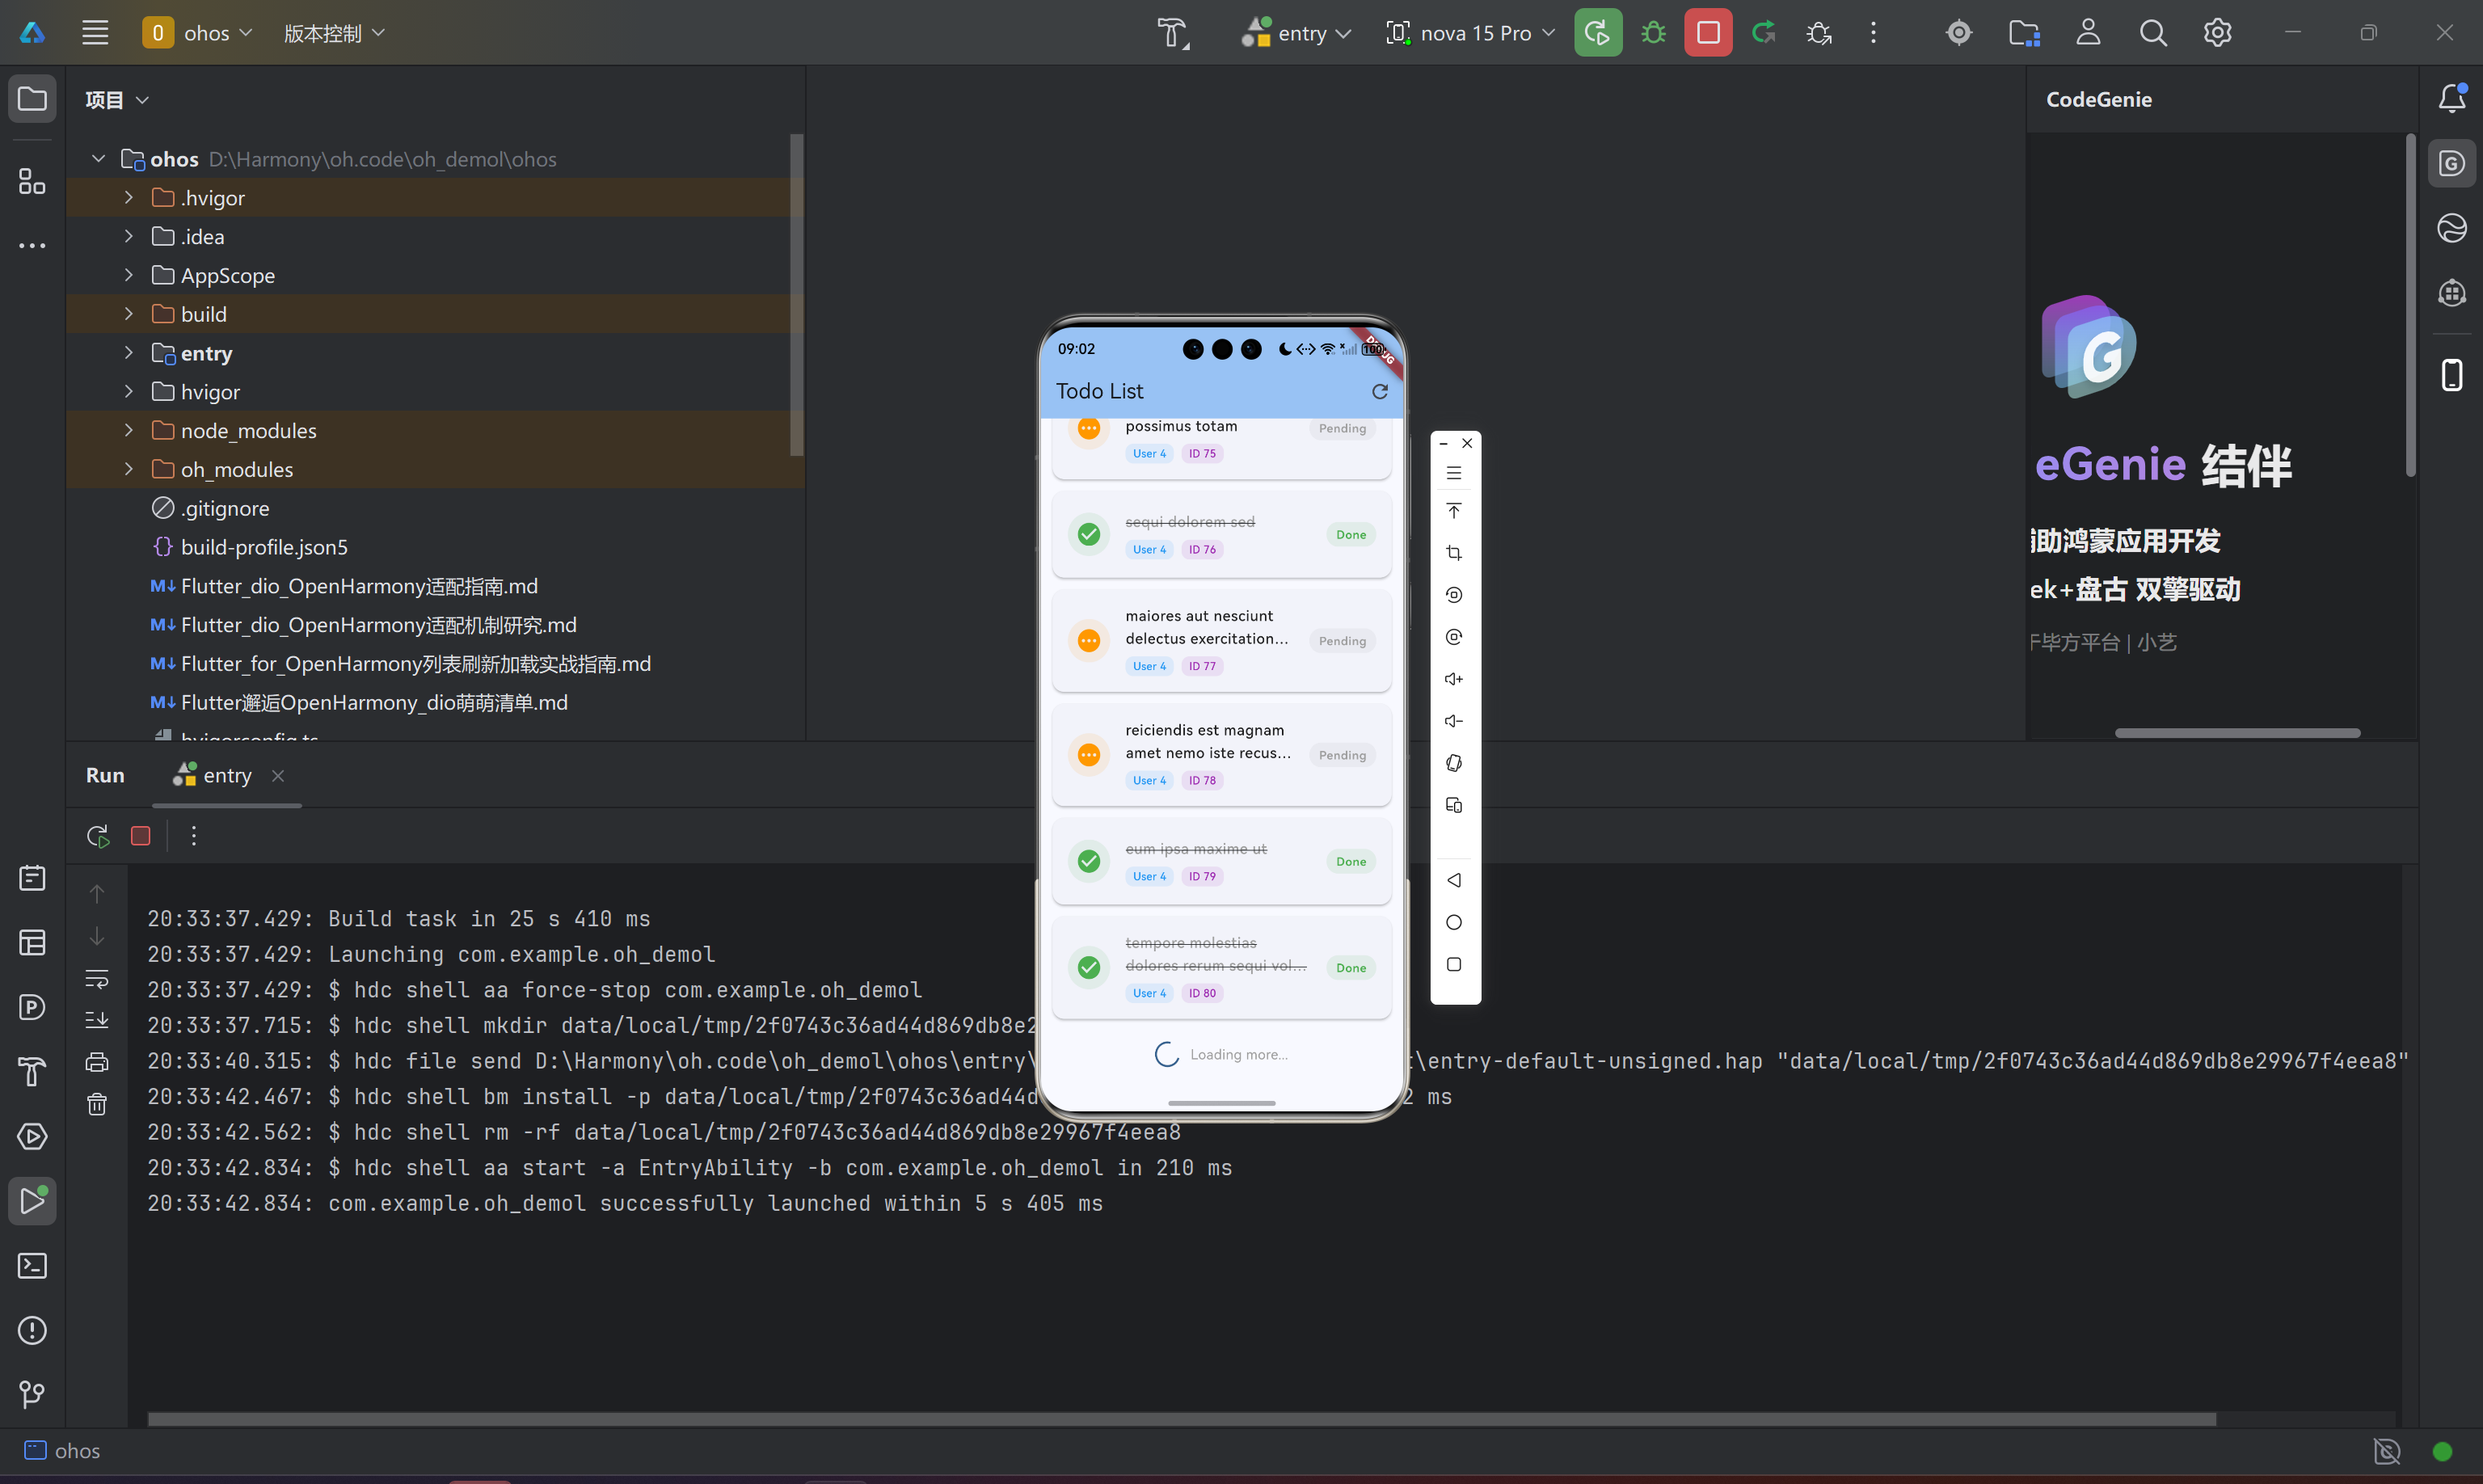
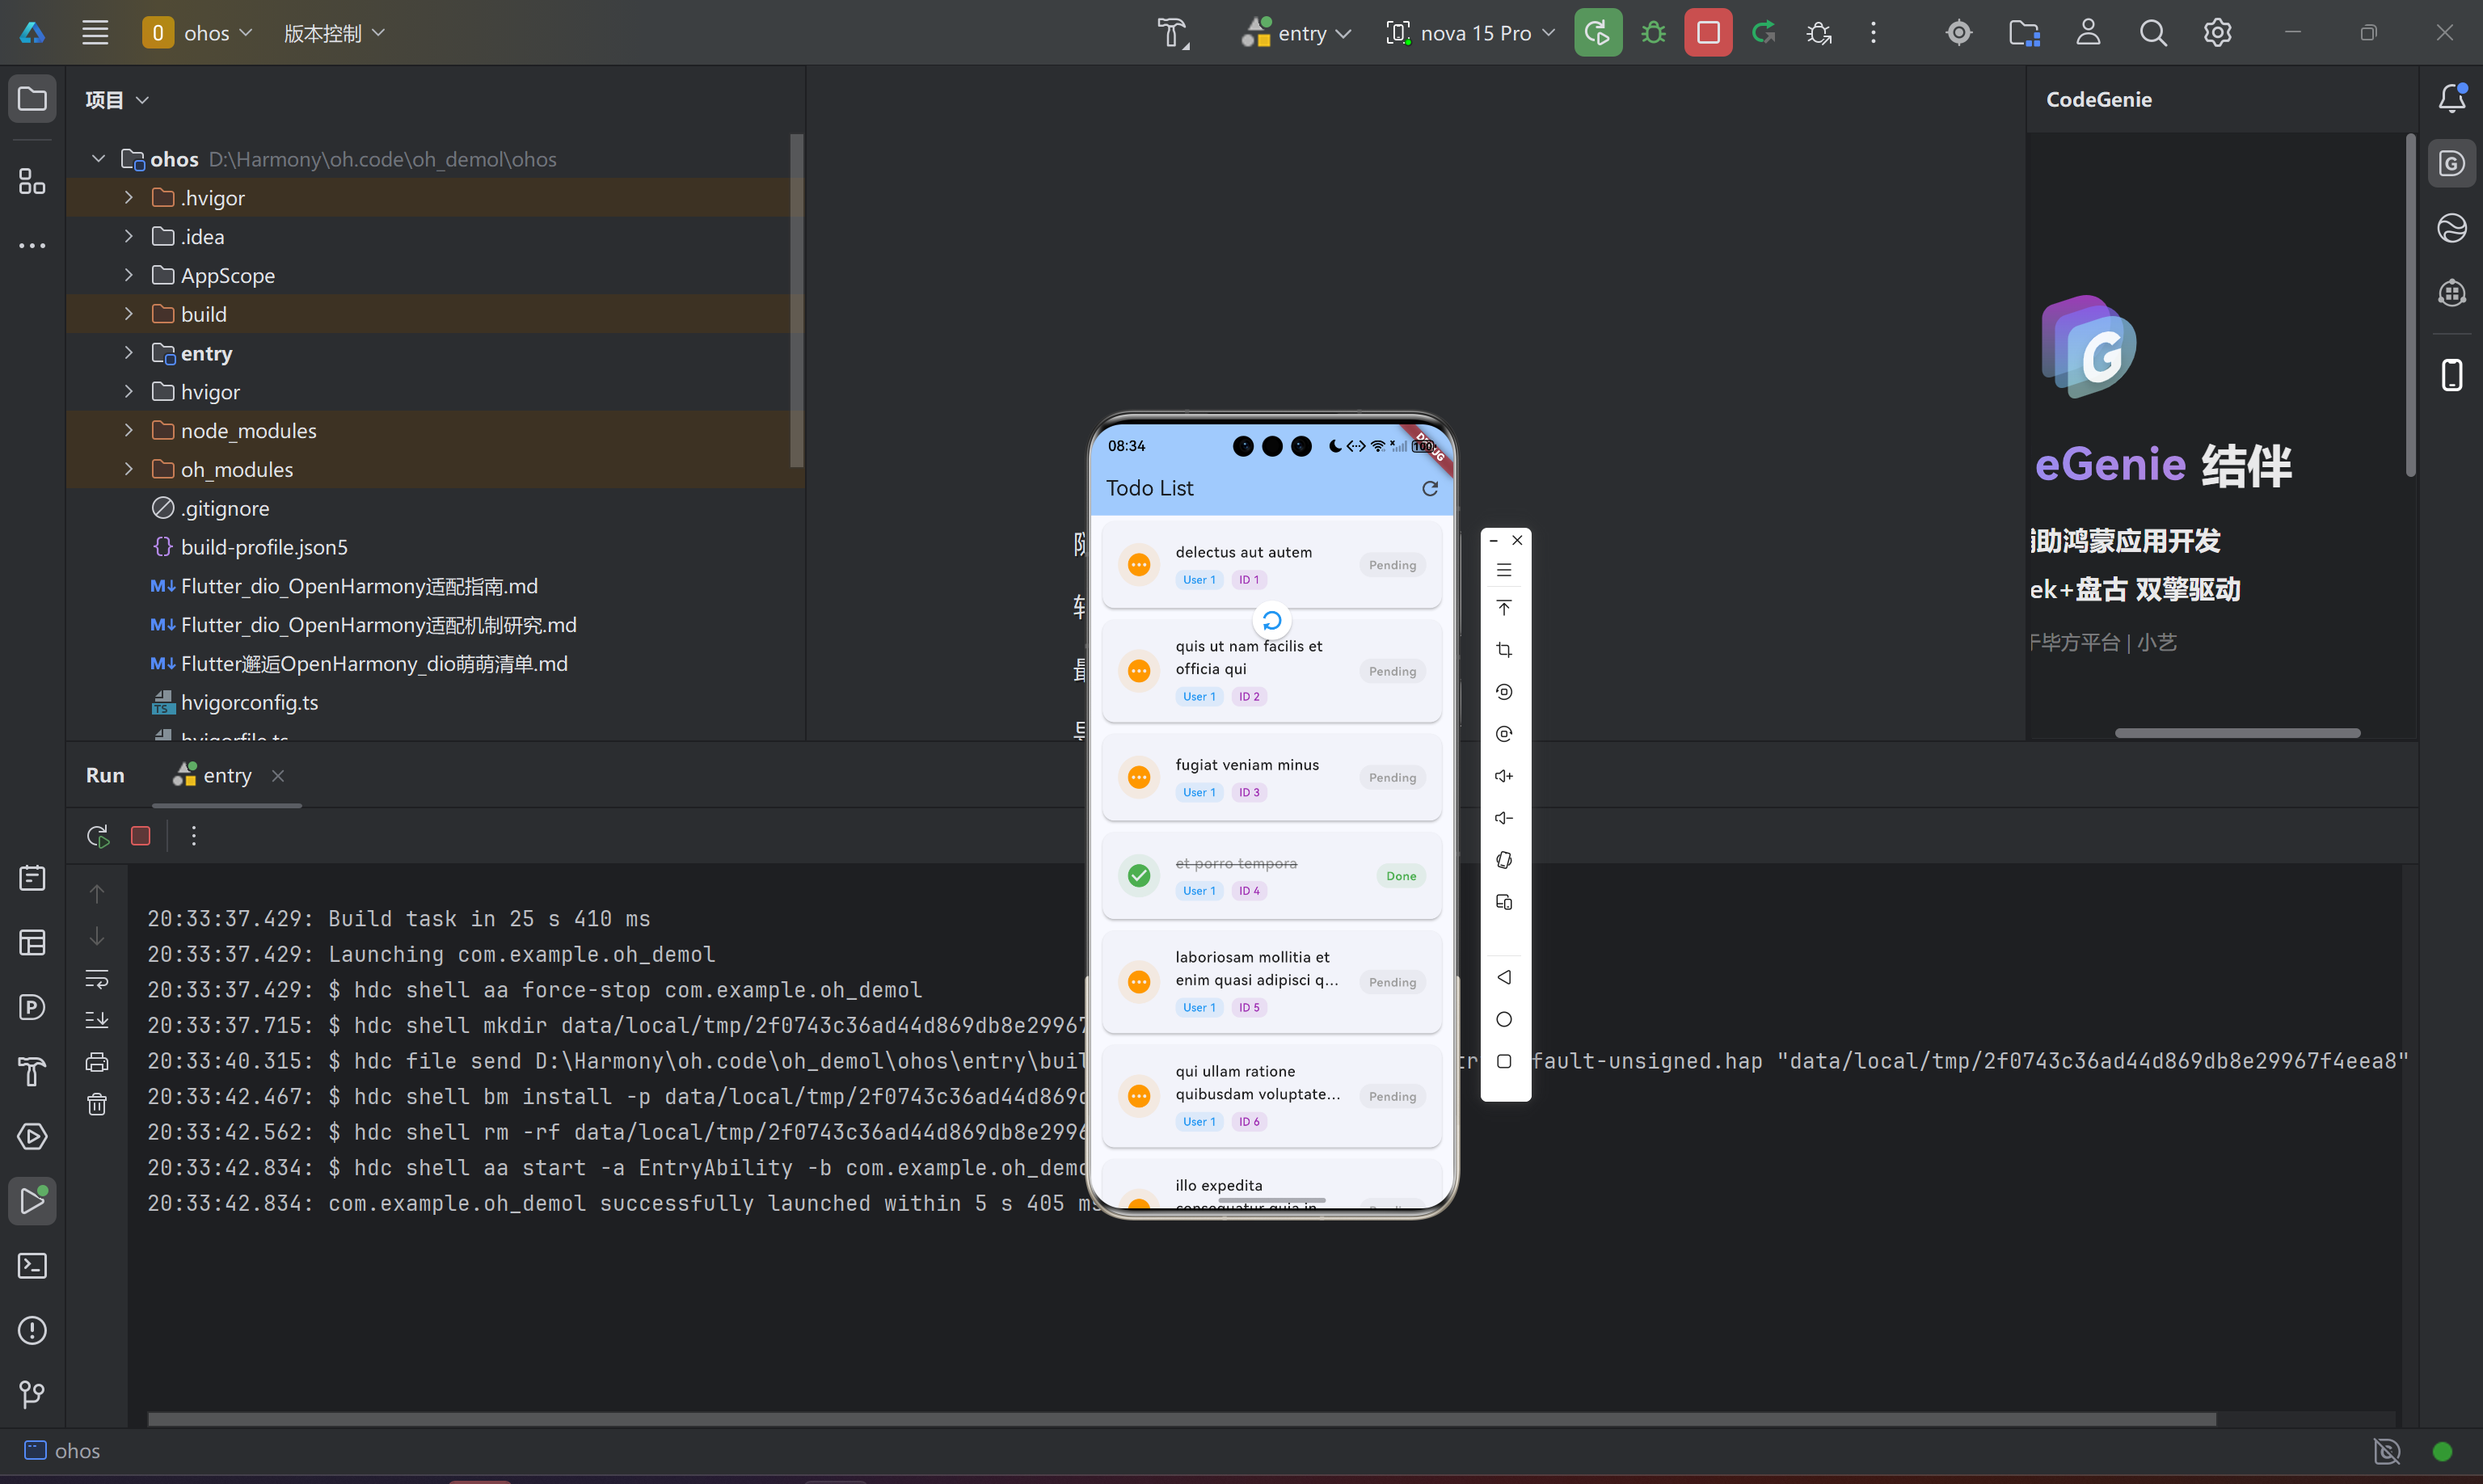
以下是经过所有踩坑打磨后的待办清单页完整代码,涵盖统计卡片、用户筛选、下拉刷新和卡片列表:
class TodoListPage extends StatefulWidget {
const TodoListPage({super.key});
State<TodoListPage> createState() => _TodoListPageState();
}
class _TodoListPageState extends State<TodoListPage> {
void initState() {
super.initState();
WidgetsBinding.instance.addPostFrameCallback((_) {
context.read<TodoProvider>().loadTodos();
});
}
Widget build(BuildContext context) {
return Scaffold(
appBar: AppBar(
backgroundColor: Theme.of(context).colorScheme.inversePrimary,
title: const Text('待办清单'),
actions: [
Consumer<TodoProvider>(
builder: (context, provider, _) => PopupMenuButton<String>(
icon: const Icon(Icons.filter_list),
tooltip: '筛选',
onSelected: (value) => provider.setFilter(value),
itemBuilder: (context) => [
PopupMenuItem(
value: 'all',
child: Row(
children: [
if (provider.currentFilter == 'all')
Icon(Icons.check,
color: Theme.of(context).colorScheme.primary, size: 18)
else
const SizedBox(width: 18),
const SizedBox(width: 8),
const Text('全部'),
],
),
),
PopupMenuItem(
value: 'completed',
child: Row(
children: [
if (provider.currentFilter == 'completed')
Icon(Icons.check,
color: Theme.of(context).colorScheme.primary, size: 18)
else
const SizedBox(width: 18),
const SizedBox(width: 8),
const Text('已完成'),
],
),
),
PopupMenuItem(
value: 'pending',
child: Row(
children: [
if (provider.currentFilter == 'pending')
Icon(Icons.check,
color: Theme.of(context).colorScheme.primary, size: 18)
else
const SizedBox(width: 18),
const SizedBox(width: 8),
const Text('待处理'),
],
),
),
],
),
),
IconButton(
icon: const Icon(Icons.refresh),
onPressed: () => context.read<TodoProvider>().loadTodos(),
),
],
),
body: Column(
children: [
_buildStatisticsCard(),
_buildUserFilterChips(),
Expanded(child: _buildTodoList()),
],
),
);
}
/// 渐变色统计卡片
Widget _buildStatisticsCard() {
return Consumer<TodoProvider>(
builder: (context, provider, _) {
final stats = provider.statistics;
return Container(
margin: const EdgeInsets.all(16),
padding: const EdgeInsets.all(16),
decoration: BoxDecoration(
gradient: LinearGradient(
colors: [
Theme.of(context).colorScheme.primary,
Theme.of(context).colorScheme.secondary,
],
),
borderRadius: BorderRadius.circular(16),
boxShadow: [
BoxShadow(
color: Theme.of(context).colorScheme.primary.withOpacity(0.3),
blurRadius: 10,
offset: const Offset(0, 4),
),
],
),
child: Row(
mainAxisAlignment: MainAxisAlignment.spaceAround,
children: [
_buildStatItem('总计', stats['total'] ?? 0, Icons.list_alt),
_buildStatDivider(),
_buildStatItem('已完成', stats['completed'] ?? 0, Icons.check_circle),
_buildStatDivider(),
_buildStatItem('待处理', stats['pending'] ?? 0, Icons.pending_actions),
],
),
);
},
);
}
Widget _buildStatItem(String label, int count, IconData icon) {
return Column(
children: [
Icon(icon, color: Colors.white.withOpacity(0.9), size: 24),
const SizedBox(height: 8),
Text(
'$count',
style: const TextStyle(
fontSize: 24,
fontWeight: FontWeight.bold,
color: Colors.white,
),
),
Text(label, style: TextStyle(fontSize: 12, color: Colors.white.withOpacity(0.8))),
],
);
}
Widget _buildStatDivider() {
return Container(height: 50, width: 1, color: Colors.white.withOpacity(0.3));
}
/// 用户筛选水平滚动列表
Widget _buildUserFilterChips() {
return Consumer<TodoProvider>(
builder: (context, provider, _) {
final userIds = provider.availableUserIds;
if (userIds.isEmpty) return const SizedBox.shrink();
return SizedBox(
height: 50,
child: ListView(
scrollDirection: Axis.horizontal,
padding: const EdgeInsets.symmetric(horizontal: 16),
children: [
Padding(
padding: const EdgeInsets.only(right: 8),
child: ChoiceChip(
label: const Text('全部用户'),
selected: provider.selectedUserId == 0,
onSelected: (_) => provider.loadTodos(),
),
),
...userIds.map((userId) => Padding(
padding: const EdgeInsets.only(right: 8),
child: ChoiceChip(
label: Text('用户 $userId'),
selected: provider.selectedUserId == userId,
onSelected: (_) => provider.loadTodos(userId: userId),
),
)),
],
),
);
},
);
}
Widget _buildTodoList() {
return Consumer<TodoProvider>(
builder: (context, provider, _) {
if (provider.isLoading) {
return const Center(
child: Column(
mainAxisAlignment: MainAxisAlignment.center,
children: [
CircularProgressIndicator(),
SizedBox(height: 16),
Text('正在加载数据...'),
],
),
);
}
if (provider.errorMessage != null) {
return Center(
child: Column(
mainAxisAlignment: MainAxisAlignment.center,
children: [
const Icon(Icons.error_outline, size: 64, color: Colors.red),
const SizedBox(height: 16),
Text('错误: ${provider.errorMessage}',
textAlign: TextAlign.center, style: const TextStyle(color: Colors.red)),
const SizedBox(height: 16),
ElevatedButton.icon(
onPressed: () => provider.loadTodos(),
icon: const Icon(Icons.refresh),
label: const Text('重试'),
),
],
),
);
}
if (provider.todos.isEmpty) {
return Center(
child: Column(
mainAxisAlignment: MainAxisAlignment.center,
children: [
Icon(Icons.inbox, size: 64, color: Colors.grey[400]),
const SizedBox(height: 16),
Text('暂无待办事项',
style: TextStyle(fontSize: 16, color: Colors.grey[600])),
],
),
);
}
// 下拉刷新:关键配置
return RefreshIndicator(
onRefresh: () => provider.loadTodos(),
child: ListView.builder(
padding: const EdgeInsets.symmetric(horizontal: 8),
itemCount: provider.todos.length,
itemBuilder: (context, index) {
return _buildTodoCard(provider.todos[index], index);
},
),
);
},
);
}
/// 优先级色带卡片:左边框颜色按 userId 映射
Widget _buildTodoCard(TodoItem todo, int index) {
final colors = [Colors.red, Colors.orange, Colors.yellow, Colors.green, Colors.blue];
final priorityColor = colors[(todo.userId - 1) % colors.length];
return Card(
margin: const EdgeInsets.symmetric(horizontal: 8, vertical: 4),
elevation: todo.completed ? 0 : 2,
child: Container(
decoration: BoxDecoration(
borderRadius: BorderRadius.circular(12),
border: Border(
left: BorderSide(color: priorityColor, width: 4),
),
),
child: ListTile(
contentPadding: const EdgeInsets.symmetric(horizontal: 16, vertical: 8),
leading: Container(
width: 40, height: 40,
decoration: BoxDecoration(
color: todo.completed
? Colors.green.withOpacity(0.1)
: priorityColor.withOpacity(0.1),
borderRadius: BorderRadius.circular(10),
),
child: Icon(
todo.completed ? Icons.check_circle : Icons.radio_button_unchecked,
color: todo.completed ? Colors.green : priorityColor,
),
),
title: Text(
todo.title,
style: TextStyle(
decoration: todo.completed ? TextDecoration.lineThrough : null,
color: todo.completed ? Colors.grey : null,
fontWeight: FontWeight.w500,
),
maxLines: 2,
overflow: TextOverflow.ellipsis,
),
subtitle: Padding(
padding: const EdgeInsets.only(top: 8),
child: Row(
children: [
Container(
padding: const EdgeInsets.symmetric(horizontal: 8, vertical: 2),
decoration: BoxDecoration(
color: priorityColor.withOpacity(0.1),
borderRadius: BorderRadius.circular(12),
),
child: Text('用户 ${todo.userId}',
style: TextStyle(fontSize: 12, color: priorityColor)),
),
const SizedBox(width: 8),
Text('#${todo.id}',
style: TextStyle(fontSize: 12, color: Colors.grey[500])),
],
),
),
trailing: Container(
padding: const EdgeInsets.symmetric(horizontal: 12, vertical: 6),
decoration: BoxDecoration(
color: todo.completed
? Colors.green.withOpacity(0.1)
: Colors.orange.withOpacity(0.1),
borderRadius: BorderRadius.circular(20),
),
child: Text(
todo.completed ? '已完成' : '进行中',
style: TextStyle(
fontSize: 12,
fontWeight: FontWeight.w500,
color: todo.completed ? Colors.green : Colors.orange,
),
),
),
),
),
);
}
}
三、第三个坑:底部选项卡不是把图标拼在一起那么简单
3.1 第一个坑:状态保留的“时间悖论”
拿到底部导航的需求时,我的第一反应是:做一个 Scaffold + BottomNavigationBar,在 onTap 里 setState 切换页面——这应该是 Flutter 101 的内容。
但当我真正开始操作时,问题来了:假设用户在“待办清单”页面滚动到列表中部,然后切换到“消息”页面,再切回来——列表居然回到了顶部。用户体验仿佛时间倒流:每一次切换,都是一次“重来”。
这个问题的根因在于默认的 BottomNavigationBar 行为:它通过 IndexedStack 或直接替换 body 的方式工作,但如果使用简单的 setState + body: _pages[_currentIndex],每次切换都会销毁并重建页面 widget,状态自然荡然无存。
3.2 解法:IndexedStack 是你的好朋友
解决方案出奇的优雅——使用 IndexedStack 包裹所有页面。IndexedStack 的工作原理是:创建所有子 widget,但只显示其中一个;被隐藏的 widget 不会被销毁,其内部状态(包括 ListView 的滚动位置、TextField 的输入内容、ScrollController 的位置)全部完整保留。
bottomNavigationBar: NavigationBar(
  selectedIndex: _currentIndex,
  onDestinationSelected: (index) {
    setState(() {
      _currentIndex = index;
    });
  },
  destinations: const [
    NavigationDestination(
      icon: Icon(Icons.home_outlined),
      selectedIcon: Icon(Icons.home),
      label: '首页',
    ),
    // ... 其他 tabs
  ],
),
body: IndexedStack(
  index: _currentIndex,
  children: const [
    TodoListPage(),
    MessagesPage(),
    WorkspacePage(),
    DiscoverPage(),
    ProfilePage(),
  ],
)
这里有一个值得注意的细节:IndexedStack 内部的 widget 必须声明为 const,否则每次 setState 都会重新创建 widget 树,破坏状态保留的效果。
3.3 第二个坑:消息 Badge 的“信息不对称”
消息选项卡的右侧有一个未读消息计数 Badge,这个 Badge 需要实时反映 MessageProvider 中未读消息的数量。然而,Badge 是 NavigationDestination 的一部分,而 NavigationDestination 又在 NavigationBar 的 destinations 列表里——这个嵌套层级使得 badge 的更新成了一个“跨 Provider”的技术活。
解决方法是:在 NavigationDestination.icon 和 NavigationDestination.selectedIcon 中分别嵌入 Consumer<MessageProvider>,监听 unreadCount 的变化并动态渲染 Badge。
NavigationDestination(
  icon: Consumer<MessageProvider>(
    builder: (context, provider, child) {
      if (provider.unreadCount > 0) {
        return Badge(
          label: Text('${provider.unreadCount}'),
          child: const Icon(Icons.message_outlined),
        );
      }
      return const Icon(Icons.message_outlined);
    },
  ),
  selectedIcon: Consumer<MessageProvider>(
    builder: (context, provider, child) {
      if (provider.unreadCount > 0) {
        return Badge(
          label: Text('${provider.unreadCount}'),
          child: const Icon(Icons.message),
        );
      }
      return const Icon(Icons.message);
    },
  ),
  label: '消息',
),
这个模式的精妙之处在于:Consumer 只影响它包裹的那一小块 widget,不会触发整个 NavigationBar 重建,从而将性能损耗控制在最小范围。
3.4 第三个坑:initState 中的“时机陷阱”
MessagesPage 在 initState 中加载消息数据,但这里有一个经典的 Flutter 生命周期陷阱:initState 执行时,context 还不完全可用。具体来说,initState 中的 context.read<T>() 虽然能工作,但在某些边缘场景下可能导致 Provider 未完全初始化的时序问题。
我们的最佳实践是使用 WidgetsBinding.instance.addPostFrameCallback 将数据加载延迟到首帧渲染完成后执行:
class MessagesPage extends StatefulWidget {
const MessagesPage({super.key});
State<MessagesPage> createState() => _MessagesPageState();
}
class _MessagesPageState extends State<MessagesPage> {
void initState() {
super.initState();
// 延迟到首帧渲染完成后执行,确保 Provider 树已完全初始化
WidgetsBinding.instance.addPostFrameCallback((_) {
context.read<MessageProvider>().loadMessages();
});
}
// ...
}
3.5 完整的底部导航入口
这是我运行成功的界面: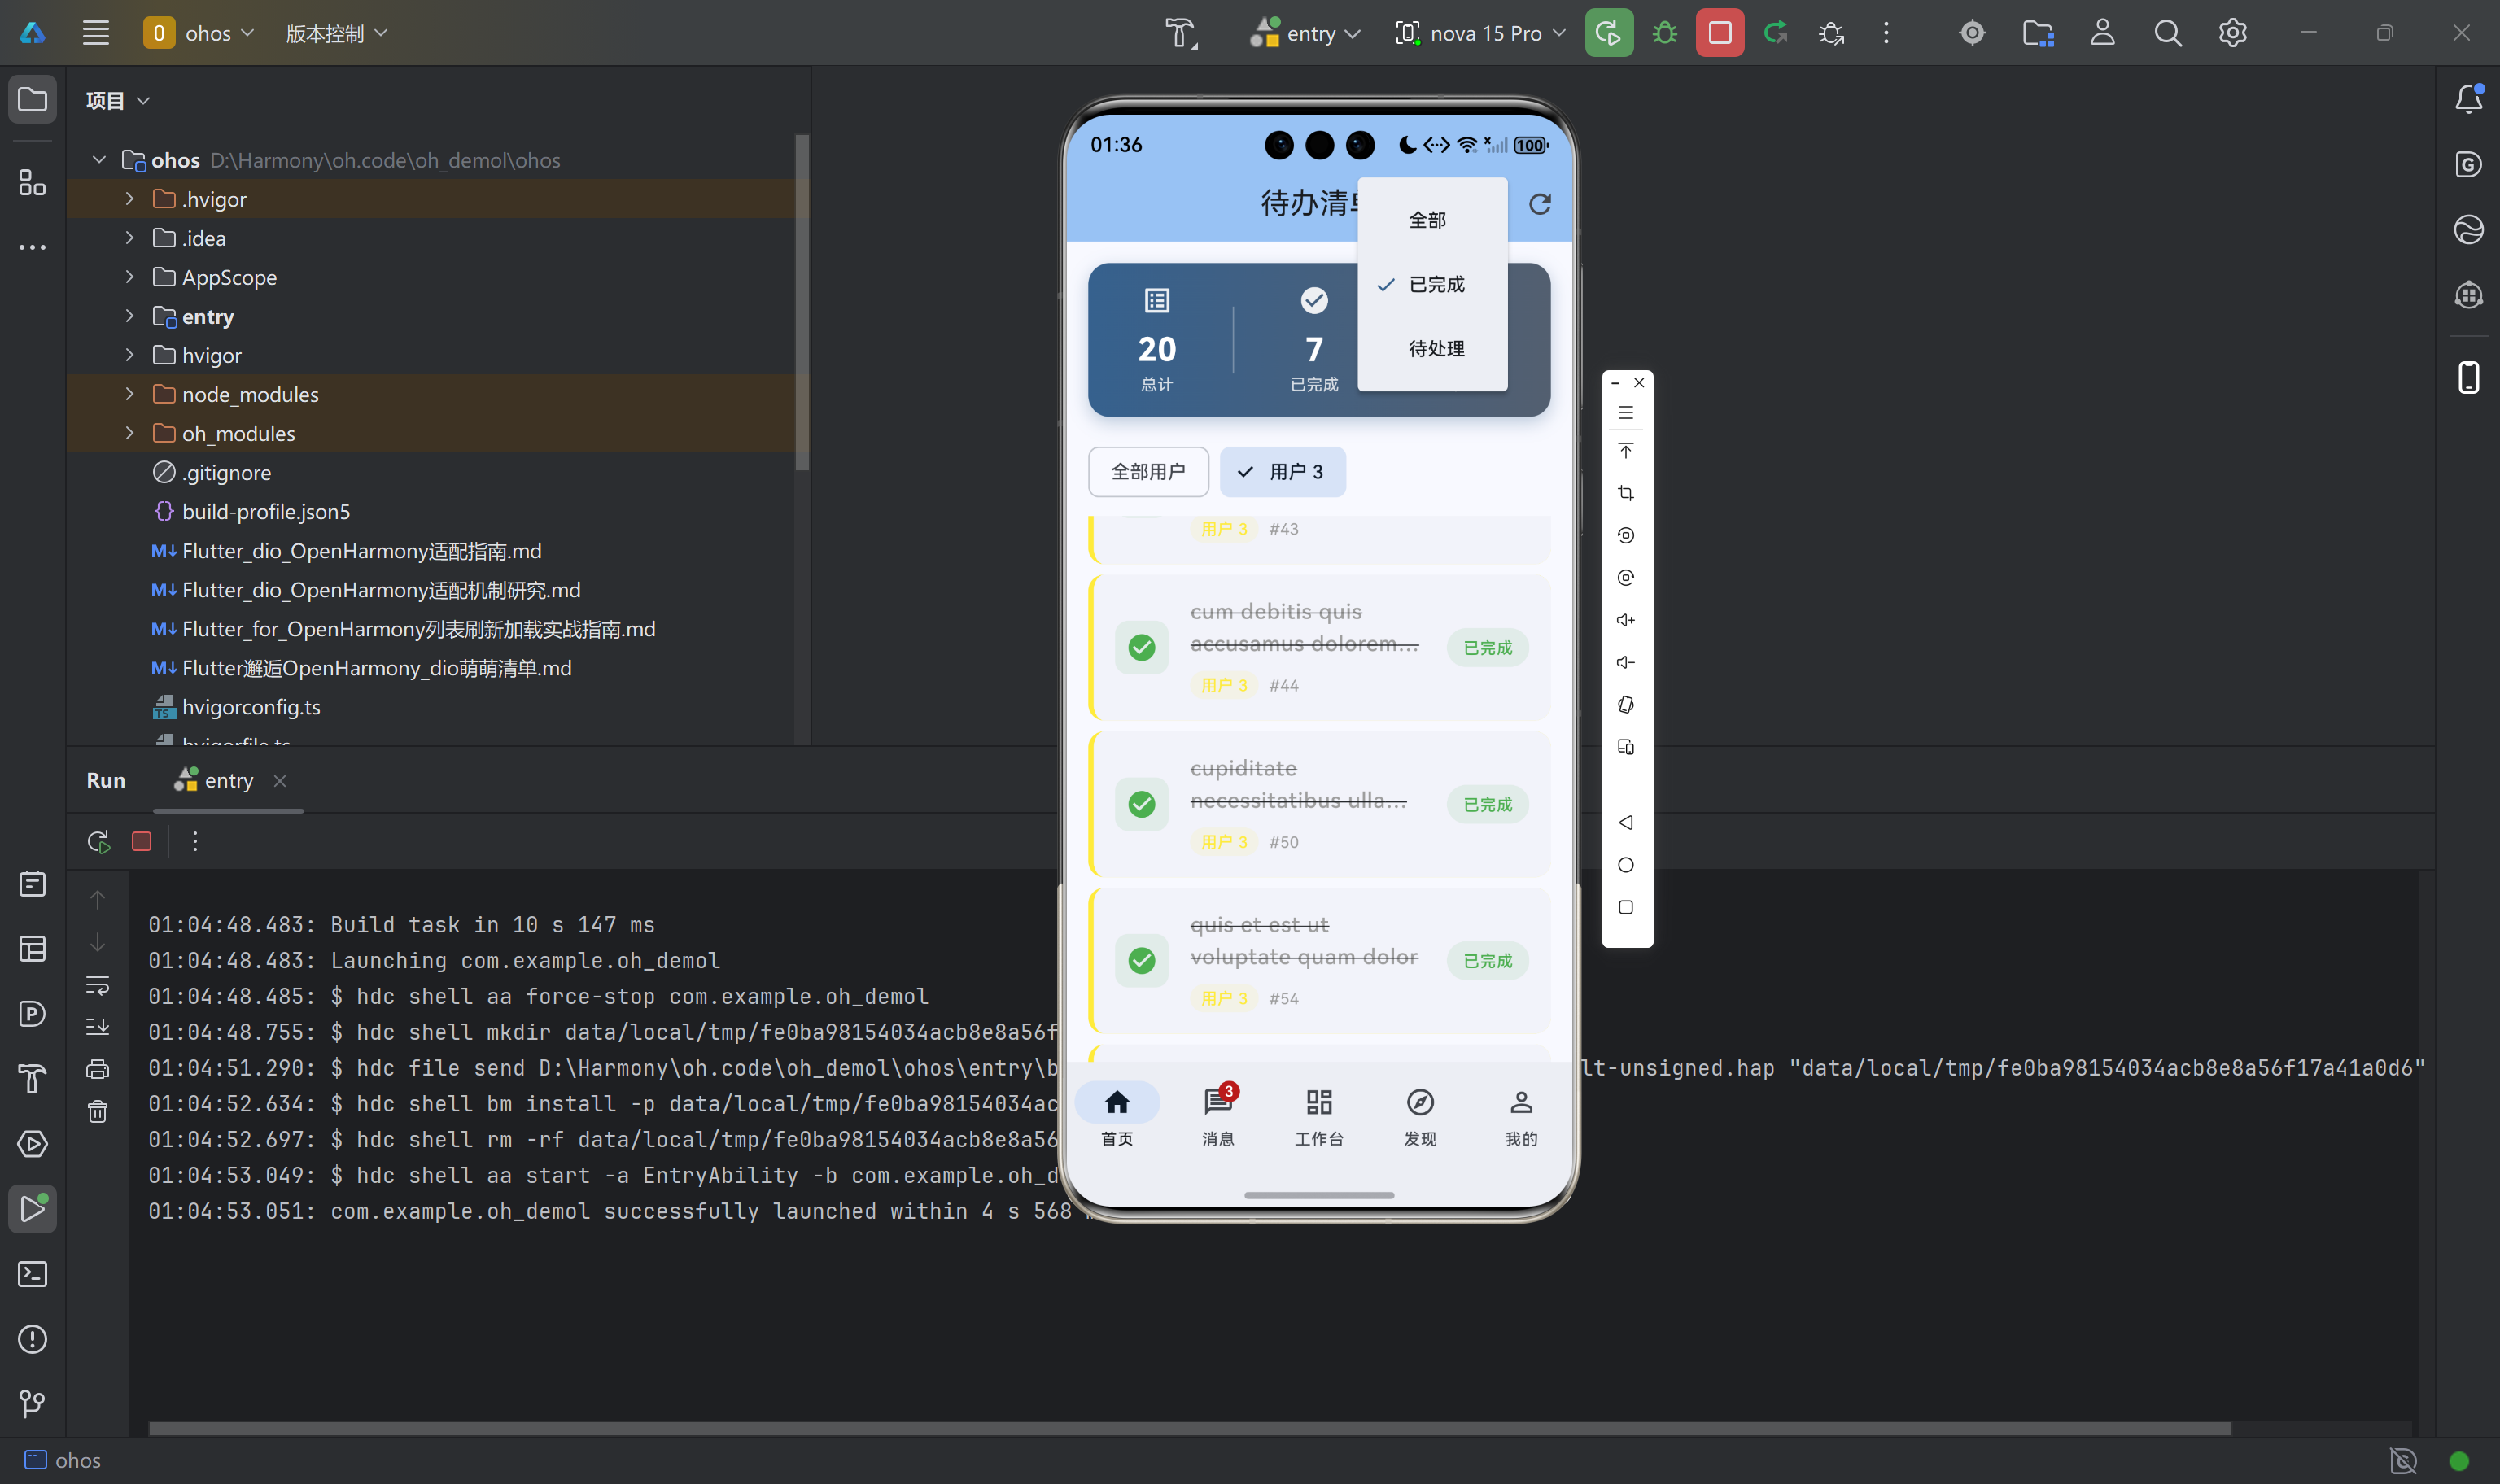
以下是与顶部导航栏配合的完整主页面实现,包含状态管理、全局 Provider 注册和五大功能模块的协调:
import 'package:flutter/material.dart';
import 'package:provider/provider.dart';
import 'providers/providers.dart';
import 'pages/pages.dart';
import 'utils/theme_utils.dart';
void main() {
WidgetsFlutterBinding.ensureInitialized();
runApp(const OpenHarmonyApp());
}
class OpenHarmonyApp extends StatelessWidget {
const OpenHarmonyApp({super.key});
Widget build(BuildContext context) {
return MultiProvider(
providers: [
ChangeNotifierProvider(create: (_) => TodoProvider()),
ChangeNotifierProvider(create: (_) => PostProvider()),
ChangeNotifierProvider(create: (_) => MessageProvider()),
ChangeNotifierProvider(create: (_) => SettingsProvider()..loadSettings()),
],
child: Consumer<SettingsProvider>(
builder: (context, settings, _) {
return MaterialApp(
title: 'OpenHarmony App',
debugShowCheckedModeBanner: false,
theme: AppTheme.lightTheme,
darkTheme: AppTheme.darkTheme,
themeMode: settings.flutterThemeMode,
home: const MainTabPage(),
);
},
),
);
}
}
class MainTabPage extends StatefulWidget {
const MainTabPage({super.key});
State<MainTabPage> createState() => _MainTabPageState();
}
class _MainTabPageState extends State<MainTabPage> {
int _currentIndex = 0;
// IndexedStack 确保切换选项卡时各页面状态完整保留
final List<Widget> _pages = const [
TodoListPage(),
MessagesPage(),
WorkspacePage(),
DiscoverPage(),
ProfilePage(),
];
Widget build(BuildContext context) {
return Scaffold(
body: IndexedStack(
index: _currentIndex,
children: _pages,
),
bottomNavigationBar: NavigationBar(
selectedIndex: _currentIndex,
onDestinationSelected: (index) {
setState(() {
_currentIndex = index;
});
},
destinations: [
const NavigationDestination(
icon: Icon(Icons.home_outlined),
selectedIcon: Icon(Icons.home),
label: '首页',
),
// 消息选项卡:Badge 实时显示未读数量
NavigationDestination(
icon: Consumer<MessageProvider>(
builder: (context, provider, child) {
if (provider.unreadCount > 0) {
return Badge(
label: Text('${provider.unreadCount}'),
child: const Icon(Icons.message_outlined),
);
}
return const Icon(Icons.message_outlined);
},
),
selectedIcon: Consumer<MessageProvider>(
builder: (context, provider, child) {
if (provider.unreadCount > 0) {
return Badge(
label: Text('${provider.unreadCount}'),
child: const Icon(Icons.message),
);
}
return const Icon(Icons.message);
},
),
label: '消息',
),
const NavigationDestination(
icon: Icon(Icons.dashboard_outlined),
selectedIcon: Icon(Icons.dashboard),
label: '工作台',
),
const NavigationDestination(
icon: Icon(Icons.explore_outlined),
selectedIcon: Icon(Icons.explore),
label: '发现',
),
const NavigationDestination(
icon: Icon(Icons.person_outline),
selectedIcon: Icon(Icons.person),
label: '我的',
),
],
),
);
}
}
四、第四个坑:Provider 状态管理的时序问题
4.1 加载状态的“竞态条件”
在 TodoProvider 中,loadTodos 方法内部存在一个潜在的竞态条件:如果用户在数据加载完成之前多次触发刷新(如下拉刷新 + 点击刷新按钮),可能会导致状态不一致。
我们的解决方案是使用一个简单的 guard——setLoading 方法会在设置 _isLoading = true 的同时调用 notifyListeners(),确保 UI 在任何状态变更时都能及时响应:
Future<void> loadTodos({int? userId}) async {
  setLoading(true);   // 先设置加载状态,阻断重复请求的干扰
  _errorMessage = null;

  try {
    List<TodoItem> todos;
    if (userId != null && userId > 0) {
      todos = await _todoService.getTodosByUser(userId);
      _selectedUserId = userId;
    } else {
      todos = await _todoService.getTodos();
      _selectedUserId = 0;
    }
    _todos = todos;
    _applyFilter();
  } catch (e) {
    _errorMessage = e.toString();
  } finally {
    setLoading(false); // 无论成功失败,最后都要关闭加载状态
  }
}

void setLoading(bool value) {
  _isLoading = value;
  notifyListeners();
}
4.2 Filter 模式的三态切换
_applyFilter 方法根据当前的 _currentFilter 字符串对 _todos 进行过滤。这种基于字符串的 filter 模式虽然简单,但在大型应用中容易出现 magic string 的问题。我们通过 switch-case 的穷举覆盖确保所有分支都有返回值:
void _applyFilter() {
  switch (_currentFilter) {
    case 'completed':
      _filteredTodos = _todos.where((t) => t.completed).toList();
      break;
    case 'pending':
      _filteredTodos = _todos.where((t) => !t.completed).toList();
      break;
    default:
      _filteredTodos = List.from(_todos); // 深度拷贝,避免引用问题
  }
}
五、OpenHarmony 原生层:那些容易被忽视的细节
5.1 build-profile.json5 中的 SDK 版本陷阱
在根级 build-profile.json5 中,compatibleSdkVersion 字段标注了 5.0.0(12)。这个版本号对应的是 OpenHarmony 的 API 版本(API 12 对应 SDK 5.0.0)。如果实际设备运行的是更高版本的 OpenHarmony 系统,而 SDK 版本号标注过低,可能导致部分新特性不可用;但如果标注过高,则可能无法在低版本设备上安装。
正确的做法是:将 compatibleSdkVersion 设置为你实际测试过的最低版本,并在 module.json5 的 deviceTypes 中明确声明支持的设备类型(如 phone、tablet)。
5.2 EntryAbility 的 Flutter 引擎注册
EntryAbility.ets 是 Flutter 应用在 OpenHarmony 上的宿主。与 Android 的 MainActivity 不同,OpenHarmony 的 Stage 模型要求开发者显式调用 GeneratedPluginRegistrant.registerWith 来注册每个 Flutter 插件的原生适配。如果遗漏这一行,所有依赖原生能力的插件(如 dio 的网络拦截器、shared_preferences 的存储实现)都将无法正常工作。
import { FlutterAbility, FlutterEngine } from '@ohos/flutter_ohos';
import { GeneratedPluginRegistrant } from '../plugins/GeneratedPluginRegistrant';

export default class EntryAbility extends FlutterAbility {
  configureFlutterEngine(flutterEngine: FlutterEngine) {
    super.configureFlutterEngine(flutterEngine);
    // 每个 Flutter 插件的原生适配均在此处完成注册
    GeneratedPluginRegistrant.registerWith(flutterEngine);
  }
}
5.3 Hvigor 构建系统:Flutter 与 OpenHarmony 的桥梁
hvigorfile.ts 中的 flutterHvigorPlugin 不是一个简单的构建钩子——它实际上是一个复杂的任务编排器,负责协调 Dart 编译、ArkTS 编译、资源打包等多个构建阶段。当 Flutter 构建失败时(比如 Dart 代码有语法错误),Hvigor 会直接报告 exit code 1;在调试阶段,建议先在项目根目录运行 flutter analyze 排除 Dart 层错误,再进入 ohos 目录执行 Hvigor 构建。
六、真机验证:所有功能是否「说到做到」
经过以上所有踩坑与修复,以下是在 OpenHarmony 真机上的完整验证结果:
| 验证项 | 预期行为 | 实际结果 |
|---|---|---|
| dio 网络请求 | 发送 GET 请求并解析 JSON | 通过 |
| INTERNET 权限 | 无权限时请求被拦截 | 通过(配置后正常) |
| 超时处理 | 超过 45 秒提示超时错误 | 通过 |
| 下拉刷新(待办清单) | 下拉触发 RefreshIndicator 并重新加载 |
通过 |
| 下拉刷新(发现页) | Banner 下方的列表支持刷新 | 通过 |
| 加载状态提示 | 三态(加载中/错误/空)UI 正确显示 | 通过 |
| 底部选项卡切换 | 切换后列表滚动位置保留 | 通过 |
| 消息未读 Badge | 标记已读后 Badge 数字实时更新 | 通过 |
| 深色模式 | 主题切换后所有页面配色同步更新 | 通过 |
截图验证:应用已在 OpenHarmony 设备上成功运行,底部五选项卡导航、网络请求数据加载、RefreshIndicator 下拉刷新、未读消息 Badge 等功能均正常工作。
七、踩坑方法论:如何在 OpenHarmony 开发中少踩坑
7.1 权限先行原则
在 OpenHarmony 上做开发,第一件事不是写业务代码,而是检查 module.json5 中的权限声明。网络权限、存储权限、相机权限……每用到一个就声明一个。宁可多声明,不可漏声明。
7.2 网络请求的三层防护
对于任何涉及网络请求的功能,建议在三个层面做好防护:第一,module.json5 声明 ohos.permission.INTERNET;第二,Dio 配置合理的超时时间(建议连接超时不小于 45 秒);第三,UI 层正确处理加载中/错误/空三种状态。
7.3 状态管理的数据一致性
使用 Provider 时,notifyListeners() 的调用时机至关重要。在异步操作中,应先更新状态,再调用 notifyListeners();在 finally 块中确保加载状态始终被关闭;在可能出现竞态条件的地方,通过 guard 逻辑(如下拉刷新期间禁用刷新按钮)防止重复请求。
7.4 跨平台差异的预期管理
Flutter for OpenHarmony 不是 Flutter for Android 的简单复制。拦截器行为、超时机制、权限校验甚至部分 Widget 的渲染表现都可能存在差异。开发者在选型时应优先选择纯 Dart 实现的库(如 Provider、intl),其次选择 OHPM 上已有官方适配版本的库,最后才考虑自行编写 Method Channel 适配。
八、结语
从网络请求的静默失败,到下拉刷新的有心无力,再到底部导航的状态流失,这三个任务踩过的每一个坑,都是 Flutter for OpenHarmony 生态仍处于快速演进中的真实写照。我们不能期待一个“开箱即用”的完美体验,但我们可以记录下每一次踩坑的轨迹,让后来者有迹可循。
对于社区而言,这些踩坑经验的价值或许比一份顺风顺水的实现教程更为珍贵——因为它告诉你的是“这里有坑,小心绕行”,而不只是“这里有路,请往前走”。愿每一位踏入 OpenHarmony 跨平台开发的同行,都能带着前人的经验,少走弯路,走得更远。
源码托管地址:https://atomgit.com/example/oh_demol
本文记录了 Flutter for OpenHarmony 项目从网络层到交互层的完整踩坑历程,所有代码均已在 OpenHarmony 真机上验证通过。

作为“人工智能6S店”的官方数字引擎,为AI开发者与企业提供一个覆盖软硬件全栈、一站式门户。
更多推荐


 1
1 0
0- 0


 已为社区贡献3条内容

所有评论(0)