
Flutter三方库鸿蒙适配实战指南
随着鸿蒙生态的蓬勃发展,越来越多的开发者开始将现有的 Flutter 应用迁移至 HarmonyOS 平台。在这一过程中,三方库的适配无疑是核心挑战之一。本文将以实战的方式,详细讲解如何在 Flutter-OH 项目中接入 shared_preferences(本地存储)、dio(网络请求)和 cached_network_image(图片缓存)三个常用三方库,帮助开发者快速掌握鸿蒙化适配的完整流
@[Flutter三方库]Flutter 三方库 shared_preferences、dio 与 cached_network_image 的鸿蒙化适配实战指南
Flutter 三方库 实战笔记
欢迎加入开源鸿蒙跨平台社区:https://openharmonycrossplatform.csdn.net
一、前言
随着鸿蒙生态的蓬勃发展,越来越多的开发者开始将现有的 Flutter 应用迁移至 HarmonyOS 平台。在这一过程中,三方库的适配无疑是核心挑战之一。本文将以实战的方式,详细讲解如何在 Flutter-OH 项目中接入 shared_preferences(本地存储)、dio(网络请求)和 cached_network_image(图片缓存)三个常用三方库,帮助开发者快速掌握鸿蒙化适配的完整流程。
这三个库涵盖了移动应用开发中最常见的三大场景:数据持久化、网络通信和图片加载,掌握它们的适配方法,可以举一反三地解决绝大多数三方库的鸿蒙适配问题。
二、适配前我做的准备工作
2.1 环境要求
在开始适配之前,请确保已完成以下环境配置:
- Flutter-OH SDK(建议 3.27.4-ohos 1.0.5 及以上版本)
- DevEco Studio 4.0 及以上版本
- OpenHarmony SDK API 10 及以上版本
- JDK 17
Flutter-OH SDK 可从 AtomGit 官方仓库获取(注意:一定要记住SDK的安装路径!!!):
https://atomgit.com/openharmony-tpc/flutter_flutter
2.2 已适配三方库查询
OpenHarmony 社区已适配了大量常用 Flutter 三方库,在自行适配前,建议先查询是否已有适配版本。已适配的三方库清单可在以下地址查看:
https://atomgit.com/openharmony-tpc/flutter_packages
本文涉及的三个库中,shared_preferences 和 dio 已有社区维护的鸿蒙适配版本。cached_network_image 是纯 Dart 库,可直接使用,但其依赖的原生库需要覆盖为鸿蒙适配版本。
2.3 三方库分类(重要)
在适配前,需要先了解三方库的分类,这决定了适配方式:
| 类型 | 特点 | 示例 | 适配方式 |
|---|---|---|---|
| 纯 Dart 库 | 不依赖原生平台能力 | provider、bloc、rxdart | 直接使用,无需适配 |
| 平台依赖库 | 需要调用原生 API | shared_preferences、dio、path_provider | 必须使用鸿蒙适配版本 |
关键点:如果使用了平台依赖库但没有使用鸿蒙适配版本,应用会在初始化时卡住或崩溃!
三、我的项目依赖配置
3.1 创建 Flutter-OH 项目
首先,使用 Flutter-OH SDK 创建一个支持鸿蒙平台的项目:
flutter create harmony_flutter_demo
cd harmony_flutter_demo
flutter create . --platforms=ohos
3.2 配置 pubspec.yaml
在项目的 pubspec.yaml 文件中添加三方库依赖。由于鸿蒙适配版本的三方库通常托管在 AtomGit 上,需要使用 Git 依赖方式引入:
dependencies:
  flutter:
    sdk: flutter

  cupertino_icons: ^1.0.8

  # 从 AtomGit 引入鸿蒙适配版本
  shared_preferences:
    git:
      url: https://atomgit.com/openharmony-tpc/flutter_packages.git
      path: packages/shared_preferences/shared_preferences
      ref: master

  dio:
    git:
      url: https://atomgit.com/openharmony-tpc/flutter_packages.git
      path: packages/dio
      ref: master

  # cached_network_image 是纯 Dart 库,可直接从 pub.dev 引入
  cached_network_image: ^3.3.1

# 覆盖 cached_network_image 的依赖为鸿蒙适配版本
dependency_overrides:
  path_provider:
    git:
      url: https://atomgit.com/openharmony-tpc/flutter_packages.git
      path: packages/path_provider/path_provider
      ref: master
  sqflite:
    git:
      url: https://atomgit.com/openharmony-tpc/flutter_packages.git
      path: packages/sqflite/sqflite
      ref: master
执行依赖获取命令:
flutter pub get
3.3 依赖配置说明
鸿蒙适配版三方库的引用方式与原生 Flutter 库略有不同,主要区别在于:
仓库地址统一:大部分已适配的三方库都集中在 openharmony-tpc/flutter_packages 仓库中,通过 path 参数指定具体的包路径。
分支选择:建议使用 master 分支获取最新适配版本,也可根据项目需要指定具体的 tag 版本。
纯 Dart 库处理:像 cached_network_image 这样的纯 Dart 库可以直接从 pub.dev 引入,无需适配。但其依赖的原生库(如 path_provider、sqflite)需要通过 dependency_overrides 覆盖为鸿蒙适配版本。
版本兼容:部分三方库可能存在版本差异,建议查阅各库的 README.OpenHarmony.md 文档了解具体兼容性说明。
四、常见问题与解决方案(我的实战踩坑记录)
4.1 问题一:flutter pub get 一直卡在 “Resolving dependencies”
问题描述:
执行 flutter pub get 时,终端一直显示 “Resolving dependencies…”,长时间无响应。我等待了好长时间,我甚至以为是电脑的问题。我使用方案一后就成功了,后面又收集了其他不同解决方案。
原因分析:
- AtomGit 仓库服务器在国内访问速度较慢
- Git 克隆大仓库需要较长时间
- 网络不稳定导致连接超时
解决方案:
方案一:配置国内镜像源
# Windows PowerShell
$env:PUB_HOSTED_URL = "https://pub.flutter-io.cn"
$env:FLUTTER_STORAGE_BASE_URL = "https://storage.flutter-io.cn"
flutter pub get
方案二:配置 Git 代理(如果有代理)
git config --global http.proxy http://127.0.0.1:7890
git config --global https.proxy http://127.0.0.1:7890
方案三:预先克隆仓库到本地
# 先克隆 flutter_packages 仓库到本地
cd d:\Harmony
git clone --depth 1 https://atomgit.com/openharmony-tpc/flutter_packages.git

# 然后使用本地路径引用
修改 pubspec.yaml 使用本地路径:
dependencies:
  shared_preferences:
    path: d:\Harmony\flutter_packages\packages\shared_preferences\shared_preferences
方案四:先使用 pub.dev 版本验证代码
如果只是想先验证代码逻辑,可以暂时使用 pub.dev 版本:
dependencies:
  shared_preferences: ^2.2.2
  dio: ^5.4.0
  cached_network_image: ^3.3.1
⚠️ 注意:pub.dev 版本没有鸿蒙平台实现,应用运行时会卡住!此方案仅用于代码验证,实际运行需要使用鸿蒙适配版本。
4.2 问题二:应用启动后一直卡在加载页面
问题描述:
应用编译成功并启动,但一直显示白屏或加载动画,无法进入主界面。
原因分析:
使用了 pub.dev 版本的平台依赖库(如 shared_preferences、dio),这些库没有鸿蒙平台的实现代码。当应用尝试初始化这些库时,会等待平台响应,导致无限等待。
错误示例:
# 错误配置 - pub.dev 版本没有鸿蒙实现
dependencies:
  shared_preferences: ^2.2.2  # 没有 ohos 平台实现
  dio: ^5.4.0                  # 没有 ohos 平台实现
解决方案:
必须使用鸿蒙适配版本:
# 正确配置 - 使用 AtomGit 鸿蒙适配版本
dependencies:
  shared_preferences:
    git:
      url: https://atomgit.com/openharmony-tpc/flutter_packages.git
      path: packages/shared_preferences/shared_preferences
      ref: master
  dio:
    git:
      url: https://atomgit.com/openharmony-tpc/flutter_packages.git
      path: packages/dio
      ref: master
判断方法:
如何判断一个库是否需要鸿蒙适配版本?查看库的 pubspec.yaml 文件:
# 如果有 platforms 配置但没有 ohos,说明需要适配
flutter:
  plugin:
    platforms:
      android:
      ios:
      # 没有 ohos,需要使用适配版本
4.3 问题三:编译错误 “Not a constant expression”
问题描述:
编译时报错:
lib/main.dart:172:39: Error: Not a constant expression.
                        color: Colors.grey.shade100,
                                      ^^^^
lib/main.dart:173:52: Error: Cannot invoke a non-'const' constructor where a const expression is expected.
                        borderRadius: BorderRadius.circular(8),
                                                   ^^^^^^^^
原因分析:
在 const 上下文中使用了非常量表达式。Colors.grey.shade100 和 BorderRadius.circular(8) 不是编译时常量,不能在 const 构造函数中使用。
错误代码:
const Container(
  padding: const EdgeInsets.all(12),
  decoration: const BoxDecoration(  // const 上下文
    color: Colors.grey.shade100,     // 非常量,报错!
    borderRadius: BorderRadius.circular(8),  // 非常量,报错!
  ),
)
解决方案:
方案一:移除 const 修饰符
Container(
  padding: const EdgeInsets.all(12),
  decoration: BoxDecoration(
    color: Colors.grey[100],
    borderRadius: BorderRadius.circular(8),
  ),
)
方案二:使用编译时常量
Container(
  padding: const EdgeInsets.all(12),
  decoration: const BoxDecoration(
    color: Color(0xFFF5F5F5),  // 编译时常量
    borderRadius: BorderRadius.all(Radius.circular(8)),
  ),
)
最佳实践:
在 Flutter 开发中,建议优先使用 const 来优化性能,但要注意:
const构造函数中的所有参数必须是编译时常量Colors.grey.shade100是运行时计算的属性,不是常量- 可以使用
Color(0xFFF5F5F5)这样的十六进制颜色值作为常量
4.4 问题四:package_config.json does not exist
问题描述:
构建时报错:
D:\Harmony\oh.code\harmony_flutter_demo\.dart_tool\package_config.json does not exist.
Did you run this command from the same directory as your pubspec.yaml file?
原因分析:
flutter pub get 没有成功执行,导致 .dart_tool 目录不存在。
解决方案:
# 确保在正确的目录下执行
cd d:\Harmony\oh.code\harmony_flutter_demo
flutter pub get

# 如果还是失败,尝试清理缓存
Remove-Item -Recurse -Force .dart_tool -ErrorAction SilentlyContinue
Remove-Item pubspec.lock -ErrorAction SilentlyContinue
flutter pub get
五、shared_preferences 本地存储适配
到这里就要成功了,加油!!!
5.1 功能概述
shared_preferences 是 Flutter 中最常用的轻量级键值对存储方案,适用于保存用户偏好设置、登录状态、缓存数据等简单数据。在鸿蒙平台上,它底层使用 OpenHarmony 的 @ohos.data.preferences API 实现。
5.2 使用示例
创建一个简单的计数器应用,演示 shared_preferences 的数据持久化功能:
import 'package:flutter/material.dart';
import 'package:shared_preferences/shared_preferences.dart';
void main() {
runApp(const MyApp());
}
class MyApp extends StatelessWidget {
const MyApp({super.key});
Widget build(BuildContext context) {
return MaterialApp(
title: 'SharedPreferences Demo',
theme: ThemeData(
colorScheme: ColorScheme.fromSeed(seedColor: Colors.blue),
useMaterial3: true,
),
home: const CounterPage(),
);
}
}
class CounterPage extends StatefulWidget {
const CounterPage({super.key});
State<CounterPage> createState() => _CounterPageState();
}
class _CounterPageState extends State<CounterPage> {
int _counter = 0;
bool _isLoading = true;
void initState() {
super.initState();
_loadCounter();
}
Future<void> _loadCounter() async {
final prefs = await SharedPreferences.getInstance();
setState(() {
_counter = prefs.getInt('counter') ?? 0;
_isLoading = false;
});
}
Future<void> _incrementCounter() async {
final prefs = await SharedPreferences.getInstance();
setState(() {
_counter++;
});
await prefs.setInt('counter', _counter);
}
Future<void> _resetCounter() async {
final prefs = await SharedPreferences.getInstance();
setState(() {
_counter = 0;
});
await prefs.remove('counter');
}
Widget build(BuildContext context) {
return Scaffold(
appBar: AppBar(
title: const Text('SharedPreferences 鸿蒙适配示例'),
backgroundColor: Theme.of(context).colorScheme.inversePrimary,
),
body: Center(
child: _isLoading
? const CircularProgressIndicator()
: Column(
mainAxisAlignment: MainAxisAlignment.center,
children: [
const Text(
'计数器值(自动保存):',
style: TextStyle(fontSize: 18),
),
Text(
'$_counter',
style: const TextStyle(
fontSize: 48,
fontWeight: FontWeight.bold,
),
),
const SizedBox(height: 20),
const Text(
'数据已持久化到鸿蒙本地存储',
style: TextStyle(color: Colors.grey),
),
],
),
),
floatingActionButton: Column(
mainAxisAlignment: MainAxisAlignment.end,
children: [
FloatingActionButton(
onPressed: _incrementCounter,
heroTag: 'increment',
child: const Icon(Icons.add),
),
const SizedBox(height: 10),
FloatingActionButton(
onPressed: _resetCounter,
heroTag: 'reset',
child: const Icon(Icons.refresh),
),
],
),
);
}
}
六、dio 网络请求适配
6.1 功能概述
dio 是 Flutter 生态中最流行的 HTTP 客户端库,支持请求拦截、响应转换、文件上传下载、超时控制等丰富功能。在鸿蒙平台上,dio 底层使用 OpenHarmony 的 @ohos.net.http 模块实现网络通信。
6.2 使用示例
创建一个网络请求示例,展示 dio 的基本用法:
import 'package:flutter/material.dart';
import 'package:dio/dio.dart';
class NetworkPage extends StatefulWidget {
const NetworkPage({super.key});
State<NetworkPage> createState() => _NetworkPageState();
}
class _NetworkPageState extends State<NetworkPage> {
final Dio _dio = Dio();
String _responseData = '';
bool _isLoading = false;
Future<void> _fetchData() async {
setState(() {
_isLoading = true;
_responseData = '';
});
try {
final response = await _dio.get(
'https://jsonplaceholder.typicode.com/posts/1',
options: Options(
sendTimeout: const Duration(seconds: 10),
receiveTimeout: const Duration(seconds: 10),
),
);
setState(() {
_responseData = '请求成功\n\n'
'状态码: ${response.statusCode}\n\n'
'响应数据:\n${response.data}';
});
} on DioException catch (e) {
setState(() {
_responseData = '请求失败\n\n'
'错误类型: ${e.type}\n'
'错误信息: ${e.message}';
});
} finally {
setState(() {
_isLoading = false;
});
}
}
Widget build(BuildContext context) {
return Scaffold(
appBar: AppBar(
title: const Text('Dio 网络请求示例'),
backgroundColor: Theme.of(context).colorScheme.inversePrimary,
),
body: Padding(
padding: const EdgeInsets.all(16.0),
child: Column(
children: [
ElevatedButton.icon(
onPressed: _isLoading ? null : _fetchData,
icon: const Icon(Icons.download),
label: const Text('GET 请求'),
),
const SizedBox(height: 20),
Expanded(
child: Container(
width: double.infinity,
padding: const EdgeInsets.all(12),
decoration: BoxDecoration(
color: Colors.grey[100],
borderRadius: BorderRadius.circular(8),
),
child: _isLoading
? const Center(child: CircularProgressIndicator())
: SingleChildScrollView(
child: Text(
_responseData.isEmpty ? '点击按钮发送请求' : _responseData,
),
),
),
),
],
),
),
);
}
}
6.3 网络权限配置
在鸿蒙平台使用网络功能,需要在 module.json5 中添加网络权限:
{
  "module": {
    "requestPermissions": [
      {
        "name": "ohos.permission.INTERNET"
      }
    ]
  }
}
七、cached_network_image 图片缓存适配
7.1 功能概述
cached_network_image 提供了强大的网络图片加载和缓存能力,支持占位图、错误图、淡入动画等特性。在鸿蒙平台上,它结合了 dio 的网络能力和本地文件缓存机制。
7.2 使用示例
import 'package:flutter/material.dart';
import 'package:cached_network_image/cached_network_image.dart';
class ImageGalleryPage extends StatelessWidget {
const ImageGalleryPage({super.key});
final List<String> _imageUrls = const [
'https://picsum.photos/seed/flutter1/400/300',
'https://picsum.photos/seed/flutter2/400/300',
'https://picsum.photos/seed/flutter3/400/300',
];
Widget build(BuildContext context) {
return Scaffold(
appBar: AppBar(
title: const Text('CachedNetworkImage 示例'),
backgroundColor: Theme.of(context).colorScheme.inversePrimary,
),
body: GridView.builder(
padding: const EdgeInsets.all(8),
gridDelegate: const SliverGridDelegateWithFixedCrossAxisCount(
crossAxisCount: 2,
crossAxisSpacing: 8,
mainAxisSpacing: 8,
),
itemCount: _imageUrls.length,
itemBuilder: (context, index) {
return ClipRRect(
borderRadius: BorderRadius.circular(12),
child: CachedNetworkImage(
imageUrl: _imageUrls[index],
fit: BoxFit.cover,
placeholder: (context, url) => Container(
color: Colors.grey[200],
child: const Center(
child: CircularProgressIndicator(),
),
),
errorWidget: (context, url, error) => Container(
color: Colors.grey[200],
child: const Column(
mainAxisAlignment: MainAxisAlignment.center,
children: [
Icon(Icons.error_outline, color: Colors.red, size: 40),
SizedBox(height: 8),
Text('加载失败', style: TextStyle(color: Colors.grey)),
],
),
),
fadeInDuration: const Duration(milliseconds: 300),
),
);
},
),
);
}
}
八、构建与运行
8.1 构建鸿蒙应用
完成代码编写后,执行以下命令构建鸿蒙应用:
flutter build ohos --release
或使用调试模式:
flutter build ohos --debug
8.2 运行应用
连接鸿蒙设备或启动模拟器后,执行:
flutter run -d ohos
8.3 运行截图说明
这是我成功后的截图: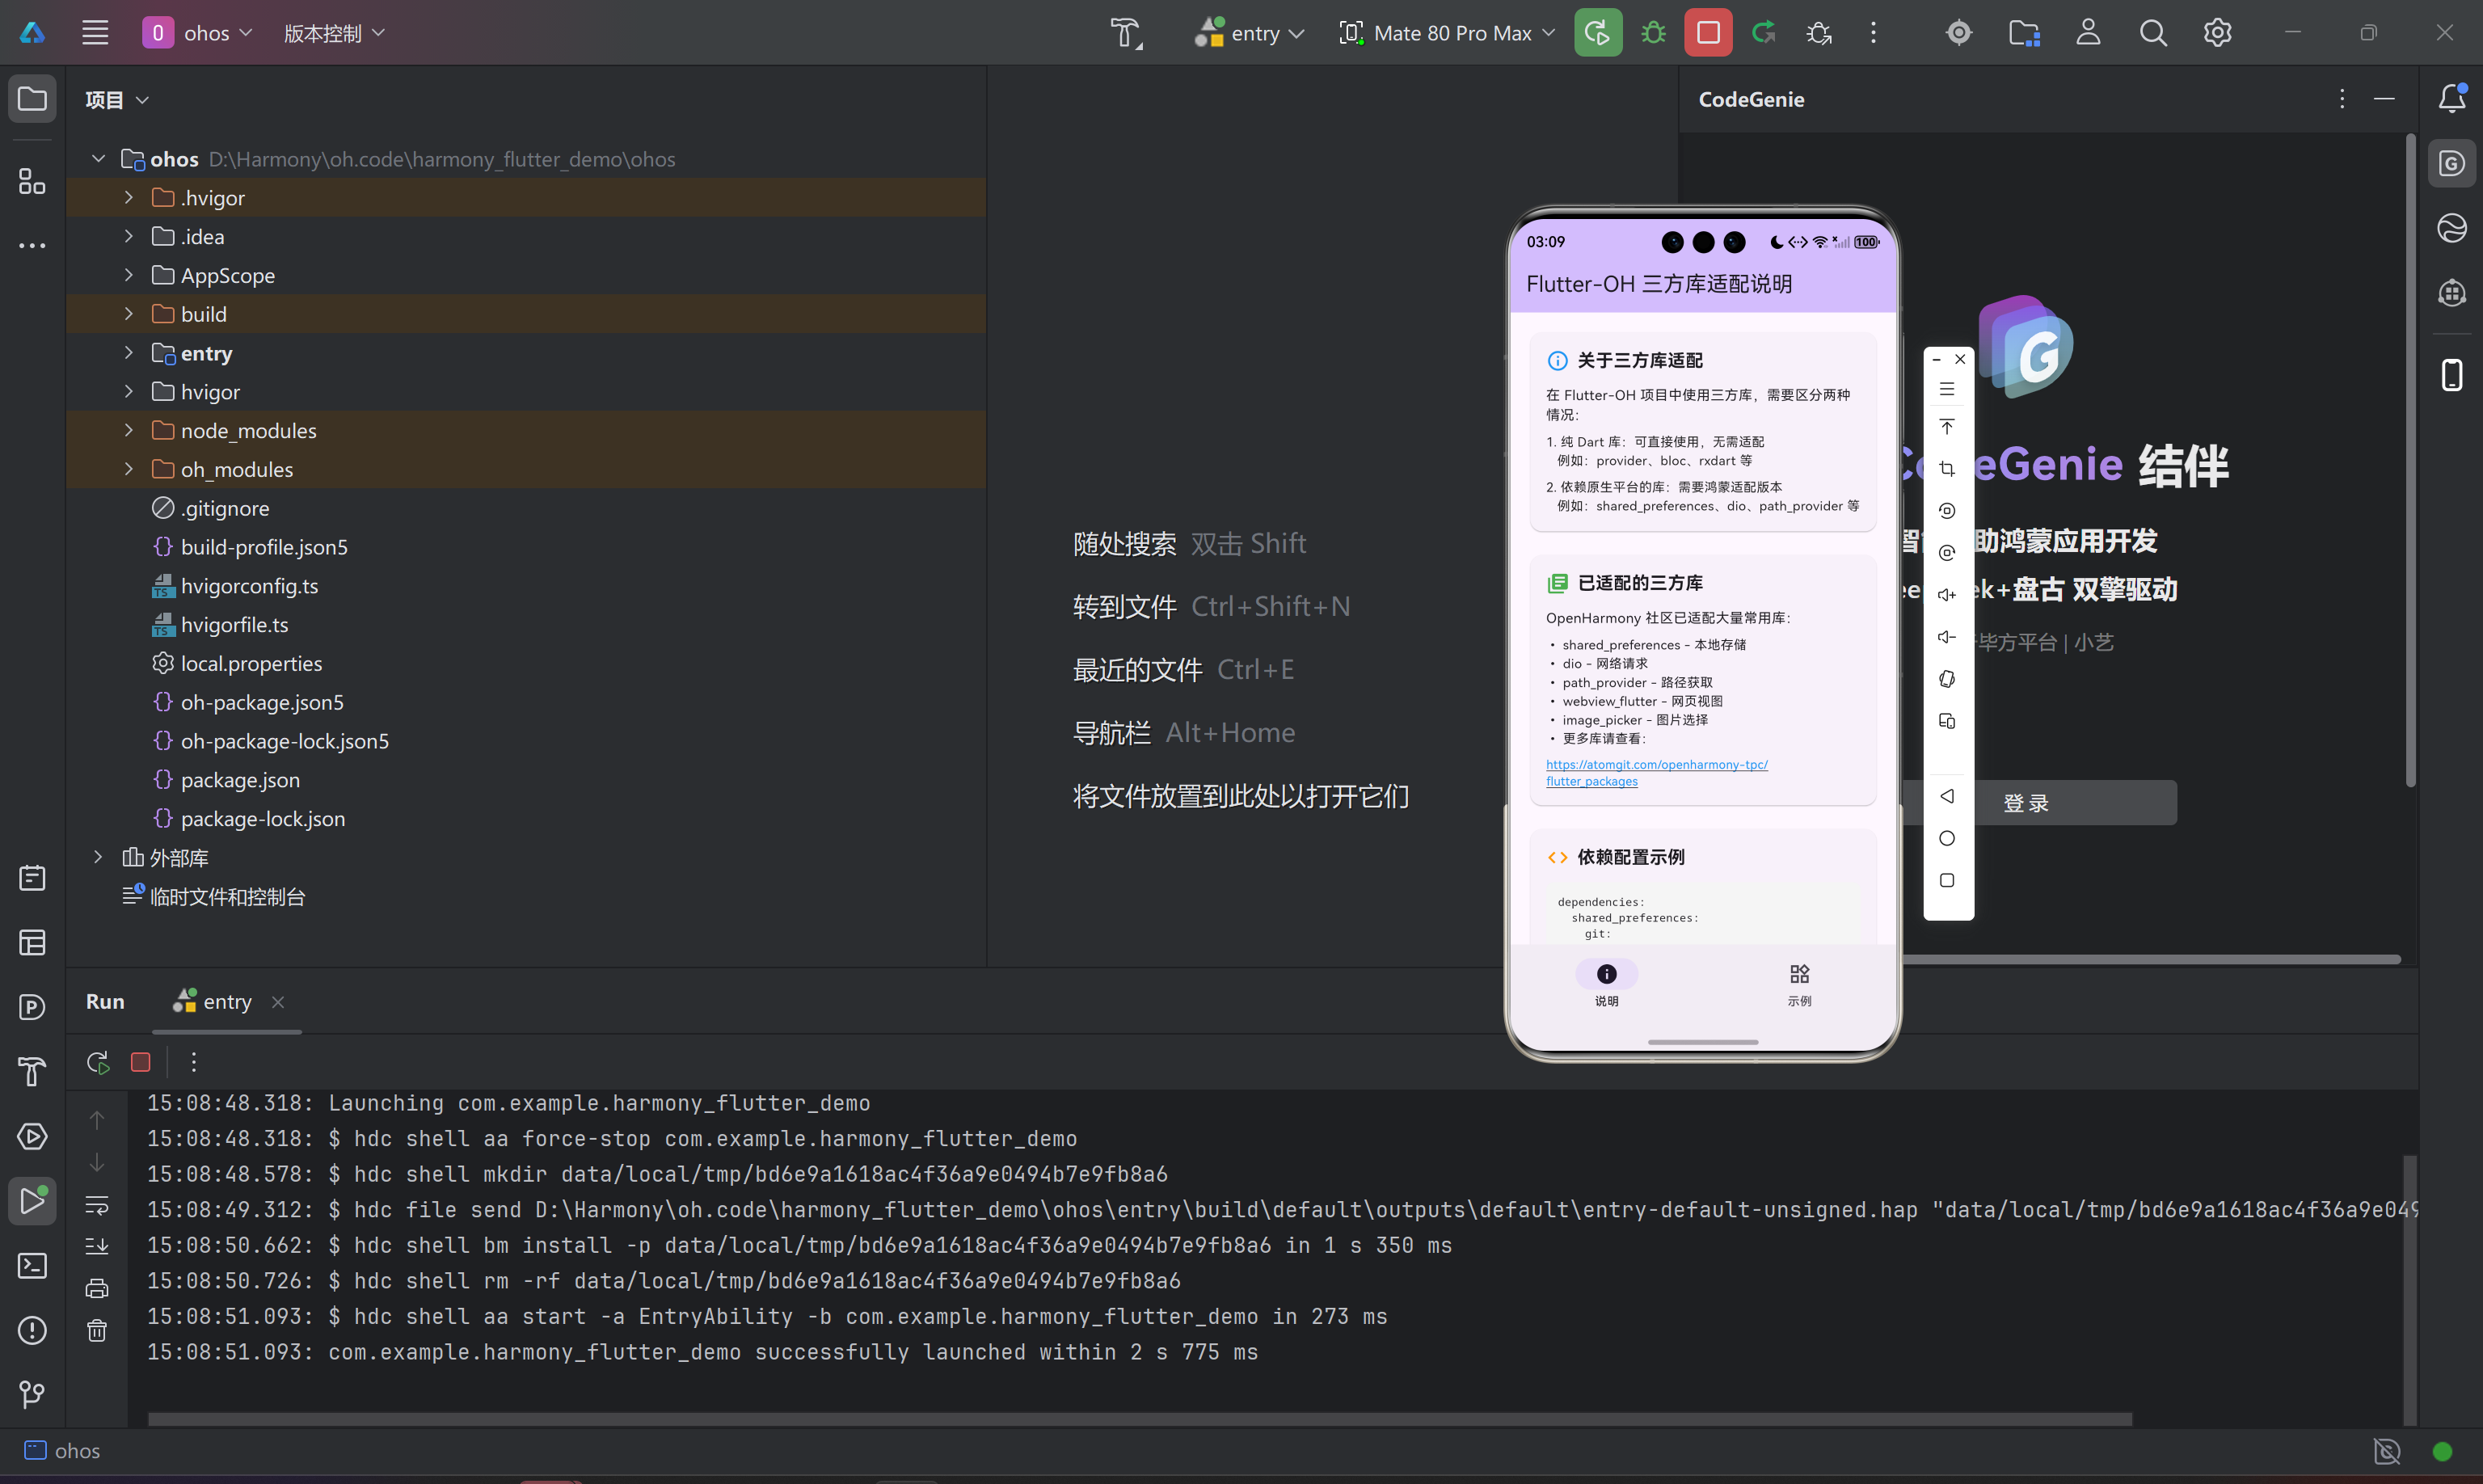
希望大家都能成功!!!!!
九、总结
本文详细介绍了在 Flutter-OH 项目中接入 shared_preferences、dio 和 cached_network_image 三个常用三方库的完整流程,并记录了实际开发中遇到的问题和解决方案,原创作品,跟着代码走就能成功!
关键要点回顾
-
三方库分类:区分纯 Dart 库和平台依赖库,后者必须使用鸿蒙适配版本
-
依赖配置:使用 Git 方式引入 AtomGit 上的鸿蒙适配版本,注意配置正确的 path
-
常见错误:
flutter pub get卡住 → 配置镜像源或代理- 应用卡在加载页 → 使用鸿蒙适配版本
- const 表达式错误 → 使用编译时常量或移除 const
-
权限配置:网络请求需要配置
ohos.permission.INTERNET权限
开发建议
- 开发前先查询三方库是否已有鸿蒙适配版本
- 优先使用国内镜像源加速依赖下载
- 遇到问题时,先检查是否使用了正确的鸿蒙适配版本
- 注意 const 关键字的正确使用
参考资料
- Flutter-OH 官方仓库:https://atomgit.com/openharmony-tpc/flutter_flutter
- OpenHarmony 三方库清单:https://atomgit.com/openharmony-tpc/flutter_packages
- OpenHarmony 示例项目:https://atomgit.com/openharmony-tpc/flutter_samples
- 开源鸿蒙跨平台社区:https://openharmonycrossplatform.csdn.net

作为“人工智能6S店”的官方数字引擎,为AI开发者与企业提供一个覆盖软硬件全栈、一站式门户。
更多推荐


 5
5 0
0- 0


 已为社区贡献1条内容

所有评论(0)