
HarmonyOS App开发——鸿蒙ArkTS端云一体化的云函数实现机制
云函数
1、创建端云一体化项目
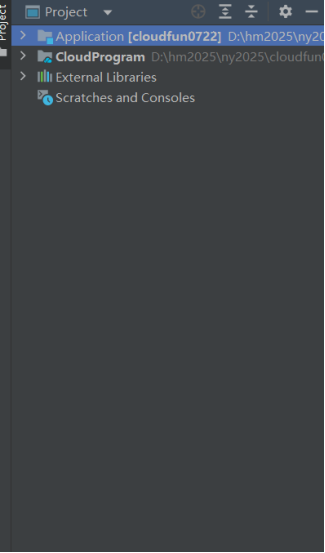
在 DevEco Studio 的 Project 面板中,可查看已打开的项目(如 Application、CloudProgram),切换视图并管理项目结构与依赖资源。
在 AppGallery Connect 项目列表页,点击左侧带蓝色加号的 “添加项目” 按钮,可创建新项目,也可选择已有项目(如 app0722)进行管理。

2、本地构建云函数并同步到云端并测试
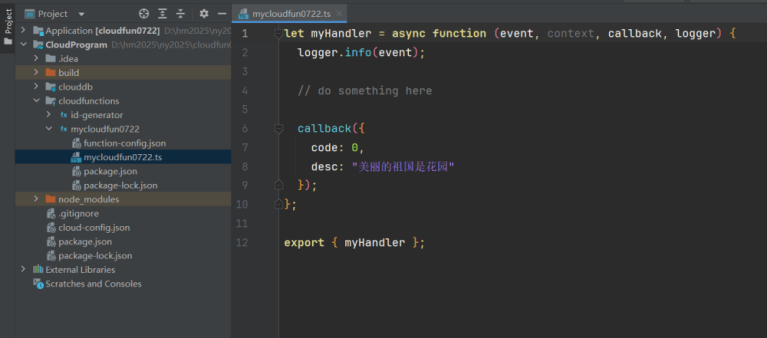
打开项目ClloudProgram
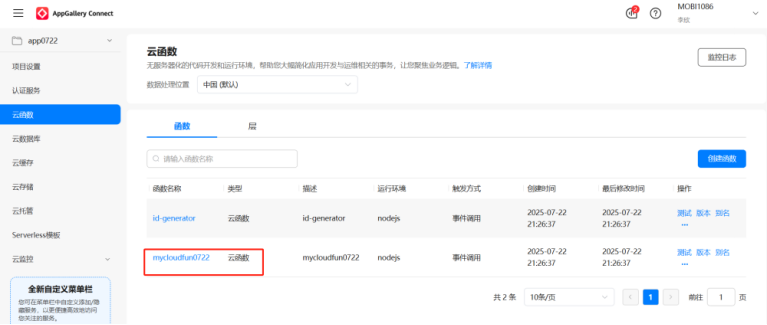
在 AppGallery Connect 的 app0722 项目中,进入云函数页面,将数据处理位置设为中国(默认)。页面展示已创建的id-generator和mycloudfun0722两个云函数,触发方式均为事件调用。可点击 “创建函数” 新增函数,也能对现有函数执行测试、版本管理、别名配置等操作,还可查看监控日志。
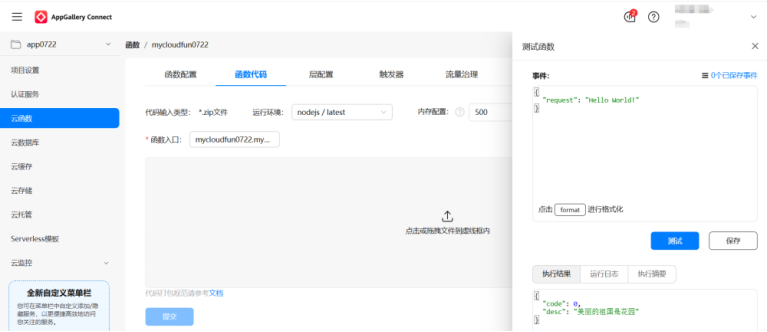
在 AppGallery Connect 的 app0722 项目云函数页面,进入mycloudfun0722函数的 “函数代码” 标签页。可设置代码输入类型为 zip 文件、运行环境与内存配置,填写函数入口,拖放 zip 文件后点击提交;右侧测试区可编辑事件、格式化,点击 “测试” 运行函数查看执行结果,也可保存相关配置。
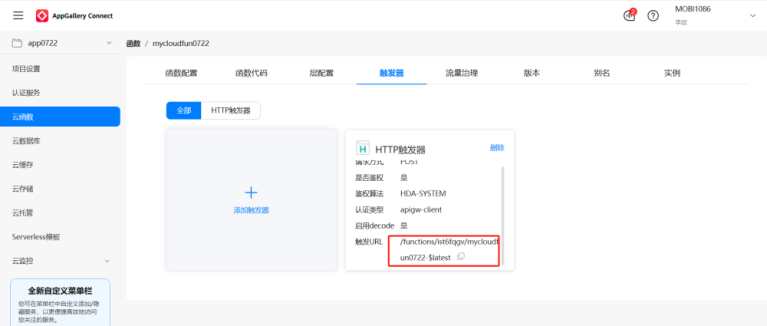
在 AppGallery Connect 的 app0722 项目中,进入mycloudfun0722云函数的触发器标签页。页面展示已配置的 HTTP 触发器,包含鉴权、启用 decode 等设置,可复制触发 URL;也可点击 “添加触发器” 创建新触发器,或对现有触发器执行删除操作。
3、本地端侧鸿蒙ArkTS的构建
import { router } from '@kit.ArkUI';
@Entry
@Component
struct Index {
@State createTime: string = ''
@State lastSignInTime: string = ''
@Builder
homeButton(title: Resource, description: Resource, routeName: string) {
Button({ type: ButtonType.Normal, stateEffect: true }) {
Column() {
Text(title)
.fontSize($r('app.float.body_font_size'))
.margin({ bottom: 5, top: 5 })
.fontWeight(FontWeight.Bold)
Text(description)
.textAlign(TextAlign.Center)
.fontSize($r('app.float.body_font_size'))
.margin({ bottom: 5 })
}
.width('100%')
}
.borderRadius(4)
.margin(10)
.borderWidth(1)
.borderColor($r('app.color.body_color'))
.fontColor($r('app.color.body_color'))
.backgroundColor($r('app.color.start_window_background'))
.width('96%')
.onClick(async () => {
let params: Record<string, Resource> = { 'title': title }
router.pushUrl({ url: routeName, params });
})
}
build() {
Flex({ direction: FlexDirection.Column, justifyContent: FlexAlign.Center }) {
Text($r('app.string.main_page_title'))
.width('100%')
.fontSize($r('app.float.main_title_font_size'))
.textAlign(TextAlign.Center)
.fontColor($r('app.color.body_color'))
.margin({ bottom: 10 })
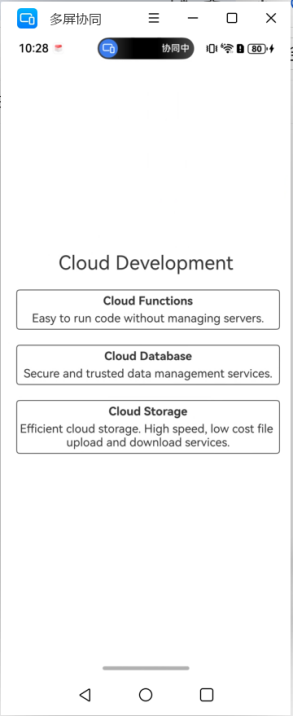
this.homeButton($r('app.string.cloud_function_title'), $r('app.string.cloud_function_description_main'), 'pages/CloudFunction')
this.homeButton($r('app.string.cloudDB_label'), $r('app.string.cloud_db_description_main'), 'pages/CloudDb/CloudDb',)
this.homeButton($r('app.string.cloudStorage_label'), $r('app.string.cloud_storage_description_main'), 'pages/CloudStorage')
}
.height('100%')
.width('100%')
.padding(10)
.backgroundColor($r('app.color.start_window_background'))
}
}
import { cloudFunction } from '@kit.CloudFoundationKit';
import { BusinessError } from '@kit.BasicServicesKit';
import { hilog } from '@kit.PerformanceAnalysisKit';
interface IdGeneratorResponse {
desc: string
}
@Entry
@Component
struct CloudFunction {
@State globalId: string = '';
build() {
Column({ space: 20 }) {
Navigation()
.title($r('app.string.cloud_function_title'))
.height('50vp')
.width('100%')
.titleMode(NavigationTitleMode.Mini)
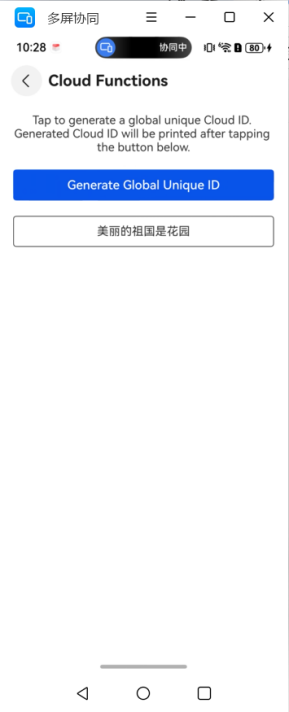
Text($r('app.string.cloud_function_description'))
.width('90%')
.textAlign(TextAlign.Center)
.fontSize($r('app.float.body_font_size'))
Button($r('app.string.cloud_function_button_text'), { type: ButtonType.Normal })
.width('90%')
.height(40)
.borderRadius(4)
.onClick(() => {
this.callIdGenerator();
})
Column() {
Text(this.globalId).fontSize($r('app.float.body_font_size'))
.fontColor($r('app.color.body_color'))
.height('100%')
}
.width('90%')
.height(40)
.borderWidth(1)
.borderRadius(4)
.borderColor($r('app.color.body_color'))
}
}
private callIdGenerator() {
cloudFunction.call({ name: 'mycloudfun0722' }).then((res: cloudFunction.FunctionResult) => {
this.globalId = (res.result as IdGeneratorResponse).desc;
console.log("云端的数据为:"+this.globalId)
}).catch((err: BusinessError) => {
hilog.error(0x0000, 'CloudFunction', 'call id-generator exception, ErrCode: %{public}d ErrMessage: %{public}s',
err.code, err.message);
});
}
}
4、鸿蒙端云一体化必须签名-真机才能发布
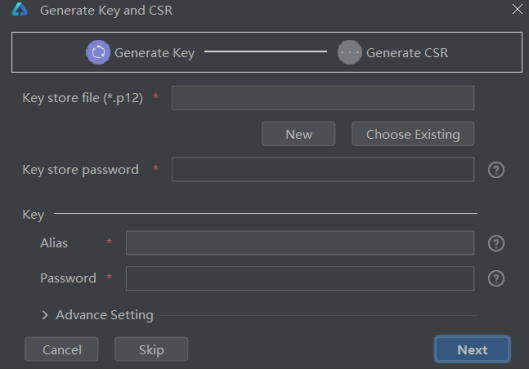
在生成密钥与 CSR 界面,当前处于 “Generate Key” 步骤,需配置 p12 密钥库文件、库密码,设置密钥别名与密码,完成后点击 “Next”。
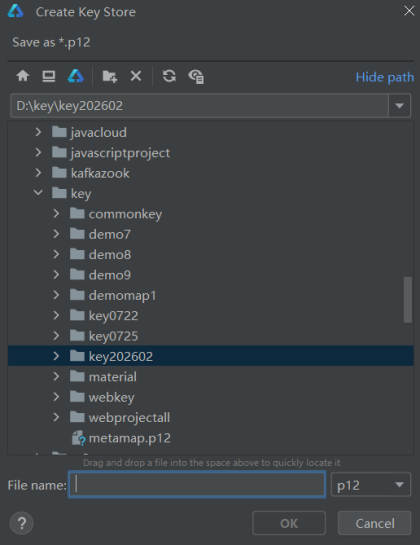
在创建密钥库(Create Key Store)界面,选择保存路径为D:\key\key202602,设置文件格式为 p12,输入文件名后点击 “OK”,即可生成 p12 格式的密钥库文件。
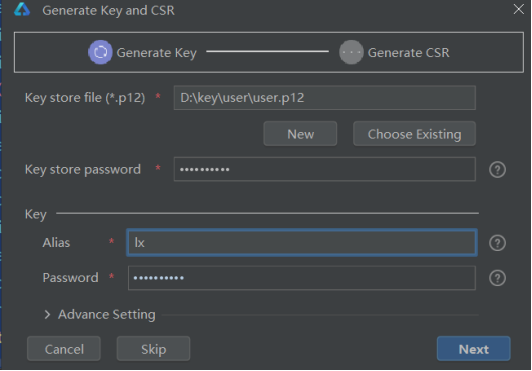
在 “Generate Key and CSR” 界面的Generate Key步骤中,已指定 p12 格式密钥库文件路径为D:\key\user\user.p12,并设置密钥库密码;在 Key 区域配置别名为lx,同时设置密钥密码,可展开 “Advance Setting” 进行高级配置,完成后点击 “Next” 即可进入生成 CSR 的后续环节,也可选择取消或跳过当前流程。
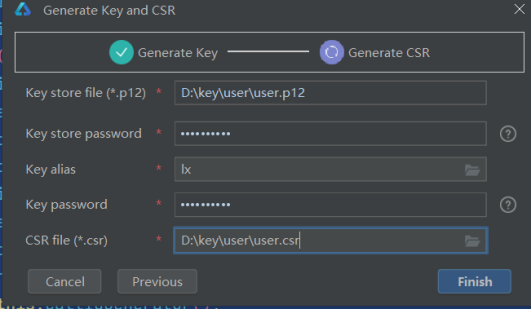
在 “Generate Key and CSR” 界面,已完成Generate Key步骤(标记为完成状态),当前进入Generate CSR环节。已配置密钥库文件路径(D:\key\user\user.p12)、密钥库密码、密钥别名、密钥密码,并指定 CSR 文件保存路径为D:\key\user\user.csr,点击 “Finish” 即可完成 CSR 文件生成,也可返回上一步或取消操作。
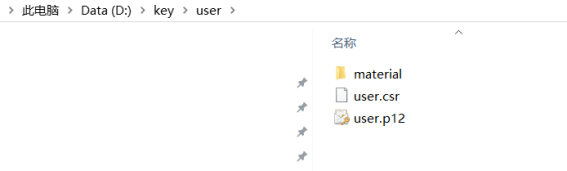
查看user.csr文件。
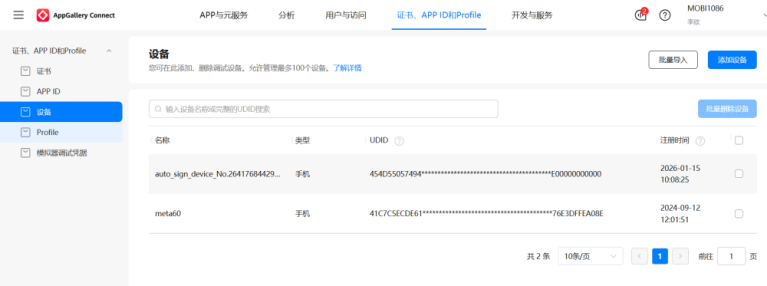
在 AppGallery Connect 的证书、APP ID 和 Profile模块下,进入 “设备” 标签页。该页面展示了已注册的测试设备信息,包含设备名称、类型、UDID、注册时间等字段。可点击 “添加设备” 手动录入设备,也可通过 “批量导入” 批量添加设备,还能选中设备执行 “批量删除”,高效管理测试设备资源。
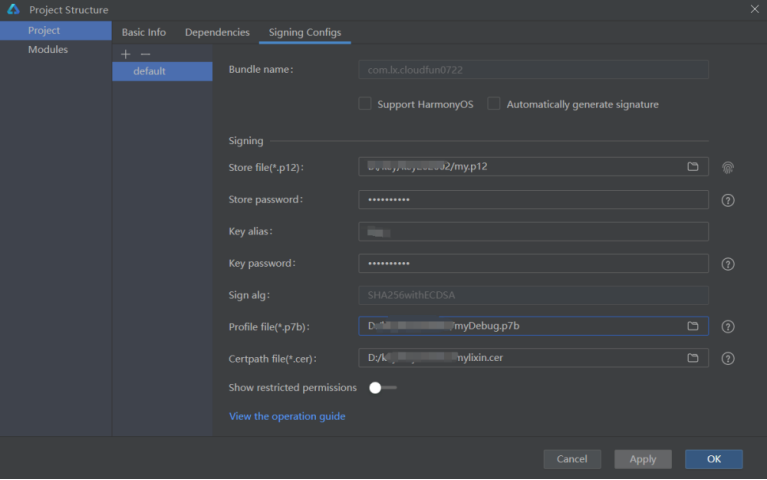
在 DevEco Studio 的Project Structure窗口中,切换至「Signing Configs」标签页,选择default签名配置项:
1.填写与 AGC 平台一致的包名com.lx.cloudfun0722;
2、在「Signing」区域配置密钥信息:指定.p12格式密钥库文件路径,输入密钥库密码、密钥别名、密钥密码;
3、选择签名算法为SHA256withECDSA,并配置.p7b格式的 Profile 文件路径与.cer格式的证书路径;
4、完成配置后,可点击「Apply」应用设置,或点击「OK」确认并关闭窗口,完成项目签名配置,为 HarmonyOS 应用的调试与发布做好准备。
发布程序,应用页面效果如下。
5、鸿蒙端云一体化必须签名-模拟器才能发布
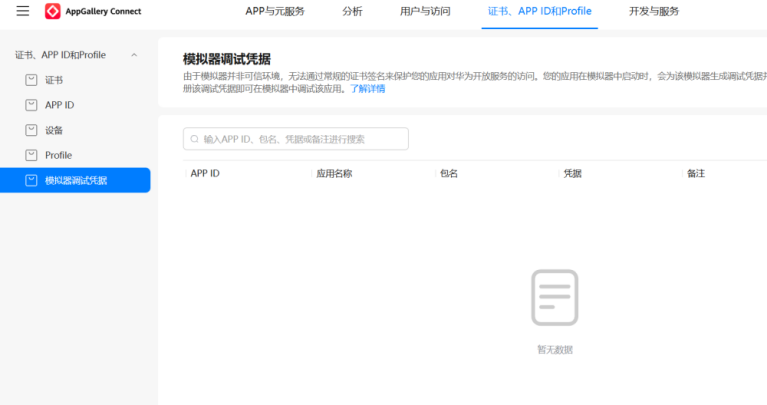
在 AppGallery Connect 平台的「证书、APP ID 和 Profile」模块中,进入左侧的模拟器调试凭据页面。该页面用于管理鸿蒙端云一体化应用在模拟器环境下的调试凭据:由于模拟器属于非可信环境,无法通过常规证书签名保护应用对华为开放服务的访问,因此应用在模拟器中启动时会生成专属调试凭据,配置后即可在模拟器中调试应用。当前页面暂无已创建的调试凭据,可通过搜索框按 APP ID、包名、凭据或备注进行检索,后续可添加新的模拟器调试凭据,这是实现模拟器发布前必须完成的签名配置环节,保障端云一体化应用能在模拟器中正常调试与发布。
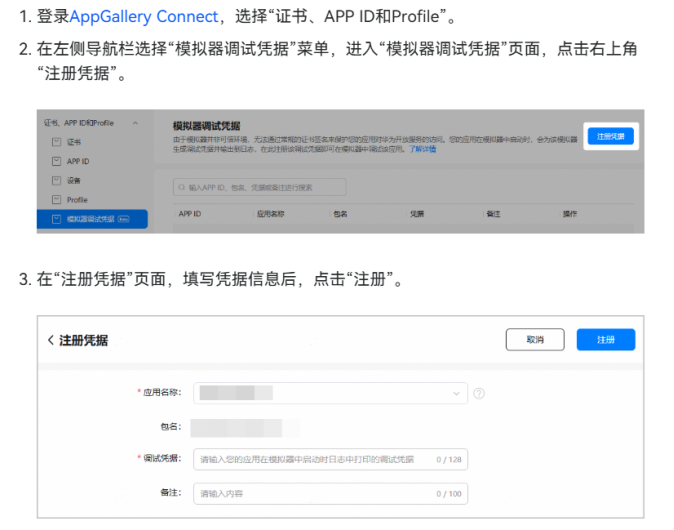
登录 AppGallery Connect,进入「证书、APP ID 和 Profile」模块,在左侧导航栏选择「模拟器调试凭据」。
点击页面右上角「注册凭据」,进入注册页面。
填写应用名称、包名、调试凭据及备注,点击「注册」,完成模拟器调试凭据的创建,用于在非可信模拟器环境中调试应用。

作为“人工智能6S店”的官方数字引擎,为AI开发者与企业提供一个覆盖软硬件全栈、一站式门户。
更多推荐
 6
6 0
0- 0


 已为社区贡献12条内容

所有评论(0)